Rosen Aviation 0500-101 User manual

Document Number 103517 Rev B
ELECTRONIC REVISION
CONTROLLED

Rosen Aviation Digital Wireless Headphone System
Document Number: 103517
Revision: A
Date: 11/23/09
Template: 4.2.3-6-FM; Revision A; 16 May, 2005
Page 2 of 10
Technical Manual, Digital Wireless Headphone System
© 2009 by Rosen Aviation, LLC
All Rights Reserved
The information contained herein is proprietary to Rosen Aviation, LLC. No part of this publication
may be reproduced, transmitted, transcribed, stored in a retrieval system, or translated into any
language in any form by any means without the written authorization from Rosen Aviation, LLC,
except as allowed under copyright laws.
Disclaimer of Liability
The information contained in this document is subject to change without notice. Because we are
continually improving and adding features to our products, Rosen Aviation, LLC reserves the right to
change specifications without prior notice. Rosen Aviation, LLC shall not be liable for technical or
editorial errors or omissions contained herein.
Rosen Aviation, LLC
1020 Owen Loop South
Eugene, OR 97402
541.342.3802
888.668.4955
Fax: 541.342.4912
www.rosenaviation.com

Rosen Aviation Digital Wireless Headphone System
Document Number: 103517
Revision: A
Date: 11/23/09
Template: 4.2.3-6-FM; Revision A; 16 May, 2005
Page 3 of 10
Contents
1. INTRODUCTION.................................................................................................................4
1.1. Unpacking.....................................................................................................................4
2. CONNECTING THE TRANSMITTER .................................................................................4
3. WIRELESS TRANSMITTER CONNECTOR.......................................................................5
4. PLACING THE TRANSMITTER .........................................................................................6
5. INSERTING THE BATTERIES INTO THE HEADPHONES ...............................................7
6. OPERATING THE HEADPHONES.....................................................................................8
7. TECHNICAL REFERENCES AND SUPPORT...................................................................8
7.1. Troubleshooting............................................................................................................8
7.2. DO-160E Qualifications ................................................................................................9
8. SPECIFICATIONS ..............................................................................................................9
9. REGULATORY APPROVALS..........................................................................................10
9.1. FCC Part 15 Requirements.........................................................................................10
10. REVISION HISTORY ......................................................................................................10

Rosen Aviation Digital Wireless Headphone System
Document Number: 103517
Revision: A
Date: 11/23/09
Template: 4.2.3-6-FM; Revision A; 16 May, 2005
Page 4 of 10
1. INTRODUCTION
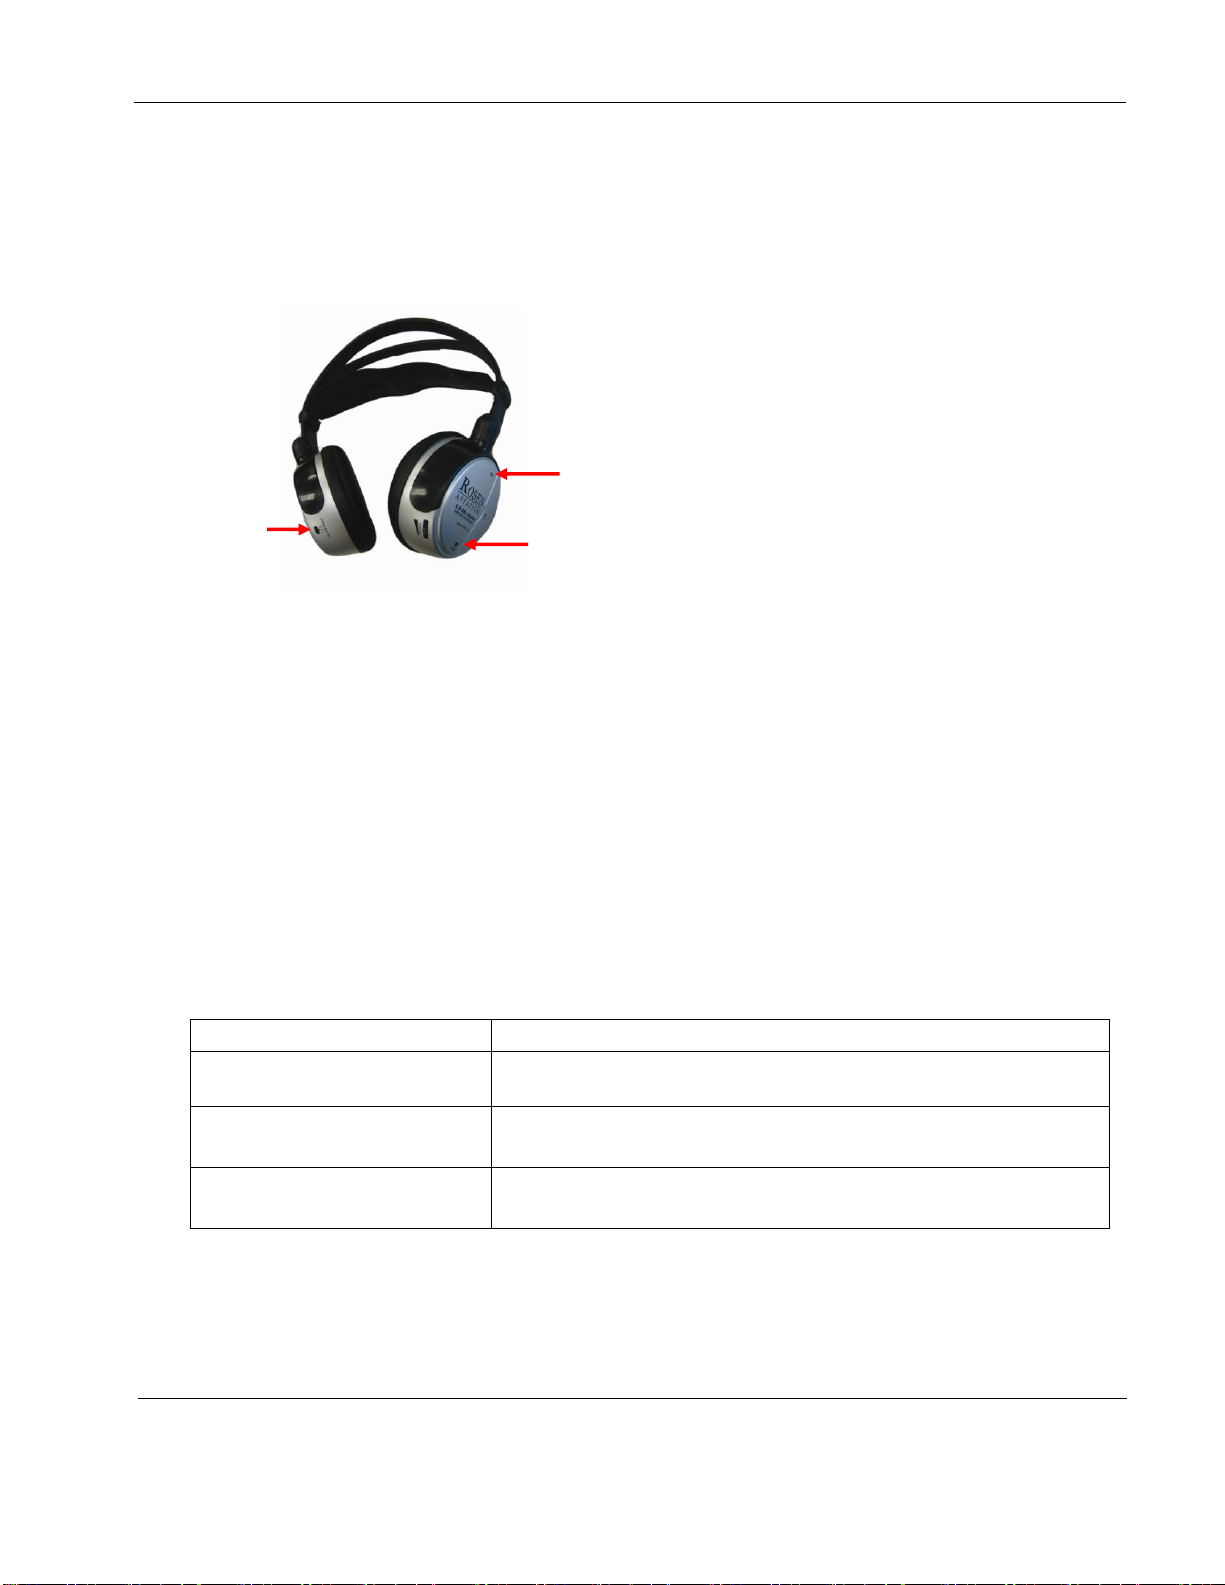
The Digital Wireless Headphone System consists of a 5.8 GHz transmitter and 5.8 GHz
headphones. The transmitter features three audio inputs and a pilot microphone input. The pilot
microphone input will override the other inputs when active. The unit is designed to integrate into
any entertainment system with analog audio capability.
This guide describes general configuration information for the Rosen Wireless Headphone
Transmitter with any audio source equipment to supplement the Outline & Installation Drawing
(P/N 0700-010-CD).
Note: Only trained and qualified personnel should perform installation and service.
1.1. Unpacking
The parts shipped with the 5.8 GHz Digital Wireless Transmitter include:
One 5.8 GHz digital audio transmitter (P/N 0700-010)
One connector kit (P/N 0300-043)
The parts shipped with the 5.8 GHz Digital Wireless Headphones include:
One set of 5.8 GHz Digital Wireless Headphones (P/N 0500-101)
Two AA batteries (P/N BAT-AA)
Drawings available at www.rosenaviation.com.
From the Rosen Aviation home page, select SupportDrawings and Pinouts, and then look
in the drawings table for the Wireless Transmitter.
2. CONNECTING THE TRANSMITTER
The transmitter provides interfaces to connect three audio sources and the pilot microphone. Use
the pinout descriptions on page 2 of the Outline & Installation drawing to assist in the wiring
process. Pay close attention to the pinout information while completing wiring connections.
Note: The wireless transmitter and headphones are for entertainment purposes only; connect the
transmitter to the non-critical power bus.

Rosen Aviation Digital Wireless Headphone System
Document Number: 103517
Revision: A
Date: 11/23/09
Template: 4.2.3-6-FM; Revision A; 16 May, 2005
Page 5 of 10
3. WIRELESS TRANSMITTER CONNECTOR
Table 1 Wireless Transmitter J1 Connector
Pin #
Signal
Comment
1
28 Volts
Power
2
Audio #1 Left Signal
Input
3
Audio #1 Right Signal
Input
4
Audio #2 Left Signal
Input
5
Audio #2 Right Signal
Input
6
Audio #3 Left Signal
Input
7
Audio #3 Right Signal
Input
8
Microphone Signal
Input
9
PA Override
Momentary or Constant Ground
10
28 Volt Return
GND
11
Audio #1 Left Return
Input
12
Audio #1 Right Return
Input
13
Audio #2 Left Return
Input
14
Audio #2 Right Return
Input
15
Audio #3 Left Return
Input
16
Audio #3 Right Return
Input
17
Microphone Return
Input
18
Reserved
Reserved
19
Reserved
Reserved
20
Reserved
Reserved
21
Reserved
Reserved
22
Reserved
Reserved
23
Reserved
Reserved
24
Reserved
Reserved
25
Reserved
Reserved
26
Reserved
Reserved

Rosen Aviation Digital Wireless Headphone System
Document Number: 103517
Revision: A
Date: 11/23/09
Template: 4.2.3-6-FM; Revision A; 16 May, 2005
Page 6 of 10
4. PLACING THE TRANSMITTER
The wall-mounted transmitter must be mounted with the J1 connector pointing toward the ceiling
of the aircraft cabin. It can be placed behind a bulkhead or other wall, as long as the bulkhead or
wall is made of composite or wood material.
Figure 1 Digital wireless headphone transmitter
For acceptable performance, the transmitter is to be mounted so that the antenna is aligned along
the aircraft longitudinal axis. The optimal installation is with the transmitter in the front of
passenger seating pointing aft.
Install transmitter so that
J1 connector points
toward aircraft ceiling
This is the antenna face. For best results,
the transmitter will be wall-mounted in
front of passenger seating with the
antenna facing aft.

Rosen Aviation Digital Wireless Headphone System
Document Number: 103517
Revision: A
Date: 11/23/09
Template: 4.2.3-6-FM; Revision A; 16 May, 2005
Page 7 of 10
5. INSERTING THE BATTERIES INTO THE HEADPHONES
There are two battery compartments, one in each earpiece.
1. To open the battery compartment, press the center of outer edge of either earpiece
firmly –the battery compartment lid will pop open.
2. Insert the battery by pressing the bottom of the battery down against the spring at the
bottom of the battery compartment. The battery should snap into place.
3. To remove the battery, pull the top of the battery down against the spring at the
bottom of the battery compartment.
4. Close the battery compartment by pushing the middle section of the lid.
.
Figure 2 Right earpiece Figure 3 Open battery compartment
Note: Never leave batteries inside the headphones for long periods of time to prevent damage to
the headphones from leaking batteries.
Push center
of outer edge
of battery
compartment
to access
batteries

Rosen Aviation Digital Wireless Headphone System
Document Number: 103517
Revision: A
Date: 11/23/09
Template: 4.2.3-6-FM; Revision A; 16 May, 2005
Page 8 of 10
6. OPERATING THE HEADPHONES
The aircraft must be powered up before the headphones will function. Set the volume control of
the headphones to minimum. Press the power button on the headphones. Once the headphones
detect a signal, the LED indicator on the headphones will turn green and the transmitter will
transmit the audio signal. If no signal is detected, the LED indicator will be red.
Turn on the headphones and slowly increase the volume, using the volume control on the
headphones to adjust the volume to the desired level.
Switch between the audio sources using the small channel select switch on the headphones. How
the transmitter is installed determines what sources are available.
After each use, be sure to switch off the headphones to extend battery life.
When the headphones detect no signal for more than one minute, the headphones will power off
and the LED indicator will go out. Reactivate the headphones by pressing the power button.
7. TECHNICAL REFERENCES AND SUPPORT
7.1. Troubleshooting
If the transmitter or headphones do not function properly, refer to the following troubleshooting
tips for symptoms and possible solutions before contacting Rosen Aviation field support.
Table 2 Troubleshooting tips and solutions
Problem
What to Do
The transmitter power indicator
is not lit
Check the wiring to ensure that 28V is present on pin 1
No audio at headphones
Ensure batteries are inserted propertly
Slowly increase volume at the headphones
Audio drops out intermittently
Eliminate possible causes of strong interference
Check battery voltage or replace batteries
Power
LED
Power
button
Channel
Select Switch
TIP: For best results,
wear headphones
straight up instead of
sideways.

Rosen Aviation Digital Wireless Headphone System
Document Number: 103517
Revision: A
Date: 11/23/09
Template: 4.2.3-6-FM; Revision A; 16 May, 2005
Page 9 of 10
7.2. DO-160E Qualifications
Table 3 DO-160E qualifications
Description
DO-160E
Section
Transmitter
DO-160E
Category
Headphones
DO-160E
Category
Temperature and Altitude
4.0
A1
A1
Temperature Variation
5.0
C
C
Humidity
6.0
A
A
Operational Shocks & Crash
Safety
7.0
B
N/A
Vibration
8.0
S, Curve B
N/A
Magnetic Effect
15.0
Z
Z
Power Input
16.0
Z/B
N/A
Voltage Spike
17.0
A
N/A
Audio Frequency Conducted
Susceptibility –Power Inputs
18.0
Z
N/A
Induced Signal Susceptibility
19.0
AC
AC
Radio Frequency Susceptibility
(Radiated & Conducted)
20.0
T
T
Emission of Radio Frequency
Energy (Radiated & Conducted)
21.0
B
B
Electrostatic Discharge (ESD)
25.0
A
A
Fire, Flammability
26.0
N/A
N/A
8. SPECIFICATIONS
Table 4 Wireless headphone specifications
Type
Dynamic, closed
Operating Time
Maximum 100 hours with two AA batteries
Frequency Response
17 kHz
Power Requirements
Two AA batteries (included)
Maximum Sound Pressure Level
100 dB
Warranty
2-year

Rosen Aviation Digital Wireless Headphone System
Document Number: 103517
Revision: A
Date: 11/23/09
Template: 4.2.3-6-FM; Revision A; 16 May, 2005
Page 10 of 10
Table 5 Wireless transmitter specifications
Audio Transmission Method
Digital
Transmitter Frequency
5.8 GHz
Signal-to-Noise ratio (A-weighted)
Min. 90 dB
Dynamic Range
Typ. 100 dB
Channel Separation
Min. 65 dB
Harmonic Distortion
Max. -55 dB
Transmitter Operating Range
20 meters in direction of transmitted signal within
the aircraft cabin
9. REGULATORY APPROVALS
9.1. FCC Part 15 Requirements
FCC ID PMJTRO2
This device complies with Part 15 of the FCC rules. Operation is subject to the following two
conditions: (1) This device may not cause harmful interference, and (2) This device must accept
any interference received, including interference that may cause undesired operation.
Caution: Any changes or modifications not expressly approved by the party responsible for
compliance could void the user's authority to operate the equipment.
10. REVISION HISTORY
Revision
Date
Revision Description
EC
A
11/23/09
Initial release
09443
B
12/23/09
Updated FCC ID from PMJTRO
09476
This manual suits for next models
1
Table of contents