5
145
D
F
ES
P
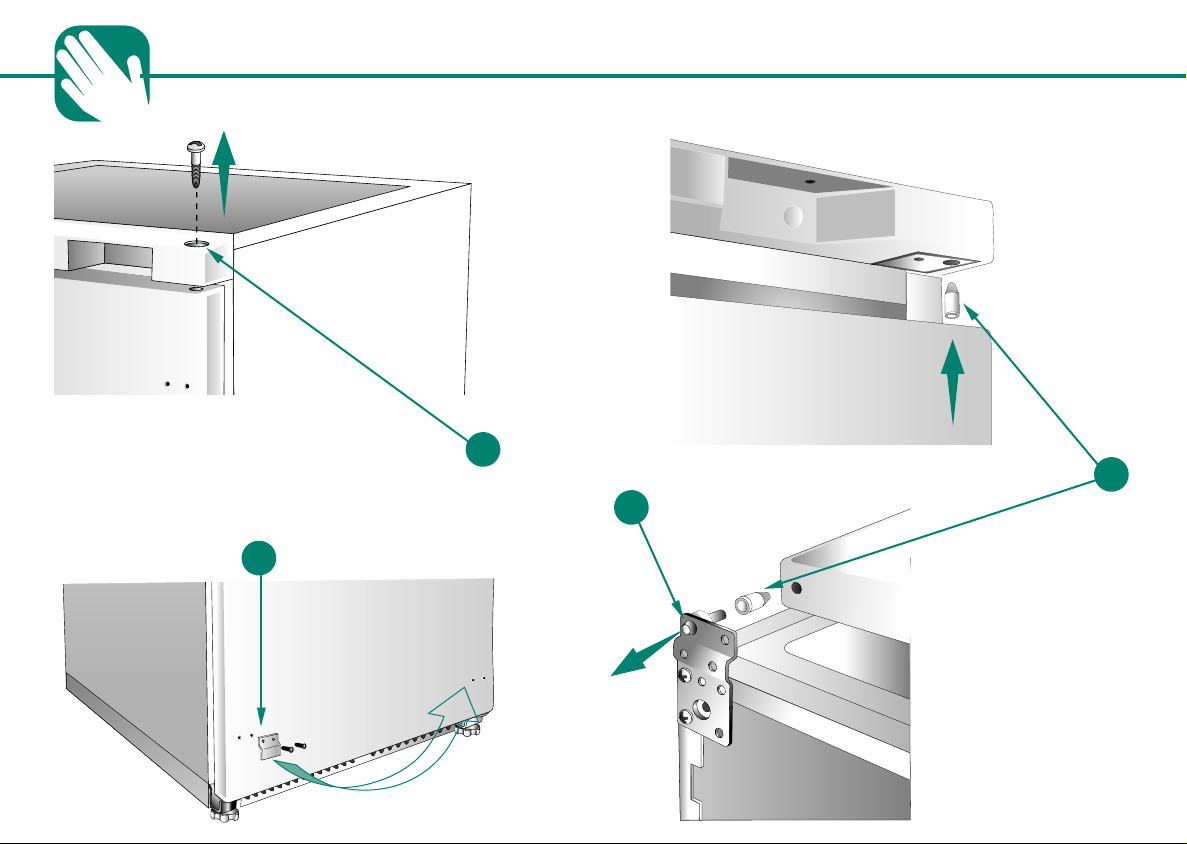
B - MODELO MIT BLECHSOCKEL:
Bei allen Modellen kann die Tür mit der Öffnung nach rechts oder nach links montiert
werden, je nachdem wie es die übrige Kücheneinrichtung erfordert. Gehen Sie
folgendermaßen vor, falls Sie die Tor in entgegengesetzter Richtung montieren wollen:
1 - Das Tiefkühlgerät auf die Rückseite legen, nachdem Sie zuvor zum Schutz des
Kompressors und seiner Bestandteile eine geeignete Unterlage angebracht haben.
2 - Die Schrauben 1 und 2 des Sockels losschrauben.
3 - Die beiden seitlichen Querstücke wegnehmen, indem Sie die drei Fixierschrauben
losschrauben und die Leiste E frei machen.
4- Das untere Scharnier A losen und die Tor hochheben.
5 - Die Fassungen B und C abmontieren und an der Gegenseite anbringen.
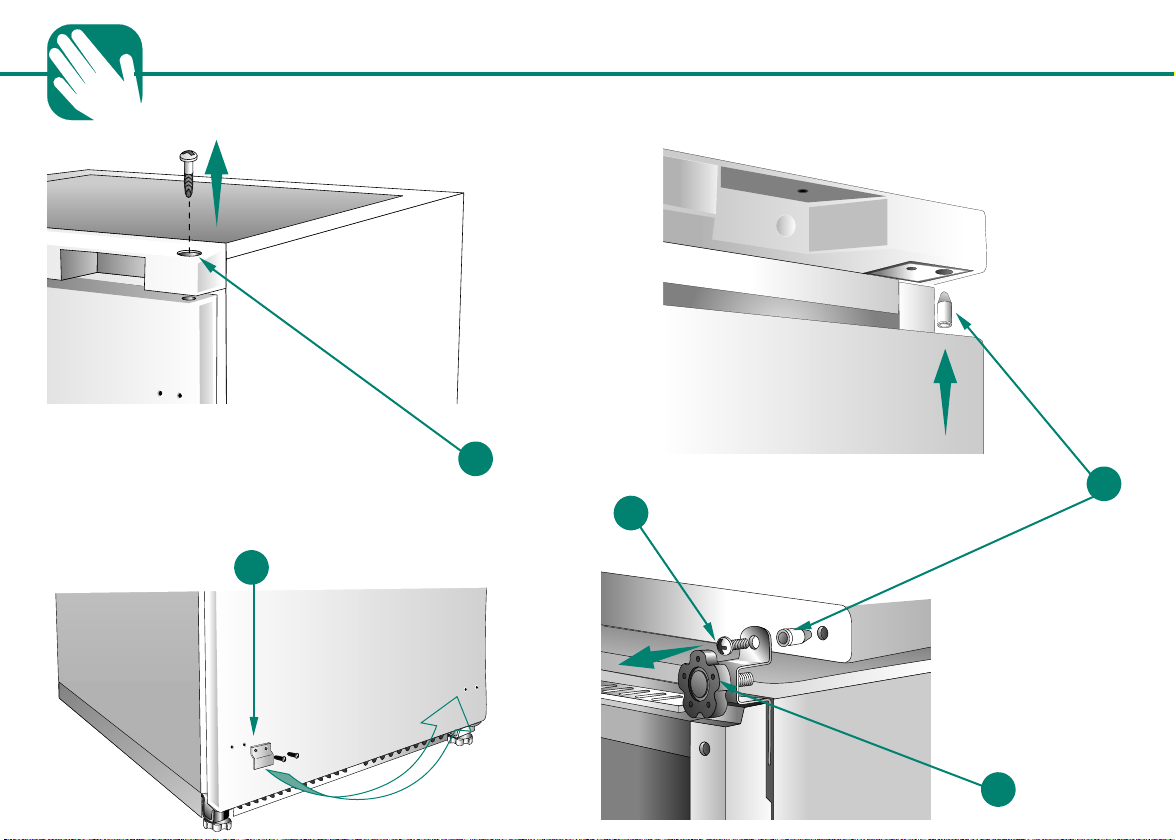
UMKEHRBARKEIT DER TÜRÖFFNUNG (voliziehen Sie die Umkehr. Bevor Sie den Gefrierapparat im Mobelumbau fixieren.)
6 - Den Stift des oberen Scharniers D herausschrauben und an der Gegenseite wieder
fixieren. 7- Den Stift 3 des Scharniers A losen und im gleichen Scharnier in
umgekehrter Richtung wieder anschrauben . 8- Die Tor montiere und das untere
Scharnier auf der Gegenseite fixieren.
9 - Die beiden seitlichen Querstücke wie unter Punkt drei beschrieben wieder
anschrauben, indem Sie die Leiste E umkehren.
10- Die zwei Schrauben 1 und 2 des Sockels wieder festschrauben.
11- Die oberen und unteren Halter für die Gleitschiene F an der Gegenseite befestigen.
Die Locher mit den beiliegenden Deckpfropfen abdecken.
N.B. Falls das Gerät mit zwei unteren Scharnieren ausgestattet ist, gehen Sie bitte wie
auf Seite 1 für das Modell OHNE SOCKEL beschrieben vor.
B- MODELO COM SAPATA LAMINADA:
REVERSIBILITÉ OUVERTURE DE LA PORTE (à effectuer avant d‘insérer le congélateur dans le meuble)
B- MODÈLE AVEC SOCLE EN TÔLE:
Tous les modèles sont prédisposés pour intervertir l’ouverture de la porte, pour mieux
coordonner l’installation de votre cuisine. Pour effectuer ce travail procéder de la façon
suivante:
1 - Coucher le congélateur sur le dos en utilisant des protections afin de ne pas écraser
le condensateur et de ne pas endommager le groupe moteur.
2 - Dévisser les deux vis 1 et 2 du socle.
3 - Démonter les deux barres latérales en enlevant les trois vis de fixage et libérer la
lame E.
4 - Démonter la charnière inférieure A, libérer la porte.
5 - Démonter les douilles B et C et les remonter sur le côté opposé.
6 - Dévisser le pivot de la charnière supérieur D et le remonter sur le côté opposé.
7 - Dévisser le pivot 3 de la charnière A et le remonter sur cette même charnière dans
la position opposée.
8 - Remonter la porte et fixer la charnière inférieure sur le coté opposé.
9 - Remonter les deux barres latérales comme indiqué au point 3 en invertissant la
position de la lame E.
10- Remonter le deux vis 1 et 2 du socle .
11- Inverser la position du guide support traînage F inférieur et supérieur. Les trous des
vis doivent être fermés avec des caches en dotation.
N.B. Si l’appareil est équipé de deux charnières inférieures procéder comme illustrer à
la page 1 pour le modèle SANS SOCLE.
REVERSIBILIDAD APERTURA DE LA PUERTA (debe efectuarse antes de inserir el congelador en el mueble)
B- MODELO BASE SUPLEMENTAR DE CHAPA:
Todos os modelos estão predispostos para inversão da abertura da porta, permitindo
assim um melhor planeamento da decoração da cozinha. Para efetuar inversão da
porta. Proceder da seguinte maneira:
1 - Deitar o congelador apaiado sobre a parte de trás, usando espaçadores apropri-
ados, para evitar esmagar condensador e causar danos ao grupo compressor.
2 - Desaparafusar os dois parafusos, 1 e 2, da base suplementar.
3- Desmontar as duas travessas laterais retirando os três parafusos de fixação e soltar
o bloco lateral E.
4 - Desmontar a dobradiça inferior A e soltar a porta
5 - Desmontar as bricas de guia B e C e montá-las novamente do lado oposto.
B- MODELO CON ZÓCALO DE CHAPA LAMINADA:
Todos los modelos están predispuestos para la inversión de apertura de la puerta, para
poder coordinar mejor con la predisposición de la cocina. Para efectuar la inversión de
la puerta proceder de la siguiente manera:
1 - Apayar el congelador sobre el lado posterior utilizando espesores especiales para
evitar el aplastamiento del condensador y daños en el grupo compresor.
2 - Detornillar los tornillos 1 y 2 del zócalo.
3 - Desmontar los dos traversaños laterales, sacando los 3 tornillos de fijación y liberar
el listel E.
4 - Desmontar la bisagra inferior A y sacar la puerta.
5 - Desmontar los farros B y C y montarlos en el lado opuesto.
6 - Detornillar el perno de la bisagra superior D y montarlo en el lado opuesto.
7 - Detornillar el perno 3 de la bisagra A y montarlo en la misma bisagra en posición
opuesta.
8 - Montar la puerta y fijar la bisagra inferior sobre el lado opuesto .
9 - Montar los 2 traversaños laterales como indicado en el punto 3, invirtiendo la
posición del listél E.
10- Montar los tornillos 1 y 2 del zócalo .
11- lnvertir la posición del soporte guía F sea inferior que superior. Tapar los orificios
con las tapitas provistas.
Nota: Si el aparato está provisto de dos bisagras inferiores proceder como se indica en
la página 1 para el modelo SIN ZÓCALO.
REVERSIBILIDADE DA ABERTURA DA PORTA (a efectuar antes de encaixar o congelador no móvel)
6 - Desaparafusar o pino dobradiça superior D e montá-lo do lado oposto
7 - Desaparafusar o eixo 3 da dobradiça A e montá-lo mesma dobradiça na posição
oposta
8 - Montar a porta e fixar a dobradiça inferior no lado oposto.
9 - Montar de novo as duas travessas laterais como indicado no ponto 3, invertendo a
posição da barra E.
10- Colocar de novo os parafusar 1 e 2 ba base suplementar.
11- lnverter a posição do suporte da guia F, tanto inferior como superior tapar os furos
com as tampas apropriadas.
N.B. Se o aparelho é dotado de 2 dobradiças inferiores, proceder como ilustrado na
pagina 1, para modelos sem base suplementar.