Roxy SHIBU DIGITAL User manual

SHIBU DIGITAL INSTRUCTION MANUAL


GENERAL GUIDE
- Press (B) to change from mode to mode. Each mode is
explained in detail on the following pages.
- After you perform an operation in any mode, pressing (B)
returns to the Timekeeping Mode.
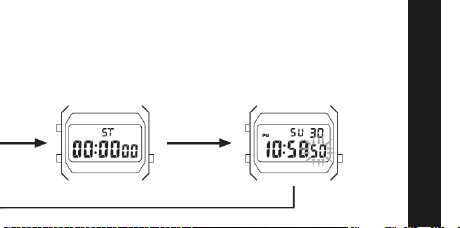
Timekeeping Mode Alarm Mode

GENERAL GUIDE
- Holding down (A) at any time illuminates the display.
- The backlight of this watch employs an electroluminescent (EL)
light, which loses its illuminating power after very long term use.
- Frequent use of the backlight shortens the battery life.
Stopwatch Mode Time Setting Mode

TIMEKEEPING MODE
- In the Timekeeping Mode, press
(C) to switch between the 12-hour
and 24-hour formats.
- Day of the week is displayed as
follows :
SU:Sunday MO:Monday
TU:Tuesday WE:Wednesday
TH:Thursday FR:Friday
SA:Saturday
Day of the week
Day
Second
Hour
Minute
PM indicator

ALARM MODE
When the Daily Alarm is switched on,
the alarm sounds for 20 seconds at the
preset time each day.
When the Hourly Time Signal is switched
on, the watch beeps every hour on the
hour.
Hourly time signal ON indicator
Mode indicator
Hour Minute
Alarm ON
indicator

ALARM MODE
Hour Minutes Normal Alarm Mode
(no digit flashes)
3. Press (C) to increase the selected digits. Holding down (C) changes the
number at high speed.
- The format (12-hour and 24-hour) of the alarm time matches
the format you select for normal timekeeping.
- When setting the alarm time using the 12-hour format, take care to set
the time correctly as morning or afternoon (PM).
4. After you set the alarm time, press (A) to return to the Alarm Mode. At
this time the Daily Alarm is switched on automatically.
To set the alarm time
1. In the Alarm Mode, press (A). The hour digits flash because they are
selected.
2. Press (A) to change the selection in the following sequence.

ALARM MODE
To stop the alarm
Press (A) to stop the alarm after it starts to sound.
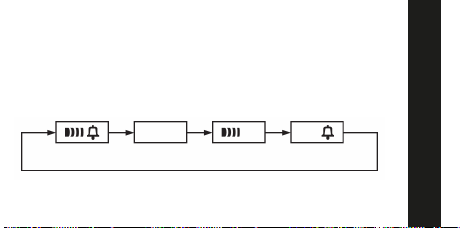
To switch the Daily Alarm and Hourly Time Signal on and off
Press (C) while in the Alarm Mode to change the status of the Daily Alarm
and Hourly Time Signal in the following sequence.
To test the alarm
Hold down (C) while in the Alarm Mode to sound the alarm.
Both ON Both OFF Daily alarm
only
Alarm ON indicator / Hourly Time Signal ON indicator
Hourly Time
Signal only

STOPWATCH MODE
Mode indicator
Split time
indicator
Minutes
Seconds
1/100 second
The Stopwatch Mode lets you measure
elapsed time, split times, and two finishes.
The range of the stopwatch is 59 minutes,
59.99 seconds.

STOPWATCH MODE
(a) Elapsed time measurement
C
Start
C
Stop
C
Re-start
C
Stop
A
Clear
(b) Split time measurement
C
Start
A
Split
A
Split release
C
Stop
A
Clear
(c) Split time and 1st-2nd place times
C
Start
A
Split
First runner
finishes.
C
Stop
Second runner
finishes.
Record time
of first runner.
A
Split release
Record time of
second runner.
A
Clear

TIME SETTING MODE
Minutes
Hours
PM indicator Date
Day of the week To set the time and date
1. Use (B) to enter the Time Setting
Mode.
- The seconds digits flash because they
are selected.
2. Press (A) to change the selection in
the following sequence.
Seconds
Seconds Hours
Day of
week Date
Minutes
Month

TIME SETTING MODE
3. While the seconds digits are selected (flashing), press (C) to reset the
seconds to “00”.
If you press (C) while the seconds count is in the range of 30 to 59, the
seconds are reset to “00” and 1 is added to the minutes. If the seconds
count is in the range of 00 to 29, the minutes count is unchanged.
4. While any other digits (besides seconds) are selected (flashing), press (C)
to increase the number. While the day of the week is selected, pressing (C)
advances to the next day. Holding down (C) changes the current selection
at high speed.
5. After you set the time and date, press (B) to return to the Timekeeping
Mode.
- If you do not operate any button for a few minutes while a selection is
flashing, the flashing stops and the watch goes back to the Timekeeping
Mode automatically.

SHIBU DIGITAL BEDIENUNGSHANDBUCH

Die Uhr darf gelegentlich nass werden, aber sie darf nicht
untergetaucht oder einem Wasserstrahl ausgesetzt werden.
Badon, Tauchon im Schwimmbad odor mit angohaltonom Atom.
Kein Tauchen mit Flaschen und kein berufliches Tauchen. Nach
der Venwendung im Meer die Uhr mit klarem Wasser waschen.
Gut trocknen.
"Unter-Wasser-Baden" im Schwimmbad. Kein tiefes Tauchen
und kein Surfen. Unter Wasser die Schieber und das
Aufziehradchen nicht betatigen.
Verwendbar beim Tauchen mit Flaschen, aber in Tiefen, die
keine Verwendung von Helium erfordem.
3 ATM
5 ATM
10 ATM
20 ATM

ALLGEMEINE ANLEITUNG
- Knopf (B) drücken, um von Modus auf Modus umzuschalten. Jeder
Modus ist in allen Einzelheiten auf den nachfolgenden Seiten erläutert.
- Nachdem Sie eine Operation in einem beliebigen Modus durchgeführt
haben, wird durch Drücken des Knopfes (B) in den Zeitnehmungs-Modus
zurückgekehrt.
Zeitnehmungs-Modus Alarm-Modus

ALLGEMEINE ANLEITUNG
- Knopf (A) gedrückt halten, um zu einem beliebigen Zeitpunkt das Display zu
beleuchten.
- Die Hintergrundleuchte in dieser Armbanduhr verwendet eine elektrolumi-
niszente (EL) Leuchte, die ihre Leuchtkraft nach sehr langer Verwendung verliert.
- Häufige Verwendung der Hintergrundleuchte verkürzt die Batterie-Lebensdauer.
Stoppuhr-Modus Zeiteinstell-Modus

ZEITNEHMUNGSMODUS
- In dem Zeitnehmungs-Modus den Knopf
(C) drücken, um zwischen dem 12-Stunden-
und 24-Stunden-Format umzuschalten.
- Der Wochentag wird wie folgt angezeigt.
SU: Sonntag MO: Montag
TU: Dienstag WE: Mittwoch
TH: Donnerstag FR: Freitag
SA: Samstag
Wochentag
Datum
Sekunden
Stunden
Minuten
PM-Anzeige
(zweite Tageshälfte)

ALARM-MODUS
Wenn der tägliche Alarm eingeschaltet ist,
ertönt der Alarm täglich zum voreingestellten
Zeitpunkt für 20 Sekunden. Wenn das
stündliche Zeisignal eingeschaltet ist, gibt die
Armbanduhr zu jeder vollen Stunde einen Piepton
aus.
Ein-Anzeige für
stündliches Zeitsignal
Modus-Anzeige
StundenMinuten
Alarm-Ein-Anzeige

ALARM-MODUS
Stunden Minuten Alarm-Modus
(Keine Stelle blinkt)
3. Knopf (C) drücken, um die angewählten Stellen zu erhöhen. Knopf (C)
gedrückt halten, um die angezeigte Zahl schnell zu ändern.
- Das Format (12-Stunden oder 24-Stunden) der Alarmzeit stimmt mit dem von
lhnen für die normale Zeitnehmung gewählten Format überein.
- Wenn der Alarm unter Verwendung des 12-Stunden-Formats eingestellt wird,
darauf achten, daß die Zeit richtig für die erste oder zweite (PM) Tageshälfte
eingestellt wird.
4. Nachdem Sie den Alarm eingestellt haben, den Knopf (A) drücken, um in den
Alarm-Modus zurückzukehren. Zu diesem Zeitpunkt wird der tägliche
Alarm automatisch eingeschaltet.
Einstellen der Alarmzeit
1. Drücken Sie den knopf (A) im Alarm-Modus. Die Stundenstellen blinken, da
sie angewählt sind.
2. Knopf (A) drücken, um die blinkenden Stellen in der folgenden Reihenfolge
zu ändern.
Table of contents
Languages:
Other Roxy Watch manuals