Royal Alloy GP300S User manual


1
This owner's manual contains important safety, operational and maintenance information. Any person
operating or riding as a passenger on your scooter should carefully read and fully understand the entire
contents of this manual prior to riding the vehicle. For your safety, follow all safety warnings contained
within the owner's manual and the labels applied to your scooter. You should always keep this owner’s
manual in your vehicle, and it should be considered a permanent part of the vehicle.
If you have any questions, please ask your dealer for assistance.
Safety symbols and notes. Please observe the following:
Failuretofollowinstructions with aWARNINGsymbolcouldresultinseriousinjuryordeath. Precautionary
measures are required.
CAUTION
Important instructions and precautionary rules to avoid damage to the vehicle. Non-observance can lead to
an unsafe vehicle condition.
NOTE
WARNING
!

2
Congratulations on your purchase of the Royal Alloy GP300S!
Please read this manual carefully prior to riding so that you will understand how to safely operate your scooter,
understand its capabilities and limitations, and become aware of all vehicle controls and features.
This owner's manual contains important maintenance information. The efficiency and longevity of your scooter
will depend heavily on your operating methods and periodic maintenance. Failure to operate and maintain your
scooter as instructed in this owner's manual may void the limited warranty and reduce the efficiency and reliability
of your vehicle.
The first 500 miles are the most important in the life of your scooter. Proper break-in during this time will ensure
maximum life. Please refer to the break-in section for specific break-in procedures prior to riding.
You should always use original
Royal Alloy OEM parts
for all maintenance and repairs as they have been
designed specifically for your vehicle.
Genuine Motor Oil
is the official lubricant of Royal Alloy vehicles. Genuine Motor Oils have been specially
formulated to keep your vehicle operating at maximum efficiency with minimal engine wear. Genuine Motor Oils
are synthetic oils that utilize the best-known lubrication technology to increase fuel mileage and produce minimum
exhaust emissions.
Your authorized Royal Alloy dealer is the primary resource for information, parts, and service. If you
have any questions, please ask your dealer for assistance.
Introduction

3
NOTICE
............................................................................ 1
INTRODUCTION
............................................................2
TABLE OF CONTENTS
................................................. 3
VEHICLE SAFETY
Accessories, Modification, Noise Regulation......................4
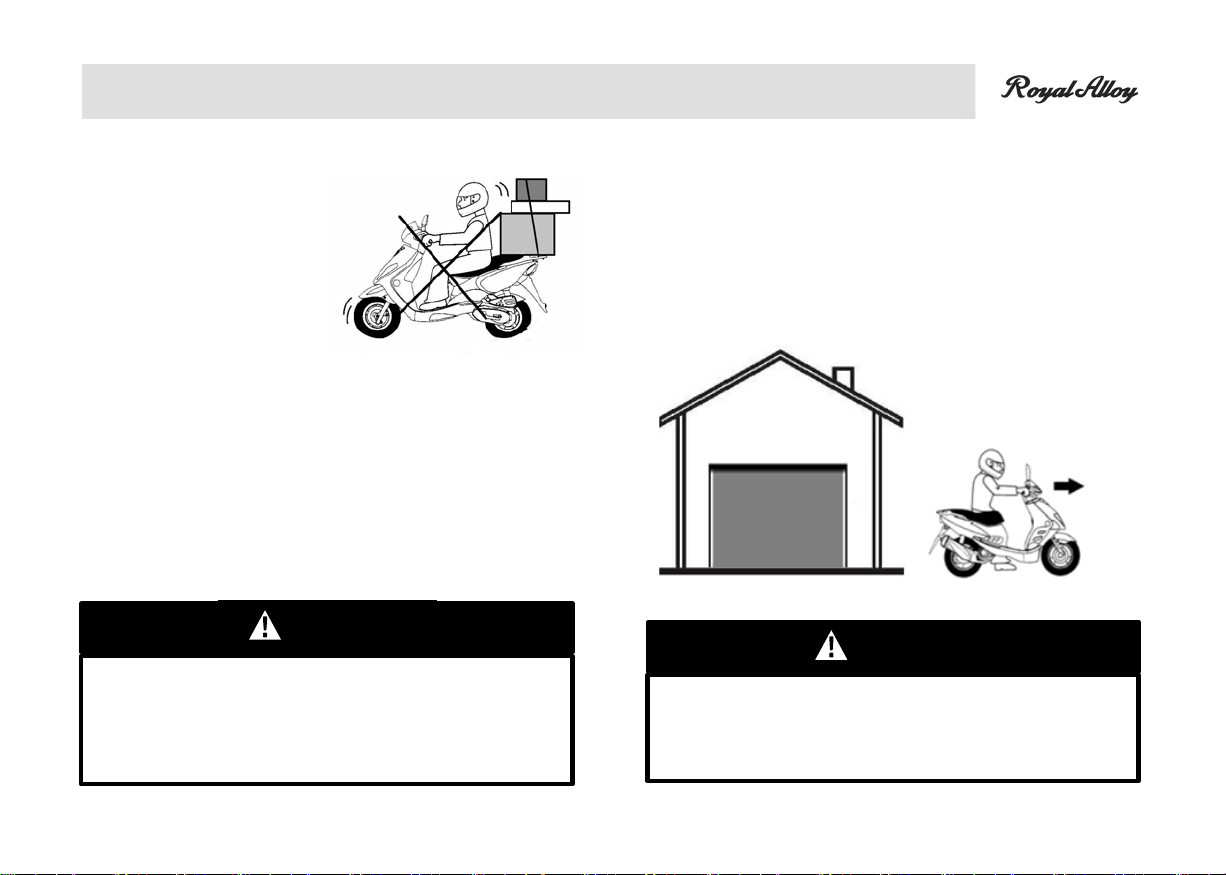
Loading, Maintenance, Pre-ride Inspection .......................5
Carbon Monoxide Gas........................................................ 5
SAFE RIDING
WearSafetyGear, Make Yourself Visible.....................
.
6
KnowYourLimits,RoadConditions................................. 6
IDENTIFICATION NUMBERS
...................................... 7
VEHICLE LAYOUT
IgnitionSwitch..............................................................
.
8
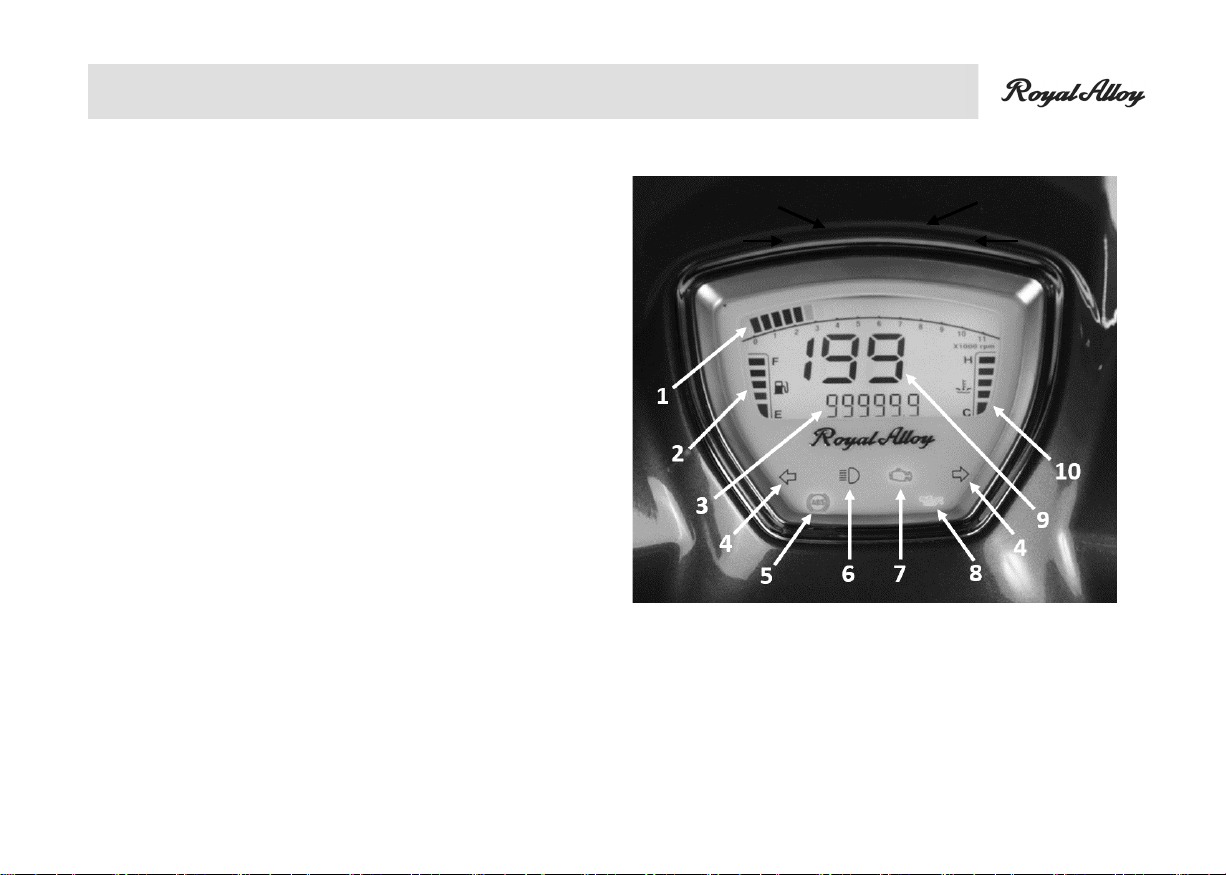
Dashboard........................................................................ 9
Dashboard and Clock...................................
.................
.
10,11
Handlebar Controls......................................................... 12
FrontandRearBrakeControls....................................
.
13
Bag Hook, Seat Lock....................................................... 14
Primary Storage, Glovebox Storage...............................15
Fuel Fill, USB Charging................................................... 16
PRE-RIDE INSPECTION
Pre-ride Inspection Checklist.......................................... 17
Front BrakeInspectionandAdjustment.......................
.
18,19
Rear BrakeInspection andAdjustment........................ 19,20
PRE-RIDE INSPECTION (CONTINUED)
Throttle Inspection and Adjustment...................................... 21
Engine Oil Type, Level Check, and Fill ................................. 22
Tire Inspection and Pressure Adjustment............................. 23
Cable Inspection and Lubrication......................................... 24
Vehicle Center and Side Stand, Assembly Check................ 24
Fuel, Lighting, Switches, and Loading.................................. 25
OPERATION
Vehicle Operation, Engine Starting...................................... 26
Engine Run-in, Engine Life...................................................27
Engine Warm-up, Riding, Throttle........................................ 28
Braking................................................................................. 29
Engine Stop, Parking............................................................ 30
PERIODIC MAINTENANCE
Periodic Maintenance Key.................................................... 31
Periodic Maintenance Table................................................. 32
Periodic Maintenance Table Continued................................ 33
Air Cleaner, Gear Oil, Transmission......................................34
Spark Plug, Brake Check...................................................... 35
Brake Fluid, Suspension....................................................... 36
Fuses, Battery, Battery Maintenance.................................... 37
Storage Guide....................................................................... 38
Maintenance Record.............................................................39
TECHNICAL DATA.....................................................
.
40
REPORTING SAFETY DEFECTS.............................
..
41
Table of Contents

4
Accessories
The addition of unsuitable accessories can result in unsafe
operating conditions.
Royal Alloy approved accessories have been designed for
use on your scooter. Always install Royal Alloy approved
accessories on your scooter. Your dealer can assist you in
selecting and properly installing accessories.
Modification
Modification of your scooter or removal of original
equipment may render the vehicle unsafe or illegal. Do not
install any part or component where the principal effect is to
bypass, defeat, or render inoperative any device or element
of design installed on or in a motor vehicle or motor vehicle
engine in compliance with regulations. Obey all applicable
equipment laws and regulations. Only use accessories that
have been approved by Royal Alloy for this scooter.
Motorcycle Noise Regulation
TAMPERING WITH NOISE CONTROL SYSTEM PROHIBITED
Federal lawprohibits thefollowingacts or thecausingthereof:
(1)
Theremovalorrenderinginoperativebyanypersonother
thanfor
purposesofmaintenance,repair,orreplacement of
any deviceor
element of design incorporated into any new
vehicle for the
purpose of noise control prior to its sale or
delivery to the ultimate
purchaser or while it is in use or (2) the
use of the vehicle after
suchdeviceor element of designhas
been removed or rendered
inoperative by any person.
AMONG THOSE ACTS PRESUMED TO CONSTITUTE
TAMPERING ARE THE ACTS LISTED BELOW.
These acts include tampering with the following systems, i.e.,
modification, removal, etc.
Exhaust System - Muffler, Exhaust pipe, Silencer
Intake System-Air cleaner case, Air filter, Intake duct.
Vehicle Safety

Vehicle Safety
5
Properly Load Your Scooter
You and any passengers
should utilize the
floorboard and
footrests for
your feet. Do not exceed
the load limits of the
vehicle. Properly secure all
cargo.
Maintain Your Vehicle
Perform maintenance as required per the maintenance
schedule or as otherwise necessary to keep your scooter
in a safe operating condition. If you notice any leaks or
notice odd sensations such as vibration, immediately stop
your vehicle.
Pre-Ride Inspection
Always perform a pre-ride inspection of your scooter prior
to each ride. Review the pre-ride inspection instruction
section contained within this manual for more information.
Carbon Monoxide Gas
The exhaust gasses from this vehicle contain carbon
monoxide, a colorless, odorless, and highly toxic gas.
An enclosed area such as a garage can quickly fill up with
carbon monoxide gas. Do not run the engine in enclosed
areas that are poorly ventilated. Move the vehicle outdoors
before operation.
WARNING
WARNING: Not performing a pre-ride inspection, altering
your vehicle from the stock configuration, or failure to
properly maintain your vehicle can result in serious injury or
death. Check your vehicle regularly and have any problems
corrected as soon as possible.
WARNING
WARNING: Carbon monoxide gas is toxic. Breathing
carbon monoxide can cause unconsciousness and even kill
you. Avoid running your engine within enclosed areas and
other activities that expose you to carbon monoxide.

Safe Riding
6
WARNING: Not wearing safety apparel increases the
chance of serious injury or death in a crash. Be sure you and
any passengers always wear helmets and protective gear
properly.
Your scooter can provide many years of riding enjoyment.
You must take responsibility for your own safety and the
safety of others. There are many steps you can take to
protect yourself and others while riding. Here are some very
important safety precautions:
Wear a Helmet
Rider safety begins with quality head protection. A head
injury is one of the most serious injuries that can occur.
Always wear a quality DOT approved helmet that is
properly buckled. If the helmet does not have a face shield,
wear suitable eye protection.
Wear Riding Apparel
Choose quality gloves, boots, pants, jackets and other riding
apparel specifically designed with protective features. Loose
clothing can be unsafe when riding your scooter.
Make Yourself Visible
Wear bright, reflective apparel to make yourself more
visible to fellow drivers. Position yourself on the road where
other drivers can easily see you. Use your turn signals,
hand signs, horn and other methods to help others locate
you and understand your driving actions.
WARNING
Know Your Limits
Ride within the boundaries of your own skill at all times. Do
not ride under the influence of drugs or alcohol. Strictly
observe all traffic regulations. Always adapt your riding to
account for traffic and road conditions.
Road Conditions
Road conditions can vary greatly with weather, foreign
material, elevation etc. Your riding stability and braking power
are limited by the grip of the tires on the road surface.
When encountering slippery road surfaces, braking distance
will increase significantly, and riding stability will be reduced.
Reduce vehicle speed and perform all actions in a gradual
and deliberate manner to prevent accidents.
Use extreme caution on painted surfaces or metal objects
such as manhole covers or train rails when they are wet.

Identification Numbers
7
VehicleIdentification Number ( VIN ) is located on the VIN plate ( 1 ) or on the lower portion of the frame ( 2 ).
Record your Vehicle Identification Number:
The Engine Serial Number (ESN) is located on the rear left side of the engine (3).
Record your Engine Serial Number: _________________________________________

Vehicle Layout
8
CAUTION
Ignition Switch Operation
Insert the key and select ON ( 1 ), OFF ( 2 ), OPEN ( 3 ),
or ( 4 ) LOCK.
1. Turn key to ON position ( 1 ) to operate the vehicle. In
this position, the key cannot be removed. The vehicle
will have power and the engine can be started.
2. Turn key to OFF position ( 2 ) to cease vehicle
operation. In this position, all vehicle power will be off,
the engine will not run, and the key can be removed
from the ignition switch.
3. Turn handlebars fully to the left steering-stop. With
the key in the OFF position ( 2 ), press key inward
toward front of the scooter and turn key left to LOCK
position ( 4 ) to lock the handlebars as a theft
deterrent. The fork is now locked and cannot be
turned. The key can be removed from the ignition
switch in the LOCK position. Insert and rotate the key
clockwise from the LOCK position to the OFF or ON
position to unlock the steering.
CAUTION: Turn handlebars gently to confirm steering
is locked after following locking procedure. Lock your
vehicle whenever you leave it unattended.

Vehicle Layout
9
Dashboard
1. Engine Speed
Current engine speed measured in thousands of revolutions per
minute (x1000 rpm).
2. Fuel Level Indicator
Current fuel level indicated by F – Full to E – Empty.
3. Odometer / Trip Odometer
Distance traveled during the life of the vehicle or current trip
measured in miles or kilometers.
4. Directional Indicator
Illuminates green when turn signal button is pressed to the left or
right and signal is on.
5. ABS Indicator
Illuminates orange if there is an ABS problem.
6. High Beam Indicator
Illuminates blue when high beam switch is selected
7. Check Engine Indicator
Illuminates orange if there is an engine problem,
8. Oil Level Indicator
Illuminates when oil level is low. Please check oil level immediately.
9. Speedometer
Current vehicle speed in miles per hour (mph) or kilometers per hour (km/h).
10. Coolant Temperature Indicator
Indicates the temperature of your engine’s coolant.

Vehicle Layout
10
Dashboard Mode Selector Button
The dashboard mode selector button is red and located
in the glovebox. The button is used to change between
odometer and trip odometer. It is also used to change
between mph and kmh units.
Odometer / Trip Odometer Selection
To change between odometer and trip odometer:
1. Press the dashboard mode selector button once to
change between odometer and trip odometer.

Vehicle Layout
11
Trip Odometer Reset
While the trip odometer is visible:
1. Hold the dashboard mode selector button for 5
seconds to clear the trip odometer history.
Miles / Kilometers Unit Selection
There are two options for unit selection:
1. Distance measured in miles and speed measured in
miles per hour (mph).
2. Distance measured in kilometers (km) and speed
measured in kilometers per hour (km/h).
To change from current unit option to the other unit option,
hold the dashboard mode selector button for 5 seconds.

Vehicle Layout
12
CAUTION
Handlebar Controls
1.
Headlight Switch
Left Handlebar Controls Right Handlebar Controls
Press up for HIGH Beam
Press down for LOW Beam
2.
Turn Signal Switch
Press switch left to signal a LEFT turn.
Press switch right to signal a RIGHT turn.
Press center button to turn indicator OFF.
3.
Horn
Press in to sound the HORN.
4.
Hazzard Switch
Press up to turn on HAZZARD flashing turn signals.
Press down to turn OFF flashing turn signals.
5.
Emergency Stop Switch
Press switch right to select RUN position to operate vehicle.
In an emergency, press switch left to STOP to stop the engine.
6. Engine Start Button
Press button in with the ignition key in ON position and at
least one brake lever engaged in to START the engine.
1
4
2
5
3
6
CAUTION: Do not press and hold start button for more
than 5 seconds at a time as this can damage the start
system. Follow starting procedure found on page 26.

Vehicle Layout
13
Front & Rear Brake Controls
Extend your fingers over the brake lever.
Pull lever toward the grip to actuate brake.
The brake lever will slow the vehicle with firm pressure.
REAR BRAKE LEVER FRONT BRAKE LEVER
11

Vehicle Layout
14
Bag Hook
A bag hook is located on the inner front side of the
leg shield. Ensure all bags and other cargo are
properly secured to prevent spillage and
subsequently a potential hazard for other
motorists.
Fuel Fill Location
Raise the seat forward toward the handlebar to expose
the fuel cap. Return the seat to rest on the body panel
and press down firmly on the rear of the seat to
securely close it. There are several suction cups
underneath the seat to keep it locked.

Vehicle Layout
15
Side Stand and Center Stand
The side stand is
located near the
undercarriage. It is
important that the
stand is resting on firm
ground to prevent the
vehicle from toppling
over. The scooter is
equipped with a side
stand switch which will prevent the engine from starting
if the side stand is engaged.
The center stand is
located behind the
side stand. It is best
practice to use the
center stand when
parking the bike. To
engage the center
stand, the user must
put full body weight
on the foot anchor and simultaneously pull the bike to
the rear.
Glovebox Storage
The glovebox is located
under the ignition switch
and the bag hook. Use
the ignition key to open
the glovebox by inserting
key into the glovebox lock
cylinder and turning to the
right.
After the glovebox is open, remove the key from the
glovebox lock cylinder.
To close the glovebox,
remove the key and press
firmly in the center of the
glovebox lock cylinder
with your thumb. The
glovebox will latch closed.

Vehicle Layout
16
Fuel Fill
The fuel tank fill location is under the seat. Lift the seat
to the upright position.
Insert the key to unlock and turn counterclockwise to
open the fuel cap.
Fill with unleaded fuel 91 octane or higher.
Take special care not to overfill fuel tank.
USB Charging
Your scooter is equipped with a USB Charging Port
located in the glovebox compartment. Remove
protective cover to expose USB charging port.
This port is designed to charge small consumer
electronics such as a cellular phone.
After use, cover the charging port with the protective
rubber cover to prevent moisture and debris from
entering the charging port.

Vehicle Layout
17
Coolant Tank Cap
The coolant tank cap is located on the left side of the
vehicle behind the side body panel. Never open the
coolant tank cap when the scooter is hot because this
might cause boiling coolant to surge out of the tank. Hot
coolant will cause injuries and burns, and it is very
important to only open the coolant tank cap when the
scooter is cool.
Rear Rack
The rear rack is located on the rear portion of the main
body behind the seat. The rear rack can be used as a
handle when propping the scooter onto the center stand.
It can also be used to carry items with a maximum load
of 11 lbs.

Pre-Ride Inspection
18
Perform a pre-ride inspection prior to every ride.
This isa checklist. Detailed procedures are in the pages that follow.
ITEM
PROCEDURE
FRONT BRAKE
Check the brake function, clearance, brake-fluid level, inspect for fluid leaks, if necessary, add
DOT 4 or higher brake fluid. Check brake lever free-play and adjust if necessary. Check brake
pad wear. If the brake pads are worn down past the wear marks, replace pads immediately.
REAR BRAKE
Check the brake function, lever free-play and clearance. If the brake lever pressure is low,
check for worn brake pads or fluid leak. Repair immediately.
THROTTLE
Check to make sure the throttle actuates freely through the range. Lubricate throttle cable if
necessary. Check throttle free-play. Adjust throttle cable tension if necessary.
LUBRICANTS
Check the engine oil level before each ride. If the engine oil level is low, refill with
JASO MA-2 5W-40 engine oil
TIRES
Check tire pressure in both the front and rear tire, add air if necessary. Inspect tires.
CABLES
Check operation of all cables. Lubricate cables and adjust tension as necessary.
CENTER / SIDE STAND
Check center and side stands for operation, lubrication and secure mounting.
ASSEMBLY
Check all vehicle assembly to ensure fasteners are secure and assemblies function properly.
FUEL SYSTEM
Check fuel level. Fill if necessary. Ensure no fuel leaks are present.
LIGHTING
Check the function of all lights. Clean lenses as necessary.
SWITCHES
Check the function of all switches.
LOADING
Ensure your vehicle is not overloaded, is loaded in a balanced manner, and cargo is secured.

Pre-Ride Inspection
19
Perform a pre-ride inspection prior to every ride.
Front Brake
The front brake is a hydraulic disk type. Inspect the brake
system prior to each ride.
Properly functioning brake systems are vitally important to
your personal safety.
Check for fluid leaks, fluid level, brake pad wear, and rotor
condition. Also check lever free-play frequently.
Pull the brake lever lightly until you feel tension, then check
the lever free-play.
10 – 20mm
Front Brake lever free-play: 10 - 20mm
If the brake lever has no free-play or is too loose, there is a
potential brake system fault. Inspect brake system
thoroughly.
Front Brake Fluid
Check all joints along the brake hose for any fluid leaking
from the joint or the brake cylinder. Leakage has occurred
if you see wet or oxidized fluid sludge.
Check brake fluid level
sight glass at base of
lever to determine brake
fluid level. Fluid should
be above the bottom half
of the sight glass.
Add brake fluid if
necessary.
Brake Fluid specification: DOT4
WARNING
WARNING
Other manuals for GP300S
1
Table of contents
Other Royal Alloy Motorcycle manuals