RunCam RunCam 3 User manual

RunCam 3 User Manual
Package Contents:
RunCam 3 X 1 Silicone Shell X 1 Micro-USB
Cable X 1
Micro-USB
TV-Out
and Power
Cable X 1
RCA Cable X 1
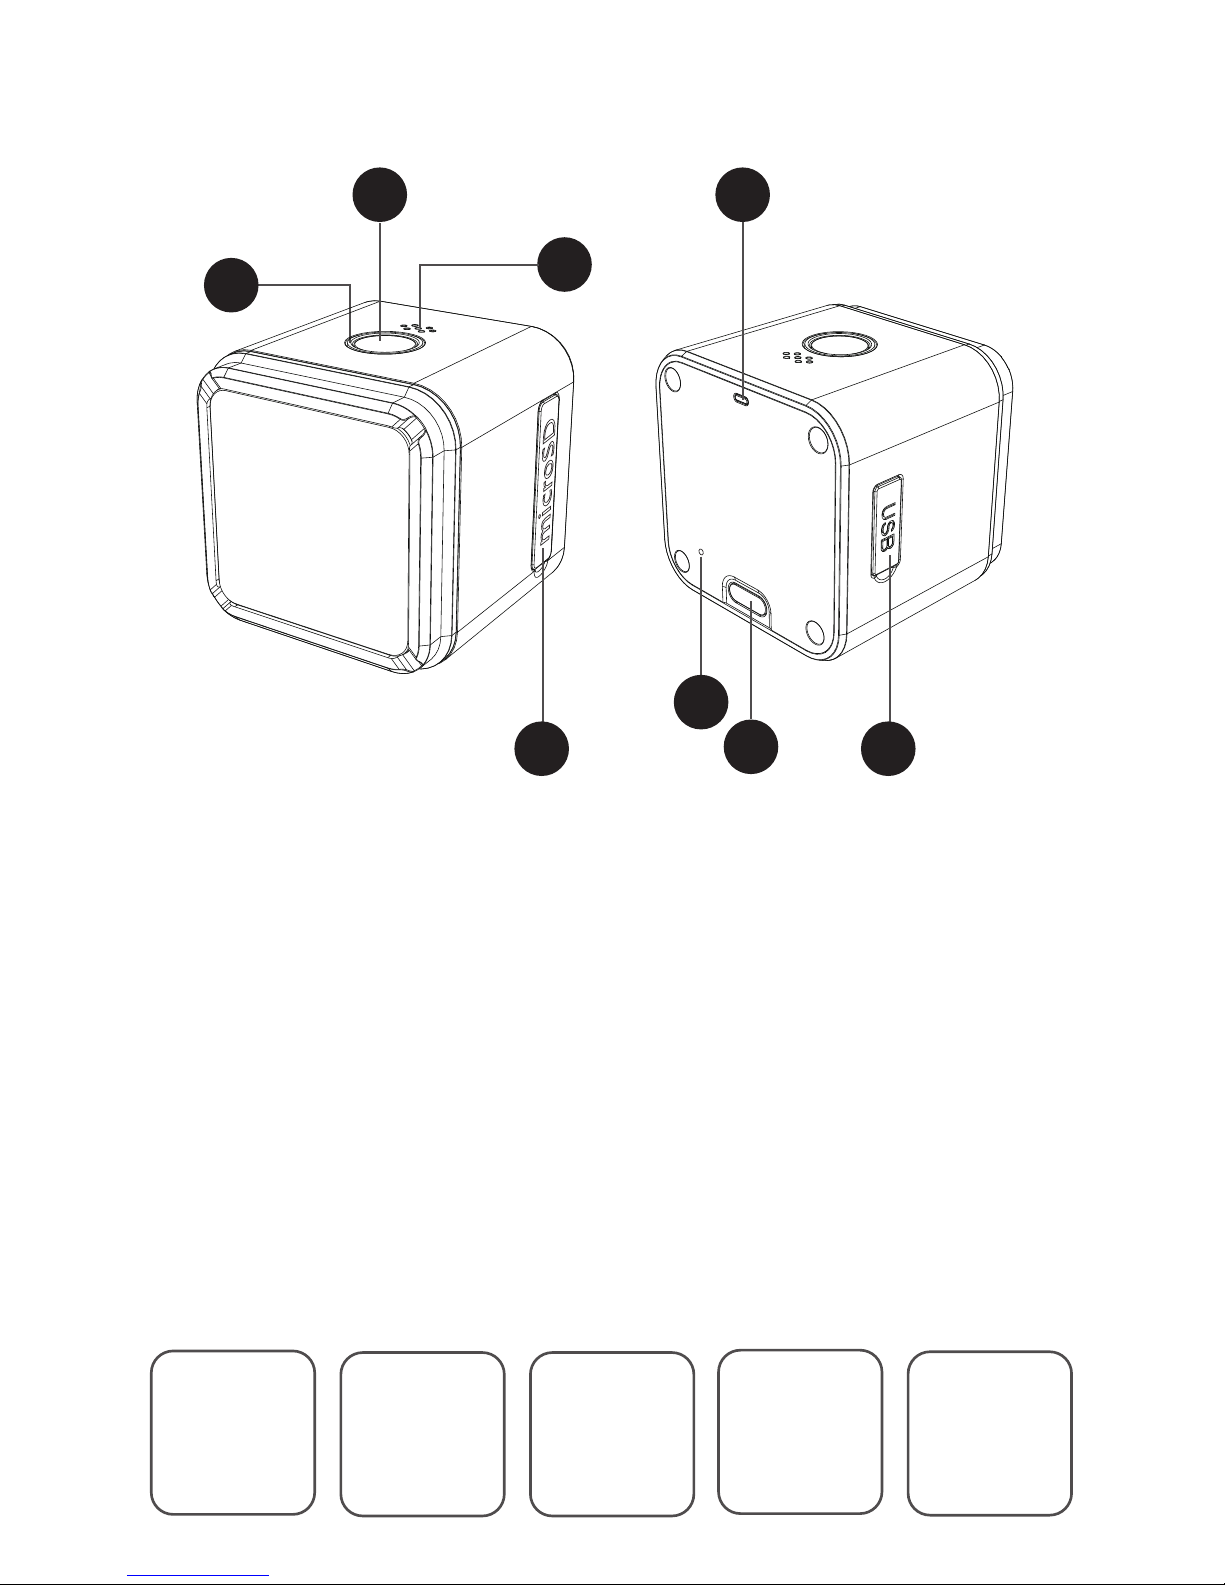
Power/Shutter Button
WiFi/Mode Switch Button
WiFi Status Light
microSD Card Slot
1
1
2
2
3
3
4
4
6
6
7
7
5
5
Microphone 1 Micro-USB Port
Camera Status Light
8
8Microphone 2
The RunCam 3 and battery are integrated. The camera status lights (green)
blink when the battery drops below 15%. If the battery reaches 0% while
recording, the camera saves the file and powers off.
RunCam 3's micro USB port takes DC 5-17V power source, it's recommended
to use mobile phone charger (output 5V 1A) to charge the battery.
The camera status lights (red) turn on during charging, turn off when fully
charged. A full charge takes about 2.5 hours.
NOTICE: Extreme cold temperatures can decrease battery life. To maximize
battery life in cold conditions, keep camera in a warm place prior to use.
WARNING: Never use the RunCam 3 as a dashcam. This may damage
the camera battery and create a safety hazard.
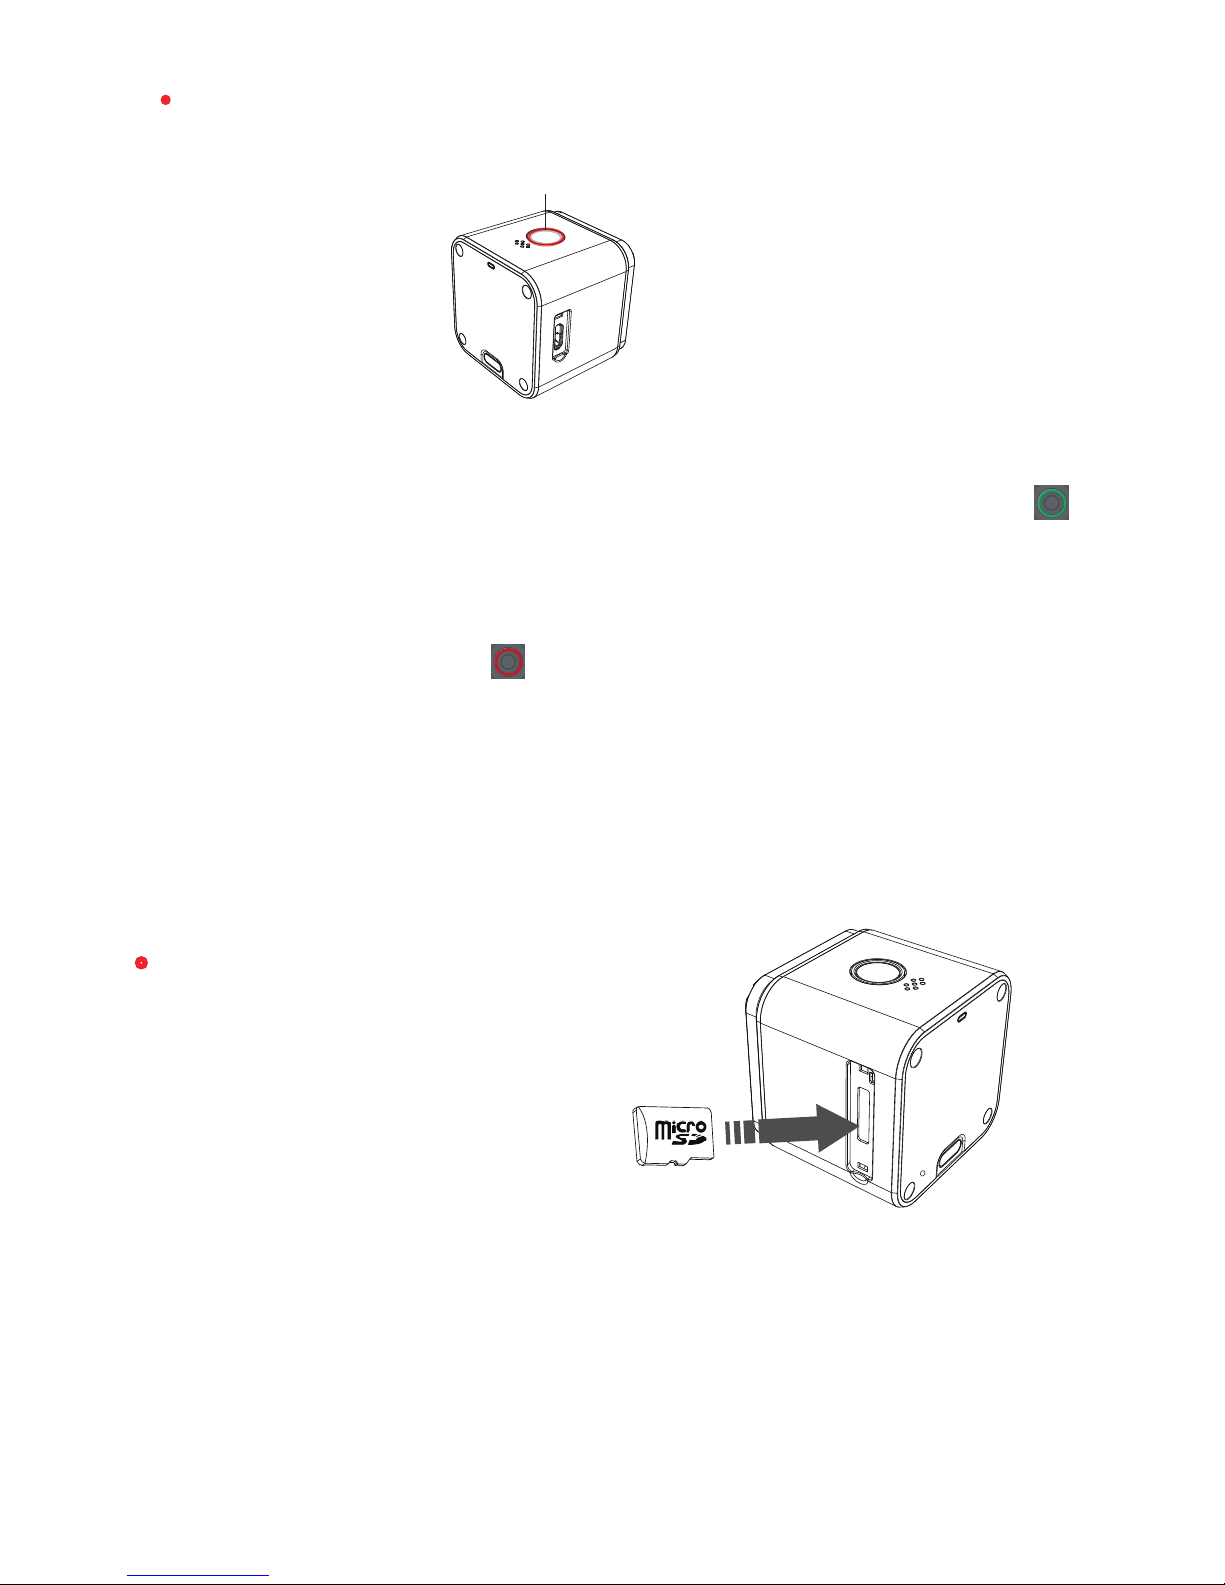
·microSD card:
Insert the microSD card as indicated by
the icon next to the card slot.
Use brand name memory cards
(sold separately) that meet these
requirements:
•microSD, microSDHC, or microSDXC
•Class 10 or UHS-I rating
•Capacity up to 64GB
NOTICE:Use care when handling memory cards. Avoid liquids, dust, and
debris. As a precaution, power off the camera before inserting or removing
the card. Check manufacturer guidelines regarding use in acceptable
temperature ranges.
The camera status lights (red)
·Charging
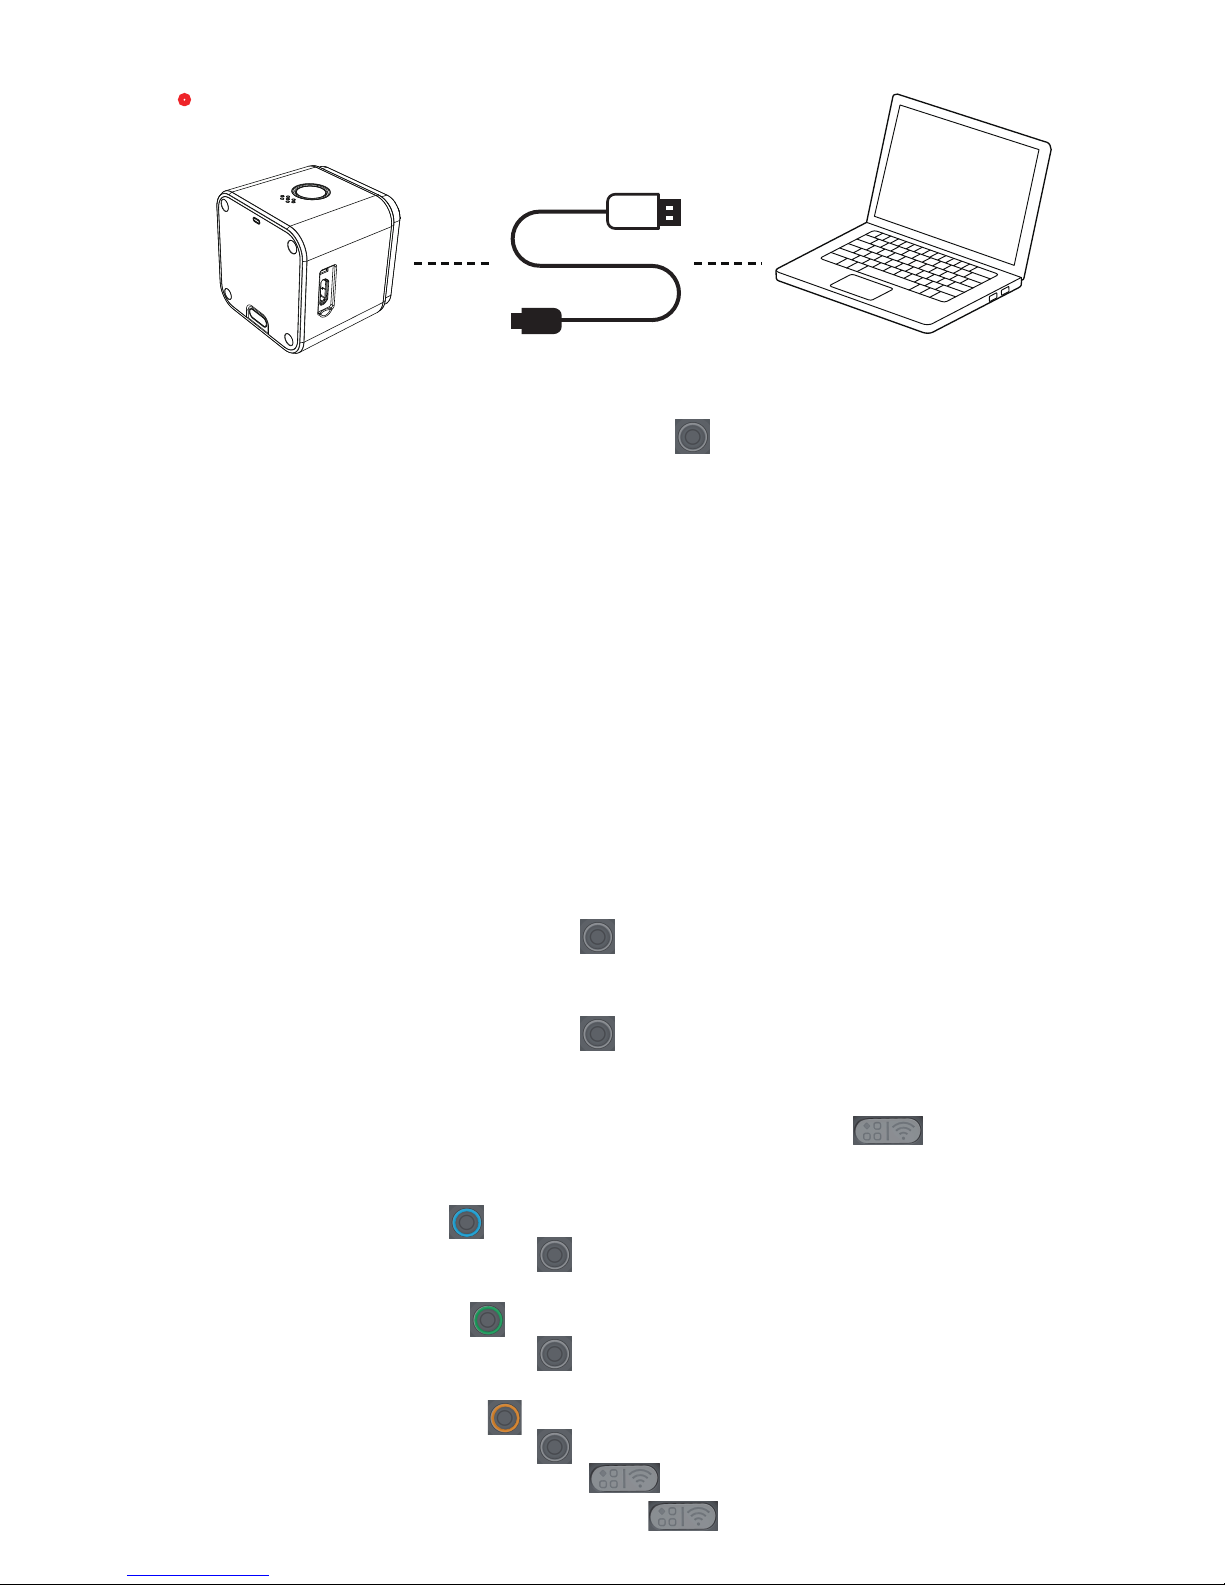
·Connection to computer
After being connected to the computer by a USB cable, the camera is in
MSDC mode. Press the Power/Shutter button will switch to WebCam mode.
NOTICE: If the camera can not be recognized by the computer after connecting,
please make sure that a microSD card is well inserted. If the infomation on
microSD card can not be read normally, please try with another micro USB
cable or micro USB port on the computer.
MSDC:Removable Disk
WebCam:Use the camera as a webcam by running amcap.exe
on the Windows OS.
In the resource manager (Win + E) address bar enter
"%appdata%/microsoft/windows/network shortcuts" to find it.
If it's missing in your system, you can go to the following link to download
and install: www.runcam.com/download/AmcapSetup.exe
Powering on:
Long press the Power/Shutter button for three seconds, the camera
powers on, beeps three times.
Powering off:
Long press the Power/Shutter button for three seconds, the camera powers
off, beeps five times.
Mode switching:
After powering on, long press the WiFi/Mode Switch button repeatedly to
cycle among the three modes: Video/Photos/OSD settings.
Video:
Camera Status Light: Blue
- Press the Power/Shutter button to start/stop recording.
Photos:
Camera Status Light: Green
- Press the Power/Shutter button to capture photos.
OSD Setup:
Camera Status Light: Orange
- Press the Power/Shutter button to browse.
- Press the WiFi/Mode Switch button to select.
- Long press the WiFi/Mode Switch button to exit the menu.
·Instructions for use:
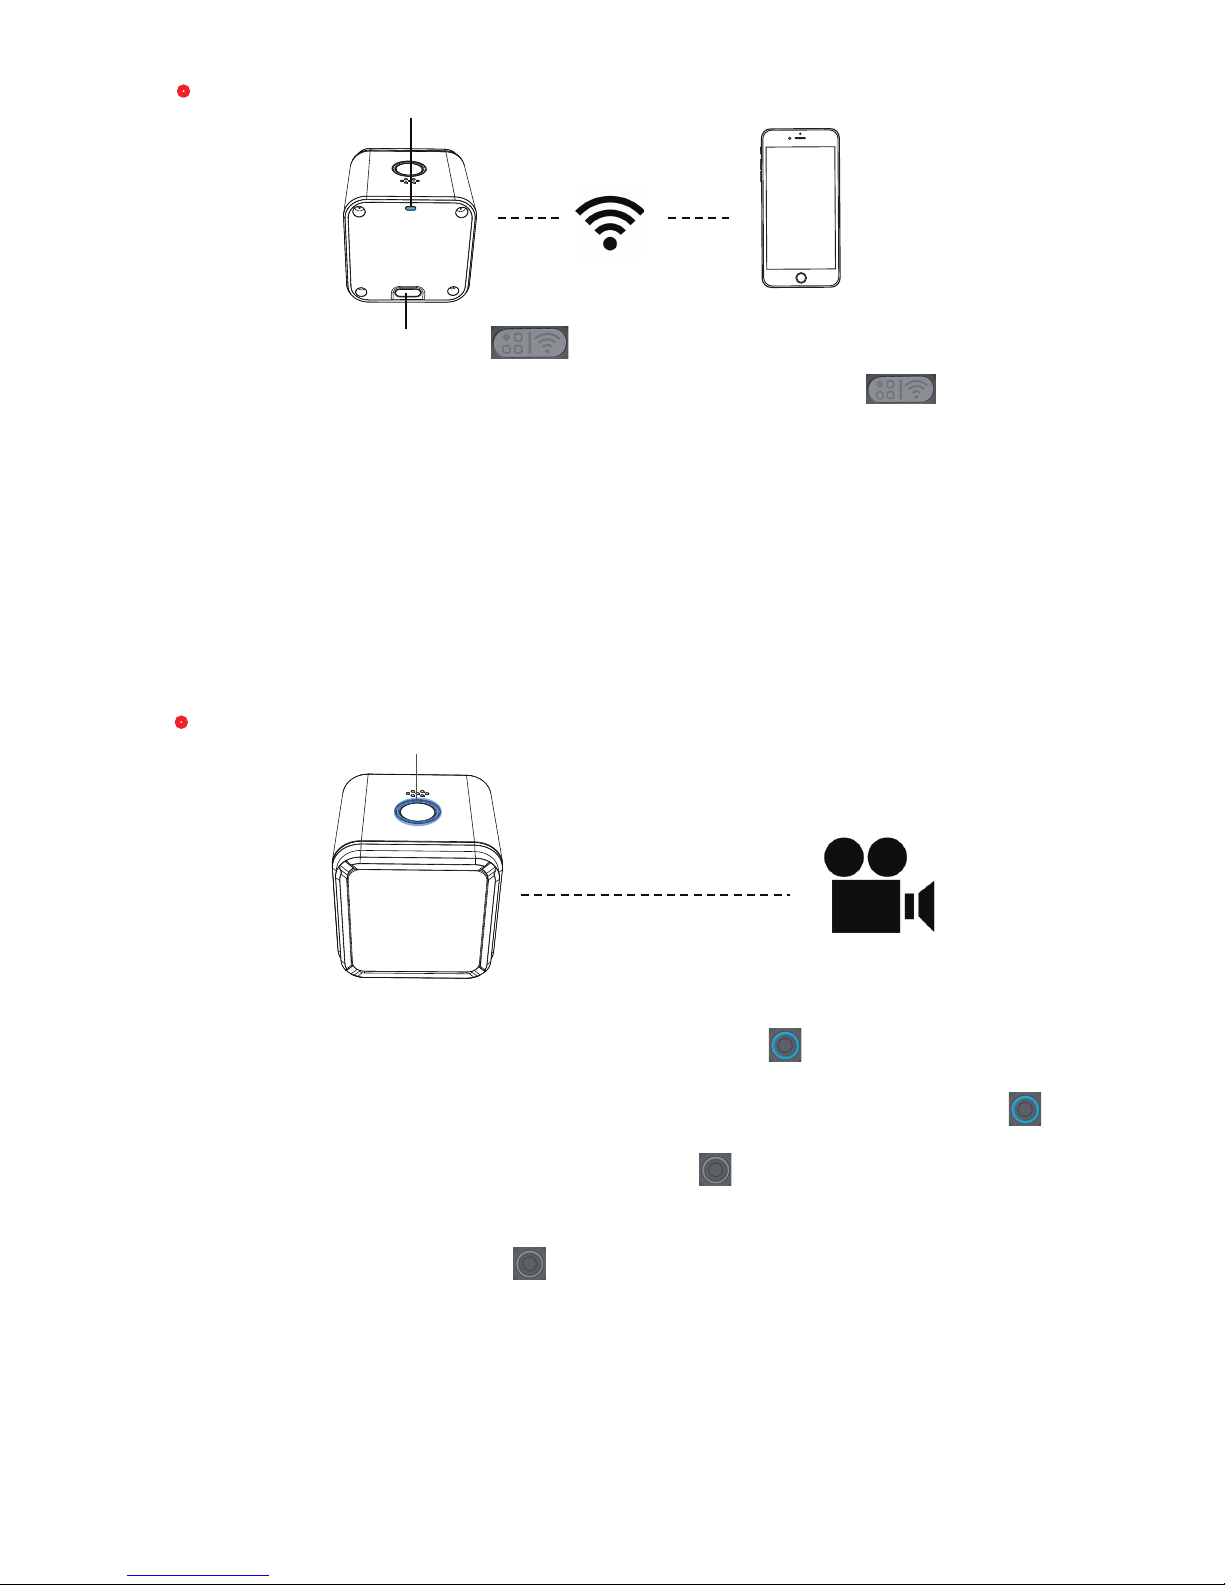
1. After powering on, press the WiFi/Mode Switch button, the WiFi
status lights (blue) blink when the WiFi is on and ready to connect.
2. In the wireless network of your smart phone, find the SSID connection of
the RunCam 3 and enter the password. After the successful connection, the
WiFi status lights (blue) will be constantly on.
Default SSID: RunCam3 _ ***** (* for letters or numbers)
Default WiFi password: 1234567890
App download: www.runcam.com
App function see table 1 : XXXXXXX
· APP
· Video
WiFi/Mode Switch Button
WiFi Status Light: Blue
The camera will power on in Video mode (1080p@60fps)as the default mode.
With the card inserted, the camera status lights (blue) are constantly
on when the camera is in standby mode.
If the memory card is abnormal or missing, the camera status lights (blue)
blink.
Normal Video:Press the Power/Shutter button , the camera starts
recording, beeps once. The camera status lights blink every two seconds
while recording.
Press the Power/Shutter button , the camera stops recording, beeps
twice, the camera status lights (blue) are constantly on.
Time-lapse Video:When the camera starts time-lapse recording, it beeps
twice and the camera status lights blink every three seconds while recording.
Video Features:In the App and OSD you can set resolution, brightness, white
balance and more advanced parameters.
Normal Video:1080p@60fps, 1080p@30fps, 720p@120fps,720p@60fps
and other resolutions are supported.
Time-lapse Video:You can set the interval and duration of time-lapse in the App.
Video mode (blue)

Capturing Photos:After powering on, long press the WiFi/Mode Switch
button until the camera status lights become green, it's in
the Photo Mode, you can press the Power/Shutter button to capture photos.
· OSD Settings(TV-OUT)
· Photos
Photo Mode (green)
WiFi/Mode Switch Button
OSD Setup Mode (orange)
WiFi/Mode Switch Button
Single Photos: It beeps once, green lights blink once.
Self Timer Photo: The beeps speed up, green lights blink once.
Time-lapse Photos: When the camera captures time-lapse photos, it beeps
twice and the camera status lights (green) blink every two seconds.
Burst photos: It beeps five times, green lights blink five times.
Photos Features:
Single Photos: Captured at 2MP resolution.
Time-lapse Photos: It captures a series of photos at specified intervals.
Burst photos: It captures up to 10 photos in 1 second
Loop recording:The recorded video file will be divided into multiple segments
(the length can be set to 1/3/5 minutes) to be written to the memory card.
The camera continues to record at the beginning when the card is full, erasing
the previously recorded material and replacing it with the new content.
When the loop recording is turned off, the recorded video will be divided
into multiple files with maximum 4GB capacity per file.
Auto Recording:The camera automatically begins recording video after
powering on.
TV-out and power cable
Servo to RCA adapter cable

Forced shutdown:
Press simultaneously the Power/Shutter button and
WiFi/Mode Switch button , the camera will be forced shutdown.
Reset:
In standby mode, quick press the Power/Shutter button three times,
the camera status lights (orange) blink twice, it completes the resettings
and the camera automatically shuts down.
After powering on, long press the WiFi/Mode Switch button
until the camera status lights become orange , it's in the OSD setup mode.
In the OSD setup mode, use the provided "USB Video Power Cable" to connect
the camera to a monitor and make settings on the screen.
OSD function see: (download link)
To get the latest features and best performance from your
RunCam 3, make sure you are using the most current
camera software. You can update your camera software with the
RunCam App or at http://www.runcam.com/download/runcam3/.
·Firmware upgrade
Ensure that the RunCam 3 battery is more than 50% before the upgrade.
Method 1 (recommended): Upgrade the firmware through App.
Method 2: Manually copy the firmware file onto the microSD card. Follow
the instruction on http://runcam.com/download/runcam3/
Firmware Upgrade Status (orange lights blink)
White balance, brightness and other advanced parameters: XXXXX
For support, please visit
Http://support.runcam.com/hc/en-us

FCC Statement
This equipment has been tested and found to comply with the limits for a
Class B digital device, pursuant to part 15 of the FCC rules. These limits
are designed to provide reasonable protection against harmful interference
in a residential installation. This equipment generates, uses and can radiate
radio frequency energy and, if not installed and used in accordance with
the instructions, may cause harmful interference to radio
communications. However, there is no guarantee that interference will not
occur in a particular installation. If this equipment does cause harmful
interference to radio or television reception, which can be determined by
turning the equipment off and on, the user is encouraged to try to correct
the interference by one or more of the following measures:
‐Reorient or relocate the receiving antenna.
‐Increase the separation between the equipment and receiver.
‐Connect the equipment into an outlet on a circuit different from that to
which the receiver is connected.
‐Consult the dealer or an experienced radio/TV technician for help.
To assure continued compliance, any changes or modifications not
expressly approved by the party.
Responsible for compliance could void the user’s authority to operate
this equipment. (Example‐ use only shielded interface cables when
connecting to computer or peripheral devices).
This equipment complies with Part 15 of the FCC Rules. Operation is
subject to
the following two conditions:
(1) This device may not cause harmful interference, and
(2) This device must accept any interference received, including
interference that may cause undesired operation.
RF warning statement:
The device has been evaluated to meet general RF exposure requirement.
The device can be used in portable exposure condition without restriction.
Other manuals for RunCam 3
1
Table of contents
Other RunCam Security Camera manuals


