Russell Hobbs RHGS01 Installation guide

INSTRUCTIONS AND WARRANTY
MODEL NO. RHGS01
RUSSELL HOBBS GROOMING SET
WITH AN ALUMINIUM TRAVEL CASE.

KEY DIAGRAM.
1Release buttons - to change heads
2On/Off switch
3Charge light Charging connection
4Charging Base/Connection

USI

INSTRUCTIONS FOR USE
Please read and retain these instructions before operating for future reference.
1Remove all packaging and keep safe until satisfied with your product.
2Charge the clipper as described below.
3Before initial use, oil blades by adding 3 drops of oil. Ceramic blades ensure
longer use of the blades.
CHARGING THE CLIPPER
1Ensure the on/off switch is off by pushing the switch downwards.
2Insert the charger lead into the charge connection at the bottom of the hair
clipper. Alternatively insert into the stand and place the clipper firmly into the charge
connection on the stand.
3Plug the AC/DC charger adaptor into a suitable mains supply and switch on.
The charge light on the clipper will illuminate.
4Never leave the charge plugged in when not in use. Future charging should
take approximately 12 hours. After the initial charging, do not leave charging for
more than 12 hours.
Good practice is to recharge the unit occasionally, not daily.
CHARGING THE CLIPPER – continued…
Do not charge for longer than the recommended time. Over charging will reduce the
working life of the rechargeable battery. Occasionally let the battery run down
completely before recharging to maintain it’s life period.
MAINS OPERATION
When the batteries are run down it is possible to use this appliance from the mains via
the charge adaptor. Never use the charge adaptor in the bathroom or near any source
of water. Insert the charger lead into the bottom of the clipper. Allow 5 minutes
before continuing to use.
USING THE HAIR TRIMMER
1Place a towel around the neck and shoulders of the person having the haircut.
2Seat the person so their head is approximately at your eye level. This allows
ease of visibility while cutting and a relaxed hold on the unit.
3Before cutting, comb the hair so it is tangle free and brushed in the direction
of growth.
4Attach the hair trimmer (head number 1), by clicking it into place. Always
ensure the clipper is switched off when changing heads and attachments.

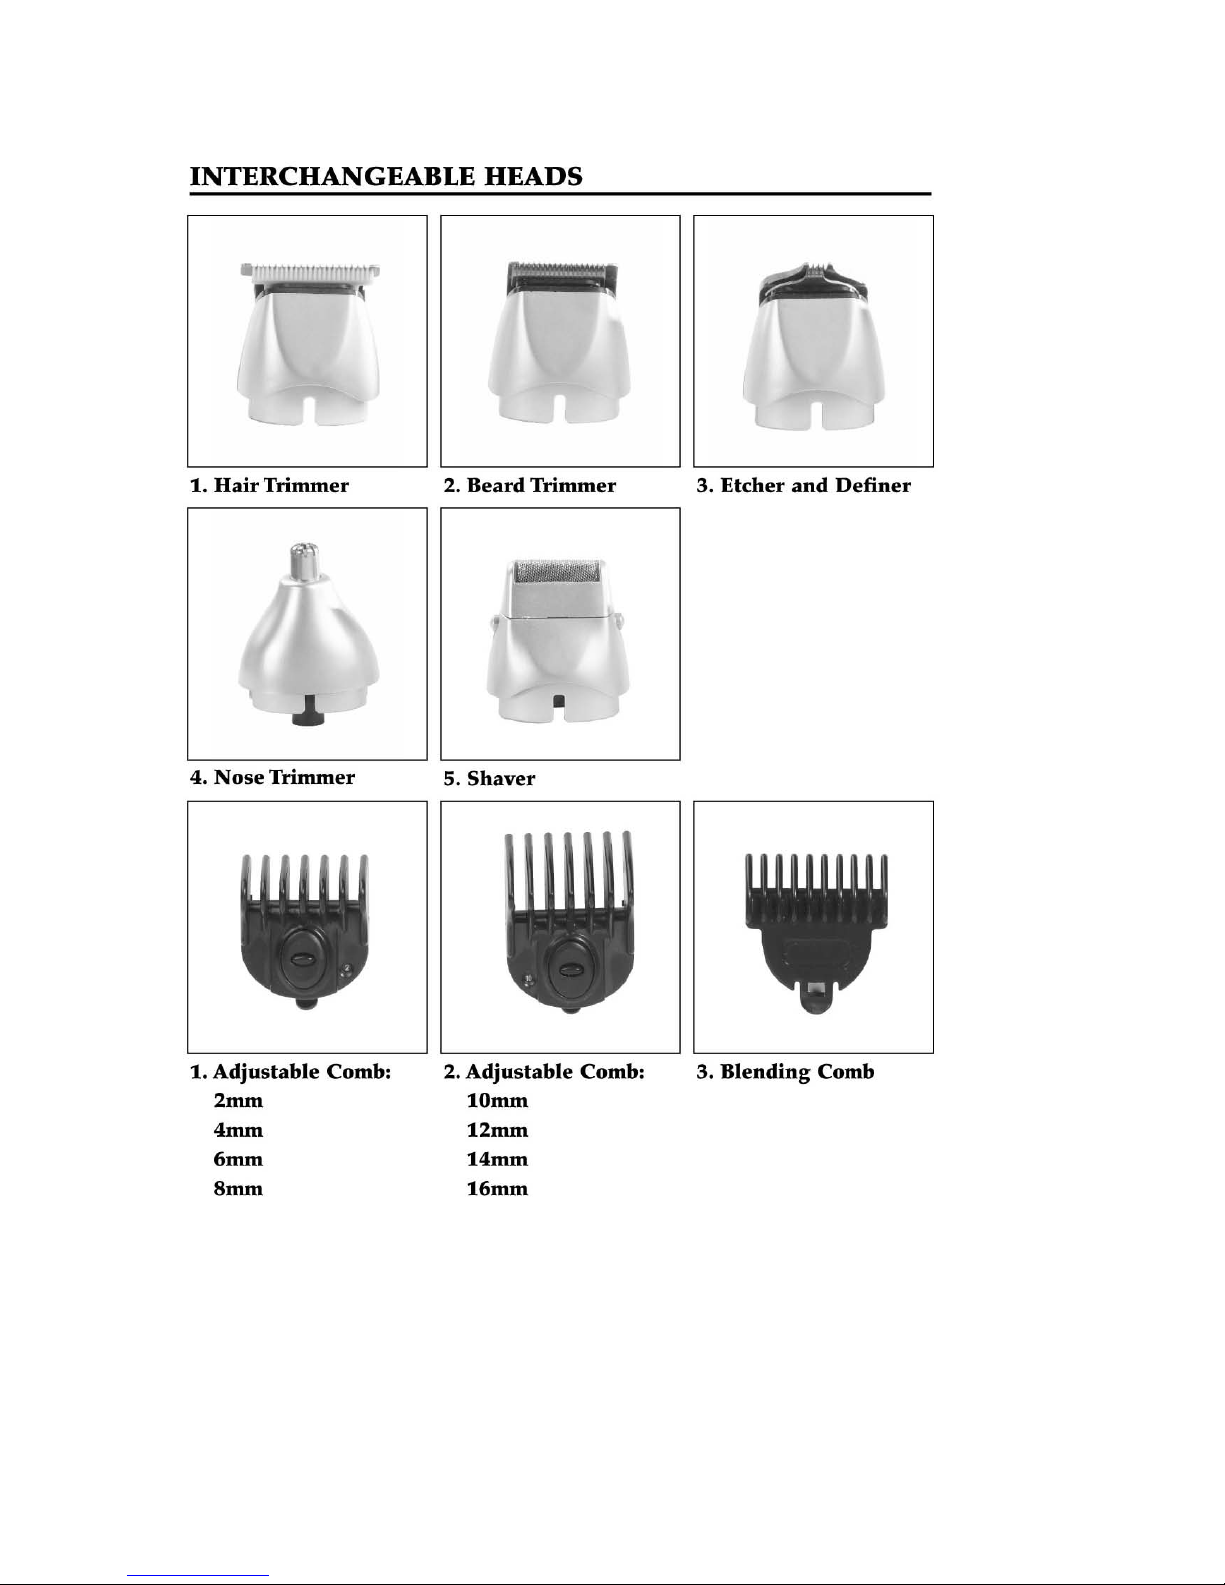
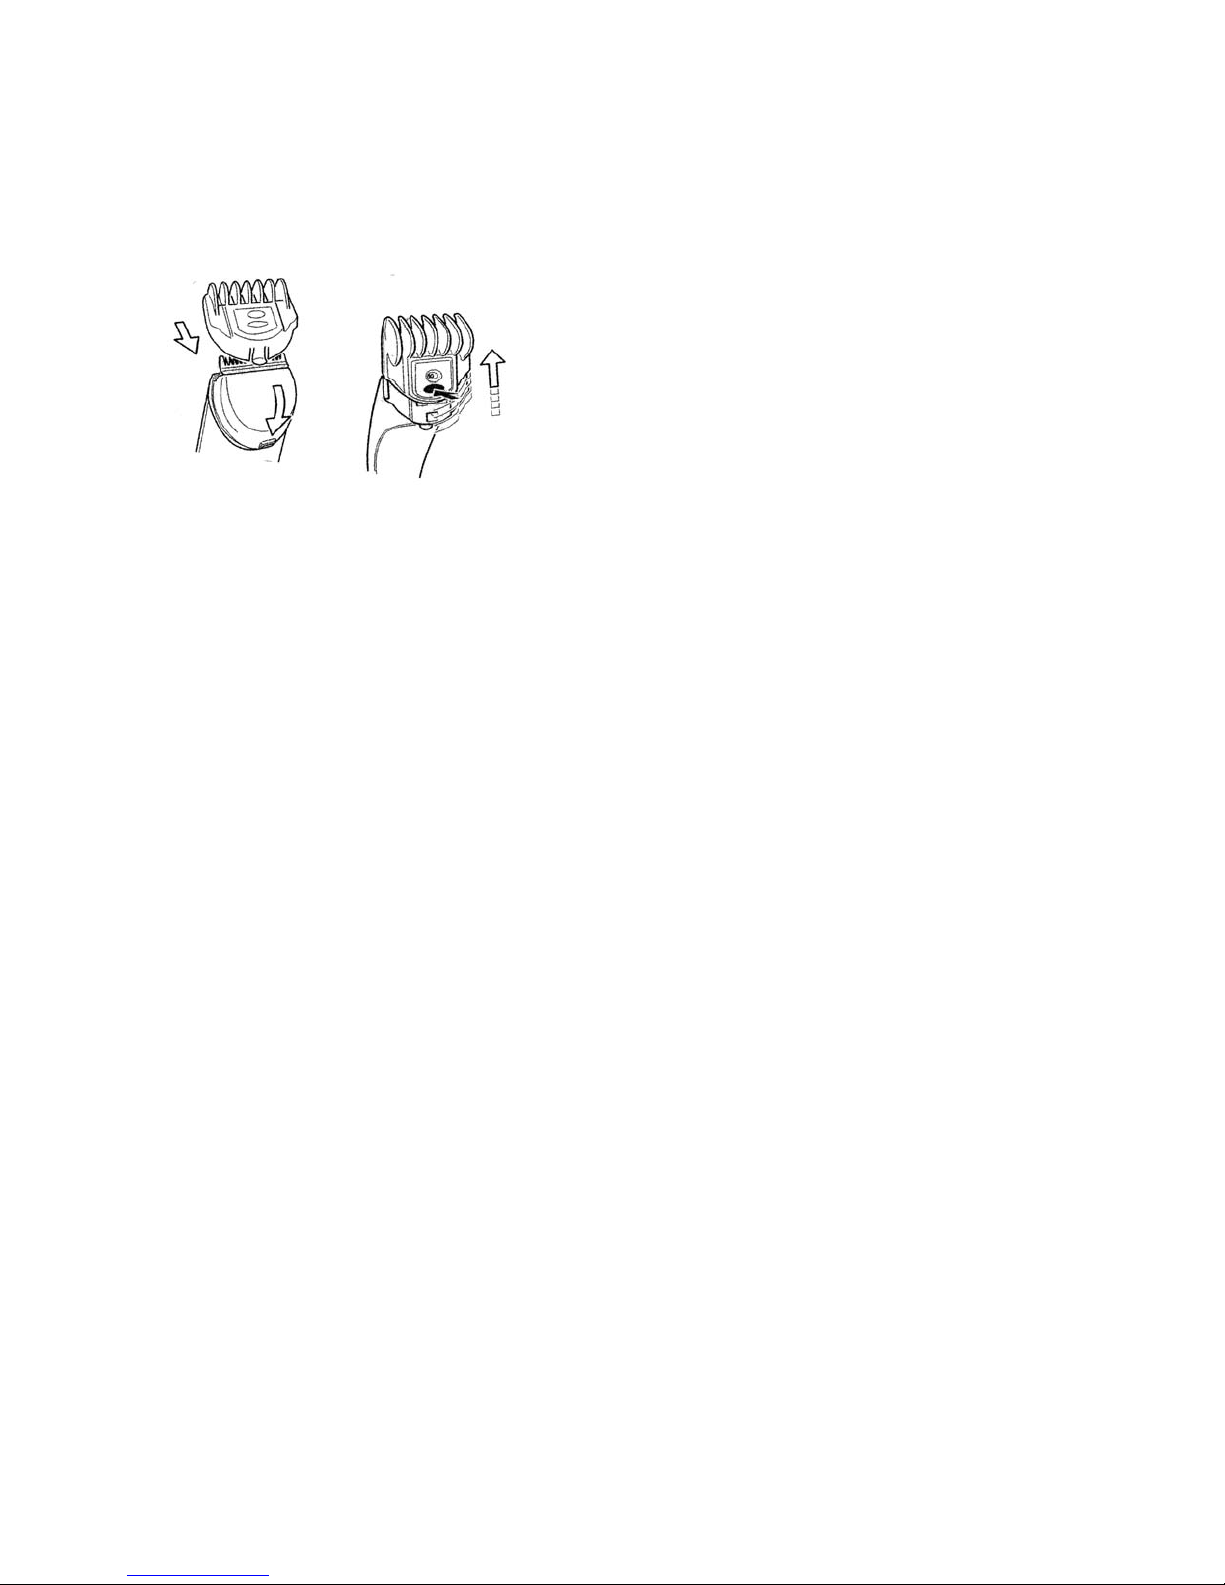
5. If desired, select an adjustable comb (attachments 1 and 2). The adjustable cutting
combs can have the cutting length adjusted by sliding out the bottom of the adjustable
comb. The cutting lengths are 2mm, 4mm, 6mm, 8mm
(attachment 1) and 10mm, 12mm, 14mm and 16mm (attachment 2),
depending on which adjustable comb is selected. The length selected is shown in the
circle.
6. Make sure head 1 is attached to the clipper, and clip on the adjustable comb, once
the
desired length has been selected.
Switch on by pushing the on/off switch upwards.
7. For even cutting allow the comb to cut its way through the hair. Do not force it
through quickly. Always remember to comb the hair frequently to remove trimmed
hair and to check for uneven strands. Switch off when not in use by pushing the on/off
switch downwards.
8. Attachment 3 can also be used for blending.
USING THE BEARD TRIMMER
1. To trim facial hair, attach head number 2. If desired, use attachments 1, 2 or 3
as well. The interchangeable heads can be changed by pushing the release
buttons on each side of the clipper.
USING THE ETCHER AND DEFINER
2. For etching and defining attach head number 3. This head can be used for
facial hair and head hair.
3.
USING THE NASAL TRIMMER
4. For nasal trimming attach head number 4. Lightly press the nasal trimmer
against the wall inside the nose.
5.
USING THE SHAVER
4. For shaving facial hair attach head number 5. Gently press the foil shaver head
against the chin to remove hair. If the clipper becomes blocked by excess hair while
cutting, switch the clipper off. If operating from the mains, unplug. Remove the
adjustable comb and lightly brush hair from the clipper using the cleaning brush
provided. Alternatively take off the shaver head from the clipper unit, and wash the
shaver head ONLY under running tap water . Then dry and re-attach to the clipper for
further use. If the blades are moving slowly or do not move they may be dirty or
clogged. Please refer to the Cleaning and Maintenance section.
How to use the attachment combs
There are 3 attachments provided
- Cutting comb with 2,4,6,8mm cutting length for hair trimmer and beard
trimmer
- Styling comb with 10,12,14,16mm cutting comb for hair trimmer only

- Blending comb with cutting length of 2mm for hair and beard trimmer
- To attach the attachment combs to the trimmer, simply slide the comb over
the trimmer head with the teeth to the front of the trimmer head. Then press
the comb toward the trimmer to click in place. See below figure.
For selecting the cutting length, press the Centre knob of comb and then push up and
down for the desired length. Release the centre knob, the comb is locked to the
desired length.
GUIDE TO CLIPPING
•Hold the clipper with a relaxed, comfortable grip.
•Cut the hair in a relaxed and slow manner. Use short strokes, working
gradually over the entire head.
•Always take off a little hair at a time, you can always trim additional hair later.
•Frequently comb the hair.
•Whilst cutting, hair may collect on top of the cutting comb. Frequently shake
excess hair from the clipper, in order to maintain the speed of the motor.
CLEANING AND MAINTENANCE
1Switch the clipper off, ensure it is unplugged from the mains and charger.
2Remove hair clippings from the interchangeable heads and/or attachments
using the brush provided.
3Wipe over the casing and attachments using a damp cloth. Only the
attachments can be rinsed under running water. But do not immerse the unit in water
or any other liquid.
4Ensure all parts are dried thoroughly with a soft towel.
5Do not use harsh abrasives or cleaners.
6Hair clippings should be cleaned from the clipper after every use.
Warning: Keep the Appliance Dry.
CLEANING AND MAINTENANCE continued
6. To ensure this product continues to give excellent performance and remains in
pristine condition, it is recommended that the hair trimmer ceramic blades
(head number 1) are oiled every 6 months, or before storing for long periods. 3
drops of oil should be added to the beard trimmer and etching and defining
blades (head numbers 2 and 3) before every use.

STORAGE
•Ensure the clipper is completely dry, switched off and unplugged from the
mains before storage.
•Store in original box in a cool, dry place.
•Store in a safe place, away from children.
•Please read these instructions before operating this appliance and retain for future
use.
FOR DOMESTIC USE ONLY
SAFETY PRECAUTIONS
•This unit must only be used in a bathroom or shower as a battery operated
(rechargeable) unit.
•Never use the mains AC/DC adaptor in a bathroom, shower or near a water
source.
•Do not fully immerse the clipper body in water or any other liquid.
•This appliance is not intended for use by persons (including children) With
reduced physical, sensory or mental capabilities, or lack of experience and
knowledge, unless they have been given supervision or instruction concerning
use of the appliance by a person responsible for their safety.
•Children should be supervised to ensure that they do not play with the
appliance.
ALWAYS
•always unplug the clipper from the mains AC/DC adaptor before using the
clipper in a bathroom or shower.
•always ensure hands are dry and hair is free from excess water before handling
the mains AC/DC adaptor plug.
•always return the appliance as stated in the After sales service after a
malfunction or if the mains AC/DC adaptor has been damaged in any manner.
•always unplug the appliance from the power supply after recharging, and
when setting down.
•always unplug the mains AC/DC adaptor and ensure the operating switch is in
the off position prior to fitting or removing attachments and before cleaning.
•always keep out of reach of children.
•always clean before storing away.
•always recycle used rechargeable batteries or dispose of safely.
IMPORTANT SAFE GUARDS continued
NEVER...
•never use the mains AC/DC adaptor plug in a bathroom, shower or near any
source of water/liquid.
•never immerse the mains AC/DC adaptor in water or any liquid to protect
against electrical hazards.
•never use for any other purpose than those described in the instructions.
•never carry or suspend the appliance by the power lead.

•never wrap the power lead around the appliance. Avoid twisting or kinking it.
•never use after a malfunction or if damage to the mains AC/DC adaptor has
occurred.
•never use if the blades are damaged, they may cause injury.
•never use any adaptor/charger or attachments other than those supplied with
the product.
•never fully immerse the clipper body in water.
IMPORTANT SAFE GUARDS DISPOSAL OF RECHARGEABLE BATTERIES
Rechargeable batteries are better for the environment than conventional batteries due
to their long lifetime, but only if they are disposed of correctly. Do not dispose with
normal household waste, but place in the specially designated waste containers
provided by local councils. The Rechargeable battery must be removed from the
appliances before it is scrapped For removing the Ni-Cd battery, run the unit until the
battery is empty. The appliances must be disconnected from the supply mains when
removing the battery. Pull out the trimming head. Use and pointed head screw driver
to take out all the screw sucker. Unscrew all the screw. Hit the unit onto the floor to
open the housing. Cut all soldering around the battery. Now you can take out the
battery for disposal The battery must be disposed of safely.

PLEASE AFFIX YOUR PROOF OF PURCHASE/RECEIPT HERE
IN THE EVENT OF A CLAIM UNDER WARRANTY THIS RECEIPT MUST BE PRODUCED.
W A R R A N T Y
1. Tedelex Trading (Pty) Limited (“Tedelex”) warrants to the original purchaser of this product
(“the customer”) that this product will be free of defects in quality and workmanship which
under normal personal, family or household use and purpose may manifest within a period of
1 (one) year from the date of purchase (“warranty period”).
2. Where the customer has purchased a product and it breaks, is defective or does not work
properly for the intended purpose, the customer must notify the supplier from whom the
customer bought the product (“the supplier”) thereof within the warranty period. Any claim in
terms of this warranty must be supported by a proof of purchase. If proof of purchase is not
available, then repair, and/or service charges may be payable by the customer to the
supplier.
3. The faulty product must be taken to the supplier's service centre to exercise the warranty.
4. The supplier will refund, repair or exchange the product in terms of this warranty subject to
legislative requirements. This warranty shall be valid only where the customer has not broken
the product himself, or used the product for something that it is not supposed to be used for.
The warranty does not include and will not be construed to cover products damaged as a
result of disaster, misuse, tamper, abuse or any unauthorised modification or repair of the
product.
5. This warranty will extend only to the product provided at the date of the purchase and not to
any expendables attached or installed by the customer.
6. If the customer requests that the supplier repairs the product and the product breaks or fails
to work properly within 3 (three) months of the repair and not as a result of misuse, tampering
or modification by or on behalf of the customer, then the supplier may replace the product or
pay a refund to the customer.
7. The customer may be responsible for certain costs where products returned are not in the
original packaging, or if the packaging is damaged. This will be deducted from any refund
paid to the customer.
TEDELEX TRADING (PTY) LTD (JOHANNESBURG)
JOHANNESBURG TEL NO. (011) 490-9600
CAPE TOWN TEL NO. (021) 535-0600
DURBAN TEL NO. (031) 792-6000
www.amap.co.za
Other manuals for RHGS01
1
Table of contents
Other Russell Hobbs Electric Shaver manuals