8921-37S: 1 of 1; 06/02
NÚMERO
DE MODELO
El Soporte ajustable para el Orador
NUMÉRO
DE MODÈLE
8921
Support ajustable pour l’Orateur
INSTRUCTIONS DE MONTAGE
Safco Products Company, New Hope, MN 55428
Si tiene preguntas o inquietudes, por favor llame a
Safco Consumer Hot Line al 1-800-664-0042.
Disponible de lunes a viernes de 8:00 a.m. a 4:30 p.m.
(hora del centro)
(las operadoras hablan inglés)
INSTRUCCIONES DE ENSAMBLAJE
Insérer le Poteau Inférieur A dans la Base B et attacher avec le Boulon
C (complètement enfilé) du dessous de la Base.
Insérer le Poteau Supérieur D dans le Poteau Inférieur, aligner les trous
dans un poteau avec les trous dans l’autre poteau à une hauteur
appropriée, et attacher avec deux Boutons avec les longues tiges E .
UTILISER DEUX TROUS
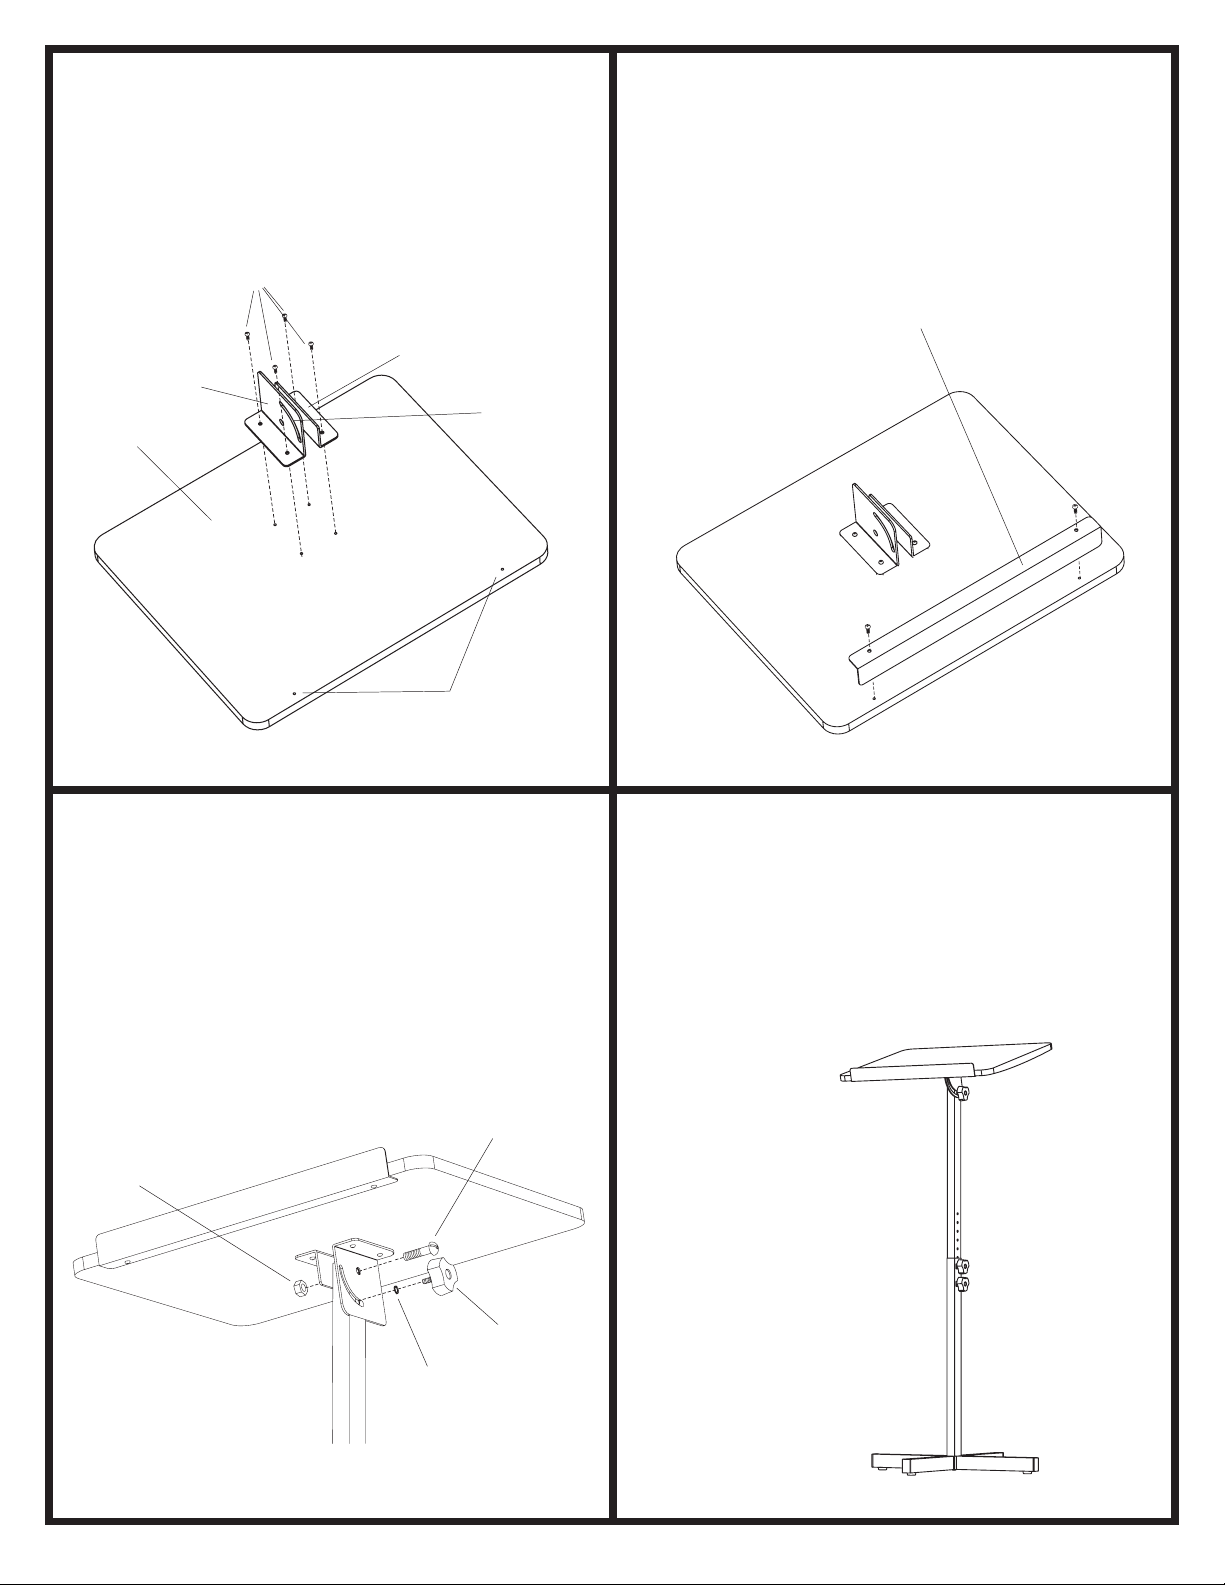
Attacher la plaque de montage pour Ajustement F et la plaque
d’ancrage G à la Plateforme Supérieure H , utiliser quatre Petits Vis
I . Faire certain que la fente de la plaque de montage pour Ajustement
fait face aux deux petits trous le long du bord de devant de la Plateforme
Supérieure.
LA FENTE LES PETITS TROUS
Attacher le Plateau pour les Crayons J à la Plateforme Supérieure,
utiliser les deux restant Petits Vis.
Aligner le trou dans la plaque de montage pour Ajustement avec le trou
supérieur dans le Poteau Supérieur; alors insérer le Boulon du Pivot K à
travers les trous. Attacher avec l’Écrou L , mais ne serre pas trop (la
Plateforme Supérieure doit être capable d'incliner librement).
Mettre la Rondelle de l’Étoile M sur la tige du Bouton avec Courte Tige
N , et visser le Bouton à travers la fente dans la plaque de montage pour
Ajustement et dans le trou dans le Poteau Supérieur.
Niveler l’unité qui utilise les niveleurs sur la Base.
Ajuster la hauteur en enlever les deux Boutons, aligner les Poteaux à la
hauteur désirée, et réinsérant les Boutons.
Défaire l’en dessus Bouton, ajuster l’angle de la Plateforme Supérieur, et
serrer encore.
1
Si vous avez des questions à poser ou des préoccupations à
exprimer, vous pouvez joindre la ligne téléphonique
d’assistance à la clientèle de Safco en composant
le 1-800-664-0042. La ligne est ouverte du lundi au vendredi,
entre 8 h et 16 h 30 (heure du Centre).
(Les standardistes sont d’expression anglaise.)
8921
LES OUTILS NÉCESSAIRES:
tournevis à pointe cruciforme, Tournevis Plat,
Prière de préciser la couleur lorsqu’on
commande des pièces de rechange.
LAS HERRAMIENTAS NECESARIAS:
Destornillador Phillips®, Destornillador Llano,
El más bajo Poste 1 8921-04
La Base 1 8921-05
El perno (totalmente fileteado) 1 8921-27
El Poste superior 1 8921-03
El bulto, el vástago largo, 2 8921-25
LaabrazaderademontajeparaelAjuste 1 8921-02
El armazón de apoyo 1 8921-09
La Plataforma superior 1 8921-01
El Tornillo pequeño 6 8921-22
La bandeja para los Lápices (y parada del papel) 1 8921-08
El Perno del pivote 1 8921-23
La tuerca 1 8921-24
La grupilla 1 8921-21
El bulto, el vástago corto, 1 8921-26
CÓDIGO
ALFA.
DESCRIPCIÓN CANT. NO. DE PIEZA
LISTA DE PIEZAS
¡Organice y cuente las piezas!
Al pedir piezas de reemplazo, por favor
especifique el color que desea.
2
3
4
5
6
Inserte el Más bajo Poste A en la Base B y ata con el Perno C
(totalmente fileteado) de la parte inferior de la Base.
Inserte el Poste Superior D en el Más bajo Poste, alinéese los agujeros
en un poste con los agujeros en el otro poste a una altura apropiada, y
ata con dos Bultos con los vástagos largos E .
USE DOS AGUJEROS
Ate la abrazadera de montaje para el Ajuste F y el armazón de apoyo
G a la Plataforma Superior H , usando cuatro Tornillos Pequeños I .
Hace cierto que la ranura de la abrazadera de montaje enfrenta los dos
huecitos a lo largo del borde delantero de la Plataforma Superior.
LA RANURA LOS HUECITOS
Ate la Bandeja para los Lápices (y parada del papel) J a la Plataforma
Superior, usando los dos Tornillos Pequeños restantes.
Alinee el agujero en la abrazadera de montaje con el agujero superior
en el Poste Superior; entonces inserte el Perno del Pivote K a través de
los agujeros. Ate con la Tuerca L , pero no se apreta demasiado (la
Plataforma Superior debe poder inclinarse libremente).
Ponga la grupilla M hacia el vástago del Bulto con el vástago corto N ,
y atornilla el Bulto a través de la ranura en la abrazadera de montaje
para el Ajuste y en el agujero en el Poste Superior.
Nivele la unidad que usa los niveladores en la Base.
Ajuste la altura quitando los dos Bultos, alineando los Postes a la altura
deseada, y reinsertando los Bultos.
Suelte el Bulto más alto, ajuste el ángulo de la Plataforma Superior, y
aprétese de nuevo.
1
2
3
4
5
6
Poteau inférieur 1 8921-04
Base 1 8921-05
Boulon(complètement enfilé) 1 8921-27
Poteau supérieur 1 8921-03
Bouton, longue tige, 2 8921-25
Plaque de montage pour Ajustement 1 8921-02
Plaque du support 1 8921-09
Plateforme supérieure 1 8921-01
Petit Vis 6 8921-22
Plateau pour le crayon 1 8921-08
Boulon du pivot 1 8921-23
Écrou 1 8921-24
Rondelle de l’étoile 1 8921-21
Bouton, courte tige, 1 8921-26
CODE
ALPHA. DESCRIPTION QTÉ. NODE PIÈCE
LISTE DES PIÈCES
Trier et compter les pièces !
A
B
C
D
E
F
G
H
I
J
K
L
M
N
Q
Q
Q
Q
Q
Q
Q
Q
Q
Q
Q
Q
Q
Q
A
B
C
D
E
F
G
H
I
J
K
L
M
N
Q
Q
Q
Q
Q
Q
Q
Q
Q
Q
Q
Q
Q
Q