www.kintech.co.uk / 01482 820333
ISS3 - 31-08-18
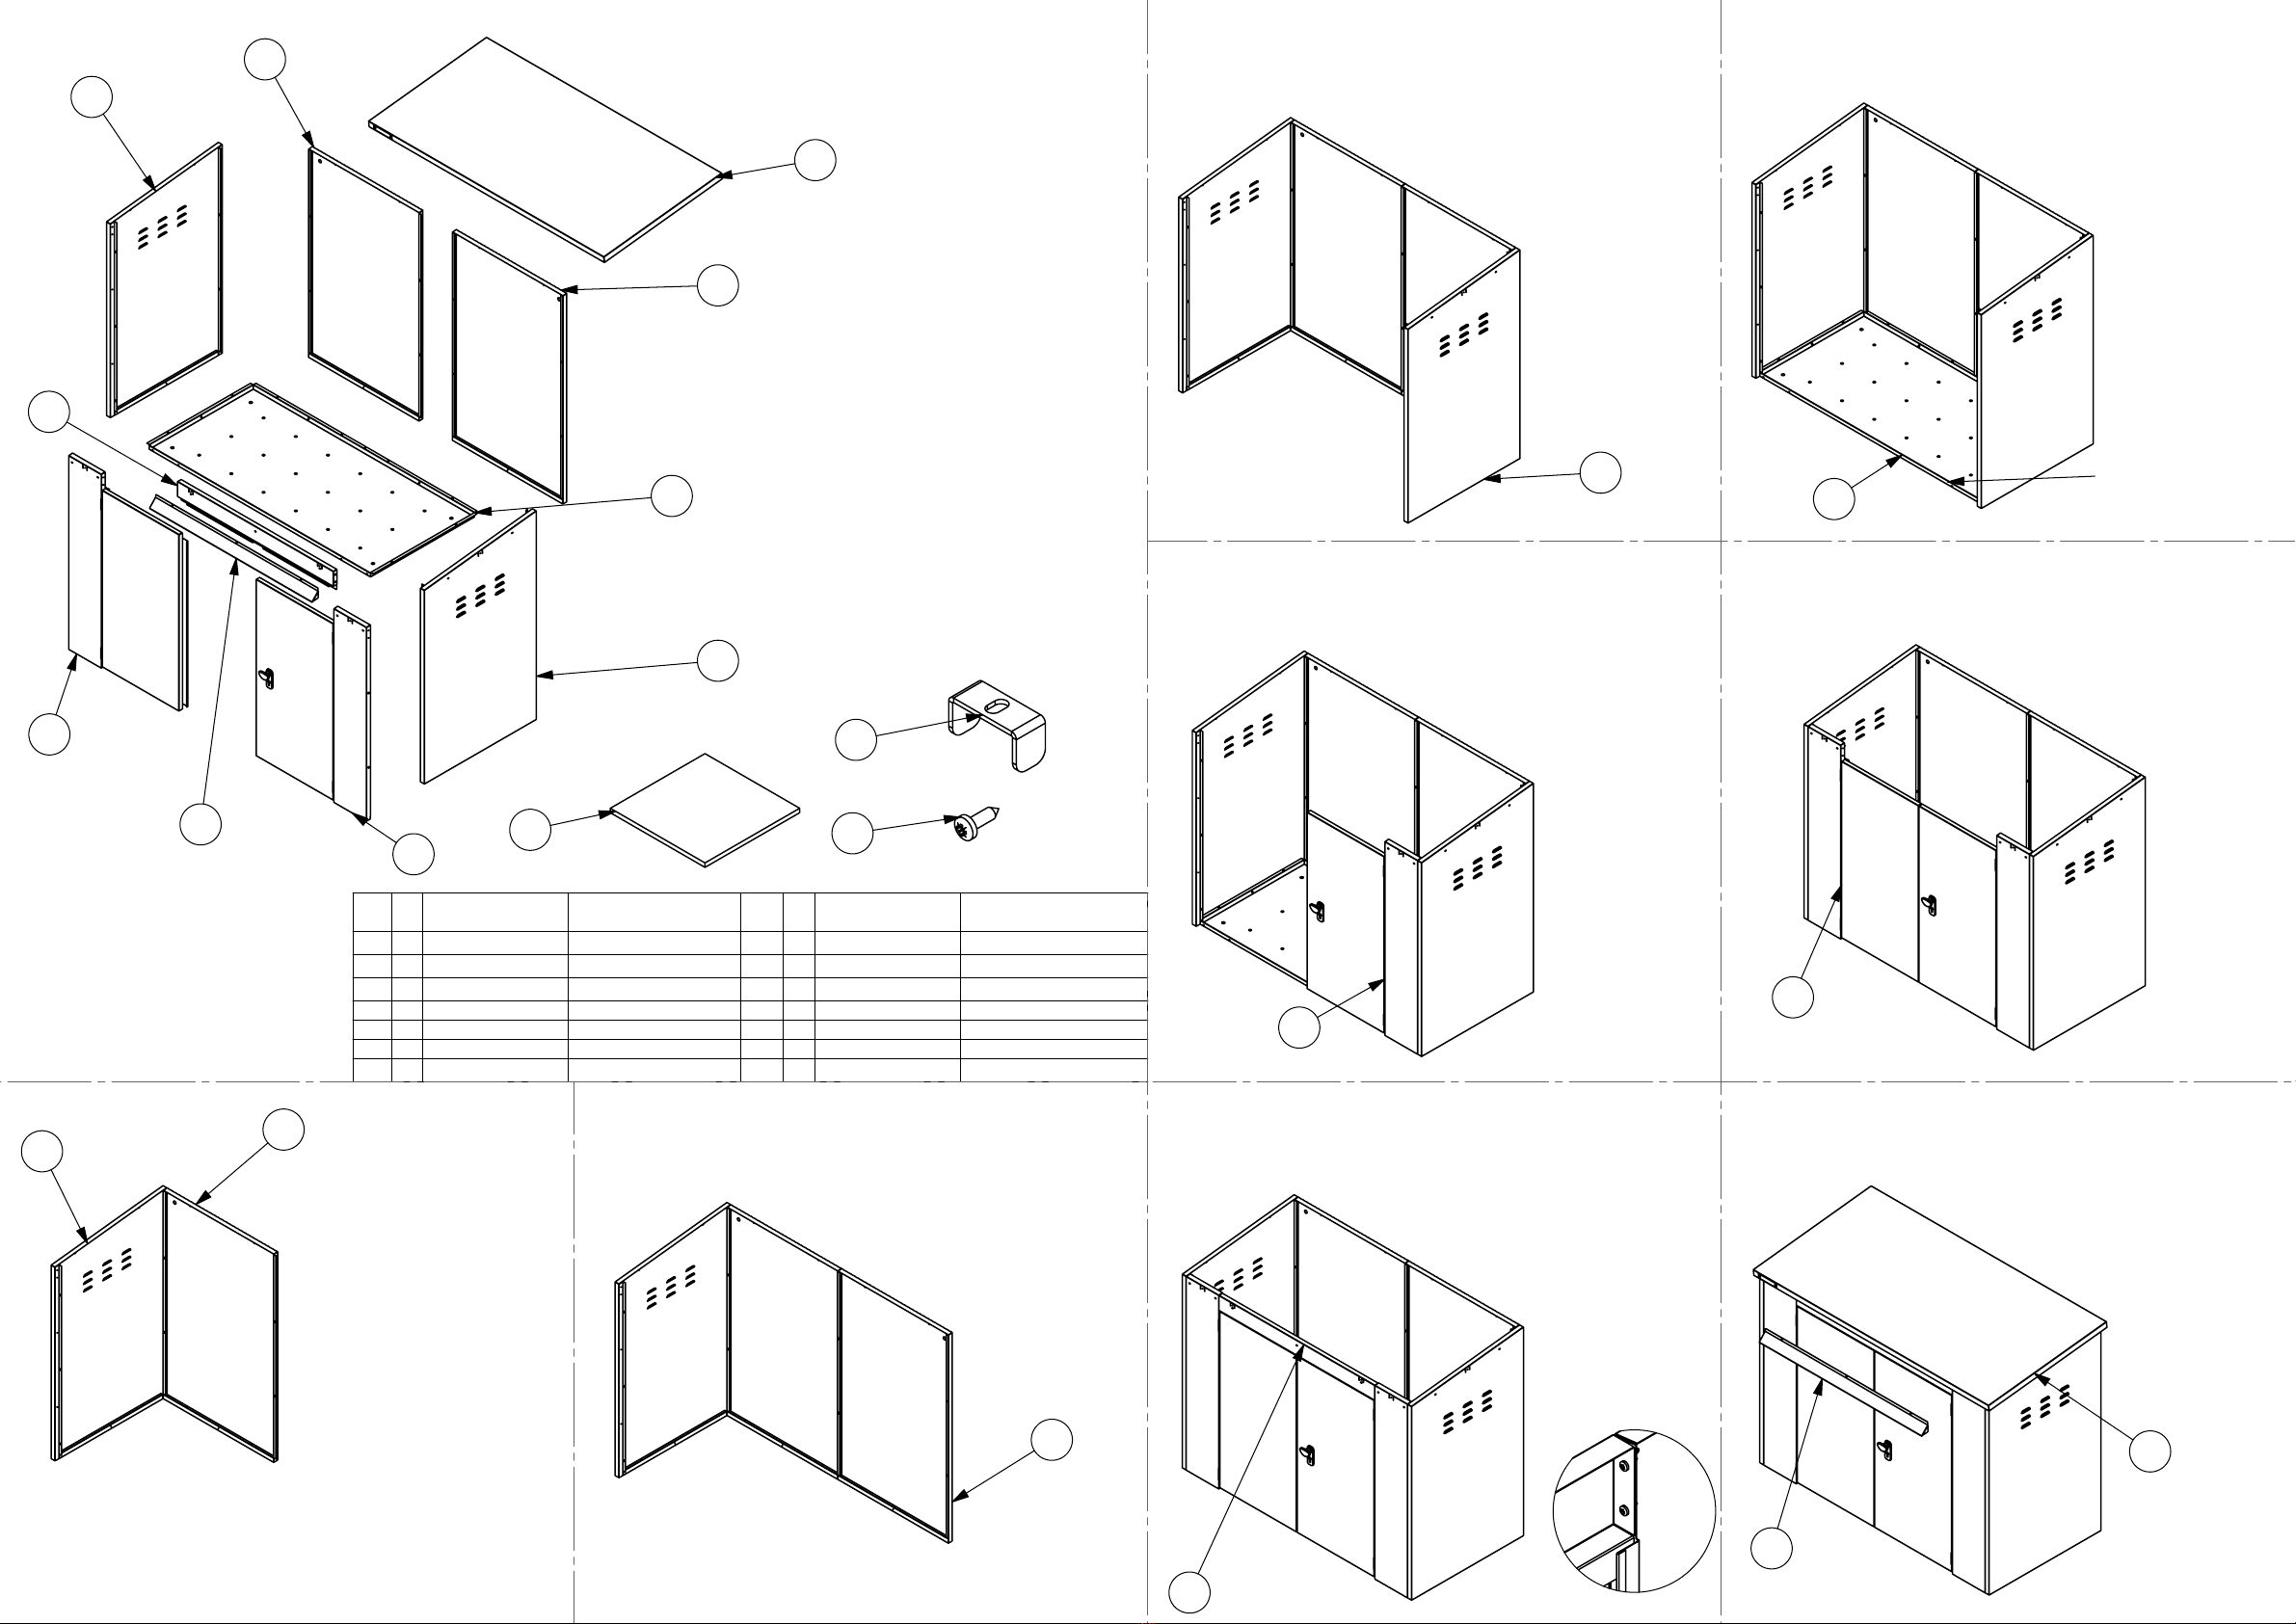
SAFESTOR SELF ASSEMBLY INSTRUCTIONS
6 x 3 STORAGE SHED
SFSC016
8 x No.12
8 x No.11
Use No.12 to fit No.11,
inside of the unit, to the
cutouts on each panel
10 x No.13
Once fully assembled
you must ensure the
unit is level using the
packing pieces.
Place under each corner
of the unit as required
until the top of the two
doors are in line
STEP 9 STEP 10
10 Year Warranty
At SafeStor we are so confident our galvanised steel sheds are built to last that we provide them with a 10 year warranty against anti-
perforation;(not including locks and hinges)
What is covered by your SafeStor Warranty?
x
This covers the repair and replacement of all Safe-stor manufactured parts, this does not include locks and hinges, damaged from
corrosion, subject to the condition the SafeStor shed has been maintained in compliance with the
maintenance instructions.
x
The units multipoint locks and Hinges are not manufactured by SafeStor but are still covered by a 12 month warranty that covers the
replacement of the multipoint locks should they fail through the use of normal wear and tear.
x
Locks that have become damaged through an attempted or successful break-in are not covered but can be replaced for a small charge.
x
The lock handles are not covered by the warranty as they are designed to sheer off in case of an attempted break in, replacements can
be purchased for a small charge.
Replacing parts of your SafeStor Shed
x
If a component of your SafeStor shed develops a fault please email us at
[email protected] with all details of the problem and any
related images and purchase order number.
x
If the failure is due to manufacturing we will supply the replacement part at no cost. If the part has failed from neglect or wear and tear
the part will be provided at a charge.
x
If necessary a SafeStor engineer can be dispatched to you to find the problem however this again will be at a cost.
SafeStor maintenance level expected to validate your warranty
x
Your SafeStor shed must be washed down regularly with soapy water. R
ecommendation is approximately four times per year, after
which all locks and hinges must be lubricated fully, dependent on the local climate such as coastal conditions this may be required to be
more often than recommended above. A pressure washer must never be used.
x
Locks and hinges must be lubricated at least once a year to ensure they are easy to use.
x
Paint damage should be treated with a rust inhibitor and immediately touched up with suitable paint, do not leave the damaged area
untreated.
x
Any ground anchors used must have been treated with rust inhibitor prior to securing the unit.
Condensation and extreme weather maintenance
x
The chance of condensation occurring in your shed has been dramatically reduced by being designed with the integrated
SafeStor
ventilation system,
however you can help reduce it even further.
x
We recommend you place your SafeStor shed in a location that allows for constant air flow around the shed rather than tight against a
wall or shed.
x
Brush any snow fall from the shed when possible. If the lock is frozen pour warm not boiling water over the lock and wipe dry. Heavy
rain may result in water ingress so be
sure to check the joints around this
area and reseal them with a silicone sealant if
necessary.
x
Your SafeStor shed and the items kept inside are not covered for any damage caused by condensation or damp, and failure to reseal in
the event of rain damage will invalidate your warranty.
x
Your shed should also not be placed in a position where it can suffer from excessive amounts of sunlight that will cause the metal shed
to become too hot. Damage to the contents caused by heat is not covered by the SafeStor warranty.
If you wish to return a purchased product please refer to our
returns policy
.
For full details please see
http://www.kintech.co.uk/warranty
ITEM
SHT No
PART NUMBER
DESCRIPTION
SIZE
LENGTH
Default/
QTY.
1
KPF0850
KPF0850 (0.8MM GALV) ISS 2 30-08-18
1814 x 890
1
2
KPF0839
KPF0839 (0.8MM GALV) ISS 1 15-03-18
1502 x 1036
1
3
KPF1079
KPF01079 (0.8MM GALV) ISS 0 15-03-18
1503 x 972
1
4
KPF0840
KPF0840 (0.8MM GALV) ISS 1 15-03-18
1503 x 966
1
5
KPF0838
KPF0838 (0.8MM GALV) ISS 1 15-03-18
1502 x 1036
1
6
SFSC016_C
FRONT INFILL ASSEM RH
1
7
SFSC016_F
FRONT INFILL ASSEM LH
1
8
KPF0847
KPF0847 (0.8MM GALV) ISS 0 16-11-16
1264 x 197
1
9
KPF0849
KPF0849 (1.2 mm GALV) ISS 1 23-08-18
1317 x 97
1
10
SFSC016_E
CARAVAN STOR ROOF ASSEM
1
11
NBW4013
SELF TAPPING SCREW No 10 4.8 X 16 POZI PANHEAD BZP
68
12
KPF0338
KPF0338 (2MM GALV) ISS 0 16-01-15
63.72 x 15
8