SAM Outillage Kap’SAM XCAP-500 Release Note

TECHNICAL HANDBOOK
Kap’SAM®
VEHICLE JUMP STARTER XCAP-500
This device is not designed to be used
by anyone (including children) whose
physical, sensory or mental capacity
is reduced, or inexperienced or unin-
formed persons unless they have had
the benet of prior monitoring or ins-
truction in the use of the device from
a person responsible for their safety.
Take care to ensure that children never
play with the device.
WARNING: There is a risk of explo-
sion if a vehicle battery is replaced
by the wrong type of battery. Dispose
of spent batteries as specied in the
instructions.
WARNING: When using on a rechar-
geable battery, there is a risk of ex-
plosive gases being emitted from that
battery. No ames or sparks.
When using the Kap’SAM®, the vehicle
battery must be placed in a suciently
well-lit place. The device is for use only
with 12 volt rechargeable batteries.
The device must be used in a tempera-
ture range of -20°C to +40°C inclusive,
and at a humidity of less than 70%.
The device is intended for indoor use
or outdoor use out of the rain.
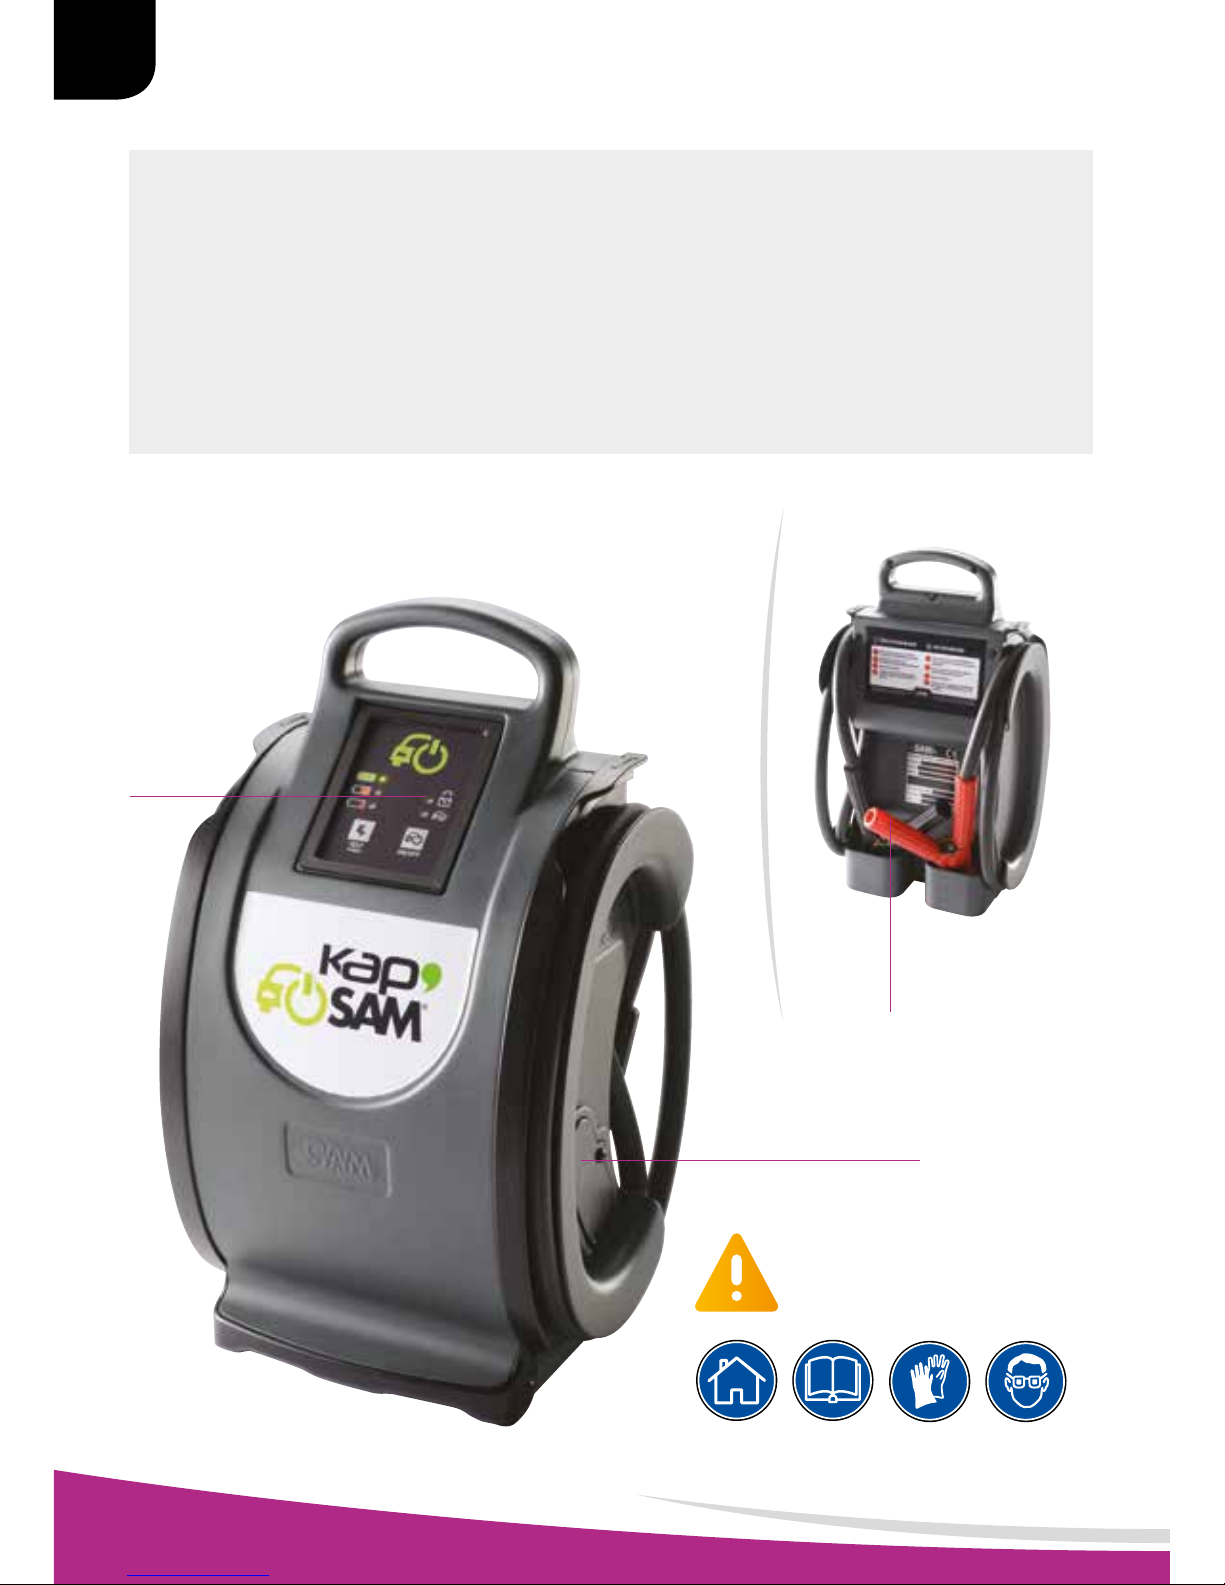
The device must be used upright with
the handle at the top, as shown in the
photo below.
The maximum operating time for the
Kap’SAM® is 30 seconds per cycle.
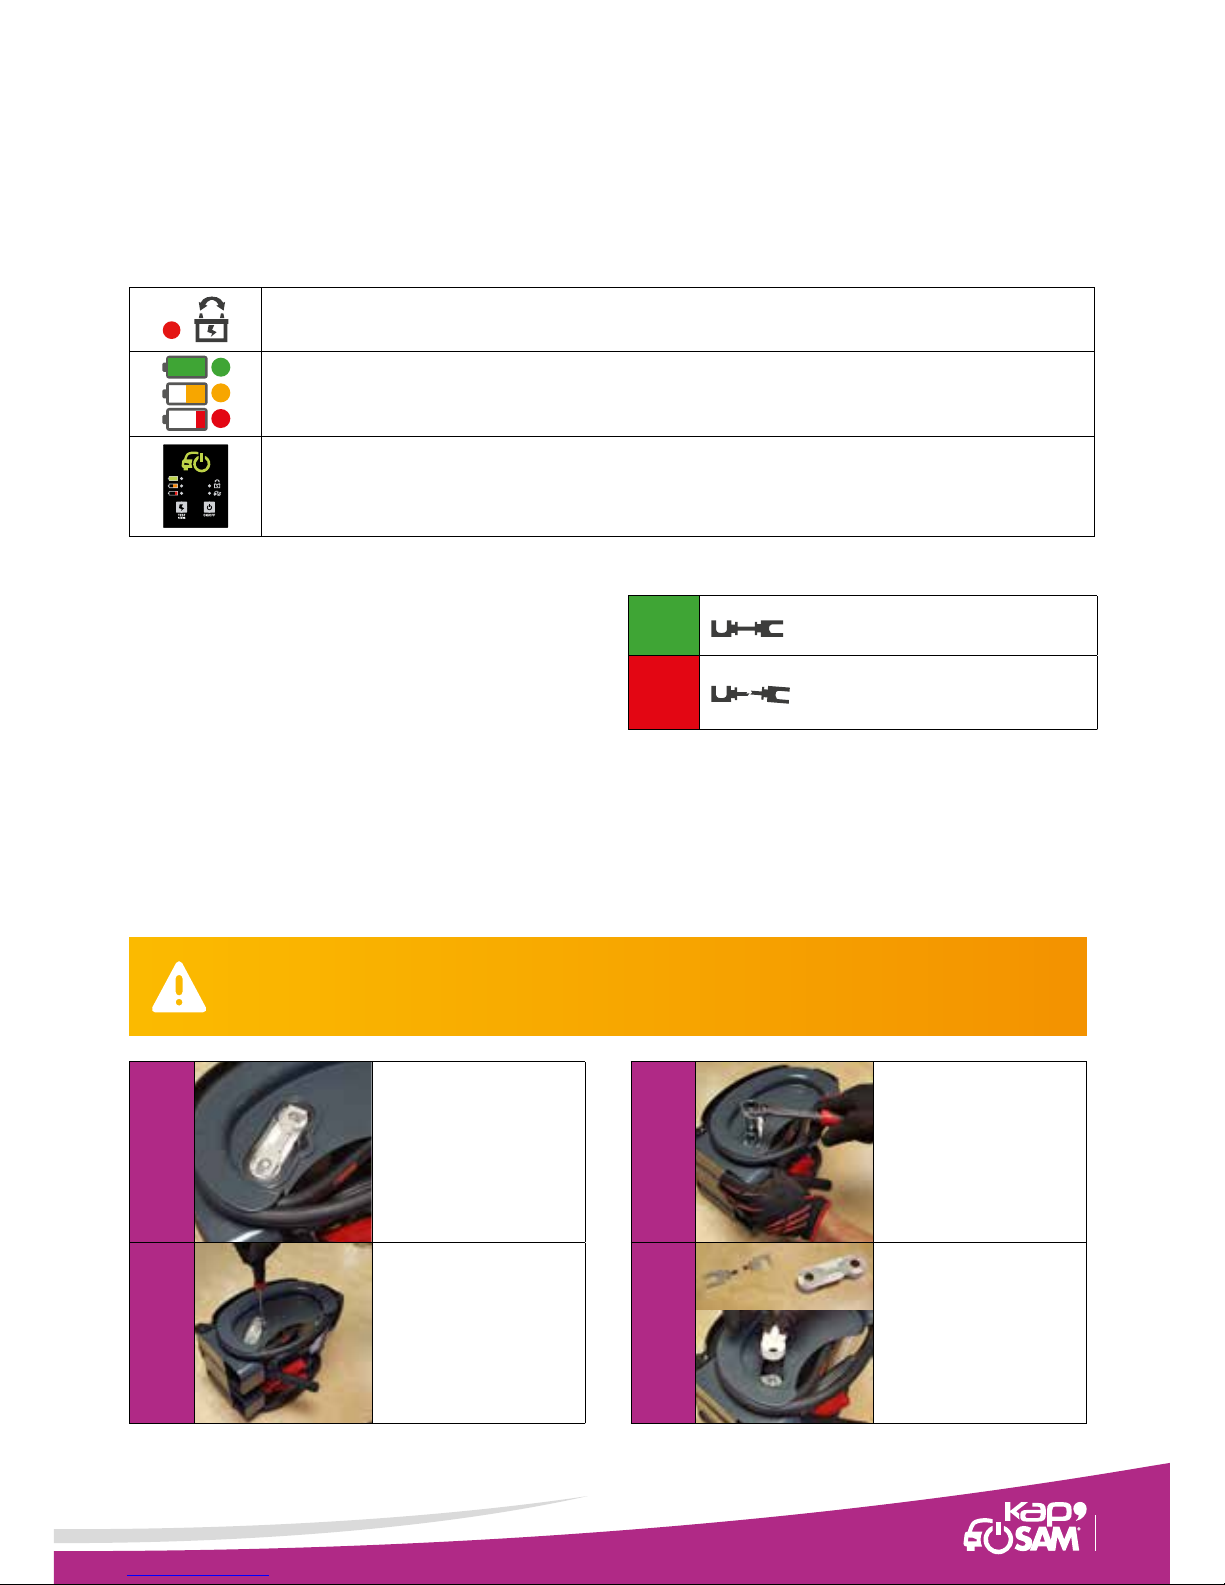
Do not open the device and do not
attempt to replace any parts, apart
from the fuse (see the procedure
for Replacing the fuse).
You have just acquired the new XCAP-500 vehicle jump starter, also known as the Kap’SAM®.
We recommend that you read this manual all the way through before using the device for the rst time.
It contains the information that will enable you to master and use the device on a day-to-day
basis very quickly and eciently. Thank you for condence.
PRECAUTIONS FOR USE
DONOTTHROWAWAYTHISDOCUMENT:
KEEPITINASAFEPLACE!ENSURETHATTHIS
DOCUMENTISREADBYTHEENDUSER!
EN
76-

Presentation of the device
Always use accessories and protection
equipment that are compatible with the
Kap’SAM®.
User
interface
Fuse compartment
Clips +
cables
TABLE OF CONTENTS
1. Description of the Kap’SAM® 9
2. Testing the Kap’SAM®’s state of charge 9
3. Starting a vehicle 9
4. Recharging the Kap’SAM® 10
5. Diagnosis and explanation of alerts displayed by the Kap’SAM® 11
6. Replacing the fuse 11
7. Warranty 12
8. Declaration of Conformity/EC 12
EN
8-

1. Description of the Kap’SAM®
2. Testing the Kap’SAM®’s state of charge
3. Starting a vehicle
Never disconnect the Kap’SAM®’s when the
start light ( ) is on. The Kap’SAM® stops
automatically after 30 seconds or can be
stopped at any time by pressing on the ON/OFF
button ( ).
The Kap’SAM® is a jump starter for vehicles with a at battery. To
avoid any malfunctions, it is indispensable to check the connection
polarities when attaching the Kap’SAM® clips to the broken down
vehicle. The device is equipped with reverse polarity protection. If
it is not connected correctly to the vehicle’s terminals, the integrated
PCB will prevent the device from starting up and it will not be
possible to start the vehicle. If the device is connected up wrongly,
a red LED comes on on the user interface.
To connect the Kap’SAM®’s clips to the vehicle, proceed as follows:
The battery terminal not connected to the chassis (usually the red
terminal) must be connected rst. The other connection (usually the
black terminal) must be made on the chassis well away from the
battery and from any fuel pipe.
After the charging operation, remove the chassis connection (black
terminal) and then the battery connection (red terminal) in the order
indicated.
Technical data
Voltage 12 Volts
Weight 8.5 kg
Cable cross section 35 mm²
Fuse 300 A
Capacitance 500 farads
STANDARD USE
1Press the Test button.
2
The charge indicator comes on temporarily and then the Kap’SAM®'s state of charge is displayed. If nothing
appears, this means the Kap’SAM® is completely discharged. In this case, see paragraph on Recharging the
Kap’SAM®.
3Green indicator: The Kap’SAM® is fully charged, so its starting capacity is optimum.
4Orange indicator: The Kap’SAM® is not completely charged, but it is still possible to start a vehicle. In this case,
you are advised to recharge the Kap’SAM® as described in the paragraph on Recharging the Kap’SAM®.
5Red indicator: the Kap’SAM® is discharged. It must be recharged. (See the paragraph on Recharging the
Kap’SAM®).
1Connect the Kap’SAM®'s clips to the broken down vehicle's battery, making sure you check the polarities.
The vehicle ignition must not be on.
2Press the ON button.
3The start light comes on.
4Start the broken down vehicle.
5
After the Kap’SAM® stops:
-Disconnect the Kap’SAM®’s clips from the vehicle
-Roll up the cables and stow the clips in the place provided.
98-

Never make an attempt to start a vehicle lasting more than 15 seconds. If the broken down vehicle does not start after 2 attempts,
the breakdown is due to something other than the battery. Look for the real cause of the breakdown before making any further
attempts to start the vehicle.
FORCED START MODE
1
The vehicle’s battery is deeply discharged. In this case, the Kap’SAM® will not detect the polarity and will there-
fore not allow the device to operate. Proceed as follows.
2Connect the Kap’SAM® clips to the broken down vehicle’s battery, making sure you check the polarities.
The vehicle ignition must not be on.
3Press on the ON button and the TEST button at the same time for 3 seconds. When you do this,
the three state of charge indicators will come on at the same time ( ).
4The start light comes on.
5Start the broken down vehicle.
6
After the Kap’SAM® stops:
• Disconnect the Kap’SAM®'s clips from the vehicle
• Roll up the cables and stow the clips in the place provided.
4. Recharging the Kap’SAM®
The Kap’SAM® recharges automatically by being connected directly to
a vehicle with a charged 12V battery. When the Kap’SAM® is used on
a broken down vehicle, it starts the vehicle and then in the next few
seconds it recharges itself automatically by drawing the energy it
needs from the vehicle’s charging circuit. If, however, your Kap’SAM®
is discharged before the intervention, it is possible to recharge it in a
few seconds by connecting the clips to any nearby vehicle with a 12V
battery with an operational engine.
1Connect the Kap’SAM® clips to the battery of vehicle that is not at making sure you check the polarities.
The vehicle ignition must not be on.
2Start the vehicle.
3Press the ON button.
4The start light comes on. Recharging takes a few seconds.
5The test indicator tells you that your Kap’SAM® is ready to go again as soon as it turns GREEN.
6
After the Kap’SAM® stops:
• Disconnect the Kap’SAM®’s clips from the vehicle
• Roll up the cables and stow the clips in the place provided.
SPECIAL CASE The vehicle’s battery is deeply discharged
+
EN
10-

During this operation, the Kap’SAM® must not be connected a vehicle or to any voltage source.
The cables and clips must be stowed in the compartment provided. During this operation you must wear safety glasses.
1
Position your Kap’SAM®
with the side facing you
as shown in the photo
opposite.
2
Unscrew the screw in the
fuse compartment cover
using a suitable Phillips®
screwdriver.
3
Unscrew the nuts fastening
the fuse holder with a 17
mm socket, starting with
the lower one on the left.
4
Replace the fuse
(reference: XCAP-FUSE)
and position it as shown
opposite using protective
gloves.
5. Diagnosis and explanation of alerts displayed
by the Kap’SAM®
6. Replacing the fuse
Indicators
Polarities reversed. Connect the Kap’SAM®’s clips to the right polarities and begin the starting procedure again.
The three state of charge indicators ash. Your Kap’SAM® is connected to a source
with too high a voltage (e.g. 24 Volts). Disconnect the Kap’SAM® to avoid damaging it.
No indicator lights up when you connect the Kap’SAM®.
The battery is deeply discharged (cf. paragraph on Forced Start Mode)
Your Kap’SAM® is connected to the broken down vehicle, the start
indicator is on following the vehicle start procedure (see paragraph
on Starting a vehicle).
• Check the Kap’SAM®’s state of charge (see paragraph Testing the
Kap’SAM®’s state of charge)
• If the state of charge is not satisfactory, recharge the Kap’SAM®
(see paragraph on Recharging the Kap’SAM®).
• If the state of charge is satisfactory, check the state of the general
fuse.
If these checks do not result in your in your Kap’SAM® restarting,
please contact our technical assistance department without delay.
(See Warranty paragraph).
OK
BLOWN Replace with the second fuse supplied
with the device
Functions: Quick check procedure
1110-

7. Warranty
8. Declaration of Conformity/EC
The warranty covers any fault or manufacturing defect for 5 years
or 10,000 uses, as of the date of purchasing the product (parts and
labour).
The warranty does not cover normal wear and tear, voltage errors,
loss, theft or damage resulting from inappropriate use, dismantling or
any damage due to transport. Any addition or substitution of parts or
accessories not made by SAM Outillage will invalidate the warranty. The
warranty does not cover normal wear on parts (e.g.: cables, clips, etc.).
In the event of a fault, return the device to the technical assistance
department at this address:
SAM Outillage – SAT
60 boulevard Thiers
42000 Saint Etienne - FRANCE
Tél. +33 (0)4 77 922 584
We the undersigned:
SAM Outillage
60 boulevard Thiers – CS 10528
42007 Saint Etienne - FRANCE
Declare that the new products dened by:
Make: SAM
Name/description: Kap’SAM® vehicle jump starter
Reference: XCAP-500
To which this declaration refers comply with SAM specications and the following standards
and/or European Directives:
- IEC 60335-2-29
- 2001/95/CE
Issued in Saint-Etienne on Monday 28 September 2015.
Didier DENIZOT
Quality Manager
5
Put back the two fastening
nuts and tighten to a torque
of 12 +/- 2 N.m. Be careful not
to overtighten as this could
permanently damage the fuse
fastening guides.
6
Put back the fuse compart-
ment cover and the screw
that holds it in place.
7
Press the test button. If at
least the bottom charge
indicator ashes, the device
must no longer be used and
must be returned under the
warranty immediately.
EN
12-
Table of contents