manuals.online logo
Brands
  1. Home
  2. •
  3. Brands
  4. •
  5. Samsung
  6. •
  7. LCD TV
  8. •
  9. Samsung LT-P 1545 User manual

Samsung LT-P 1545 User manual

BN68-00633A-05
1-800-SAMSUNG(1-800-726-7864)
U.S.A
Samsung Electronics America
Service Division
400 Valley Road, Suite 201
Mount Arlin ton, NJ 07856
www.samsun usa.com
Canada
Samsung Electronics Canada Inc.
Samsung Customer Care
7037 Financial Drive
Mississau a, Ontario
L5N 6R3
www.samsun .ca
LT-P1545
LT-P1 45
LT-P2045
LT-P2045
U
This device is a Class B di ital apparatus.
COVER.qxd.q.q 5/12/04 4:35 PM Page 1
2222222.pdf 2004-04-10 오후 3:36:432222222.pdf 2004-04-10 오후 3:36:43
CONTENTS
1
CONTENTS
Chapter 1: Your New TV
List of Features . . . . . . . . . . . . . . . . . . . . . . . . . . . . . . . . . . . . . . . . . . . .1
List of Parts . . . . . . . . . . . . . . . . . . . . . . . . . . . . . . . . . . . . . . . . . . . . . . .1
Familiarizing Yourself with Your New TV . . . . . . . . . . . . . . . . . . . . . . .2
Front Buttons . . . . . . . . . . . . . . . . . . . . . . . . . . . . . . . . . . . . . .2
Rear Panel Jacks . . . . . . . . . . . . . . . . . . . . . . . . . . . . . . . . . . . .3
Remote Control . . . . . . . . . . . . . . . . . . . . . . . . . . . . . . . . . . . . .4
Installing Batteries in the Remote Control . . . . . . . . . . . . . . . .5
If remote control doesn’t work! . . . . . . . . . . . . . . . . . . . . . . . .5
Chapter 2: Installation
Connecting VHF and UHFAntennas . . . . . . . . . . . . . . . . . . . . . . . . . . .6
Antennas with 300-ohm Flat Twin Leads . . . . . . . . . . . . . . . . .6
Antennas with 75-ohm Round Leads . . . . . . . . . . . . . . . . . . . .7
Separate VHF and UHFAntennas . . . . . . . . . . . . . . . . . . . . . .7
Connecting Cable TV . . . . . . . . . . . . . . . . . . . . . . . . . . . . . . . . . . . . . . .7
Cable without a Cable Box . . . . . . . . . . . . . . . . . . . . . . . . . . . .7
Connecting to a Cable Box that Descrambles All Channels . . .8
Connecting to a Cable Box that Descrambles Some Channels
. .8
Connecting a VCR . . . . . . . . . . . . . . . . . . . . . . . . . . . . . . . . . . . . . . . . .10
Connecting an S-VHS VCR . . . . . . . . . . . . . . . . . . . . . . . . . . . . . . . . .11
Connecting a DVD Player . . . . . . . . . . . . . . . . . . . . . . . . . . . . . . . . . . .12
Chapter 3: Special Features
Turning the TV On and Off . . . . . . . . . . . . . . . . . . . . . . . . . . . . . . . . . .13
Changing Channels . . . . . . . . . . . . . . . . . . . . . . . . . . . . . . . . . . . . . . . .13
Using the Channel Buttons . . . . . . . . . . . . . . . . . . . . . . . . . . .13
Using the PRE-CH Button to select the Previous Channel . .13
Adjusting the Volume . . . . . . . . . . . . . . . . . . . . . . . . . . . . . . . . . . . . . .13
Using Mute . . . . . . . . . . . . . . . . . . . . . . . . . . . . . . . . . . . . . . .13
Viewing the Display . . . . . . . . . . . . . . . . . . . . . . . . . . . . . . . . . . . . . . .14
Viewing the Menus . . . . . . . . . . . . . . . . . . . . . . . . . . . . . . . . . . . . . . . .14
Chapter 4: Operation
Plug & Play Feature . . . . . . . . . . . . . . . . . . . . . . . . . . . . . . . . . . . . . . . .15
Memorizing the Channels . . . . . . . . . . . . . . . . . . . . . . . . . . . . . . . . . . .16
Selecting the Video Signal-source . . . . . . . . . . . . . . . . . . . . .16
Storing Channels in Memory (Automatic Method) . . . . . . . .17
To check the channels stored in memory . . . . . . . . . . . . . . . .17
To select channels over 100 . . . . . . . . . . . . . . . . . . . . . . . . . .17
ADD and DEL Channels (Manual Method) . . . . . . . . . . . . . .18
To select the Input Source . . . . . . . . . . . . . . . . . . . . . . . . . . . . . . . . . .19
To Edit the Input Source Name . . . . . . . . . . . . . . . . . . . . . . . . . . . . . . .20
Using Automatic Picture Settings . . . . . . . . . . . . . . . . . . . . . . . . . . . . .21
Customizing the Picture . . . . . . . . . . . . . . . . . . . . . . . . . . . . . . . . . . . .22
Contents.qxd.q 4/8/04 4:43 AM Page 1
CONTENTS
2
CONTENTS
Using Automatic Sound Settings . . . . . . . . . . . . . . . . . . . . . . . . . . . . . .23
To select the Sound option . . . . . . . . . . . . . . . . . . . . . . . . . . . . . . . . . .24
Selecting a Menu Language . . . . . . . . . . . . . . . . . . . . . . . . . . . . . . . . .25
Setting the lue Screen Mode . . . . . . . . . . . . . . . . . . . . . . . . . . . . . . . .26
Adjusting the Color Tone . . . . . . . . . . . . . . . . . . . . . . . . . . . . . . . . . . .27
Automatic volume control . . . . . . . . . . . . . . . . . . . . . . . . . . . . . . . . . . .28
Setting the Clock . . . . . . . . . . . . . . . . . . . . . . . . . . . . . . . . . . . . . . . . .29
Option 1: Setting the Clock Manually . . . . . . . . . . . . . . . . . .29
Option 2: Using the Local P S Channel to Automatically
Set the TV Clock . . . . . . . . . . . . . . . . . . . . . . . . . .30
Setting the On/Off Timer . . . . . . . . . . . . . . . . . . . . . . . . . . . . . . . . . . .32
Setting the Sleep Timer . . . . . . . . . . . . . . . . . . . . . . . . . . . . . . . . . . . .34
Viewing Closed Captions . . . . . . . . . . . . . . . . . . . . . . . . . . . . . . . . . . .35
Using the V-Chip . . . . . . . . . . . . . . . . . . . . . . . . . . . . . . . . . . . . . . . . . .36
Setting Up Your Personal ID Number (PIN) . . . . . . . . . . . . .36
How to Enable/Disable the V-Chip . . . . . . . . . . . . . . . . . . . . .37
How to Set up Restrictions Using the ‘TV guidelines’ . . . . .38
How to Set up Restrictions Using the MPAA Ratings:
G, PG, PG-13, R, NC-17, X . . . . . . . . . . . . . . . . . . . . . . . . . .40
How to Reset the TV after the V-Chip
locks a Channel (‘Emergency Escape’) . . . . . . . . . . . . . . . .41
Chapter 5: PC isplay
Using Your TV as a Computer (PC) Display . . . . . . . . . . . . . . . . . . . . .42
How to Set up Your PC Software (Windows only) . . . . . . . .42
Adjusting the Screen Quality . . . . . . . . . . . . . . . . . . . . . . . . .43
Changing the Screen Position . . . . . . . . . . . . . . . . . . . . . . . . .44
To Initialize the Screen Position or Color Settings . . . . . . . . .45
How to Auto Adjust . . . . . . . . . . . . . . . . . . . . . . . . . . . . . . . .46
Using Automatic Picture Settings . . . . . . . . . . . . . . . . . . . . . .47
Customizing the Picture . . . . . . . . . . . . . . . . . . . . . . . . . . . . .48
Adjusting the Color Tone . . . . . . . . . . . . . . . . . . . . . . . . . . . .49
Customizing the color . . . . . . . . . . . . . . . . . . . . . . . . . . . . . . .50
Chapter 6: Troubleshooting
Identifying Problems . . . . . . . . . . . . . . . . . . . . . . . . . . . . . . . . . . . . . . .51
Appendix
Using the Anti-Theft Kensington Lock . . . . . . . . . . . . . . . . . . . . . . . . .53
Retractable Stand . . . . . . . . . . . . . . . . . . . . . . . . . . . . . . . . . . . . . . . . . .54
Installing VESA compliant mounting devices . . . . . . . . . . . . . . . . . . . .55
Installing the Wall Mount Kit (sold separately) . . . . . . . . . . . . . . . . . .56
Cleaning and Maintaining Your TV . . . . . . . . . . . . . . . . . . . . . . . . . . .60
Using Your TV in Another Country . . . . . . . . . . . . . . . . . . . . . . . . . . . .60
Display Mode . . . . . . . . . . . . . . . . . . . . . . . . . . . . . . . . . . . . . . . . . . . .61
Specifications . . . . . . . . . . . . . . . . . . . . . . . . . . . . . . . . . . . . . . . . . . . .62
Contents.qxd.q.q 5/7/04 7:48 PM Page 2
English-1
List of Features
Your TV was designed with the latest technology.
This TV is a high-performance unit that includes the following special features:
• Easy-to-use remote control
• Easy-to-use on-screen menu system
• Automatic timer to turn the TV on and off
• Adjustable picture and sound settings that can be stored in the TV s memory
• Automatic channel tuning for up to 194 channels.(Air : 69 , STD : 125 )
• A special filter to reduce or eliminate reception problems
• Fine tuning control for the sharpest picture possible
• A built-in multi-channel sound decoder for stereo and bilingual listening
• Built-in, dual channel speakers
• Headphone jack for private listening
List of Parts
Please make sure the following items are included with your LCD TV.
If any items are missing, contact your dealer.
Chapter One
YOUR NEW TV
Remote Control
(BN59-00429A) &
Batteries (AAA x 2)
Power Cord
17 : 3903-000144
15 /20 : 3903-000085
Owner’s
Instructions
Wall Mount kit
15 /17 : BN96-01270A
20 : BN96-01271A
15” / 17”20”
17”
15” / 20”
BN68-00633A-06Eng 1.qxd.q 5/12/04 6:31 PM Page 1
English-2
Familiarizing Yourself with Your New V
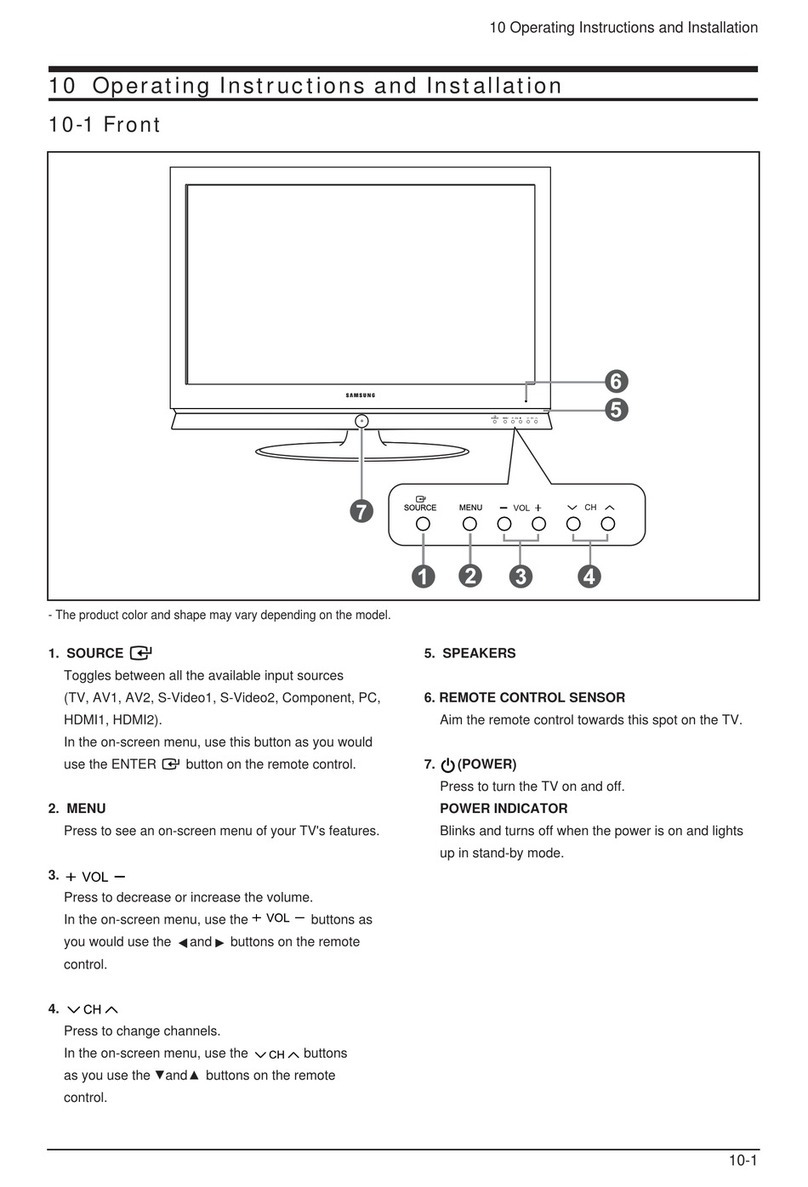
Front Panel Buttons
The buttons on the front panel control your TV s basic features, including the on-screen
menu. To use the more advanced features, you must use the remote control.
YOUR NEW TV
SOURCE
Displays a menu of all of the available
input sources (TV, VIDEO, S-VIDEO,
Component, PC)
MENU
Press to see an on-screen menu of
your TV’s features.
– VOL +
Press to decrease or increase the volume.
Press to see an on-screen menu on the screen.
CH
Press to change channels. Also press to
highlight various items on the on-screen menu.
POWER
Press to turn the TV on and off.
HEADPHONE JACK
Connect a set of external headphones to
this jack for private listening.
SPEAKERS
REMO E CON ROL SENSOR
Aim the remote control towards this spot
on the TV.
POWER INDICA OR
Lights up when you turn the power off.
(Red light shows in stand-by mode, Red
shows when you turn the power on, and light
is off after the power is on. Green shows
when you set Timer on or off.)
You can also use the SOURCE( )
button on the TV s control
panel to make selections.
BN68-00633A-06Eng 1.qxd.q 5/12/04 6:31 PM Page 2
English-3
YOUR NEW TV
Rear Panel Jacks
Use the rear panel jacks to connect an A/V component that will be connected
continuously, such as a VCR or a DVD player.
For more information on connecting equipment, see pages 6 ~ 12.
POWER INPU
PC AUDIO IN (STEREO)
PC VIDEO INPU
Connect to the video output port on your PC.
VIDEO INPU
Connect a video signal from a
camcorder or VCR.
AUDIO INPU
Connect an audio signal(L/R) from a
camcorder or VCR.
S-VIDEO INPU
Connect an S-Video signal from a
camcorder or VCR.
V AN ENNA
Connect to an antenna or to a cable
TV system.
COMPONEN
Connect a component video/audio.
KENSING ON LOCK
(See page 53)
< LT-P1745 > < LT-P1545 / LT-P2045 / LT-P2045U >
BN68-00633A-06Eng 1.qxd.q 5/12/04 6:31 PM Page 3
English-4
YOUR NEW TV
Remote Control
POWER
(See Page 13)
Turns the TV on and off.
NUMBER BU ONS
Press to select channels
directly on the TV.
+100
Press to select channels over 100.
For example, to select channel
121, press “+100,” then press
“2” and “1.”
CH and CH
(Channel Up/Down)
Press CH or CH to change
channels.
VOL+ and VOL-
Press to increase or
decrease the volume.
MU E
(See Page 13)
Press to temporarily cut off
the sound.
SLEEP
(See Page 34)
Press to select a time for the TV
to turn off automatically.
MENU
Displays the main on-screen
menu.
UP/DOWN/LEF /
RIGH /EN ER
Use to select on-screen menu
items and change menu values.
(The remote control will only
function with VCR or DVD units
that are compatible with the LCD TV.)
AU O PROG.
Use to store the broadcast/cable
channels that you receive.
P.MODE
Adjust the TV picture by selecting
one of the preset factory settings.
You can use the remote control up to a distance of about 23 feet from the TV.
When using the remote, always point it directly at the TV.
PRE-CH
Turns to the previous channel.
SOURCE
(See Page 19)
Input source selection
INFO DISPLAY
Use to see information on the
current broadcast.
EXI
Press the menu to exit.
ADD/DEL
Use to store and delete channels
to/from memory.
CAP ION
Press to set caption on/off.
M S
(Multichannel elevision Stereo)
Press to choose stereo, mono or
Separate Audio Program
(SAP broadcast).
S.MODE
Adjust the TV sound by selecting one
of the preset factory settings.
BN68-00633A-06Eng 1.qxd.q 5/12/04 6:31 PM Page 4
English-5
3
Replace the cover.
Remove the batteries and store them
in a cool, dry place if you won t be
using the remote control for a long
time.
The remote control can be used
up to about 23 feet from the TV.
(Assuming typical TV usage,
the batteries last for about one year.)
2
Install two AAA size
batteries.
Make sure to match the “+” and
“–” ends of the batteries with the
diagram inside the compartment.
Installing Batteries in the Remote Control
1
Slide the cover out
completely.
YOUR NEW TV
If remote control doesn’t work
Check the following:
1. Is the TV power switch on?
2. Are the plus and minus ends of the batteries reversed?
3. Did the batteries run out?
4. Is the power out, or is the power cord unplugged?
5. Is there a special fluorescent light or a neon sign nearby?
BN68-00633A-06Eng 1.qxd.q 5/12/04 6:31 PM Page 5
English-6
Connecting VHF and UHF Antennas
If your antenna has a set of leads that
look like this, see “Antennas with
300-ohm Flat Twin Leads” below.
If your antenna has one lead that looks
like this, see “Antennas with 75-ohm
Round Leads” on page 7.
If you have two antennas, see “Separate
VHF and UHF Antennas” on page 7.
Antennas with 300-ohm Flat win Leads
If you are using an off-air antenna (such as a roof antenna or “rabbit ears”) that has
300-ohm twin flat leads, follow the directions below.
Chapter wo
INSTALLATION
1
Place the wires from
the twin leads under
the screws on a 300-
75 ohm adaptor (not
supplied). Use a
screwdriver to tighten
the screws.
2
Plug the adaptor into
the TV ANTENNA
terminal on the
bottom of the back
panel.
BN68-00633A-06Eng 1.qxd.q 5/12/04 6:31 PM Page 6
English-7
Connecting Cable V
To connect to a cable TV system, follow the instructions below.
Cable without a Cable Box
1
Plug the incoming
cable into the TV
ANTENNA terminal
on back of the TV.
Because this TV is cable-ready,
you do not need a cable box to
view unscrambled cable channels.
2
Plug the combiner
into the TV
ANTENNA terminal
on the bottom of
the rear panel.
INSTALLATION
Antennas with 75-ohm Round Leads
1
Plug the antenna
lead into the TV
ANTENNA terminal
on the bottom of the
back panel.
Separate VHF and UHF Antennas
If you have two separate antennas for your TV (one VHF and one UHF), you must
combine the two antenna signals before connecting the antennas to the TV. This
procedure requires a an optional combiner-adaptor (available at most electronics shops).
1
Connect both antenna
leads to the combiner.
BN68-00633A-06Eng 1.qxd.q 5/12/04 6:31 PM Page 7
English-8
INSTALLATION
Connecting to a Cable Box that Descrambles All Channels
1
Find the cable that is
connected to the
ANTENNA OUT
terminal on your cable
box.
This terminal might be labeled
“ANT OUT”, “VHF OUT”, or
simply, “OUT”.
2
Connect the other end
of this cable to the TV
ANTENNA terminal on
the back of the TV.
Connecting to a Cable Box that Descrambles Some Channels
If your cable box descrambles only some channels (such as premium channels), follow the
instructions below. You will need a two-way splitter, an RF (A/B) switch, and four lengths
of coaxial cable. (These items are available at most electronics stores.)
1
Find and disconnect
the cable that is
connected to the
ANTENNA IN terminal
on your cable box.
This terminal might be labeled
“ANT IN”, “VHF IN”, or simply,
“IN”.
2
Connect this cable
to a two-way splitter.
3
Connect a coaxial
cable between an
OUTPUT terminal on
the splitter and the IN
terminal on the cable
box.
BN68-00633A-06Eng 1.qxd.q 5/12/04 6:31 PM Page 8
English-9
4
Connect a coaxial
cable between the
ANTENNA OUT
terminal on the
cable box and the
B–IN terminal on the
A/B switch.
5
Connect another
cable between the
other OUT terminal
on the splitter and
the A–IN terminal on
the RF (A/B) switch.
6
Connect the last
coaxial cable
between the OUT
terminal on the RF
(A/B) switch and the
VHF/UHF terminal
on the rear of the
TV.
INSTALLATION
After you ve made this connection, set the A/B switch to the “A” position for normal
viewing. Set the A/B switch to the “B” position to view scrambled channels.
(When you set the A/B switch to “B,” you will need to tune your TV to the cable box s
output channel, which is usually channel 3 or 4.)
BN68-00633A-06Eng 1.qxd.q 5/12/04 6:31 PM Page 9
English-10
INSTALLATION
3
Connect a coaxial
cable between the
ANTENNA OUT
terminal on the VCR
and the antenna
terminal on the TV.
4
Connect a set of
audio cables
between the AUDIO
OUT jacks on the
VCR and the AUDIO
jacks on the TV.
5
Connect a video
cable between the
VIDEO OUT jack on
the VCR and the
VIDEO jack on the
TV.
Follow the instructions in “Viewing a VCR or Camcorder Tape” to view your VCR tape.
* Each external input source device has a different back panel configuration.
A coaxial cable is usually included with a VCR. (If not, check your local electronics store).
If you have a “mono” (non-stereo) VCR, use the Y-connector (not supplied) to hook up
to the left and right audio input jacks of the TV.
If your VCR is stereo, you must connect two cables.
Connecting a VCR
These instructions assume that you have already connected your TV to an antenna or a
cable TV system (according to the instructions on pages 6-9).
Skip step 1 if you have not yet connected to an antenna or a cable system.
1
Unplug the cable or
antenna from the
back of the TV.
2
Connect the cable or
antenna to the
ANTENNA IN terminal
on the back of the
VCR.
BN68-00633A-06Eng 1.qxd.q 5/12/04 6:31 PM Page 10
English-11
INSTALLATION
3
Connect an S-video
cable between the
S-VIDEO OUT jack on
the VCR and the
S-VIDEO INPUT jack
on the TV.
An S-video cable is usually included with an S-VHS VCR.
(If not, check your local electronics store.)
* Each external input source device has a different back panel configuration.
1
To begin, follow
steps 1–3 in the
previous section to
connect the antenna
or cable to your
VCR and your TV.
Connecting an S-VHS VCR
Your Samsung TV can be connected to an S-Video signal from an S-VHS VCR.
(This connection delivers a better picture as compared to a standard VHS VCR.)
2
Connect a set of audio
cables between the
AUDIO OUT jacks on
the VCR and the
AUDIO INPUT jacks
on the TV.
BN68-00633A-06Eng 1.qxd.q 5/12/04 6:31 PM Page 11
English-12
INSTALLATION
Note : For an explanation of Component video, see your DVD player owner's manual.
The component terminal of this set only supports 480i/480p resolution.
* Each external input source device has a different back panel configuration.
Connecting a DVD Player
The rear panel jacks on your TV make it easy to connect a DVD player to your TV.
1
Connect a set of audio
cables between the
L, R AUDIO INPUT
jacks on the TV and
the AUDIO OUT jacks
on the DVD player.
2
Connect a video cable
between the
COMPONENT
(Y, Pb, Pr) jacks on
the TV and the Y, Pb,
Pr jacks on the DVD
player.
BN68-00633A-06Eng 1.qxd.q 5/12/04 6:31 PM Page 12
English-13
Changing Channels
Using the Channel Buttons
1
Press the CH /buttons to change channels.
When you press the CH /buttons, the TV changes channels in sequence.
You will see all the channels that the TV has memorized. (The TV must have memorized at
least three channels.) You will not see channels that were either erased or not memorized.
Using the PRE-CH Button to select the Previous Channel
1
Press the PRE-CH button.
The TV will switch to the last channel viewed.
To quickly switch between two channels that are far apart, tune to one channel, then use
the number button to select the second channel. Then use the PRE-CH button to quickly
alternate between them.
Chapter hree
SPECIAL FEATURES
Adjusting the Volume
1
To control speaker volume.
2
To control headphone volume.
- when headphone is connected.
When a headphone is connected, the Volume Control OSD screen changes automatically as
in number 2.
Press the VOL +/– buttons to increase or decrease the volume.
1
Press MU E and the sound cuts off.
The word “”
will appear in the lower-left corner of the screen.
2
To turn mute off, press the MU E button again, or simply press the VOL +/- buttons.
Using Mute
At any time, you can temporarily cut off the sound using the Mute button.
urning the V On and Off
Press the POWER button on the remote control.
You can also use the Power button on the front panel.
BN68-00633A-06Eng 1.qxd.q 5/12/04 6:31 PM Page 13
English-14
SPECIAL FEATURES
Viewing the Display
The display identifies the current channel and the status of certain
audio-video settings.
Viewing the Menus
The on-screen displays
disappear after about ten seconds.
Press the button once more or
wait approximately 10 seconds
and it disappears automatically.
Allows the user to adjust the
settings according to his/her
preference and shows the
current settings.
1
Press the INFO button
on the remote control.
The TV will display the
channel, the type of
sound, and the status
of certain picture and
sound settings.
1
With the power on,
press the MENU button.
The main menu appears
on the screen. It’s left
side has five icons:
Input, Picture, Sound,
Channel, and Setup.
The on-screen menus
disappear from the screen after
about two minutes.
You can also use the
SOURCE buttons
on the control panel of the TV
to make selections.(See page 19)
2
Use the UP/DOWN buttons to select one of the
five icons. Then press EN ER to access the
icon’s sub-menu.
3
Press the EXI button to exit.
BN68-00633A-06Eng 1.qxd.q 5/12/04 6:31 PM Page 14
English-15
Chapter Four
OPERATION
Plug & Play Feature
When the TV is initially powered On, two basic custo er settings proceed
auto atically and subsequently: Setting Auto progra , Clock.
1
Press the POWER
button on the remote
control.
The message “Plug &
Play” is displayed.
2
Press the
UP/DOWN buttons
to select “English”,
“Français”,
“Espa ol”, or
“Português”
then press
the ENTER button.
Press the UP/DOWN
buttons to select
“Air”,“STD”, “HRC” or
“IRC”, then press the
ENTER button.
3
Press the ENTER
Button. The TV will
begin memorizing all of
the available channels.
Press the ENTER
button to stop.
5
The message
“Enjoy your watching.”
is displayed.
4
Press the
LEFT/R GHT
buttons to move to the
hour or minute.
Set the hour or minute
by pressing the
UP/DOWN buttons.
(refer to “Setting the
Clock” on page 29).


BN68-00633A-06Eng 2.qxd.q 5/12/04 6:22 PM Page 15
English-16
OPERATION
Memorizing the Channels
Your TV can e orize and store all of the available channels for both “off-air” (antenna)
and cable channels. After the available channels are e orized, use the CH and CH
buttons to scan through the channels. This eli inates the need to change channels by
entering the channel digits. There are three steps for e orizing channels: selecting a
broadcast source, e orizing the channels (auto atic) and adding and deleting channels
( anual).
Selecting the Video Signal-source
Before your television can begin e orizing the available channels, you ust specify the
type of signal source that is connected to the TV (i.e., an antenna or a cable syste ).
1
Press the MENU button
to display the menu.
Press the
UP/DOWN buttons
to select “Channel”, then
press the ENTER
button.
2
Repeatedly press the
ENTER button to
cycle through these
choices:
Air, STD, HRC or IRC
(all cable TV).
Press the
UP/DOWN
buttons to select the
Video signal source,
then press the
ENTER button.
Press the EX T button
to exit.
Note : STD, HRC and IRC identify various types of cable
TV syste s. Contact your local cable co pany to identify
the type of cable syste that exists in your particular area.
At this point, the signal source has been selected.
Proceed to “Storing Channels in Me ory” (next page).
BN68-00633A-06Eng 2.qxd.q 5/12/04 6:22 PM Page 16

Other manuals for LT-P 1545

6

This manual suits for next models

3

Other Samsung LCD TV manuals

Samsung LE37M86BD User manual

Samsung

Samsung LE37M86BD User manual

Samsung Series 7 750 LN46C750 Instruction Manual

Samsung

Samsung Series 7 750 LN46C750 Instruction Manual

Samsung 5 Series User manual

Samsung

Samsung 5 Series User manual

Samsung Series 4+ User manual

Samsung

Samsung Series 4+ User manual

Samsung LN46A530 User manual

Samsung

Samsung LN46A530 User manual

Samsung LTM 1525 Setup guide

Samsung

Samsung LTM 1525 Setup guide

Samsung LE32N7 User manual

Samsung

Samsung LE32N7 User manual

Samsung LN46B500 User manual

Samsung

Samsung LN46B500 User manual

Samsung LW15S13C User manual

Samsung

Samsung LW15S13C User manual

Samsung Series 4+ User manual

Samsung

Samsung Series 4+ User manual

Samsung 9000 Series User manual

Samsung

Samsung 9000 Series User manual

Samsung LN26R71WD User manual

Samsung

Samsung LN26R71WD User manual

Samsung 3 SERIES User manual

Samsung

Samsung 3 SERIES User manual

Samsung LE19C350D1W User manual

Samsung

Samsung LE19C350D1W User manual

Samsung LE26A41B User manual

Samsung

Samsung LE26A41B User manual

Samsung 6 series User manual

Samsung

Samsung 6 series User manual

Samsung LN19R71B User manual

Samsung

Samsung LN19R71B User manual

Samsung 750 series User manual

Samsung

Samsung 750 series User manual

Samsung LN26A450 User manual

Samsung

Samsung LN26A450 User manual

Samsung LE32C630 K1WXXC User manual

Samsung

Samsung LE32C630 K1WXXC User manual

Samsung LE26R7 User manual

Samsung

Samsung LE26R7 User manual

Samsung LN32A540P2D User manual

Samsung

Samsung LN32A540P2D User manual

Samsung UN55MU6500F Guide

Samsung

Samsung UN55MU6500F Guide

Samsung LN40C550 User guide

Samsung

Samsung LN40C550 User guide

Popular LCD TV manuals by other brands

Hisense LTDN40V87HUS user manual

Hisense

Hisense LTDN40V87HUS user manual

Vizio E321MV user manual

Vizio

Vizio E321MV user manual

Polaroid TLU-02612C user manual

Polaroid

Polaroid TLU-02612C user manual

Dynex DX-24L150A11 user manual

Dynex

Dynex DX-24L150A11 user manual

JVC LT-26DF7BC Service manual

JVC

JVC LT-26DF7BC Service manual

Philips 26PFL3405H Specifications

Philips

Philips 26PFL3405H Specifications

Digimax KIT-101JDHX30BP1U1 Assembly guide

Digimax

Digimax KIT-101JDHX30BP1U1 Assembly guide

LG EA98 series owner's manual

LG

LG EA98 series owner's manual

Sharp LC-32LE360EN Operation manual

Sharp

Sharp LC-32LE360EN Operation manual

Haier L32A10A operating instructions

Haier

Haier L32A10A operating instructions

August DA900C user manual

August

August DA900C user manual

Sharp Aquos LC 30HV6U Service manual

Sharp

Sharp Aquos LC 30HV6U Service manual

Grundig GR 32-120 M3HD SRS user guide

Grundig

Grundig GR 32-120 M3HD SRS user guide

Sharp LC-32LE225E Service manual

Sharp

Sharp LC-32LE225E Service manual

Bush LCD40883F1080P instruction manual

Bush

Bush LCD40883F1080P instruction manual

LG 32LM63 Series quick start guide

LG

LG 32LM63 Series quick start guide

Grundig 48 VLE 555 BG manual

Grundig

Grundig 48 VLE 555 BG manual

Philips 20PFL4112S Specifications

Philips

Philips 20PFL4112S Specifications

manuals.online logo
manuals.online logoBrands
  • About & Mission
  • Contact us
  • Privacy Policy
  • Terms and Conditions

Copyright 2025 Manuals.Online. All Rights Reserved.