- 2 -- 1 -
- 6 -- 5 -
- 3 -
- 7 -
- 4 -
- 8 -
Connections
HDMI OUT
HDMI OUT
AUDIO OUT
R-AUDIO-L
DVI OUT
W R
RW
W R
RW
AUDIO OUT
R-AUDIO-L
VIDEO OUT
ANT OUT
Y
R
Y
R
RBRG
R
GB
COMPONENT OUT
YPRPB
Remote Control
✎
This rem ote contro l has Brai lle point s on the Power, Cha nnel, and Vol ume but tons and ca n be used by v isuall y impaire d perso ns.
Figures and illustrations in this User Manual are provided for reference
only and may differ from actual product appearance. Product design and
specifications may be changed without notice.
Important Warranty Information Regarding
Television Format Viewing
✎
See the wa rrant y card for mo re inform ation on wa rrant y terms.
Wide screen format LED Displays (16:9, the aspect ratio of the screen width to height)
are primarily designed to view wide screen format full-motion video. The images
displayed on them should primarily be in the wide screen 16:9 ratio format, or expanded
to fill the screen if your model offers this feature and the images are constantly moving.
Displaying stationary graphics and images on screen, such as the dark sidebars on
non- expanded standard format television video and programming, should be limited
to no more than 5% of the total television viewing per week. Additionally, viewing other
stationary images and text such as stock market reports, video game displays, station
logos, web sites or computer graphics and patterns, should be limited as described
above for all televisions. Displaying stationary images that exceed the above guidelines
can cause uneven aging of LED Displays that leave subtle, but permanent burned-in
ghost images in the LED picture. To avoid this, vary the programming and images, and
primarily display full screen moving images, not stationary patterns or dark bars. On LED
models that offer picture sizing features, use these controls to view different formats as
a full screen picture. Be careful in the selection and duration of television formats you
use for viewing. Uneven LED aging as a result of format selection and use, as well as
burned-in images, are not covered by your Samsung limited warranty.
t4".46/(&-&$530/*$4/035)".&3*$"/-*.*5&%8"33"/5:45"5&.&/5
Subject to the requirements, conditions, exclusions and limitations of the original
-JNJUFE8BSSBOUZTVQQMJFEXJUI4BNTVOH&MFDUSPOJDT4".46/(QSPEVDUTBOEUIF
SFRVJSFNFOUTDPOEJUJPOTFYDMVTJPOTBOEMJNJUBUJPOTDPOUBJOFEIFSFJO4".46/(
XJMMBEEJUJPOBMMZQSPWJEF8BSSBOUZ3FQBJS4FSWJDFJOUIF6OJUFE4UBUFTPO4".46/(
QSPEVDUTQVSDIBTFEJO$BOBEBBOEJO$BOBEBPO4".46/(QSPEVDUTQVSDIBTFE
in the United States, for the warranty period originally specified, and to the Original
Purchaser only.
5IFBCPWFEFTDSJCFEXBSSBOUZSFQBJSTNVTUCFQFSGPSNFECZB4".46/("VUIPSJ[FE
Service Center. Along with this Statement, the Original Limited Warranty Statement
and a dated Bill of Sale as Proof of Purchase must be presented to the Service
Center. Transportation to and from the Service Center is the responsibility of the
purchaser. Conditions covered are limited only to manufacturing defects in material or
workmanship, and only those encountered in normal use of the product. Excluded, but
not limited to, are any originally specified provisions for, in-home or on-site services,
minimum or maximum repair times, exchanges or replacements, accessories, options,
upgrades, or consumables.
'PSUIFMPDBUJPOPGB4".46/("VUIPSJ[FE4FSWJDF$FOUFSQMFBTFDBMMUPMMGSFF
oo*OUIF6OJUFE4UBUFT4".46/(
oo*O$BOBEB4".46/(
Still image warning
Avoid displaying still images (such as jpeg picture files) or still image elements (such as
TV channel logos, panorama or 4:3 image format, stock or news bars at screen bottom
etc.) on the screen. Constant displaying of still pictures can cause ghosting of LED
screen, which will affect image quality. To reduce risk of this effect, please follow below
recommendations:
t
Avoid displaying the same TV channel for long periods.
t
Always try to display any image on full screen, use TV set picture format menu for
best possible match.
t
3FEVDFCSJHIUOFTTBOEDPOUSBTUWBMVFTUPNJOJNVNSFRVJSFEUPBDIJFWFEFTJSFE
picture quality, exceeded values may speed up the burnout process.
t
Frequently use all TV features designed to reduce image retention and screen
burnout, refer to proper user manual section for details.
Securing the Installation Space
Keep the required distances between the product and other objects (e.g. walls) to
ensure proper ventilation.
Failing to do so may result in fire or a problem with the product due to an increase in the
internal temperature of the product.
✎
When us ing a stand o r wall-mou nt, use par ts provided by Sams ung Elect ronics
only.
x
*GZPVVTFQB SUTQSPWJ EFECZBOPU IFSNBOV GBDUVSFSJUNBZS FTVMUJOBQS PCMFN
with the pr oduct or a n injury d ue to the prod uct falli ng.
✎
The app earance m ay differ depe nding on th e product.
✎
Be caref ul when you conta ct the TV b ecause s ome par ts can be som ewhat hot.
Installation with a stand. Installation with a wall-mount.
4inches
4inches
4inches
4inches
4inches
4inches
4inches
Channel Menu
TSeeing Channels
Channel List
Add, delete or set Favorite channels and use the program guide for
digital broadcasts. Select a channel in the All Channels, Added
Channels, Favorite or Programmed screen by pressing the Ÿ/ ź
buttons, and pressing the ENTER
E
button. Then you can watch
the selected channel.
Added Channels
6 Air
Ɔ79
Ɔ79
8 Air
9 Air
Ɔ79
10 Air
Ɔ79
Ɔ79
Air 'Zoom 'Select T7RROVŹ1H[W3URJUDP
■
All Channels: Shows all currently available channels.
■
Added Channels: Shows all added channels.
■*
Favorite: Shows all favorite channels.
■
Programmed: Shows all currently reserved programs.
✎
Using the remote control buttons with the Channel List
x
(SFFOZoom): Enlarges o r shrinks a channe l number.
x
:FMMPXSelect): Selects multiple channel lists. Select desired
DIBOOFMTBOEQSFTTUIF:FMMPXCV UUPOUPTFUB MMUIFTFMFDUFE
channels at the sa me time. Th e
c
mark ap pears to th e left of
the selected channels.
x
T
(Too l s): Displays the Channel List option menu. (The Options
menus may differ depend ing on the si tuation.)
Channel Status Display icons
Icons Operations
c
A channel selected.
*
A channel set as a favorite.
A reserved program.
(
A program currently being broadcast.
TMemorizing channels
Antenna (Air / Cable)
t
Before your television can begin memorizing the available channels,
you must specify the type of signal source that is connected to the
TV (i.e. an Air or a Cable system).
Auto Program
✎
When selecting the Cable TV system: Selects the cable
system. STD, HRC and IRC identif y various types of cable T V
systems. Contact your local cable company to identif y the typ e
of cable system that exists in your par ticular area. At this point,
the signal source has been selected.
✎
After all the available channels are stored, it star ts to
remove scrambled channels. The Auto progr am menu then
reappears.
✎
Press the ENTER
E
button to stop the channel store during
Auto Program.
How to Stop Auto Programming
1. Press the ENTER
E
button.
2. A message will ask Stop Auto Program? Select Yes by pressing
the Żor Źbutton.
3. Press the ENTER
E
button.
TOther Features
Clear Scrambled Channel
This function filters out scrambled channels after Auto Program is
DPNQMFUFE5IJTQSPDFTTNBZUBLFVQUP_NJOVUFT
✎
Press the ENTER
E
button to stop the Clear Scrambled
Channel.
✎
This function is only available in Cable mode.
Channel List
Channel List Option Menu
t
Set each channel using the Channel List menu options. Option
menu items may differ depending on the channel status.
■
Add / Delete: Delete or add a channel to display the channels
you want.
✎
All deleted channels will b e shown on th e All Channels
menu.
✎
A gray-colored channel indi cates the channel has been
deleted.
✎
The Add menu onl y appears for deleted channels.
✎
Delete a ch annel from the Added Channels or Favorite
menu in the same manner.
■
Add to Favorite / Delete from Favorite
t
: Set channels
you watch frequently as Favorites.
■
Timer Viewing:PVDBOTFUBEFTJSFEDIBOOFMUPCFEJTQMBZFE
automatically at the set time; even when you are watching another
channel. Set the current time first to use this function.
✎
Only memorized channels can be reserved.
✎
3FTFS WFEQSPHSBNTXJMMC FEJTQMBZFEJOUIFProgrammed
menu.
✎
When a digital channel is selected, press the Ź(Next
ProgramCVUUPOUPWJFXUIFEJHJUBMQSPHSBN*GZPVTFMFDU
the ENTER
E
(Schedule) button on the next program, you
can set Timer Viewing directly.
■
Channel Name Edit (analog channels only): Assign your own
channel name.
■
Select All: Select all the channels in the channel list.
■
Deselect All: Deselect all the selected channels.
✎
:PVDBOPOMZTFMFDUDeselect All when one or more
channels are selected.
■
Auto Program: Scans for a channel automatically and stores in
the TV.
Programmed
(in Channel List)
:PVDBOWJFXNPEJGZPSEFMFUFBTIPXZPVIBWFSFTFSWFEUPXBUDI
■
Change Info: Change a show you have reserved to watch.
■
Cancel Schedules: Cancel a show you have reserved to watch.
■
Information%JTQMBZBTIPXZPVIBWFSFTFSWFEUPXBUDI:PV
DBOBMTPDIBOHFUIFSFTFSWBUJPO*OGPSNBUJPO
■
Select All / Deselect All:PVDBOTFMFDUPSEFTFMFDUBMMDIBOOFMT
in the channel list.
Sound Menu
Mode
t
■
Standard: Selects the normal sound mode.
■
Music: Emphasizes music over voices.
■
Movie: Provides the best sound for movies.
■
Clear Voice: Emphasizes voices over other sounds.
■
Amplify*ODSFBTFUIFJOUFOTJUZPGIJHIGSFRVFODZTPVOETUPBMMPXB
better listening experience for the hearing impaired.
Equalizer
(standard sound mode only)
■
Balance L/R: Adjusts the balance between the right and left
speaker.
■
100Hz / 300Hz / 1KHz / 3KHz / 10KHz (Bandwidth Adjustment):
Adjusts the level of specific bandwidth frequencies.
■
Reset3FTFUTUIFFRVBMJ[FSUPJUTEFGBVMUTFUUJOHT
SRS TruSurround HD
(standard sound mode only)
4345SV4VSSPVOE)%JTBQBUFOUFE434UFDIOPMPHZUIBUTPMWFTUIF
problem of playing 5.1 multichannel content over two speakers.
TruSurround delivers a compelling, virtual surround sound experience
through any two-speaker playback system, including internal
UFMFWJTJPOTQFBLFST*UJTGVMMZDPNQBUJCMFXJUIBMMNVMUJDIBOOFMGPSNBUT
Preferred Language
(digital channels only)
Digital-TV broadcasts are capable of simultaneous transmission of
many audio tracks (for example, simultaneous translations of the
program into foreign languages).
✎
:PVDBOPOMZTFMFDUBMBOHVBHFGSPNBNPOHUIFPOFTCFJO H
broadcasted.
Multi-Track Sound (MTS)
(analog channels only)
■
Mono: Choose for channels that are broadcasting in mono or if
you are having difficulty receiving a stereo signal.
■
Stereo: Choose for channels that are broadcasting in stereo.
■
SAP: Choose to listen to the Separate Audio Program, which is
usually a foreign-language translation.
✎
Depending on the program being broadc ast, you can listen to
Mono, Stereo or SAP.
Auto Volume
Because each broadcasting station has its own signal conditions,
the volume may fluctuate each time channel is changed. This feature
lets you automatically adjust the volume of the desired channel by
lowering the sound output when the modulation signal is high or by
raising the sound output when the modulation signal is low.
Sound Reset
■
Reset All3FTFUTBMMTPVOETFUUJOHTUPUIFGBDUPSZEFGBVMUT
Setup Menu
TSetting the Time
Time
✎
The current time will appear every tim e you press the INFO
button.
■
Clock: Setting the clock is for using various timer features of the
TV.
✎
*GZPVEJTDPOOFDUUIFQPXFSDPSEZPVIBWFUPTFUUIFDMPDL
again.
Clock Mode: Set the current time manually or automatically.
Clock Set: Set the Month, Day, Year, Hour, Minute and am/pm.
✎
Available only when Clock Mode is set to Manual.
Time Zone: Select your time zone.
DST (Daylight Saving Time): Switches the DST (Daylight Saving
Time) function on or off.
✎
DST and Time Zone function is only available when the
Clock Mode is set to Auto.
■
Sleep Timer
t
"VUPNBUJDBMMZTIVUTPGGUIF57BGUFSBQSFTFUQFSJPEPGUJNF
BOENJOVUFT
✎
To cancel the Sleep Timer, select Off.
Timer 1 / Timer 2 / Timer 3
5ISFFEJGGFSFOUPOPGGUJNFSTFUUJOHTDBOCFNBEF:PVNVTUTFUUIF
clock first.
■
On Time / Off Time: Set the hour, minute, am/pm and Activate /
*OBDUJWBUF5PBDUJWBUFUIFUJNFSXJUIUIFTFUUJOHZPVIBWFDIPTFO
set to Activate.)
■
Volume: Set the desired volume level.
■
Contents: When the On Time is activated, you can turn on a
specific channel or play back contents such as photo or audio files.
- TV/USB: Select TV or USB. (Make sure that an USB device is
connected to your TV.)
- Antenna: Displays the current antenna source.
- Channel: Select the desired channel.
- Music/Photo4FMFDUUIFGPMEFSDPOUBJOJOH.1+1&(mMFTPO
the USB device.
✎
The maximum displayed number of files, including sub
GPMEFSTJOPOFGPMEFSPG64#TUPSBHFEFWJDFJT
✎
The media may not be playing smoothly when using the
EFWJDFMPXFSUIBO64#
■
Repeat: Select Once, Everyday, Mon~Fri, Mon~Sat, Sat~Sun or
ManualUPTFUBUZPVDPOWFOJFODF*GZPVTFMFDUManual, you can
set up the day you want to activate the timer.
TOther Features
Program Rating Lock
The Program Rating Lock feature automatically locks out programs
that are deemed inappropriate for children. The user must enter a
1*/QFSTPOBMJEFOUJmDBUJPOOVNCFSCFGPSFBOZPGUIF1SPHSBN3BUJOH
Lock restrictions are set up or changed.
✎
Program Rating Lock is not available in HDMI or Component
mode.
✎
5IFEFGBVMU1*/OVNCFSPGBOFX57TFUJTi w
Contact SAMSUNG WORLDWIDE
*GZPVIBWFBOZRVFTUJPOTPSDPNNFOUTSFMBUJOHUP4BNTVOH
QSPEVDUTQMFBTFDPOUBDUUIF4".46/(DVTUPNFSDBSFDFOUFS
Country CANADA U.S.A
Address
Samsung Electronics
$BOBEB*OD$VTUPNFS
Service 55 Standish
Court Mississauga,
0OUBSJP-3#
Canada
Samsung Electronics
"NFSJDB*OD
$IBMMFOHFS3PBE
3JEHFmFME1BSL/+
Customer Care
Center
4".46/(
Web Site
www.samsung.com
LED TV
user manual
Getting Started
Accessories
t 3FNPUF$POUSPM"""
Batteries (AAA x 2)
t 8BSSBOUZ$BSE4BGFUZ(VJEF
t 0XOFST*OTUSVDUJPOT
t 8JSF)PMEFS4UBOE#/"
t Power Cord
Input Cables (Sold Separately)
t )%.*
t )%.*%7*
t Component
t Composite (AV)
t $PBYJBM3'
✎
Check the cable before plug-in
Cable Ports
Do not plug cable upside down.
Be sure to check before plug-in.
HDMI
USB
TV Controller (Panel Key)
TV Controller
TV Controller
Function menu
MEDIA.P
mRs
P
3FUVSO
3FNPUFDPOUSPMTFOTPS
UN32EH4003 / UN39EH5003
UN22ES4003
Power on Turns the TV on by pressing the controller in standby
mode.
Adjusting the volume Adjusts the volume by moving the controller from side
to side when the power is on.
Selecting a channel Selects a channel by moving the controller up and
down when the power is on.
Using the function
menu
Press the controller when the power is on, then the
GVODUJPONFOVTDSFFOBQQFBST*GZPVQSFTTJUBHBJO
the function menu screen disappears.
Selecting the Media
Play
Selects the MEDIA.P by moving the controller in
the function menu screen. The Media Play main
screen appears.
Selecting the MENU
(
m
)
Selects the MENU(
m
) by moving the controller in the
function menu screen. The OSD(On Screen Display)
of your TV’s feature appears.
Selecting the Source
List (
s
)
Selects the Source List(
s
) by moving the
controller in the function menu screen. The Source
List screen appears.
Power Off (
P
)Selects the Power Off (
P
) to turn the TV off by
moving the controller in the function menu screen.
✎
Exits t he menu wh en pres sing the co ntrolle r more tha n 1 second.
✎
When se lectin g the func tion by movi ng the con troller to t he up/down/ left /
SJHIUEJ SFDUJP OTCFTVSFO PUUPQSFTTUI FDPOUSPM MFS*GZPVQSFT TJUGJST UZPV
cannot operate it to move the up/down/left/right directions.
Plug & Play (Initial Setup)
When you turn the TV on for the first time, a sequence of on-screen
prompts will assist in configuring basic settings. Press the POWER
button. Plug & PlayJTBWBJMBCMFPOMZXIFOUIF*OQVUTPVSDFJTTFUUP
TV.
✎
Connecting the power cord and antenna. (refer to
‘Connections’)
Selecting a language
Select Language of the OSD.
Language
U
Move
E
Enter
Plug & Play
Ç
o
nÆ
English
Español
Français
Select the desired OSD (On Screen
Display) language.
È
Selecting a Home Use mode
4FMFDUA)PNF6TFXIFOJOTUBMMJOHUIJT57 JOZPVSIPNF
L
Move
E
Enter
Plug & Play
)PNF6TFStore Demo
Ç
o
Ë
n
t Select the Home Use mode. Store
Demo mode is for retail environments.
t When pressing TV controller, the
function menu screen appears. Select
the MENU(m) and press it more than 5
seconds using the controller. The Store
Demo mode is set. Cancel the Store
Demo by selecting Source List(s)
and pressing it more than 5 seconds.
È
Selecting an antenna
Select the Antenna source to memorize.
Air Start
Cable Start
Auto Start
U
Move
E
Enter
m
Skip
Plug & Play
oÌ
Ç
n
*OCable mode, you can select the correct
signal source among STD, HRC, and IRC
by pressing the Ÿ, ź, Żor Źbutton.
È
Setting the Clock Mode
Set the Clock Mode.
Clock Mode : Auto
Plug & Play
E
Enter
m
Skip
nÆ
oÌ
Set the Clock Mode automatically or
manually.
t *GZPVTFMFDUUIFAuto, set the
DST(Daylight Saving Time).
t On the DST screen, press ENTER
E
,
then select whether to turn DST
(Daylight Savings Time) on or off. Select
the time zone where you live.
È
Viewing the HD Connection Guide
5IFDPOOFDUJPONFUIPEGPSUIFCFTU)%TDSFFORVBMJUZJTEJTQMBZFE
È
Enjoy your TV.
Press the
ENTER
E
button.
Changing the Input Source
Source List
Use to select TV or an external input source such as a DVD player /
Blu-ray player / cable box / STB satellite receiver.
1. Press the SOURCE button.
2. Select a desired external input source.
UN32EH4003 / UN39EH5003
■
TV / AV / Component / HDMI1/DVI / HDMI2
UN22ES4003
■
TV / AV / Component / HDMI/DVI
✎
:PVDBOPOMZDIPPTFFYUFSOBMEFWJDFTUIBUBSFDPOOFDUFE
UPUIF57*OUIFSource List, connected inputs will be
highlighted.
How to use Edit Name
&EJU/BNFMFUTZPVBTTPDJBUFBEFWJDFOBNFUPBOJOQVUTPVSDF5P
access Edit Name, press the TOOLS button in Source List. The
following selections appear under Edit Name:
■
VCR / DVD / Cable STB / Satellite STB / PVR STB / AV
Receiver / Game / Camcorder / PC / DVI PC / DVI / TV / IPTV
/ Blu-ray / HD DVD / DMA/BNFUIFEFWJDFDPOOFDUFEUPUIF
input jacks to make your input source selection easier.
✎
When connecting a PC to the HDMI IN 1(DVI) or HDMI / DVI
INQPSUXJUI)%.*DBCMFZPVTIPVMETFUUIF5 7UPPC mode
under Edit Name.
✎
When connecting a PC to the HDMI IN 1(DVI) or HDMI / DVI
INQPSUXJUI)%.*UP%7*DBCMFZPVTIPVMETFUUIF57UPDVI
PC mode under Edit Name.
✎
When connecting an AV devices to the HDMI IN 1(DVI) or
HDMI / DVI INQPSUXJUI)%.*UP%7*DBCMFZPVTIPVMETFUUIF
TV to DVI mode under Edit Name.
Information
:PVDBOTFFEFUBJMFEJOGPSNBUJPOBCPVUUIFDPOOFDUFEFYUFSOBM
device.
■
Program Rating Lock:PVDBOCMPDLSBUFE571SPHSBNT
■
TV Parental Guidelines:PVDBOCMPDL57QSPHSBNTEFQFOEJOH
on their rating. This function allows you to control what your
children are watching.
■
MPAA Rating:PVDBOCMPDLNPWJFTEFQFOEJOHPOUIFJS.1""
rating. The Motion Picture Association of America(MPAA) has
implemented a rating system that provides parents or guardians
with advanced information on which films are appropriate for
children.
■
Canadian English:PVDBOCMPDL57QSPHSBNTEFQFOEJOHPO
their Anglophone Canadian.
■
Canadian French:PVDBOCMPDL57QSPHSBNTEFQFOEJOHPO
their French Canadian rating.
■
Downloadable U.S. Rating: Parental restriction information can
be used while watching DTV channels.
■
Change PIN5IF$IBOHF1*/TDSFFOXJMMBQQFBS$IPPTFBOZ
EJHJUTGPSZPVS1*/BOEFOUFSJUJOEnter New PIN3FFOUFS
the same 4 digits in Confirm New PIN8IFOUIF$IBOHF1*/
screen disappears, press the OK button. The TV has memorized
ZPVSOFX1*/
✎
*GZPVGPSHFUUIF1*/QSFTTUIFSFNPUFDPOUSPMCVUUPOTJO
UIFGPMMPXJOHTFRVFODFXIJDISFTFUTUIFQJOUPiw
POWER (off) ĺMUTE ĺ8 ĺ2 ĺ4 ĺPOWER (on)
Language
Set the menu language.
✎
Choose between English, Español and Français.
Game Mode
When connecting to a game console such as PlayStation™ or
Xbox™, you can enjoy a more realistic gaming experience by
selecting the game menu.
✎
Precautions and limitations for game mode
x
To disconnect the game console and connect another external
device, s et Game Mode to Off in the setup menu.
x
*GZPVEJTQ MBZUIF57NFOVJOGame Mode, the sc reen sha kes
slightly.
✎
Game Mode is not available when the input source is set to
TV.
✎
After connecting the game console, set Game Mode to On.
Unfortunately, you may notice reduced picture quality.
Caption
(On-Screen Text Messages)
■
Caption:PVDBOTXJUDIUIFDBQUJPOGVODUJPOPOPSPGG*G
captions are not available, they will not be displayed on the
screen.
✎
The Caption feature does not work i n Component or
HDMI mode.
■
Caption Mode:PVDBOTFMFDUUIFEFTJSFEDBQUJPONPEF
Default / CC1~CC4 / Text1~Text4: (analog channels only) The
Analog Caption function operates in either analog TV channel
mode or when a signal is supplied from an external device to the
TV. (Depending on the broadcasting signal, the Analog Caption
function may or may not work with digital channels.)
Default / Service1~Service6 / CC1~CC4 / Text1~Text4:
(digital channels only) The Digital Captions function works with
digital channels.
✎
Service1~6 may not be available in digital caption mode
depending on the broadcast.
■
Digital Caption Options: (digital channels only)
Size: Options include Default, Small, Standard and Large. The
default is Standard.
Font Style0QUJPOTJODMVEF%FGBVMUBOE4UZMFTUP5IF
EFGBVMUJT4UZMF
Foreground Color0QUJPOTJODMVEF%FGBVMU8IJUF#MBDL3FE
(SFFO#MVF:FMMPX.BHFOUBBOE$ZBO:PVDBODIBOHFUIF
color of the letter. The default is White.
Background Color0QUJPOTJODMVEF%FGBVMU8IJUF#MBDL3FE
(SFFO#MVF:FMMPX.BHFOUBBOE$ZBO:PVDBODIBOHFUIF
background color of the caption. The default is Black.
Foreground Opacity: This adjusts the opacity of text. Options
include Default, Transparent, Translucent, Solid and Flashing.
Background Opacity: This adjusts the opacity of the caption
background. Options include Default, Transparent, Translucent,
Solid and Flashing.
Return to Default: This option sets each Size, Font Style,
Foreground Color, Background Color, Foreground Opacity and
Background Opacity to its default.
✎
Digital Caption Options are available only when Default
and Service1 ~ Service6 can be selected in Caption
Mode.
✎
The Foreground and Backgroun d cannot be s et to have the
same color.
Melody
Set so that a melody plays when the TV is turned on or off.
✎
The Melody does not play.
x
When no sound is output from th e TV bec ause the MUTE
button has been pressed.
x
When no sound is output from th e TV bec ause the vo lume has
been reduced to mi nimum wi th the VOL – button.
x
When the TV is tur ned off by Sleep Timer function.
Auto Protection Time
■
Auto Protection Time (Off / 2 hours / 4 hours / 8 hours / 10
hours)*GUIFTDSFFOSFNBJOTJEMFXJUIBTUJMMJNBHFGPSBDFSUBJO
period of time defined by the user, the screen saver is activated
to prevent the formation of ghost images on the screen.
Eco Solution
■
Energy Saving (Off / Low / Medium / High / Picture Off) :
This adjust the brightness of the TV in order to reduce power
DPOTVNQUJPO*GZPVTFMFDUPicture Off, the screen is turned
off, but the sound remains on. Press any button except volume
button to turn on the screen.
■
No Signal Power Off (Off / 15 min. / 30 min. / 60 min.): Sets
how quickly the TV switches to standby mode, if no picture is
being received.
✎
Disabled when the PC is in power saving mode.
■
Auto Power Off (Off / On): The TV will be automatically turned
off when no user operation is received for 4 hours.
ª4BNTVOH&MFDUSPOJDT$P-UE"MMSJHIUTSFTFSWFE
UN22ES4003 7$3Blu-ray player
Cable
or
1PXFS*OQVU
573FBS1BOFM
573FBS1BOFM
7)'6)'"OUFOOB
AV Device (3)
Using an Audio/Video
Cables
AV Device (2)
Using a Component Cable
VQUPQ
Media Play
Using a USB Drive PC
6TJOHBO)%.*$BCMFPS
BO)%.*UP%7*$BCMF
Use the PC speakers for
audio.
AV Device (1)
6TJOHBO)%.*$BCMFVQ
UPQ
Blu-ray player / DVD / cable
box / sat box
PC
UN32EH4003 / UN39EH5003
nr
q
p
o
n
o
pq
r
✎
'PS6/&4DPOOFDUJPOZPVDBOSFGFS
UP6/&)6/&)BDDPSEJOHUP
connection numbers.
#/"
Channel Mode
Change the channel mode directly between Added Channels and
Favorite Channels.
✎
The Favorite Channels is enabled only when you set Add to
Favorite.
Fine Tune
(analog channels only)
*GUIFSFDFQUJPOJTDMFBSZPVEPOPUIBWFUPmOFUVOFUIFDIBOOFMBT
UIJTJTEPOFBVUPNBUJDBMMZEVSJOHUIFTFBSDIBOETUPSFPQFSBUJPO*G
the signal is weak or distorted, fine tune the channel manually.
✎
Fine tuned channels that have been saved a re marked w ith an
BTUFSJT LiwPOUIFSJHIUIBOETJEFPGUIFDIBO OFMOVNC FSJOUIF
channel banner.
✎
To reset the fine-tuning, select Reset.
Picture Menu
Mode
t
Select your preferred picture type.
✎
When connecting a PC, you can only select Entertain and
Standard.
■
Dynamic: Suitable for a bright room.
■
Standard: Suitable for a normal environment.
■
Movie: Suitable for watching movies in a dark room.
■
Entertain: Suitable for watching movies and games.
✎
Only available when connecting a PC.
Backlight / Contrast / Brightness / Sharpness /
Color / Tint (G/R)
:PVSUFMFWJTJPOIBTTFWFSBMTFUUJOHPQUJPOTGPSQJDUVSFRVBMJUZDPOUSPM
✎
When connecting a PC, you can only make changes to
Backlight, Contrast, Brightness and Sharpness
Advanced Settings
(available in Standard / Movie mode)
Compared to previous models, new Samsung TVs have a more
precise picture.
✎
When connecting a PC, you can only make changes to
Gamma and White Balance.
■
Color Space (Auto / Native): Adjusts the range of colors
available to create the image.
■
White Balance: Adjusts the color temperature for a more natural
picture.
R-Offset / G-Offset / B-Offset: Adjusts each color’s (red, green,
blue) darkness.
R-Gain / G-Gain / B-Gain: Adjusts each color’s (red, green, blue)
brightness.
Reset3FTFUTUIFWhite Balance to it’s default settings.
■
Gamma: Adjusts the primary color intensity.
■
Dynamic Contrast (Off / Low / Medium / High): Adjusts the
screen contrast.
■
Black Tone (Off / Dark / Darker / Darkest): Select the black level
to adjust the screen depth.
■
Flesh Tone&NQIBTJ[FQJOLinFTIUPOFw
■
Motion Lighting (Off / On)3FEVDFQPXFSDPOTVNQUJPOCZ
brightness control adapted motion.
✎
Available in Standard mode only.
Picture Options
✎
When connecting a PC, you can only make changes to the
Color Tone, Size and HDMI Black Level.
■
Color Tone (Cool / Standard / Warm1 / Warm2)
✎
Warm1 or War m2 will be d eactivated when the picture
mode is Dynamic.
■
Size:PVSDBCMFCPYTBUFMMJUFSFDFJWFSNBZIBWFJUTPXOTFUPG
TDSFFOTJ[FTBTXFMM)PXFWFSXFIJHIMZSFDPNNFOEZPVVTF
16:9 mode most of the time.
16:9: Sets the picture to 16:9 wide mode.
Zoom1: Use for moderate magnification.
Zoom2: Use for a stronger magnification.
Wide Fit: Enlarges the aspect ratio of the picture to fit the entire
screen.
4:3: Sets the picture to basic (4:3) mode.
✎
Do not watch in 4:3 format for a long time. Traces of borders
displayed on the lef t, right and center of the screen may
cause image retenti on (screen burn) which are not cove red
by the warranty.
Screen Fit (DTV): Displays the full image without any cut-off when
)%.*QJQPS$PNQPOFOUJQ
signals are inputted.
✎
)%)JHI%FGJOJUJPOJQYQ
Y
✎
Settings can be adj usted and stored for each external device
you have connected to an input on the TV.
✎
1JDUVSF4J[FTBWBJMBCMFCZ*OQVU4PVSDF
*OQVU4PVSDF Picture Size
"57"7$PNQPOFOUJ
Q 16:9, Zoom1, Zoom2, 4:3
%57JQ
$PNQPOFOUJQ
)%.*QJQ
16:9, Wide Fit, 4:3, Screen
Fit
■
Digital Noise Filter (Off / Low / Medium / High / Auto)*GUIF
broadcast signal received by your TV is weak, you can activate
the Digital Noise Filter feature to reduce any static and ghosting
that may appear on the screen.
✎
When the signal is weak, try other options until the best
picture is displayed.
■
HDMI Black Level (Normal / Low): Selects the black level on the
screen to adjust the screen depth.
✎
Available only in HDMINPEF3(#TJHOBMT
■
Film Mode (Off / Auto): Sets the TV to automatically sense and
process film signals from all sources and adjusts the picture for
optimum quality.
✎
"WBJMBCMFJO"57%57JOUFSMBDF"7$0.10/&/5J
JBOE)%.*JJ
■
LED Motion Plus (Off / On)3FNPWFTESBHGSPNGBTUTDFOFTXJUI
a lot of movement to provide a clear picture.
Picture Reset
3FTFUTZPVSDVSSFOUQJDUVSFNPEFUPJUTEFGBVMUTFUUJOHT
■
Reset Picture Mode3FUVSOTBMMQJDUVSFWBMVFTJOUIFDVSSFOUMZ
selected mode to the default settings.
✎
/PUF
y'PSCFUUFSQJDUVSFBOEBVEJPRVBMJUZDPOOFDUUPBEJHJUBMEFWJDFVTJOHBO)%.*
cable.
yThe picture may not display normally (if at all) or the audio may not work if an
FYUFSOBMEFWJDFUIBUVTFTBOPMEFSWFSTJPOPG)%.*NPEFJTDPOOFDUFEUPUIF57*G
TVDIBQSPCMFNPDDVSTBTLUIFNBOVGBDUVSFSPGUIFFYUFSOBMEFWJDFBCPVUUIF)%.*
version and, if out of date, request an upgrade.
y#FTVSFUPQVSDIBTFBDFSUJmFE)%.*DBCMF0UIFSXJTFUIFQJDUVSFNBZOPUEJTQMBZ
or a connection error may occur.
y1$%7*"6%*0*/JOQVUBSFOPUTVQQPSUFE
y%*(*5"-"6%*0065015*$"-JTOPUTVQQPSUFE
y'PS)%.*%7*DBCMFDPOOFDUJPOZPVNVTUVTFUIFHDMI IN 1(DVI) or HDMI / DVI
IN jack.
y$POOFDUJOHUISPVHIUIF)%.*DBCMFNBZOPUCFTVQQPSUFEEFQFOEJOHPOUIF1$
y*GBO)%.*UP%7*DBCMFJTDPOOFDUFEUPUIFHDMI IN 1(DVI) or HDMI / DVI IN port,
the audio does not work.
ySERVICE: Connector for service only.
1PXFS*OQVU
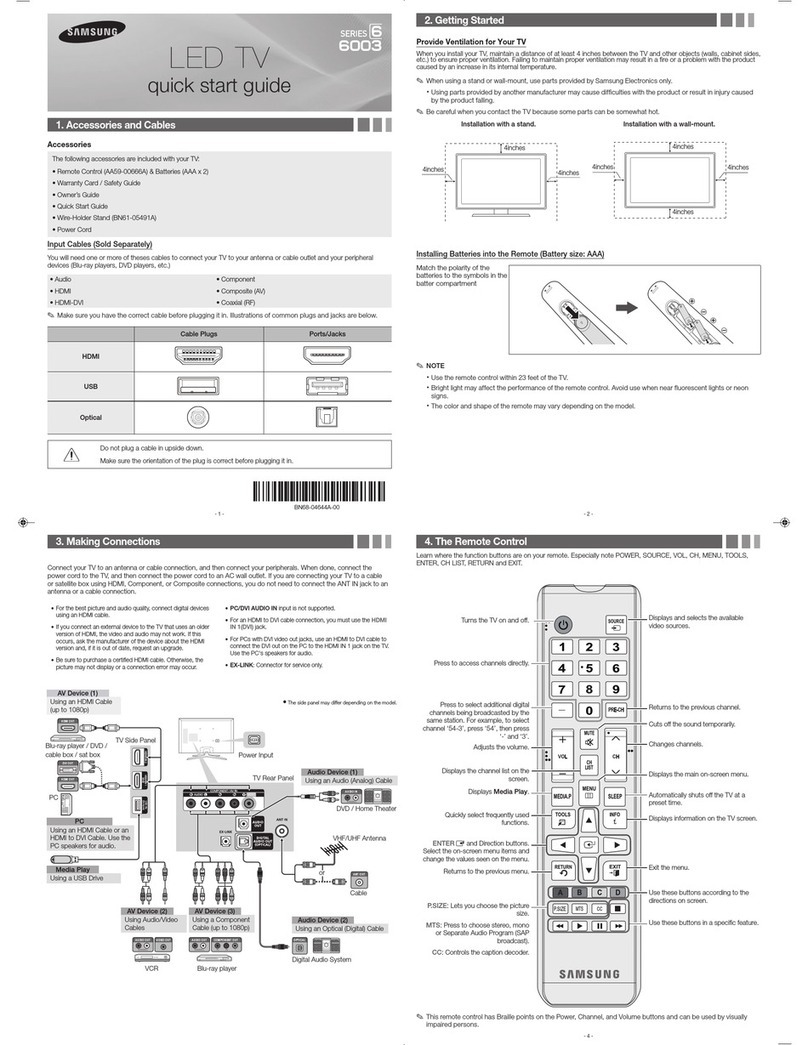
Press to select additional channels (digital) being
broadcasted by the same station. For example, to
select channel ‘54-3’, press ‘54’, then press ‘-’ and ‘3’.
3FUVSOTUPUIFQSFWJPVTDIBOOFM
Press to directly access to channels.
Turns the TV on and off.
Use these buttons in a specific feature.
P.SIZE: Lets you choose the picture size.
MTS:Press to choose stereo, mono or Separate Audio
Program (SAP broadcast).
CC: Controls the caption decoder.
Cuts off the sound temporarily.
Automatically shuts off the TV at a preset time.
Displays the channel list on the screen.
Displays information on the TV screen.
Quickly select frequently used functions.
Selects the on-screen menu items and changes the
values seen on the menu.
Exit the menu.
3FUVSOTUPUIFQSFWJPVTNFOV
Displays and selects the available video sources.
Use these buttons according to the direction on screen.
Changes channels.
Displays the main on-screen menu.
Views the Media Play.
Adjusts the volume.
MEDIA.P SLEEP
Installing batteries (Battery size: AAA)
✎
NOTE
x
Use the rem ote control w ithin 23 feet from TV.
x
Bright l ight may af fect the performance of t he remote co ntrol.
Avoid use when nearby fluorescent lights or neon signs.
x
The Color and sha pe may var y depen ding on the m odel.
[UE4003-ZC]BN68-04466A-ENG.indd 1


