Sandstrom SCB2510E User manual

Instruction Manual
Combination Microwave
SCS2510E / SCB2510E / SCW2510E
Instruction Manual
Combination Microwave GB
Manuale Di Istruzioni
Forno A Microonde Combinato IT
Návod
Kombinovaná Mikrovlnná Trouba CZ
Návod Na Obsluhu
Kombinovaná Mikrovlnná Rúra SK
SCW2510E
SCB2510E
SCS2510E


Contents GB
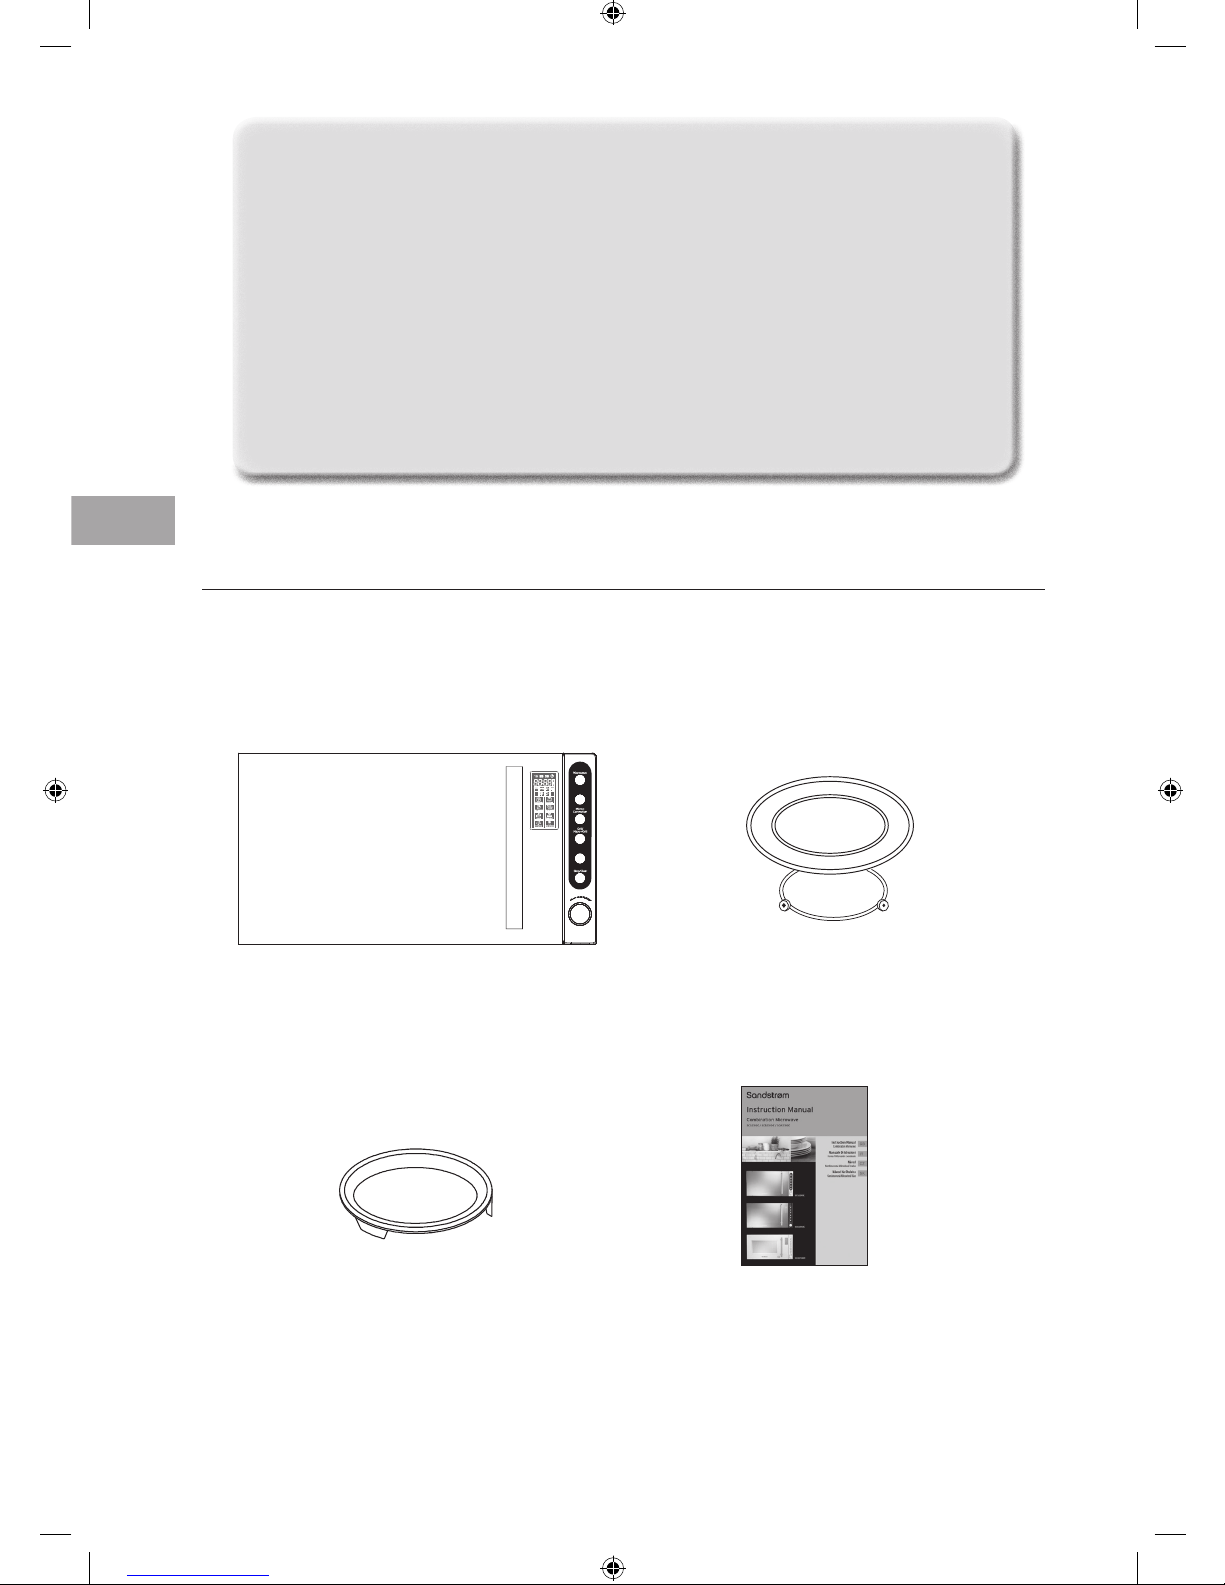
Unpacking.........................................................................................................4
Product Overview..............................................................................................5
Using Aluminium Foil inYour Microwave ..........................................................6
Getting Ready...................................................................................................7
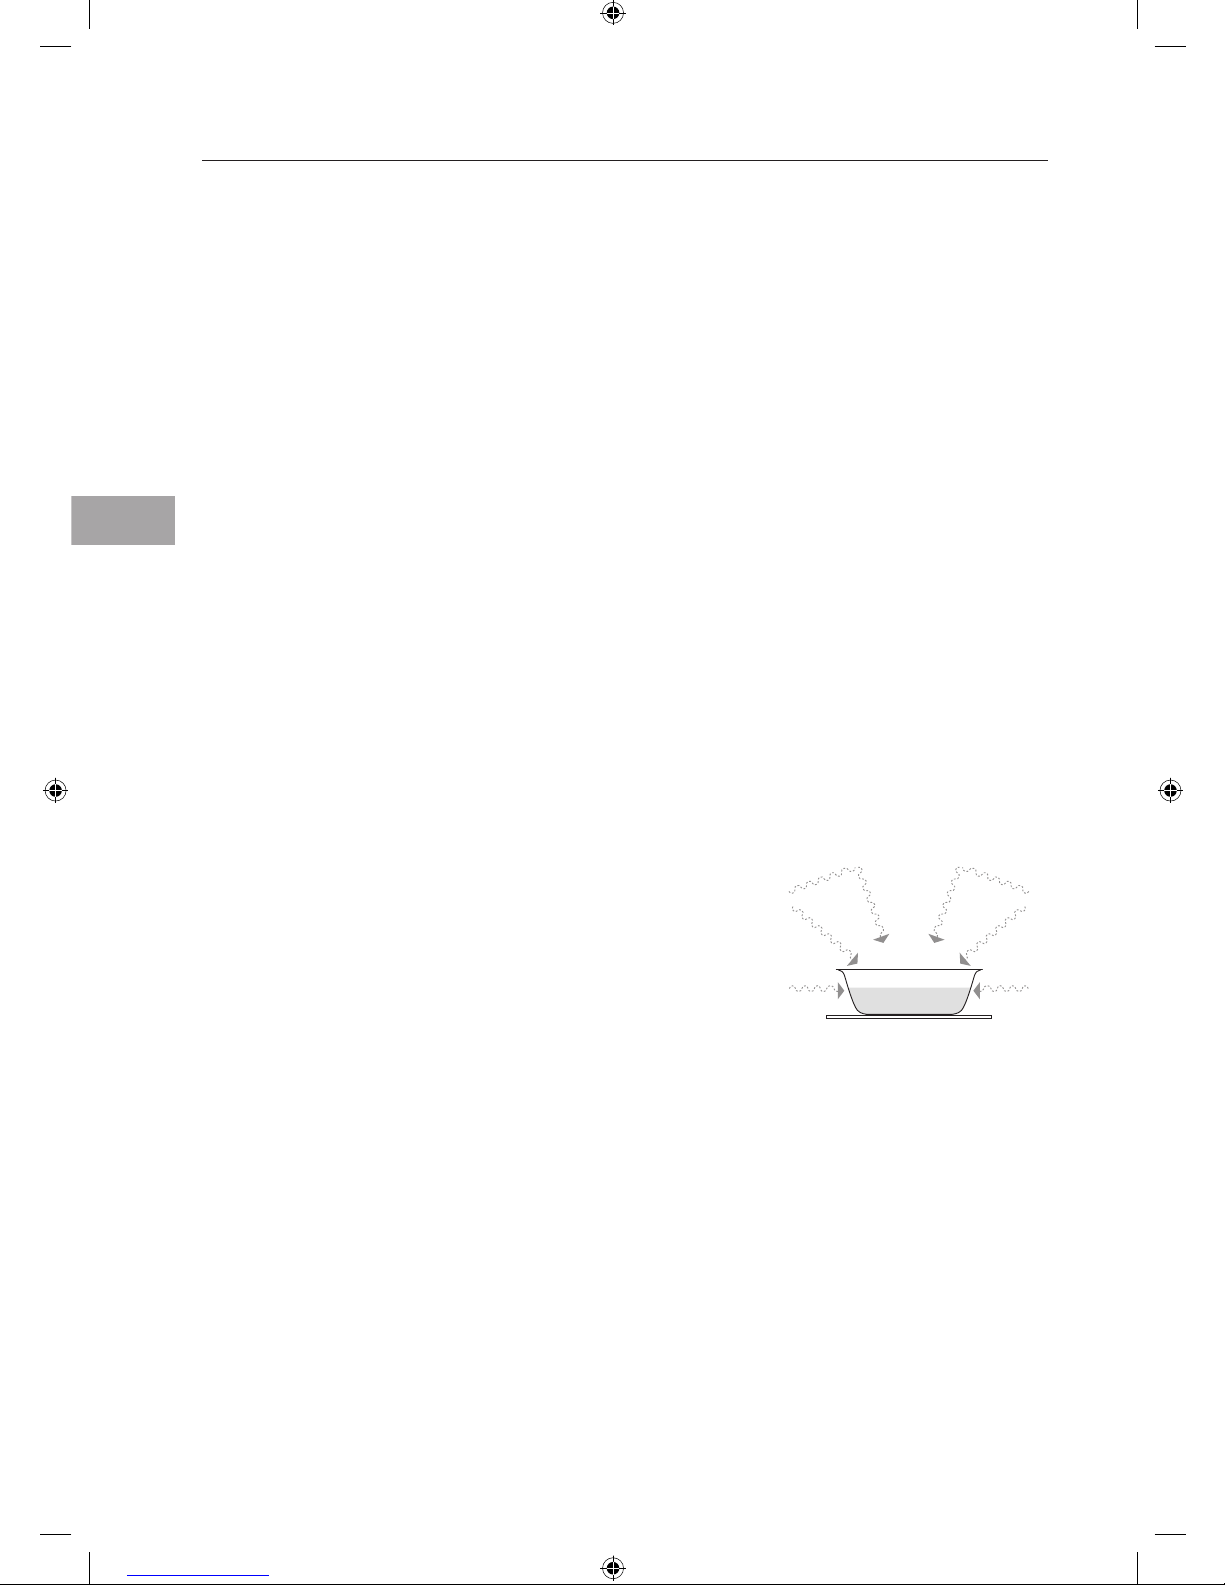
Introducing Microwave Cooking........................................................................8
Cooking with a Microwave.........................................................................8
Checking your Cooking Utensils .................................................................9
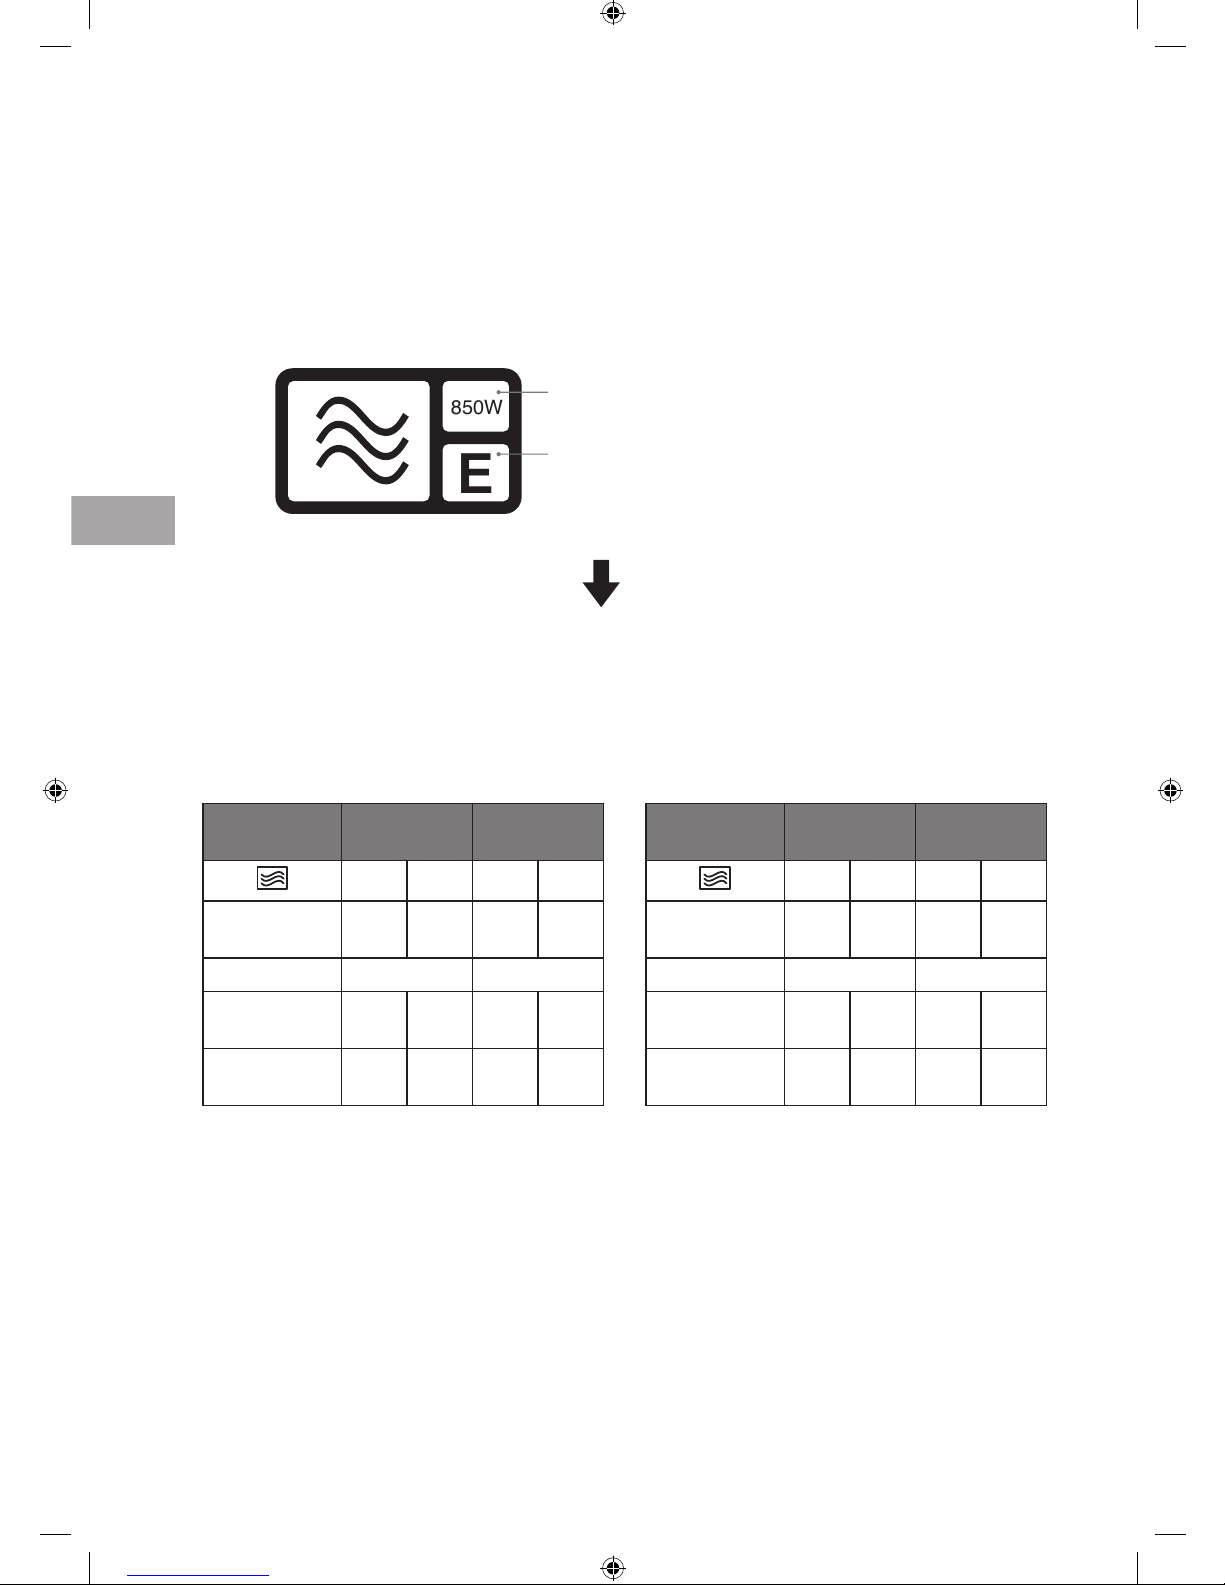
Microwave Heating Categories.................................................................10
Steam......................................................................................................11
Condensation...........................................................................................11
Checking your Microwave ........................................................................11
Clock Setting...................................................................................................12
Setting the Child Lock .....................................................................................13
Microwave Cooking.........................................................................................14
Grill or Combination Cooking...........................................................................15
Convection Combination Cooking....................................................................16
Convection Cooking (with preheating)............................................................17
Convection Cooking (without preheating).......................................................18
Multi- Stage Cooking ......................................................................................19
Auto Cooking...................................................................................................20
Quick Start Cooking.........................................................................................22
Defrosting.......................................................................................................23
Defrost byTime........................................................................................23
Querying the Cooking Function.......................................................................24
Cleaning your microwave................................................................................25
Frequently Asked Questions............................................................................26
Specication ...................................................................................................27
Safety First!...................................................................................................100
Indice IT
Disimballaggio................................................................................................28
Panoramica del prodotto.................................................................................29
Uso della pellicola d’alluminio nel forno a microonde.....................................30
Operazioni preliminari ....................................................................................31
Introduzione alla cottura al microonde ...........................................................32
Cucinare con il forno a microonde............................................................32
Controllo degli utensili usati per la cucinare.............................................33
Categorie di cottura al microonde............................................................34
Vapore .....................................................................................................35
Condensa.................................................................................................35
Pulizia del forno a microonde ..................................................................35
Impostazione dell’orologio..............................................................................36
Impostazione del blocco per i bambini............................................................37
Cottura al microonde.......................................................................................38
Cottura grill o combinata ................................................................................39
Cottura combinata a convezione.....................................................................40
Cottura a convezione (con pre-riscaldamento)................................................41
Cottura a convezione (senza pre-riscaldamento).............................................42
Cottura a più fasi.............................................................................................43
Cottura automatica .........................................................................................44
Cottura rapida.................................................................................................46
Scongelamento...............................................................................................47
Scongelamento a tempo..........................................................................47
Controllo della funzione di cottura..................................................................48
Pulizia del forno a microonde..........................................................................49
FAQ..................................................................................................................50
Speciche tecniche..........................................................................................51
Prima la sicurezza! ........................................................................................101
Obsah CZ
Vybalování......................................................................................................52
Přehled výrobku..............................................................................................53
Použití hliníkové fólie v mikrovlnné troubě .....................................................54
Příprava...........................................................................................................55
Představení vaření v mikrovlnné troubě..........................................................56
Vaření s mikrovlnnou troubou..................................................................56
Kontrola kuchyňského náčiní...................................................................57
Kategorie mikrovlnného ohřevu ..............................................................58
Pára .........................................................................................................59
Kondenzace .............................................................................................59
Kontrola mikrovlnné trouby.....................................................................59
Nastavení hodin..............................................................................................60
Nastavení dětského zámku .............................................................................61
Mikrovlnné vaření...........................................................................................62
Gril nebo kombinované vaření ........................................................................63
Konvekční kombinační vaření..........................................................................64
Konvekční vaření (s předehřátím)....................................................................65
Konvekční vaření (bez předehřátí)...................................................................66
Vícefázové vaření.............................................................................................67
Automatické vaření.........................................................................................68
Rychlé zahájení vaření.....................................................................................70
Rozmrazování .................................................................................................71
Rozmrazování podle času.........................................................................71
Dotazy na funkci vaření...................................................................................72
Čištění mikrovlnné trouby...............................................................................73
Často kladené dotazy......................................................................................74
Technické údaje...............................................................................................75
Bezpečnost především! .................................................................................102
Obsah SK
Rozbalenie......................................................................................................76
Prehľad výrobku..............................................................................................77
Používanie hliníkovej fólie v mikrovlnnej rúre.................................................78
Príprava...........................................................................................................79
Úvod do mikrovlnného varenia .......................................................................80
Varenie pomocou mikrovlnného žiarenia.................................................80
Kontrola riadov na varenie.......................................................................81
Kategórie mikrovlnného ohrevu ..............................................................82
Para .........................................................................................................83
Kondenzácia ............................................................................................83
Kontrola mikrovlnnej rúry........................................................................83
Nastavenie hodín............................................................................................84
Nastavenie rodičovského zámku .....................................................................85
Mikrovlnné varenie .........................................................................................86
Grilovanie alebo kombinované varenie ...........................................................87
Kombinované konvekčné varenie....................................................................88
Konvekčné varenie (s predbežným ohrevom)..................................................89
Konvekčné varenie (bez predbežného ohrevu)................................................90
Viacfázové varenie...........................................................................................91
Automatické varenie.......................................................................................92
Varenie s rýchlym štartom...............................................................................94
Rozmrazovanie................................................................................................95
Rozmrazovanie na základe času...............................................................95
Otázka ohľadne funkcie varenia......................................................................96
Čistenie mikrovlnnej rúry ................................................................................97
Často kladené otázky.......................................................................................98
Technické špecikácie .....................................................................................99
Bezpečnosť je na prvom mieste! ...................................................................103

4
GB
Congratulationson the purchase of your new Logik Microwave.
These operating instructions will help you use it properly and safely.
Before using your Logik Microwave
• Read these instructions carefully and retain for future reference.
• Remove all packaging labels. Please dispose of them properly.
Before calling for service
• Review the section on Troubleshooting. This will help you to solve some general
problems by yourself and reduce the need to ask for the help of professional
technicians.
Unpacking
Remove all packaging from the unit. Retain the packaging. If you dispose of it please do so according to
local regulations.
The following items are included:
The Main Unit Glass Turntable x 1
P.N.: XGALK25CSSP11
Turntable Ring x 1
P.N.: XGALK25CSSP12
Baking Plate x 1
P.N.: XGALK25CSSP66
Instruction Manual x 1
P.N.: SCS-B-W2510E-001
Clock/Weight
Convection
u
/
T
i
n
m
e
e
M
Clock/Weight
Convection
u
/
T
i
n
m
e
e
M
Clock/Weight
Convection
u
/
T
i
n
m
e
e
M
Clock/Weight
Convection
u
/
T
i
n
m
e
e
M
Clock/Weight
Convection
u
/
T
i
n
m
e
e
M
Clock/Weight
Convection
u
/
T
i
n
m
e
e
M
Clock/Weight
Convection
u
/
T
i
n
m
e
e
M

5
GB
Stop/Clear
Micro+
Convection
Clock/Weight
Convection
Grill/
u
/
T
i
n
m
e
e
M
Micro+Grill
Clock/Weight
Convection
u
/
T
i
n
m
e
e
M
Clock/Weight
Convection
u
/
T
i
n
m
e
e
M
Clock/Weight
Convection
u
/
T
i
n
m
e
e
M
Clock/Weight
Convection
u
/
T
i
n
m
e
e
M
Clock/Weight
Convection
u
/
T
i
n
m
e
e
M
Clock/Weight
Convection
u
/
T
i
n
m
e
e
M
Clock/Weight
Convection
u
/
T
i
n
m
e
e
M
Product Overview
The Main Unit
The Control Panel
Control Panel
LED Display
Shows the clock, cooking
time and setting.
Menu / Time dial
Use this dial to select auto menu
programme and set the cooking
time. Use this dial to quick start
cooking by increments of 30
seconds. Each press adds 30
seconds. Use this button to also
start/ restart cooking.
Microwave button
Use this button to select the
microwave function.
Convection button
Use this button to select the
convection function.
Micro + Convection button
Use this button to select the
microwave and convection
combination function.
Grill / Micro + Grill button
Use this button to select the
grill and microwave + grill
combination function.
Clock / Weight button
Use this button to set the clock
and to select the default food
weight.
Stop / Clear button
Use this button to stop cooking
and clear cooking settings.
Door Handle

6
GB
Using Aluminium Foil in your Microwave
It is safe to use aluminium foil in your microwave as long as you follow these safety guidelines.
As with all metal, microwave energy cannot pass through foil, but provided that you keep the foil
away from the side of the microwave it will not cause sparks and there will not be any damage to your
microwave.
Using foil is a good way of shielding parts of food that you do not want to cook as quickly as others –
perhaps where the food is narrower and would otherwise overcook.
Place the foil over the area you want to shield, taking care that the foil will not touch the sides of the
microwave when the turntable rotates. Only use one piece of foil at a time so that you do not get sparks
between the separate pieces.
Follow these guidelines when using foil in your microwave:
• Remove foil lids from containers before using in the microwave. Some lids are made of card with a foil
covering – these should be removed too. Use a microwave safe transparent lid if possible.
• Stir food during cooking if the container has a lid or film cover.
• Always use the glass turntable.
• Use shallow containers with a large surface area. Do not use containers that are more than 1.25in
(3.5cm) deep.
• Use gloves when handling hot foil containers.
• Do not completely cover food with foil. The microwave energy cannot pass through the foil so the food
will not cook.
• Do not let aluminium foil touch the inside of the microwave.
• Do not use more than one piece of foil in the microwave at the same time.

7
GB
2. Choose a flat work surface for your microwave
away from heat sources such as radiators or
fires and away from cold areas. You should
allow a 10cm space all around the microwave
and 30cm above so that warm air can
escape from the vents during cooking – This
microwave is not designed to be built in.
Getting Ready
This microwave is designed for home use. It should not be used for commercial catering.
1. After unpacking your microwave, check that it has not been damaged whilst in the box. Make sure
there are no dents, and the door closes properly. A damaged microwave could allow microwave energy
to escape. Make sure that you have taken out all of the packaging from the inside of the microwave.
Please dispose of the plastic wrappings/ bags safely and keep out of the reach of babies and young
children.
3. Plug your microwave into a standard
household electrical socket (230 volt, 13 amp
rated). Avoid using a socket that also has an
adaptor and other equipment plugged in. Do
not use a multi adaptor.
4. Put the turntable ring inside the microwave
and place the glass turntable on top of the
ring. The turntable is shaped to sit securely on
the spindle. You must always use the turntable
and ring whenever you use the microwave.
Underside View
30cm
10cm10cm
Clock/Weight
Convection
u
/
T
i
n
m
e
e
M
Clock/Weight
Convection
u
/
T
i
n
m
e
e
M
Clock/Weight
Convection
u
/
T
i
n
m
e
e
M
Clock/Weight
Convection
u
/
T
i
n
m
e
e
M
Clock/Weight
Convection
u
/
T
i
n
m
e
e
M
Clock/Weight
Convection
u
/
T
i
n
m
e
e
M
Clock/Weight
Convection
u
/
T
i
n
m
e
e
M
5. To protect your work surface, we recommend
that you fix some non-slip cushion pads (not
included) to the underside of the microwave.

8
GB
Introducing Microwave Cooking
Always remember the basic safeguards you should follow when using any cooking equipment or handling
hot food.
See below for basic guidelines in microwave cooking.
Cooking with a Microwave
• Cooking with a microwave is much faster than conventional cooking and, whilst you should make sure
that food is fully cooked, you should be careful not to overcook it.
• Microwave energy can heat unevenly so stirring to distribute heat is very important. Always stir from
the outside, inwards.
• If you are cooking a number of individual foods at the same time, such as baked potatoes or small
cakes, arrange them evenly on the turntable so that they cook evenly. Never stack food in your
microwave.
• Turn larger foods such as meat roasts and poultry during cooking so that the top and bottom cook
evenly. It is also recommended to turn pieces of meat or poultry, especially if they have not been
deboned.
• Meat and poultry which is cooked for 15 minutes or more will brown lightly in it’s own fat. Anything
cooked for a shorter time can be brushed with a browning sauce to give an appetising colour.
• Strips of aluminium foil can be used to cover the thinner pieces of food to stop them overcooking
before the thicker parts of the food have had a chance to cook. Use the foil sparingly and wrap around
the food or container carefully to stop it touching the inside of the microwave which could cause
sparks.
• Microwave cook food using microwave energy that is similar to naturally occurring radio waves.
Normally, these “waves”would fade as they dispersed into the atmosphere but in a microwave they are
concentrated onto food causing it to heat up.
• Microwave energy cannot pass through metal – so it cannot escape from inside your microwave – but
it can pass through materials like glass, porcelain, plastic and paper.
These materials are used in the manufacture of microwave safe
cooking equipment.
• Microwave safe cooking equipment will still get hot as the food
it contains heats up.
The microwave energy focuses on the moisture in the food
causing lots of tiny vibrations. The vibrations get so great that the
moisture – and the food – heat up.

9
GB
Checking your Cooking Utensils
Most heat-resistant, non-metallic cooking utensils are safe to use in your microwave. If you are not sure if
you can use a utensil in your microwave, follow this simple test:
1. Put the utensil into the microwave next to a cup of water – use a cup that you know is microwave safe.
Close the door.
2. Turn the microwave on for 30 seconds only.
3. After 30 seconds, carefully check to see if the water has warmed up.
4. If the water has not warmed up but the utensil has, the utensil is not microwave safe and should not be
used in the microwave.
5. Do not use your hands to touch the utensils as it may already be hot.

10
GB
Microwave Heating Categories
Your microwave has been tested and labelled to meet the government’s voluntary agreement on the
reheating of pre-cooked food.
The heating characteristics and output power levels of microwave are usually calculated using a relatively
large portion of food (a 1000 gram load, IEC 705) but many packs of pre-cooked food are sold in smaller
packs, often about 350 grams.
The government, in partnership with food companies and microwave manufacturers, have set up a system
of heating categories to help you choose the reheating time for pre-cooked food.
850W
E
850W is the output power of the microwave.
E is the heating category for your microwave.
Check the cooking times for category E on the
food’s packaging to see how long it should be
cooked for. Please see below example for reference.
To Microwave:
1. Remove outer packaging.
2. Pierce film lid SEVERAL TIMES.
3. Place on a microwaveable plate.
4. Heat on full power.
5. Turn halfway through heating.
Heating
Category
Wattage
(IEC705)
B D 650W 750W
Full power (in
minutes)
2222
Turn Turn Turn
Full power
(in minutes)
2 1.5 2 1.5
Standing time
(in minutes)
1111
To Microwave from frozen:
1. Remove outer packaging.
2. Pierce film lid SEVERAL TIMES.
3. Place on a microwaveable plate.
4. Heat on full power.
5. Turn halfway through heating.
Heating
Category
Wattage
(IEC705)
B D 650W 750W
Full power (in
minutes)
3 2.5 3 2.5
Turn Turn Turn
Full power
(in minutes)
4 3.5 4 3.5
Standing time
(in minutes)
1111

11
GB
Checking your Microwave
Check your microwave after unpacking.
For your safety, the microwave stops if the
door is opened during cooking. Close the
door and press the Menu / Time button
to continue the cooking cycle.
1. Pull the door handle to open the door.
Place a cup of water on the glass turntable.
Make sure the cup is microwave safe (it should
not have any decorative metal trim).
2. Close the door.
3. Press the Stop / Clear button to clear any
settings that have already been made.
4. Press the Menu / Time dial once to start a
simple 30-second microwave cooking cycle.
This allows you to check the operation of the
microwave.
5. When the cooking cycle has finished, the
water should be hot (be careful when you take
the cup out of the microwave). Press the Stop
/ Clear button to clear any settings.
Stop/Clear
Micro+
Convection
Clock/Weight
Convection
Grill/
u
/
T
i
n
m
e
e
M
Micro+Grill
Steam
When you microwave food, steam is created as water in the food heats up and evaporates.
The steam formed during microwave cooking is entirely safe. It has to escape from the microwave to
prevent pressure from building up inside the microwave. It does this through the vents on the back of the
microwave and from around the door.
Condensation
As the steam cools, you may find the condensation
gathers in small pools inside your microwave and on the
work surface beneath the door and vents. Always dry
the microwave after cooking foods with a high moisture
content.
Your microwave is designed to let steam escape from the
vents and around the door without microwave energy
escaping. There is no danger of microwave energy
escaping with the steam.
3, 5
4
Clock/Weight
Convection
u
/
T
i
n
m
e
e
M
Clock/Weight
Convection
u
/
T
i
n
m
e
e
M
Clock/Weight
Convection
u
/
T
i
n
m
e
e
M
Clock/Weight
Convection
u
/
T
i
n
m
e
e
M
Clock/Weight
Convection
u
/
T
i
n
m
e
e
M
Clock/Weight
Convection
u
/
T
i
n
m
e
e
M
Clock/Weight
Convection
u
/
T
i
n
m
e
e
M

12
GB
Clock Setting
When the microwave is connected to the mains power, the LED display will show 1:01, and the microwave
will sound once. Please ensure you have set the clock prior to use.
Please follow the steps below to set the clock.
1. Press the Clock / Weight button once and
the LED display will also show Hr:12. Press
it again and the LED display will show Hr:24.
This indicate it is in clock setting mode.
2. Turn the Menu / Time dial to adjust the hour
figures. For 12-hour clock (Hr:12), the input
time has to be within 1-12. For 24-hour clock
(Hr:24), the input time has to be within 0-23.
3. Press the Clock / Weight button and the
minute figures will flash.
4. Turn the Menu / Time dial to adjust the
minute figures. The input time has to be
within 00-59.
5. Press the Clock / Weight button again to
complete the clock setting. “ : ” will start
flashing and the time will illuminate to
confirm that the clock setting is completed.
Stop/Clear
Micro+
Convection
Clock/Weight
Convection
Grill/
u
/
T
i
n
m
e
e
M
Micro+Grill
1, 3, 5
2, 4

13
GB
Setting the Child Lock
This feature prevents the electronic operation of the microwave by locking the operation of the control
panel until you have cancelled it.
Please follow the steps below to set the child lock.
1. Press the Stop / Clear button for 3 seconds
and microwave will sound. The LED display will
also show to indicate that the microwave
has set the child lock.
2. To release the child lock, press the Stop /
Clear button again for 3 seconds and the
microwave will sound to indicate that the
microwave has released the child lock.
Stop/Clear
Micro+
Convection
Clock/Weight
Convection
Grill/
u
/
T
i
n
m
e
e
M
Micro+Grill
1, 2

14
GB
Microwave Cooking
For simple Microwave Cooking, follow the steps below. For instance: If you want to use 80% microwave
power to cook for 20 minutes.
1. Press the Microwave button once and the LED
display will show P100 .
2. Press the Microwave button again to change
the power level to P-80.
3. Turn the Menu / Time dial to adjust the
cooking time until the LED display shows
20:00.
4. Press the Menu / Time dial once to confirm
and start cooking.
5. Press the Stop / Clear button once to stop
and hold the cooking. Press again to cancel
the setting.
Power Level Control
Order LED Display Microwave Power
1 P100 100%
2 P-80 80%
3 P-60 60%
4 P-40 40%
5 P-20 20%
When removing food from the microwave,
please ensure that the power is switched
off. Operating the microwave without food
in it can result in overheating and damage
the magnetron.
Stop/Clear
Micro+
Convection
Clock/Weight
Convection
Grill/
u
/
T
i
n
m
e
e
M
Micro+Grill
1, 2
5
3, 4

15
GB
Grill or Combination Cooking
For Grilling, follow the steps below.
1. Press the Grill / Micro + Grill button once
and the LED display will show . There is one
power level which reaches a temperature of
approximately at 160°C.
2. Turn the Menu / Time dial to adjust the
cooking time. The time setting is between :10
- 95:00.
3. Press the Menu / Time dial to confirm and
start the cooking.
4. Press the Stop / Clear button once to stop and
hold the cooking. Press it again to cancel the
setting.
For Combination Cooking, follow the steps below.
1. Press the Grill / Micro + Grill button till the
LED display shows , , and Co-1. Press the
Grill / Micro + Grill button again and the LED
display will show , , and Co-2.
2. Turn the Menu / Time dial to adjust the
cooking time.
3. Press the Menu / Time dial to confirm and
start the cooking.
4. Press the Stop / Clear button once to stop and
hold the cooking. Press it again to cancel the
setting.
Combination Button Control
Order LED
Display Suitable For Microwave
Time Interval
Grill
Time Interval
Cavity
Temperature
1,
Co-1
Fish, Potatoes or Au
Gratin 30% 70%
Approximately keeping at
160ºC
2,
Co-2
Pudding, Omelets,
Baked Potatoes and
Poultry
55% 45%
The microwave will sound twice to remind you to turn your food over periodically for better
grilling performance. This is normal.
Press the Stop / Clear button once to stop cooking and open the door. Then, turn your food over
and close the door. Press the Menu / Time dial to continue cooking.
Stop/Clear
Micro+
Convection
Clock/Weight
Convection
Grill/
u
/
T
i
n
m
e
e
M
Micro+Grill
1
4
2, 3

16
GB
Convection Combination Cooking
For Combination Cooking (Microwave and Convection), follow the steps below.
1. Press the Micro + Convection button once
and the LED display will flash 200ºC. Keep
pressing the Micro + Convection button
until the LED display shows your preferred
temperature. The temperature ranges from
110ºC - 200ºC.
2. Place your food in the microwave and close
the door. Turn the Menu / Time dial to adjust
the cooking time. The time setting is between
:10 to 95:00.
3. Press the Menu / Time dial once to confirm
and start cooking.
4. Press the Stop / Clear button once to stop
and hold the cooking. Press again to cancel
the setting.
The microwave will sound twice to remind
you to turn your food over periodically for
better cooking performance. This is normal.
Press the Stop / Clear button once to stop
cooking and open the door. Turn your food
over and close the door. Press the Menu /
Time dial to continue cooking.
Stop/Clear
Micro+
Convection
Clock/Weight
Convection
Grill/
u
/
T
i
n
m
e
e
M
Micro+Grill
1
4
2,3
Microwave + Convection Button Control
Order LED
Display
Microwave Time
Interval
Convection
Time Interval
Cavity
Temperature
1 200°C 30% 70% 200°C
2 170°C 45% 55% 170°C
3 140°C 58% 42% 140°C
4 110°C 73% 27% 110°C

17
GB
Convection Cooking (with preheating)
Convection Cooking allows you to cook food like a traditional oven.
It is recommended to preheat the oven to the appropriate temperature before placing the food in the
oven. Microwave power will not be used.
1. Press the Convection button once and the
LED display will display 200ºC.
2. Keep pressing the Convection button
until the LED display shows your preferred
temperature setting. The temperature ranges
from 110ºC to 200ºC.
3. Press the Menu / Time dial to start preheating.
When the preheating temperature has been
reached, the oven will sound once.
Cooking time cannot be input until the
preheating temperature is reached and
the oven door is opened.
4. Place your food in the oven and close the
door.
5. Turn the Menu / Time dial to adjust the
cooking time. The maximum time setting is 95
minutes.
6. Press the Menu / Time dial to confirm and
start cooking.
You can check the convection
temperature while cooking is in progress
by pressing the Convection button.
Stop/Clear
Micro+
Convection
Clock/Weight
Convection
Grill/
u
/
T
i
n
m
e
e
M
Micro+Grill
1, 2
3, 5, 6

18
GB
Convection Cooking (without preheating)
For Convection Cooking without preheating, please follow the steps below.
For instance: If you want to cook your food for 20 minutes at 180ºC.
1. Press the Convection button once and the
LED display will display 200ºC.
2. Keep pressing the Convection button until
the LED display shows 180ºC. The temperature
ranges from 110ºC to 200ºC.
Alternatively, press the Convection
button once, then press the Menu /
Time dial for quick start 30 minutes
cooking.
3. Place your food in the oven and close the
door. Turn the Menu / Time dial to adjust the
cooking time to 20:00.The maximum time
setting is 95 minutes.
4. Press the Menu / Time dial to confirm and
start cooking.
5. Press the Stop / Clear button to stop cooking
and cancel the setting.
Stop/Clear
Micro+
Convection
Clock/Weight
Convection
Grill/
u
/
T
i
n
m
e
e
M
Micro+Grill
1, 2
5
3, 4

19
GB
Multi- Stage Cooking
For Multi-Stage Cooking, please follow the steps below.
For instance: If you want to grill with convection at 200ºC for 10 minutes, then cook it with 80% microwave
power for 7 minutes and finally grill it for 8 minutes.
Auto Menu Cooking (CODE 1 to CODE 8) cannot be programmed in Multi-Stage Cooking.
1. Press the Convection button once and the
LED display will show 200ºC.
2. Turn the Menu / Time dial to adjust the
cooking time until the LED display shows
10:00.
3. Press the Microwave button once and the LED
display will show P100 and 2S. Press it again
and the LED display will show P-80.
4. Turn the Menu / Time dial to adjust the
cooking time until the LED display shows 7:00.
5. Press the Grill / Micro + Grill button once and
the LED display will show and 3S. Turn the
Menu / Time dial to adjust the cooking time
until the LED display shows 8:00.
6. Press the Menu / Time dial to confirm and
start cooking. The microwave will sound
once to indicate it has started the grill with
convection count down. The microwave
will sound again as it starts the microwave
cooking and displays S2 (the second stage).
Then, the microwave will sound again as it
starts the grill cooking and displays S3 (the
third stage). Once completed, the microwave
will sound five times to indicate the
completion.
7. Press Stop / Clear button to stop and cancel
the setting.
Stop/Clear
Micro+
Convection
Clock/Weight
Convection
Grill/
u
/
T
i
n
m
e
e
M
Micro+Grill
1
5
7
3
2, 4,
5, 6

20
GB
Auto Cooking
This feature allows you to cook most of your food based on the food category and the weight.
Select the category and choose the default weight of the food. For quick reference of the cooking time and
the default weight, please refer to the Auto Menu table.
Auto Menu
1. Turn the Menu / Time dial to select Auto
Menu cooking function. The LED display will
show 1to 8.
2. Press the Clock / Weight button to choose the
default weight for your chosen programme.
Please refer to the Auto Menu table for
information.
3. Press the Menu / Time dial to confirm and
start the cooking.
4. Press the Stop / Clear button once to stop and
hold the cooking. Press it again to cancel the
setting.
For example if you want to cook 1000g of chicken
using Auto Menu programme. Please follow the
steps below.
• Press the Menu / Time button to select Auto
Menu programme for chicken. The LED display
will show 4.
• Press the Clock / Weight button to choose
the default weight until the LED display shows
1000.
• Press the Menu / Time dial to confirm and
start the cooking.
• Press the Stop / Clear button once to stop and
hold the cooking. Press it again to cancel the
setting.
Stop/Clear
Micro+
Convection
Clock/Weight
Convection
Grill/
u
/
T
i
n
m
e
e
M
Micro+Grill
4
2
1, 3
This manual suits for next models
2
Table of contents
Languages:
Other Sandstrom Microwave Oven manuals

Sandstrom
Sandstrom S20BIG13E User manual

Sandstrom
Sandstrom SCS2510E User manual

Sandstrom
Sandstrom S20MB10E User manual

Sandstrom
Sandstrom S25MB12 User manual

Sandstrom
Sandstrom S23MGB13 User manual

Sandstrom
Sandstrom S20MB10 User manual

Sandstrom
Sandstrom S25CDMB12 User manual

Sandstrom
Sandstrom S20BIG15E User manual