Santa Fe WG1TB User manual

OWNER’S MANUAL
& RECIPE BOOKLET
WG1TB

1
IMPORTANT SAFEGUARDS
When using electrical appliances, basic safety precautions should
always be followed, including the following:
1. Read all instructions.
2. Do not touch hot surfaces. Use handles or knobs.
3. To protect against electric shock, do not immerse Temperature
Control Probe, cord, or plug, or the appliance in water or
other liquid.
4. Close supervision is necessary when any appliance is used
near children. This appliance is not for use by children.
5. Unplug from outlet when not in use and before cleaning. Allow
to cool before putting on or taking off parts, and before
cleaning the appliance.
6. Do not operate any appliance with a damaged cord or plug or
after the appliance malfunctions or has been damaged in any
manner. Contact Consumer Service.
7. The use of accessory attachments not recommended by
Salton, Inc. may cause injuries.
8. Do not use outdoors.
9. Do not let cord hang over edge of table or counter, or touch
hot surfaces.
10. Do not place on or near a hot gas or electric burner, or in a
heated oven.
11. Do not use appliance for other than intended use.
12. Prior to connecting or disconnecting plug from wall outlet, turn
Temperature Control Knob to “OFF.” Always attach
Temperature Control Probe to appliance first, then plug cord
into wall outlet. To disconnect, turn Temperature Control Knob
to “OFF,” then remove plug from the wall outlet.
13. Extreme caution must be used when moving an appliance
containing hot oil or other hot liquids. Allow grease or oil to cool
before disposal.
14. Do not remove Grill from Base until Grill is cool.
THIS APPLIANCE IS FOR HOUSEHOLD USE ONLY
SAVE THESE INSTRUCTIONS

2
Additional
Important Safeguards
1. A person who has not read and understood all operating and
safety instructions is not qualified to operate this appliance.
2. If this appliance falls or accidentally becomes immersed in water,
unplug it from the wall outlet immediately. Do not reach into
the water!
3. The Temperature Control Probe is designed to yield precise
results. Use care not to drop, hit, or impact it against
hard surfaces.
4. Provide adequate air space around all sides of the appliance
during use. Do not operate this appliance while it is touching
curtains, wall coverings, clothing, dish towels, or other
flammable materials.
5. Proper precautions must be taken to prevent the risk of burns,
fires, or other damage to persons or property.
6. CAUTION: The grilling surface becomes very hot. Avoid
contact with hot Grill. Always use oven mitts to handle the
hot SANTA E BU ET™ Removable Grill/Heating Plate.
7WARNING! While using the SANTA E BU ET™ with the
Lid in place, steam will rise from the Steam Hole. Keep
hands and face away from Steam Hole.
8. When grilling, always use Grill with Base and make sure to slide
the grease-catching Drip Tray into its track underneath the Grill
side of the SANTA E BU ET.™It will lock easily into place.
Failure to engage the Drip Tray may result in hot grease dripping
onto your table or counter top.
9. Wait for the Removable Grill/Heating Plate and the Glass Lid to
cool down completely before touching or cleaning.
10. The cord to this appliance should be plugged into a
110V/120V AC electrical outlet only.
11. Do not leave this appliance unattended during use.
12. Use the SANTA E BU ET™ on a hard, flat surface. Don’t
place it near a flame or heat or on a soft surface (such as carpet).
Avoid placing it where it may fall or tip over during use.
13. If this appliance begins to malfunction during use, immediately turn
the Temperature Control Knob to “OFF” and unplug the cord.
Remove the Probe from the Grill. Do not use or attempt to repair
the malfunctioning appliance! Contact Consumer Service.
14. Do not use the Glass Lid if cracked or chipped.
15. THIS APPLIANCE IS FOR HOUSEHOLD USE ONLY.

Short Cord Instructions
A short power-supply cord is provided to reduce the risk resulting from
becoming entangled in or tripping over a longer cord.
Longer detachable power-supply cords or extension cords are
available and may be used if care is exercised in their use.
If a longer detachable power-supply cord or extension cord is used,
(1) the marked electrical rating of the cord set or extension cord
should be at least as great as the electrical rating of the appliance,
and (2) the longer cord should be arranged so that it will not drape
over the counter top or table top where it can be pulled on by
children or tripped over unintentionally.
Polarized Plug
This appliance has a polarized plug (one blade is wider than the
other). To reduce the risk of electric shock, this plug is intended to
fit into a polarized outlet only one way. If the plug does not fit fully in
the outlet, reverse the plug. If it still does not fit, contact a qualified
electrician. Do not attempt to modify the plug in any way.
Temperature
Control Probe
Use only the Temperature Control Probe (P/N 21145) supplied with
this product. Using any other type of Temperature Control Probe
may cause fire, electric shock, or injury.
Plasticizer Warning
CAUTION: To prevent Plasticizers from migrating from the
finish of the counter top or table top or other furniture, place
NON-PLASTIC coasters or place mats between the appliance
and the finish of the counter top or table top.
Failure to do so may cause the finish to darken, permanent
blemishes may occur or stains can appear.
3

W
a
r
m
L
o
w
M
e
d
i
u
m
H
i
g
h
O
f
f
1.
14.
15.
16.
2.
2.
3.
4.
5.
6.
7.
8.
9.
10.
11.
13.
12.
Lid and Lid Knob Assembly
1. Unscrew the Lid Knob from inside of the Lid.
2. Position the Knob on top of its Base on
the outside of the Lid, at its topmost
point. Screw the Lid Knob from the
bottom through the top of the Lid. (See
sketch at right.) Both the Knob and its
Base must always be on the exterior of
the Lid during cooking.
3. Periodically check to make sure the Knob
is securely fastened onto the Lid. Always
tighten by hand; do not over tighten.
1. Base (P/N 21143)
2. Cool Touch
Grill Handles
(P/N 21144)
3. Removable
Non-Stick
Ribbed Grill
4. Adjustable
Temperature
Control Probe
(P/N 21145)
5. Temperature
Control Knob
6. Power On/
Indicator Light
7. Power Cord with
Polarized Plug
8. Glass Lid
(P/N 21146)
9. Lid Knob
(P/N 21150)
10. Steam Hole
11. Stainless Steel
Tortilla Pan
(P/N 21147)
12. Probe Receptacle
13. Non-Stick Round
Heating Plate
14. Grease Drain
15. Drip Tray (P/N 21148)
16. Plastic Tongs
(P/N 21149)
Getting To Know Your
Santa e BU ET™
4

5
Congratulations on your purchase of the SANTA E BU ET.™
This all-in-one kitchen buffet makes preparing your favorite dishes
quick and easy. Your family and friends will love using the SANTA
E BU ET™ to make and serve delicious meals and snacks for
family gatherings or festive parties. Best of all, the SANTA E
BU ET™ has a non-stick grilling surface which is removable to
make cleanup a snap!
Before Using or The irst Time
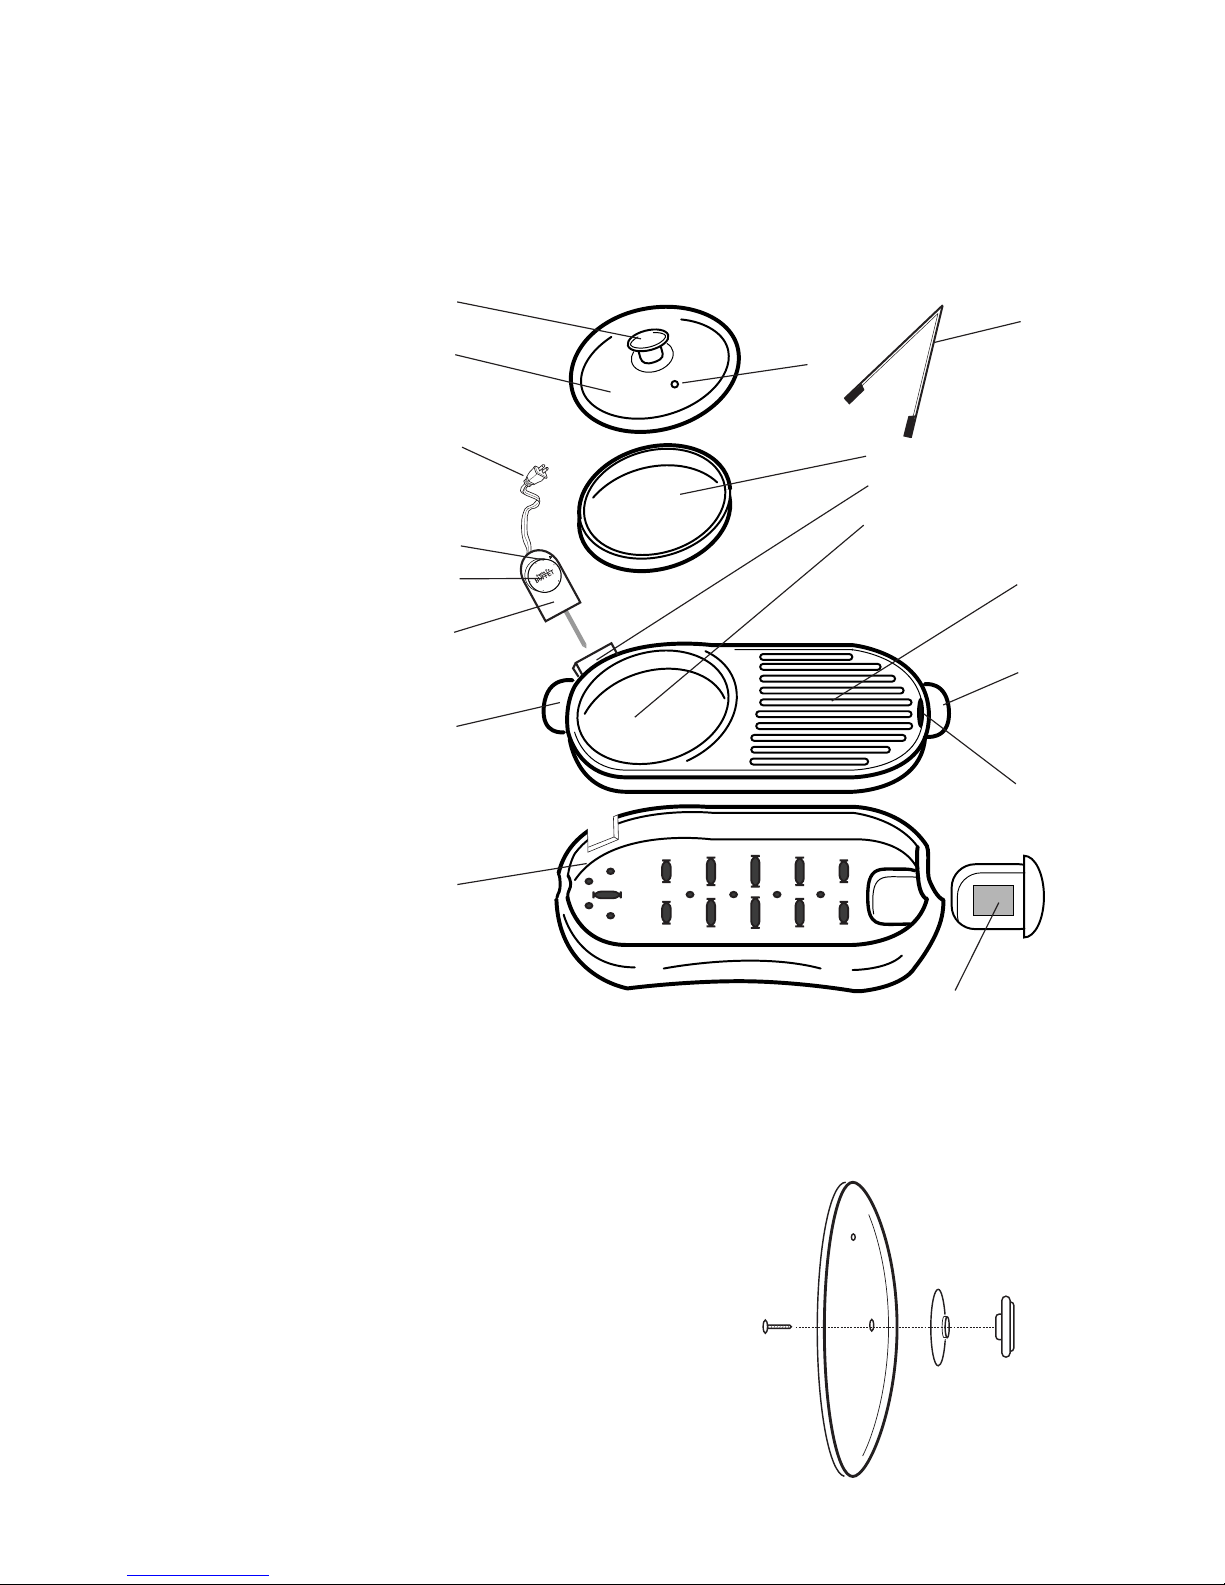
1. Attach Lid Knob to Lid following instructions and illustration on page 4.
2. Wash the Glass Lid, Tortilla Pan, Drip Tray, Tongs and Base in warm,
soapy water. Rinse all parts well and dry thoroughly.
CAUTION: Do not immerse the Temperature Control Probe in
water or any other liquid!
3. Wipe the Temperature Control Probe with a damp cloth. Dry
thoroughly with a soft cloth.
4. Clean the Removable Grill/Heating Plate by carefully rinsing the
coated surface with warm, soapy water. Wipe clean with a soft,
damp cloth. If necessary, you may submerge the Grill in water, but
use care not to submerge the end of the Grill which houses
the Probe Receptacle. Rinse well and dry all parts thoroughly.
Instructions or Use
1. To preheat the SANTA E BU ET,™place the Lid on the Round
Heating Plate. Turn the Temperature Control Knob to “OFF” and
attach Temperature Control Probe to the BU ET. Then plug the
cord into a wall outlet. As the Temperature Control Knob is turned,
the Light on the Temperature Control Probe will illuminate and the
Grill will begin to heat.
2. The Indicator Light will go off when the temperature heat level
(“HIGH,” “MEDIUM,” “LOW,” or “WARM”) is reached.
CAUTION: The grilling surface becomes very hot. Avoid contact
with hot Grill. The use of cooking mitts or potholders is
recommended.
NOTE: The Indicator Light will turn on and off while you are cooking.
This is normal and indicates that the Thermostat is cycling on and off
to maintain a constant cooking temperature.
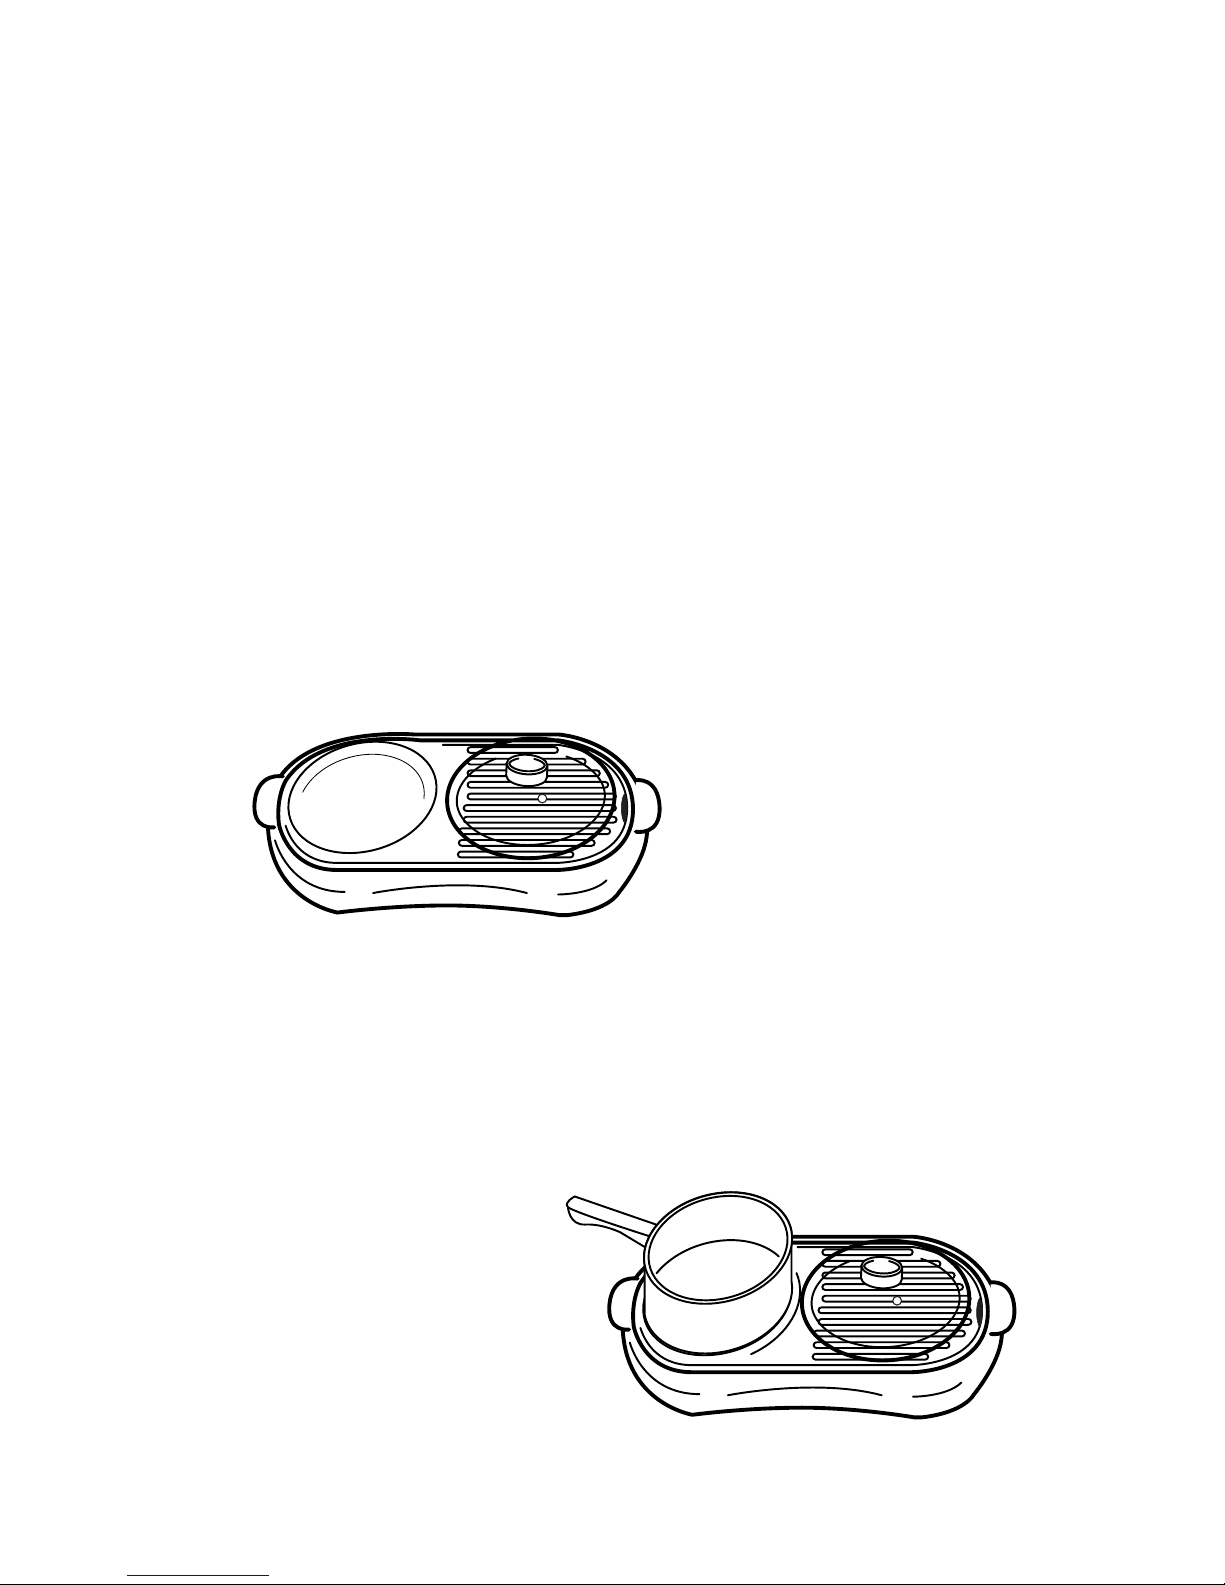
3. You may use the Glass Lid, on either the flat, Round Heating Plate or
the Ribbed Grill cooking surface. See “Wrap Station and Grill” and
“Party Service Buffet” Sections of this manual for correct Grill set-up.
4. Exact cooking times vary for different types of foods and recipes.
Consult your recipe and adjust as needed. With the Lid in place on
the Round Heating Plate, your SANTA E BU ET™ performs as
a vented covered pan.
5. When your food is ready, turn the Temperature Control Probe to
“OFF.” Always remove your food using the SANTA E Plastic
Tongs provided, or a wooden spatula, or non-metal fork.

Instructions or Use (Continued)
6
CAUTION: Do not use metal or sharp-edged utensils, as these can
damage the non-stick surface of the Grill. Do not leave any
plastic utensils in or on the grilling surface, while it is plugged
in or is hot.
6. When cooking or serving is finished, unplug the SANTA E
BU ET™ from the wall outlet first, and then remove Temperature
Control Probe from the appliance.
CAUTION: Always disconnect the plug from the wall outlet when
not in use.
Wrap Station and Grill
1. The circular Tortilla Warmer can be used to hold the tortillas for tacos,
enchiladas, tostadas, burritos, etc. to which grilled vegetables and
meats, fish and/or cheese can be added.
Place the Stainless Steel Tortilla Pan into the Round Heating Plate.
You can place up to 10 tortillas into the Pan. Use the Glass Lid to
keep tortillas warm and moist for up to 30 minutes.
2. The non-stick coating on the SANTA E BU ET™ means
cooking with very little fat or oil. If desired, a mere 1/2 teaspoon is all
you will need to coat the inside cooking surfaces to prevent sticking
or add flavor.
*See “User Maintenance Instructions” regarding use of oils, butter,
and margarine.
3. Before grilling, slide the grease-catching Drip Tray underneath the
Ribbed Grill of the SANTA E BU ET™, directly under the Grease
Drain. The Tray should slide effortlessly into a firm locked position.
When the Grill is being used, grease drips through the Grease Drain
located under the Ribbed Grill (see illustration on page 4).
4. With the Temperature Control Knob turned to “OFF,” attach the
Temperature Control Probe to the unit first. Then plug the SANTA
E BU ET™ into electric outlet. Turn Temperature Control Knob to
the desired setting and preheat 5-8 minutes or until Light goes out.
Carefully remove the Lid, preferably using oven mitts.
5. Use Plastic Tongs provided to carefully place the items to be cooked
on the SANTA E BU ET™ grilling surfaces.
Wrap Station with
Stainless Steel
Tortilla Pan keeps
up to 10 tortillas
warm for up to
30 minutes.

CAUTION: Be careful not to touch any part of the
SANTA E BU ET™ as Grill parts will be HOT!
6. Grill meats, vegetables or fruits on the Ribbed Grill. The Ribbed
Grill adds beautiful grill lines while searing in juices and adding
flavor. Cook foods according to your recipes.
7. Depending on the foods you are cooking, cook with the Lid
either on or off.
Party Service Buffet
1. Use as a dual Grill, one side covered, one side open.
2. The Glass Lid may be used on either side.
WARNING! While using SANTA FE BUFFET™ with the Lid in
place, steam will rise from the Steam Hole. Keep hands
and face away from the Glass Lid’s Steam Hole.
Always use oven mitts to handle hot Grill/Heating Plate or
Tortilla Pan.
3. The flat, Round Heating Plate of the SANTA E BU ET™
can be used for preparing a wide variety of foods such as
pancakes, eggs, hamburgers, pizza, or stir-fries. Grill sausages,
bacon, meats, fruits, vegetables on the Ribbed Grill.
4. After foods are cooked, turn the Temperature Control Knob to
“WARM.” Let family and guests help themselves to delicious
foods kept at perfect serving temperature.
5. Add your own pan (up
to 8”) to keep sauces,
soups, stews, chilies,
party dips warm. Serve
grilled foods, toasted
tortilla chips, warmed pitas
covered on the Grill at the
same time.
6. When cooking is finished, turn
the Temperature Control Knob to
“OFF” and unplug the SANTA E BU ET™.
7
Cook on both the Ribbed
Grill and the Heating Plate.
Make pizza crust in the flat
Heating Plate and grill
veggies and meat toppings
at the same time.
Wrap Station & Grill (Continued)

Hints or Best Results
1. The non-stick coating on the SANTA E BU ET™ means
cooking without any fat at all! Use butter, margarine or oil only
for extra browning or flavor. Use 1/2 teaspoon to coat the
cooking surfaces. We recommend using a cooking brush to
apply oil or melted butter to the Ribbed Grill surface.
*See “User Maintenance Instructions” regarding use
of oils or butter.
2. The SANTA E BU ET™ has an easy-to-use Adjustable
Temperature Control with 4 temperature settings: “HIGH,”
“MEDIUM,” “LOW,” and “WARM.”
3. Use the Adjustable Temperature Control on “LOW”
for scallops and tender seafood — on “HIGH” for
swordfish steaks.
4. For beef and chicken, we recommend using “HIGH” heat to
get those grill marks you love!
5. Personal taste, thickness of cut of fish, meat, vegetables
or fruits may vary cooking times. Always check for
doneness and always use fresh, refrigerated foods for
you and your family.
USDA NOTE: The USDA recommends that meats such as beef,
pork, lamb, etc. should be cooked to an internal temperature of
160ºF and poultry products should be cooked to an internal
temperature of 170ºF - 180ºF to be sure any harmful bacteria,
Listeria and Ecoli, has been killed. When reheating meat/poultry
products, they should also be cooked to an internal
temperature of 165ºF.
6. Cleaning the SANTA E BU ET™ is a snap! The entire
grilling surface lifts easily out of the Base. Clean thoroughly
and replace Grill by lining up the cut-out notch for the
Temperature Control Probe on the Grill and the Base.
7. To loosen tidbits that have dried on to the Grill Pan, remove
the Temperature Control Probe. Pour 1/2 cup water onto
Grill surfaces, let soak, pour off the water and then use a
sponge or non-scratching plastic kitchen dish brush.
(See “User Maintenance Instructions” for more suggestions.)
8. To take advantage of the added heat/steaming effect from use
of the Glass Lid, or to keep foods from splattering, cook with
the Lid in place.
8

9
User Maintenance
Instructions
WARNING: To avoid electric shock, unplug from outlet when
not in use and before cleaning. Use care not to fully
submerge Probe Receptacle during cleaning.
1. Before cleaning, turn the Temperature Control Probe to “OFF,”
and unplug the appliance from the wall outlet. Remove the
Temperature Control Probe from the BU ET and allow entire
appliance to cool thoroughly.
2. Inside cleaning: Remove the Grill from the Base to clean.
Clean the Removable Grill/Heating Plate by carefully rinsing the
coated surface with warm, soapy water. Wipe clean with a soft,
damp cloth. If necessary, you may submerge the Grill in water, but
use care not to submerge the end of the Grill which houses
the Probe Receptacle. Rinse well and dry all parts thoroughly.
The Glass Lid and Tortilla Pan should be rinsed with warm
water and, if necessary, cleaned with a soft cloth or sponge
and wiped dry.
NOTE: Both the Lid and the Stainless Steel Tortilla Pan are
dishwasher safe!
Empty the Drip Tray and clean with warm, soapy water. Wipe dry.
3. Although the Grills are coated with a non-stick coating, some food
may still adhere to the Removable Grill/Heating Plate. To remove,
simply pour a little cooking oil onto the baked-on food and allow to
stand for 5 to 10 minutes. This should soften the food and make it
easy to remove. If this method fails, we then suggest wiping the pan
with a slightly dampened cloth and a little dishwashing detergent.
CAUTION: Handle the Glass Lid with extreme care, as it may
become slippery when wet.
4. Outside cleaning: Wipe the plastic Base with a soft dry cloth.
Dry both Grill surfaces thoroughly.
5. DO NOT use abrasive cleaners or scouring pads or steel wool to
clean this appliance.
6. Do not immerse Adjustable Temperature Control Probe in water or
any other liquid.
IMPORTANT:
Your Salton®SANTA E BU ET™ is coated with a non-stick
surface. Rather than using grease or shortening, please use liquid
margarine, melted butter or cooking oil. We do not recommend using
spray-on, aerosol type coatings or food release products, as these
build up a residue on the cooking surface.
Any service requiring disassembly other than the above cleaning must
be performed by a qualified electrician.

10
Recipes
pp
ppaa
aarr
rrtt
ttyy
yy
ss
ssnn
nnaa
aacc
cckk
kkss
ss
roasted tomatillo salsa*
12 fresh tomatillos, husked and washed
1 small - medium onion, peeled and quartered
2 tablespoons salt
4 tablespoons olive oil
1 teaspoon canned smoked chipotle peppers
(in adobo sauce)
2 small cucumbers (pickling size), chopped
1/4 cup grapefruit juice (or lime juice)
2 -3 tablespoons honey
1 cup fresh cilantro, soft stems included
Cut washed and husked tomatillos in half and place into a
medium bowl with the quartered onion. Drizzle 4 tablespoons of
olive oil over tomatillos and onion, add salt and mix to coat lightly.
Preheat SANTA E BU ET™ on “HIGH” 5-8 minutes.
Place tomatillos face down onto Ribbed Grill and add onions.
Place Glass Lid over tomatillo/onion mixture.
Grill tomatillo/onion mixture for 10 minutes, turn and continue
cooking with Lid in place until tomatillos and onions are soft and
browned. If mixture begins to burn, turn Control down between
“MEDIUM” and “HIGH,” for about 15-20 minutes in total. When
finished, remove items from Grill.
When tomatillo/onion mixture is cooled, place into blender. Add
the remaining ingredients, chipotle pepper, cucumbers, juice,
honey and cilantro. Process lightly until well blended.
Chill and serve.
*PLEASE NOTE: THIS SALSA IS SPICY! To tone down the
heat, add more cucumbers. For medium-mild tomatillo salsa,
omit the chipotle pepper and add 2 or more seeded/stemmed
jalapeno peppers to taste. For non-spicy salsa, add red/green
bell peppers to taste, or omit peppers altogether.
PARTY Variation: Set up a buffet table with plenty of
fresh salsa served. Offer individual bowls of finely chopped
cucumbers, red tomatoes, minced red onion, cilantro, finely
minced jalapeno peppers, canned, drained black beans.

BORDER CHILI CHEESE DIP WITH
RESH DUSTED CORN CHIPS
4 - 6 7" corn tortillas Spices:
1/2 teaspoon chili powder
1 - 15.5 oz. jar Salsa con Queso 1/4 teaspoon cumin
1 - 4 oz. can diced green chilies 1/4 teaspoon salt
1 teaspoon sugar
corn oil or butter to coat tortillas
Empty one jar of Salsa con Queso into a small pan, and mix one
small can of drained green chilies into cheese. Stir. Add pan directly
to Heating Plate. Remember to stir cheese dip occasionally.
Preheat SANTA E BU ET™ on “HIGH” 5-8 minutes.
Turn down to “MEDIUM.”
In small bowl, mix spices together well. Cut each corn tortilla into
6 pieces. Place as many pieces on the Ribbed Grill as comfortable
(about 6-8 at time). Brush tortillas lightly with melted butter or corn
oil. Sprinkle tortillas with some of the spice mixture, saving enough
for the rest of the batches. Tortilla chips should grill approximately
1-2 minutes on each side.
Repeat with remaining tortilla chips until all have been grilled.
Remove onto plate.
Spoon cheese dip into small side dishes for dipping.
Variations: Fire up your Queso with some smoked Chipotle
peppers. Set out separate bowls of black beans, refried beans,
pico de gallo, chopped onions, diced carrots and jicama, and
fresh guacamole for your guests to create their own Border
Appetizer Plate. Spoon chili cheese dip over finished plates.
11

12
GRILLED STU ED POBLANO
PARTY poppers
3 small poblano peppers, stems removed and seeded
4 oz. cream cheese, softened
4 oz. shredded taco cheese
1/3 cup green olives with pimentos, chopped
1 tablespoon cilantro, roughly chopped
1/2 teaspoon ground cumin
Fill Round Heating Plate about 1/2 way with water. Preheat
SANTA E BU ET™ 5-8 minutes on “HIGH.”
Wash peppers and cut off stem ends. Scrape out seeds. In about
2 minutes, water will be boiling. Add peppers cover with Glass Lid.
As peppers steam, they will wilt slightly. Steam the peppers for
8 minutes. Remove with Tongs onto plate.
In a small bowl, while peppers are steaming, beat the cream
cheese until soft, then add the taco cheese, olives, cilantro
and cumin.
When peppers are cool enough to handle (about 2 minutes), stuff
the peppers with cheese mixture. Do not fill to the top because, as
they grill, the cheese will ooze.
These peppers can be prepared up to 2 days ahead, cover with
plastic wrap and refrigerate until ready to finish and serve.
Preheat SANTA E BU ET™ on “HIGH” for 5 minutes. Turn
heat down between “MEDIUM” and “HIGH.” Place peppers on
Ribbed Grill, with Glass Lid on top. Grill for a total of 8-10 minutes,
turning every few minutes, until grilled on each side. Cheese should
be melted and hot. Remove carefully with Tongs.
Cut in halves or serve whole.
Serves 3-6.
Variations: For fun, mouth-watering appetizers, use jalapeno
peppers and reduce steam time to 4 minutes. Proceed with recipe.
Or, stuff poblano peppers with cheese, rice and chopped, grilled
sausage. Experiment with various cheeses and cheese blends.

13
bb
bbrr
rree
eeaa
aakk
kkff
ffaa
aass
sstt
tt
santa fe pancakes with
TURKEY SAUSAGES
1 cup Aunt Jemima® Pancake Mix
1 can cream corn (8.75 oz.)
1 egg
4 tablespoons medium hot salsa (with black beans and corn)
2 tablespoons canned, diced green chilies
cayenne pepper or tabasco sauce to taste
1 tablespoon oil (optional to coat Grill)
1 - 14 oz. package turkey sausages
Preheat SANTA E BU ET™ between “MEDIUM” and
“HIGH” for 5-8 minutes. Place turkey sausages evenly on Ribbed
Grill. Grill, turning sausages on all sides for 12-15 minutes or until
golden brown.
While sausages are cooking, combine pancake batter and all
ingredients listed above (except sausages and oil) into a medium
mixing bowl and mix lightly.
After sausages have grilled about 8 minutes, begin ladling pancakes
by the tablespoon into the Round Heating Plate. About 3 - 4 small
pancakes will fit. When pancakes start to bubble on top (2 minutes),
turn to other side and cook another 1-2 minutes longer. This recipe
will make 12 - 16 pancakes.
Remove sausages and pancakes. Serve with maple syrup.
Santa Fe Pancakes make a great side dish when accompanied with
salsa and eggs.
Serves 4.
STRAWBERRY PANCAKES Variation: To make
strawberry pancakes, replace corn and peppers with 1/4 teaspoon
vanilla, 6-8 medium strawberries, diced, 1/4 teaspoon nutmeg and
dust with powdered sugar.

sunny POACHED
HUEVOS RANCHEROS
1 - 13 oz. can black bean chili
4-6 large eggs
1/3 cup mild or medium salsa
TOPPING:
3 oz. chihuahua cheese, crumbled
2 Tablespoons chopped cilantro
6 - 6" corn tortillas, cut into quarters
2-3 tablespoons corn oil
Preheat SANTA E BU ET™ on “HIGH” for 5-8 minutes.
Reduce heat to “MEDIUM.” Pour one can of black bean chili into
Round Heating Plate. Stir in 1/3 cup salsa.
Stir chili 3-4 minutes, until mixture is hot. Crack eggs carefully, one
at a time, onto chili mixture. When all eggs are placed on top of
chili, cover with Glass Lid and poach for about 3-4 minutes, or until
eggs are set.
While eggs are cooking, brush tortilla quarters lightly with oil
and place on Ribbed Grill. Grill for 2-3 minutes total, turning and
watching carefully, so that tortillas do not burn. Remove carefully
with Tongs.
Remove Lid and sprinkle with cheese, cilantro and salsa.
Spoon onto plates, accompanied by tortilla chips.
Serves 3-4.
14

15
ll
lluu
uunn
nncc
cchh
hh
ATHENIAN EGGPLANT PIZZA
CRUST:
1 cup all purpose flour
1/2 teaspoon salt
1/4 teaspoon pepper
2/3 cup milk
2 eggs
1 small eggplant, peeled and cut into 2” x 1/4" slices
6 pitted and chopped kalamata olives
1 small tomato, sliced into 6 slices
3 oz. feta cheese, crumbled
4 fresh basil leaves, torn into small pieces
extra-virgin olive oil
Preheat SANTA E BU ET™ on “HIGH” 5-8 minutes.
Turn Control down between “MEDIUM” and “HIGH.” In small bowl,
mix crust ingredients together until well blended.
Place eggplant slices on Ribbed Grill, and brush tops lightly with
olive oil. Season with salt and pepper. After eggplant has grilled
1 minute, place Glass Lid on Ribbed Grill to cover eggplant.
Continue to grill for 2 minutes.
Pour crust mixture into Round Heating Plate. Spread evenly. Now, turn
eggplant on other side, and replace Glass Lid over eggplant.
(Eggplant should grill 6 -8 minutes in total.)
When crust has cooked 5-6 minutes, turn carefully by prying up on
end, slipping a plastic spatula underneath, and flipping over. Brush top
of browned crust with olive oil.
Place grilled eggplant pieces on top of crust. Tomato slices go next,
followed by chopped olives, crumbled feta cheese, and basil. Place
Glass Lid on Round Heating Plate and continue to cook for another
4 - 6 minutes. Remove carefully with spatula onto plate. Cut into
wedges to serve.
Serves 2.
PARTY Variations: Fresh, home-made pizzas are perfect for
party snacks. Set out individual bowls with all of your favorite sauces
and toppings. Grill sausages, bacon, all kinds of vegetables. Use red
pizza sauce or pesto sauce. Use a variety of cheeses: mozzarella,
muenster, even brie! Make fresh pizza crusts or use tortillas! Assemble
pizzas and cook covered on either the Ribbed Grill or Round Heating
Plate to finish.

16
BACON LETTUCE & TOMATO
WRAPS WITH CHILI MAYO
1 - 12 oz. package bacon
1 - 2 medium tomatoes, sliced
1/4 wedge of lettuce, shredded
4 -6 8" flour tortillas
CHILI MAYO
1/4 cup mayonnaise
2 Tablespoons chili sauce
1/4 teaspoon chili powder
Preheat SANTA E BU ET™ 5-8 minutes on “HIGH.” Turn
Control down between “MEDIUM” and “HIGH.” Place bacon
strips evenly on Ribbed Grill. (You will have to grill bacon in
several batches.) Grill 4-5 minutes, then turn with Tongs, and
grill 4-5 minutes more until golden and crisp. Remove with
Tongs onto plate lined with paper towels to drain.
In small bowl, mix chili mayo ingredients. Spread chili mayo on
tortillas. Divide bacon evenly among tortillas. Place tomato and
lettuce on top. Roll up tortillas and serve.
Serves 4-6.
PARTY Variations: These wraps are a family and party
favorite. Grill thin chicken breast strips alongside bacon. When
finished cooking, line grill with chicken breast strips and bacon,
turn Grill to “WARM.” Set out individual bowls of chopped
avocados, red and green peppers, chopped radishes, alfalfa
sprouts and shredded cheeses and let guests build their
own wraps.

17
favorito GOAT CHEESE WRAPS
WITH LOTSO
GRILLED VEGGIES
1 red pepper, sliced
4 large mushrooms, quartered
1 small vidalia onion, quartered
1 small zucchini, sliced lengthwise into 4 strips
4 - 8" flour tortillas
1 - 11 oz. pkg. Goat cheese
1/2 cup basil pesto
salt and pepper
Preheat SANTA E BU ET™ for 5-8 minutes on “HIGH.”
Turn Control down between “MEDIUM” and “HIGH.” Place
vegetables evenly on Grill. Turn after about 3-4 minutes, and
watch carefully. Grill another 3 minutes and remove.
Spread each tortilla with some pesto, dividing evenly among
4 tortillas. Next, spoon some of the goat cheese onto one side of
the tortilla. Divide vegetables among tortillas. Sprinkle with salt
and pepper.
Fold 2 sides of tortilla inward,then roll up, and press down slightly
to seal. Carefully place tortillas, 2 at a time on Grill, and grill
30 seconds. Turn 45 degrees, and grill another 30 seconds.
Turn and follow the same procedure. Remove to plates and serve.
Serves 4.
Variations: Serve with shredded lettuce and chopped
tomatoes. Other interesting grilled vegetables are asparagus,
green beans, or jicama.
santa fe Variation: Spread refried beans on tortillas
and stuff with grilled veggies, guacamole, shredded cheddar
cheese, top with salsa and sour cream.

18
dd
ddii
iinn
nnnn
nnee
eerr
rr
CLASSIC CHICKEN CAESAR
ensalada WRAPS
1 - 1 lb. package chicken tenders, cut into 1/2” strips
1 - 7.5 oz. bag Dole® Complete Caesar Salad Kit
1 red pepper, cut into strips
4 - 8" flour tortillas, plain or spinach herb flavored
salt and pepper
oil to coat Grill
Preheat SANTA E BU ET™ on “HIGH” for 5-8 minutes.
Place Tortilla Pan onto Round Heating Plate. Place the 4 tortillas in
the Tortilla Pan and cover with Glass Lid.
Brush Grill with oil. Place red pepper strips evenly on Ribbed Grill.
Grill 3-4 minutes. Turn on other side with Tongs. Grill for 3 minutes
longer. Remove with Tongs.
Place chicken strips evenly on Ribbed Grill. Grill 2-4 minutes and
when meat turns to chalky white, quickly turn over using Tongs.
Prepare the salad, following the directions on the package.
Continue grilling tenders until done and there is no pink in the
middle, approximately another 2-4 minutes. DO NOT OVERCOOK
OR UNDERCOOK! See USDA note in “Hints For Best Results” on
page 8 of this manual. Remove with Tongs.
Divide chicken, peppers and salad evenly among 4 tortillas.
Roll tortillas into wraps and serve.
Serves 4.
PARTY Variations: Set out individual bowls for the salad
and other fillings: artichoke hearts, capers, anchovies, sliced or
chopped tomatoes, chopped green onions, bacon bits, or sliced
olives. Turn Temperature Control down to “WARM.” Leave
chicken on the Grill and allow family and friends to assemble
wraps themselves.

19
salsa STEAK PITAS
1/2 - 3/4 cup medium salsa
1 lb. sirloin steak cut into 1/2" strips,
cut diagonally across the grain
1 clove garlic, crushed
1/4 teaspoon crushed red pepper
1 - 8 oz. pkg. shredded white cheddar cheese
4 tablespoons minced parsley
2 whole wheat pitas
sliced jalapeno peppers (optional)
Marinate steak in salsa, crushed garlic and red pepper for at least
1/2 hour in the refrigerator. Set Temperature Control between
“MEDIUM” and “HIGH” and preheat SANTA E BU ET™ for
5-8 minutes Place steak strips evenly on Ribbed Grill (meat should
sizzle) and cook 3 minutes. Turn with Plastic Tongs and grill another
2 minutes (steak will be cooked to medium doneness).
When steak is on its second side, place pita pockets one at a time
in Round Heating Plate, and turn to Control down to “WARM.”
Repeat with second pita. Pitas should warm about 30 seconds on
each side.
Remove steak strips. Carefully wipe Ribbed Grill with folded paper
towel to remove any steak juices. Cut each pita in half to expose
pocket. Divide steak evenly among the 4 pockets you have created.
Put about 2 oz. cheese, jalapeno peppers, and a dab of salsa in
each pocket, sprinkle with parsley.
Place each pocket on Grill for 30 seconds to 1 minute on each side
until cheese melts. You may cover 2 pockets at a time with the
Glass Lid to expedite cheese melting. Remove and serve while hot.
Serves 4.
italian Variation: Substitute Italian salad dressing for
salsa, use mozzarella cheese. Substitute jalapenos with pepperocini
peppers and cook as directed.
Table of contents
Popular Grill manuals by other brands

Fritel
Fritel SG 2180 instruction manual

Weber
Weber SX-335 Assembly guide

Outback
Outback Meteor 3 Assembly and operating instructions

Bella
Bella 8-IN-1 GRILL Instruction manual & recipe guide

Cuisinart
Cuisinart SMK0036AS Owner's manual & operating instructions

Bullet Barbecue
Bullet Barbecue 48038 Assembly & operating instructions