Sasi NB1849 User manual

Notebook Computer
User’s guide
K3U.book Page i Wednesday, October 15, 2003 10:39 AM

Changes may be made periodically to the information in this publication without obligation to notify any
person of such revision or changes. Such changes will be incorporated in new editions of this manual or
supplementary documents and publications. This company makes no representations or warranties, either
expressed or implied, with respect to the contents hereof and specifically disclaims the implied warranties of
merchantability or fitness for a particular purpose.
Record the model number, serial number, purchase date, and place of purchase information in the space
provided below. The serial number and model number are recorded on the label affixed to your computer.
All correspondence concerning your unit should include the serial number, model number, and purchase
information.
Model Number : __________________________________
Serial Number:____________________________________
Purchase Date: ___________________________________
Place of Purchase: ________________________________
Copyright © 2003
All Rights Reserved
Notebook Computer User’s guide
Original Issue: October 2003
Notebook Computer
All trademarks and registered trademarks are the properties of their respective companies.
K3U.book Page ii Wednesday, October 15, 2003 10:39 AM

iii
Preface
This notebook computer incorporates such features as CardBus, internal pointing
device, IEEE 1394, and Universal Serial Bus 2.0 in a portable package.
This manual should answer most of the questions you have about the day-to-day
operation of your notebook computer.
You should also take advantage of the online help files that are available with
almost all of the programs shipped with your computer.
We hope you enjoy your notebook computer. With proper care, your computer will
provide you with years of productive service.
Connecting the computer
Connecting the computer is as easy as 1-2-3.
1. Insert the battery and align the arrows (a); slide the battery (b) until it clicks
into place.
Note: When using a battery pack for the first time, fully recharge the battery,
then disconnect the adapter to use up the battery before recharging again.
Perform this action twice to condition the battery pack.
K3U.book Page iii Wednesday, October 15, 2003 10:39 AM

iv
2. Connect one end of the AC adapter to the DC-in port on the computer’s rear
panel and the other end to a properly grounded power outlet.
3. Slide the display cover latch to the right (a) and open the display to a
comfortable viewing angle (b).
K3U.book Page iv Wednesday, October 15, 2003 10:39 AM

v
4. Press and release the power switch to turn on the power. The POST (power-
on self-test) routine executes and Windows begins loading.
Note: To turn off the power, use the Windows Turn Off command to shut
down the computer. If you are unable to shut down your computer normally,
press and hold the power switch for more than four seconds to turn off the
computer. If you turn off the computer and want to turn it on again, wait at
least two seconds before powering up.
Care and maintenance
Taking care of your computer
Your computer will serve you well if you take care of it.
• Do not expose the computer to direct sunlight. Do not place it near sources of
heat, such as a radiator.
• Do not expose the computer to temperatures below 0ºC (32ºF) or above 50ºC
(122ºF).
• Do not subject the computer to magnetic fields.
• Do not expose the computer to rain or moisture.
• Do not spill water or any liquid on the computer.
• Do not subject the computer to heavy shock and vibration.
• Do not expose the computer to dust and dirt.
K3U.book Page v Wednesday, October 15, 2003 10:39 AM

vi
• Never place objects on top of the computer to avoid damaging the computer.
• Never place the computer on uneven surfaces.
Taking care of your AC adapter
Here are some ways to take care of your AC adapter:
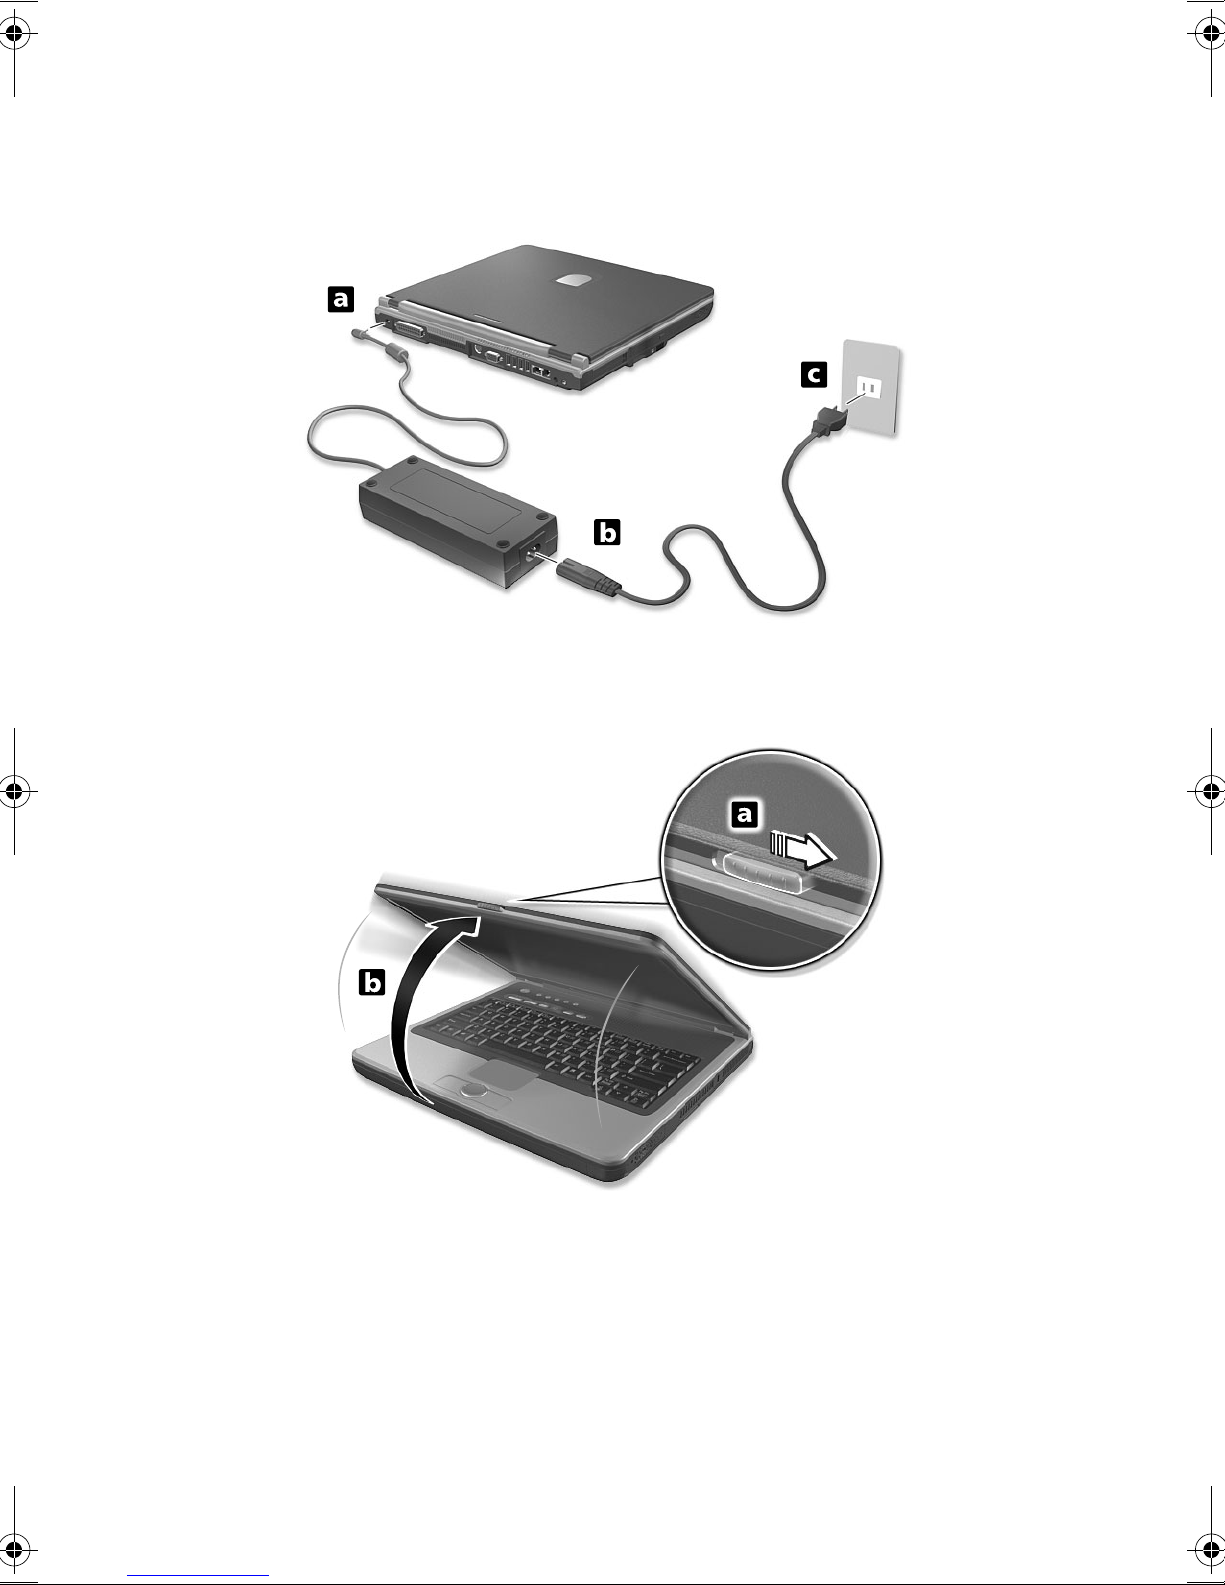
• Do not connect the adapter to any other device.
• Do not step on the power cord or place heavy objects on top of it. Carefully
route the power cord and any cables away from all potential traffic.
• When unplugging the power cord, do not pull on the cord itself but pull on the
plug.
• The total ampere ratings of the equipment plugged in should not exceed the
ampere rating of the cord if you are using an extension cord. Also, the total
current rating of all equipment plugged into a single wall outlet should not
exceed the fuse rating.
Taking care of your battery pack
Here are some ways to take care of your battery pack:
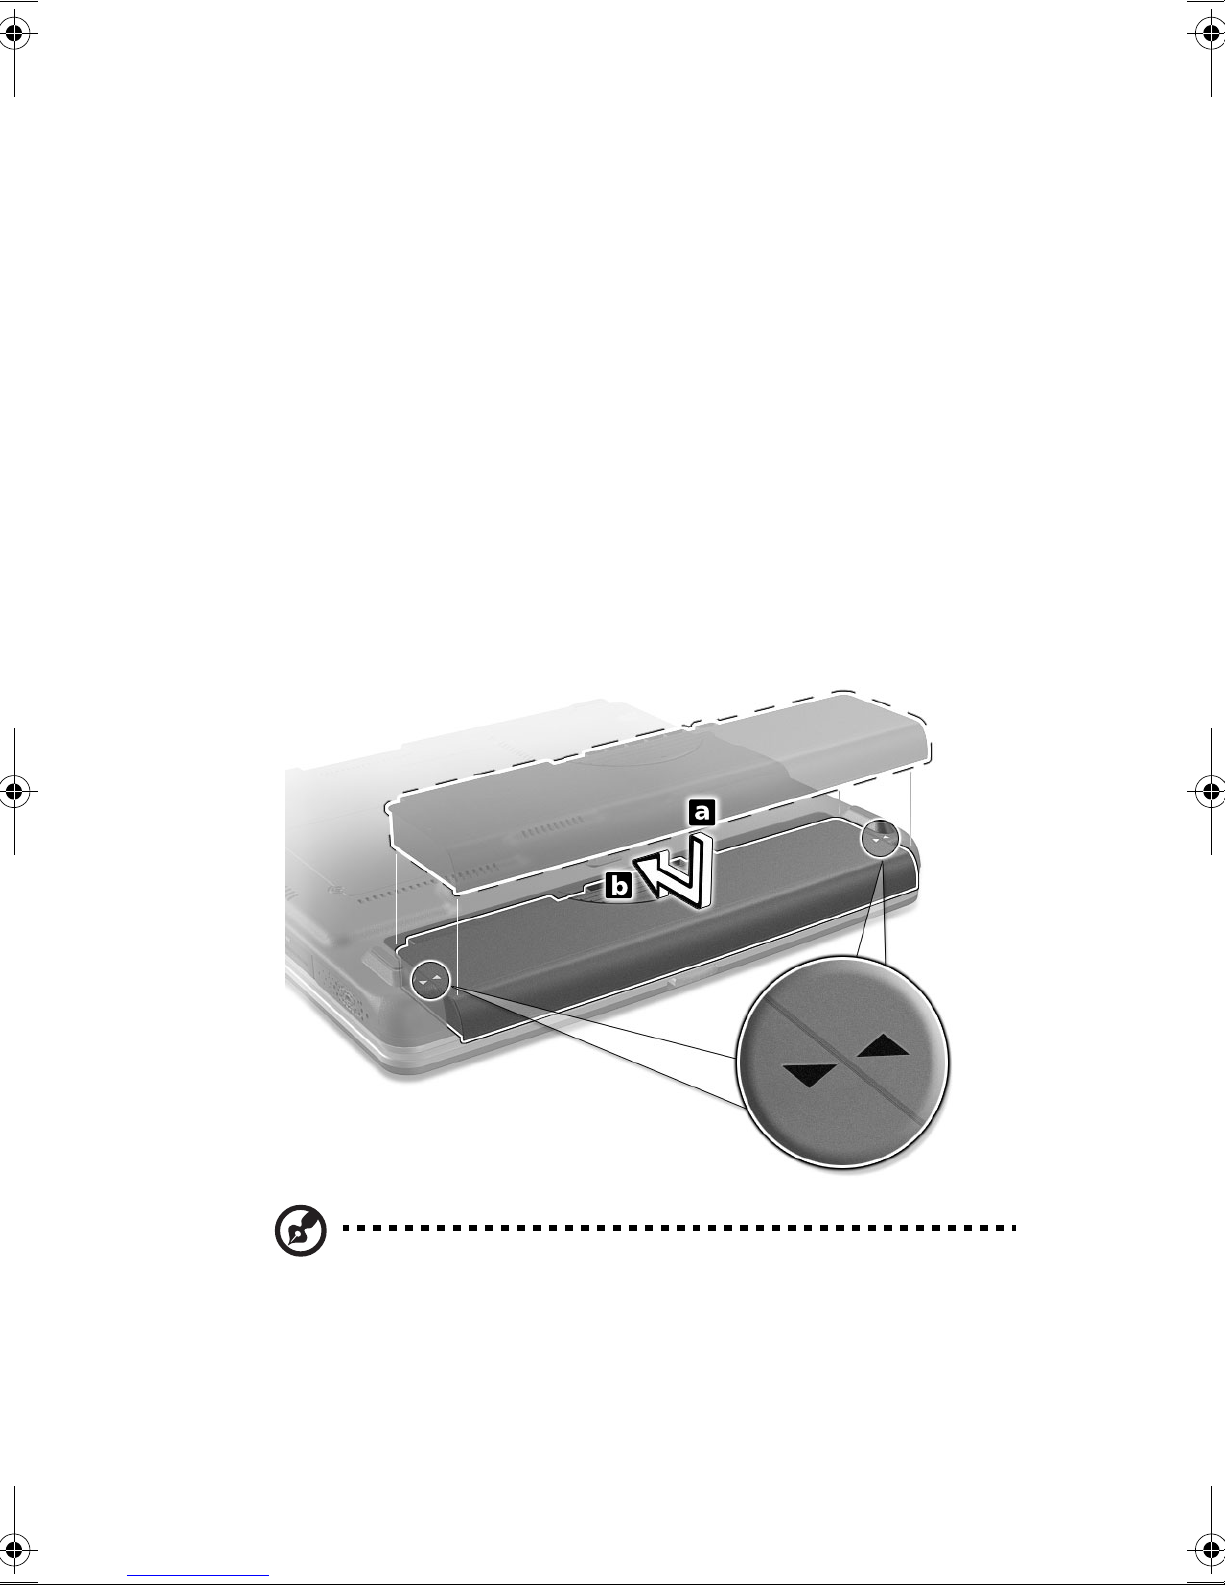
• Use only batteries of the same kind as replacements. Turn the power off
before removing or replacing batteries.
• Do not tamper with batteries. Keep them away from children.
• Dispose of used batteries according to local regulations. Recycle if at all
possible.
Cleaning and servicing
When cleaning the computer, follow these steps:
1. Power off the computer and remove the battery pack.
2. Disconnect the AC adapter.
3. Use a soft cloth moistened with water. Do not use liquid or aerosol cleaners.
Contact your dealer or see your service technician if any of the following occurs:
• The computer has been dropped or the body has been damaged.
• Liquid has been spilled into the product.
• The computer does not operate normally.
K3U.book Page vi Wednesday, October 15, 2003 10:39 AM

Preface iii
Connecting the computer iii
Care and maintenance v
Contents vii
1 Getting familiar with your computer 1
A tour of your computer 3
Top view 3
Left view 5
Right view 6
Rear view 6
Bottom view 8
Features 9
Display 11
Indicators 12
Keyboard 14
Special keys 14
Keyboard ergonomics 19
Touchpad 20
Launch keys 22
Storage 23
Hard disk 23
Optical drive 23
3-in-1 slot 24
Connectivity options 26
Ethernet and LAN 26
Fax/data modem 26
Fast infrared 27
Optional wireless communication 28
Audio 29
AV control panel 30
Securing your computer 37
Security notch 37
Passwords 37
2 Operating on battery power 39
Battery pack 41
Battery pack characteristics 41
Installing and removing the battery pack 42
Charging the battery 43
K3U.book Page vii Wednesday, October 15, 2003 10:39 AM

Contentsviii
Checking the battery level 44
Optimizing battery life 44
Battery-low warning 44
Power management 46
Advanced Configuration and Power Interface 46
3 Peripherals and options 47
External monitor 49
Using simultaneous display 49
S-video 50
Printer 51
PC Card 52
PC Card slot 52
USB devices 54
IEEE 1394 devices 55
Miscellaneous options 56
Key component upgrades 57
Memory upgrade 57
4 Moving with your computer 59
Disconnecting from the desktop 61
Moving around 62
Preparing the computer 62
What to bring to short meetings 62
What to bring to long meetings 62
Taking the computer home 63
Preparing the computer 63
What to bring with you 63
Special considerations 63
Setting up a home office 64
Traveling with the computer 65
Preparing the computer 65
What to bring with you 65
Special considerations 65
Traveling internationally with the computer 66
Preparing the computer 66
What to bring with you 66
Special considerations 66
5 Software 67
Launch Manager 69
BIOS Utility 70
K3U.book Page viii Wednesday, October 15, 2003 10:39 AM

ix
Security 71
Exit 74
6 Troubleshooting 75
Frequently-asked questions 77
Error messages 80
A Specifications 85
B Notices 91
Index 99
K3U.book Page ix Wednesday, October 15, 2003 10:39 AM

Contentsx
K3U.book Page x Wednesday, October 15, 2003 10:39 AM

1 Getting familiar with
your computer
K3U.book Page 1 Wednesday, October 15, 2003 10:39 AM

This notebook computer combines high-performance,
versatility, power management features and multimedia
capabilities with a unique style and ergonomic design. Work
with unmatched productivity and reliability with your new
power computing partner.
This chapter gives an in-depth "tour" of the computer’s many
features.
K3U.book Page 2 Wednesday, October 15, 2003 10:39 AM

3
A tour of your computer
Let us show you around your new notebook computer.
Top view
#Item Description
1 Display screen Also called LCD (liquid-crystal display), displays
computer output.
2 Status indicators LEDs (light-emitting diodes) that turn on and off to
show the status of the computer and its functions and
components.
3 Launch keys Buttons for launching frequently-used programs. See
“Launch keys” on page 22 for more details.
K3U.book Page 3 Wednesday, October 15, 2003 10:39 AM

1 Getting familiar with your computer4
4 Power button Turns on the computer power.
5 AV control panel AV (audio/video) control panel for playing CDs,
VCDs, DVDs and MP3s. See “AV control panel” on
page 30 for more details.
6 Touchpad Touch-sensitive pointing device which functions like a
computer mouse.
7 Click buttons (left
and right)
The left and right buttons function like the left and
right mouse buttons.
8 4-way scroll key This button mimics your cursor pressing on the
vertical and horizontal scroll bars of Windows
application.
9 Palm rest Comfortable support area for your hands when you use
the computer.
10 Keyboard Inputs data into your computer.
11 Fan slots Help keep the computer cool. Do not cover these slots
which promote proper airflow to the computer.
# Item Description
K3U.book Page 4 Wednesday, October 15, 2003 10:39 AM

5
Left view
# Item Description
1 PC Card slots Accepts two Type II/I CardBus PC Card.
2 PC Card eject
buttons
Ejects the PC Card from its slot.
3 3-in-1 slot media slot Accepts any of the following flash memory cards;
Secure Digital (SD), Memory Stick, MultiMediaCard
(MMC).
4 IEEE 1394 port Connects to an IEEE 1394-compatible device (e.g.,
digital video camera).
5 Infrared port Interfaces with infrared devices (e.g., infrared printer,
IR-aware computer).
6 Speaker Outputs sound.
7 Optical drive Internal optical drive (CD, DVD, or DVD/CD-RW
combo drive).
8 Emergency eject slot Ejects the optical drive tray when the computer is
turned off. See page 78 for more details.
9 Eject button Ejects the CD/DVD tray.
10 Optical drive activity
indicator
Lights up when the optical drive is active.
K3U.book Page 5 Wednesday, October 15, 2003 10:39 AM

1 Getting familiar with your computer6
Right view
Rear view
# Item Description
1 Speaker Outputs sound.
2 Security keylock Connects to a Kensington-compatible computer
security lock.
#Item Description
1 DC-in jack Connects to the AC adapter.
2 Parallel port Connects to a parallel device (e.g., parallel printer).
K3U.book Page 6 Wednesday, October 15, 2003 10:39 AM

7
3 S-video out port Connects to a television or display device with S-
video input.
4 External monitor port Connects to a display monitor (up to 2048x1536
resolution).
5 USB (2.0) ports
(four)
Connect to USB devices (e.g., USB mouse).
6 Network jack Connects to an Ethernet-based network.
7 Modem jack Connects a phone line (only for models with an
internal fax/data modem).
8 S/PDIF line-out jack Connects to audio line-out devices (e.g., speakers,
headphones); supports S/PDIF connections.
9 Line-in jack Accepts audio line-in devices (e.g., audio CD player,
stereo walkman).
# Item Description
K3U.book Page 7 Wednesday, October 15, 2003 10:39 AM

1 Getting familiar with your computer8
Bottom view
#Item Description
1Memory
compartment cover
Houses the computer’s main memory.
2 Battery pack Supplies power to the computer.
3 Battery release latch Unlatches the battery to remove the battery pack.
K3U.book Page 8 Wednesday, October 15, 2003 10:39 AM

9
Features
This computer was designed with the user in mind. Here are just a few of its many
features:
Performance
• Intel® Pentium® 4 processor
• 512KB Flash BIOS with boot block; shadow RAM support
• 15” SXGA LCD
• nVidia® high-performance graphics chipset with 64MB DDR graphic
memory with 8X AGP support
• Memory upgradable to 1 GB with two PC 2700/3200 (333/400MHz DDR)
soDIMM slots
• Power management system
• Dual display capability
• Simultaneous LCD and CRT display
Multimedia
• Audio codec supports stereo at 18-bit ADC/20-bit DAC
• AC’97 2.2-compliant stereo audio
• Line-out jack with S/PDIF support
• Enhanced audio system with two speakers
• CD-ROM, DVD or DVD/CD-RW combo drive
• S-video output port
•SuperDJ
Connectivity
• High-speed fax/data software modem
• Onboard PCI 10/100 Mbps LAN
• Optional 802.11g wireless LAN
Human-centric design and ergonomics
• Full-sized keyboard
• Ergonomically-centered touchpad pointing device
K3U.book Page 9 Wednesday, October 15, 2003 10:39 AM

1 Getting familiar with your computer10
• Launch keys
Expansion
• Upgradeable memory
• Secure Digital (SD)/Memory Stick/MultiMediaCard (MMC) 3-in-1 slot
• USB (Universal Serial Bus) ports (2.0)
• IEEE 1394 port
• Optional DVD+RW or DVD-RW optical drive
K3U.book Page 10 Wednesday, October 15, 2003 10:39 AM
Table of contents