Scania AUS4STD User manual

Truck Infotainment with 7” screen
Radio with
navigation system
This manual can be downloaded at: www.scania.com/manuals

BUTTONS AND CONTROLS
Buttons
and
In radio mode:
Short
press: Switch to next/previous
preset (radio) or next track (media)
Long
press: Switch to next/previous
station on station list (radio)
In media mode:
Select title (press)
Start quick scan (long press)
Button
Return to previous view
Right rotary encoder/press button
Select menu item, change setting (rotate);
call up menu
Confirm setting (press)
Display/touch screen
SD slot 1:
Navigation data
Left rotary encoder/push button
Adjust volume (rotate)
Mute audio signals (press)
Turn unit on/off (long press)
SD slot 2
Media, audio, video playlists, POIs
NAVI button
Navigation function
PHONE button
Phone functions
TRAFFIC button
Traffic information
CAMERA button
Camera functions
MEDIA button
Media mode
DISPLAY button
RADIO button
Radio mode
SETUP button
Approach Sensor
If
this function is
activated, approaching the
sensor will activate and deactivate
the
display.

3*) Optional features/ settings
CONTENT
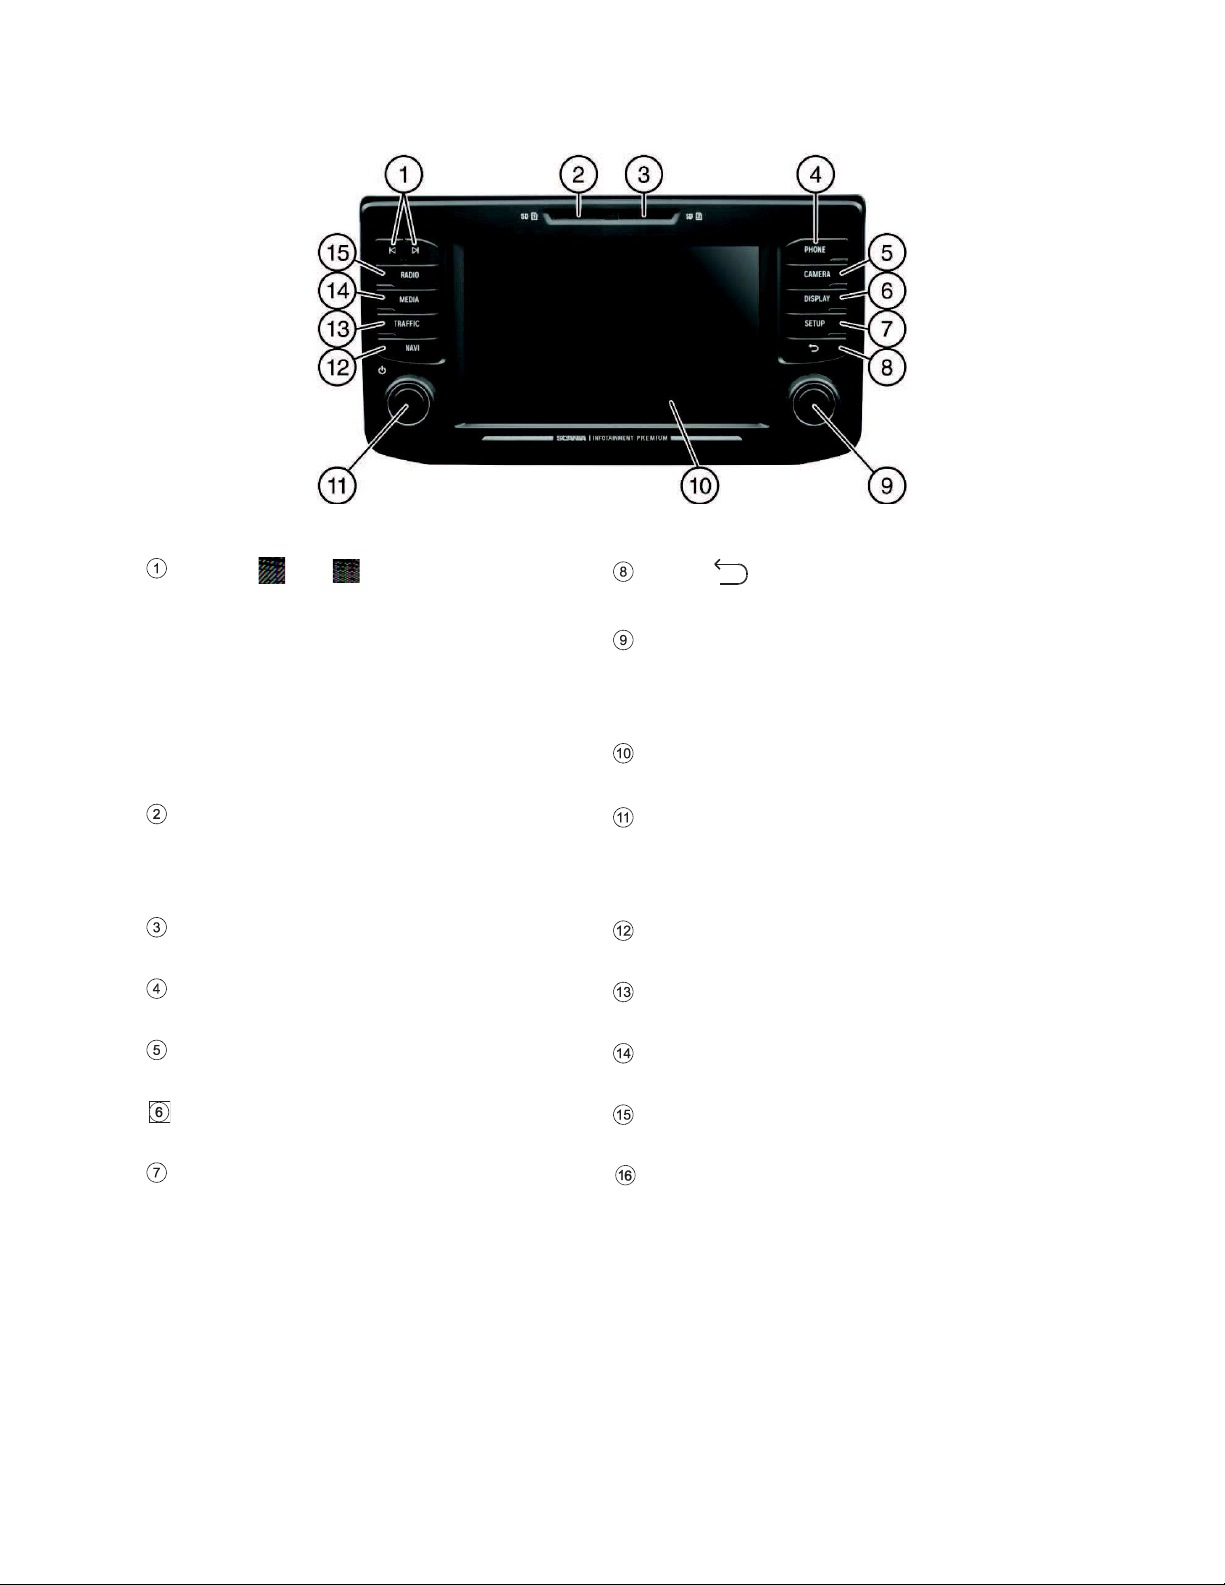
Buttons and controls ................................................2
Important information ...............................................5
This must be observed! ...............................................5
Notes on handling SD cards .......................................6
Usable navigation SD cards........................................6
Notes on these instructions.........................................6
Formatting conventions..........................................7
Introduction ...............................................................8
Feature List .................................................................8
Radio reception ...........................................................9
Operating modes.........................................................9
Radio settings ........................................................9
Media settings ........................................................9
Navigation settings.................................................9
Phone settings .......................................................9
Operation.....................................................................9
Controls..................................................................9
Multifunction knob ................................................10
Scroll through a list of menu items.......................11
Home icon ............................................................11
Turning on the system .........................................11
Adjust the volume.................................................11
Customise settings ....................................................12
Sound settings .....................................................12
Volume settings.........................................................14
Adjusting volumes ................................................14
System settings .........................................................16
Select the language .............................................16
Units .....................................................................17
Automatic text scrolling ........................................17
Bluetooth and phone .................................................18
Display settings .........................................................19
Customising the display .......................................19
Driver Profiles............................................................19
Theft protection .........................................................20
Speech DialogUe System –SDS* ............................20
Supported commands ..........................................21
Dialogue session..................................................22
Radio ........................................................................24
Activating the radio....................................................24
Select BAND .............................................................24
Traffic announcements (TA)......................................25
Priority for traffic announcements ........................25
Station search ...........................................................26
Automatic station search......................................26
Manual tuning.......................................................27
Store radio stations ...................................................27
Retrieving radio stations............................................27
Radio settings............................................................28
Media ........................................................................29
General information...................................................29
Important information ................................................29
Media sources........................................................... 30
Audio files on an MP3 player or USB drive ......... 30
Playing audio files from an SD card .................... 30
Playing files from a USB mass storage device.... 30
Connecting a TV/EXT device on AUX 2*............. 30
Media Player........................................................ 31
Bluetooth audio connection ...................................... 32
Important information........................................... 32
Connecting a Bluetooth device............................ 33
Bluetooth music mode .............................................. 34
Aux port..................................................................... 36
Media settings........................................................... 37
Phone*...................................................................... 38
General information .................................................. 38
Bluetooth profiles ................................................. 38
Bluetooth connection ........................................... 39
Pairing a Bluetooth device ................................... 40
Connection to another paired device................... 40
Management of two phones ................................ 40
Disconnecting a paired device............................. 41
Emergency call ......................................................... 41
Making an emergency call................................... 41
Operation .................................................................. 42
Control elements on the control panel................. 42
Hands-free mode ...................................................... 42
Using the phone book.......................................... 43
Search for a phone number................................. 43
Using call lists ...................................................... 43
Select a phone number again.............................. 43
Enter a phone number ......................................... 44
Access to the voice mailbox ................................ 44
Incoming call........................................................ 44
Functions during the call........................................... 46
Temporarily deactivate hands-free mode ............ 46
Temporarily deactivate the microphone .............. 46
Add call - Teleconference .................................... 46
Ending call ........................................................... 46
Phone book setup ..................................................... 47
Update the phone book ....................................... 47
Sort the phone book ............................................ 47
Phone book on the SIM card or
in the phone memory ........................................... 47
Add favourites...................................................... 48
Delete favourites.................................................. 48
Display text messages......................................... 48
Read text messages ............................................ 49
Phone settings .......................................................... 50
Navigation* .............................................................. 51
Functions of the navigation system .......................... 51
Traffic information system and dynamic
navigation.................................................................. 51
Advantages of TMC/TPEG .................................. 52
Current coverage ................................................. 52
Map data ................................................................... 52
Information on the map display................................. 53
NAVI button and menu navigation ............................ 55

4 *) Optional features/ settings
Destination entry ..................................................55
Enter address.......................................................55
Alternative routes .................................................58
POI - Point of Interest...........................................59
Geo Coordinates ..................................................60
Home address......................................................61
Emergency ...........................................................61
Contacts ...............................................................62
Search in map ...........................................................62
Select a point on map ...............................................62
Display location information .................................62
Save position information.....................................63
Map view when route guidance is inactive ..........63
DESTINATION MEMORY.........................................64
Recent Destinations ..................................................64
Saved destinations ....................................................64
Saved routes .............................................................64
Received destinations*..............................................64
Options during route guidance ..................................65
Add destination ....................................................66
Vehicle profiles.....................................................67
Avoid options........................................................69
Blocking................................................................70
Voice guidance.....................................................71
Setup button and menu Navigation and Traffic.........73
Map settings.........................................................73
Route Guidance ...................................................74
Import POIs ..........................................................76
Map Version .........................................................77
Navigation Database.................................................78
Navigation SD card ..............................................78
Replacing a navigation SD card...........................78
Traffic messages* .....................................................79
Camera .....................................................................81
Choose camera....................................................81
Camera settings ...................................................82
Steering wheel remote control* .............................83
Functions of the steering wheel remote control ........83
MirrorLink.................................................................85
Turn on MirrorLink .....................................................85
Start MirrorLink application .......................................86
CARPLAY® ..............................................................87
Turn on CARPLAY ....................................................87
LAUNCH CARPLAY APPS .......................................88
Launch voice recognition (Siri)..................................88
Eyes Free Function (Siri) .....................................88
Fleet Management Services*..................................89
Start Scania Fleet......................................................89
Appendix ..................................................................90
Optional features/settings .........................................90
Wi-Fi connection ..................................................90
Sound settings - Subwoofer level ........................91
END USER LICENSE AGREEMENT ....................... 92
Certification Information ........................................ 95

5
IMPORTANT INFORMATION
This radio navigation device was manufactured with the latest technology and in
accordance with recognised safety regulations. However, it may be dangerous if you
do not observe the safety information in these instructions.
Note
-
Read these instructions carefully and completely before first use.
-
Keep these instructions where they will be accessible
to all users at all
times.
THIS MUST BE OBSERVED!
The device is designed to operate in a commercial vehicle with a 24 V vehicle system
voltage and for installation in a 2-DIN slot.
The traffic guidance accompanying the navigation SD card is designed for
commercial vehicles. The navigation SD card contains specific information about the
navigation of commercial vehicles, such as height restrictions or maximum permitted
road load.
Road safety
Road safety is of highest priority. Inattentive driving or not observing traffic
situations can cause serious accidents.
-
Familiarise yourself with the device before driving.
-
Only operate your device if the traffic situation permits. Stop at a suitable
location before entering a new destination into the device or changing
system settings.
-
The radio-
navigation device gives driving recommendations during route
guidance. Only follow these if they do not contravene traffic regulations.
-
Traffic signs and traffic regulations always have priority over driving
recommendations.
You must always be able to hear the audible signals from the police, fire and
rescue services in the vehicle in a timely manner.
- Therefore, listen to media at appropriate volumes while driving.
Risk of injury
You must not open or modify the device.
Refrain from repairing the device.
Repairs and maintenance should only be performed by trained personnel.
Risk to the device
We accept no liability for damage to the SD slots caused by inappropriate
SD cards.

6
Cleaning
Do not use solvents or abrasives, as these may attack and damage the surface of the
device.
- Clean the device with a dry or slightly damp cloth and, if necessary, with suitable
cleaning or maintenance products.
Disposal of old units (EU countries only)
Do not dispose of your old
device in the household waste!
-
Take advantage of the
available return and collection
systems.
NOTES ON HANDLING SD CARDS
To ensure proper functionality, use clean SD cards that are not damaged.
Contamination or damage of an SD card may cause difficulties in reading the card.
We recommend that you handle SD cards carefully.
Notes
-
Do not expose the SD card to strong magnetic or electric fields.
Data
can be lost or the SD card may be destroyed.
-
Do not expose to direct sunlight or high humidity.
-
Do not expose to dirt, water or other liquids.
-
Always insert the SD card in the correct position.
- Only insert or remove the SD card when the unit is switched off.
USABLE NAVIGATION SD CARDS
This radio-navigation device may only be used with original SCANIA data storage
media.
Note
The radio-navigation unit is not designed for the use of third-party navigation
SD cards. The resultant functional limitations
of navigation are not covered
by the warranty.
NOTES ON THESE INSTRUCTIONS
These instructions will familiarise you with the functions of the radio navigation unit
and ensure its safe and successful operation.
Note
-
Read these instructions carefully and completely before first use.
-
Keep these instructions where they will be accessible to all users at all
times.

7
Formatting conventions
Safety instructions are highlighted with a grey bar and the symbol:
Helpful hints are highlighted with a grey bar and the symbol:
You will also find items in these instructions, clearly marked as illustrated here:
Action steps:
·Press ...
Device buttons:
e.g.
SETUP
button
Buttons:
e.g. Navigation
Note
The order and availability of the menu items are dependent on the inserted
navigation SD card and may therefore differ from the illustrations in these
instructions.

8
INTRODUCTION
FEATURE LIST
Mode
Feature
Radio
FM (18 stations)
AM (18 stations)
LW (6 stations)
MW (6 stations)
SW (6 stations)
DAB (18 stations)
*
*)
DAB may not be receivable in
every
region.
USB port
2 USB ports:
- Media data
- Charging external media
USB port 1:
Provides current up to 1.5 A
USB port 2:
Provides current up to 0.5 A
SD slot
SD slot 1:
- Navigation data
SD slot 2:
- Media data
Connection
to external
(storage)
media
- MP3 player
- USB flash memory
- 2 Video
-In
- External audio sources via AUX-In
Navigation
system
Dynamic directions to avoid traffic jams or
other traffic problems.
Phone
link
Connection with Bluetooth-enabled mobile
phones
Notes
-
The system must be used so that the vehicle can be driven in a safe
manner at all times.
If in doubt, stop your vehicle and operate the
system while the vehicle is at
a standstill.
-
The use of the navigation system does not mean that the driver
should not
display
proper and attentive driving behaviour in traffic. Traffic regulations
must always be followed. If you have to interact with the system (e.g. to
enter a destination
), stop your vehicle at a safe location and then perform
the necessary function.
-
Some areas where entrance is forbidden, such as one-way streets,
entrances and other pedestrian areas, may not be marked on the
navigation map. The system will not issue a warning message in such
areas. Traffic regulations should be followed here.

9
RADIO RECEPTION
Radio reception can be affected by atmospheric interference, noise, distortion or
other reception interference, such as:
- Increased distance from the transmitter
- Multipath reception due to reflection or shadowing
In such conditions the radio reception is affected. However, this not due to faulty
behaviour of the unit.
OPERATING MODES
Settings options in main menus are displayed by tapping the icon.
Radio settings
·Press the
RADIO
button to switch to the RADIO function.
See the "Radio" chapter for further details.
Media settings
·Press the
MEDIA
button to start an SD card, USB, BLUETOOTH AUDIO or
AUX function.
See the "Media" chapter for further details.
Navigation settings
·Press the
NAVI
button to start the NAVIGATION function.
See the "Navigation*" chapter for further details.
Phone settings
·Press the Phone button to start the phone function.
See the "Navigation**" chapter for further details.
OPERATION
Controls
The system can be operated using the rotary encoder/knob, buttons and menus
displayed on the touch screen.

10
Touch screen
Risk of damage to the touch screen
The unit is equipped with a capacitive touch display. Only use your fingers.
Do not use sharp or hard objects such as pens or pencils
to operate the
touch screen.
The screen of the system has a sensory interface that enables direct selection of
displayed menu options. For example, it is possible to activate a menu option on the
screen by tapping the button with a finger or to change the position of the sliding
element on the screen by sliding with a finger.
In menus with several views (several buttons in the upper part of the menu), you can
change between views from left-to-right or right-to-left by swiping with your finger.
Note
-
Before a system function is executed, you are often asked via a message
to confirm whether the selected system function should really be executed.
You can then instruct the unit to
complete the function.
-
Press the
button
if you want to suppress such a message without
triggering a system function.
Multifunction knob
To navigate through the menu options:
·Rotate the right rotary encoder/push button clockwise or anti-clockwise.
To activate the selected menu item:
·Press the right rotary encoder/push button .
>The corresponding system function is activated or a message or a view with
additional options is displayed.
Note
In the main audio and phone menus, only the screen switch in the lower part
of the menu can be selected/activated via the touch screen.

11
Scroll through a list of menu items
With the touch screen:
·Tap on the button at the top or bottom of the slider.
or
·Move the slider of the slider bar up or down with your finger.
or
·Swipe your finger up or down to scroll through the list of menu items.
With the right rotary encoder/push button :
·Rotate the right rotary encoder/push button clockwise or anti-clockwise to
scroll through the list of menu items.
Home icon
When the Home icon is tapped, the last active tab of the home screen is shown. If
the last active tab is not available, the 2nd tab is shown. As soon as the user
navigates to another tab in the home screen, a back button is available in the
bottom left corner.
Note
The home screen layout can be selected via the
SETUP
button and
tapping on the
icon.
For more details, see the “Introduction; System settings”chapter.
Turning on the system
·Switch on the vehicle ignition.
>The system turns on automatically.
Note
If the unit is turned off manually using the left rotary encoder/push button
it needs to be turned on again by pressing the left rotary encoder/push
button .
Automatic shut down
If the system is turned on while the vehicle ignition is turned off, the system will turn
off automatically after one hour.
Adjust the volume
·Rotate the left rotary encoder/push button .
>The current setting is displayed.
When the system is turned on, the last selected volume is set.
·Press the left rotary encoder/push button to mute the unit or return to the
original volume.
>If the volume is muted, the icon is displayed on the screen.

12
CUSTOMISE SETTINGS
The following examples describe the method of changing the settings available in the
different menus using the menu options on the screen or the right rotary
encoder/push button .
Sound settings
·Press the
SETUP
button.
·Tap on the icon.
>The AUDIO SETTINGS menu is displayed.
There are two available options
- Simple Equalizer for Bass/Mid/Treble settings (standard)
- Advanced Equalizer for advanced sound settings
Note
To change the settings you can proceed as follows:
·Tap on one of the screen buttons ( / ) to change the audio
settings.
·Move the slider on the touch screen.
·Move the slider by rotating the right rotary encoder/push button .
Bass:
Use this setting to modify the low frequencies of your audio source.

13
Mid:
Use this setting to modify the middle frequencies of the audio source.
Treble:
Use this setting to modify the high frequencies of the audio source.
·Tap on Advanced to open the Advanced Equalizer.
Advanced Equalizer:
The Advanced Equalizer includes ten sliders (-9 to 9) to edit audio frequency ranges.
Customised settings can be stored.
Balance:
Use this setting to adjust the volume balance between the left and right speakers of
the vehicle.
Fader (optional):
Use this setting to adjust the volume balance between the front and rear speakers of
the vehicle.
Adjusting the speed-dependent volume
If speed-dependent volume is activated, the volume is adjusted automatically to
compensate for road and wind noise while driving.
·Press the
SETUP
button.
·Tap on the icon.
>The AUDIO SETTINGS menu is displayed.

14
Note
-
If the setting for speed-dependent volume is set to "Off", the volume does
not increase at higher vehicle speeds.
-
If the setting for speed
-dependent volume is set to
"High", the volume is
increased to the maximum at higher vehicle speeds.
Change settings
Via touch screen:
·Tap with your finger on the intersection of both lines and then hold and move
the finger to the desired position.
>Values for Balance and Fader change according to the position of the
intersection.
Setting range: -9 to 9
Note
Tap on Reset, to align the intersection centrally.
I.e. Balance = 0, Fader = 0
VOLUME SETTINGS
Adjusting volumes
·Press the
SETUP
button.
·Tap on the icon.
·Tap on Volume settings.
·Select the list entry you want to modify.
·Adjust the Volume to the desired level.
>The selected volumes are adjusted.

15
Adjusting the phone volume
Note
The phone volume can also be adjusted during a call using the left rotary
encoder/push button .
Once the volume is set, the customised setting is saved by the system and is used as
a default for all future calls until the setting is changed again.
If the volume of the phone is changed, the ringtone volume also changes.
Adjusting the volume of the traffic announcements (TA)
The volume of the traffic announcements can be adjusted during the message using
the left rotary encoder/push button . When the message has been completed or is
cancelled, the volume is automatically reset to the original setting.
Modifying the volume of the voice guidance (Navigation)
The volume of the voice prompts can be adjusted during the direction messages
using the left rotary encoder/push button or via the NAVIGATION SETUP menu.
The setting is saved by the system and is used automatically for all future voice
prompts until the setting is changed again.
Adjusting the volume of beeps
The volume of the traffic announcements can be adjusted, when Beeps are activated
in system settings.
Adjusting the volume of voice (SDS)
The volume of voice announcements can be adjusted when the Speech Dialogue
System - SDS is available.
Volume mixing
Sets the relative background volume of all audio sources (radio or media) during
voice guidance, ongoing call, traffic announcement, system notification or speech
recognition dependent on vehicle speed.
- If the value is set to “off”, then radio/media sounds are quiet during other sound
events.
- If the value is set to “max”, radio/media volume will still be reduced.

16
SYSTEM SETTINGS
The default settings for the system can be changed via the SYSTEM SETTINGS
menu.
·Press the
SETUP
button and tap on the icon.
With the touch screen:
·Tap on a menu item to change the setting.
With the right rotary encoder/push button :
·Rotate the right rotary encoder/push button clockwise or anti-clockwise to
select a menu item.
·Press the right rotary encoder/push button to change the setting.
Select the language
Different languages can be selected for the menu display. Voice output (optional)
also occurs in this language.
·Select the menu item Language.
>A list of the languages is displayed.
·Select the desired language.
>You have successfully changed the language settings.
Note
If Automatic is selected, the language is set via the instrument cluster.
Note
Voice recognition is not available for every language. To activate the voice
re
cognition feature, see the “Steering wheel remote control*”chapter,
sub-
section
“Button ”on page 83.

17
Units
·Select the menu item Units.
>A list of the Units is displayed.
·Select the desired system of units:
Automatic
Metric (km, m, t, kmh)
Imperial (mi, yd, t, mph)
Note
If Automatic is selected, the units are set via the instrument cluster.
Automatic text scrolling
·Activating or deactivating automatic text scrolling (touch-click):
If this option is activated, list entries which are too long to fit on the current screen will
first be displayed with three dots at the end and afterwards they will scroll
automatically from right to left, so that the user can read the rest of the text on the
respective entries.
Beeps
Activating or deactivating beeps (touch-click):
If the Beeps option is activated, a sound is emitted every time you tap the screen.
If the Sounds option function is activated, the following actions of the user or the
system are acknowledged with a beep:
·Radio function:
When a station is stored on a station button.
·Media function:
When activating the fast forward or rewind.
·Navigation function:
When activating/deactivating the voice announcements in navigation mode.
Home screen layout
·Select the menu item Home screen layout.
>A list of possible layouts is displayed.
·Select the desired layout.
Media - Navi - Phone
Media - Navi
Media - Phone

18
Factory reset
This menu entry allows the deletion of all personal data.
·Select the menu item Factory reset.
>A popup requests user acknowledgement.
Yes = Deletes all personal data
Another popup informs the user that all personal data has been deleted
No = Cancels the query
Goes back to the menu
SW vers.
This menu entry displays the current software version installed.
BLUETOOTH AND PHONE
For details, see the "Media" chapter, sub-chapter "Bluetooth audio connection" on
page 32 or the "Phone*" chapter, sub-chapter "General information" on page 38.

19
DISPLAY SETTINGS
Customising the display
·Press the
SETUP
button and tap the icon.
·Tap on Brightness.
·Select the appropriate option to adjust the Brightness of the screen and to
adjust the display to match the light conditions of your surroundings.
Note
There
are one automatic and two manual modes ( day or night) in
the
system.
If you select
Auto, the system will follow the brightness level for the
instrument panel.
If you select (day) or (night)
you can set your own
brightness level.
·Select the appropriate option to activate/deactivate a Screen saver.
·Select the appropriate option to activate/deactivate the Approach sensor
feature.
Note
The dots under a setting indicate that additional options are still available.
Press the dots to see the other options.
With right rotary encoder/push button
·Rotate the right rotary encoder/push button clockwise or anti-clockwise to
select a menu item.
·Press the right rotary encoder/push button to change the setting.
Approach Sensor Feature
If the approach sensor feature has been enabled. When a screensaver or Display
off is currently shown, approaching the screen turns the display on temporarily. When
the approach sensor is no longer detecting anything, the display will be turned off
again after a pre-set time.
DRIVER PROFILES
If a new driver card is inserted, all settings will be updated per the settings stored on

20
the driver card. If no settings are stored on the driver card, the previously active
settings will still be used. If a driver card is removed, all settings are kept as they are.
If the user changes any setting without a driver card being inserted, these changes
will not be stored to any driver ID.
THEFT PROTECTION
Theft protection is activated when the vehicle identification number (VIN) of the
vehicle does not match the device VIN number.
>A popup appears.
Please contact your local SCANIA dealer
SPEECH DIALOGUE SYSTEM –SDS*
*) The voice recognition feature is dependent on vehicle configuration, the language
set and the region in which the vehicle was sold.
Note
Speech Dialogue System - SDS is not available in every region.
The on-board voice recognition system is designed to achieve complex tasks using
voice commands.
·Press the Push to Talk button on the steering wheel to initiate voice
recognition
>A beep is heard. The speech session has started.
·The user may issue a command after the beep. For more details see
Example 2.
Table of contents
Other Scania Car Receiver manuals