SCENES SOUND PANO User manual

SOUND PANO
USER GUIDE
The Best
VR Sound Recorder
(All in One)

CONTENT
Overview
Diagram
Status Indicator Description
How To Use
3D Sound Real-time Monitor Function
3D Sound Record Quick Start
Maintenance and Repair
Notices
What's in the case
Specifications
2
2
3
4
5
5
6
6
7
8

1
DIAGRAM
TOP PANEL
OVERVIEW
2
Sound Pano All in One, is a cutting-edge VR audio recorder for VR shooting, which
based on Double Quad Binaural recording theory that maintains dummy head struc-
ture, lineament factors and bionic ears. It can be used for capturing the most vivid
sound-field, which reproduces directions, distances and movements info in VR film. It
considers integrated design which helps making VR movie easier.
Scenes provides an end-to-end solution for VR movie maker, including proprietary VR
decoding algorithm and post-production software. If you want to learn more, visit our
official web www.scenssound.com/en/ .
Sound Pano All in One, comes with 16-omnidirectional-mic-matrix towards 8 direc-
tions and each pointed at 45°from the adjacent one, and record 48khz/24bit lossless
360°audio. Also, it has a built-in standard gimbal for mainstream VR camera. 8 WAV
(uncompressed file) including 16 sound tracks are output, also can be mixed in 1 AAC
audio via Scenes Audio(A kind of proprietary algorithm for compression and decod-
ing), those for reproducing REALISTIC and IMMERSIVE sound-field in VR watching.
1. Power Button
2. Charge Jack
3. Battery Level LED
4. Gimbal and Camera
5. Micro SD Card Slot
6. Gain-
7. Gain+
8. Recording
9. Monitoring Port
10. Status LED
11. Real-time Monitoring
12. Auto Gain
13. Positive Direction Indicator
1
2
3
4
9
6
7
5
8
2
10
11
12
13

BOTTOM PANEL
Battery Status:
When an external battery with full power connects with Sound Pano, the battery
level LED will reveal as the right illustration shows. When only the last red one
left, it means that almost run out, which will shut out 30 minutes at most. Please
immediately change another battery before shut down.(“G” means Green light,
“R” means Red light)
“MONITOR", “AUTO GAIN", “REC", “GAIN+",“GAIN-", all have their own status LED. But “REC" LED
turns RED when it works, the others’ turn GREEN.
When you open Sound Pano, Battery LED will turn on first, and then please wait for the horse race
lamp from “MONITOR" to “GAIN-". After the horse race lamp stops, you can press “REC” to start
recording.
If you NOT insert Micro SD card (hot-plugging not supported) or storage before power-on, it
can NOT work and “REC" status LED will NOT turn RED.
STATUS INDICATOR DESCRIPTION
3
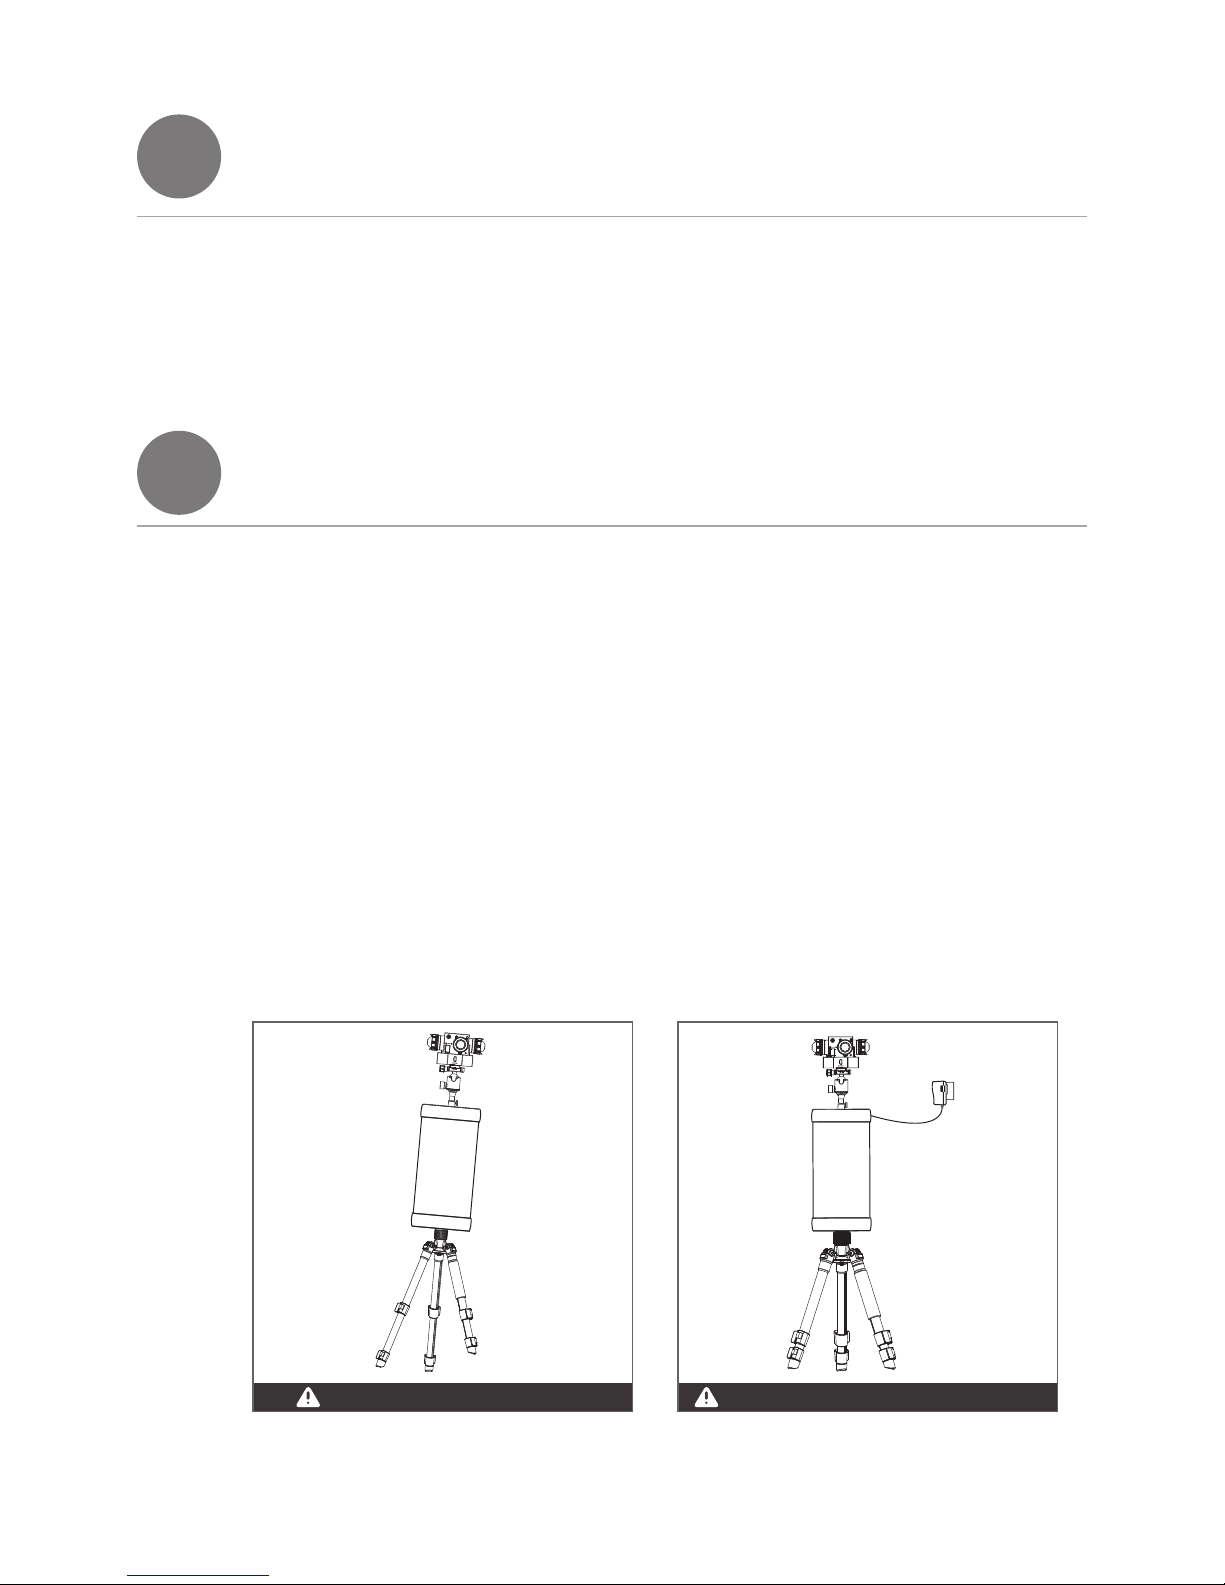
1. Gimbal and Tripod
2. Charge Jack
33
1.
2.
3.
4.
1
2
GGGR
battery level LED
FXLION
BP-100L
Recommended Lithium ion battery

Lock
32GB
HOW TO USE
4
1. 2.
3.
Open the case, take out the tripod. Make sure to set it
up steadily. Then put Sound Pano on it carefully.
Set up your VR camera, put it on the Gimbal and make sure the positive orientation as same as
where the pointer pined. And then insert the Micro SD card correctly into the slot.
4. Connect the external battery
to the Sound Pano bottom 's
4-pin XLRF.Then Press power
button, and wait Sound Pano
to start up. The status LED of
5 main operational buttons
will fast flash like horse race
lamp. After the horse race
lamp stops, Sound Pano is
prepared to work.
(Tips: There are two XLRs separately on the top and on the bottom for connection to external
battery, but the XLR on the bottom is recommended to connect due to operational convenience.)
Settle the position and adjust the
height before shooting.
1Set up VR camera
Press power button
2
4
VR Camera
Standard
Gimbal
Micro SD Card
Adjust VR camera.
If you want to choose one side to be the positive
orientation, you can follow the positive mark
+
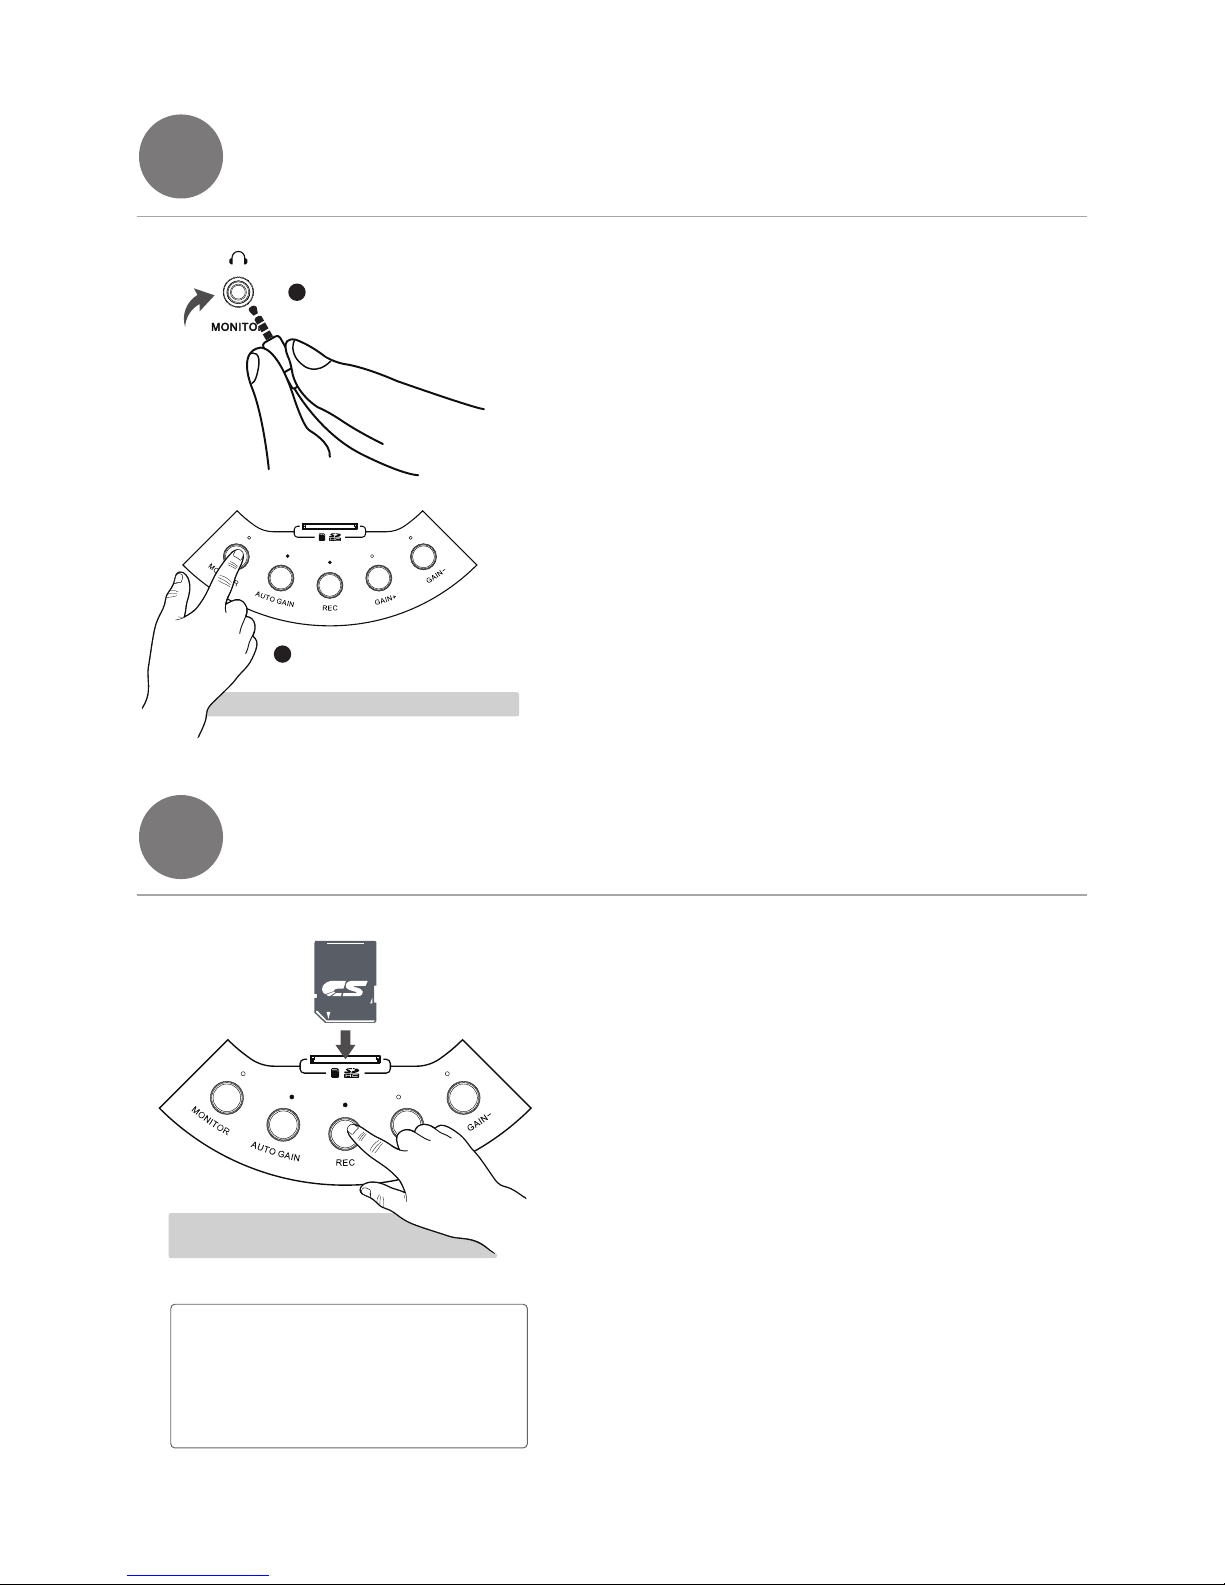
Insert your headphone into 3.5mm port, press “MONITOR"
button. When it turns GREEN, you will monitor the 360°
audio in real-time.
But what you’re monitoring is based on the position of
positive direction(0°direction). If you want change to
monitor another direction, you need to manually short
press from 1-8th direction successively. (one press for
one direction)
When "AUTO GAIN" opens, "GAIN+" and "GAIN-" will NOT
work, and the sound volume will change higher or lower
automatically. When you press “GAIN+" or “GAIN-"
manually,one short press for 1 level. There are 4 levels to
turn louder or lower.
3D SOUND REAL-TIME MONITOR FUNCTION
5
1
2
3D SOUND RECORD QUICK START
6
Lock
32GB
Press monitor button
ATTENTION: Use it after the LED turns on
5
Built-in 3.5mm port for
real-time monitoring
Tips:
Sound Pano comes with a maximum 32GB
Micro SD card (hot-plugging not supported).
A UHS-10 Micro SD card is recommended
due to their fast read and write speeds
allowing you to save high-fidelity 3D audio
data.
Before power-on, insert Micro SD card into the slot. Press
“POWER" button, and then press “RECORD" button. When
status LED turns RED, you can start to record. During
recording, you can use “AUTO GAIN",“GAIN+",“GAIN-" as
you want.
If Micro SD card NOT inserted or has NOT enough storage,
“REC" status LED will shut off.
(Notice: When power turns on, do NOT insert or take out
of the SD card.Otherwise, the data in the card may be lost.
Press and hold the “RECORD"button for at least 2 seconds
(until RED light fast flashing to stop) to stop recording.There
are 8 audio files in a new folder in your every time recording.
They'll be named in 1-8 to help you distinguish each audio
from different direction.
ATTENTION: Status LED turns on
that means in recording status
7
NOTICES
8
6
Please do NOT use it while charging, it will be damaged.Avoid unsteady platform to damage the product.
1. If you want to clean it, please use soft and dry fabric to clean up.
2. Do NOT use it under the sunlight in long time, in rainy day or next to heat source.
3. Make sure you'll store it away from dust and water.
Avoiding from unsteady platform, please prevent Sound Pano from falling down or creeping
down.
Avoid putting liquid materials on the Sound Pano.
Sound Pano comes with a maximum 32GB UHS-10 Micro SD card (hot-plugging not
supported), which has approximately 4-hour storage.Please make sure you have enough
storage before you record.
If “REC" status LED NOT turn RED, maybe it is not correctly inserted or has Not enough
storage. When you want to insert or take out SD card, please make sure to shut down
Sound Pano.
A new Sound Pano comes with a SD card which can NOT be replaceable.When power turns
on, do NOT insert or take out of the SD card.Otherwise, the data in the card may be damaged
or lost. SanDisk UHS-10 32GB Micro SD card is recommended.
There is no built-in battery in the Sound Pano, so an external battery is extra needed to
connect with the Sound Pano, which can be used an external lithium ion battery ( FXLION
BP-100L recommended) with a XLRF to connect with.
1.
2.
3.
4.
5.
6.
MAINTENANCE AND REPAIR

WHAT'S IN THE CASE
9
Lock
32GB
7
1x
Scenes VR Sound Recorder
1x
Standard Gimbal for VR camera 1x
Tripod 1x
Dedicated Case
1x
32GB UHS-10 Micro SD Card

SPECIFICATIONS
10
8
Temperature Range -10℃to 50 ℃
Weight
Dimensions
Output Format
Supported SD Cards
4KG
300mm*600mm (diameter*height)
8WAV(uncompressed audio file)
1AAC audio via Scenes Audio
UHS-10 Micro SD Card
Model No. SC-800
Frequency Range
Sesitivity
S/N Ratio( 1KHZ/Pa)
Total Harmonic Distortion(THD)
Output Impedance
Power Supply (for full performance)
Microphone Diameter
Description
Theory
Polar Pattern
Microphone Type
Maintain dummy head and lineament
structure and bionic ears
Double Quad Binaural
Omnidirectional
Electret condenser microphone
20Hz-20kHz
40dB ±2dB (0dB=1V/Pa,1KHZ)
95dB
0.003%@1kHz,+4dBu
100 Ω±30%
Ø6.0 mm
5V
This manual suits for next models
1
Table of contents
Popular Measuring Instrument manuals by other brands


Valeport
Valeport 803 operating manual

SICK
SICK GM32 Series operating instructions

Rohde & Schwarz
Rohde & Schwarz VOR/ILS Analyzer EVS200 user manual

3nh
3nh NH310 Operation manual

Dwyer Instruments
Dwyer Instruments Rate-Master RMC Installation and operating instructions

RC Electronics
RC Electronics Flarm Indicator user manual