Scion 2012 xB User manual

OWNER’SOWNER’S
OWNER’SOWNER’S
OWNER’S
MANUMANU
MANUMANU
MANUALAL
ALAL
AL
SCION xB
HEADREST DVD REAR SEAT ENTERTAINMENT SYSTEM
128-7907A
1of 32

128-7907A
2 of 32
INTRODUCTION
Your vehicle is equipped with a Headrest DVD Rear Seat Entertainment System (RSE). The system is designed to give you
and your passengers many years of video and audio entertainment in a mobile environment. The system allows you to
listen to audio CD’s and watch DVD’s. Video cameras as well as a variety of standard video games can be used with this
system. The DVD player is capable of playback of standard DVD’s, CD’s and CD-R/RW media. This includes CD’s with
MP3 format.
Please review this Owner’s Manual to become familiar with the features and controls as well as the very important safety
information. Please review User Manuals for video games and video game equipment when used as auxiliary inputs for
your Head Rest Rear Seat Entertainment System. Please read all of the safety and operating instructions before operating
the system and retain for future reference.
Federal Communication Commission (FCC) Compliance
Changesormodificationsnotapprovedcouldvoiduser’sauthoritytooperatetheequipment.Thisequipmenthasbeentestedand
found to comply with the limits for a Class B digital device, pursuant to Part 15 of the FCC Rules. These limits are designed to
provide reasonable protection against harmful interference in a residential installation. This equipment generates, uses and can
radiate radio frequency energy and, if not installed and used in accordance with the instructions, may cause harmful interference
andradiocommunications.Ifthisequipmentdoescauseharmfulinterferencetoradioortelevisionreception,whichcanbedetermined
by turning the equipment off and on, the user is encouraged to consult their Toyota dealer.
- I-

128-7907A
3 of 32
-II-
SAFETY PRECAUTIONS
ThismanualcontainscertainCAUTIONandNOTICEWarningsthatareusedtopreventorreducethechanceofinjuryordamageto
passengers and vehicle equipment, respectively. If you are driving a TOYOTA with a RSE system, please adhere to the following
guidelines:
!
CAUTION
ThisisaWARNINGagainstsomethingthatmaycause injury
topassengers ifthewarning isignored. You areinformedwhat
youmustormustnotdoin order to avoid or to reduce the risk
ofinjury to yourself andothers.
For safety reasons, when changing video media it is
recommended that the vehicle is not in motion and that you
donot allow children tounfasten seat-belts to changevideo
mediaor makeanyadjustments tothesystemexceptthrough
the remote control. System adjustments can be
accomplishedusingtheremote control unit, while seat-belts
remain fastened. Enjoy your entertainment system and
remember the safety of all of the passengers in the vehicle
shouldalways remain the numberonepriority.
!
CAUTION
NOTICE
This is a WARNING against something that may cause
damagetothevehicleoritsequipmentifthewarningisignored.
You are informed what you must or must not do in order to
avoidor toreducetherisk ofcausingdamageto thevehicleor
itsequipment
Thedriver mustnotattemptto operateanyfunctionof theDVD
system while the vehicle is in motion. Give full attention to
driving and to the road. Pull off the road and park in a safe
placebeforeinsertingorextractingDVD’sfrom the system. A
remote control is included with the system to allow the rear
seat occupants to operate most system functions without
distractingthedriverorremovingseatbelts.
!
CAUTION
128-7907A
4 of 32
CAUTION
1. Keep the monitor clean and dry.
2. Alwaysseekqualifiedpersonnel to perform repairs. Never
attemptyourownrepairs.
3. Do not drop the monitor or expose the monitor to strong
impacts.
4. Do not expose the monitor to direct sunlight for extended
periodsoftime.
-III-
!
CAUTION
Conversational speech on some DVDs is recorded at a low
volume to emphasize the impact of sound effects. If you
adjustthe volumeassumingthattheconversationsrepresent
the maximum volume level available for the DVD, you may
be startled by the louder sound effects or when you change
to a different audio source. Loud sounds may have a
significantimpactonthehumanbodyorposeadrivinghazard.
Keep this in mind when you adjust the volume.
!
BeforeputtingonHeadphonesalwaysadjustthevolumesetting
to the lowest position.
!
CAUTION
The front glass on the liquid crystal display (LCD) screen
maybreakwhen hit with ahardobject.Ifthe glass breaks, do
not touch the liquid crystalline material. In case of contact
with skin, wash immediately with soap and water. Caution
childrentoavoidtouching or scratching the screen, as it may
becomedirtyordamaged.
!
CAUTION

128-7907A
5 of 32
- I V-
Moisture in the air will condense in the DVD player under
extremelyhumid conditionsorwhenmoving fromacoldplace
toawarm one. Moisture condensationmaycausedamageto
the DVD and/or player. If moisture condensation occurs, do
notinsertaCDorDVDintotheplayer. If one is already inthe
player, remove it.TurntheDVDplayer ON to drythemoisture
beforeinserting a DVD. This could takeanhouror more.
NOTICE
Donotuseanysolventsorcleaningmaterialswhencleaning
theLCDdisplay. Do not use any abrasive cleaners, they may
scratch the screen. Use only a lightly dampened lint free
cloth to wipe the screen if it is dirty.
NOTICE
Donotoperatevideo games or video equipment ifthepower
cordsand/orcablesarebroken,splitor damaged. Carefully
placecordsand/orcables where they will not be stepped on
orinterferewith the operationofseatsand/orcompartments.
Disconnect video games and video equipment power cords
and/or cables when not in use. Do not allow the auxiliary
input jack to get wet or dirty. Do not clean any part of the
DVD player/screen with benzene, paint thinner or any other
solvent.
NOTICE NOTICE
Exercisecare to preventdirtandforeignobjects from entering
the DVD player compartment. Be especially careful not to
spill liquids of any kind onto the media controls or into the
system. If liquid is accidentally spilled onto the system,
immediately turn the system OFF and consult a qualified
servicetechnician.
NOTICE
Lock the LCD screens in the fully closed position when not in
use.
Whenthe vehicle isparkedindirectsunlight or inanextremely
cold place for a long period of time, wait until the cabin
temperatureofthevehicleisatacomfortabletemperaturebefore
operating the system.
NOTICE
NOTICE
Theuseof a cellular phone inside ornear thevehicle may
causenoiseoraudio interference from the speakers of the
system, which you are listening to. However, this does not
indicateamalfunction.

128-7907A
6 of 32
-V-
Donotplay the Rear SeatEntertainmentSystemforextended
periods of time with the engine shut off as this will drain the
battery.
NOTICE
NOTICE
Do not attempt to service, repair or modify the Rear Seat
EntertainmentSystem. See your dealer ifserviceis needed.
Do not insert foreign objects into the DVD openings.
NOTICE
Donotexposetheliquid crystal display (LCD) screen to direct
sunlightorintensiveultravioletraysforextensiveperiodsoftime.
Ultravioletraysdeterioratethe liquid crystal.
NOTICE

128-7907A
7 of 32
-VI-
TABLE OF CONTENTS
INTRODUCTION ................................................................. I
FederalCommunicationCommission(FCC) Compliance I
SAFETYPRECAUTIONS ................................................II-V
QUICKSTART GUIDE ........................................................ 1
OperatingtheDVD System ............................................ 1
CONTROLSAND INDICATORDIAGRAM .......................... 2
ControlFunctionDescriptionsfor M1 and M2 Monitor..... 2
M1 / M2 Panel Control ................................................... 2
DVDHEADREST SYSTEM OVERVIEW ............................. 3
REMOTECONTROLOPERATION...................................... 4
BatteryInstallation ......................................................... 4
RemoteControlFunctionalDescription....................... 5-9
WIRELESSHEADPHONES OPERATION ..........................10
WirelessHeadphonesSpecialFeatures ........................10
WirelessHeadphoneBatteryInstallation .......................10
OPERATION INSTRUCTIONS ...........................................11
Control Button Functions (M1 / M2 Unit) .......................11
DVD Basics ..................................................................12
RegionCoding ...............................................................12
Types of Discs Your System Will Play ..........................12
Disc Compatibility .........................................................12
Loading and Playing Discs ........................................12
To Load and Play a Disc...........................................12
SourceSelection ......................................................12
Settings and Adjustments ........................................... 13
UsingtheSetup Menu ............................................... 13
Exiting the Setup Menu ............................................. 13
Language Setup .......................................................... 13
Languagefor On-Screen Display ............................... 13
SubtitleSetup............................................................ 14
AudioSetup .............................................................. 14
Video Setup ................................................................. 15
TVDisplay................................................................. 15
TVType ..................................................................... 15
Rating Setup ................................................................ 16
Rating........................................................................ 16
Misc Setup..................................................................... 16
Factory Defaults ........................................................... 16
ScreenSaver.................................................................. 17
Playing Audio CDs ....................................................... 17
Playing MP3 Discs ....................................................... 18
Selecting a Play Mode .............................................. 18
SkippingSongs ......................................................... 18
SelectingFoldersandSongs..................................... 18
ProgramPlay ............................................................ 19
Deleting the Play List ................................................ 19
TROUBLESHOOTING ........................................................ 20
FUSEREPLACEMENT ....................................................... 21
SPECIFICATIONS .............................................................. 22
OWNER’SNOTES..........................................................23-24

128-7907A
8 of 32
QUICK START GUIDE
9. Tiltthescreen to a comfortableviewingposition (the
headrest itself can be tilted forward to help achieve a
comfortableviewingposition).
10. SelectAV1 using thesource button on thefrontpanel
orremote control to viewprogrammaterial on M1 or
selectfrom the other available sources DVD,or AUX
forM2Monitor.
*NOTE: To operate the M1 screen, press M1 on the
remotecontrol. To operate theM2screen,
press M2 on the remote control.
Operating The DVD System:
1. TurnontheM1 Monitor (passenger side) using the
Powerbutton on the front ofthescreen or the *Remote
Control.Tiltthe screenforwardusingthe center tab
at the top of thescreen.
2. Insert a DVD, CD or MP3 disc into the slot (disc label
towarddriver).
3. The disc will start playing.
4. Tiltthemonitorto a comfortable viewing position (the
headrestitselfcan be tilted forward to help achieve a
comfortableviewing position).
5. When the DVD menu appears, select the menu item
using the cursor keys and press the Enter or Play
button.
6. Each wireless headphone has a CH A/CH B switch.
When sitting in front of the M1 monitor, use the CH A
switch setting. When sitting in front of the M2 monitor,
use the CH B switch setting. Set the headphone to
theproperchannelandpressthePower On/Off
switch.Thepower indicator will light up red.Turnthe
volumedowntoits lowest setting before putting
themonyour head.
7. Ifaudioplaybackthroughthevehicle radio is preferred,
set the radio to AUX mode. Verify that nothing is
connectedtothevehicle radio’sAUX jack.
NOTE: Ifthereisaplugin the vehicle radio’sAUX jack; it
willoverridethe DVD audio.
8. TurnontheM2 Monitor (driver’s side) using the power
button on the front of the screen or remote control.
-1-
128-7907A
9 of 32
EJECT
1
2
M1 / M2 Panel Control
1. DVD disc insertion slot (disc label towards driver)
2. EJECTButton
3. PowerIndicatorLED
4. IRSensor
5. POWER Button
6. SOURCEButton
7. SCREENMODEButton (Normal, Wide, Off)
8. PLAY Button
9. STOPButton
10. IRTransmitterLEDs
11. AUXInput Jack (use withsuppliedAV adaptor)
12. LCDScreen
CONTROLS AND INDICATOR DIAGRAM Control Function Descriptions for M1 and M2
Monitor
-2-
S
AUX
35
67 8 9
10
11
12
4

128-7907A
10 of 32
DVD HEADREST SYSTEM OVERVIEW
1. TheDVDHeadrest system is aversatile audio / video
system which includes two monitors, each with a built-
inDVD player.
2. The M1 Monitor (passenger side) is comprised of a 7"
TFTLCDmonitor with built-in DVD playerthatallowsthe
usertoselectfrom DVD, A/V1, or AUX sources. The M1
monitorhas a built-in infrared audiotransmitter(CH A)
foruse with the suppliedtwo-channelwireless
headphones(CHA).TheM1monitoralsohastheability
toprovide the audio source foroutputto allow audio
playbackthroughthevehicleradio.
3. TheM2monitor (driver’s side) iscomprised of a 7"TFT
LCDmonitorwith built-in DVDplayerthatallows the user
to select from DVD, A/V1, or AUX sources. The M2
monitorhas a built-in infraredaudio transmitter (CH B)
for use with the supplied two channel wireless
headphones(CHB).
4. The monitors will show all of the system functions with
thecomprehensive On Screen Display (OSD).
5. TheDVDHeadrest System includes twoIR
Headphones.TheheadphoneshaveanA-Bswitchthat
allowtheusers to select the audio from either the M1
(CH A) or the M2 (CH B).
6. Eachmonitoruses different Remote Control IRcodes.
TheM1Monitorwill only respond to the Remote Control
unit when the Monitor Select (M1) button is pressed on
remote control. The M2 Monitor will only respond to the
RemoteControl unitwhentheMonitorSelect(M2)button
on remote control is pressed.
7. TheM1andM2Monitorwillacceptanaudio/videoinput
throughtheAUX(usewithsuppliedAVadaptor)input
locatedonthefrontoftheunit. Theaudio/videodevice
couldbeavideogamesystem,video camera,orother
inputdevice.
8. Pivotthescreenuntilacomfortableviewinganglereached.
The internal lock limits the screen to a maximum
adjustmentof30 degreesfrom closedposition,the
headrestitselfcanbe tiltedforwardtohelpachieve a
comfortableviewingposition.
AUX IN AUX IN
30 degrees
9. Pivotthescreen 10. Eject disc
M1/M2 Screen
Insert disc
-3-
M1/M2 Screen
Eject disc
128-7907A
11 of 32
-4-
REMOTE CONTROL OPERATION
Battery Cover
Lift for battery
installation
Battery Installation:
Before attempting to operate your remote control, install the
batteriesasdescribedbelow.
1. Turntheremotecontrolface down.Usingafingernail,lift
thebatterycoveroff.
2. Installtwo“AAA”batteries.Make surethatproperpolarity
(+/-)isobserved.
3. Align the cover tabswiththeremote control and press
down until the cover clicks.
128-7907A
12 of 32
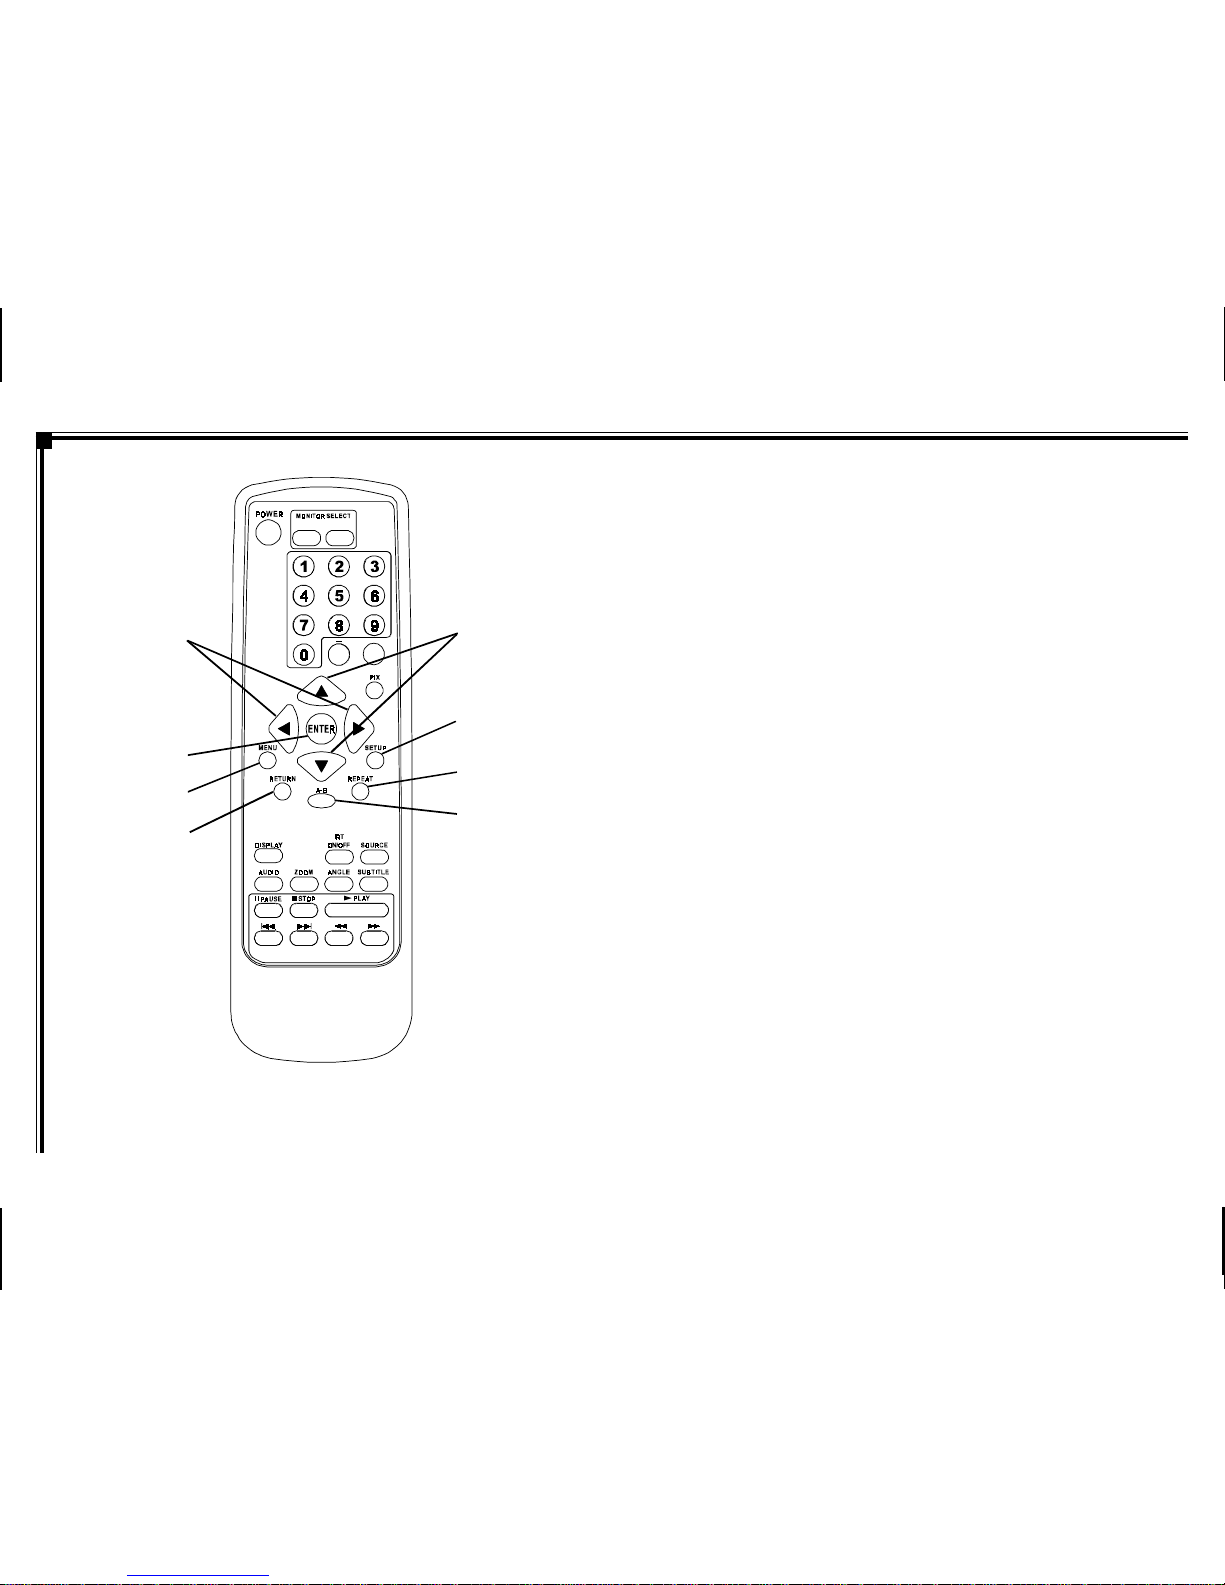
Figure 1a. Remote Control
-5-
1. POWER Button* – Press this button to turn M1 or M2
Monitor ON. Press the button again to turn M1 or M2
MonitorOFF.
2. Monitor Select (M1 and M2 Buttons) – Press
correspondingbuttonto change the Remote Control
code to enable control of the M1 or M2 Monitor.
3. NUMBER Buttons – Allows the user to enter the
numbers 0 to 9 for selection of CD tracks, DVD
chapters, and password setting.
4. UP/DOWN (+/-) Buttons – Use these buttons
to make picture adjustments in the picture select
mode.
5. PIXButton(PICTURESELECT)– Eachtimethisbutton
is pressed, the on screen picture adjustment displays
the“adjustmentbar”forBRIGHTNESS,CONTRAST,
COLORorTINT.Oncethedesiredadjustmentbar is
displayed, use the (+) / (–) button to adjust the setting.
TheOSD will automaticallyturnoffif no adjustmentsare
made within 6 seconds, or if any other button is pressed.
REMOTE CONTROL FUNCTIONAL
DESCRIPTION
* Functioncontrolisavailableonthe unitandremotecontrol.
NOTE:Tocontroltheindividualunits(M1Monitor/M2Monitor)
presseitherM1 or M2 before pressinganyotherbutton.For
example,toturnM1MonitorON,pressM1andthenthepower
button.
128-7907A
13 of 32
7
10 9
8
6A
11
M1M2
+
–
6B
6C
Figure 1b. Remote Control
6a.Up ()/Down () Buttons – Use these buttons to scroll
upwardanddownward,respectively,inmenuoptions.
6b. LEFT ()/Right () Buttons – Use these buttons to shift
leftandright, respectively, in themenuoptions.
6c. ENTER Button – Used to implement a selected setting.
7. SETUP Button – Press to display the Setup Menu which
allows the user to change the DVD player options such
asTVDISPLAY,OSDLANGUAGE, PARENTAL
CONTROLetc.Referto theSettingsandAdjustments
sectionformoreinformation.
8. REPEAT Button – Allows the user to repeat a selected
Title,Chapteror Track ofaDVD,CDorMP3. Refer to
repeat function in this manual for each type of disc.
9. A-B Button – Allow user to repeat the playback from
point A to point B.
10. RETURNButton –Not usedonthis model.
11. MENU Button – Allows the user to access the DVD
(DVDMODE)rootmenu.
-6-
128-7907A
14 of 32
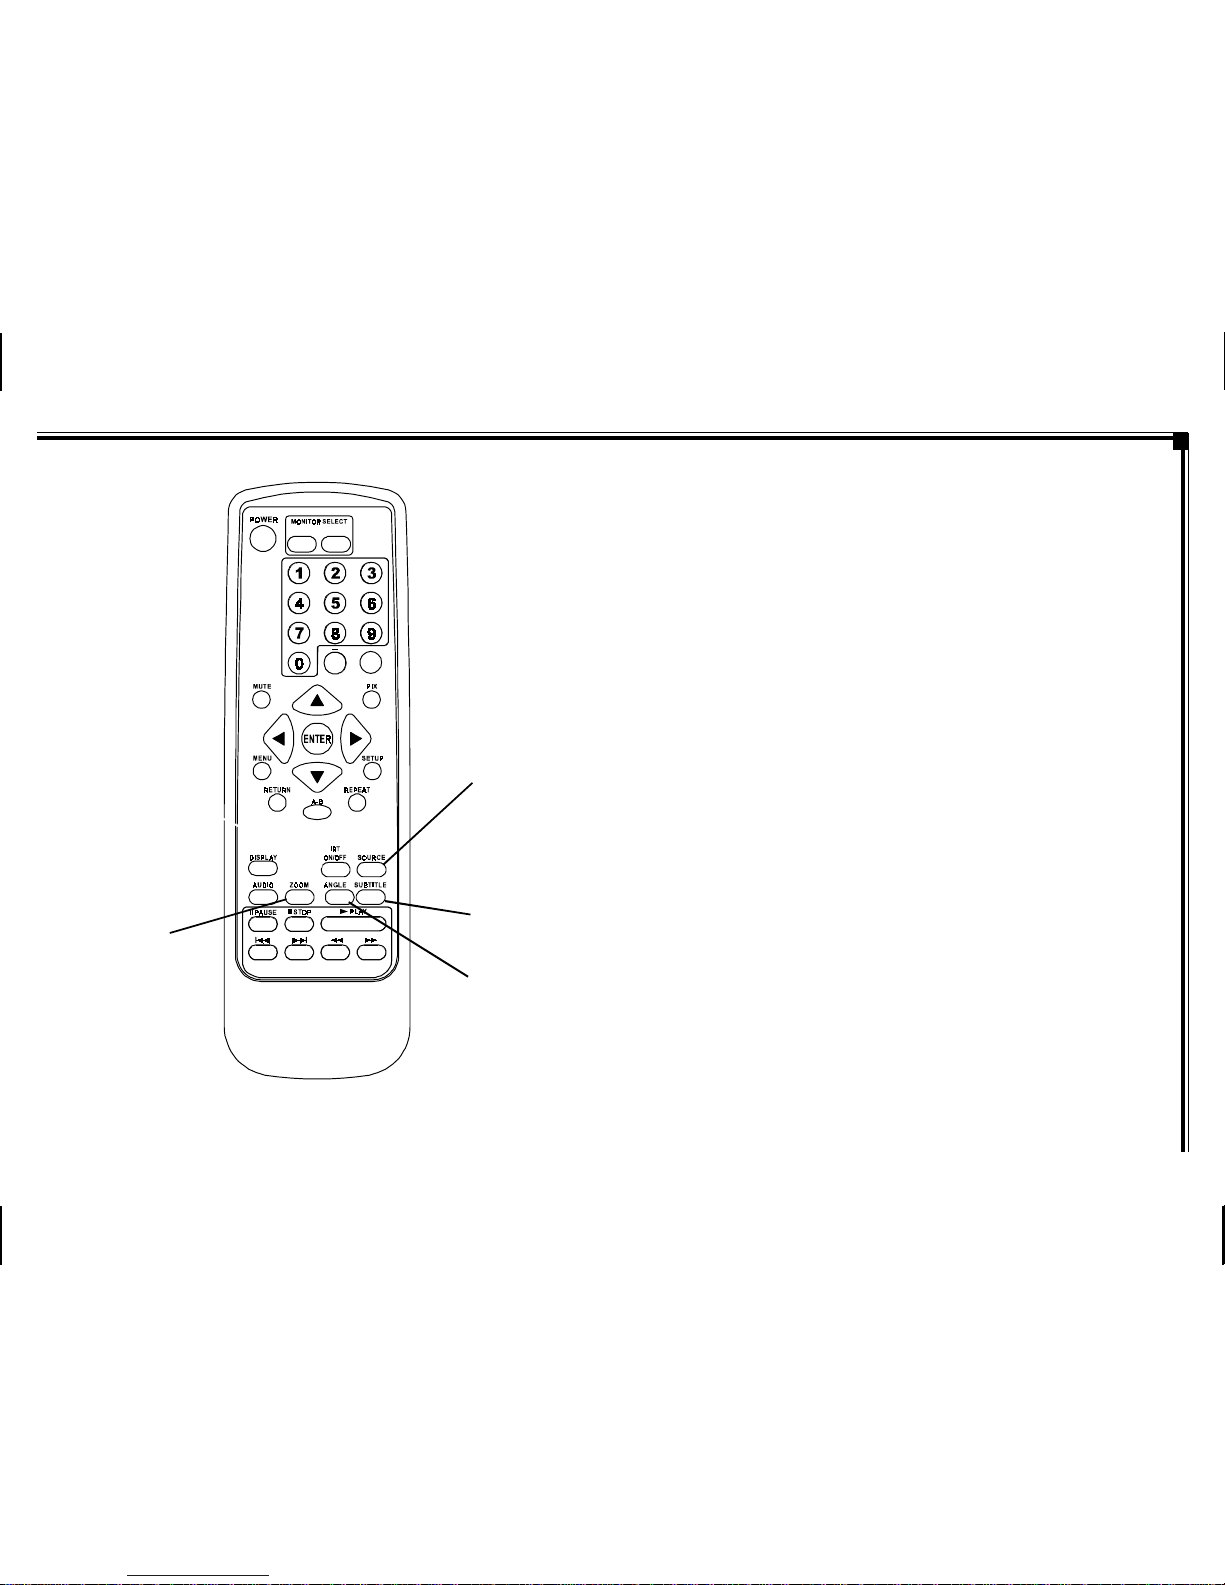
Figure 1c. Remote Control
12. SOURCE Button* – Press this button to select the
availablesources. On theM1monitor,thesources are
DVD, AV1, & AUX. On the M2 Monitor, the sources are
DVD,AV1,&AUX.
13. SUBTITLE Button – Press to display and select the
subtitle language in DVD mode. Each time you press
thebutton, the subtitlelanguagechanges.
NOTE:Thetypeandnumberoflanguagesforsubtitlesvary
from disc to disc.
14. ANGLE Button – Press to display and select different
camera angles in DVD mode. Each time you press the
button,theanglechanges.
NOTE:The numbersofanglesvaryfromdisctodisc. Not
all discs contain this option.
15. ZOOM Button – Press this button to enlarge the picture
when playing a DVD disc.
PressZOOMbutton DVD Player Performs
Once Enlargethe picture 2 times of
the original size
Twice Enlarge the picture3timesof
the original size
3 times Enlargethe picture 4 times of
the original size
4 times Pictureis returnedtooriginal
size
-7-
12
13
15
M1M2
+
–
14

128-7907A
15 of 32
Figure 1d. Remote Control
16. AUDIO Button – Press to display and select the
AUDIOlanguagein DVD mode. Each timeyoupress
thebutton,thelanguagechanges.
NOTE:The languagesforaudiovaryfromdiscto disc.
17. DISPLAY Button – Press to display the current
disc information while the disc is playing. Press the
cursor()buttonstohighlightthedesired
option. For title and chapter selection use the
numberbuttonstoenterthedesiredtitleorchapter
numberforangle, audio, and subtitle. Press the
ENTERbutton repeatedlytochangetheitem.
Title
Chapter
Angle
Audio
Subtitle
18. IRT ON/OFF Button – Press this button to turn the
selectedunit (M1/M2)IRTransmitterON/OFF.
17
18
M1M2
+
–
16
-8-

128-7907A
16 of 32
Figure 1e. Remote Control
19. PLAY () Button* – Press to activate the play mode
while a disc is loaded in the disc compartment.
20. SCAN FORWARD () Button – Press to search in a
forwarddirection.Pressrepeatedly tochangethe
search speed from 2, 4, 8, 16 times the normal
speed.
21. SCAN BACKWARD () Button – Press to search in
abackwarddirection. Press repeatedlytochangethe
search speed from 2, 4,8, 16 times the normal speed.
22. NEXT (l) Button – Press to skip to the next chapter,
track or song.
23. PREVIOUS (l) Button – Press to return to the
previouschapter,trackorsong.
24. PAUSE (II) Button – Allows the user to pause the
playback. Press the Play button to resume normal
playback.
25. STOP () Button* – Press to stop playback.
-9-
20
19
M1M2
+
–
21
20
19
21
22
23
24
25
128-7907A
17 of 32
-10-
WIRELESS HEADPHONES OPERATION
The system includes built-in infrared transmitters for use with
WirelessHeadphones. Themastermonitor (M1) IR transmitter
uses CH A of the wireless headphones. An A-B switch allows
theuserto select the audio from either the M1Master (CH A)or
the M2 Satellite (CH B).
Wireless Headphones Special Features
• DualChannel
• Automaticlevelcontrolpreventsinput signal overloading.
• Uses high frequency infrared light to assure a clean signal
forclearreception.
• Fold-flat ear pieces rotate 90° to facilitate storing in
seat back pocket or door pocket.
When sitting in front of the M1 screen, use the CH A switch
setting. When sitting in front of the M2 screen, use the CH B
switch setting.
To operate the Headphones:
1. Settheheadphones to the properchanneland press
thePower ON/OFF switch onthe right-handearpiece
(Figure2)to turn the headphones ON. Thepower
indicator will light red.
2. Adjust the Volume level with the VOL Control Dial on
the right-hand ear piece (Figure 2) to its lowest setting
beforeputting them on your head.
3. PresstheON/OFF buttonagaintoturn theHeadphones
OFF.
Wireless Headphone Battery Installation
1. Remove the Battery Cover and remove old batteries
(Figure3).
2. Place two alkaline AAA batteries into the battery
compartmentof each Headphone,makingsurethat the
battery polarity is correct.
3. ReplaceBatteryCover.
Figure 3. Replacing the Headphone Batteries
NOTE: The IR transmitter must be in the “ON” mode. See
IRTransmitter“RemoteControl Functional Description,
Item18.
NOTE: When storing the Wireless Headphones in the
seat back pocket or door pocket, pivot the ear pieces to
the flat position.
Figure 2. Wireless Headphones Controls and Indicators
Volume Control
Power
Indicator
LED (red)
Channel A-B
Switch
Battery
Cover
CH.B
CH.A
TOYOTA
TOYOTA
VOL
Power
Power ON/OFF
Button
128-7907A
18 of 32
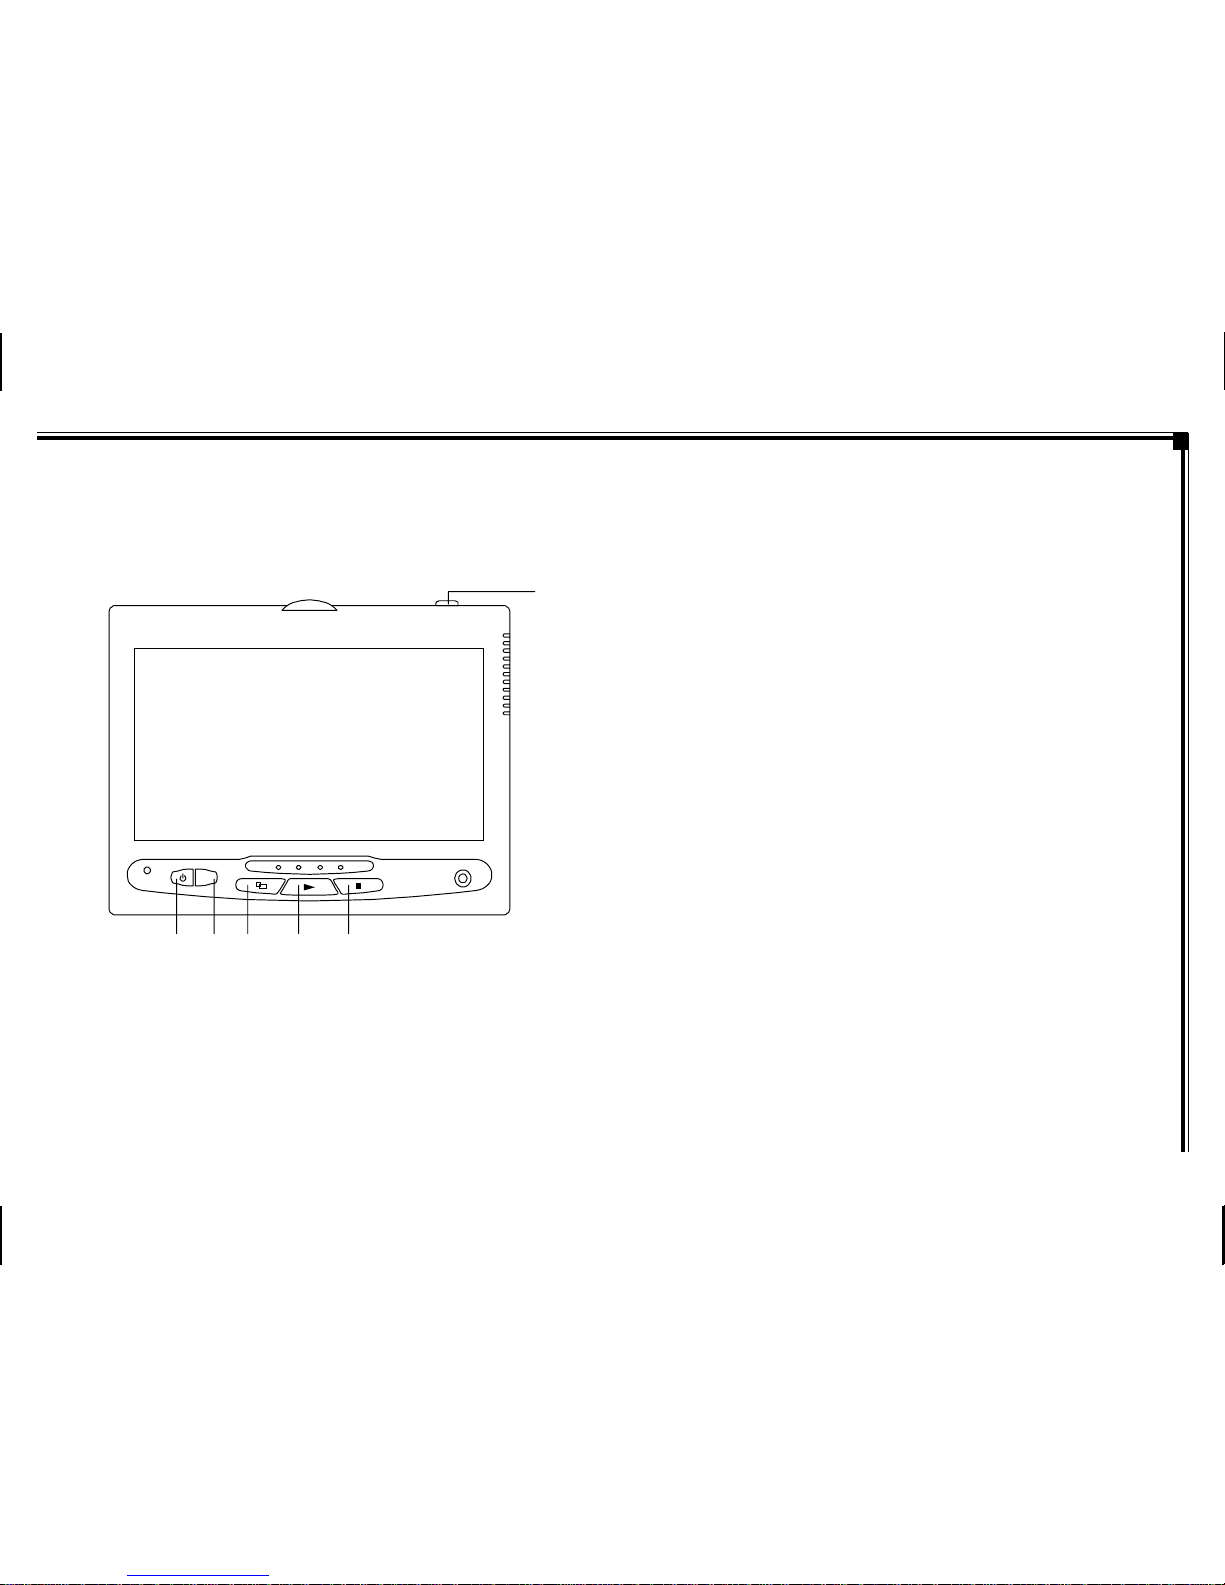
There are six (6) buttons on the M1 unit and M2 unit:
1. POWER Button – Press this button to turn the unit
ON/OFF.
2. SOURCE Button – Press this button to select between
DVD,AV1,andAUX.
3. SCREEN MODE Button – Press this button to select
betweenWide(16:9),Normal (4:3)aspectratioorscreen
off(displayOFF).
4. PLAY Button – Press this button to start playback.
5. STOP Button – Press this button to stop playback.
6. EJECT Button – Press this button to eject the disc.
OPERATION INSTRUCTIONS
Control Button Functions (M1/M2 Unit)
S
AUX
123 4 5
6
-11-
Figure4. Monitor ButtonFunctions

128-7907A
19 of 32
DVD Basics
To get the optimum use out of your DVD Headrest System,
please read this section completely.
Region Coding
Boththe DVDplayerandDVDsarecodedby region.These
region codes must match in order for the disc to play. If
the codes don’t match, the disc won’t play. This unit is set to
region1 (USA) and will notplaydiscs that have a regioncode
differentfromregion1.Theunitwilldisplay“WrongRegion”.
Types of Discs Your System Will Play
• DVD disc* - DVD discs which contain video.
• Audio discs - Audio CDs contain musical or sound
content only.
• MP3 discs - A disc that contains audio files (for
example,aCD-RwithdownloadedMP3files).
* This system is capable of playing most recordable DVD
formats.However,duetothevarietyofdiscmanufacturersand
software,playbackcannotbeguaranteedforeverydisc.
DiscCompatibility
Before you load a disc, make sure that it is compatible with the
player. Insert thediscwiththe labelfacingthedriver.
NOTE: Thefollowingdiscscannot beplayedwith this player:
• MiniDisc
• Laserdisc
• CD-I,CD-ROM,DVD-ROM,SuperAudioCD(SACD),
DVDAudio
• BD(Blue-RayDisc™)andHD(HighDefinition)DVD
discs
Loading and Playing Discs
To Load and Play a Disc
Press the Power button to turn the unit ON. Pivot the screen
forward,selectDVD mode and insertthedisc(labeltowards
driver)intothe disc insertion slot.
Source Selection
M1Sources:
DVD,AV1, AUX
DVD-SelectDVDtoview the internal (M1) DVD player.
AV1 - Select AV1 to view the source that is selected on the
M2monitor.
AUX-SelectAUXtoviewthesourcethatisconnectedtothe
AUXinput* onthefront oftheunit.
M2Sources:
DVD,AV1, AUX
DVD-SelectDVDtoview the internal (M2) DVD player.
AV1 - Select AV1 to view the source that is selected on the
M1monitor.
AUX-SelectAUXtoviewthesourcethatisconnectedtothe
AUXinput* onthefront oftheunit.
*TheAUXinputrequirestheuseofthesuppliedAVadapter
cable(1/8"-to-RCA). Plugtheexternalsourceintothe3RCA
jacks(red-to-red,white-to-white,yellow-to-yellow)andplugthe
1/8"pluginto the AUX jack on thefront ofthe screen.
-12-

128-7907A
20 of 32
TheSetupMenucontainsfeaturesandoptionsthatletyoucustomize
your DVD player. For example, you can set a language for the on-
screen display and limit playback of disc content for children.
Using the Setup Menu
1. Press the SETUP button on the remote.The Setup
Menuappearson the screenasshowninthe diagram.
2. To selectthe desiredfunction,move the highlight
using the cursor button or to the function indicated.
3. Afterenteringthedesiredfunction,highlightthe desired
item using the cursor button or .
4. Presstomovethe highlighttothedifferent optionsfor
the selected item. Press or to select the desired
optionsandthen press ENTER to confirmthe
selection.
5. Tochangetoanother function, press until the
highlightmoves back to thefunctionitem of the
SetupMenu.
SETTINGS AND ADJUSTMENTS
-13-
Exiting the Setup Menu
Press the SETUP button to exit.
LANGUAGE SETUP
Language for On-Screen Display
OSD MENU: The OSD MENU setup allows the user to select
the language for the on-screen display. The user can select
English,French, Spanish, German orItalian for the OSD
language.
1. Whileinthe LanguageSetup,highlight OSD
LANGUAGEusing the cursor button .
2. Pressto movethehighlightto thedifferentoptionsfor
the selected item. Press or to select the desired
optionsandthen press ENTER to confirmthe
selection.
3. Press the cursor button to return to the function
setuppage.
LanguageSetup
VideoSetup
RatingSetup
Misc Setup
Table of contents
Other Scion Car Receiver manuals

Scion
Scion BeSpoke User manual

Scion
Scion scion audio system User manual

Scion
Scion PT546-00100 User manual

Scion
Scion PT546-00140 User manual

Scion
Scion BeSpoke Premium Audio pt296-00142 User manual

Scion
Scion PT546-18130 User manual

Scion
Scion PT546-00120 User manual

Scion
Scion PT546-00130 User manual

Scion
Scion PT546-00160 User manual


