sComm UbiDuo User manual

UbiDuo User Manual
V2.D

FCC
This equipment complies with Part 68 of the FCC rules and the requirements
adopted by the ACTA. On the bottom of this equipment is a label that contains,
among other information, a product identifier in the format US:AAAEQ##TXXXX.
If requested, this number must be provided to the telephone company.
This equipment uses the following standard jack types for network connection:
RJ11C.
Facility Interface Code (FIC) 02LS2
Service Order Code (SOC) 9.0F
This equipment contains an FCC compliant modular jack. It is designed to be
connected to the telephone network or premises wiring using compatible modular
plugs and cabling which comply with the requirements of FCC Part 68 rules.
The Ringer Equivalence Number, or REN, is used to determine the number of
devices that may be connected to a telephone line. Excessive RENs on a
telephone line may cause an incoming call to become undetectable. In most but
not all areas, the sum of RENs should not exceed five (5.0). To be certain of the
number of devices that may be connected to your line, contact your local
telephone company.
In the unlikely event that this equipment causes harm to the telephone network,
the telephone company will notify you in advance that temporary discontinuance
of service may be required. But if advance notice isn't practical, the telephone
company will notify you as soon as possible. In the event such a disconnection is
deemed necessary, you will be advised of your right to file a complaint with the
FCC.
The telephone company may make changes in its facilities, equipment,
operations or procedures that could affect the operation of the equipment. If this
happens the telephone company will provide advance notice in order for you to
make necessary modifications to maintain uninterrupted service.
If trouble is experienced with this equipment, for repair or warranty information,
please contact sComm, Inc. at 866-505-7008 (voice) or 866-505-
7001(TTY/Sorenson VP). If the equipment is causing harm to the telephone
network, the telephone company may request that you disconnect the equipment
until the problem is resolved.
There are no user serviceable components within this equipment.
This equipment must not be used on party lines. Connection to party line service
is subject to state tariffs. Contact the state public utility commission, public
service commission or corporation commission for information.
If your home has specially wired alarm equipment connected to the telephone
line, ensure the installation of this equipment does not disable your alarm
equipment. If you have questions about what will disable alarm equipment,
consult your telephone company or a qualified installer.

Compliance Statement (Part 15.19)
This device complies with Part 15 of the FCC Rules.
Operation is subject to the following two conditions:
1. This device may not cause harmful interference, and
2. This device must accept any interference received,
including interference that may cause undesired operation.
Warning (Part 15.21)
Changes or modifications not expressly approved by the party
responsible for compliance could void the user’s authority to
operate the equipment.
FCC Interference Statement (Part 15.105 (b))
This equipment has been tested and found to comply with the limits for a Class B
digital device, pursuant to Part 15 of the FCC Rules. These limits are designed to
provide reasonable protection against harmful interference in a residential
installation. This equipment generates uses and can radiate radio frequency
energy and, if not installed and used in accordance with the instructions, may
cause harmful interference to radio communications. However, there is no
guarantee that interference will not occur in a particular installation. If this
equipment does cause harmful interference to radio or television reception, which
can be determined by turning the equipment off and on, the user is encouraged
to try to correct the interference by one of the following measures:
-Reorient or relocate the receiving antenna.
-Increase the separation between the equipment and receiver.
-Connect the equipment into an outlet on a circuit different from that
to which the receiver is connected.
-Consult the dealer or an experienced radio/TV technician for help.
This portable transmitter with its antenna complies with FCC’s RF exposure limits
for general population / uncontrolled exposure.
Specific Absorption Rate
This portable equipment with its antenna complies with FCC's RF radiation
exposure limits set forth for an uncontrolled environment. This equipment has
shown compliance with FCC's Specific Absorption Rate (SAR) limits. To maintain
compliance, this transmitter must not be co-located or operating in conjunction
with any other antenna or transmitter.
Industry Canada CS03 Statement
“NOTICE: The Industry Canada label identifies certified equipment. This
certification means that the equipment meets telecommunications network
protective, operational and safety requirements as prescribed in the appropriate
Terminal Equipment Technical Requirements documents(s). The department
does not guarantee the equipment will operate to the user’s satisfaction.
Before installing this equipment, users should ensure that it is
permissible to be connected to the facilities of the local telecommunications

company. The equipment must also be installed using an acceptable method of
connection. The customer should be aware that compliance with the above
conditions may not prevent degradation of service in some situations.
Repairs to certified equipment should be coordinated by a
representative designated by the supplier. Any repairs or alterations made by
the user to this equipment, or equipment malfunctions, may give the
telecommunications company cause to request the user to disconnect the
equipment.
Users should ensure for their own protection that the electrical
ground connections of the power utility, telephone lines and internal metallic
water pipe system, if present, are connected together. This precaution may be
particularly important in rural areas. Caution: Users should not attempt to
make such connections themselves, but should contact the appropriate electric
inspection authority, or electrician, as appropriate.”
An explanatory note on Ringer Equivalence Numbers (see Section 10.0) and
their use must be provided for the terminal equipment user in the information
accompanying the terminal equipment. A notice similar to the following would be
suitable:
“NOTICE: The Ringer Equivalence Number (REN) assigned to each terminal
device provides an indication of the maximum number of terminals allowed to be
connected to a telephone interface. The termination on an interface may consist
of any combination of devices subject only to the requirement that the sum of the
ringer equivalence Numbers of all the devices does not exceed 5.”
Industry Canada Statement per Section 4.0 of RSP-100
The term "IC:" before the certification / registration number only signifies that the
Industry Canada technical specifications were met.
Section 7.1.5 of RSS-GEN
Operation is subject to the following two conditions:
1) this device may not cause harmful interference, and
2) this device must accept any interference received,
including interference that may cause undesired operation.
Section 7.1.4 of RSS-GEN
This device has been designed to operate with an antenna having a maximum
gain
Of 4.31dB. Antenna having a higher gain is strictly prohibited per regulations
of Industry Canada. The required antenna impedance is 50 ohms."
Section 7.1.5 of RSS-GEN
To reduce potential radio interference to other users, the antenna type and its
gain should be so chosen that the equivalent isotropically radiated power (EIRP)
is not more than that required for successful communication.

Section 2.6 of RSS-102
This portable transmitter with its antenna complies with Industry Canada RF
Exposure Limits for General Population / Uncontrolled Exposure.

UbiDuo® User Manual
© Copyright 2007
Table of Contents
A Note from the CEO........................................................................7
Warnings!...........................................................................................8
Separating the Two Halves............................................................8
Power and Ports Panel .......................................................................9
Turning on the UbiDuo..................................................................9
Main Menu Icons.........................................................................11
Split Screen Chat......................................................................11
Split Screen Toolbar ............................................................12
Exiting the Split Screen Chat...............................................15
Call (Ubi4Tel)..........................................................................15
Using the Ubi4Tel Feature...................................................16
Receiving a Telephone Call.............................................16
Ending a Telephone Call..................................................16
Saving a Telephone Conversation ...................................16
Saving a Contact’s Name and Number............................17
In Range...................................................................................17
Inviting Other UbiDuos to Chat...........................................17
Holding a Three-way Conversation.................................18
Holding a Four-way Conversation...................................19
No Units in Range................................................................19
Auto-Link.................................................................................19
Brightness ............................................................................21
Contrast................................................................................21
Backlight..............................................................................22
Time/Date ............................................................................22
Modem.................................................................................23
I.D. Display..........................................................................24
Font .....................................................................................24
Settings ................................................................................25

7
S/W Update (Update Software)...........................................25
Part One -UbiDuo...........................................................25
Part Two -PC...................................................................26
Part Three -UbiDuo.........................................................28
Saved Conversations................................................................28
Viewing Saved Conversations.............................................29
Downloading a Saved Conversation to a Computer............30
Deleting a Saved Conversation............................................30
Function Keys..............................................................................30
Shift + F Keys..........................................................................31
Alt + F Keys.............................................................................32
Ctrl + F Keys............................................................................33
Features for People with Low Vision ..............................................35
Reverse Video..............................................................................35
Backlight......................................................................................35
Brightness ....................................................................................35
Contrast........................................................................................35
Font..............................................................................................35
Key Repeat Rate ..........................................................................36
Turning off the UbiDuo...................................................................36
Charging the Batteries..................................................................36
Troubleshooting...........................................................................37
Customer Assistance....................................................................37
Ordering Accessories...................................................................38
Bag...........................................................................................38
Warranty information...................................................................38

8
A Note from the CEO
Hello, and thank you for purchasing a UbiDuo, the premier face-to-face
communication solution for people who are deaf, hard of hearing, or who
face any communication barriers. The UbiDuo has opened the door for
many people and has given them a sense of freedom and independence
like nothing else. With the UbiDuo, you’ll be able to communicate
directly, without an interpreter and without writing notes back and forth
on paper or reading lips, no matter where you go.
For those of you who have purchased a UbiDuo to better service clients
or employees who are deaf or hard of hearing, congratulations. The
UbiDuo offers an affordable alternative to expensive interpreters. While
there may be some situations in which an interpreter might be
necessary, you now will be able to hold impromptu conversations, quick
training sessions, or meetings without worrying about hourly rates or a
minimum length of time.
The UbiDuo does not connect to the Internet, so there are no monthly
access fees to pay. The UbiDuo has TTY capabilities built in, which we
call the Ubi4Tel feature; however, it is so much more. Once you use
Ubi4Tel to communicate over the telephone lines, you’ll never want to
use an old-fashioned TTY again!
Please remember, though, the UbiDuo is designed specifically for face-
to-face communication. We hope that every worker who is deaf or hard
of hearing in America will have a UbiDuo on their desk or in their work
area so that they, too, can experience the kind of spontaneous
conversations that hearing people engage in every day.
We’d love to hear your feedback about the UbiDuo, whether you’re a
person who is deaf or hard of hearing using it in personal or professional
settings, or whether you’re a business owner who bought a UbiDuo for
an employee who is deaf or hard of hearing. We’d love to hear from
agencies who have recommended the UbiDuo to clients who are deaf or
who interact with the deaf. More information about how to contact us is
included later in this manual.
Thank you again for your business.
Communicating freely,
Jason Curry

9
Warnings!
When using electrical appliances, basic safety instructions should always
be followed.
•Read all instructions before using the UbiDuo.
•To protect against risk of electrical shock, do not put the UbiDuo or
its cord or plug in water or other liquid.
•Do not operate either side of the UbiDuo with a damaged cord or
plug, or after either side has been damaged in any manner. Contact
our Tech Support if the UbiDuo is damaged in any way.
•Do not let cord touch hot surfaces and where possible, do not let
cord hang over edge of table, desk, or counter.
•The use of accessories not recommended by manufacturer may
cause fire, electric shock or injury.
The UbiDuo was manufactured to be fairly rugged, but that does not
mean you can throw it around. Please treat this as you would a laptop
computer: do not drop it; do not spill liquids on it (although the keyboard
is water-resistant, repeated spills may cause damage); and do not
unscrew the back of the UbiDuo to remove the casing. Only use an AC-
DC adapter to charge the units. The UbiDuo will operate on 120 volts; if
you are traveling overseas, you will need a converter.
Separating the Two Halves
To separate the two halves of the UbiDuo without damaging the internal
parts, you must always lay the UbiDuo flat, preferably on a hard surface,
such as a desk or a table, unfold the two sides, and then disconnect
them using the two u-shapped metal hinges. Never pull them apart using
the plastic cases. See the illustrations below
RIGHT WAY WRONG WAY

10
Power and Ports Panel
This section describes the panel on the right-hand side of the UbiDuo
with the Power button and different ports. When you turn on the UbiDuo
for the very first time, an error message will appear that tells you to turn
off the device. This is normal; simply press Enter. The UbiDuo will shut
off. When you turn it on again, it will stay on.
Turning on the UbiDuo
To turn on the UbiDuo, press the green Power (PWR) button located on
the right-hand side of each unit.
Cell phone/PDA Battery indicator lights
port (for future use)
Wall charger port
Reboot port
USB port
Phone port Power button
Cell phone/PDA port –Reserved for future use
Phone port –Telephone line connects here for Ubi4Tel feature
IC/IR indicators –Incoming chat request (IC) is lit up when someone is
requesting a chat session; in range (IR) is lit up when another UbiDuo is
in range. This corresponds with the lights on the front side of the UbiDuo
(IC = blue light; IR = white light).
Power button –Turn the UbiDuo on and off with this button
USB port –Upload new software releases to the UbiDuo or download
saved conversations by connecting the UbiDuo to a computer
B1/B2 indicators –B2 is lit up when the UbiDuo is plugged in to a wall
outlet. (B1 is for future use.)
DC IN –Wall chargers connect here to charge the batteries or to power
the UbiDuo
Reboot port –If the UbiDuo freezes or locks up, insert the end of a
paper clip or safety pin here to reboot it

11
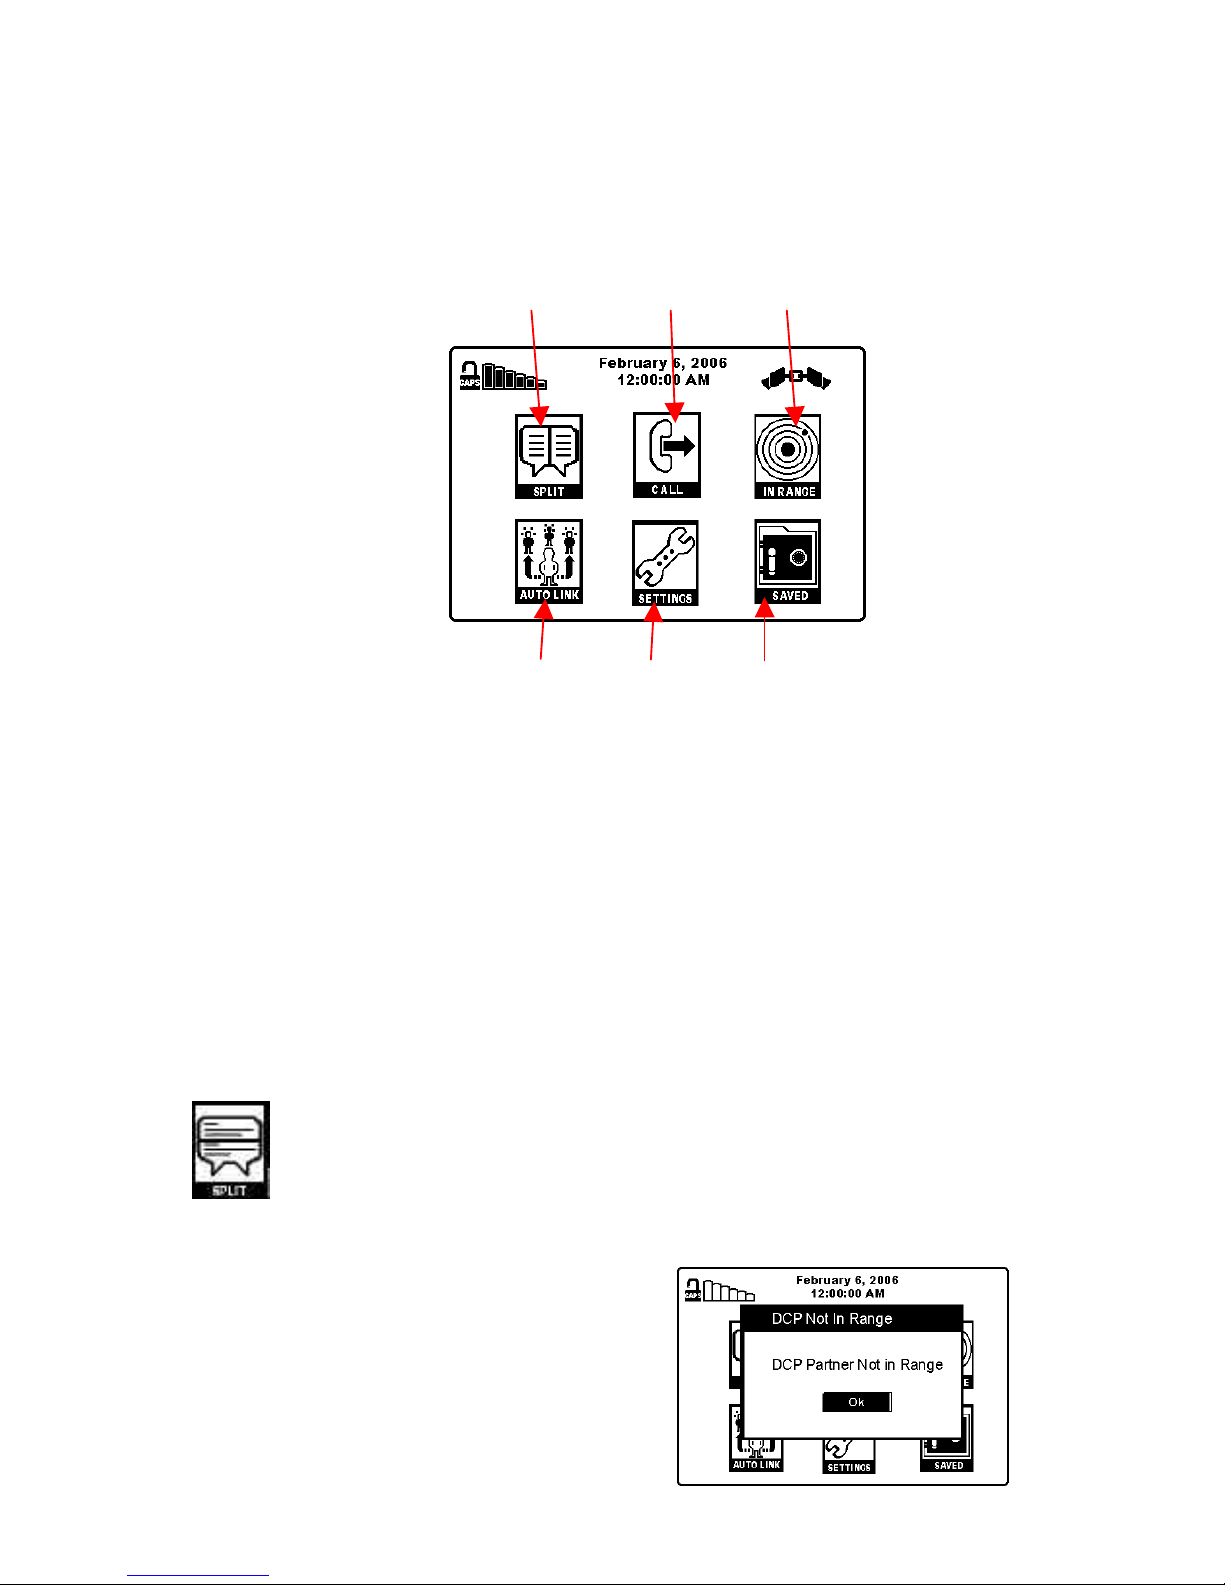
Main Menu
The Home screen will appear, showing the Main Menu and other
features.
12345 6
1 —Caps Lock indicator. The Caps Lock defaults to the unlocked
position. There is a small space between the square portion of the lock
labeled CAPS and the U-shaped piece on top. If the Caps Lock key has
been pressed, the U-shaped piece will move down to indicate that Caps
Lock is on.
2 —Battery indicator (six bars that get shorter and shorter). When the
battery in a unit has been charged, all six bars are black. When the
UbiDuo is used without being plugged in, the battery will lose its charge,
and each bar will turn white, starting with the tallest on the left.
NOTE: When the UbiDuo is set to Reverse Video for clients with low
vision, the battery bars will be white and will turn black as the battery
wears down. Read more about Reverse Video in the Features for People
with Low Vision section of this manual. Read more about the batteries
and how to charge them in the Charging the Batteries section of this
manual.
3 —Date. Right underneath that is the time, indicated in hours, minutes,
and seconds. When you first turn on the UbiDuo, you will need to set the
time and date on each half. Read more about setting the time and date
later in this manual.
4 —Telephone indicator. (Not shown in picture.)This icon will show
only when the UbiDuo is making or receiving a telephone call.
5 —Auto-Link indicator.When the Auto-Link is set to Off, the indicator,
which looks like a seatbelt, is unbuckled. When the Auto-Link is set to
On, the seatbelt is buckled. In the illustration above, the Auto-Link is on.
12
6 —Main Menu icons. You can select any of the icons by using either
the Tab key or the up/down/right/left arrow keys. The menu icons are
explained below.
Main Menu Icons
12 3
4 56
1 –Split screen chat. Start a chat session by pressing Enter when this
icon is highlighted.
2 –Call (using Ubi4Tel feature). Connect the UbiDuo to a telephone
line and place a call.
3 –In Range. See whether other UbiDuos are within range to start a
conversation.
4 –Auto-Link. Use Auto-Link to automatically connect to other UbiDuos
within range or to keep others from automatically linking to you.
5 –Settings. Check your settings or change your default settings.
6 –Saved conversations. Save a conversation or view saved
conversations.
Split Screen Chat
When the UbiDuo is first turned on, the Split Screen option is the
default. To open the Split Screen and start a chat session, wait until the
Auto-Link indicator appears (a buckled seatbelt), and press Enter.
NOTE: Both UbiDuo units must be on to
start a chat session. The following error
message will appear if only one unit is
on:

13
When both units are on and ready to chat,
this is what the Split Screen looks like:.
The text you type will appear at the top of
the screen. The text your Designated Chat
Partner, or DCP, types will appear in the
bottom half of the screen.
Split Screen Toolbar
The two halves are divided by a toolbar. These are the icons and what
they mean.
Save a conversation –To save a conversation, press Tab once to
highlight the Save icon on the toolbar and press Enter. Pressing
<Ctrl>F3 also saves a conversation. A box will appear that says Enter
Log File Name. Backspace to remove the CHATLOG default title. Type
in an 8-letter file name for the conversation, for example, Mom1, if you
want to save a conversation with your mother, and press Enter. Your
conversation will be saved, and you will return to the Split Screen.
NOTE: If your UbiDuo fully loses power, any saved chats stored on the
UbiDuo will be lost. You must download them to a PC.
NOTE: Any conversations you have saved will be deleted when you
download software to the UbiDuo. Before updating your software, you
should transfer your saved conversations to a PC if you do not want
them to be deleted.
NOTE: Conversations are limited to 20 KB in size. If you try to save a
conversation larger than 20 KB, the UbiDuo will save only the first 20 KB
of data. The rest will be lost. There is no error message to warn you on
the UbiDuo about your file size; however, when you download a
conversation file larger than 20 KB to a PC and try to access it, you will
receive the following error message:
“Cannot open the E:\LOG\file_name.TXT file. Make sure a
disk is in the drive you specified.”
Read more about viewing and downloading saved conversations in the
Saved Conversations section of this manual.

14
Settings/Return to Home –To return to the Home screen, press
Tab twice to highlight the Settings icon on the toolbar and press Enter.
(The square and the wrench will be black; in Reverse Video the square
and the wrench will be white.) This will return you to the Main Menu on
the Home screen so that you can change your settings. Read more
about UbiDuo settings later in this manual.
Bolding text –To make your text appear bold, press Tab three times
to highlight the Bold icon on the toolbar and press Enter. Any text that
you type after that will appear bold. NOTE: When you bold your text,
Function Key menus will be bold also. Read more about Function Key
menus later in this manual. NOTE: Setting your text to appear bold will
NOT change the other person’s text at the bottom of your screen.
To turn the Bold setting off, press Tab three times to highlight the Bold
icon again and press Enter. Any text you type will appear normal.
Italicizing text –To make your text appear in italics (slanted), press
Tab four times to highlight the Italics icon on the toolbar and press Enter.
Any text that you type after that will appear in italics. NOTE: When you
set your text to appear in italics, Function Key menus will be in italics
also. Read more about Function Key menus later in this manual. NOTE:
Setting your text to appear in italics will NOT change the other person’s
text at the bottom of your screen.
To turn the Italics setting off, press Tab four times to highlight the Italics
icon again and press Enter. Any text you type will appear normal.
Underlining text –To make your text appear underlined, press Tab
five times to highlight the Underline icon on the toolbar and press Enter.
Any text that you type after that will appear underlined. NOTE: When you
set your text to appear underlined, Function Key menus will be
underlined also. Read more about Function Key menus later in this
manual. NOTE: Setting your text to appear underlined will NOT change
the other person’s text at the bottom of your screen.

15
To turn the Underline setting off, press Tab five times to highlight the
Underline icon again and press Enter. Any text you type will appear
normal.
Changing font size –To change the size of the text on your screen,
press Tab six times to highlight the Font Size icon (a number with down
arrow), and press Enter. Available font sizes are
12-point font
16-point font
20-point font
24-point font
NOTE: When you change the size of your font after you have already
started typing,
•all of the text on both halves of your screen will change (what
you have typed and what your chat partner has typed at the
bottom of your screen).
•function key menus will be changed to that size font also.
•it will not change the size of the font on your chat partner’s unit.
They must change the size of the font themselves on their unit.
NOTE: Font size defaults to 16-point font. To change the default so that
text always appears larger, review the Settings section of this manual.
To change the font to another size, press Tab six times to highlight the
Font Size icon again and press Enter.
Inserting emoticons –The UbiDuos are programmed with 11
emoticons that you can use during your chat sessions. To access the
emoticon list, press F1. Press Esc to return to the chat session, and then
press the function key for the emoticon you want to use. Emoticons are
listed below.
Key Function Help
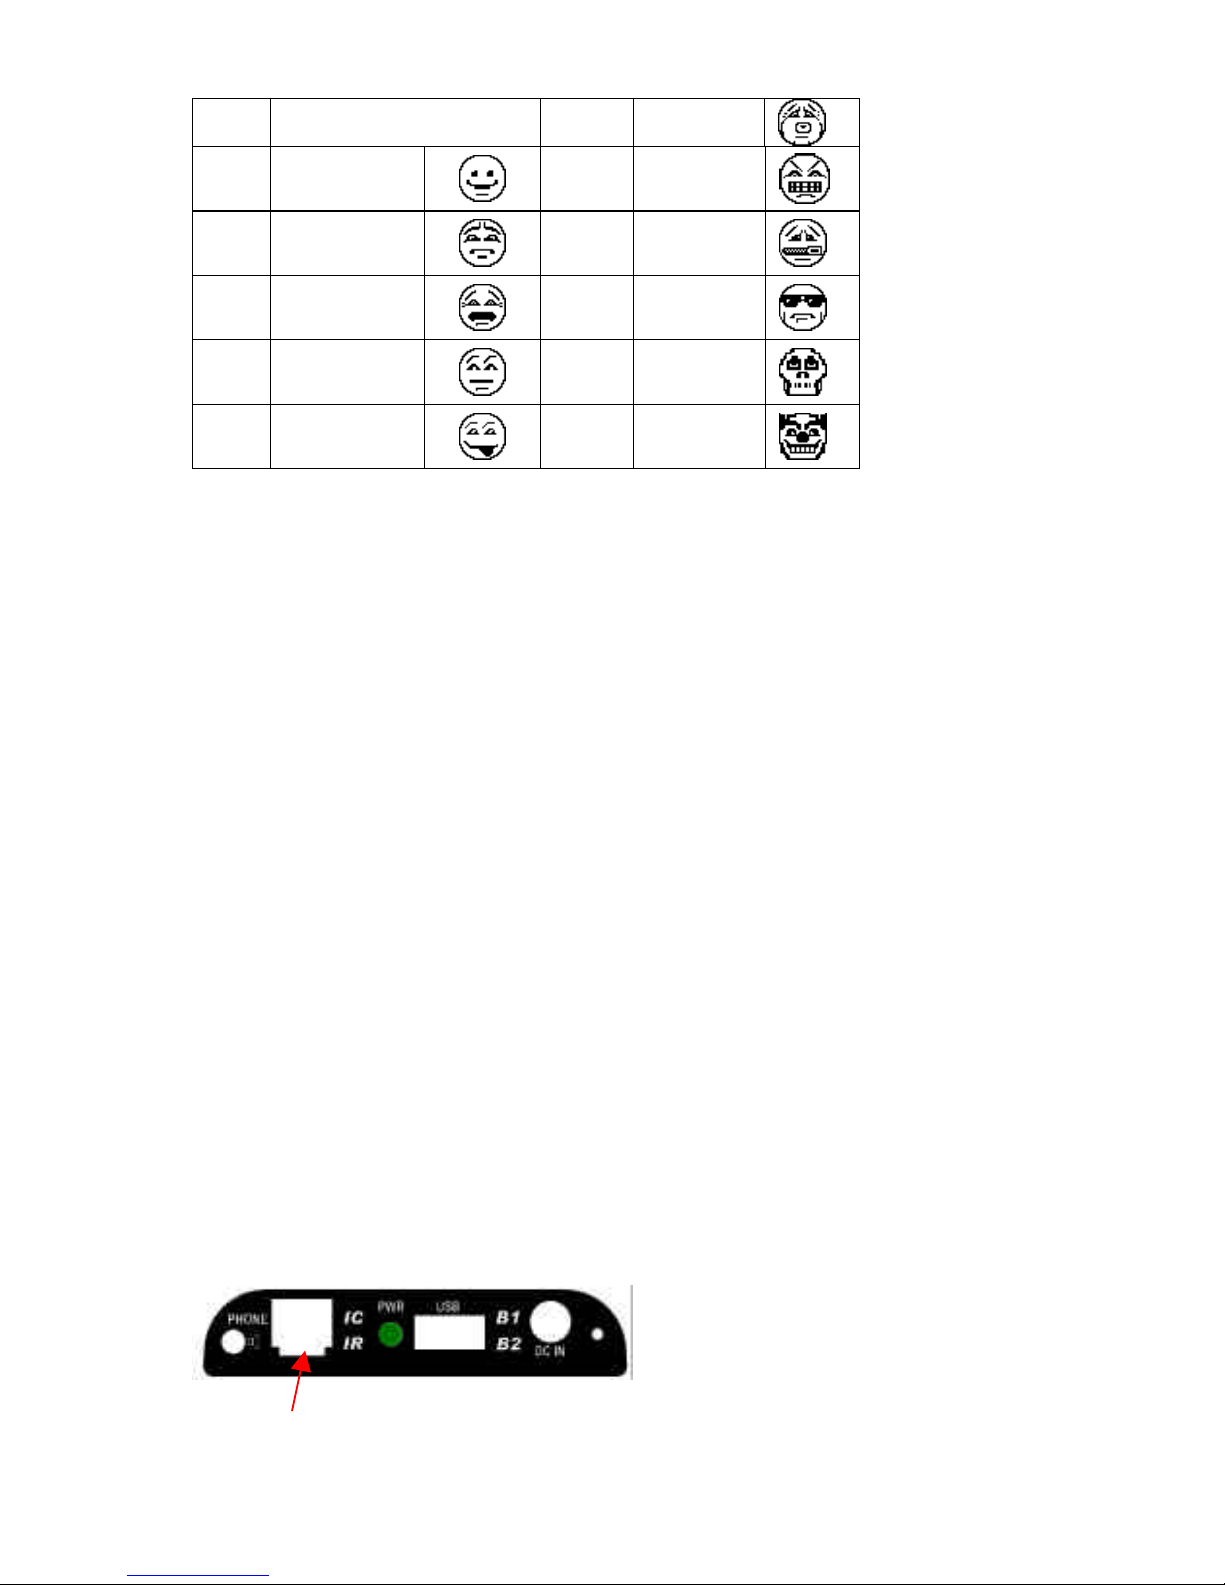
16
F1 Open This Window F7 Sick
F2 Smile F8 Angry
F3 Sad F9 Secret
F4 Shocked F10 Cool
F5 Question F11 Die
F6 Tease F12 Clown
Exiting the Split Screen Chat
To exit the split screen without saving your conversation, press Tab twice
to highlight the Settings icon and press Enter.
Call (Ubi4Tel)
The UbiDuo has teletype (TTY) capabilities, meaning it can be used to
communicate over the telephone lines. We call it the Ubi4Tel™, though,
because using the UbiDuo over the phone lines is like talking to
someone face to face: you can do it in real time and communicate
simultaneously —and you can connect up to four people! No longer do
you have to wait for the other person to finish typing –while you are
unable to interrupt if you have a question or comment. With the Ubi4Tel
feature, you can both type at the same time. You don’t have to use “GA,”
“QM,” or “SK” unless you want to.
NOTE: To communicate in real time at the same time over the phone,
each person must have a UbiDuo. If one person is on a regular TTY and
one person is on a UbiDuo, you will have to communicate as if you are
both on regular TTYs. You cannot talk at the same time because the
regular TTY cannot support two people talking at one time.
To use the Ubi4Tel feature with your telephone at home (a land line),
unplug the phone cord from the telephone itself and plug it into the
Phone port on the right-hand side of either UbiDuo half.
Phone port

17
Using the Ubi4Tel Feature
From the Main Menu on the Home screen, press Tab or use the arrow
keys to highlight the Call icon and press Enter. The Place Call screen will
appear, as shown below.
Press Tab to bring up the cursor in the
left-hand number field, and dial the
number of the person you want to call.
To dial the number without saving it in
your phone book, press Enter. The Call
being Placed screen will appear.
NOTE: Up to four people can chat at the same time through the Ubi4Tel
feature. For more information about inviting other UbiDuos to chat, see
the Inviting Other UbiDuos to Chat section later in this manual.
Receiving a Telephone Call
To receive a phone call using the Ubi4Tel feature, you must have the
UbiDuo plugged in to the telephone line, and the UbiDuo must be on.
NOTE: For information on how to adjust the length of time it takes for
your UbiDuo to answer an incoming call, see the Modem section later in
this manual.
Ending a Telephone Call
To end the call, press <Alt> F10.
Saving a Telephone Conversation
When the call has ended and you would like to save the conversation,
press Tab once to highlight the Save icon on the toolbar and press Enter.
Pressing <Ctrl>F3 also saves a conversation. A box will appear that says
Enter Log File Name. Type in an 8-letter file name for the conversation,
for example, Mom1, if you want to save a conversation with your mother.
18
NOTE: Conversations are limited to 20 KB in size. If you try to save a
conversation larger than 20 KB, the UbiDuo will save only the first 20 KB
of data. The rest will be lost. There is no error message to warn you
about your file size.
Saving a Contact’s Name and Number
To store the number in your phone book, tab to the New Contact field on
the right and press Enter. This brings up the New Contact screen, as
shown below.
Type the contact’s name in the
Name field, and press Tab to move
to the Number field. Type in the
contact’s phone number and press
Enter to save the information. You
will be returned to the Home screen,
where again, you will have to tab or
use the arrow keys to select Call.
In Range
The In Range functionality shows what other UbiDuos are within 1000
feet of your UbiDuo. These units will show up in a list on your machine;
however, they will not be able to access your conversation unless you
invite them to chat.
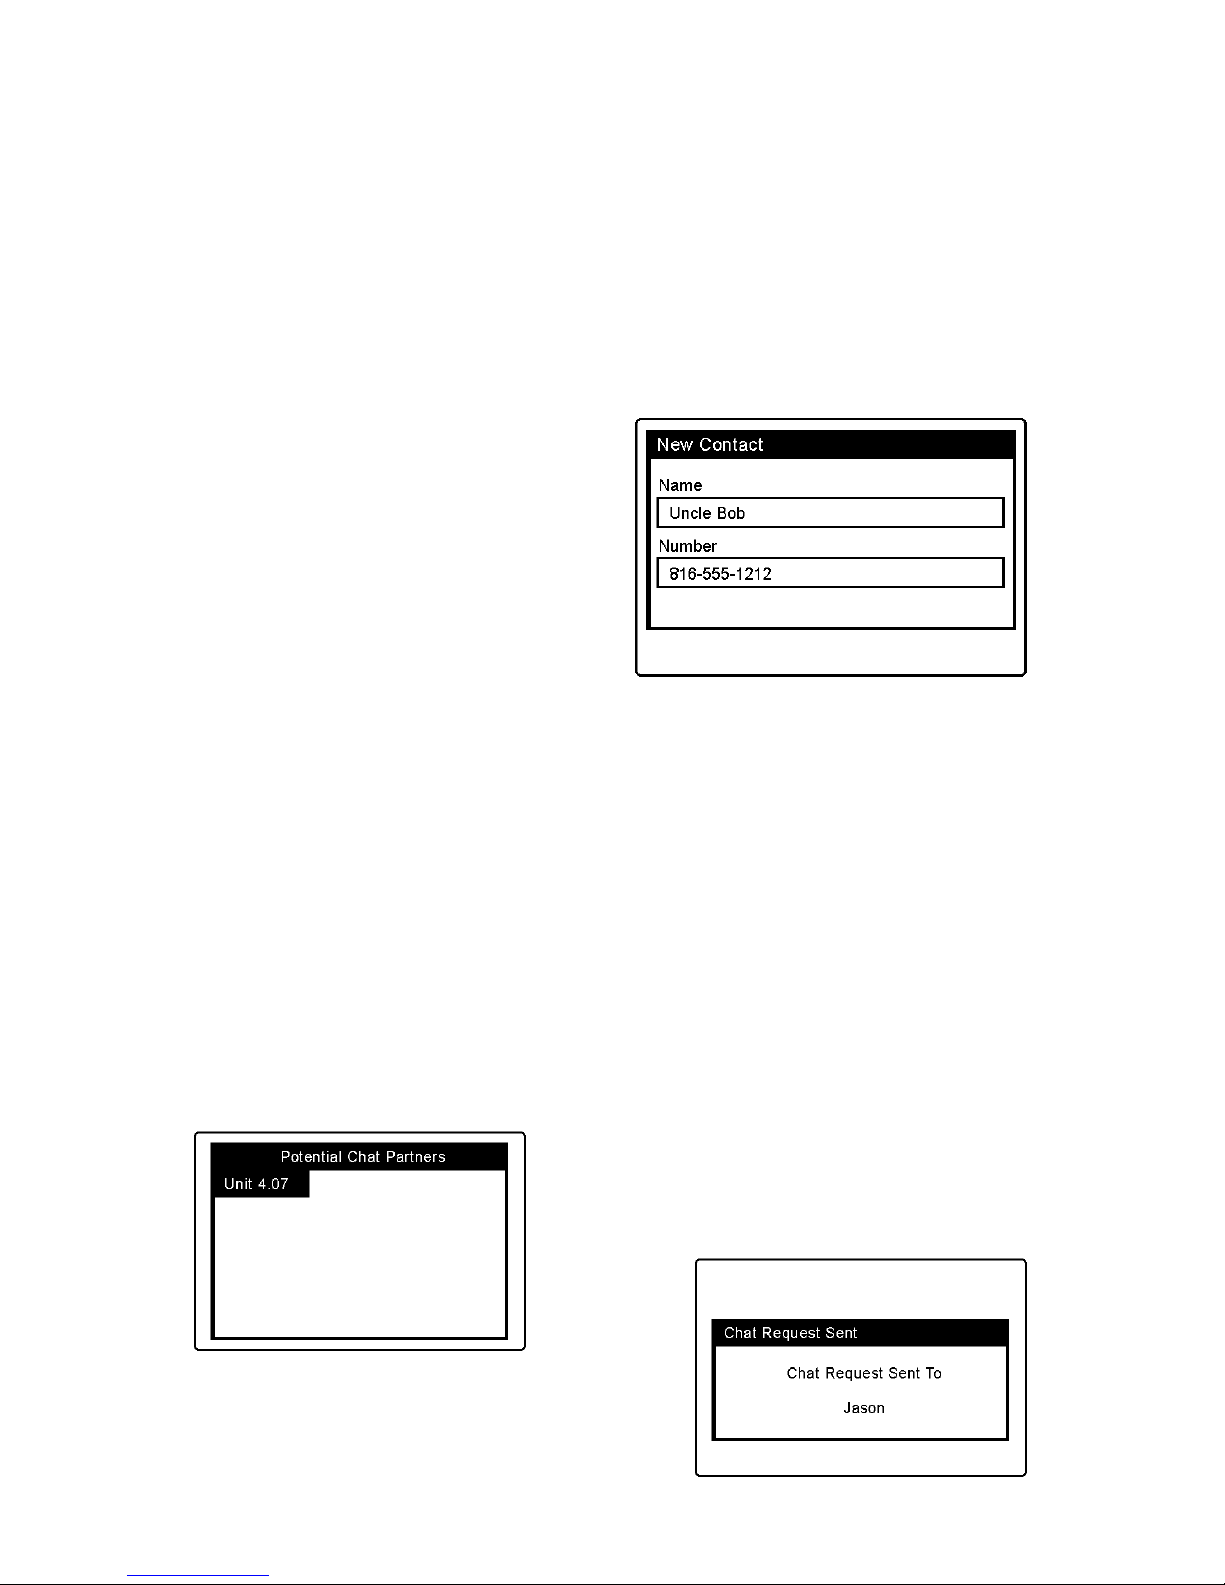
Inviting Other UbiDuos to Chat
If other UbiDuo users have assigned unit IDs to their UbiDuos, when you
tab or arrow key to the In Range icon on the Main Menu and press Enter,
a list of Potential Chat Partners will appear. The other half of your
UbiDuo always will be listed. You always will have a connection to this
unit. This is what the screen will look like with only the other half of your
UbiDuo within range.
To start a chat with another UbiDuo in
range, tab through the list to select a unit,

19
and then press Enter. This is what the message will look like.
This is what the Chat Request looks like
to the invited user, who can either
accept or reject the request. The default
is Accept.
If the user accepts the request, the Split Screen will then appear (as
shown under Split Screen Chat).
If the user rejects the request, this is the
message the requestor will receive.
Holding a Three-way Conversation
The UbiDuos are designed to enable a group of up to four people to
communicate freely. To invite another UbiDuo to join your chat, go to the
Main Menu and select the In Range icon.
This is what the screen will look like
when there is one other UbiDuo within
range. On the screen, one Unit I.D. is
the other half of the UbiDuo; the other
two I.D.s are two halves of another
UbiDuo.
To add a third person into the
conversation, use the Tab key to select
another I.D., and press Enter. If the
person accepts your chat request, your
screen will divide into three parts, as
shown here.

20
NOTE: The split screen toolbar will always be between the Designated
Chat Partners (the two halves of the UbiDuo).
Holding a Four-way Conversation
Because there are two halves to the
UbiDuo, you have the possibility of
conversing with three other people at the
same time. Go to the Main Menu and
select the In Range icon. Using the same
example as above, this is what the screen
will look like with another UbiDuo within
range.
To add a fourth person into the
conversation, use the Tab key to select
the other I.D., and press Enter. If the
person accepts your chat request, your
screen will divide into four parts, as
shown here.
No Units in Range
If there are no other UbiDuos within the 1000-foot range, an error
message will appear.
Press Enter to return to the Main Menu.
Auto-Link
When the Auto-Link feature is set to On (shown in the top right-hand
corner of the Main Menu), whenever your UbiDuo is on, anyone can
open up a Split Screen window and chat with you without requesting
permission. You will not see a pop-up window requesting a chat; the Split
Screen will open automatically if you are not already chatting with
someone.
If you are chatting with someone, other UbiDuo users within range
automatically will join your chat sessoin. You will not see a pop-up
window requesting a chat; the Split Screen automatically will separate
into thirds for the new user.
Table of contents


