scope ActiveCore User manual
User Guide
Thank you for purchasing a SKOPE refrigeration product.
Safety
Always observe safety precautions when using any electrical appliance. Read these instructions carefully and keep them
for future reference.
• This appliance is not intended for use by persons (including children) with reduced physical, sensory or mental capabilities,
or lack of experience and knowledge, unless they have been given supervision or instruction concerning use of the appliance
by a person responsible for their safety. Children should be supervised to ensure that they do not play with the appliance.
• Do not use this appliance for other than its intended use.
• Do not insert fingers/foreign objects into any holes.
• Only use this appliance with the voltage specified on the cabinet rating label.
• Ensure the appliance has adequate ventilation as this is essential to economical, high performance.
• Be careful not to touch moving parts and hot surfaces.
• For your own safety and that of others, ensure that all electrical work is done by authorised personnel.
• If the power supply flexible cord becomes damaged, it must be replaced by an authorised service agent or similarly qualified
person in order to avoid a hazard.
• Ensure all necessary safety precautions are observed during installation or removal of the refrigeration unit.
• The appliance is not designed to be stable while in motion. Use extreme caution when moving or transporting it.
• Do not store explosive substances such as aerosol cans with a flammable propellant in this appliance.
• If the cabinet is to be scrapped, ensure the cabinet is unplugged from the power supply and cut off the mains flex close to the
back of the cabinet. Be mindful of the risk of animals or children becoming trapped in the appliance – either remove or
secure doors if necessary.
• Refrigerant must be removed by a qualified service person and the cabinet recycled/disposed of in accordance with local
regulations.
WARNING
• Ensure the appliance is disconnected from the power supply before performing any cleaning or maintenance.
• Do not cover the grilles or block the entry or exhaust of airflow by placing objects up against the refrigeration unit.
• Should manual defrosting be necessary, turn off the refrigeration system and allow the ice to melt by air circulation. Collect
ice and water during defrost to prevent a slip hazard. Do not use mechanical methods to remove ice, as this may damage
the refrigeration circuit.
• Do not use any electrical devices or appliances inside the food storage compartment.
This cabinet is designed to operate within a specific climatic class environment.
See the cabinet rating label inside the cabinet for climate class number.
The cabinet includes relevant hazard symbols that may be associated with the
cooler. Refer to the information below for symbol description.
Climate class Ambient temperature Relative humidity WARNING
The refrigeration system contains flammable R290 refrigerant.
Do not tamper with it.
The refrigeration system must only be serviced by qualified
personnel.
3 25°C 60%
4 30°C 55%
5 40°C 40%
7 (tropical) 35°C 75%
Refrigeration
Refrigeration
Fridge
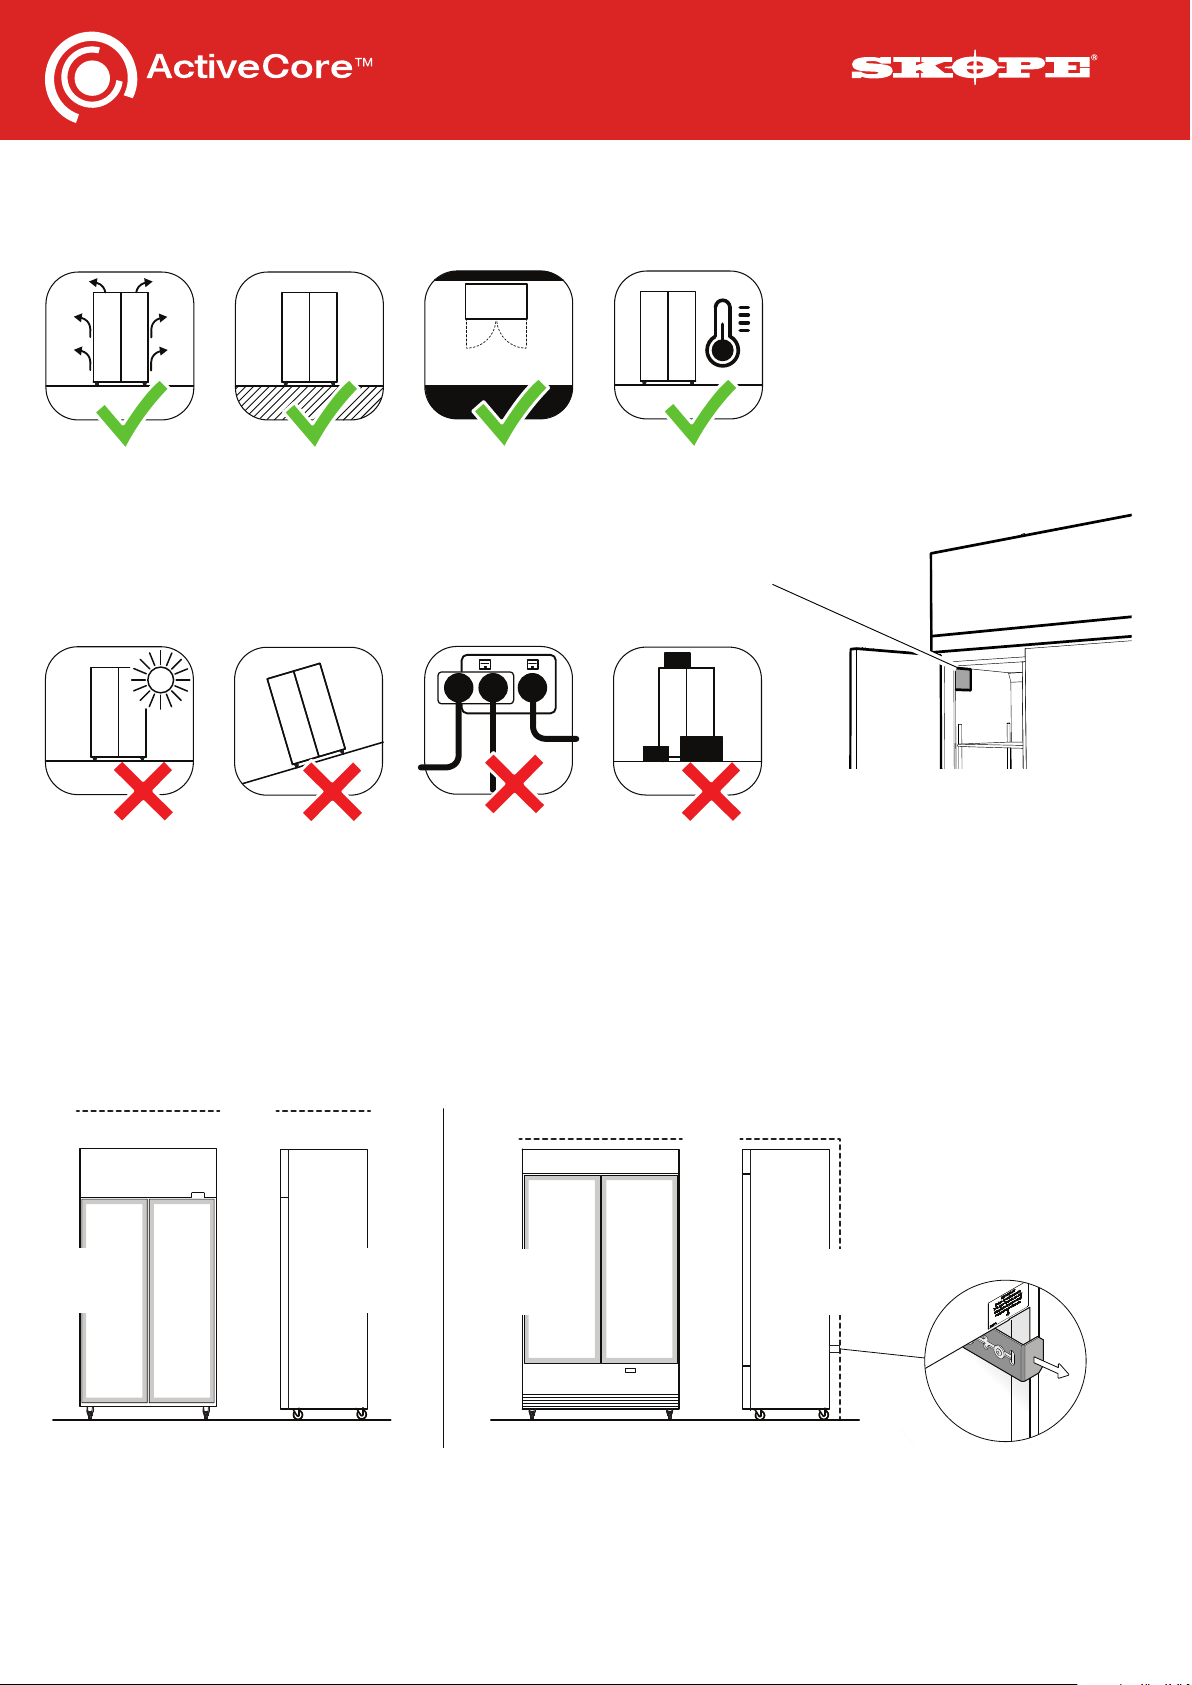
Installation Guidelines
When installing this fridge, ensure the installation guidelines below are considered and met .
Ventilation Requirements
This fridge must have the following ventilation clearances at all times.
Ventilation
Ensure all ventilation
requirements below are
met.
Door Opening
Allow adequate space for
the door/s to open and
close properly.
Sunlight
Do not install the fridge in
direct sunlight.
Uneven Surface
Do not install the fridge on
an uneven surface.
Surface
The installation surface
must be capable of
supporting the loaded
cabinet.
Power Supply
Do not overload the power
supply.
Blocking
Ventilation
Do not store boxes or
items in front or on top of
the fridge.
Climate Class
The fridge must be installed
in an environment within its
climate class.
The climate class is stated
on the cabinet rating label
inside the fridge, and
explained on the front page
of this user guide.
TME and SKT models BME and SKB models
No below clearance required
Min. 300mm above
No side
clearance
required
No behind
clearance
required
Min. 50mm above
Min.
50mm
below
No side
clearance
required
Min. 50mm
behind (provided
by rear spacer)
BME and SKB Rear Spacer
Extend the two rear spacers
out, ensuring they are
locked into place.
Refrigeration
Refrigeration
Fridge

Refrigeration
Refrigeration
Fridge
Door Handles
The door handles may be packed inside the fridge.
Shelves
The wire shelves sit on shelf clips. The shelf clips twist onto the shelf support strips in the cabinet interior. The shelves
may be positioned at different heights to suit various product. Use the numbers on the shelf support strips to help with
setting the shelf clips at the same height.
BME and SKB fridges are fitted with solid bottom shelves, which must remain in place at all times.
Loading product
Let the fridge run for 30 minutes before loading it with product for the first time. When loading the shelves with
product:
To fit the door handle To remove the door handle
1. A metal spring is fitted inside the
handle mounts. Ensure the springs
point up.
1. Peel back the door gasket from
behind the handle mounts on the
inside of the door frame.
2. Unscrew the handle mounts through
the holes on the inside of the door
frame, and remove the handle.
Only unscrew the top and bottom
screws. Do NOT unscrew the middle
screw.
2. Place BOTH handle mounts
simultaneously onto both door
brackets. Then push the handle
down onto the brackets until the
handle locks in place.
3. Remove the bracket/s from the
handle mount by pressing the
bracket in and down until it unclips
from the handle mount.
3. If the handle doesn’t lock into place,
check that the spring clips are
pointing up and try again. If only one
end of the handle locks into place,
remove the door handle and refit
with both handle mounts placed
onto the brackets.
4. Fit and screw the bracket/s back
onto the door. Ensure the catches
are pointing up as pictured.
5. Clip the gasket back into place on
the inside of the door frame.
If the gasket is out of shape, use a
hair drier to heat and reshape it.
To fit a shelf clip:
Twist anticlockwise onto the shelf support strip.
To remove a shelf clip:
Pull the centre tab up and twist off clockwise.
To adjust the shelf clip height:
Pull the centre tab up and slide up or down as
required. Once in position, ensure it clicks into
place.
Handle
Bracket
Front of
door
Bracket
Bracket
Handle mount
Handle
Bracket
Catch
Catch
Spring clip
(pointing up)
MAX
46kg
per shelf
Max. Loading
Do not overload the
shelves.
Shelf Flexing
Remove product if the
shelf is flexing.
Shelf Overhang
Do not let product
overhang the shelves.

Refrigeration
Refrigeration
Fridge
Door Lock/s
The fridge may be fitted with bracket locks or key locks, located above or below each door. Bracket locks require a lock
(padlock or similar) through the brackets to lock the door. Key locks can be locked with the supplied key.
Electronic Controller
The electronic controller regulates the fridge’s temperature, signals alarms and captures operational
information. The fridge temperature is set at the factory for storing perishable product (all shelves
maintain temperatures below 5°C).
To customise the fridge settings to your requirements and view historical data, download the
SKOPE-connect app from the Google Play Store or Apple App Store, and connect via Bluetooth ®.
Lights
The fridge lights switch on and off automatically depending on fridge use.
Cleaning
Ensure the fridge is unplugged from the power supply before cleaning.
Wipe the inside and outside of the cabinet with a damp cloth, taking care to keep moisture away from electrical parts.
The condenser coil must be kept clean. SKOPE strongly urges monthly cleaning of the condenser coil and air filter (optional
air filter available on BME only). Do NOT use hard or sharp tools to clean the coil as these may cause damage.
TME and SKT – Clean the Coil BME and SKB – Clean the Filter
1. Unplug the fridge from the power
supply. 1. Rotate the grille at the bottom of the
front kick panel out to gain access to
the filter.
2. Remove the front panel from the top
of the cabinet. Lit sign panels also
need to be unplugged.
2. To remove the filter, use the finger
loops to pull the filter up and detach
from the front kick panel.
3. Brush the condenser coil with a soft
brush to remove any dust and fluff.
3. Clean the filter with a vacuum
cleaner, wash with cold water and
shake excess water off before
refitting. Do not apply hot water,
blow dry or place in a dishwasher. If
necessary, discard the air filter and
refit a new one.
4. To refit the filter, insert it up into the
front kick panel vent with the finger
loops facing out, then clip the into
the slots on the bottom face of the
front kick panel vent.
4. Refit the sign assembly and
reconnect to the power supply.
Important
When refitting, ensure the tabs on
the back of the sign are located in
the notches on top of the cabinet,
and that the sign is pushed fully in
and secure.
BME and SKB – Clean the Coil
1. Unplug the fridge from the power
supply.
2. Remove the front kick panel from the
front of the cabinet.
3. Brush the condenser coil with a soft
brush to remove any dust and fluff.
4. Refit the front panel and reconnect
to the power supply.
Grille
Grille
Finger loop
Coil
Tab and notch
Coil
PRN80133 Rev. 1.7 May 2022
0070513784
Other scope Refrigerator manuals


