SCREENLINE SL2776 User manual

SL2776
Blind control device
Battery module
DISPOSITIVO
DI COMANDO
TENDA
MODULO
BATTERIA
Manuale per l’utente
User’s
guide
Anwender-Handbuch
Notice
utilisateur
www.pellini.net


3
MODULO BATTERIA SL2776
Il dispositivo è dotato di due aree sensibili, contrassegnate
dai suoi comandi a freccia, programmate per svolgere tut-
te le funzioni; non ha pulsanti meccanici.
IMPORTANTE: al ne di un corretto funzionamento, il con-
tatto tra dito e zona sensibile deve coprire una supercie
sucientemente ampia.
SOLLEVAMENTO/ABBASSAMENTO
Per abbassare o sollevare la tenda:
• Accendere il modulo batteria
toccando brevemente una
delle due frecce; l’illuminazio-
ne delle frecce conferma l’ac-
censione del modulo batteria;
• Toccare la freccia corrispon-
dente alla direzione di movi-
mentazione desiderata, per
più di due secondi: la freccia
toccata assume un colore
scuro, che ritorna chiaro su-
perati i due secondi.
La tenda si metterà in movimento no a raggiungimento
del necorsa superiore o inferiore, senza la necessità di
mantenere la pressione sulla freccia. Per fermare il movi-
mento in qualsiasi momento è suciente toccare breve-
mente una qualsiasi delle frecce.
In alcuni casi, è possibile notare una movimentazione ini-
ziale “a scatti” della tenda, che è da ritenersi comunque
normale e ammissibile.
ORIENTAMENTO DELLE LAMELLE PER TENDE VENEZIANE
Per orientare le lamelle:
• Accendere il modulo batteria toccando brevemente una
delle due frecce; l’illuminazione delle frecce conferma
l’accensione del modulo batteria;
• Toccare brevemente (per un tempo inferiore a due se-
condi) la freccia corrispondente alla direzione di movi-
mentazione desiderata, no ad ottenere l’orientamento
desiderato.
IT
Aree
sensibili di
azionamento
con LED
Micro USB

4
N.B.: Quando una tenda veneziana è parzialmente sol-
levata, in base alle sue dimensioni e al livello di carica
della batteria potrebbe non essere possibile orientare le
lamelle. In tal caso, è necessario sollevare nuovamente la
tenda no al raggiungimento della massima velocità per
poi abbassarla no al raggiungimento dell’inclinazione
desiderata.
RICARICA BATTERIA
Il modulo viene consegnato con la batteria parzialmente
carica: è pertanto necessario provvedere inizialmente ad
almeno una ricarica completa.
In caso di fornitura associata a pannello fotovoltaico (op-
tional): nel normale ciclo di funzionamento, il pannello fo-
tovoltaico aiuta a mantenere carico il modulo batteria. In
casi particolari (ad esempio: pannello fotovoltaico posizio-
nato sul lato nord dell’edicio o comunque in zona d’ombra,
intenso utilizzo, temperature molto basse) può rendersi
comunque necessaria anche la ricarica della batteria me-
diante l’alimentatore SL2405 eventualmente fornito.
La necessità di ricaricare la batteria è segnalata dal lam-
peggio rosso delle frecce, a seguito di comando di salita o
discesa. La fase di ricarica è controllata dal modulo batte-
ria in modo completamente automatico.
Per effettuare la ricarica delle batterie:
1. Staccare il modulo batteria dal supporto;
2. Inserire l’alimentatore in una presa di corrente;
3. Inserire il connettore micro-USB dell’alimentatore
nell’apposito ingresso sul modulo.
Con l’alimentatore collegato, il LED segnala le seguenti
condizioni:
• LED lampeggianti: carica in corso
• LED accesi ssi: carica terminata
Al termine della carica staccare il cavo e riposizionare il
modulo sul suo supporto.
In presenza di batteria nuova possono essere necessari
2-3 cicli completi di carica/scarica per portare la batteria
alla sua piena capacità.

5
MEMORIZZAZIONE CANALI RADIO E MODALITA’ DI FUN-
ZIONAMENTO
Le informazioni relative ai canali radio e alla modalità di
funzionamento della tenda, vengono salvate su una me-
moria presente nel supporto del modulo batteria (la parte
ssa applicata al vetro o al serramento, che viene collegata
alla tenda).
N.B.: In caso di presenza di più tende e di più moduli bat-
teria, non è necessario riposizionare i moduli batteria
sempre sullo stesso supporto, poiché i telecomandi ed i
canali sono associati al supporto e non al modulo batte-
ria. Il modulo batteria, una volta posizionato sul suppor-
to, leggerà le informazioni da quest’ultimo. Allo stesso
modo, in caso di sostituzione di un modulo batteria, non
sarà necessaria la relativa riprogrammazione, in quanto
le informazioni necessarie verranno automaticamente
fornite dal supporto.
Per la scrittura delle informazioni sul supporto, seguire le
istruzioni sotto riportate.
PROGRAMMAZIONE PER IL RADIOCOMANDO SCREENLINE
(OPTIONAL)
Il modulo batteria è equipaggiato di serie con un ricevito-
re radio per radiocomando. Il radiocomando contiene una
scheda radio a 99 canali. Il ricevitore radio posizionato
all’interno del modulo batteria può memorizzare no a 26
canali, quindi è in grado di ricevere altrettanti indirizzi da
uno o più radiocomandi.
Memorizzazione di un canale
1. Staccare il modulo batteria dal supporto;
2. Visualizzare sul display del radioco-
mando il canale richiesto, premendo i
pulsanti +/-;
3. Utilizzando uno strumento appunti-
to, come ad esempio la punta di un
fermaglio, premere il pulsante di pro-
grammazione posizionato sul modulo
batteria (vedi illustrazione a anco) per
3 secondi, no all’accensione ed imme-
diato spegnimento del LED giallo sulla
freccia di salita;
4. Posizionare entro 20 secondi il modulo
batteria sul supporto che si desidera programmare;
Pulsante
programmazione

6
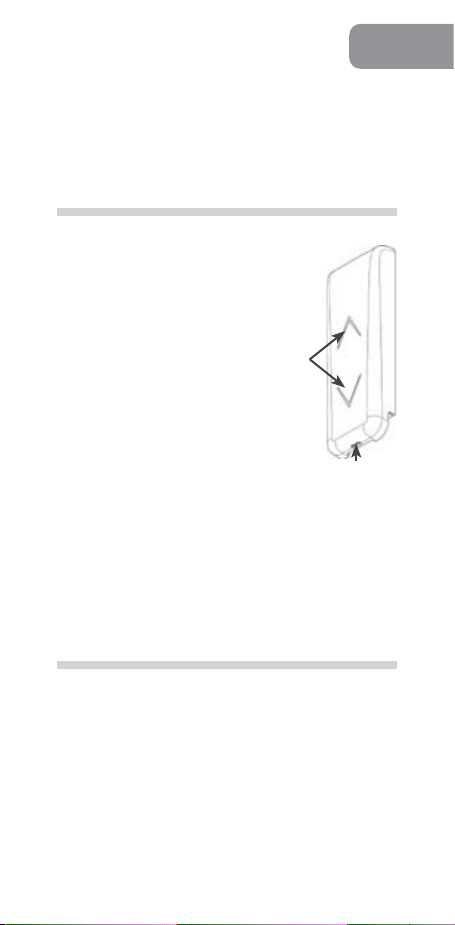
5. Il LED giallo resterà acceso ed entro 10 secondi sarà ne-
cessario inviare il comando di associazione premendo
contemporaneamente i pulsanti di salita e discesa sul
telecomando no a quando i LED del modulo batteria
emetteranno rapidi lampeggi di colore verde.
Cancellazione di un canale
1. Staccare il modulo batteria dal supporto;
2. Visualizzare sul display del radiocomando il canale da
cancellare premendo i pulsanti +/-;
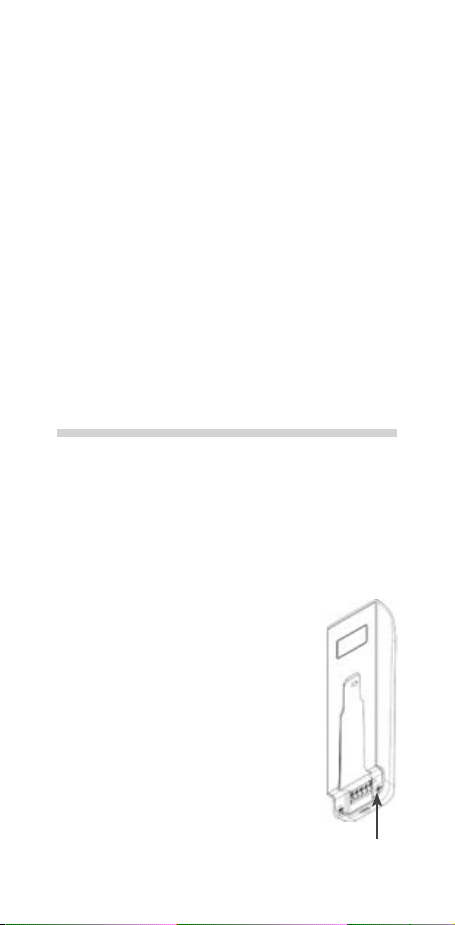
3. Premere il pulsante di programmazione del modulo
batteria per 3 secondi, no all’accensione ed immediato
spegnimento del LED giallo sulla freccia di salita;
4. Posizionare entro 20 secondi il modulo batteria sul sup-
porto che si desidera programmare;
5. Attendere 10 secondi, no all’accensione e al rapido
lampeggio del LED giallo sulla freccia di salita;
6. Inviare entro 10 secondi il comando di cancellazione del
canale desiderato premendo contemporaneamente i
pulsanti di salita e discesa sul telecomando, no al lento
lampeggio in colore verde dei LED del modulo batteria: il
canale prescelto è stato eliminato.
Cancellazione di tutti i canali
1. Staccare il modulo batteria dal supporto;
2. Premere il pulsante di programmazione del modulo
batteria per 3 secondi, no all’accensione ed immediato
spegnimento del LED giallo;
3. Posizionare entro 20 secondi il modulo batteria sul sup-
porto che si desidera programmare;
4. Il LED giallo sulla freccia di salita si accenderà e comin-
cerà a lampeggiare velocemente. Attendere 10 secondi,
no a quando lampeggerà più lentamente;
5. Inviare entro 10 secondi il comando di cancellazione di
tutti i canali premendo contemporaneamente i pulsanti
di salita e discesa di un qualsiasi telecomando (impo-
stato su qualsiasi canale), no al lampeggio in colore
viola dei LED del modulo batteria: tutti i canali prece-
dentemente memorizzati dal modulo batteria sono stati
eliminati.
NOTA: è possibile interrompere la procedura in qualsiasi
momento, premendo nuovamente il pulsante posteriore
del modulo batteria.

7
Per ulteriori istruzioni sull’uso del radiocomando fare riferi-
mento al relativo manuale di istruzioni.
RIAVVIO DEL MODULO BATTERIA
In caso di funzionamento irregolare del modulo batteria è
possibile riavviarlo seguendo la seguente procedura:
1. Staccare il modulo batteria dal supporto;
2. Inserire l’alimentatore in una presa corrente;
3. Inserire il connettore micro-USB dell’alimentatore
nell’apposito ingresso sul modulo batteria;
4. Estrarre il connettore.
Il riavvio del modulo è confermato dall’accensione del LED
giallo sulla freccia di salita.
Se il malfunzionamento dovesse persistere, è possibile for-
zare manualmente un riavvio del modulo:
1. Staccare il modulo batteria dal supporto;
2. Premere il pulsante di programmazione del modulo bat-
teria per almeno 10 secondi.
Anche in questo caso, il riavvio del modulo sarà conferma-
to dall’accensione del LED giallo.
MANUTENZIONE
Il prodotto non richiede manutenzione. Eventuali riparazio-
ni devono essere effettuate da un tecnico autorizzato da
Pellini SpA.
N.B.: La mancata osservanza delle raccomandazioni o la
manomissione del modulo batteria comportano la deca-
denza della garanzia.
PULIZIA
Pulire il prodotto con un panno morbido, pulito, asciutto
e che non lasci residui. Per rimuovere sporco ostinato, il
panno può essere leggermente inumidito con acqua tiepi-
da. Non utilizzare detergenti contenenti solventi. Non puli-
re i contatti dorati con alcool o altre sostanze.
SOSTITUZIONE DELLA BATTERIA
La sostituzione della batteria deve essere effettuata da un
tecnico autorizzato da Pellini SpA.

8
SMALTIMENTO DEL DISPOSITIVO
Secondo le prescrizioni della direttiva 2012/19/UE, il modu-
lo batterie è considerato appartenente alla categoria dei
RAEE (Riuti di Apparecchiature Elettriche ed Elettroni-
che), e non può quindi essere smaltito come riuto urba-
no. Alla ne del suo ciclo di vita l’apparecchio deve essere
depositato presso uno dei centri di raccolta differenziata
per i riuti di apparecchiature elettriche ed elettroniche
provenienti dai nuclei domestici. Fare riferimento ai centri
di raccolta del comune di appartenenza, il quale assicura
la funzionalità, l’accessibilità e l’adeguatezza dei sistemi di
raccolta differenziata, in modo da permettere ai detentori
nali ed ai distributori di conferire gratuitamente al centro
di raccolta i riuti prodotti nel loro territorio.
L’apparecchio deve essere disconnesso dall’alimentazione
prima di rimuovere la batteria.
La batteria deve essere rimossa prima della rottamazione.
Perla rimozione svitarele due viti posteai lati del connetto-
re utilizzando un cacciavite Torx T6, rimuovere il coperchio
posteriore, estrarre la batteria e scollegare il connettore.
La batteria deve essere smaltita in modo sicuro.
INFORMAZIONI SULL’USO CONFORME
Il modulo batteria è fornito per l’azionamento di tende
Pellini serie “W”.
Solo per uso interno.
Ogni altro tipo di impiego non è conforme alla destinazione.
Il produttore non si assume alcuna responsabilità per i
danni derivanti da uso non conforme.
INFORMAZIONI SULLA SICUREZZA
ATTENZIONE! È fondamentale seguire e conservare le
seguenti istruzioni, per la sicurezza delle persone!
L’apparecchio non deve essere utilizzato da bambini o da
persone le cui capacità siche, sensoriali o mentali siano
ridotte. L’apparecchio non deve altresì essere utilizzato da
persone prive di esperienza o conoscenza delle modalità
d’uso dello stesso, senza la sorveglianza o l’intermediazio-
ne di una persona responsabile della loro sicurezza.

9
L’apparecchio non è un giocattolo: tenerlo fuori dalla por-
tata dei bambini, controllare che non giochino con i co-
mandi e il telecomando.
NON forzare l’uso dell’apparecchio nel caso in cui siano ne-
cessarie riparazioni o regolazioni.
NON tentare riparazioni fai-da-te: esse devono essere ef-
fettuate solo da personale autorizzato.
NON lasciare incustodito il modulo durante la carica delle
batterie.
NON gettare le batterie esauste nel fuoco: possono esplo-
dere.
NON aprire o forare o cortocircuitare le batterie.
Caratteristiche tecniche
Modulo batteria SL2776
Batteria: 3.7Vd.c. Lithium-ion Polymer 2600mAh;
Carica batteria:
Primario: 100-240Va.c. 50/60Hz 15VA
Secondario: 5V 2A d.c.
III


11
BATTERY MODULE SL2776
The device is provided with two sensitive areas, identied
by its arrow-shaped push buttons, which are designed to
perform all functions. There are no mechanical buttons.
IMPORTANT: for correct operation, the contact area
between nger and sensitive area must be suciently
wide to induce reaction.
RAISING/LOWERING
To raise or lower the blind:
• Turn on the battery module by
tapping one of the arrows; the
latter’s turning on conrms
that the battery module has
been activated;
• Touch the arrow corresponding
to the desired operation
direction for more than two
seconds: the touched arrow
shows a darker colour, which
becomes lighter again after
two seconds.
The blind will move until it reaches the upper or lower end
stop, without the need to keep the arrow pressed. To stop
the movement at any time, simply tap any arrow once.
In some cases, it is possible to notice an initial “jerky”
movement of the blind, which is however to be considered
normal and acceptable.
SLAT TILTING FOR VENETIAN BLINDS
To tilt the slats:
• Turn on the battery module by tapping one of the
arrows; the latter’s turning on conrms that the battery
module has been activated;
• Briey tap (for less than two seconds) the arrow
corresponding to the desired operation direction, until
reaching the desired tilting angle.
N.B.: when partially raised, Venetian blinds may not be
able to be tilted open, depending on their size and state of
charge of the battery. In cases like this, it is necessary to
raise the blind again until reaching maximum speed and
then lower the blind until the desired angle is achieved.
GB
Activation
sensitive
areas with
LED
Micro USB

12
RECHARGING THE BATTERY
The module is delivered with the battery partially charged:
it is therefore necessary to put it through at least one
complete charge cycle.
When supplied with a solar panel (optional): during the
normal operating cycle, the solar panel helps keep the
battery module charged. In certain cases, e.g. solar
panel positioned on the north side of the building or in a
shady area, intense use, or very low temperatures, it may
nonetheless be necessary to recharge the battery also by
means of the charger SL2405, if provided.
If the battery needs recharging, the arrows will ash
red following an up or down command. Recharging is
automatically controlled by the battery module.
To recharge the battery:
1. Detach the battery module from the base plate;
2. Plug the battery charger into a power socket;
3. Plug the micro-USB connector into the port provided on
the module.
When the charger is connected, the LED will indicate the
following conditions:
• LED blinking: charging underway
• LED steadily lit: charging completed
After charging, detach the cable and t the module back
onto its base plate.
In case of a new battery, 2-3 full charging/discharging
cycles may be necessary to bring the battery to its full
capacity.
MEMORIZING RADIO CHANNELS AND OPERATING MODE
The information relating to the radio channels and the
operating mode of the blind is saved on a memory card
housed in the battery module base plate (namely, the xed
part applied on the glass or the window frame, which is
connected to the blind).
N.B.: if several blinds and several battery modules are
installed, it is not necessary to always reposition each
battery module onto its corresponding base plate, since
the remote controls and channels are associated with

13
the base plate and not with the battery module. Once
positioned on the base plate, the battery module will read
the information from the latter. Likewise, when a battery
module is replaced, its reprogramming is not required, as
the necessary information will be automatically provided
by the base plate.
To write information onto the base plate, please follow the
instructions below.
PROGRAMMING THE SCREENLINE REMOTE CONTROL
(OPTION)
The battery module is equipped as standard with a
radio receiver for remote control. A 99-channel radio
transmitting board is used for the remote control. The
radio receiver housed in the battery module can memorize
up to 26 channels; it can thus receive an equal number of
addresses from one or several remote controls.
Memorizing a channel
1. Detach the battery module from its
base plate;
2. Select the required channel on the
remote control display by pressing the
+/- buttons;
3. Using a thin tool, such as the end of
a paperclip, press the programming
button on the battery module (see
image opposite) for 3 seconds, until
the yellow LED on the up arrow turns on
and immediately off;
4. Within 20 seconds hook the battery
module onto the base plate to be
memorized;
5. The yellow LED will remain steadily
on and, within 10 seconds, it will
be necessary to send the association command by
pressing the up and down push buttons simultaneously
on the remote control, until the green LED on the battery
module ashes quickly.
Deleting a channel
1. Detach the battery module from its base plate;
2. Call up the channel to be deleted on the remote control
display by pressing the +/- push buttons;
Programming
button

14
3. Press the programming button on the battery module
for 3 seconds, until the yellow LED on the up arrow turns
on and immediately off;
4. Within 20 seconds hook the battery module onto the
base plate to be memorized;
5. Wait 10 seconds, until the yellow LED on the up arrow
turns on and starts ashing quickly;
6. Within 10 seconds send the cancellation command of
the desired channel by pressing the up and down push
buttons simultaneously on the remote control, until the
LEDs on the battery module ash green quickly: the
chosen channel has been deleted.
Deleting all channels
1. Detach the battery module from its base plate;
2. Press the programming button on the battery module
for 3 seconds, until the yellow LED on the up arrow turns
on and immediately off;
3. Within 20 seconds hook the battery module onto the
base plate to be memorized;
4. The yellow LED on the up arrow will turnon and then
start ashing quickly. Wait10 seconds until it ashes
more slowly;
5. Within 10 seconds send the cancellation command of
all channels by pressing the up and down push buttons
simultaneously on any remote control (set on any
channel), until the purple LED on the battery module
starts ashing: all channels have been deleted.
NOTE: the procedure can be suspended anytime by
pressing again the programming button of the battery
module.
For further instructions on using the remote control, refer
to the dedicated instruction manual.
RESTARTING THE BATTERY MODULE
If the battery module is not working properly, it is possible
to restart it by following the procedure described below:
1. Detach the battery module from its base plate;
2. Plug the battery charger into a power socket;
3. Plug the micro-USB connector into the port provided on
the battery module;
4. Pull out the connector.

15
The restart of the battery module is acknowledged by the
yellow LED on the up arrow turning on.
Should the malfunction persist, it is possible to manually
force the module restart:
1. Detach the battery module from its base plate;
2. Press the programming button on the battery module
for at least 10 seconds. Also in this case, the restart of
the battery module will be acknowledged by the yellow
LED turning on.
MAINTENANCE
The product requires no maintenance. Any repairs must be
made by a technician authorized by Pellini SpA.
N.B.: any failure to follow the instructions or tampering
with the battery module will invalidate the warranty.
CLEANING
Clean the product using a clean, dry, soft cloth that does
not leave any residues. To remove stubborn dirt, you can
slightly moisten the cloth with warm water. Do not use
solvent-containing detergents. Do not clean the gold-
plated contacts with alcohol or other substances.
REPLACING THE BATTERY
The battery canonly be replacedby a technician authorized
by Pellini SpA.
DISPOSOSAL OF THE DEVICE
According to the provisions of Directive 2012/19/EU,
the battery module is to be considered as belonging to
the category of WEEE (Waste Electrical and Electronic
Equipment), thus it cannot be disposed of as unsorted
municipal waste. At the end of its lifetime, the device must
be taken to one of the separate waste collection centres
for waste electrical and electronic equipment from
households. Make reference to the collection centres in
your town or city, which assures that suitable, accessible,
functional separate collection systems are set up to enable
end users and retailers to dispose of the waste produced
within the municipal territory free of charge.

16
Unplug the device before removing the battery.
The battery must be removed from the device before being
disposed of.
To remove the battery, unscrew the two screws located on
both sides of the connector using a screwdriver Torx T6,
pull the back lid away, remove the battery and disconnect
the connector.
The battery must be disposed of safely.
INFORMATION ABOUT PROPER USE
The battery moduleis supplied for thepurpose of operating
Pellini “W” blinds.
For indoor use only.
Any use for other than the intended purpose is to be
considered improper use.
The manufacturer accepts no liability for possible damage
caused by improper use.
SAFETY INFORMATION
WARNING! It is essential to keep and follow the following
instructions to ensure people’s safety!
The device must not be used by children or individuals with
physical, sensory or mental impairments.
The device must also not be used by individuals who have
no experience or knowledge about how it is used without
the supervision of a person responsible for their safety.
The device is not a toy: keep it out of children’s reach and
make sure they do not play with the (remote) controls!
DO NOT force the device to work if any repairs or
adjustments are needed.
DO NOT attempt any do-it-yourself repairs: repairs must be
carried out by authorized personnel only.
DO NOT leave the module unattended while the batteries
are charging.
DO NOT throw spent batteries into a re: they could
explode.
DO NOT open or perforate or short circuit the batteries.

17
Technical data
Battery module SL2776
Battery: Lithium-ion Polymer 3.7Vdc, 9.99Wh. 2700mAh.
Battery charger:
Primary: 100-240Vac 50/60Hz 15VA
Secondary: 5V 2A dc
III


19
BATTERIE-/BEDIENUNGS-MODUL SL2776
Das Bedienungsmodul hat zwei Sensorächen, die durch
Pfeile gekennzeichnet sind und über die alle Funktionen
ausgeführt werden. Es gibt keine mechanischen Schalter.
WICHTIG: Für eine sichere Funktion muss die
Kontaktäche zwischen Finger und Sensoräche
ausreichend groß sein, um eine Reaktion auszulösen.
HEBEN/SENKEN
Um den Behang zu heben oder
senken:
• Schalten Sie das Batteriemodul
ein, indem Sie auf einen der
Pfeile tippen. Das Aueuchten
des Pfeils bestätigt, dass das
Batteriemodul aktiviert wurde;
• Berühren Sie den Pfeil, der der
gewünschten Betriebsrichtung
entspricht, länger als zwei
Sekunden: Der berührte Pfeil
leuchtet stärker und wird nach
zwei Sekunden wieder heller.
Der Behang bewegt sich bis zur oberen oder unteren
Endposition, ohne dass der Pfeil gedrückt gehalten werden
muss. Um die Bewegung jederzeit zu stoppen, tippen Sie
einfach auf einen der Pfeile.
In einigen Fällen ist es möglich, dass sich der Behang
anfänglich „ruckend“ bewegt, dies ist unbedenklich und
normal und daher zu akzeptieren.
LAMELLENWENDUNG VON JALOUSIEN
• Schalten Sie das Batteriemodul ein, indem Sie auf einen
der Pfeile tippen. Das Aueuchten des Pfeils bestätigt,
dass das Batteriemodul aktiviert wurde;
• Tippen Sie kurz (weniger als zwei Sekunden) auf den
Pfeil, der der gewünschten Betriebsrichtung entspricht,
bis die gewünschte Einstellung des Lamellenwinkels
erreicht ist.
HINWEIS: Wenn der Behang nur zum Teil hochgefahren
ist, können die Lamellen einer Jalousie, in Abhängigkeit
DE
Sensor-
ächen mit
LED
Micro USB

20
von Behanggröße und Akkuladezustand, möglicherweise
nicht geöffnet werden. In einem solchen Fall muss die
Jalousie erst ein Stück hochgefahren werden, bis die
maximale Geschwindigkeitsstufe erreicht wurde, und
dann wieder herabgefahren werden.
AUFLADEN DES AKKUS
Das Modul wird mit teilweise geladenem Akku ausgeliefert.
Vor dem ersten Einsatz ist daher mindestens eine
vollständige Auadung erforderlich. Bei Lieferung mit
Solarzelle (optional): Im Normalbetrieb dient die Solarzelle
zur Unterstützung, um die Ladung des Batteriemoduls
zu erhalten. In bestimmten Fällen (z.B. Positionierung
der Solarzelle an der Gebäude-Nordseite oder in einem
Schattenbereich, intensive Nutzung, extrem niedrige
Temperaturen) kann ein zusätzliches Auaden des Akkus
über das optionale Ladegerät SL2405 erforderlich sein.
Ein notwendiges Auaden des Akkus wird durch rotes
Blinken der Pfeile nach einem Hebe- oder Absenkbefehl
angezeigt. Das Auaden erfolgt komplett automatisch
kontrolliert durch das Batteriemodul.
Auaden des Akkus:
1. Das Batteriemodul aus der Basisstation nehmen;
2. Das Netzteil an eine Steckdose anschließen;
3. Den Micro-USB-Stecker des Netzteils in den
entsprechenden Eingang am Modul stecken.
Bei angeschlossenem Netzteil zeigt die LED-Anzeige
folgende Betriebszustände an:
• LED blinkt: Akku wird geladen;
• LED leuchtet konstant: Ladevorgang abgeschlossen.
Nach dem Ladevorgang das Kabel abziehen und das Modul
wieder auf die Basisstation stecken.
Bei neuem Akku können 2-3 vollständige Lade-/
Entladezyklen erforderlich sein, bevor der Akku seine volle
Leistungsfähigkeit erreicht.
SPEICHERN VON FUNKKANÄLEN UND BETRIEBSMODUS
Die Informationen zu den Funkkanälen und zum
Betriebsmodus des Behangs benden sich auf einer
Speicherkarte in der Basisstation des Batterie-/
Table of contents
Languages:
Popular Camera Accessories manuals by other brands

American Dynamics
American Dynamics ADCPWMCRNR Installation sheet

Sea & Sea
Sea & Sea YS-55TTL instruction manual

Smart system
Smart system smartSlider Reflex Quick reference guide

EasyShot
EasyShot Clip HD DV2HDWDIV user manual

Nauticam
Nauticam NA-S1H instruction manual

GNB
GNB GB3862 Operating and maintenance instructions