Seago e-Power 36v User manual

Power
ELECTRIC FOLDING BIKE
OWNERS MANUAL
e-Power 36v Go City-Lite

Thank you for purchasing a Seago electric folding bike.
In order to get the best out of your new bike you must read and fully understand this user manual.
We recommend that you register your new bike using the Seago website: https://www.seagoyachting.co.uk/register
We hope you enjoy your new electric folding bike.
Team Seago

CONTENTS
1 Important information
2 Battery care
3 Specication
4 Components
5 Control panel (e-Power 36v)
6 Control panel (Go City-Lite)
11 Important information before charging
12 Charger functions
13 Bike assembly
14 Removing the battery
15 Warranty

1
Before attempting to use your E-bike you should familiarise yourself with the user hand book. If you are in any doubt as to how to use your E-bike you should call Seago or
consultaqualiedbicycletechnician.
NEVER USE YOUR BIKE WITHOUT FIRST USING THE FOLLOWING 10 POINT CHECK LIST.
1. Tyre pressures correct
2. Centre frame clamp closed and securely tightened
3. Front and rear wheels clamped tight and securely tightened
4. Front and rear brakes function correctly
5. Seat stem & saddle adjusted and securely tightened
6. Handle bars securely tightened in the correct position
7. Pedals are securely tightened
8. Front and rear lights function correctly
9. The pedal assist electrical system is functioning correctly
10. All other nuts, bolts and clamps are securely tightened
For recharging the battery, follow the instruction supplied with the battery charger.
NEVER PUT ANYTHING INTO THE CHARGE PORT - THIS WILL CAUSE IRREPARABLE DAMAGE.
NEVER LEAVE THE BATTERY ON CHARGE UNATTENDED.
IMPORTANT INFORMATION
Beforeyourstride,youmusthaveyourbicyclethoroughlycheckedandadjustedbyaprofessionalbicycletechnician.
Thisnaladjustmentwillactivateyourwarrantyandensurethatyourbicycleisoptimallyadjustedforsafetyandperformance.
It is important to read the manual before riding, instructions must be carefully followed for safe enjoyment of this product.

BATTERY CARE
2
Keep your lithium battery charged
Lithiumbatteriesaregenerallybestkeptfullycharged,evenafterjourneysofjustafewmiles.Completelydischargingalithiumbatteryregularlywillsignicantlyreduceits
abilitytoholdacharge,diminishingitscapacityandlife.Ifyoudo“atten”yourbatteryyoushouldfullyre-chargeitassoonaspossible.Werecommendthatyouregularlytop
up the charge on your battery even if only used for short journeys and if you plan not to use the bike for a period greater than 1 month you should remove the battery from the
bike, fully charge it and then continue to top up every month thereafter. Allowing your battery to fully discharge and not recharging as described will seriously damage your
battery and may lead to you not being able to recharge it at all. The electric bike battery does not have to be completely discharged before it is recharged. A Lithium battery
hasno“memory”andthereforecanbechargedatanytime.Ontherstchargeyoushouldchargeforaminimumof5-8hoursuntilthegreenisshowing.Pleaserefertoyour
battery charger document for safe charging and charging times.
The battery comes with a 12 months limited warranty subject to normal use and charged using the schedule set out. All other electrical parts have a 2-year warranty as does
the frame. The warranty procedure for any bike / battery is that you must return the item (carriage paid) to the retailer or directly to Seago who will carry out tests and an
inspection to determine if the fault is a warranty issue or not. Return carriage will be applied to claims not covered by warranty.
Keep your electric bike battery clean and dry
There is little danger from a wet battery however we do not recommend riding in heavy or driving rain. Contacts on the battery should be dried to avoid oxidation and corrosion
which would weaken the ability of the battery to power the bike. Check the contacts every few months and clean if necessary.
Keep your lithium batteries cool
The lithium powder inside the battery cells decreases its electrical resistance as it warms up. This means that in warmer conditions your battery will discharge more quickly
and will need charging more often.
You should notice that on cold days your bike will travel less distance, this is due to this same property of lithium powder - its resistance increases with colder conditions. This
means that you will travel further on warmer days. A lithium battery is best stored in cool / cold conditions.
Never open an electric bicycle battery
Openingalithiumbatteryisverydangerous!Lithiumpowderisextremelyammableandwillcombustoncontactwithoxygen,explosively!Ifyoususpectyourbatteryisfaulty
or has lost its capacity you will have to return it for testing.

• Max speed 25KM/H (With Power assist)
• Range 60 km (Depending on conditions)
• 2Tonepaintwithpearlescenteectandclearcoatprotection
• Lightweight aluminium 20 Inch folding frame
• 250W Motor
• Samsung36V9AHLI-IONremovablebattery
• External charging point
• AIS Brakes front & Rear
• 20 Inch Aluminium wheels
• Disc brakes front & Rear
• Folded size 88 x 35 x 69CM
• Weight 19.9KG With battery
• LED Light front & rear
• Front&Rearwheelreectors
• Pedal Assist
• Luggage rack
• Battery status indicator
• Retractable pedals
• 5 Speed low to high power mode
• 7 Speed Shimano gears
SPECIFICATION
3
e-Power 36v Go City-Lite
• Max speed 25KM/H (With Power assist)
• Range 60 km (Depending on conditions)
• Folding frame
• Luggage rack
• Disc brakes
• 7 Speed Shimano gears
• Front suspension
• Two tone paint
• Curved high strength aluminium 20-inch frame
• 250W8FUNmotor
• 36V 10.4Ah Lockable Panasonic battery
• USB Port
• Splash proof cover to charging port
• External charging point
• AIS Shimano gears
• 20-inch aluminium wheels
• Folded size 88 x 35 x 69cm
• Weight 22KG with battery
• LED Light front & rear
• CEApprovedEpacEN15194
• Pedal assist
• LCD 5 Speed power changer
• LCD multi-function controller and display
• Retractable pedals

BIKE COMPONENTS
4
e-Power 36v / Go City-Lite
29
3
6
5
1
7
8
1 Control panel
2 Front LED light
3 Shock absorber
4 Disk brake
5 Rotation sensor
6 Kick stand
7 Derailleur
8 Motor hub
9 Rear LED light
10 Battery (in frame)
11 USB Port
12 Power switch
13 Charge port
10
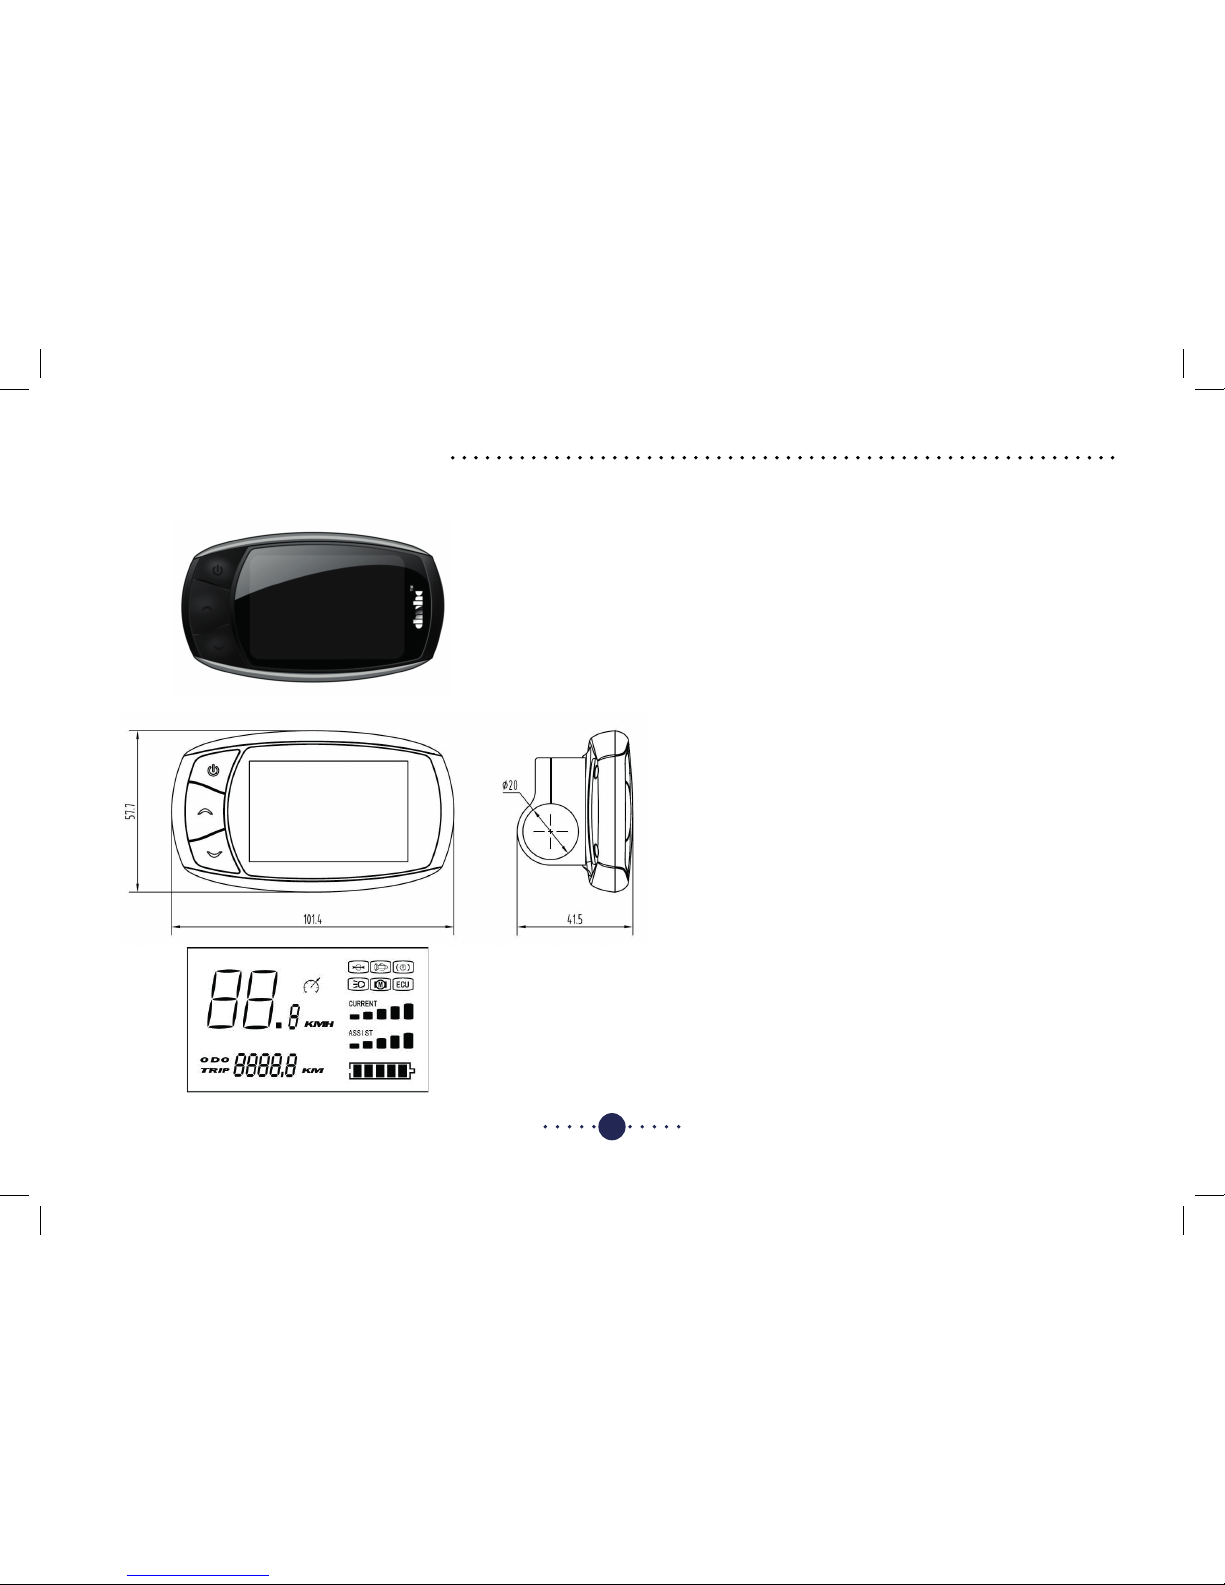
Control panel (Go City-Lite)
Control panel (e-Power 36v)
Connectivity (Go City-Lite)
12
13
11

Battery level indicator:
The battery charging status is indicated as follows:
5
CONTROL PANEL (e-Power 36v)
1 2 3
4 5
Note:
WhenpressingtheMODEswitch(4)theprogramstartswithmedium
power assistance and the MED (5) LED light comes on.
EachtimeyoupressMODE(4)youcanchoosethedesiredassistance
level.(LOW/MED/HIGH)
1 Batterycapacityindication(1)ON/OFFswitchforpowerassistance
2 ON/OFFswitchforthefrontlight
3 LED battery capacity indicator
5 LED indicator for assistance level
4 MODEswitchforchoosingpowerassistancelevel
3 lit LED’s means: the battery is 75% charged.
1 lit LED means: the battery is almost empty and needs
to be re-charged (remaining capacity or about 25%).
2 lit LED’s means: the battery is 50% charged.
4 lit LED’s means: the battery is fully charged.
6
CONTROL PANEL (Go City-Lite)
Functions of TC480 control panel:
Operationvoltage24v-48v
• Battery indicator
• Auto dormancy
• 5 Speed PAS
• Instantaneous power display
• Speed reading (KMH)
• ODO/TRIP(KM)
• Lights on indicator
• Breaks on indicator
• Power assist level
• User input current
Before the control panel can be used the power
must be turned on at the battery.
See bike components page 4, item 12.
7
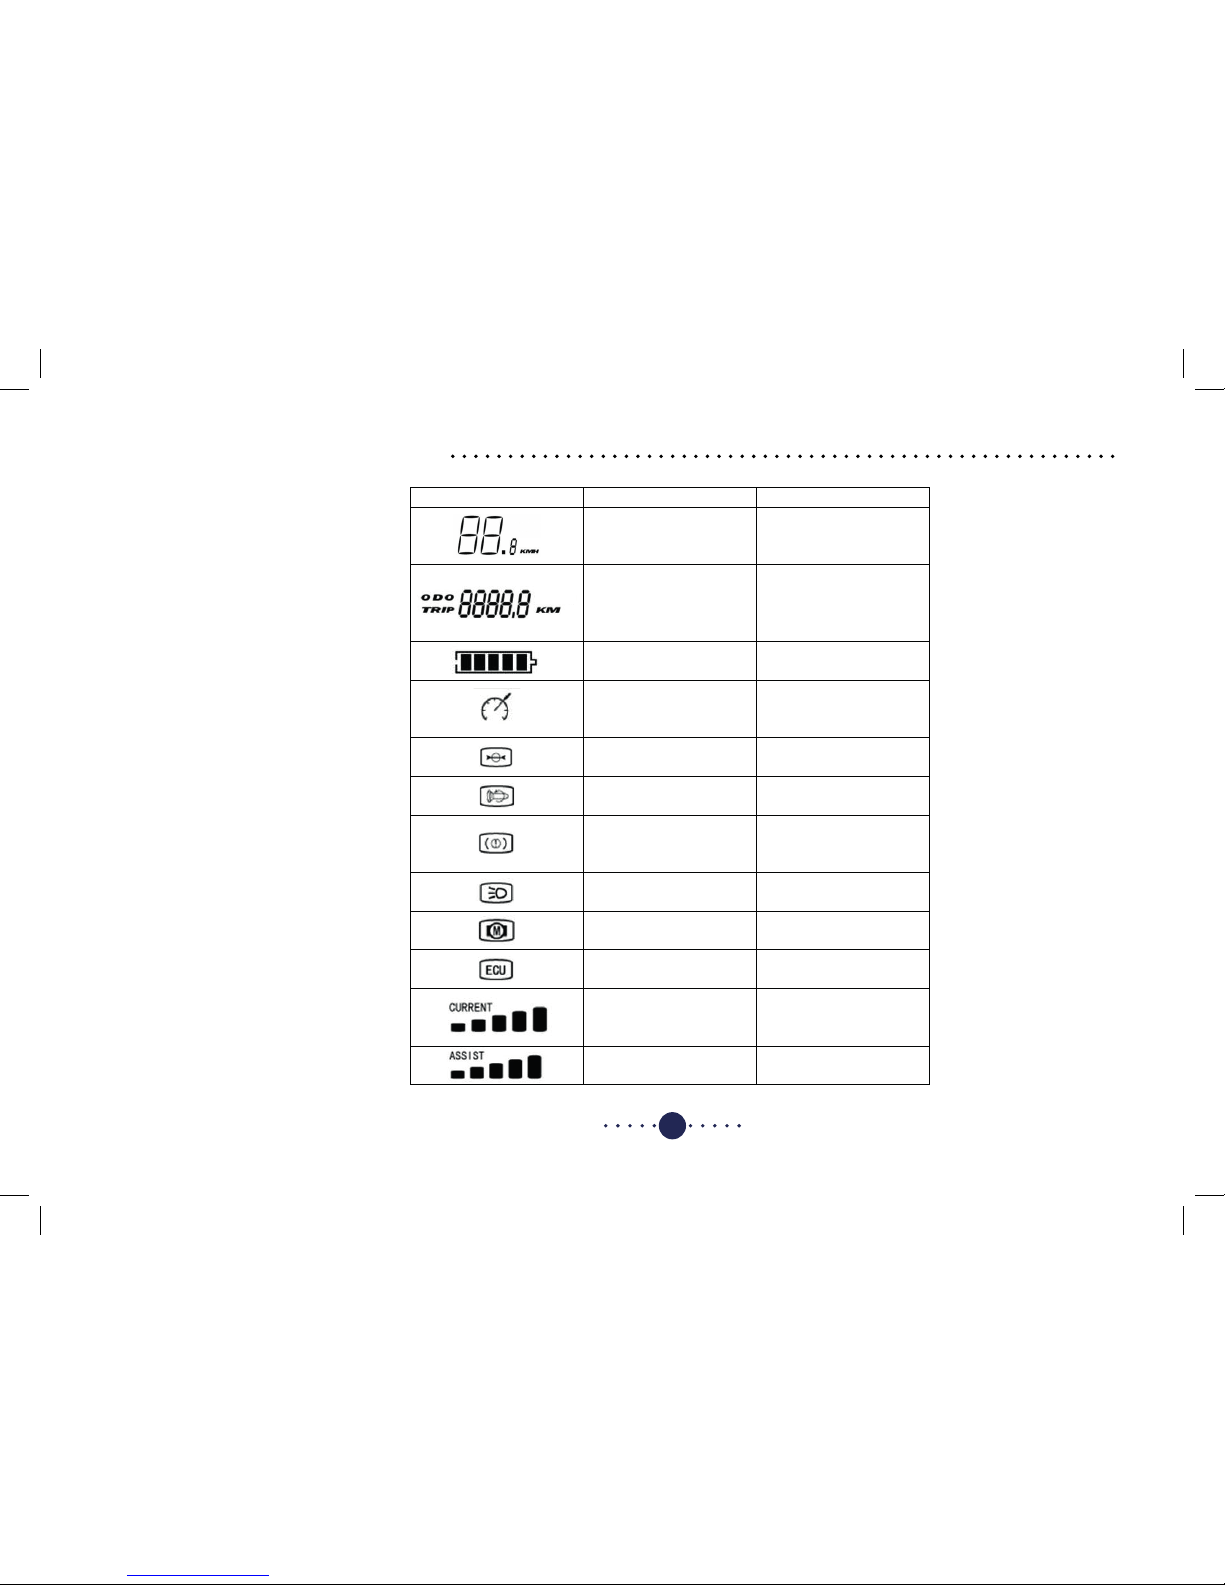
CONTROL PANEL (Go City-Lite)
Display Function
Speed
ODO/TRIP
Battery indicator
Cruiseidentication
Wheel diameter set
Throttle fault
Brakes on indicator
Lights on indicator
Motor fault
Controller fault
Current indicator
PAS indicator
Description
Speed, display unit in KM/H.
ODOforaccumulativetotal
mileage. Trip for single mileage.
Switch with function key.
Residual electricity display.
Display for cruise state.
Set by manufacturer, for setting
wheel diameter.
Shows when the throttle is abnormal.
Shows when the brake is on.
Shows when the lights are on.
Shows when the motor has a fault.
Shows when the controller has
a fault.
Displays the level of current
produced.
Displays the power assist level

8
CONTROL PANEL (Go City-Lite)
Key
1xBriey
Press to turn on control panel. Turn
on/oilluminationwithonepress.
Operation Display Function
ON
Description
1xbriey
2xBriey
1x Long OFF
Trip
mileage
reset
Turnon/o
the head lights
Presstoturnon/othebikelights
front and rear. Control must be turned
onrst.
1 Brief pree followed by 1 continuous
press to rest trip mileage.
Pressandholdtopowerothe
display.
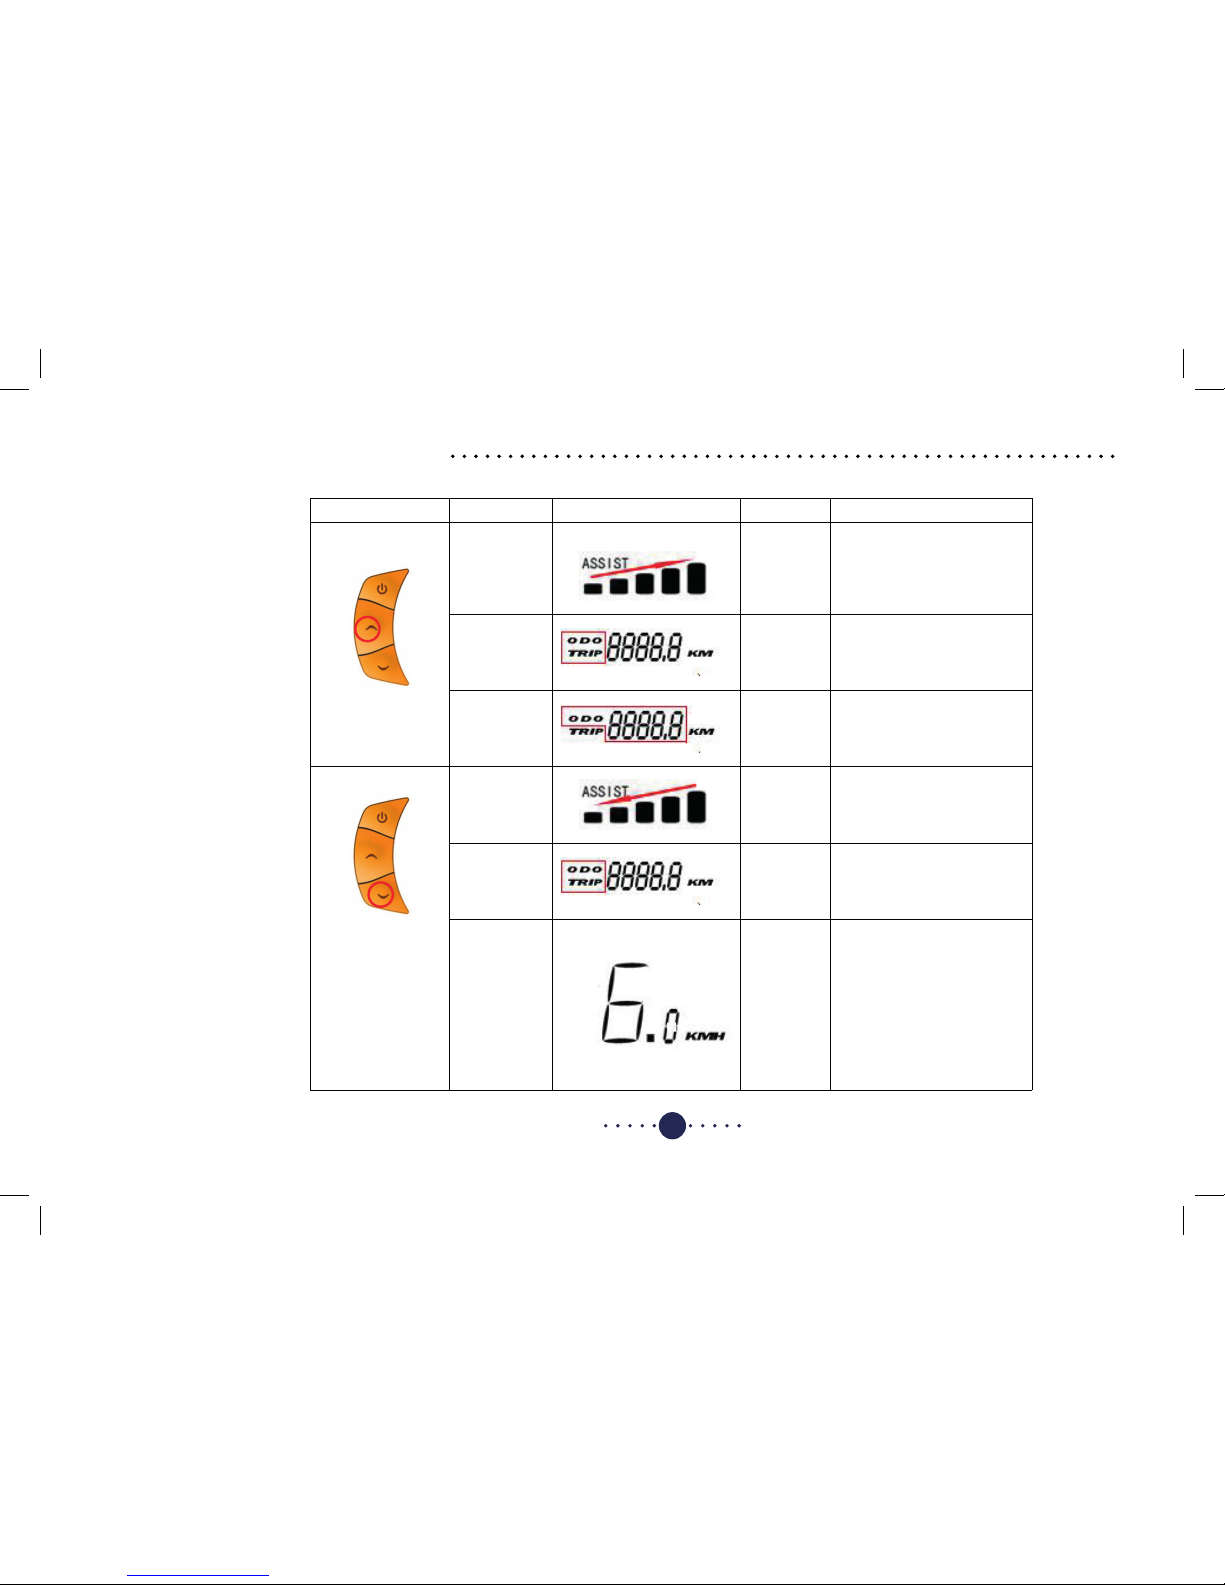
CONTROL PANEL (Go City-Lite)
9
Key Operation Display Function Description
1xBriey
2xBriey
1x Long
1xBriey
2xBriey
1x Long
PAS
increase
ODO
mileage
ODO
mileage
reset
PAS
decrease
Trip
mileage
Press and hold to enter 6km/h
implement mode.
6KM/H
1 Brief press followed by 1
continuous press, trip mileage is
displayed.
Each press decreases the power
assist level by one.
Longpressfor2secondsODO
mileage reset.
1 Brief press followed by 1
continuouspress,ODOmileageis
displayed.
Each press increases the power
assist level by one.
10
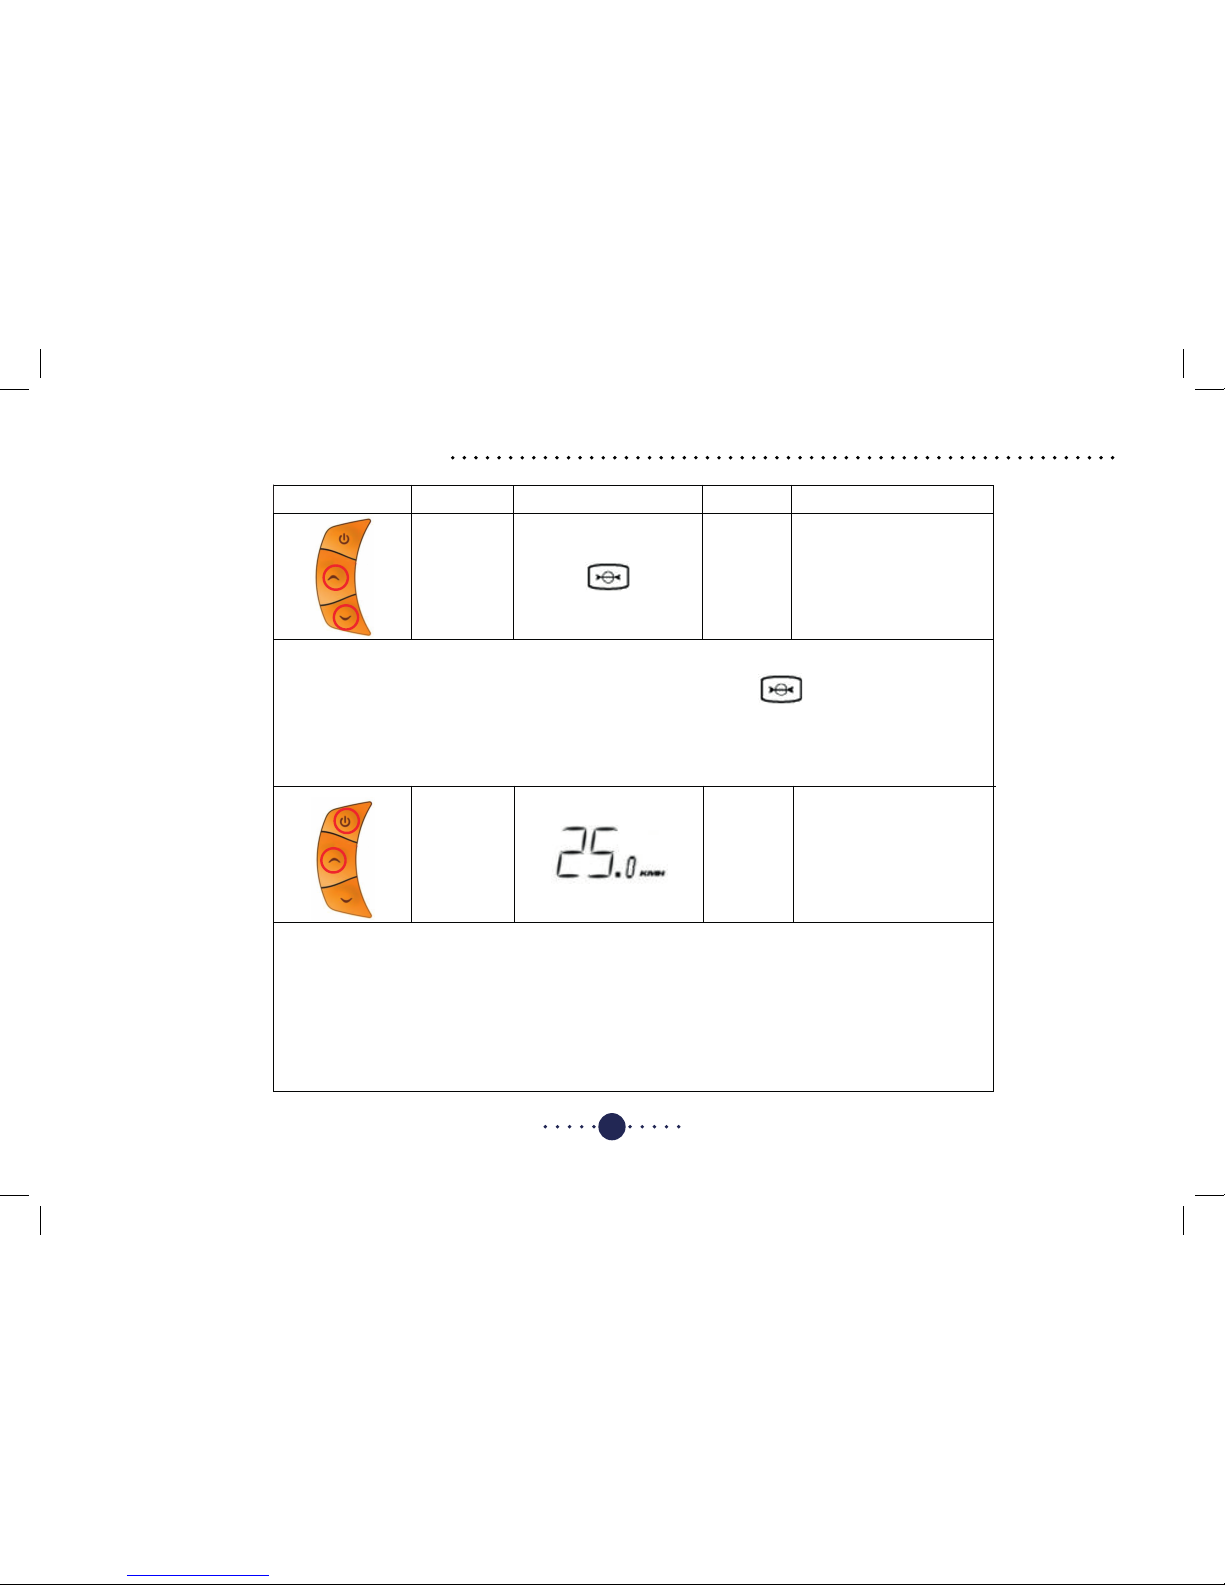
CONTROL PANEL (Go City-Lite)
Key Operation Display Function Description
Wheel diameter settings: Press the speed increase and speed decrease buttons at the same time for 5 seconds to enter the wheel
diameter settings. In the upper right corner the wheel diameter adjust icon will appear.
The display will show the default wheel size already set for the bike. The wheel size can be adjusted using the increase and decrease
arrowbuttons.Toconrmthewheelsizesettingpressandholdtheincreaseanddecreasearrowsfor5seconds.Thedisplaywill
revert back to 0.0 and the wheel diameter adjust icon will disappear from the top right corner.
Wheel
diameter
1x Long See the description below
Speed limitation settings: Press the speed increase and the power on buttons at the same time for 5 seconds to enter the speed
limitationsettings.Thedefaultspeedwillbedisplayedandashindicatingthecontrolisreadytobeset.Usingtheincreaseand
decrease arrows the speed can be set to values: 20-29, 60.
When the desired speed limitation has been set press and hold the speed increase and the power on buttons at the same time for 5
seconds. The display will revert back to 0.0 and the wheel diameter adjust icon will disappear from the top right corner.
NOTE:Thespeedlimitationsettingallowsthemotortocontinueassistinguptothesetspeedbeforecuttingouserinputis
required to reach the set speed.
Speed
limitation
1x Long See the description below

11
IMPORTANT SAFETY INFORMATION BEFORE CHARGING
Beforeyourstusethechargerpleasereadthefollowingnotesregardingsafetycarefully!
WARNING
Keepthechargerawayfromchildren!
In order to prevent any possible injury this charger should only be used for the original lithium battery which is supplied together with the e-Power/Go City-Lite.
Any other battery is not compatible and risks to explode while charging, causing serious injury to people as well as damage to other equipment.
UsingthischargerforbatteriesnotsuppliedbySeagoforthee-Power/GoCity-Litecouldriskcatchingre,provokeelectricshockand/orcauseseriousinjury.
Please make sure that the charger is always kept dry and does not get wet at any time.
Should there be an incidence of contact with water or any other liquid, make sure to unplug the charger immediately from the power socket and have it inspected by a
specialty dealer or contact Seago for advice.
Makesurethechargeisalwaysplacedonaatsurfacewheninuse.
Please make sure that the charger is always unplugged and removed from the power socket when not in use.
Beforeusingthecharger,alwaysmakesurethattheplugandthecablesarenotdamaged.Neverconnectadamagedcableorplugtothepowersocket.
Nevertrytodisassemblethecharger.Wrongre-assemblingcouldcauseanelectricshockandseriousinjury.Alwaysunplugthechargerbeforecleaningit.
Thechargershouldonlybecleanedwithadrycloth.Neveruseawetcloth,oiloranyotherliquid.
Donotuseanextensioncable.Onlyusetheoriginalcablesuppliedwiththecharger.
12
CHARGER FUNCTIONS
Onlyusethesuppliedcharger.
ThischargerisdesignedtoworkspecicallywiththesuppliedSamsung (e-Power)/Panasonic (Go City-Lite) battery that comes with your Seago electric bike.
The battery can be charged either directly into the bike or the battery can be removed using the supplied keys.
LED INDICATION AND CHARGING CYCLE
LED MODE
GREEN The battery is not connected
RED The battery is charging
GREEN Thebatteryischarged,thechargerswitcheso
TROUBLE SHOOTING:
Shouldtherebeanydicultieswithchargingpleasecheckif:
- The power cable is connected properly.
- The charger plug or the battery socket is damaged.
- The battery shows any damage on the surface.
- The power socket works and whether the correct voltage is provided.
(If necessary, plug in another gadget and check),
Should the problem persist, please contact the shop where the e-bike was purchased or contact us at sales@seagoyachting.co.uk

BIKE ASSEMBLY
Assembly of your Seago folding electric bike is very simple and can be done in a matter of seconds. These instructions are the same for e-Power & Go City-Lite.
Folded state
1) Unfoldthebikefromthemiddleandsecuretogetherusingthelockingclamp(seeg.1)
2) Unfoldthehandlebarsbyliftingthemupwardsandsecuretogetherusingthelockingclamp(seeg.2)
3) Setthehandlebarsinpositionandsecurewiththehandlebarclamp(seeg.3)
4) Lifttheseattothedesiredheightandsecureinplacewiththeseatclamp(seeg.4)
5) Fold out the pedals by pulling the trigger in the centre of the pedal
6) Reverse these steps to fold up the bike again
7) Beforeridingyourbikeensurethefrontwheelissecuredtightlyusingthewheelclamp(seeg.5)
Fold the bike carefully to avoid any likelihood of injury or damage to the bike and the electrical connections.
Always check the frame is locked and all clamps are tightly secured before use.
Fig.1 - Locking clamp Fig.2 - Locking clamp Fig.4 - Saddle clampFig.3 - Handle bar clamp
13
Fig.5 - Front wheel clamp
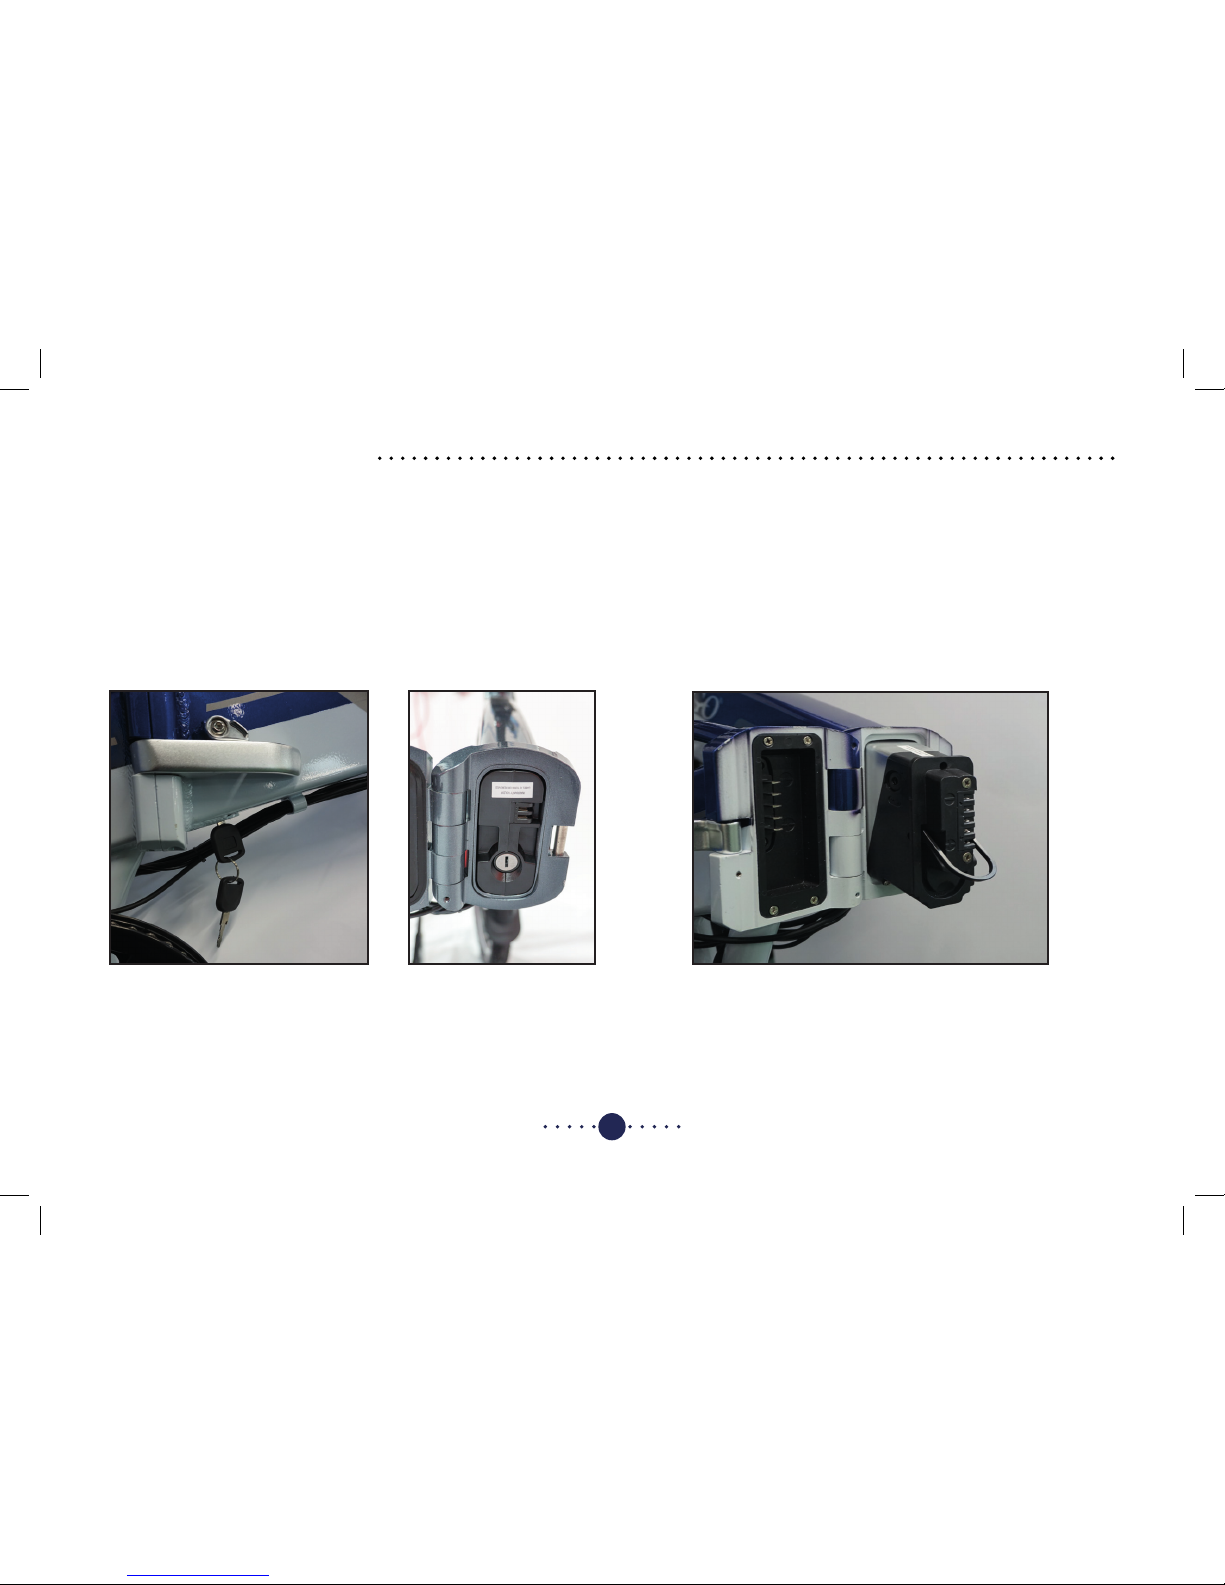
REMOVING THE BATTERY
14
The battery lock is located at the bottom of
the bike.
Before the battery can be removed on e-Power and Go City-Lite folding bikes the battery lock has to be unlocked. This is done using the provided keys attached to a cable
on the handle bars. The battery lock locations for each model are show below in Fig.1 and Fig.2.
When the bike is in the folded position this allows you to access the bike’s battery. The black pull tab helps you pull out and remove the battery from the bike see Fig.3.
Always ensure that the battery is locked in place before use. Keep the keys in a safe place.
Fig.1 - e-Power lock location Fig.2 - Go City-Lite lock location Fig.3 - Battery removal
The battery lock is located on the battery
accessed when the frame is folded

WARRANTY
15
Limited warranty:
1) Wewarrantythe1stnewownerandaccessoriesattached,thereto(hereafterreferredtoas“bike”)manufacturedbyus,tobefreefromdefectsinmaterialand
workmanship, but only when sale to the consumer is made in a country to which we authorise distribution.
2) Thiswarrantyshallbecomeeectiveonlyuponregistrationonlineatwww.seagoyachting.co.uk/registerwhichshallidentifytheserialnumberoftheproduct.
3) Your bike comes with a 2 year limited warranty of the frame and a 1 year warranty for the battery and other components.
4) Claims shall be made under this warranty by delivering the product for inspection to the selling dealer who will then arrange for the inspection and repair,
provided such service is covered under this warranty. It is the owner’s responsibility to register the bike within 28 days of purchase. There are no exceptions
to the terms and conditions of this warranty; if your bike is not registered your extended warranty will not apply. Purchaser shall pay for all related
transportation charges. If the service is not covered by this warranty, purchaser shall pay for all related labour, component and any other expenses associated
with that service. Any product or parts shipped by purchaser for inspection or repair must be shipped with transportation charges prepaid.
5) TheownersregistrationmustbeonlewithSeagoyachtingatthetimethewarrantyserviceisrequired.Proofofpurchasemustbeshownbeforeanywarranty
claim can be processed.
6) Ourobligationunderthiswarrantyshallbelimitedtorepairingadefectivepartoratouroptionreplacingsuchpartorpartsasshallbenecessarytoremedy
a malfunction resulting from defects in components or workmanship as covered by this warranty. We reserve the right to improve or change the design or any
product without assuming any obligation to modify any product previously manufactured.
7) All incidental and consequential damages are excluded from this warranty. Implied warranties are limited to the life of this warranty.
8) Thiswarrantygivesyouspeciclegalrights,andyoumayalsohaveotherlegalrights,whichmayvaryfromareatoarea.


Deanland Business Park |Golden Cross |East Sussex |BN273RP
www.seagoyachting.co.uk
This manual suits for next models
1
Table of contents
Popular Scooter manuals by other brands


Enhance Mobility
Enhance Mobility TRANSFORMER S3021 user manual

Xiaomi
Xiaomi Mi Electric Scooter 1S Important information

byox
byox FLURRY MC-15 A instruction manual

Sym
Sym JOYRIDE 300 2022 manual

Pride Mobility
Pride Mobility scooter owner's manual

IMAGINARIUM
IMAGINARIUM ItsImagical Candy Baby Scooter quick guide


