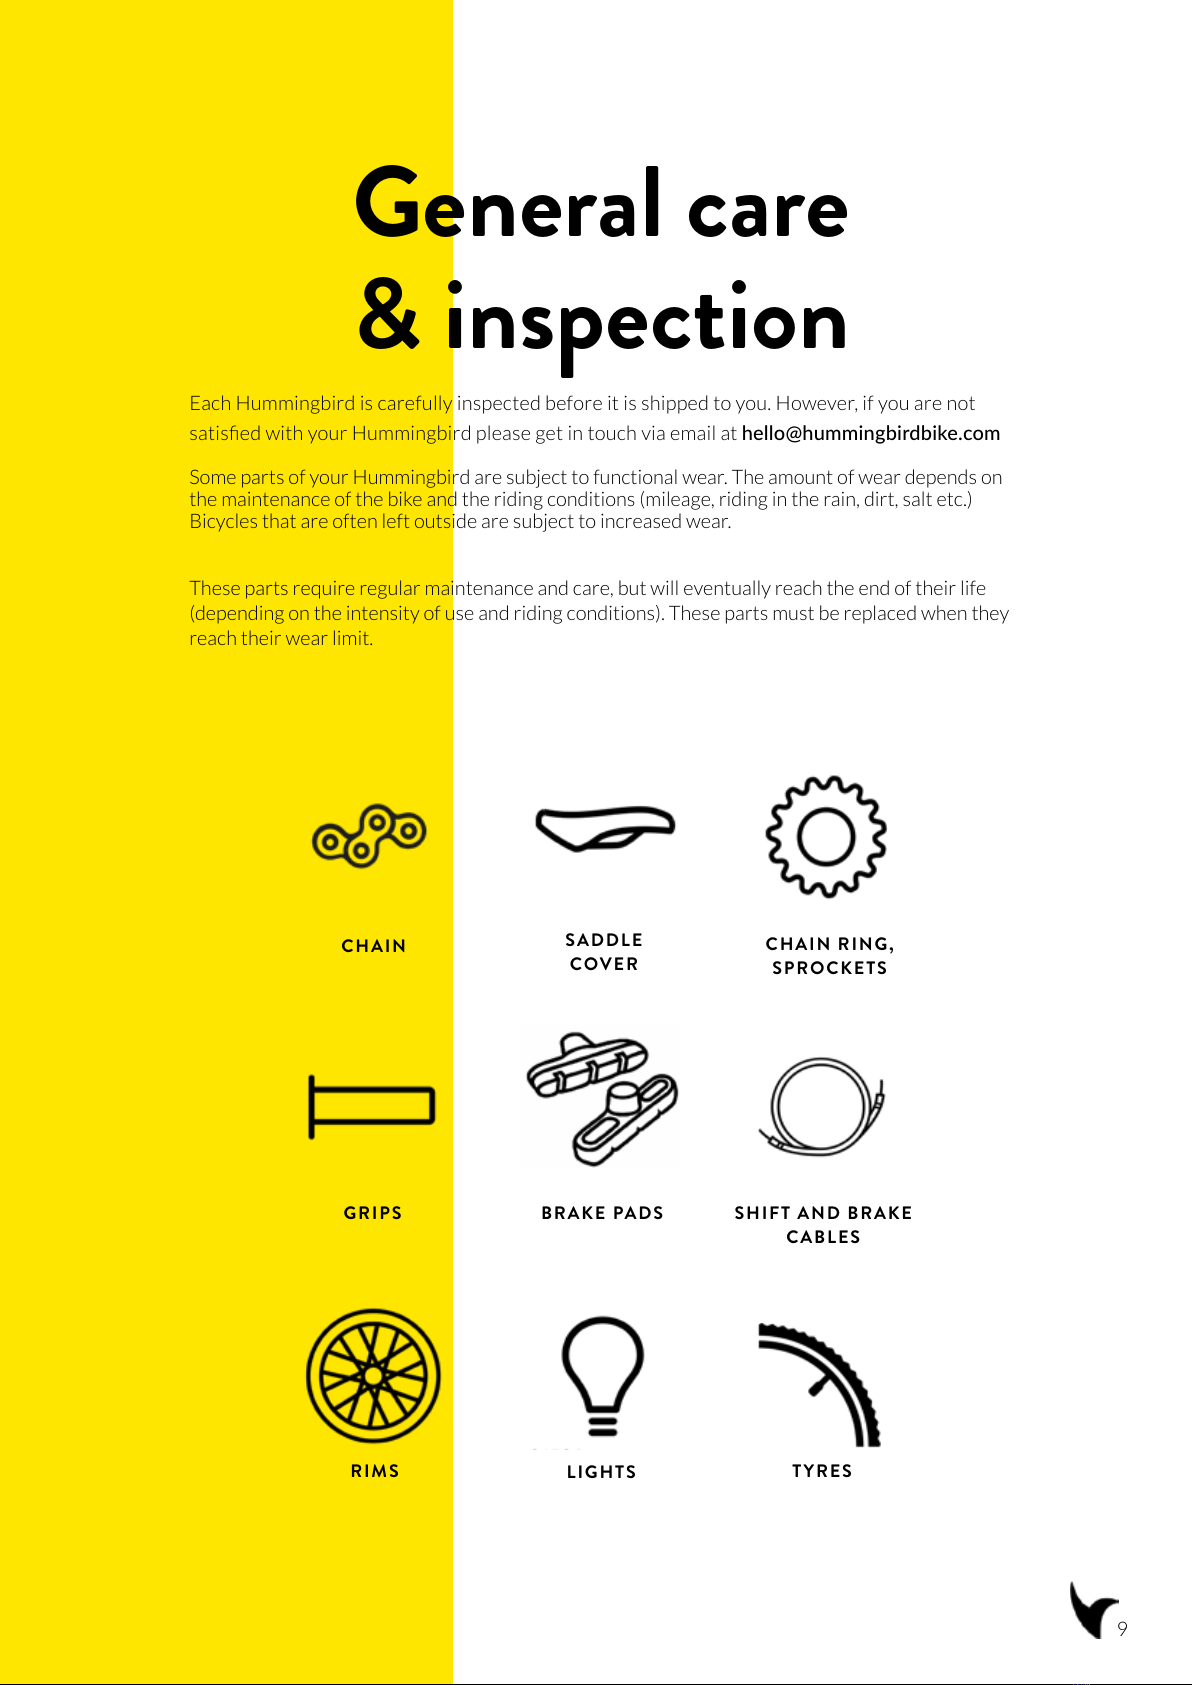
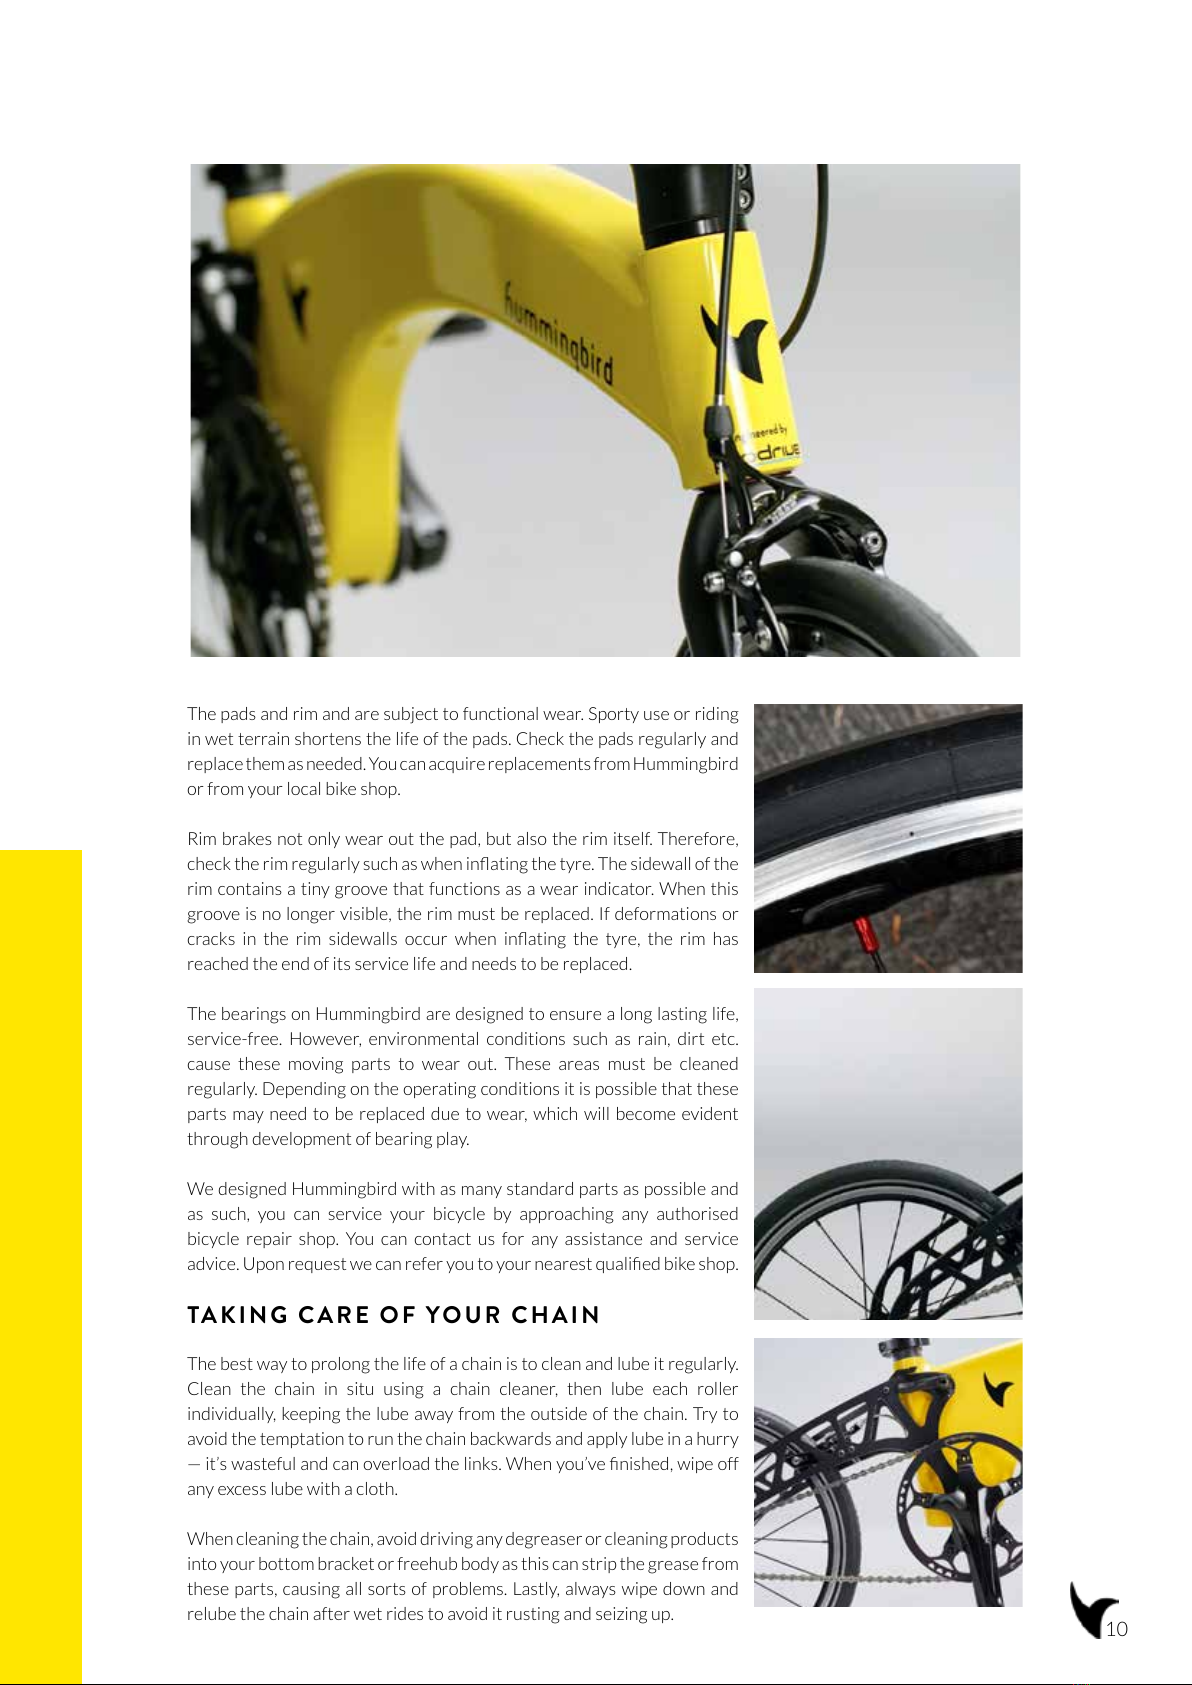
Hummingbird GEN 2.0 User manual

Hummingbird
USER MANUAL
EN 14764 | CITY AND TREKKING BICYCLES

Thank you for choosing Hummingbird. In the following pages you’ll
nd everything there is to know about the bike. We have put a lot of
thought into the design and we truly think that Hummingbird is a
beautifully engineered, simple solution which meets all the needs of an
urban bicycle.
During the design process, we constantly thought about your riding
enjoyment and safety. Even though we cannot anticipate every
possible scenario, this manual answers many of the key questions you
may have and gives you many tips on using your bike.
You’ll also nd important information about bicycle technology,
maintenance and upkeep, summarised to ensure that you enjoy your
new Hummingbird for many years to come.
Last but not least, don’t forget to enjoy the ride!
Petre and the Hummingbird Team
Congratulations!

Before Every Ride
page 4
Get Ready to Ride
page 5
Fing your Hummingbird
page 7
Folding & Unfolding Hummingbird
page 8
General Care & Inspecon
page 9
Adjusng your Hummingbird
page 12
Servicing
page 16
Maintenance
page 17
Maintenance Table
page 18
General Informaon
page 19
Hummingbird Electric
page 20
Contents
Geng started with E-Hummingbird
page 22
Your e-ride
page 23
The app
page 25
Technical data
page 32
E-maintenance
page 33
Baery pack
page 34
Warranty
page 35
Legal Requirements
page 37
Hummingbird Parts
page 38
Torque Sengs
page 39

TYRE
Check tyre pressure (between
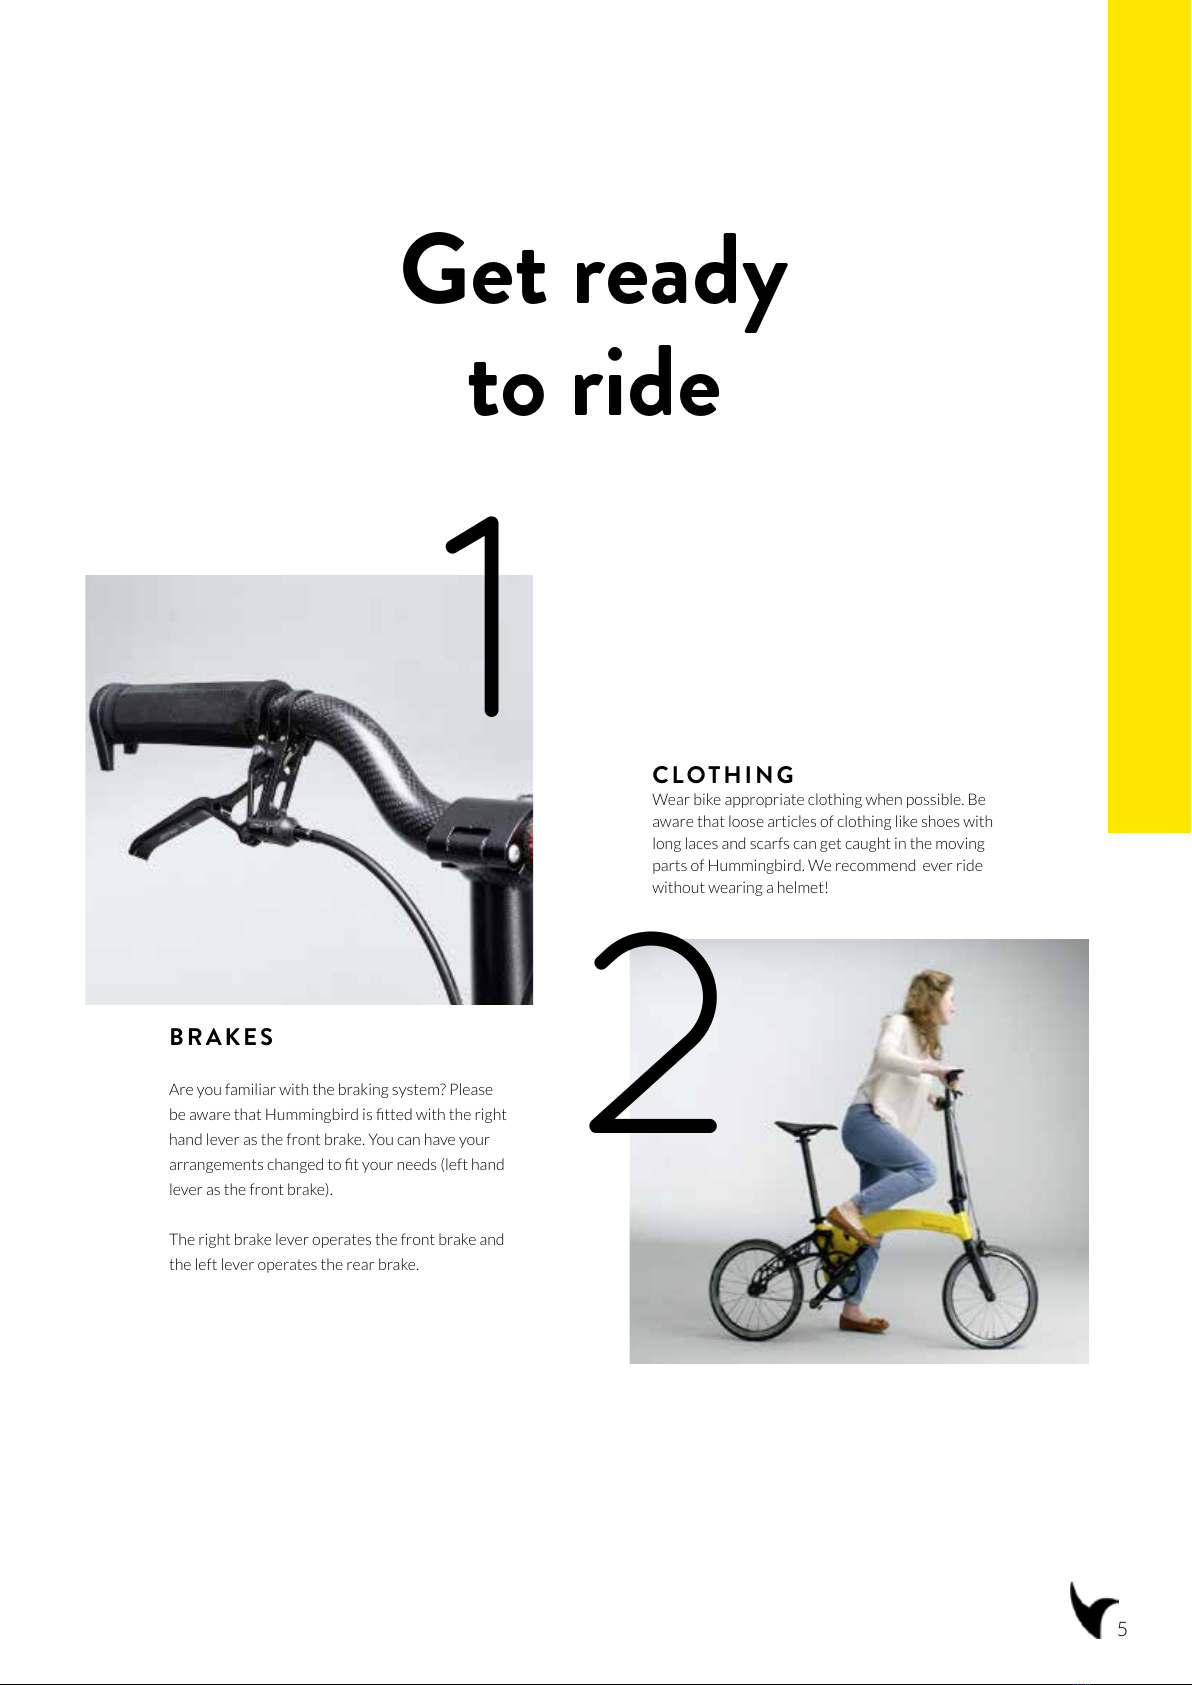
70-115 PSI or 5-8 BAR) BRAKES
Check brakes for function and adjust
if necessary. Make sure the brakes
feel tight when pulled and that they
provide enough braking power.
Brakes can be adjusted if necessary.
WHEELS
Check wheel is true and check rims for
wear
CHAIN
Check for tight links in chain and that
the chain turns freely through the
gears
FASTNERS
Check quick release levers and that
the wheel nuts aren’t loose
CRANKS
AND CABLES
Check cranks for fatigue and cables
for smooth operation and damage
Hummingbird is an urban bicycle designed for riding on roads and well-made paths. Hummingbird should
not be used for stunts, cross-country riding or extreme sports. Your Hummingbird should be used only for
its intended purpose. Misuse may lead to failure of some components and void your warranty.
PRACTICE AT SLOW SPEEDS FIRST
Before riding fast or in more difcult conditions, learn the function and performance of all the mechanisms
of your bicycle by riding at slower speeds in a at, empty space. If you or your local bike shop make
adjustments or repairs to your bike, repeat this learning procedure to understand how the changes have
affected the bike’s performance.
BE CAREFUL WHEN RIDING IN WET CONDITIONS
Even properly aligned and maintained, brakes require greater lever pressure and longer stopping distances
in wet weather. Please keep in mind the extra distance it will take to stop. Wet weather causes reduced
visibility for both you and motorists. It also reduces traction. Use slower cornering when tyre grip is reduced,
such as when riding over wet leaves, painted crosswalks or manhole covers as the slippery surfaces might
cause you to lose control.
AVOID SHARP POINTS, MOVING PARTS, HOT SPOTS AND
PINCH POINTS
Some parts of your bicycle can injure you if mishandled. Sharp points include the teeth of the chainrings and
some pedals. The area where the chain engages the teeth of the chainring (or rear cog) is a pinch point and
can cut. Brakes and their parts can get hot. Please mind that moving parts, including wheels, handlebars and
clamps can cause injuries if mishandled.
Give Hummingbird a shake and make sure there are no loose parts. We recommend you check:
Before every ride
4
After riding in wet conditions, make sure you clean the grit off the seat
post before lowering it when folding your Hummingbird. Not doing so will
result in scratches on the surface of the seat post.
Hummingbird has brake levers which can be adjusted
for reach. If you have smaller hands or nd it difcult to
squeeze the brake levers, your local bike shop can
either adjust the reach or t shorter reach brake levers

1
2
CLOTHING
Wear bike appropriate clothing when possible. Be
aware that loose articles of clothing like shoes with
long laces and scarfs can get caught in the moving
parts of Hummingbird. We recommend ever ride
without wearing a helmet!
BRAKES
Are you familiar with the braking system? Please
be aware that Hummingbird is tted with the right
hand lever as the front brake. You can have your
arrangements changed to t your needs (left hand
lever as the front brake).
The right brake lever operates the front brake and
the left lever operates the rear brake.
5
Get ready
to ride

3SEATING POSITION
Are the saddle and handlebar in the right
position? The saddle should be adjusted so
that with the pedal in its lowest position, you
can just reach it with your heel. Check that
you can stay in the saddle and still reach the
ground with your tiptoes.
Do not extend seatpost past minimum and
maximum insertion point marked at the back
of the seatpost.
6
Shifting from an easier, “slower” gear (like 1) to a harder, “faster” gear (like 2 or 3) is called an
upshift. Shifting from a harder, “faster”, gear to an easier, “slower”, gear is called a downshift. It is
not necessary to shift gears in sequence. Find the “starting gear” right for you — a gear which is
hard enough for quick acceleration but easy enough to let you start from a stop without
wobbling — and experiment with upshifting and downshifting to get a feel for the different
gears. At rst, practice shifting where there are no obstacles, hazards or other trafc, until you
have built up your condence. Learn to anticipate the need to shift and shift to a lower gear
before the hill gets too steep. If you have difculties with shifting, the problem could be
mechanical adjustment. Refer to the maintenance chapter for help.
4
SHIFTING
(MULTISPEED
HUMMINGBIRD)
Shifting with an internal gear hub drivetrain is
simply a matter of rotating the gripshifter to the
indicated position for the desired gear ratio.
After you have rotated the shifter to the gear
position of your choice, ease the pressure on the
pedals for an instant to allow the hub to
complete the shift. The numerically lowest gear
(1) is for the steepest hills. The numerically
largest gear (4) is for the greatest speed..

The best riding position is the one that you are most comfortable in, but a badly adjusted
bicycle may lead to back or joint pain and can reduce your control. Check your saddle is at
the correct height and that you can reach the handlebars and brake levers comfortably.
The saddle can be moved up and down, forward and back and angled up and down so play
around with it to get the best t. When riding, your hips should remain stationary and your
knee should have a slight bend. About 20~25° away from fully locked.
The saddle should be roughly parallel to the ground, but if it’s not comfortable, tip the nose
down to relieve pressure on the crotch or up to distribute your weight over a greater area
of the saddle.
7
RIDER HEIGHT
The Hummingbird accommodates riders up to a height of 152cm to 200cm (from 5’1” to 6’5”)
MAX. RIDER WEIGHT
The rider’s maximum weight including baggage should not exceed 110kg (265 lbs)
Fitting your
Hummingbird

STEP 1
Unlock the swing arm by pulling on the quick
release lever located above the crankset. Slightly lift
the bike up as the swing arm starts to pivot and
bring it under the frame.
Folding & unfolding
Hummingbird
Hummingbird has a revolutionary folding system that takes less than 5 seconds.
Watch our video guide following this link: bit.ly/HummFold
(NOTE: To unfold Hummingbird please follow steps 1 to 4 in reverse order)
STEP 2
Unlock the stem by clicking the safety pin and pull
on the lever. Start tilting the handlebars and tuck
them under the swing arm.
STEP 3
Open the seatpost clamp and drop the seatpost all
the way down. Quick release pedals can be
detached and slotted into the brake bridge.
STEP 4
For a more compact fold you can attach the front
wheel to the swingarm. To do so, open the front
quick release axle and the brake caliper quick
release to increase the tyre clearance. Pull the front
wheel out and clamp it on the dropout extension
located on the swing arm. Tighten quick release
until wheel is secure. Put seatpost in the gap
between stem and rear wheel.
8

General care
& inspection
Each Hummingbird is carefully inspected before it is shipped to you. However, if you are not
satised with your Hummingbird please get in touch via email at hello@hummingbirdbike.com
Some parts of your Hummingbird are subject to functional wear. The amount of wear depends on
the maintenance of the bike and the riding conditions (mileage, riding in the rain, dirt, salt etc.)
Bicycles that are often left outside are subject to increased wear.
These parts require regular maintenance and care, but will eventually reach the end of their life
(depending on the intensity of use and riding conditions). These parts must be replaced when they
reach their wear limit.
9
CHAIN SADDLE
COVER
CHAIN RING,
SPROCKETS
SHIFT AND BRAKE
CABLES
GRIPS BRAKE PADS
RIMS LIGHTS TYRES

The pads and rim and are subject to functional wear. Sporty use or riding
in wet terrain shortens the life of the pads. Check the pads regularly and
replace them as needed. You can acquire replacements from Hummingbird
or from your local bike shop.
Rim brakes not only wear out the pad, but also the rim itself. Therefore,
check the rim regularly such as when inating the tyre. The sidewall of the
rim contains a tiny groove that functions as a wear indicator. When this
groove is no longer visible, the rim must be replaced. If deformations or
cracks in the rim sidewalls occur when inating the tyre, the rim has
reached the end of its service life and needs to be replaced.
The bearings on Hummingbird are designed to ensure a long lasting life,
service-free. However, environmental conditions such as rain, dirt etc.
cause these moving parts to wear out. These areas must be cleaned
regularly. Depending on the operating conditions it is possible that these
parts may need to be replaced due to wear, which will become evident
through development of bearing play.
We designed Hummingbird with as many standard parts as possible and
as such, you can service your bicycle by approaching any authorised
bicycle repair shop. You can contact us for any assistance and service
advice. Upon request we can refer you to your nearest qualied bike shop.
TAKING CARE OF YOUR CHAIN
The best way to prolong the life of a chain is to clean and lube it regularly.
Clean the chain in situ using a chain cleaner, then lube each roller
individually, keeping the lube away from the outside of the chain. Try to
avoid the temptation to run the chain backwards and apply lube in a hurry
— it’s wasteful and can overload the links. When you’ve nished, wipe off
any excess lube with a cloth.
When cleaning the chain, avoid driving any degreaser or cleaning products
into your bottom bracket or freehub body as this can strip the grease from
these parts, causing all sorts of problems. Lastly, always wipe down and
relube the chain after wet rides to avoid it rusting and seizing up. 10

INSPECTION OF THE COMPOSITE PARTS
OF YOUR HUMMINGBIRD
Carbon fibre is a synthetic polymer that is heated to high temperatures until they carbonise.
The result is a black, extremely light and firm fibre, smaller than a human hair with a tensile
strength four times higher than the best steel alloys – at just a quarter of the weight.
The fibres are preimpregnated with a special resin which when cured at high temperature
bonds together all the fibers making the part a single solid composite piece.
Inspect for cracks, broken, splintered or delaminated areas. Any crack is serious. Do not ride
any bicycle or component that has a crack of any size.
Delamination is serious damage. Composites are made from layers of fabric. Delamination
means that the layers of fabric are no longer bonded together.
Undamaged areas will look glossy, shiny or “deep,” as if one was looking into a clear liquid.
Delaminated areas will look opaque and cloudy. The surface shape may change and may have a
bump, a bulge, soft spot, or not be smooth and fair. If you then tap a delaminated area, you will
hear a dierent sound, usually duller, less sharp.
Either a crack or delamination can cause creaking noises while riding. Think about this noise as
a serious warning signal. A well maintained bicycle will be very quiet and free of creaks and
squeaks. Investigate and find the source of any noise. It may not be a crack or delamination,
but whatever is causing the noise must be fixed before riding.
Do not ride a bicycle or component with any delamination or crack. Riding a delaminated or
cracked frame, fork or other component could lead to complete failure, with risk of serious
injury or death.
If you were involved in a crash, first check yourself for injuries and take care of them as best
you can. Seek medical help if necessary. Next, check your bike for damage. After any crash,
take your bicycle to your local bike shop for a thorough check. All components such as
carbon composites, handlebars, stems, cranksets, brakes etc. which have sustained an impact
must not be ridden until they have been disassembled and thoroughly inspected by a qualified
mechanic.
11

Adjusting your
Hummingbird
12
ADJUSTING THE BRAKES
When the brakes are not applied, the brake pads should be 2 to
4mm from the rim. If the brake pads are too close to the rim,
the brake is too tight. Brake pads should be aligned with the rim
surface. If the brakes are not properly adjusted, take your
bicycle to your local bike shop for service. Every month, make
sure you check the brake cables on your bicycle for kinks, rust,
broken strands and frayed ends. Also check the housing for
bent ends, cuts, stretched coils, and wear. Replace any part
which does not pass inspection.
Every month inspect the brake pads on your bicycle for wear.
Brake pads have shallow grooves in their braking surface. If any
of these grooves are less than 2 mm deep, replace the pads.
ADJUSTING THE BRAKE PAD
CLEARANCE TO THE RIM
To increase the pad clearance, turn the barrel adjuster clockwise.
To reduce the pad clearance, turn the barrel adjuster counter-
clockwise. The barrel adjuster is located at the top of the brake
itself, where the cable enters the caliper.
If the brake pads cannot be adjusted properly in this manner,
loosen the cable clamp bolt and re-attach the cable. Turn the
adjusting barrel clockwise so the threads on the adjusting barrel
are not exposed above the caliper, or outside the lever. Hold the
brake pads against the rim, pull the cable snug, and tighten the
cable clamp bolt to the torque specication (see Torque Settings)
ADJUSTING THE ALIGNMENT
OF THE BRAKE PADS
Loosen the brake pad xing bolt and align and tighten
the brake pads.
After the brakes are adjusted, test the brakes. Apply maximum
braking force to the levers. Ensure the cable does not slip, the
pads close toward the rim at the right angles and the pads do
not contact the tyre.

QUICK RELEASE SETUP
The seat post clamp works exactly like the traditional wheel clamp
fastener. The binder uses an over-center cam action to rmly clamp the
seat post
Riding with an improperly tightened seat post can allow the saddle to turn
or move and cause you to lose control and fall. Before you ride your
Hummingbird, make sure you check that the seat post is securely clamped.
ADJUSTING THE SEAT POST
CLAMP MECHANISM
The action of the cam squeezes the seat collar around the seat
post to hold the seat post securely in place. The amount of
clamping force is controlled by the tension adjusting nut.
Increase clamping by changing the tension - adjust the nut
clockwise, while keeping the cam lever from rotating.
Turning it counterclockwise while keeping the cam lever from
rotating reduces clamping force. Less than half a turn of the
tension adjusting nut can make the difference between safe and
unsafe clamping force.
TYRES
Never inate a tyre beyond the maximum pressure marked on the tyre’s
sidewall. Exceeding the recommended maximum pressure may blow the
tyre off the rim, which could cause damage to the bike and injury to the
rider.
You can inate the tyres with the Hummingbird pump supplied with the
bike, but we reccomend getting a oor pump with a pressure indicator
dial for home use.
The Presta valve has a narrower diameter and it is designed to hold
higher pressure. To inate a Presta valve tube using a Presta headed
bicycle pump, remove the valve cap; unscrew (counterclockwise) the
valve stem lock nut and push down on the valve stem to free it up. Then
push the pump head on to the valve head and inate.
Do not begin any adjustments or service on your Hummingbird unless
you have been guided by a specialised technician. We recommend that
signicant mechanical repairs should be carried out by a qualied bicycle
mechanic. Improper adjustment or service may result in damage to the
bicycle or in an accident which can cause serious injury.
13
WHEEL QUICK RELEASE SETUP
The wheel hub is clamped in place by the force of the over-center cam
pushing against one dropout and pulling the tension adjusting nut, by
way of the skewer, against the other dropout. The amount of clamping
force is controlled by the tension adjusting nut.

INFLATING YOUR HUMMINGBIRD’S
TYRES WITH THE PRESTA VALVE
Check The Valve & Deate The Bike Tyre
Find the valve and remove any dust-cap.
14
CHECK THE VALVE
If the presta valve hasn’t been opened for a while release a short hiss of air
to check it’s not stuck. The same process, holding the valve open longer,
deates the bike tyre.
PRESTA VALVE
A presta valve is locked with a tiny acorn nut, unscrew this before you
inate a bike tyre and press the stem down to release air.
CONNECT THE PUMP
The hose or pump connection may screw on or press on. Some push t
connections lock with a cam lever. To check the correct operation of the
connection look at the rubber washer and move the lever back and forth.
The the ‘locked’ position squeezes the washer, the ‘on-off’ position lets the
washer relax. The rubber washer in a pump connector wears out with use.
It needs to be replaced when it stops gripping valves to give an air-tight
sea.
INFLATE THE TYRE
If your pump or hose has a push t, press the connection on parallel to the
presta valve to avoid releasing air or bending the presta valve stem.
Fully open and fully close the pump with each stroke. It’s important to
press the piston right to the end of it’s travel to force air into the tyre. If
you stop too soon the air in the pump will tend to compress rather than
ow into the tyre.

15
ADJUSTING THE CHAIN TENSION
Hummingbird is equipped with horizontal dropouts, where the wheel
can slide forward or backward to change the tension of the chain.
Gradually loosen the rear wheel axle fasteners located on each side of
the rear wheel. Slide the wheel to re-tension the chain, and center the
wheel in the frame. Tighten one fastener and check chain tension.
When grasped in the middle of the chain, run between the front and
rear sprockets, there should be about 12 mm (0.5 inches) total up-
and-down movement. After you are happy with the tension, make
sure both fasteners are tight and wheel is centered in the dropouts.
Please note that an overly tight or loose chain can damage the drive-
train prematurely.
STURMEY ARCHER GEAR ADJUSTMENT
(MULTISPEED HUMMINGBIRD)
If moving the shift control one click repeatedly fails to result in a smooth shift
to the next gear chances are that the mechanism is out of adjustment. Take the
bike to your local bike shop to have it adjusted or refer to the Sturmey user
manual found here:bit.ly/Sturmey
LUBRICATION AND CLEANING
Once a month clean and oil the chain. When lubricating or cleaning
your chain, always place a rag behind the chain to avoid getting oil on
the rest of the bicycle. It is important to use a synthetic chain oil or
something similar. We found that a dry lube such as a parafn based
product gives the best results. Please refer to the use instructions of
the lubrication product.
We do not recommend cleaning the chain with solvents while on the
bike as they can damage the nish of your Hummingbird.
RECOMMENDED TOOLS
• Torque wrench with lb-in or Nm gradations
• 2, 2,5, 4, 5, 6, 8, 10 mm allen key wrenches
• 15 mm open-ended wrench
• Bicycle tire pump with gauge
• Puncture repair kit
• Tyre levers
***For replacement parts, call us at at +44 (0) 1295 273 355 or email at hello@hummingbirdbike.com

Servicing
FIRST SERVICE
On the rst few rides the wheels might be subject to a bedding-in process or cables may stretch,
making gear shifting imprecise. In the rst 30 days Hummingbird must be taken to a bike shop
for inspection and adjustments if necessary.
REGULAR ANNUAL SERVICE
If you have been riding regularly through the year we recommend that you have your bike
thoroughly checked. Depending on how much you cycle, the repair of worn-down parts may be
necessary already.
The annual service can be carried out by our skilled staff at Hummingbird, upon request. Please
contact us at +44 (0) 1295 273 355 or email us at hello@hummingbirdbike.com
Alternatively, you can take Hummingbird to any authorised bicycle shop. We have tried our best
to make Hummingbird as easy to service as possible. Still, there are some unique design features
that might require further instructions. Please do contact us with any enquiries.
HUMMINGBIRD SAFETY CHECK
If you ride your Hummingbird less than 1,000 km (620 miles) a year, it requires less servicing.
Please service when required - consult the maintenance table for further details. We have
developed a maintenance schedule to help you enjoy your Hummingbird for many miles.
To be able to enjoy your Hummingbird for many years it needs to be serviced regularly. The
schedule given in chapter “Maintenance” is a rough guide for cyclists who ride their bike
between 1,500 and 2,500 km (930 and 1,550 miles) a year. If your Hummingbird does harder
service, either because your mileage is consistently bigger or because you ride a great deal on
poor road surfaces, it will require shorter maintenance periods. This includes frequent rides in
the rain, as well as in wet conditions. If a component needs to be replaced, make it a rule to only
use original parts.
THE FIRST 2 YEARS
During the warranty period (1 year for components and 5 years for the frame), Hummingbird
make available all your essential spare parts. In the event of unavailability, Hummingbird will
offer spare parts of equal or higher value.
Never work on your bicycle unless you feel absolutely condent in your skills!
If you are in doubt or if you have any questions, contact us at hello@hummingbirdbike.com
16

Cleaning your Hummingbird by hand gives you the
opportunity to identy any defects in the paint or
worn or defective components at an early stage.
After drying your Hummingbird you can polish its
coating and metal surfaces with hard wax. Apply the
hard wax also to hubs, bolts and nuts etc.
Use a hand-held atomizer for parts with small
surfaces. Polish waxed surfaces with a soft cloth to
give them a nice shine and make them water-
repellent. Inspect the chain after you have nished
cleaning and grease or lubricate it, if necessary.
Dirt and salt from riding during the winter or in
sea air harm your Hummingbird. You should
therefore make a habit of regularly cleaning all the
components of your Hummingbird and protecting
them from corrosion.
Do not clean your Hummingbird with a steam jet.
This cleaning method is quick, but it entails
serious drawbacks: as the water is ejected at high
pressure in a narrowly focused jet, it may pass
through seals and penetrate bearings. This leads
to the dilution of lubricants and consequently to
greater friction and onset of corrosion. This
destroys and impairs the functionality of the
bearing races in the long term. Steam jet
treatment also tends to abrade paint and decals.
A more suitable way of cleaning your
Hummingbird is with a soft cloth and a
mulisurface cleaner spray.
17
When performing basic maintenance please
be aware of the moving and clamping parts.
Bicycles are subject to wear and high stresses.
Different materials and components may be
affected in different ways. If the design life of
a component has been exceeded, it may
suddenly fail, possibly causing injury.
Any form of crack, scratch or change of
coloring may indicate that a component
requires replacing.
Remember to maintain, clean and lubricate
your Hummingbird using appropriate cleaning
and lubing products. Please refer to the
maintenance table for specic lubrication
locations and schedules.
Maintenance
CLEANING YOUR BIKE

Maintenance Table
COMPONENT SERVICE
CHECK
FREQUENCY
BEFORE
EVERY RIDE MONTHLY ANNUALY OTHER
Lights Check batteries *
Tyres Check Pressure *
Tyres Check for wear and
damage *Replace if necessary
Brake pads Check for wear and
damage *
Brake cables Visual check for wear
and damage *
Geared hub Regrease
Bottom bracket Check for play *Replace every 6,000 KM
Chain Check and/or
lubricate *
Chain Replace Every 1,000 KM
Crank Check and/or
retighten
Paint Polish At least every 6 months
Wheels Check trueness and
tension *Retrue if necesarry
Handlebar Visually inspect Replace if necesarry
Folding stem Check for play and/or
lubricate *
Headset Check for play *
Replace bearings if
necessary every 6,000
KM
Pedals Check for bearing
play
Pedals Check locking
mechanism *
Nut and bolts Check
and/or retighten
Valves Check for wear *
Seatpost Remove and regrease
Gear/brake cables Remove and regrease
Mudguards Visually inspect and/
or retighten
Jobs marked “*” you should be able to do yourself, provided you have a certain degree of manual skill, a little
experience and suitable tools. If you come across any defects, take appropriate measures without delay.
If you have any questions call us at +44 (0) 1295 273 355 or email at hello@hummingbirdbike.com
18

Riding a bike is fun. Riding the
Hummingbird is REALLY fun -
but we do want you to keep an
eye on the safety regulations
and respect your surroundings.
So here’s a few key pointers for
you to consider before going
out for a ride.
1. Never ride without a helmet
and make sure you always wear
appropriate clothing.
2. Never ride your bike with
incomplete or improper
maintenance. You could
endanger your life or the lives
of others.
3. Make sure your front wheel,
handlebar stem and seat post
quick release levers are tightly
closed in place. When tight, the
levers should have a rm feel
and prevent any rotation or
rattle. If you’re unsure, drop by
your local bike shop and ask a
technician to demo the proper
way.
Sign up to TfL’s cycle training to
increase condence on two
wheels and make you feel safer:
t.gov.uk/cycletraining.
URBAN CYCLING
The Hummingbird is designed for use as an urban bicycle on
paved roads only. Other uses, such as jumps or stunts, may cause
damage to the frame and risk rider injury.
Some places require the use of lights and other accessories.
Riding in some areas can be restricted. Check out your local laws
and regulations and follow them when you’re out riding.
Always be on the lookout for potholes and other dangers, like car
doors opening. Think about your own visibility and try to avoid
entering driver blind spots. Always fall behind vehicles when
entering a junction. When possible, do not ride on the inside of
the road in junctions, as turning vehicles might not see you.
Luggage carriers can be tted on Hummingbird to the handlebar
stem and seatpost. Hummingbird is not suitable for use with a
trailer bicycle.
A bicycle trailer can be attached to Hummingbird. Please refer
to the trailer manufacturer’s instructions for tting.
Hummingbird is suitable for attachable luggage carriers as long
as the maximum weight limit is not exceeded.
Hummingbird is designed for a single rider. Please do not carry
children or passengers on your Hummingbird.
STAY ALERT
Don’t wear
headphones or
sunglasses that
affect your
vision. Don’t
ride if you have
consumed
alcohol.
WEIGHT
You and your gear
have to weigh less
than 110 kg (240
lbs). If carrying extra
weight or bags, make
sure the bike is
stable. Hummingbird
is designed for one
rider only.
VISIBILITY
Riding in low light
or poor visibility is
much more
dangerous than in
normal lighting
conditions. Always
ride with lights and
reectors.
General information
19
x

Hummingbird
Electric
SAFETY INFORMATION
Read all safety warnings and all instruction. Failure to follow the warnings and instructions may
result in serious injury. Save all safety warnings and instructions for future reference.
DO NOT open the unit yourself. Hummingbird Electric is maintenance-free and must be
repaired only by qualied experts and only with original spare parts. Any unauthorized attempt
to open the unit will void warranty claims.
DO NOT make any modication to your Electric Hummingbird and DO NOT remove the anti
rotational plates from your bike. This would yield to an incorrect behavior by your bike and it
may result in serious injury.
DO NOT use the bike without the protection covers for the charging connector (see Figure 1).
Warranty is void if the bike is being used without protecting the connector. Please observe all
national regulations on registering and using e-bikes.
The term “battery pack” refers to an internal part of the Hummingbird system. DO NOT try to
access the battery pack.
Your Hummingbird must not be subjected to direct mechanical impacts. There is a risk that the
battery pack and the electronics will be damaged.
Protect the battery system against severe heat, re and immersing into water. Danger of re
and explosion.
Vapors can escape in case of damage or improper use of the battery. Avoid contacts with those
vapors, as they can irritate the respiratory system.
Charge the battery pack only with original Zheus battery charger. Damage can occur while using
non original charging devices.
IF your Hummingbird wheel has a 6 pin connector (see Figure 1), please be careful to insert the
6 pin charger plug in the 6-pin connector in the proper way. Otherwise short circuits can occur.
Warranty is void if charger is not inserted correctly. Do not short circuit the pinout of the
charging connector.
Keep the battery charger away from rain or moisture. Keep the battery charger clean. Danger of
electric shock
Before any charging operation, check the battery charger status (cable, plug, connectors). If any
damage is detected, DO NOT use the charger and contact a qualied retailer.
20
Table of contents
Popular Scooter manuals by other brands

Add Freedom Scooters
Add Freedom Scooters Swift ES008 J-4 Operation manual

PEUGEOT
PEUGEOT JETForce Technical training

Vermeiren
Vermeiren Mercurius 4D installation manual

Langfeite
Langfeite L8 user manual

Shinga
Shinga Lacros SCAMPER S200 Original manual

Jupiter Bikes
Jupiter Bikes Jupiter Bikes Operation manual