Seben 900-76 EQ2 User manual

900-76 EQ2 Reflector Telescope
Owner´s Manual
Please read before using this equipment
Deutsche Anleitungen finden Sie zum Download auf:
http://www.seben.com/manuals/
You can download instructions here:
http://www.seben.com/manuals/
Vous pouvez télécharger la notice en français sur:
http://www.seben.com/manuals/
Per il download delle istruzioni in italiano cliccate qui:
http://www.seben.com/manuals/
Puede descargar las instrucciones en español aquí:
http://www.seben.com/manuals/
www.SEBEN.com
Seben GmbH – Ollenhauer Str. 73 -13403 Berlin – Deutschland

EN
Interesting information for starting
By buying a telescope you made the decision to pursue a very interesting and exciting hobby and we
congratulate you. We would like to give you a couple of tips upfront.
Astronomy isn’t a cinema movie
Astronomy isn’t a cinema movie that you watch for a couple of hours without doing anything. This great
hobby needs a lot of self-initiative and a high self-motivation. Take your time for this beautiful hobby,
because, like with many other things, you have to practice the handling of a telescope, how to properly view
things with it and the orientation. The pictures that you’ll see are also not the ones that you’ve seen as
colored pictures from NASA or that you know from the media. So don’t be disappointed when you’ll get to
see how an object really looks like through your own telescope.
Don’t expect too much at once and approach the topic slowly. You’ll only see as much as your experience
and your ability allow you to see, even with the best and most expensive telescope. The journey is the
destination and the fascinating thing about this hobby is the independent discovery of the objects and the
analysis of time and space.
Learning from others
The exchange with other astronomers is an important factor and nowadays this can be easily done through
the many Internet forums. By talking with like-minded people you can get tips and solve many problems and
answer many questions yourself. Maybe you’re also looking for an astronomy club near you?
There are countless objects in the sky that can be seen with a telescope. A map of the stars is essential, so
that you’re able to orientate and find specific objects. You can find and purchase one that is robust and made
of plastic on the Internet.
It’s essential to buy an astronomy book that’s suitable for you and we recommend that you don’t eschew this
purchase. Our experiences have shown that hobby astronomers get better observation results and also
derive a lot of joy from this hobby by using a book.
Children should watch together with someone else, who is already experienced with a telescope, if possible.
Not every location is suitable for observing
It’s best to look for a spot that is as dark as possible. You’re lucky if you live outside of the city. The ones
living in the city should drive outside of it to get better observation conditions. Because it’s almost impossible
to find a dark observation location in the city, due to the many light sources.
Consider that the temperature of the telescope has to adapt to the outside temperature to get decent
observation results.
The underground is also determining the observation quality
Avoid pulling out the tripod legs completely and erecting the tripod when it’s very windy, so that you have a
proper footing. The flatter the instrument is standing the more stable it is.
Make sure that the tripod is standing on a firm ground. Balconies, wooden floors or other undergrounds can
make observations more difficult, due to their high self-oscillation.
Free sight for your telescope
Don’t observe through a window or through an open balcony door, because the temperature differences
between inside and outside and/or the thick window glass are making it impossible to get a sharp picture.
How does a telescope actually work?
A telescope collects the weak light of the stars better than a human eye is able to. Thus you can see more in
the sky with it.
Depending on the kind of objective you distinguish between refracting telescope and reflecting telescope.
Both have the same job; to capture the light of a distant object and accumulate it at the focal point, where the
ocular will then magnify the image. All telescopes create an image that is turned by a 180 degree angle; so
it’s upside down and mirror-inverted
Telescope designs
The refracting telescope:
You look into a refracting telescope at the rear end. They are also called refractors, because they break the
light (Latin “fractere”=breaking). The light falls from the frontal lens onto a second lens and from there
through an “ocular” into the eye.
EN
The reflecting telescope:
You look into a reflecting telescope at the side. Reflecting telescopes are also called “reflectors”, because
they reflect the light (Latin “reflectare”=reflecting). The light falls through the frontal opening onto the big main
mirror. It reflects the light onto the small secondary mirror, which is located in the tube called “lens barrel”.
From there the light falls through the “ocular” into the eye.
Optics
Magnification
The size of a telescope is determined by the opening and the focal length. The opening is the diameter of the
objective lens or the main mirror and the focal length is the distance of the objective lens or the main mirror
to the focal point. The magnification can be change as desired through oculars with different focal lengths.
Here an example:
Telescope Seben 1000/114 > opening 114mm, focal length 1000 > magnification with a 10mm ocular
1000/10 = 100x
Light-gathering power
The light-gathering power is dependent on the diameter of the objective or the lens of the telescope. Simply
put: the bigger the diameter, the higher the light-gathering power. It increased squarely with the diameter.
The light-gathering power of the telescope is calculated like this: Opening² in mm² / 49
Example: Opening 114mm > light-gathering power 265 (calculation: 114² / 49 = 265)
Resolution
The resolution capability increases linearly with the size of the optical diameter and it makes it possible to
see things more detailed. The resolution capability is calculated like this: 138 / opening in mm
Example: Opening 114mm > 138 / 114 = 1,2“
Accessories for telescopes
Please note that this is a general information and that the mentioned accessories are not included in
the delivery of the telescope that you bought.
The ocular
A telescope is a tube with lenses or mirrors inside. It collects the light and
sends it out again through an opening The opening is also called “focuser”.
If you look into the opening without an ocular then you won’t see a sharp
image. It’s the ocular that collects and magnifies the light as a lens onto a
point of the retina in the eye. There is usually a number on the oculars.
The higher the number the less it magnifies the section of the image.
The ocular is put into the focuser. When you change the ocular you’ll see that the picture won’t be sharp
anymore with the new ocular. Every ocular has a different “focal point”, so it collects the light on a different
point than the last ocular. So it’s best to adjust the image and make it sharp again with every change of the
ocular. Use the wheels on the side to move the focuser in and out. Always start with the smallest
magnification. Take your time when you observe. You have to learn first how to observe with a telescope.
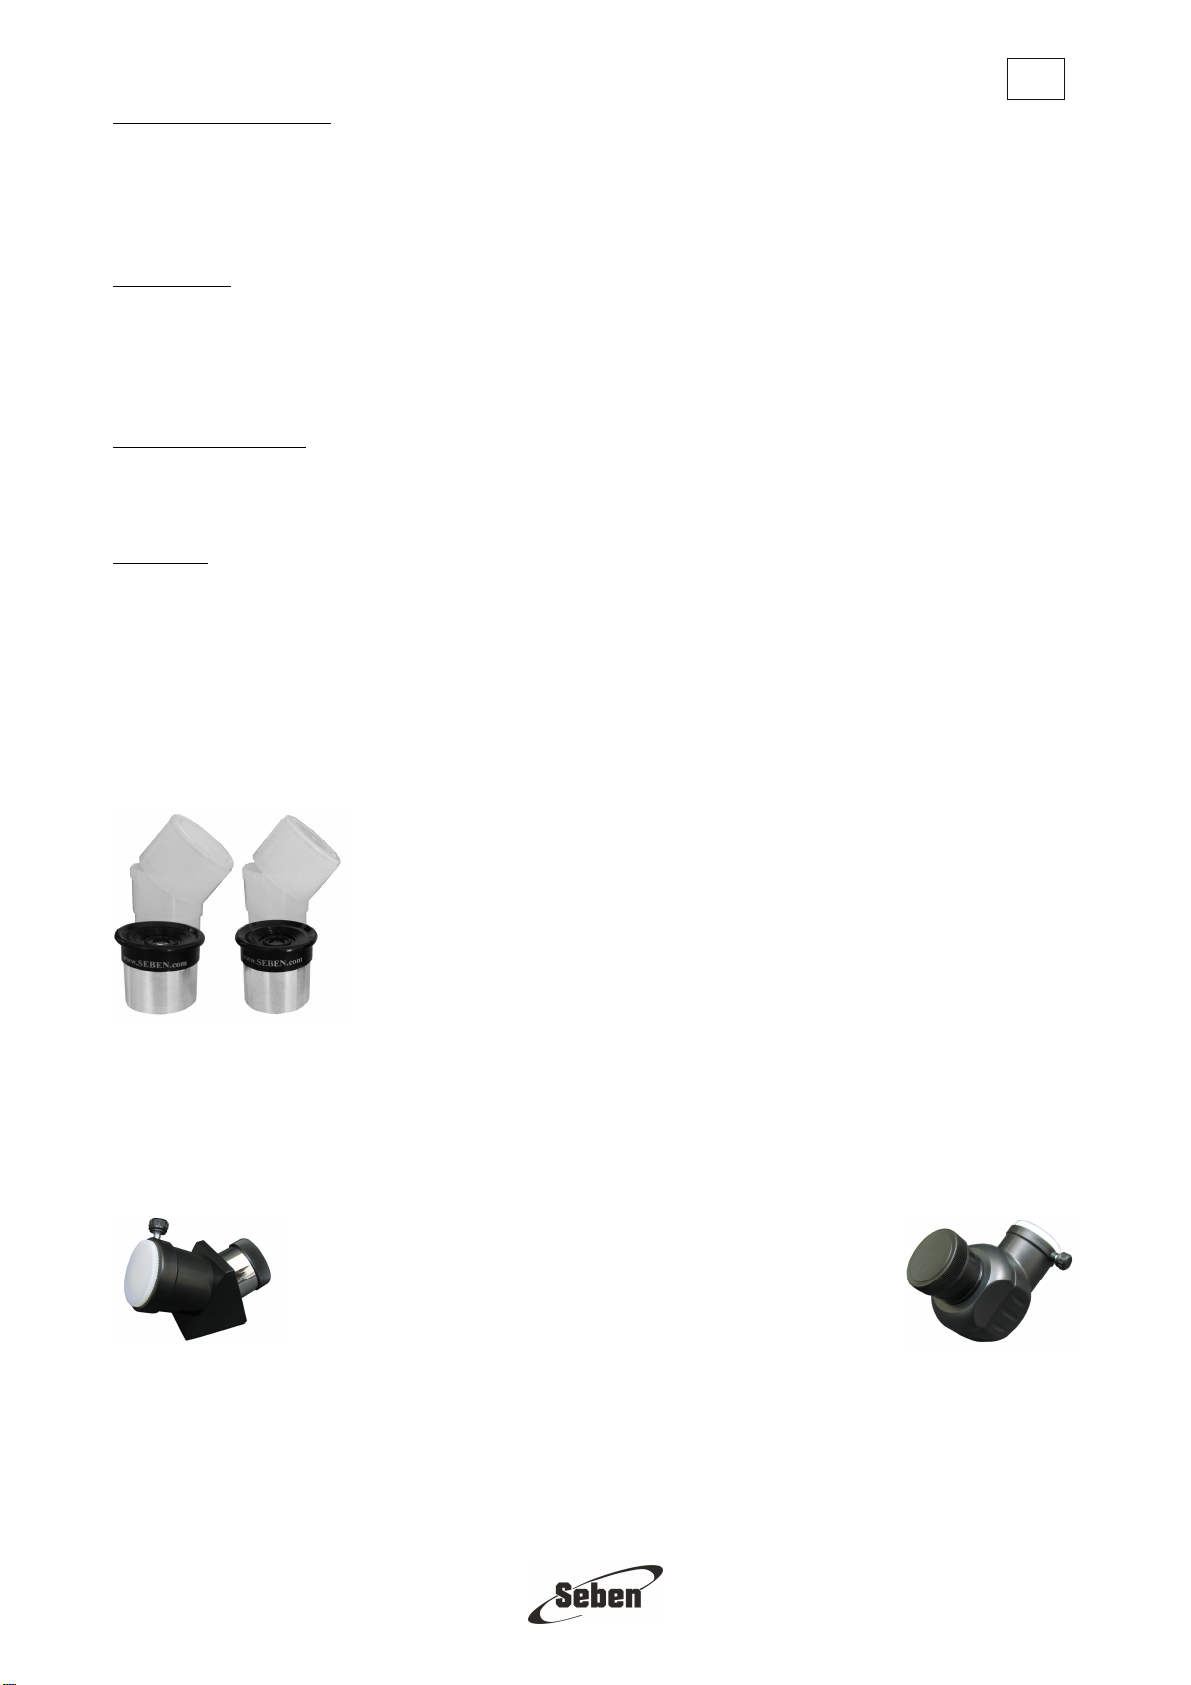
The diagonal (only for refractors)
The picture is upside down and inverted in astronomical
telescopes. The star diagonal is righting the picture again, so
that you can also comfortably make nature observations, but it
doesn’t correct the inverted image. It deflects the optical path by
90 degrees, so that it’s easier to observe objects near the zenith
through the ocular.
The Amici prism corrects both, so it rights the picture again by 180 degrees. Amici prisms are available with
a 90 degree and 45 degree deflection. Prisms are put into the focuser before the ocular.
Prisms are only used in refractors.

EN
The reversing lens (mainly in reflectors)
The picture is inverted in an astronomical telescope and upside down. This isn’t important for an
astronomical observation, but it is for a terrestrial observation. The reversing lenses make sure
that the image is upright, but not laterally correct in a terrestrial observation. The reversing lens
for telescopes is intended for occasional usage, because telescopes are only partly suited for
terrestrial observations. Reversing lenses are used with reflectors.
The Barlow lens
You can use special lenses like the Barlow lens to increase the focal length. The Barlow
lens increases the focal length and thus the magnification of a telescope. It has rating that
shows how high the increase of the focal length is. It’s written on the Barlow lens and
usually is 2x, but also 1.5x or 3x.
If you combine a 2x Barlow lens, for example, with a 60/900mm telescope, then the
resulting focal length is 1800mm. If you now put a 20mm-ocular into the Barlow lens, then
the magnification increases from 45× to 90×.
The moonfilter
The moon filter reduces the brightness of the moon and increases the
observation contrast. This way you can see the finer details of the moon
surface, which would otherwise get lost due to overexposure.
The color filters
The color filters are made to increase the contrast when observing
planets, so that you can see the details of the surfaces that are hardly
recognizable. Seben also offers an astronomy filter package as
accessory, which offers you the most important color filters in one
package. A reasonable addition, so that you can have an even better
observation.
Sun filters
Please note that the sun can’t ever be observed without the use of suitable filters. The person who doesn’t
adhere to this guideline will be punished by immediate non-reversible blindness. So be very careful and
thorough when observing the sun. Sun filters that are attached to the ocular are highly dangerous. They can
suddenly break due to the heat of the sun and expose the eye of the observer directly to the sun. This will
lead to an immediate and non-reversible blindness.
There are high quality sun filter foils in accessory shop that are being put in front of the telescope opening, if
you’re interested in observing the sun You have to always adhere to the warning messages of the
manufacturer when observing the sun!
The finder
Many objects in the sky can’t be seen with the naked eye, so you need
help to find them. A “finder” or the “finderscope”, a small refractor with an
ocular that has a low magnification and a large field of vision, is used for
that purpose. If it’s aligned parallel to the telescope, then you can easily
look for an object through the finder and then admire it through the
telescope.
EN
Our most popular accessories
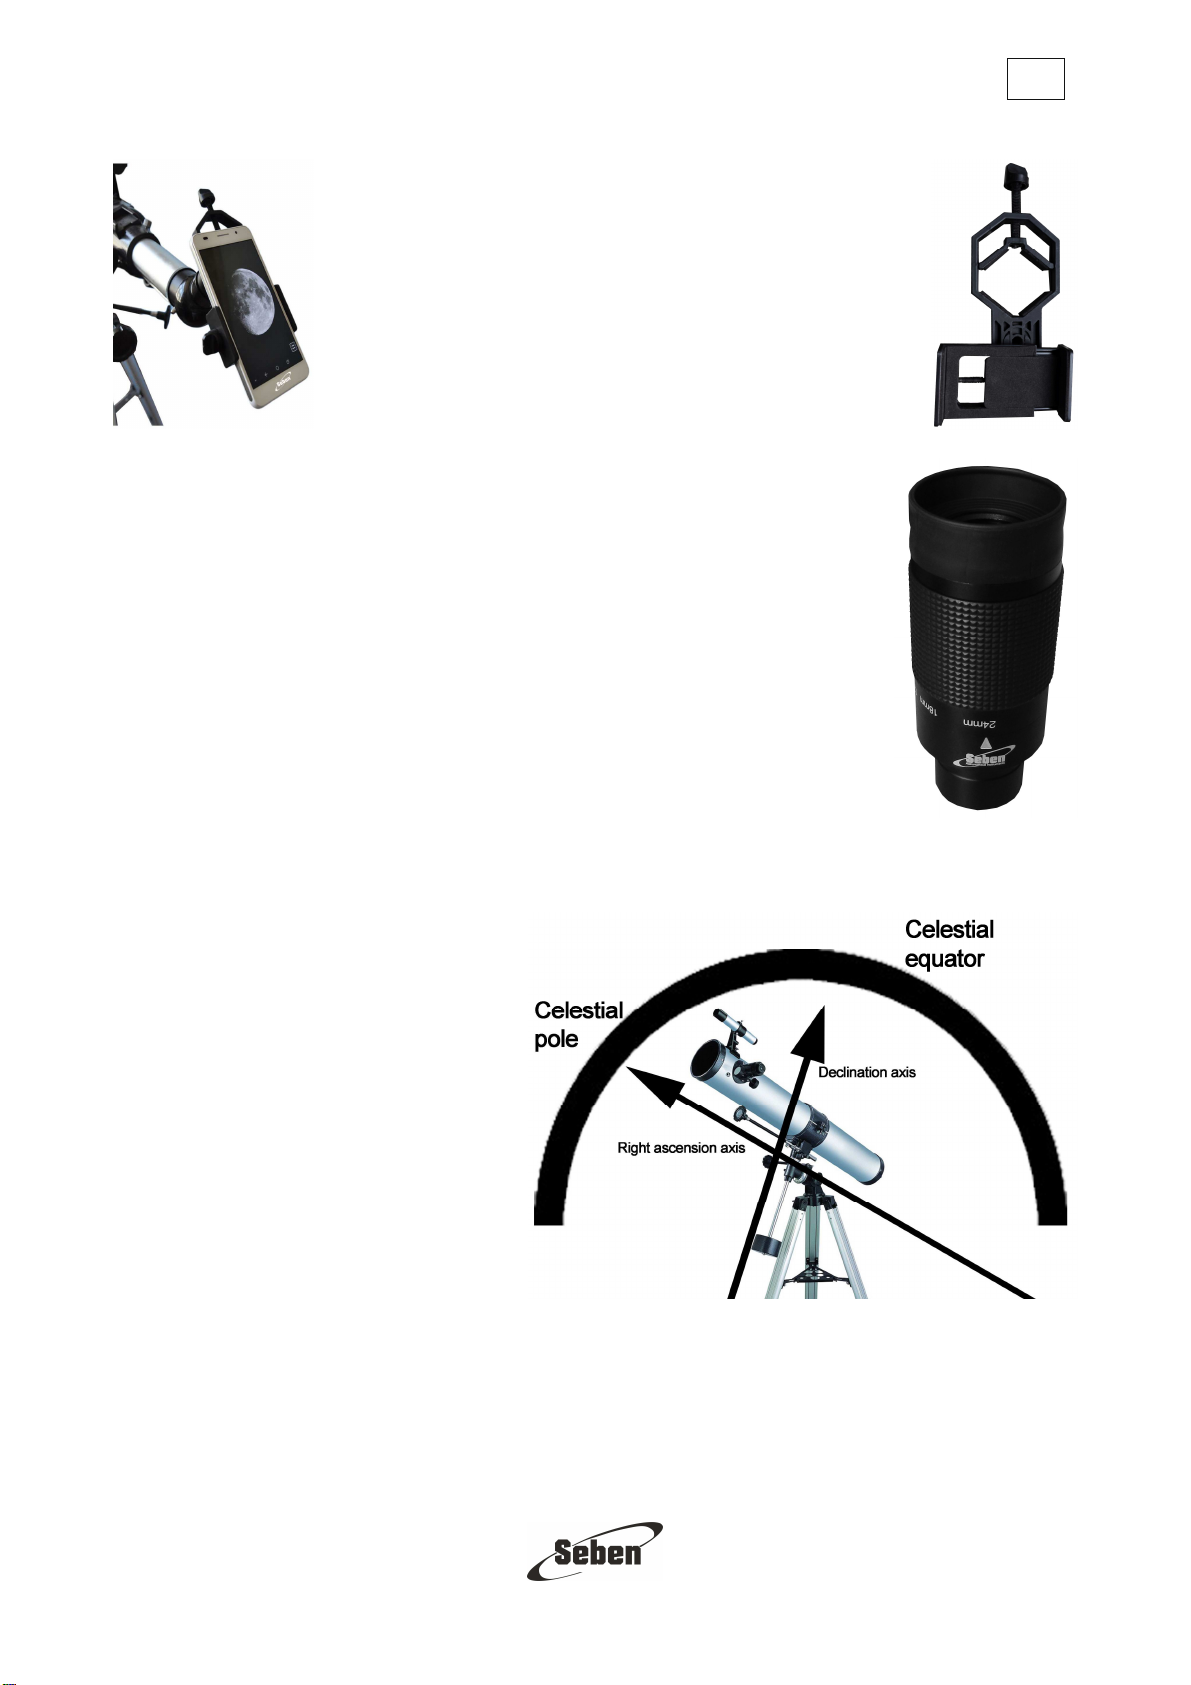
Smartphone adapter Seben DKA5
The DKA5 is a smartphone mount for your telescope and
ideal for making pictures and videos with your smartphone in
combination with the telescope. The DKA5 is simply
connected to the ocular of the telescope through a stable
clamping device. The smartphone is also connected with the
DKA5 this easily.
Seben 31,7mm 1,25“ Zoom 8-24mm FMC Telescope Ocular
Since 2004, the Seben Zoom 8-24mm FMC Ocular is the most sold Seben
ocular of all times and is being used a thousand times by astronomers
around the world with the greatest satisfaction.
Countless test reports, comparison tests and hundreds of statements in
astronomy forums and blogs about our Seben Zoom 8-24mm FMC Ocular
clearly show: The original Seben Zoom 8-24mm FMC Ocular in this FMC
production quality and processing can only be found here.
Perfect to cheaply cover many focal lengths with only one ocular. It’s also
ideal for putting together a space-saving equipment for travels or for mobile
observations.
If you own a beginner telescope with simple standard oculars and if you want
to have more fun with astronomy in a cheap way, then you’ll experience an
incredible increase in performance when you’re using the Seben Zoom 8-
24mm FMC Ocular.
The paralactic mount
Both axes are aligned to the axis of
the earth, whereby one axis is
adjusting the right ascension and
the other axis the declination. For
tracing you now only need to adjust
the right ascension.
The right ascension axis is set to
the celestial pole, also called polar
star, whereas the declination axis
points to the celestial equator.
Handling this kind of mounting has to be learned, because it’s set up to follow the apparent celestial
movements.
This kind of mounting is very good for DeepSky observations or also for astrophotography, because the
paralactic mounting follows the movement of the stars (see above).

EN
Setting up the telescope
Put the package on a save underground and open it carefully.
Get ALL boxes out of the package, because they are also on one another. Empty boxes are merely there to
ensure the transportation.
Put all components on a save and flat
underground, so that you can see them
properly. Be careful to not damage the lens
barrel and to not lose the small screws.
For the erection of the tripod we need
the following parts:
3 tripod legs, tripod mount, ocular shell,
3 screws with female screw, 3 screws
with butterfly nut, maybe 3 screws to
fixate the tripod (if they aren’t already
there).
At the tripod mount there are three
mountings. Take one tripod leg and
slide the upper connecting piece
carefully to the mounting of the tripod
mount. Ensure that the holes for the
screws are at the same spot. You
can simply take a look from the side
to see if the holes are aligned
fittingly.
EN
Also especially ensure when
setting up the tripod leg that the
mounting for the ocular shell is on
the inside!
Remove a butterfly nut from one
of the three screws and put the
screw through the hole, so that
the connection of the tripod and
the mounting of the tripod mount
is fixated.
Now the first leg is mounted and it
should look like on the picture here.
The tripod leg and the tripod mount
are firmly connected and the mounting
for the ocular shell is pointing
inwards.
Repeat these steps for the mounting
of the tripod leg and mount the second
and third leg the same way.
All mountings for the ocular shell point
inwards.
If the 3 screw to fixate the tripod legs
aren’t attached already, then please
screws them into the tripod legs.
Raise the mount for the
ocular shell on the tripod
and place the corner of
the ocular shell as far
outside as possible. Now
insert the small screw
with the wing nut and
pull it tight carefully.
Repeat with the
remaining two brackets.
EN
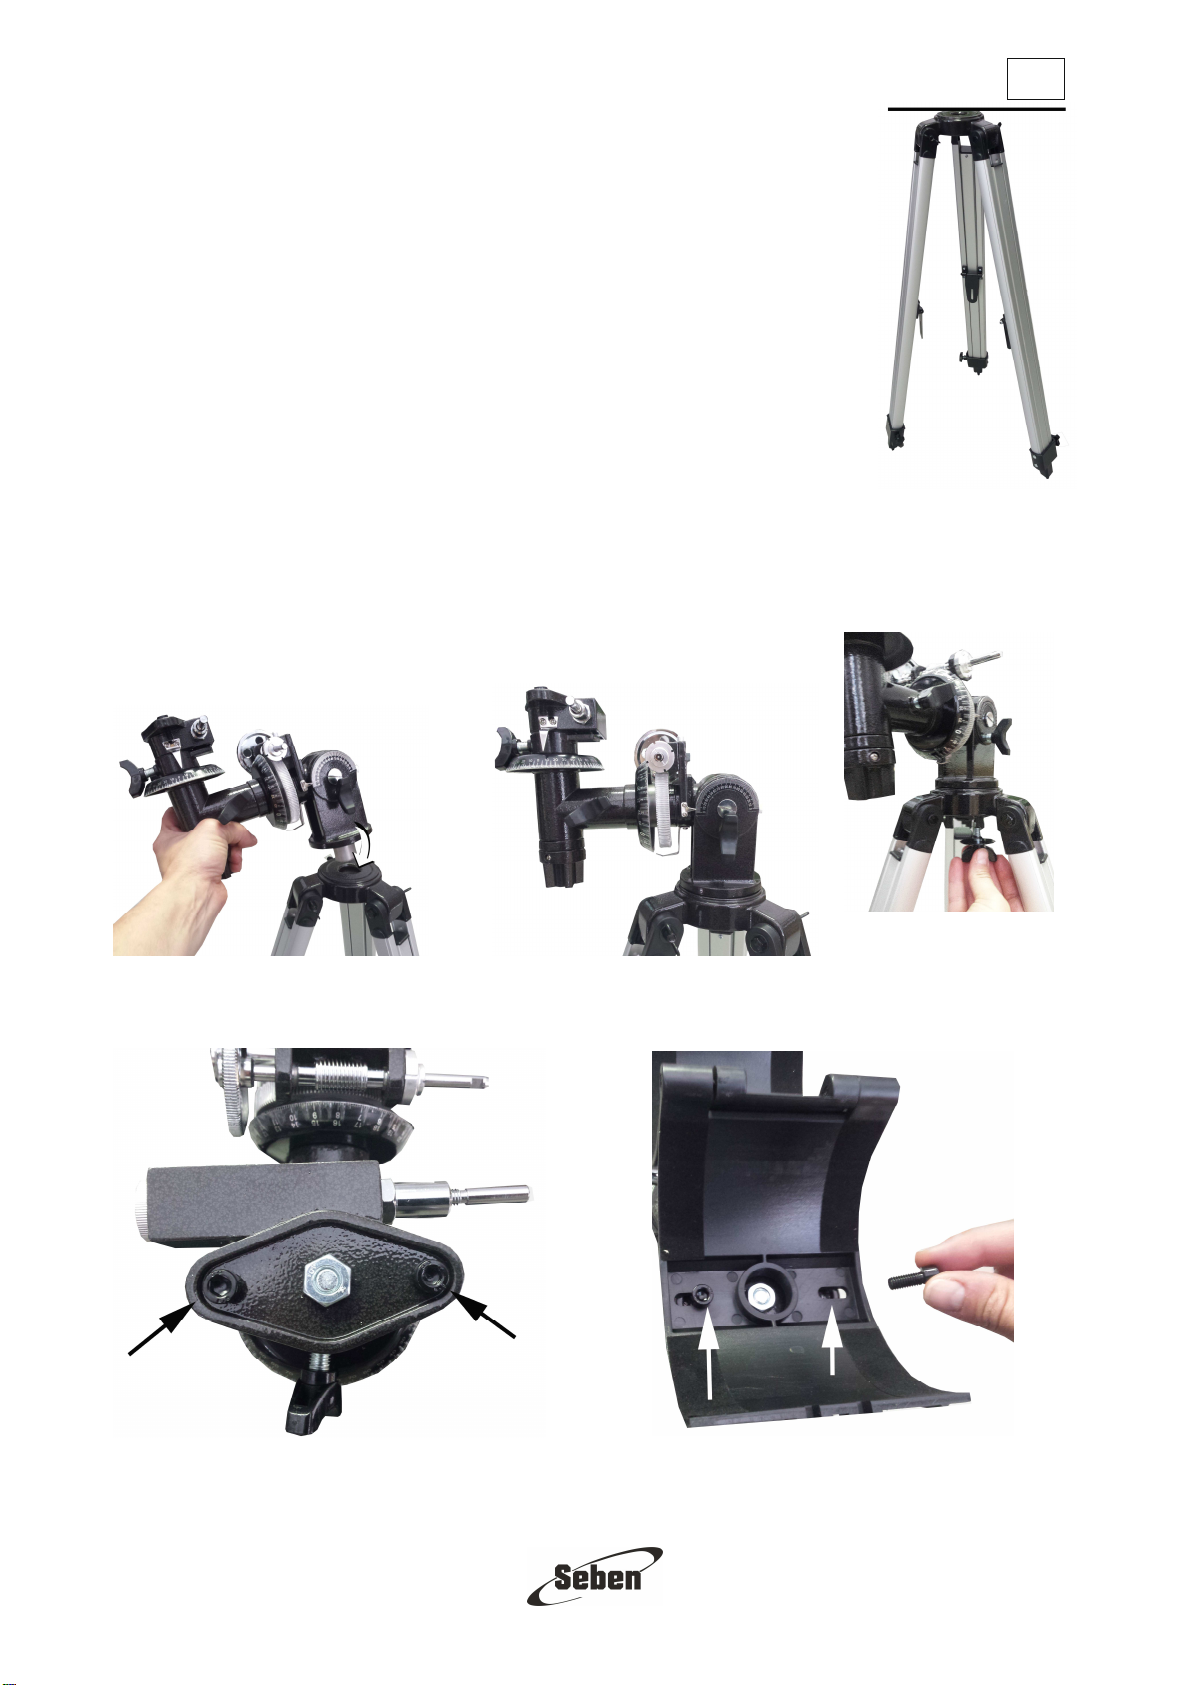
You have now successfully assembled the tripod.
Set the tripod on a stable and plane surface so that it is stands horizontally. To
ensure maximum stability, the tripod legs should be maximum spread, but not
completely pulled out.
Setting up the telescope
The mounting is set-up absolutely horizontal. A water level is very helpful in this case.
Put the mounting on the tripod mount and screw it together from below
Rotate the declination axis of the mounting
upwards, if needed, and attach the telescope tube
ring. To do that, unscrew both screws from the
mounting socket for the telescope tube ring.
Now attach the telescope tube ring correctly. Put the
screws back in, through the holes in the telescope tube
ring, and tighten them.

EN
Attach the fine movements shafts.
To do that, remove the small protective rubber
studs from the locating bolts, if necessary.
Take the weight and slide it onto the weight rod.
Screw the rod correctly into the mounting from
below.
Put the tube into the telescope tube ring and close
the telescope tube ring at the side. Make sure that
the declination shaft is pointing towards the ocular.
Loosen and remove the screw heads on the front
tube and put the viewfinder on the screws.
Then screw the heads back on the screws so that
the viewfinder is firmly on the tube.
Make sure that the narrow end points towards the
focuser. This is the opening to look into.

EN
Adjustment of a paralactic mounting
Every paralactic mounting has two axes, which each
can be opened, moved and closed again. These are
the right ascension axis and the declination axis.
If you’ve adjusted and aligned the telescope
correctly, then the advantage of this paralactic
mounting is that you now can only track the celestial
objects through the fine movement with the shafts.
You can control the movement automatically
through an additionally attached motor
(available in Seben’s accessories program).
The adjustment of the mounting is important, because both axes have to stand level. This has the effect that
the telescope, no matter how it’s positioned, won’t tip over sideways due to the unilateral overload. Think of a
seesaw: if one side has more load on it, then it will sink downwards.
On the one hand this affects the tube, which has to be level in its telescope tube ring: it shouldn’t tip over
sideways when the axis is opened.
On the other hand it affects the axis of the tube and the weights. Also here, if the axis is opened, then neither
the tube nor the counterweight should drift off.
If now both sides have the same weight, like with a seesaw, then they are in balance and adjusted.
We’ll now explain you how to do that in detail.
We first adjust the right ascension axis. This axis
affects the tube and the rod with the weights.
First bring the telescope tube and the
counterweight in a horizontal position. Now you
can see if a side is heavier than the other and if it
slumps downwards.

EN
Loosen the right ascension clamp. It holds the
axis. If you loosen this clamp, then the axis is
freestanding and can be moved like a seesaw.
The side of the telescope tube or the side of the
counterweight will now probably sink downwards.
It depends on which side is heavier.
Depending on if the tube or the counterweight
sinks down, move the counterweight on the rod to
achieve a balance.
If you achieved that, then secure the
counterweight and close the right ascension
clamp.
You’ve now adjusted the right ascension axis. That means that this axis will now always be level,
independent from the position the telescope is in.
Now we just have to balance the second axis. This
affects the tube. We need the declination clamp to
do this. It ensures that the tube won’t move and is
locked or in other words, that the tube can be
moved if it’s open.
So now open the declination clamp. The tube is
now freestanding and you’ll see that it perhaps
has excess weight on one side and slumps down.
The sample principle as with a seesaw applies
here.
To correct that, slightly open the clasp of the
telescope tube ring, so that the tube can be
moved back and forth. Move the tube until it
doesn’t move anymore by itself (meaning it won’t
slump down on one side) and then close the
declination clamp again.

EN
You have now successfully assembled the tripod.
First observations
Set up the telescope outside at least half an hour before the beginning of observation so that it can cool
down.
Please take the lid from your telescope and remove the
cap from the eyepiece.
Insert eyepiece on reflectors
Before you focus on your first goal, put an eyepiece with a
magnification as small as possible, thus with a large number (for
example, 20mm), in the focuser.
Now take out the eyepiece of the protection container and put it in the
focuser. Then tighten the side screw on the focuser so that the
eyepiece can no longer move.
Aligning the finderscope
Check whether the telescope and the viewfinder have been set correctly.
The finder scope must be precisely adjusted in parallel to the main telescope.
Pick a distant object, such as a tower or a light spot.
Put an eyepiece with the smallest possible enlargement, ie with a large
number (for example, 20mm), in the focuser. The sharpness can be set
on the side with the wheels.
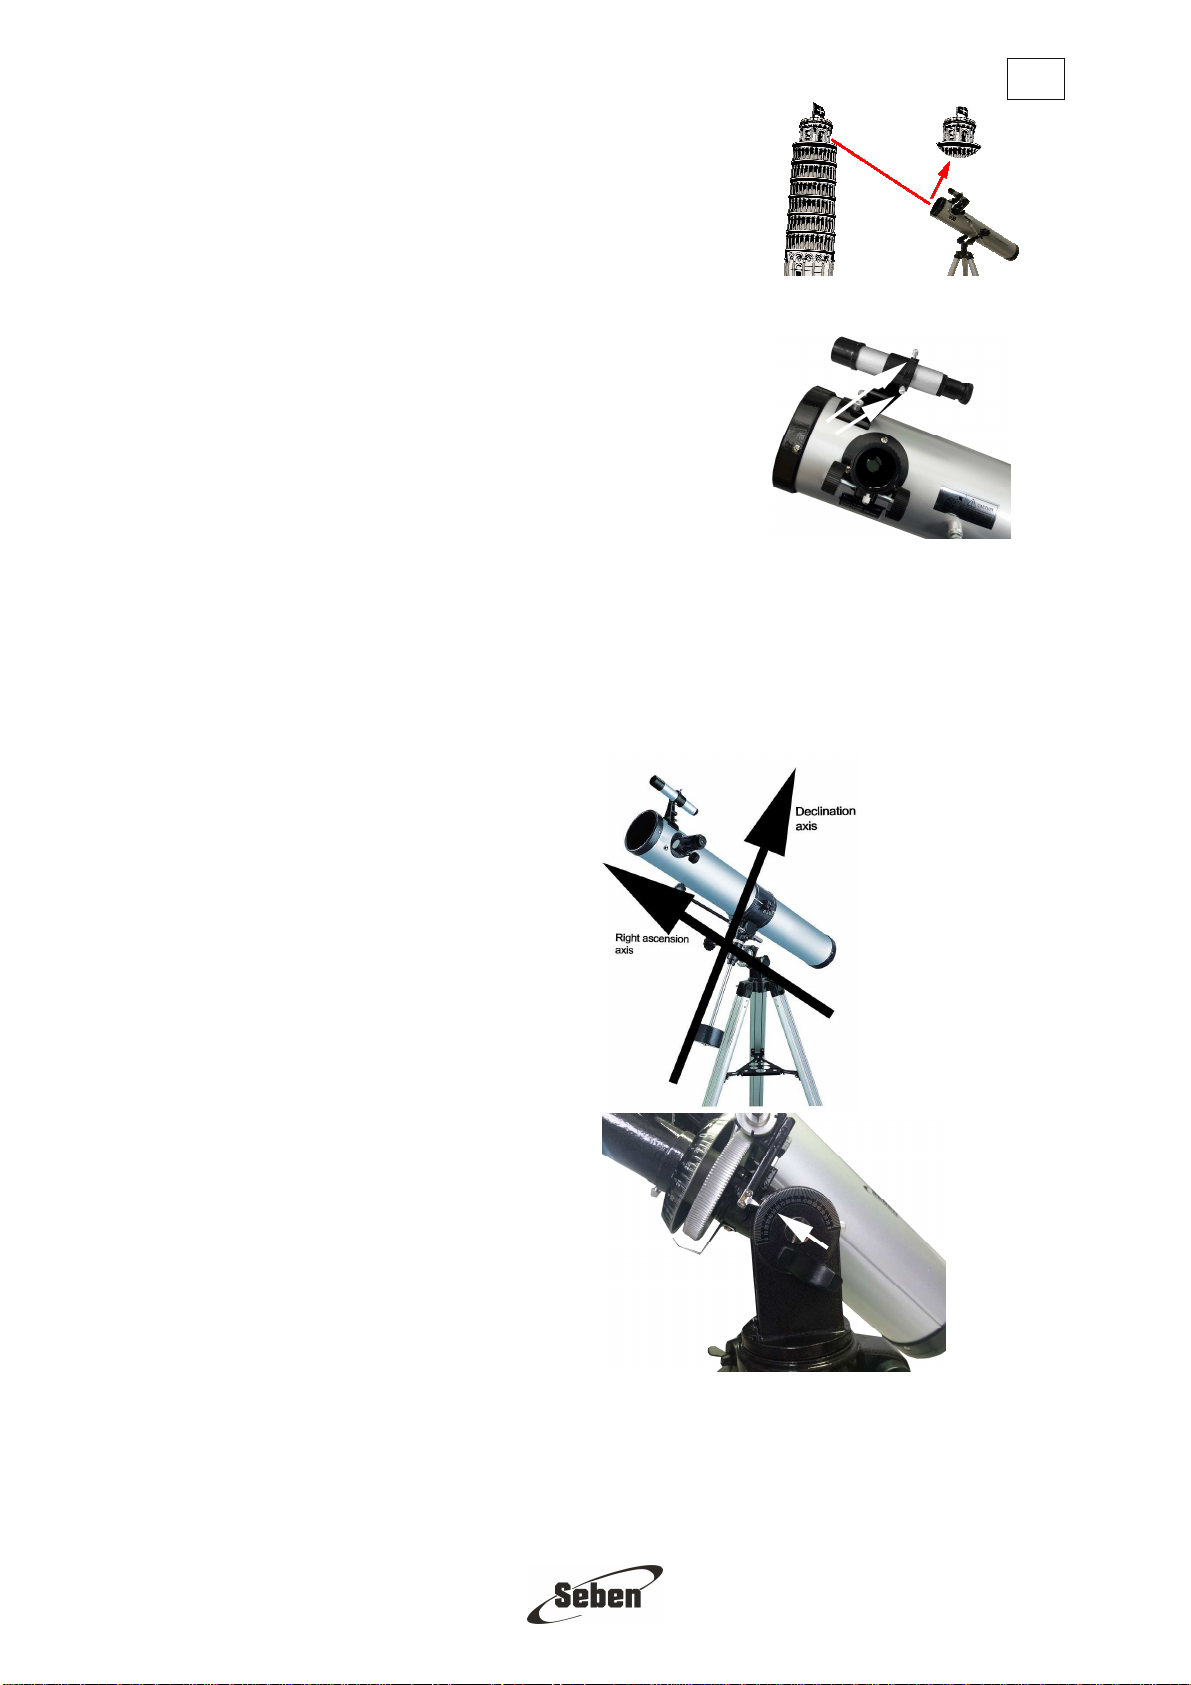
EN
Look through the telescope and place it on position on the top of the
tower.
Look through the viewfinder tube. If you do not see exactly the same
image, adjust the viewfinder tube. On the search tube you will find small
screws, which can be used to adjust the viewfinder tube until the object
can be seen exactly in the viewfinder tube. Then you have aligned
telescope and finder telescope parallel to each other. If you encounter
the viewfinder, repeat the procedure.
The viewfinder should be set up before each observation.
Aligning the telescope with a paralactic mounting
Important information: We’re trying here to explain to you the alignment of a paralactic mounting as easily
and descriptively as possible. But you should still bear in mind that difficulties can arise, despite the
instructions. So please don’t be afraid to look for any additional help. Construction videos on the Internet are
very helpful here, like the ones you can find on Youtube.
You have to align the telescope so that you can find the celestial objects later. Please remember that the
mounting, therefore the tube and the opening, points northwards. You can use a compass here.
First align the right ascension axis (polar axis), with
the help of a compass, northwards. That means that
the telescope tube, with it’s opening, points towards
the polar star.
Now look through the finderscope and aim at the
polar star. The polar star should be visible in the
middle of the visual field of the finderscope.
Now adjust the correct latitude.
You can adjust the latitude with the altitude
adjustment T-bolt on the lateral latitude scale. You
can find out the exact latitude of your location on the
Internet.
The latitude in Germany is usually about 50
degrees. You’re adjusting the latitude by turning the
altitude adjustment T-bolt. The telescope tube will
then tilt in this angle.
You can now trace the movement of the stars, if you found a celestial object, through the tracking of this right
ascension axis. We want to explain this to you briefly: The celestial objects seem to move in a circular path,
because the earth rotates. If we don’t move the telescope and just keep looking at one point, then the
celestial object will be soon out of your visual field.
But if you’ve adjusted and aligned the telescope correctly, then only the fine adjustment with the shafts is
necessary, so that you can observe the object, without it disappearing from your visual field.

EN
How to use the moon filter?
The moon filter can be screwed by means of its
socket in the socket of the eyepieces. The moon filter
and the eyepiece, you can then use as usual in the
focuser. If you replace the eyepiece, you should also
screw the filter out and back in.
How to use a color filter?
Like the moon filter, the single color filter is screwed
into the eyepiece and then inserted into the eyepiece
output with the eyepiece.
How to use reversing lens and barrio lens?
First place them
in the eyepiece
and then insert it
into the
eyepiece.

EN
What to look for in the sky:
The moon
The moon is the easiest target to find in the night. When it is in the full position, when the entire face is lit,
then it bathes the night with a silvery light washing out the rest of the sky from all but the brightest objects.
The best time to view the moon is actually not when it is full by rather anytime up to the first quarter, this is
when the face appears to be half lit up.
The terminator on the moon, the dividing line between dark and light, shows the best features such as
craters and mountains.
The planets
The planets are our solar system companions. These range in size from moon size rocky bodies to giant gas
balls which could hold 1000 earths. To find the planets requires some information as to when they are
visible. An astronomy magazine such as SkyNews or Sky and Telescope will give you the locations of the
planets from month to month. Most people who have looked up at night have probably seen some planets
but did not realize it. A planet, when it is well clear of the horizon will not twinkle as do the stars. They are
resolved by the eye as tiny balls as opposes to the stars which are infinitely small points of light. The easiest
planets to view are Venus, Mars, Jupiter and Saturn, Uranus and Neptune. Mercury is an object to look for
but it is usually below the horizon and often is a challenge to find. Pluto is too small for most telescopes
below 10'‘ so do not worry about finding it at this time.
Each of the planets has its own interesting views. Venus is covered with clouds. So all we see is an
extremely bright light, the brightest next to the moon. However it goes through phases like our moon. In other
words the planets surface will, as it travels around the sun, appear to have different amounts of it lit up. This
gives the planet varying crescent shapes, as if a bite were taken out of it.
Beyond our solar system there lies a multitude of objects to be found. Galaxies, nebulae and star clusters
abound.
What you can discover on the night sky
Finding objects in the sky
You need a lot of time to look for and find objects in the sky, especially when you’re using a telescope for the
first time. But consider that you have to first learn to orientate and this is easier in the beginning with simple
and bright objects. The disappointment here isn’t big as well, because astronomical objects don’t look like we
know them from books or the Internet, except for the moon.
Looking for bright sky objects
Try to see the moon first. Search for the moon in the finder, to observe it. When it’s in the middle there, then
it should also be in the middle in the ocular as well. Now look through the ocular and turn the wheels of the
focuser until the image is sharp. You’ll find countless craters, partially with small central mountains in the
middle. It’s important that the finder is first adjusted in parallel to the telescopic tube.
Star hopping
The first observations can be very irritating, because the picture in the telescope is upside down and inverted
and the picture of the map of the stars looks different. This effect can be reversed with a reversing lens when
doing terrestrial observations, but if you’re doing sky observations then you shouldn’t use it, because the
combination of lenses is impeding the light-gathering power of the telescope. You’ll get used to the unfamiliar
view with a little bit of practice and patience and you’ll orient yourself better.
If you’re starting with the search for objects then you should first select points from constellations which you
can see the whole year. One example would be the Great Bear. In the beginning just watch the sky with the
naked eye and find the constellation, a map of the stars is helpful here.
Then if you found the constellation, search for the confining main stars. Now you can target one of these
stars. Take your time and be patient to successfully master this; even many tries are not unusual even for
experienced astronomers. Be careful to not zoom too much, because the movements will be getting larger
and it blurs very quickly.
Focus
Many beginners oftentimes have the problem that the targeted object can only be seen blurred. In a
telescope the gathered light rays are focused through mirrors and/or lenses to the outside into the eye, so
that we can see something, for example the moon. You can use the wheels on the focuser to turn it in or
out, whereby you adjust the focal point of these concentrated light rays. If you change the ocular then you
have to readjust the focus. Please note that the higher the magnification is, the harder it is to adjust the
focus.

EN
Care and cleaning of Optics:
WARNING: Improper cleaning of optical components may void the warranty!
Optical components of a telescope will over time get dirty. The amount of dirt and or dust collected onto a
lens or mirror should only be removed with the utmost care and this is at times best left to people with
experience in this procedure. A considerable amount of dirt or dust must be present on the optical surface
before one will notice the effect visually.
1. Keeping the dust caps during storage of the telescope will reduce the amount of dust collected.
2. After using the telescope there might be dew condensation on the optical surfaces. When the telesecope
is brought inside remove the dust caps und allow the moisture to evaporate naturally. Point the telescope
downwards so as to minimize the collection of airborne dust.
3. Once the moisture is gone then replace the dust caps.
4. If you wish to remove dust from the lenses or mirrors you first should try using a can of filtered
compressed air. Remove the dust cap and the dew shield in the case of the refractor style of telescope, or
take the mirror cell out of the reflecting type. Once you are able to freely blow across the surface of the
optics then begin by first pointing the can away from the piece and gently expel some air. This will remove
any condensate in the air can lines and clear off dust that may have accumulated on the discharge tube.
Next using short quick bursts of air carefully remove the dust particles.
DO NOT HOLD THE TRIGGER OF THE COMPRESSED AIR FOR TOO LONG AS CONDENSATE MIGHT
BE BLOWN OUT ACROSS THE OPTICAL SURFACE.
The optics of your telescope should last a long time before they generally require major cleaning. By keeping
the dust caps on and avoiding the temptation to handel the lenses or mirrors you will find that very little is
need in the way of optical maintenance.
Common problems with telescopes
- Did you remove the lid and put an ocular in? Did you not only remove the small, but also the big lid
completely? With the lid on and without the ocular, too little light gets into the telescope and all you
see is black. Remove the lid and put the ocular in.
- Did you adjust the finder in parallel to the telescope? If this isn’t the case, then you might target an
object with the finder, but you won’t see it through the telescope. Adjust the finder.
- Did you start with a magnification that is too high? This can be the reason for a black image. It’s best
to start with a small magnification, adjust the image so that it’s sharp and then slowly increase the
magnification. You’re making the image sharp by moving the focuser in or out through the wheels on
the side.
- Didn’t you make the object sharp enough through the focuser? You’re making the image sharp by
moving the focuser in or out through the wheels on the side.
- Is the telescope adjusted? The mirrors can move, because of the transport. If they’re too much out of
alignment, then the telescope will show a worse image on higher magnifications. A laser collimator
can help in this case to adjust the telescope.
- Did you let the telescope cool down enough outside? Otherwise the instrument can’t display an
image properly.
Table of contents
Other Seben Telescope manuals


Popular Telescope manuals by other brands

Orion
Orion SkyQuest XT12 IntelliScope instruction manual

Newcon Optik
Newcon Optik SPOTTING SCOPE 15-45X60 Operation manual

cassini
cassini C-80 operating instructions

Celestron
Celestron NexStar 60 instruction manual

Orion
Orion XT4.5 instruction manual

Orion
Orion SkyView Deluxe 90mm 9401 instruction manual
EASTCOLIGHT
EASTCOLIGHT GALAXY TRACKER 60 quick start guide

Celestron
Celestron LandScout instruction manual

DayStar Filters
DayStar Filters SolaREDi manual

ESA
ESA ItsImagical 225X manual

Celestron
Celestron PowerSeeker 114EQ Specifications

ORION TELESCOPES & BINOCULARS
ORION TELESCOPES & BINOCULARS SkyQuest XT10 9810 instruction manual


