Secufirst HDNVR-7R User manual
High Denition Wireless Digital
Video Recorder
Installation and Operating Instructions
Model: HDNVR-7R
Version 2.0
PLEASE READ THESE INSTRUCTIONS CAREFULLY BEFORE USING THIS PRODUCT
AND KEEP THIS MANUAL FOR FUTURE REFERENCE.

1
CONTENTS
IMPORTANT SAFETY PRECAUTIONS ..........................................................................................2
OVERVIEW .....................................................................................................................................4
FRIENDLY REMINDER ...................................................................................................................5
KIT CONTENT ................................................................................................................................6
KNOWING YOUR DEVICES ...........................................................................................................7
Wireless Digital Monitor ...........................................................................................................7
Wireless Digital Outdoor Camera ..............................................................................................9
Motion Detection .....................................................................................................................10
INSTALLING YOUR DEVICES ...................................................................................................... 11
Installing your camera ............................................................................................................. 11
Setting up your monitor ...........................................................................................................13
Live Screen Displays...............................................................................................................15
Quick Select Menu ..................................................................................................................16
SYSTEM OPERATION ..................................................................................................................17
Main Menu ..............................................................................................................................17
Camera Setup.........................................................................................................................18
Recorder Setup.......................................................................................................................20
Detection Sensitivity................................................................................................................22
Motion Area.............................................................................................................................23
Event List................................................................................................................................25
System Setup..........................................................................................................................27
Storage Setup.........................................................................................................................29
SETTING UP YOUR DEVICE ........................................................................................................31
Add Device .............................................................................................................................31
APP INTRODUCTION ...................................................................................................................33
App Main Control Menu...........................................................................................................35
Push Notication .....................................................................................................................37
Remote Setting .......................................................................................................................40
Recorder Setup.......................................................................................................................41
System Setup..........................................................................................................................45
Storage Setup.........................................................................................................................48
Push Notication Setting .........................................................................................................49
Factory Default Setting............................................................................................................51
TROUBLE SHOOTING .................................................................................................................52
PRODUCT SPECIFICATION .........................................................................................................54

2
IMPORTANT SAFETY PRECAUTIONS
Damages caused by non-compliance with this operating manual will void the warranty! We will
not assume any liability for damages to items or persons caused by improper handling or non-
compliance with the safety notices! Any warranty claim will be null and void in such cases.
1. Do not drop, puncture or disassemble the camera; otherwise the warranty will be voided.
2. Avoid all contact with water, and dry hands before using.
3. Never tug on the power cords. Use the plug to unplug it from the wall outlet.
4. Do not expose the camera to high temperature or leave it in direct sunlight. Doing so may
damage the camera or cause camera temporary malfunction.
5. Use the devices with care. Avoid pressing hard on the camera body.
6. For your own safety, avoid using the camera or power off the camera when there is a storm or
lightning.
7. Remove the power adapter during long periods between usages.
8. Use only the accessories and power adapters supplied by the manufacturer.
9. To meet the regulations pertaining to parental responsibility, keep the devices out of the reach of
infants.
10. Check power cables, do not get crushed or damaged by sharp edges whenever the devices are
in operation.
FCC Compliance Statement: This
device complies with Part 15 of the
FCC rules. Operation is subjected to
the following two conditions: (1) this
device may not cause harmful interference, and (2) this
device must accept any interference received, including
interference that may cause undesired operation.
Products with CE Marking comply
with EMC Directive (2014/30/EU);
Low Voltage Directive (2014/35/
EU); RED (2014/53/EU); ROHS
Directive (2011/65/EU) issued by the Commission
of the European Community. Compliance with
these directives implies conformity to the following
European Norms:
EMC: EN 301 489
LVD: EN 60950
Radio: EN 300 328

3
FCC/CE WARNING
This equipment has been tested and found to comply with limits for a Class B digital device,
pursuant to Part 15 of the FCC rules and ETSI(EN) 300328. These limits are designed to provide
reasonable protection against harmful interference in residential installations. This equipment
generates, uses, and can radiate radio frequency energy, and if not installed and used in
accordance with the instructions, may cause harmful interference to radio communications.
However, there is no guarantee that interference
will not occur in a particular installation. If this equipment does interference to radio or
television equipment reception, which can be determined by turning the equipment off
and on, the user is encouraged to try to correct the interference by one or more of the
following measures:
• Reorient or relocate the receiving antenna.
• Move the equipment away from the receiver.
• Plug the equipment into an outlet on a circuit different from that to which the receiver is
connected.
• Consult the dealer or an experienced radio/television technician for additional suggestions.
You are cautioned that any change or modications to the equipment not expressly
approved by the party responsible for compliance could void your authority to operate
such equipment.
DISPOSAL
If the camera system no longer functions or can no longer be repaired, it must be
disposed of according to the valid statutory regulations.
Disposal of spent batteries/accumulators:
You are required by law (Battery Ordinance) to return all spent batteries and
accumulators. Disposing of spent batteries/accumulators with common household waste is
prohibited! Batteries/accumulators that contain hazardous substances are marked with the symbols
on the side. These symbols indicate that it is prohibited to dispose of these batteries/accumulators
in the household waste. The abbreviations for the respective heavy metals are: Cd=cadmium,
Hg=mercury, Pb=lead. You can return spent batteries and accumulators that can no longer be
charged to the designated collection points in your community, outlets or wherever batteries or
accumulators are sold. Following these instructions will allow you to fulll the legal requirements
and contribute to the protection of our environment!
CAUTION
• This product is designed with built-in high sensitivity microphone. Please keep the camera away from
the receiver (at least 3 to 5 meters in distance) to avoid continuous howling noise to occur, otherwise
please adjust receiver volumn to low if the location of camera(s) is near by the receiver.
• Do not insert or remove memory card and/or HDD (external/internal version) while the system is in
operation. This may cause system to malfunction and/or damage the storage media. It is strongly
recommended to format the memory card and/or HDD prior the initial operation of the system and
periodically afterwards.

4
OVERVIEW
The HDNVR which can receive video and audio data from Hight Definition Digital Wireless
Cameras (supports up to 4 cameras), and is able to store received data to the HDD. You are able
to view the data in real-time, or at later time. Remotely have live-view via mobile device(s) with
Internet connection.
The Digital Wireless Camera(s) is able to wirelessly transfer compressed video and audio data
in digital format which offers efficient, secure and ‘Interference Free’ wireless connection to the
HDNVR unit.
The method of transferring audio and video is secure and private, and eliminates the need of
running cable(s) between the monitor and the cameras, ensures quick and easy installation with
minimum cost at the same time.
△
BEFORE THE PRODUCT IS INSTALLED
‧Please read the operation manual carefully.
‧ Please unpack all boxes carefully and identify that all the parts are present.
‧Make sure you use only the recommended power supplies. Damage caused to the camera
or receiver by incorrect voltage or wiring is not covered by the warranty.
‧Cutting any cable will void the warranty.
‧Do not drop, pierce or dismantle the camera or receiver.

5
FRIENDLY REMINDER
The state of High Definition Wireless Digital Video Recorder is capable of deliver high quality
video to your smart-mobile device(s), which would require higher internet bandwidth. Due to your
local internet environment condition, your mobile device(s) may display black-screen or temporary
disconnect to the HDNVR.
*
For best performance, please keep the camera and monitor minimum 1 meter away form the
receiver and Wi-Fi router.
* Make sure the HDNVR is operating with sufcient internet bandwidth, 1.5Mbps (upload speed) is
suggested.
* For best performance, the smart-mobile device(s) need to be on Wi-Fi or 4G mobile network
in order to receive maximum download speed.
* When the APP automatically switch to Relay Mode:
‧By adjusting image quality to “low” or set to 720P HD resolution in the camera setting section,
connection will be improved.
* Your internet bandwidth is limited. For best performance, avoid more than two users
connecting to the HDNVR simultaneously.
* Make sure your smart-mobile device(s) is equipped with up-to-date technology, Guard-core 1.9GHz
or higher is suggested.
* Please make sure the memory card used is CLASS10 rated. And insert or remove memory card
when the Digital Wireless Receiver Console is power OFF.
* Before using the memory card/ HDD for recording video, you MUST format the memory card/ HDD
on the console.

6
Minimum System Requirement for HDNVR:
*Digital Wireless Outdoor IR
Camera
*Camera Stand
*Camera / ReceiverDigital Wireless Receiver
Console
Ethernet Cable
x 1
x 1
*For Networking:
- DHCP enabled router
- 1.5Mbps or above upload bandwidth (both home and mobile device)
- iPhone 5 / Mini iPad 2 or above
- Android 1.9GHz Guard core or above
Camera / Receiver Adaptor
x 1
*Camera power
adapter-5V/1.5A
HDNVR power
adapter-12V/2A
Screw Pack
x 4
For Camera
KIT CONTENT
*Quantity varied subject to conguration

7
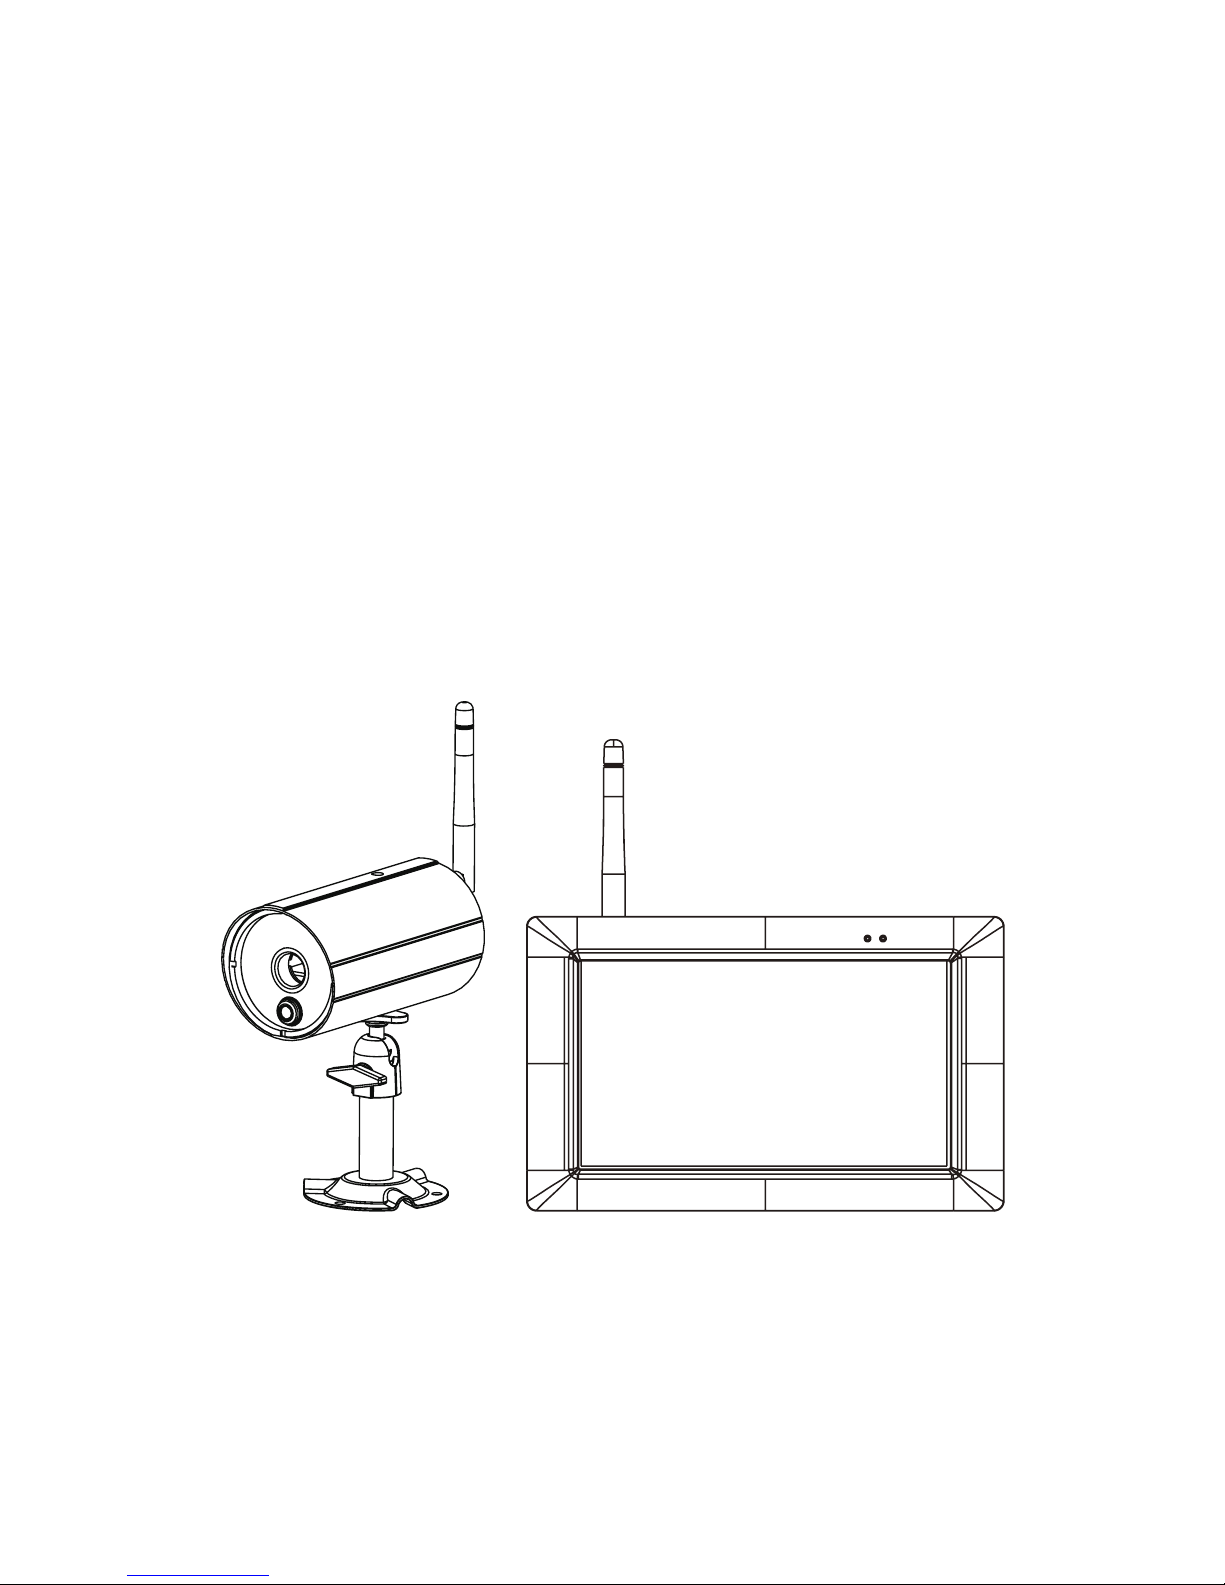
Wireless Digital Monitor
Item Name Function
1Power Indicator Indicate Power On/Off Status
2
Wireless Indicator
Indicate Wireless Connect Status
3Antenna Transmit/Receive Digital Wireless Audio/Video Data
4
Reset Button
Reset System
5Memory Card Slot Memory Card
Insert Location
6Power Jack DC 12V Adaptor
12
4
3
5 6
KNOW YOUR DEVICES

8
Note: Please connect your external HDD
before power on the Digital Wireless
Receiver Console(apply to external HDD
version only).
Item Name Function
7Power Button Power On/Off
8Enternet Jack
Connect to Internet router
9USB Port Connect to external USB HDD, USD Flash disk, external
SSD drive, and USB mouse/wireless mouse
10 Monitor stand Put monitor in upright position
7
8 9
10

9
Item Name Function
1Power Indicator Indicate Power On/Off Status
2Wireless Indicator Indicate the monitor and cameras are connected
3Lens Capture Image
4
PIR
Passive Infrared sensor for detecting heat emission from
biomass (human, animals, etc.)
5
IR LEDs Night View
6
Antenna Transmit/Receive Digital Wireless Audio/Video Data
7
Camera Stand Fasten Camera to Wall, Ceiling and/or Flat Surface
8SMA Connector Camera Antenna Installation (Twist On)
9Pairing Button Connect Camera to Receiver
10
Power Jack DC 5V/1A Adaptor
11
Microphone Capture Audio
Wireless Digital Outdoor Camera
6
5
7
3
4
21
8
9
11
10
Front View Back View
10
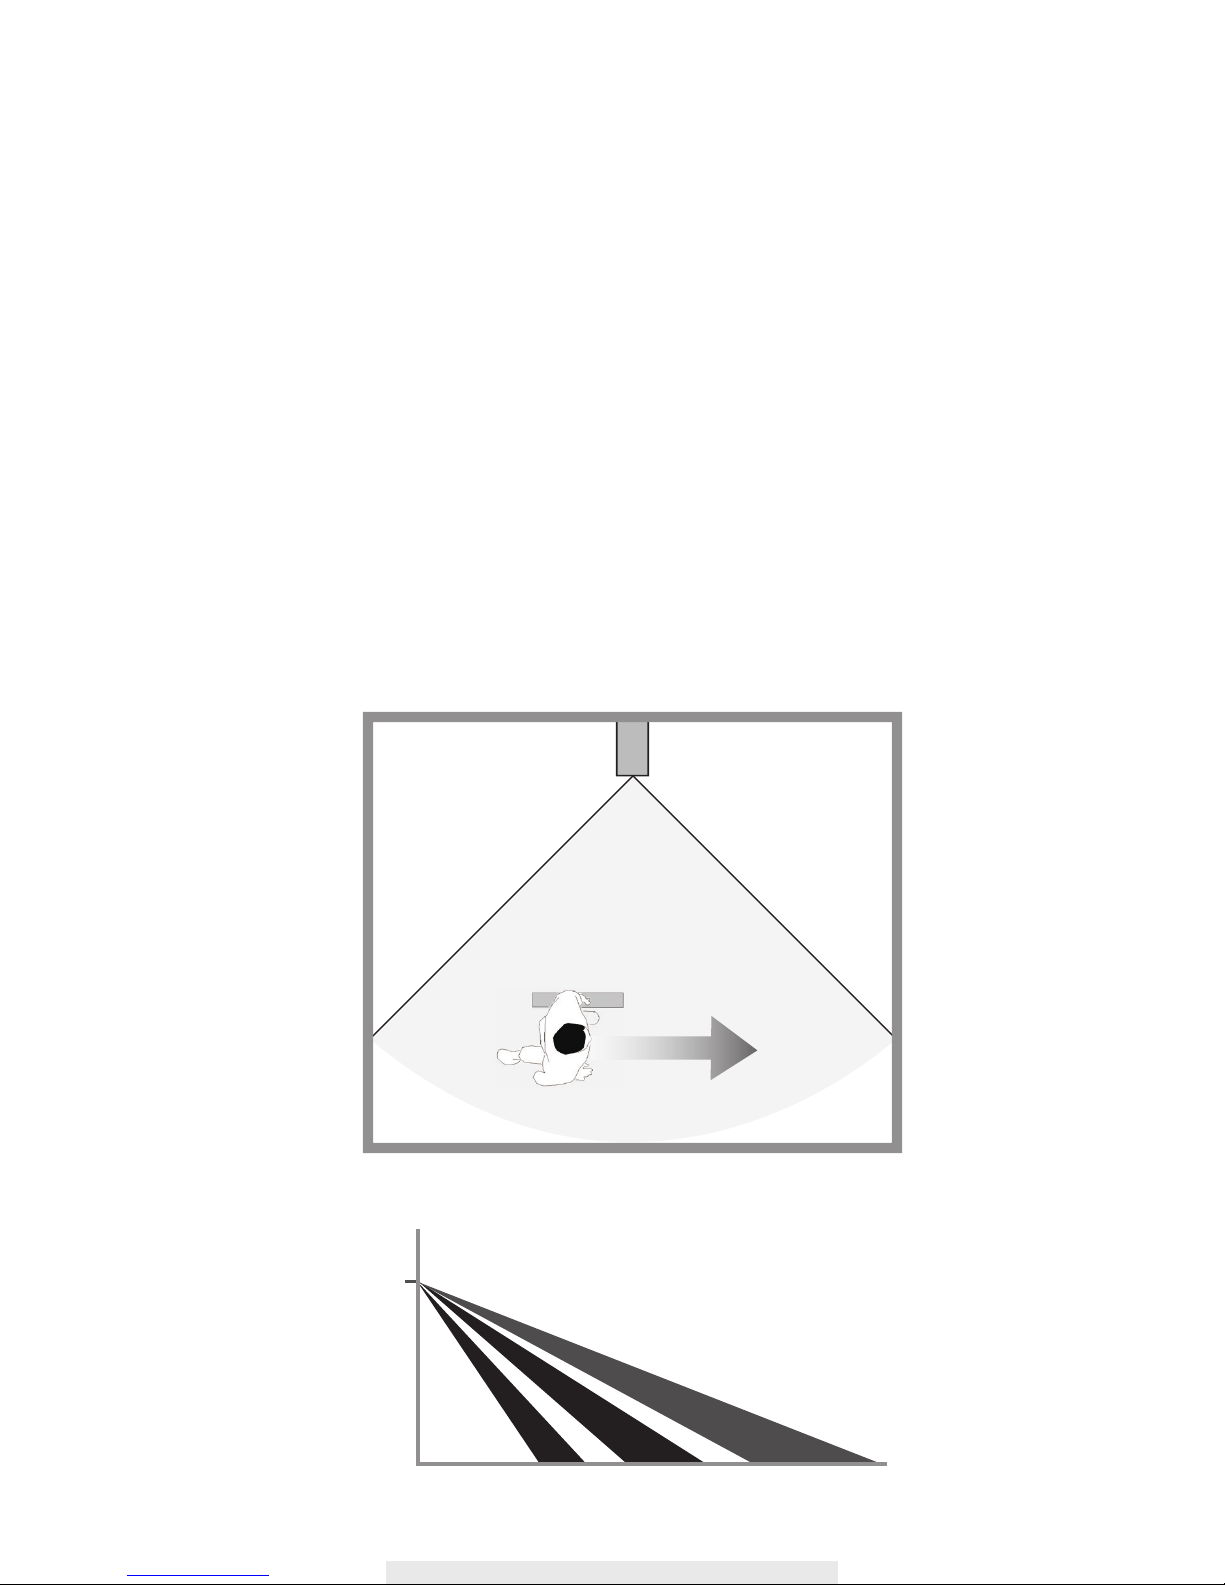
Motion Dectection
Keep active locations in the camera’s field of view. The camera has a 90-degree viewing angle.
Position your camera so that the space that you want to monitor is within the camera’s eld of view.
The best area for motion detection is 3 to 5 meters from the camera position.
Avoid false triggers, please note this device is equipped with a PIR Motion Sensor that detecting
temperature changes in the area in front of the device; Please avoid placing the device under the
following environments:
(1) Aiming the camera at windows or glass doors.
(2) Where small animals may enter the detection area.
(3) Where a heat source (sunlight, incandescent light, car headlights, etc) may aect the motion
sensor.
(4) Where sudden temperature changes inside or around the detection area caused by hot or cold
wind (fans, air conditioners, etc.).
Dectection Area 90°
R=5 Meters
1.5m
3m 4m 5m
Top View
Side View

11
INSTALLING YOUR DEVICES
Installing your camera
1. Locate a suitable location to mount the camera.
2. Secure the camera stand to a stable surface, celling or wall using the three screws.
3. Loosen the thumb screw of the camera stand and secure the camera body to the bracket. Make
sure the camera is in an upright position (relative to your viewing environment).
Thumb Screw

12
5. Connect the supplied power adaptor to the camera and the power source. The RED LED
will light up which indicate the camera is ready for setup. Please refer to page 17 for pairing
camera.
4. Screw the antenna into rear of the camera.
Ceiling Mount Wall Mount

13
Setting up your monitor
1.Insert the memory card and/or connect HDD device to USB port. It supports up yo 128GB
memory card to store security video clip or copy/backup a video clip from HDD. For long term
recording video, we suggested that you connect an external HDD which supperts up to 2TB.
Suggested memory card:
a. Sandisk 128GB/class-10
b. kingston 128GB/class-10
c. Sony 128GB/class-10
d. Samsung 128GB/class-10
Note:
‧Make sure the monitor is power off before connecting your HDD/ash disk.
‧Max USB power supported to HDD/flash disk is 5V/1000mA. Please use the external
power supply for the HDD/ash disk, if the HDD/ash disk require power supply higher than
1000mA.
‧Format your HDD/ash disk and/or SD card on HDNVR rst before using, following steps as
shown in "storage setup" section.
Memory Card Slot
USB Port connect to
HDD/Flash Disk
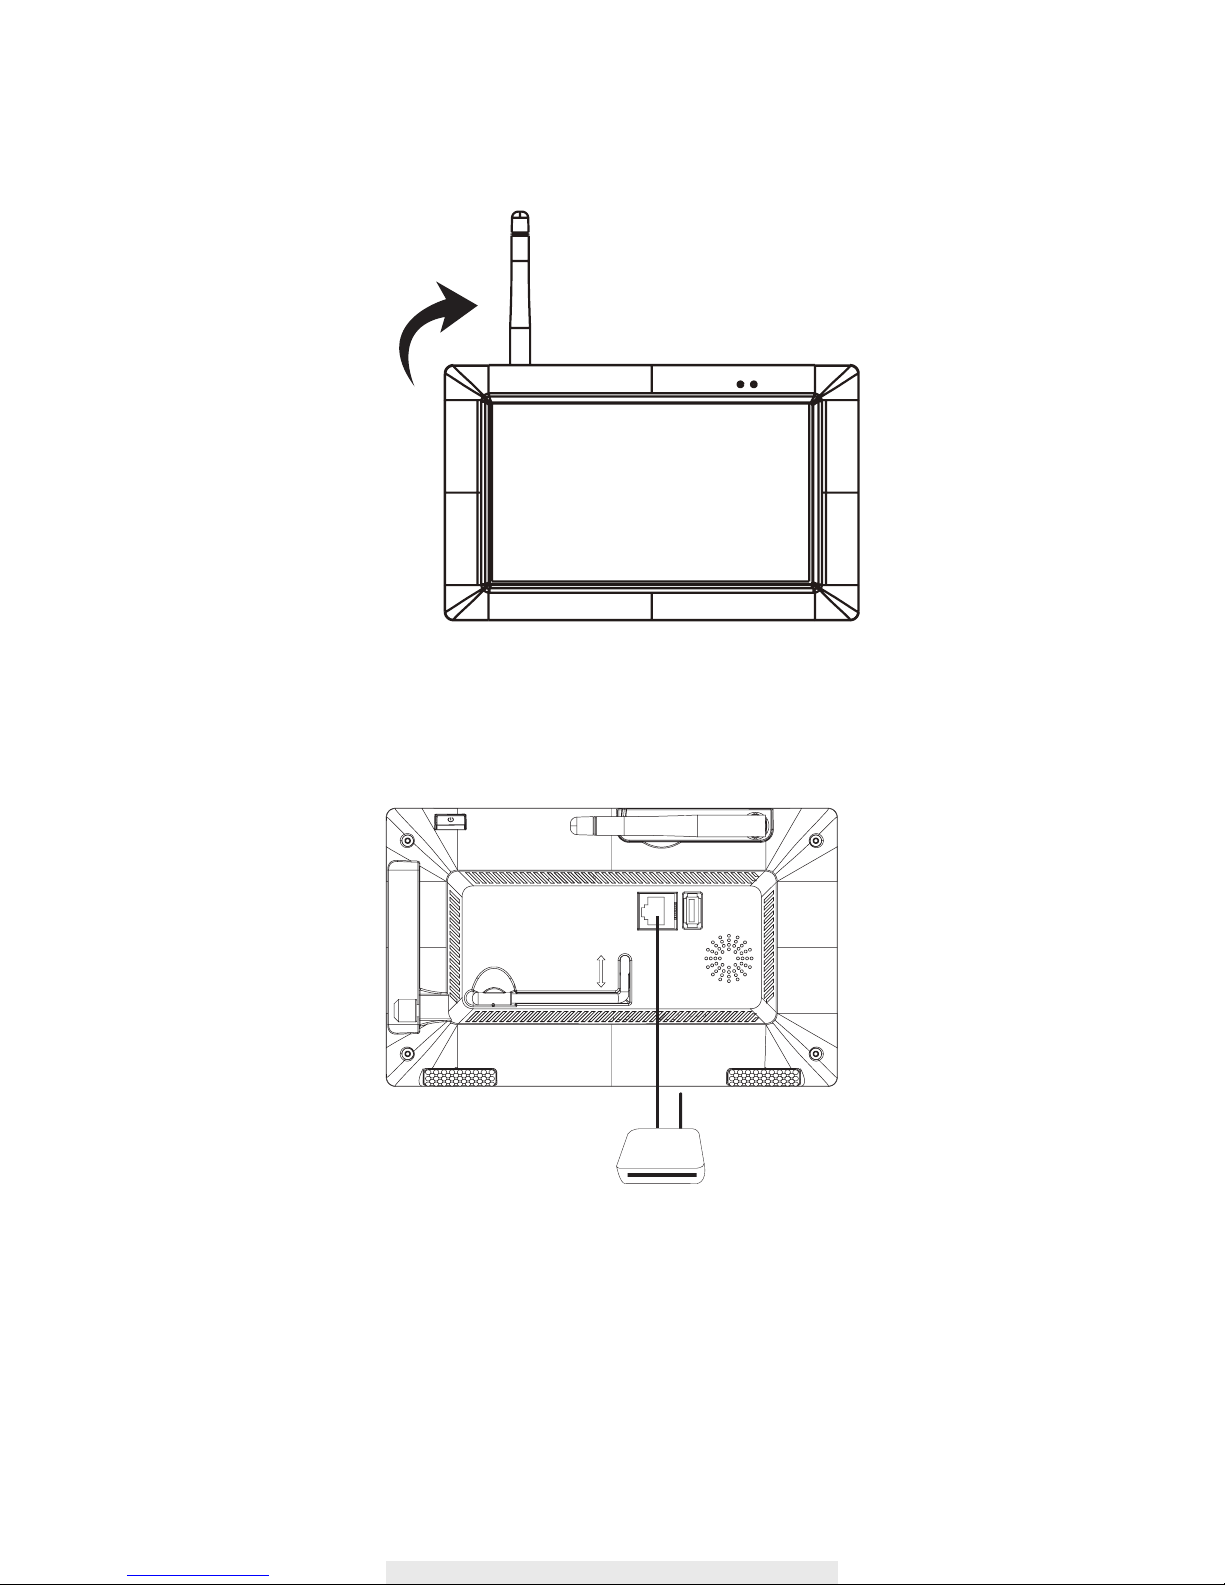
14
Router
3. Connect the Ethernet cable from the BACK of the console to your router. In order to having live-
view video from your HDNVR anywhere in the world on your 4G/Wi-Fi enable smart devices. You
will need to connect HDNVR to the home router with an Ethernet cable.
2. Twist on the antenna to the LEFT side of the console.
4. Connect the 12V power adaptor and power on the system for further system setup or operation.
The power indicator will light up.
5. Twist on the stand to the back of the console.
*You may use USB mouse to control the system.
15
Live Screen Displays
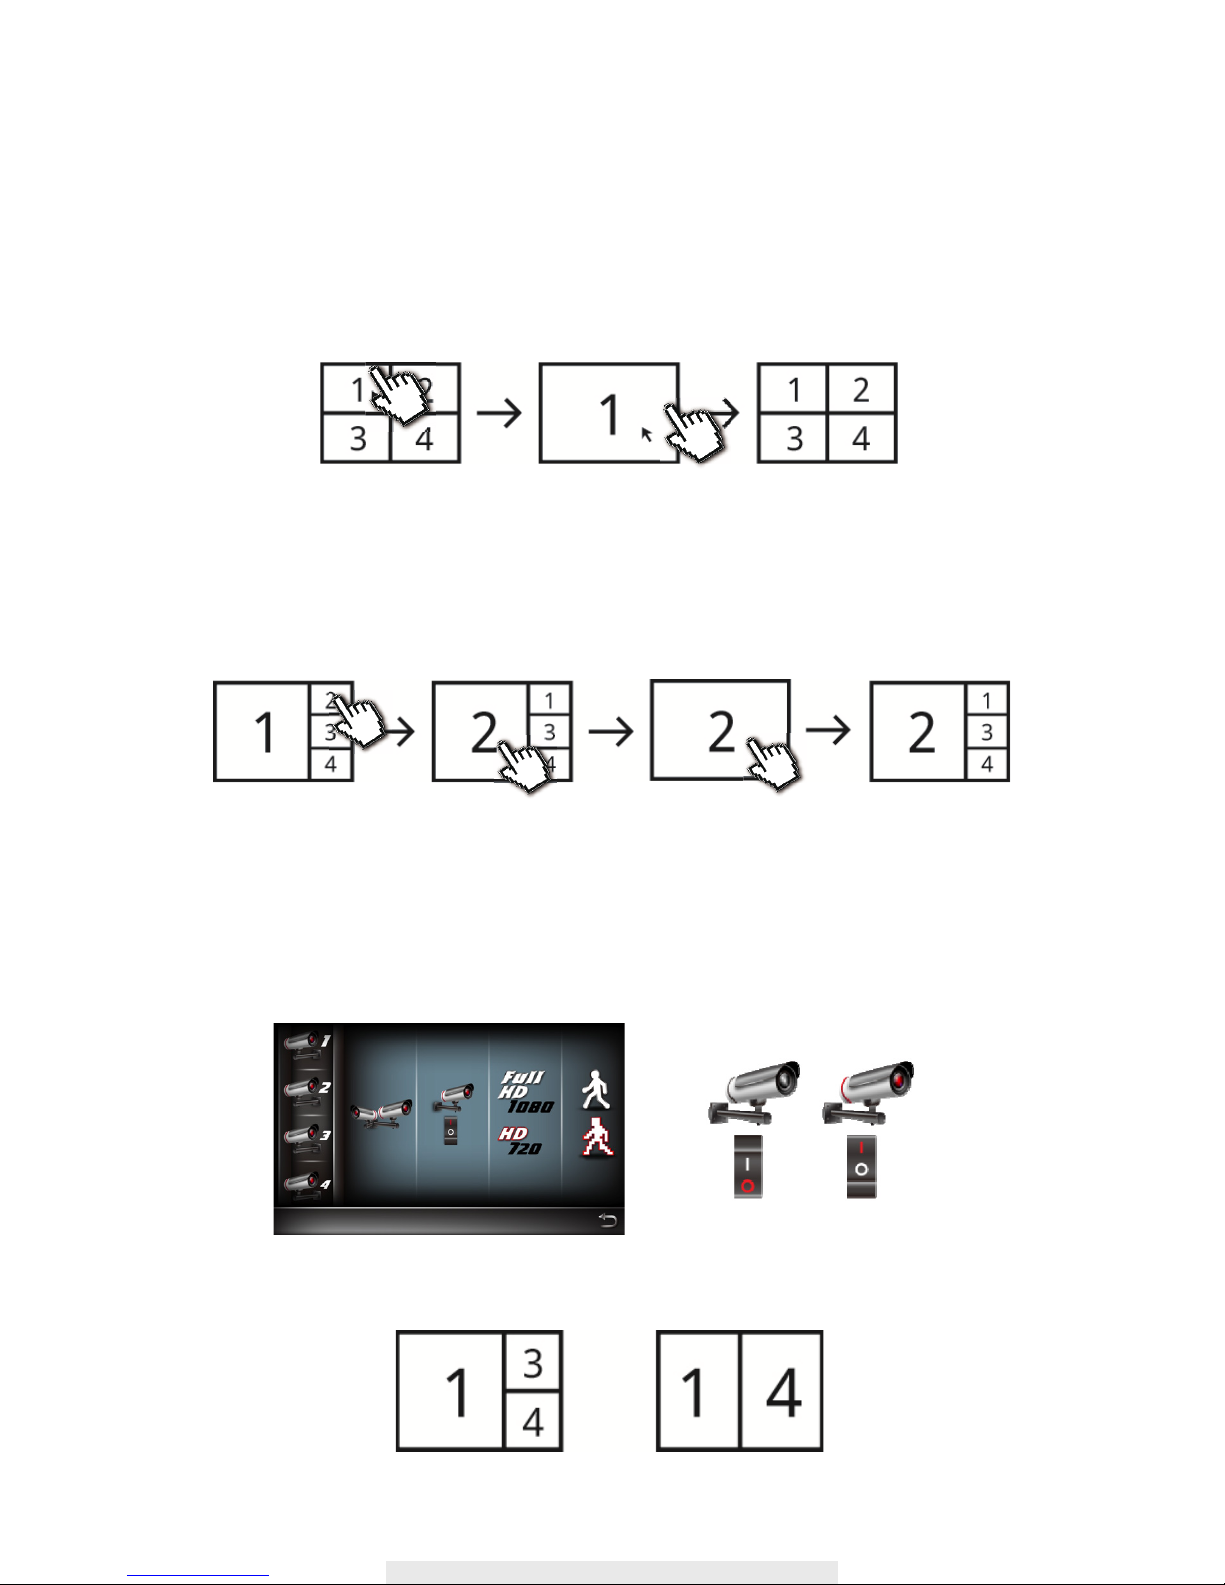
This function allows you to change the camera views are displayed on-screen in Live View mode.
Live View with Quad Dispaly
During LIVE VIEW in QUAD DISPLAY mode,tap any channel or screen for full screen display.
* The red "V" sign shows which channel is currently selected. The camera audio will be displayed.
Live View with Smart-Quad Dispaly
During LIVE-VIEW in SMART-QUAD DISPLAY mode, tap screen any of the side display channels
to allocate the image to the main display section of the SMART-QUAD DISPLAY.
Live View with Dynamic Dispaly
You can choose to deactivate any or multiple channels in the CAMERA SETUP section of the
MAIN MENU. The Wireless Digital Video Recorder will remove deactivated channel(s) from QUAD
DISPLAY and SMART-QUAD DISPLAY.
Further, SMART-QUAD DISPLAY will automatically re-configure display for optimum viewing
experience.
Tap again to returnTap one channel Live-view full screen
Tap again to returnTap one channel Show it at left side Live-view full screen
Turn CH2 off Turn CH2/CH3 off
Tap to turn on /off the camera
16
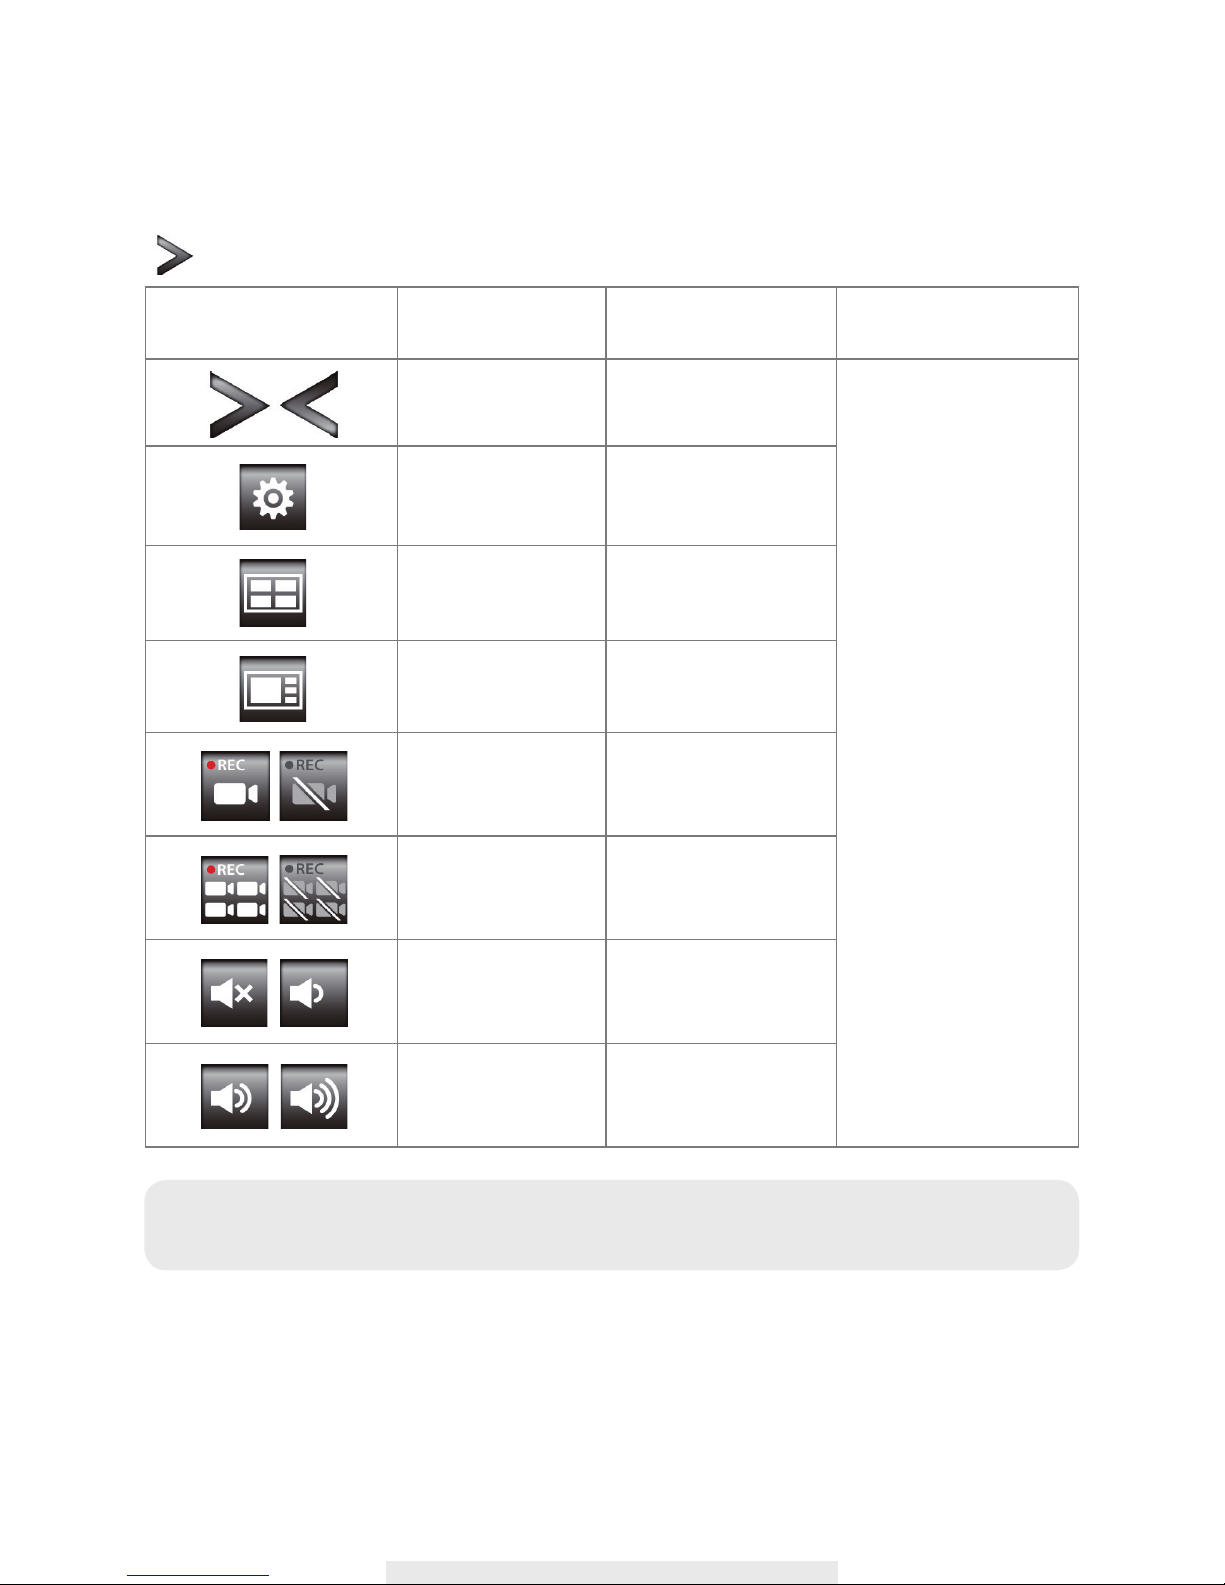
QUICK SELECT MENU
The HDNVR system is controlled through mouse operation or touch screen. Tap on the Arrow
icon, it brings up menu options that allow you change the settings on the monitor and camera.
AUTO SCAN
When you are running multiple cameras, you can choose to display all available channels in
sequence (5 or 10 seconds). In the system setup of main menu, setup AUTO SCAN function.
Tap DISPLAY SETUP to choose display method you prefer. You may choose to deactivate the
channel(s) so the AUTO SCAN function can automatically skip the channel(s) deactivated.
Quick Select Menu
Icon Image
Function
Tap screen or left-
click the mouse
Tap screen or right-
click the mouse
Display Menu/
Fold up Menu
Display/Fold up Menu Exit Quick Select Menu
Enter Main Menu Enter System Setting
QUAD Display
Select
Select QUAD Display
Smart-QUAD
Display Select
Select Smart-QUAD
Display
Single Channel
Record/Stop Single
Channel Record
Start/Stop Recording
Single Channel
All Channel Record/
Stop All Channel
Record
Start/Stop Recording
All Channels
Volume Adjust Mute/Vol1
Volume Adjust Vol2/Vol3
Note: System will automatically exit QUICK SELECT/MAIN menu after idling for 1 minute or
longer.

17
SYSTEM OPERATION
Main Menu
This section allows you control the various actions and options that are availableon your HDNVR.
Tap screen or left-click the mouse. Tap or right-click the mouse to return live view.
Icon Left Mouse Button
Available Options
1
CAMERA SETUP
‧Camera Pairing
‧Camera Activation
‧Resolution
‧Quality
2
RECORDER SETUP
‧Record Schedule
‧Motion Sensitivity
‧Motion Area
‧Detection
3
EVENT LIST ‧Event List Calendar
4
SYSTEM SETUP
‧Date and Time
‧Language
‧Display Setup
‧Idle Display Setup
‧Power Saving
5
STORAGE SETUP
‧Storage Status
‧Storage Formatting
‧Network Setup
‧Network Info
Main Menu
Camera Setup
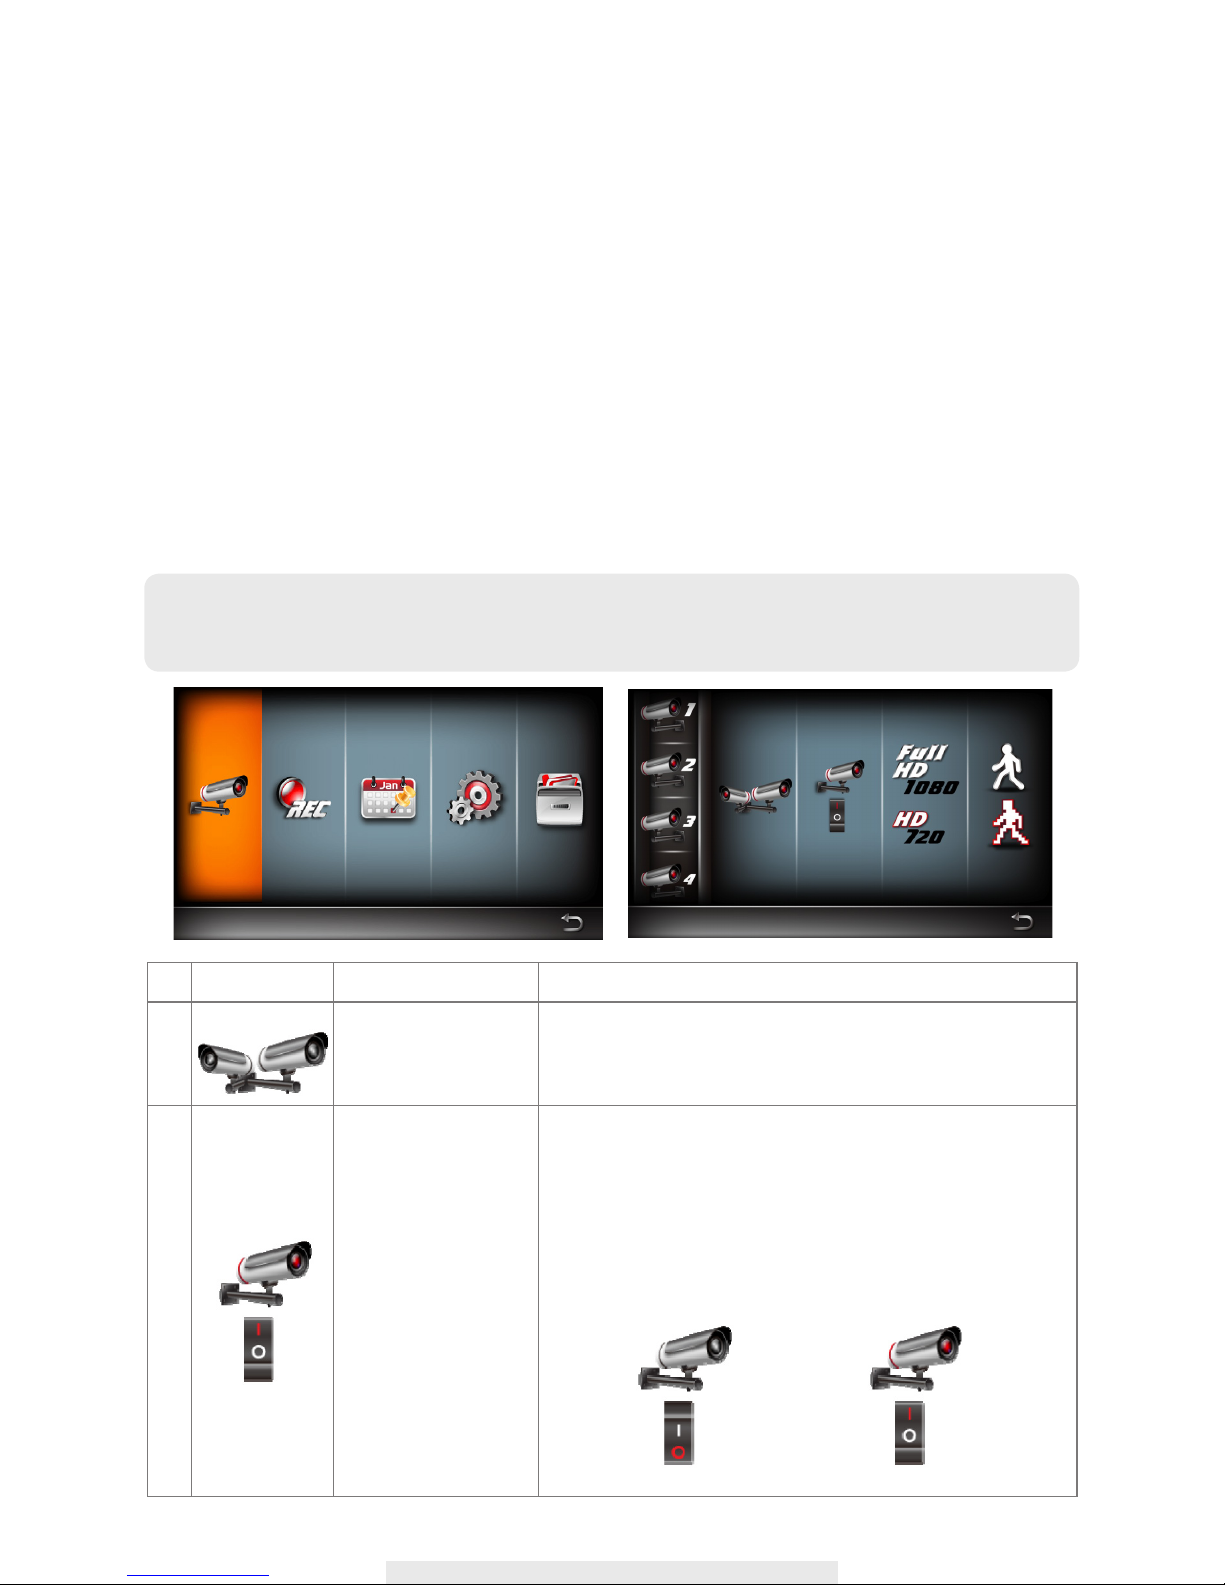
18
Camera Setup
This section allows you to add the camera, if you have purchased addition cameras or
change
original camera channel. Also you can enable/disable each camera connected to the receiver.
For better performance, you can setup the camera's resolution and video quality individually.
Pair the camera to HDVR
1. Tap the camera setup icon to access the camera pairing screen.
2. Select the Camera channel (Camera 1/2/3/4).
3. Tap the "Camera Pairing" icon.
4. Within 35 seconds, press and hold the pairing button on the back of the camera for 2 seconds.
The Green Link LED will light up which indicate the camera is paired successfully.
Icon Main Function
Setup Description
1
CAMERA PAIRING
Pairing the camera to HDNVR is needed when
‧Purchase of additional camera(s).
‧Change original camera channel.
2
CAMERA
ACTIVATION
Enable/Disable camera connection for camera(s)
paired to the HDNVR. If you disable the camera
connection, live video streaming of that particular
camera will no longer be available during the LIVE
VIEW mode and there won’t be any recording events
from this camera.
Camera On Camera Off
Main Menu
Camera Setup
NOTE: Once pairing is completed, the system will automatically restart upon leaving the
MAIN MENU.

19
3
RESOLUTION
The HDVR system supports High and Normal resolution:
‧Normal resolution setting provides better frame rate
and optimized for mobile device display.
4
QUALITY
Select quality of video image:
‧High quality for better video display quality,
the system will lower the display frame rate as
compensation.
‧Lower quality for better display frame rate,
the system will lower the quality as compensation.
Table of contents
Popular DVR manuals by other brands

Proficient Audio Systems
Proficient Audio Systems 00P3DG090DSEB3 user manual

Vitek
Vitek Transcendent VT-TR8NHA Series quick start guide

Philips
Philips Divar Digital versatile recorder Operation manual

Nuutech
Nuutech NVR user manual

Armed Security
Armed Security Sabre 5009 user manual

Motorola
Motorola DCX3501-M quick start guide


