Selectron PF2920BK User manual

SPECIFICATIONS
Receiving System: M/N
Colour System: PAL/NTSC
Picture Tube: 74cm (29") diagonal
Ext. Antenna: 75 Ohm CoaxialCable
Ext. In/Out: Audio/Video-In/Out
Speaker: 2 speakers
Audio Output: STEREO:>3W <5W*2
Power Consumption: AC 110-240V50-60Hz, 150W
Dimension:
Net Weight: 45.3 kg
REMOTE CONTROL
Transmitting System: Infrared
Power Supply: DC 3V (1.5x 2)
Dimension: 28(W) x 155(L)x 45(D) mm
Net Weight: 83 g
Design and specificationsare subject tochange without prior notice.
ACCESSORY LIST
lUser's Manual x1
lRemote Control Unitx 1
lBattery (1.5VAAA) x 2
810(W) x503(D) x595(H)mm
1

SAFETY PRECAUTIONS
1. Power-supply cords should be routed so that they are not likely to be walked on or
nagged by items placed upon or against them. Pay particular attention to cords at
doors, plugs, receptacles, and the point where they exit from the product. When the
power cord or plug is damaged or frayed, unplug the TV from the wall outlet and refer
servicing to your authorized dealer.
2. Do not overload wall outlets, extension cords, or convenience receptacles on other
equipment as thiscan result ina risk offire or electricshock.
3. Unplug the TV product from the wall outlet before cleaning. Do not use liquid cleaners
or aerosol cleaners.Use a dampcloth for cleaning.
4. If the TV should be dropped and/ or broken, it could result in an injury, and continued
use could result in fire or electrical shock. Immediately turn off the power switch,
disconnect the powerplug from thepower outlet andcontact your authorizeddealer.
5. Do not insert liquids or foreign object. Penetration of liquids or foreign objects could
result in fireor electrical shock.
6. Do not attempt to service the TV yourself. Opening or removing covers can expose you
to high voltage and other dangerous conditions. Refer all servicing to your authorized
dealer.
7. Do not place the TV on an unstable shelf, slant or vibrant surface. The TV may fall,
causing serious injuryto human andserious damage tothe appliance.
8. Avoid dusty places,since accumulated dustinside the chassis may cause failure of the
TV when inhigh humidity environment.
9. Do not placethe TV nearwater. Forexample, a bathroom,a beach, etc.
10. Do not obstruct the ventilation openings of the equipment with items such as
newspapers, tablecloth, etc.
11. Do not placethe TV on a carpet, sofa or bedding.
12. Keep the TV away from heat sources such as radiators, heaters, stoves and other heat
generating products.
13. Do not placethe TV in a "built-in"enclosure, unless proper ventilation is provided.
14. Do not place flower vases, pots, cups, cosmetics, liquids such as water, etc on or
around the TV.
15. Choose a placewhere light (artificial or sunlight) does not shine directly on the screen.
16. If the TV does not work properly and you are unable to restore normal operation by
following the "troubleshooting"section in your instruction manual, do not attempt any
further adjustment. Unplugthe TV and consult your authorized dealer.
17. Do not touch the controls other than those described in the operating instructions as
improper adjustment of other controls may result in damaging. Please ask your service
authorized dealer torestore the TV to normal operation.
18. For added protection for this TV during a lightning storm, unplug it from the wall outlet
and disconnect theantenna or cable system.
19. If a strange sound or smell gives off from the TV, please turn off and unplug it from the
wall outlet, thenrefer to authorized dealer.
20. To prevent fire, never place any type of candle or naked flames on the top or near the
TV.
21. Avoid any kindof impact to the TV. Be specialcareful not to damage the screen face.
22. If the TV is to remain unused for a period of time. Turn off and unplug it from the wall
outlet.
2
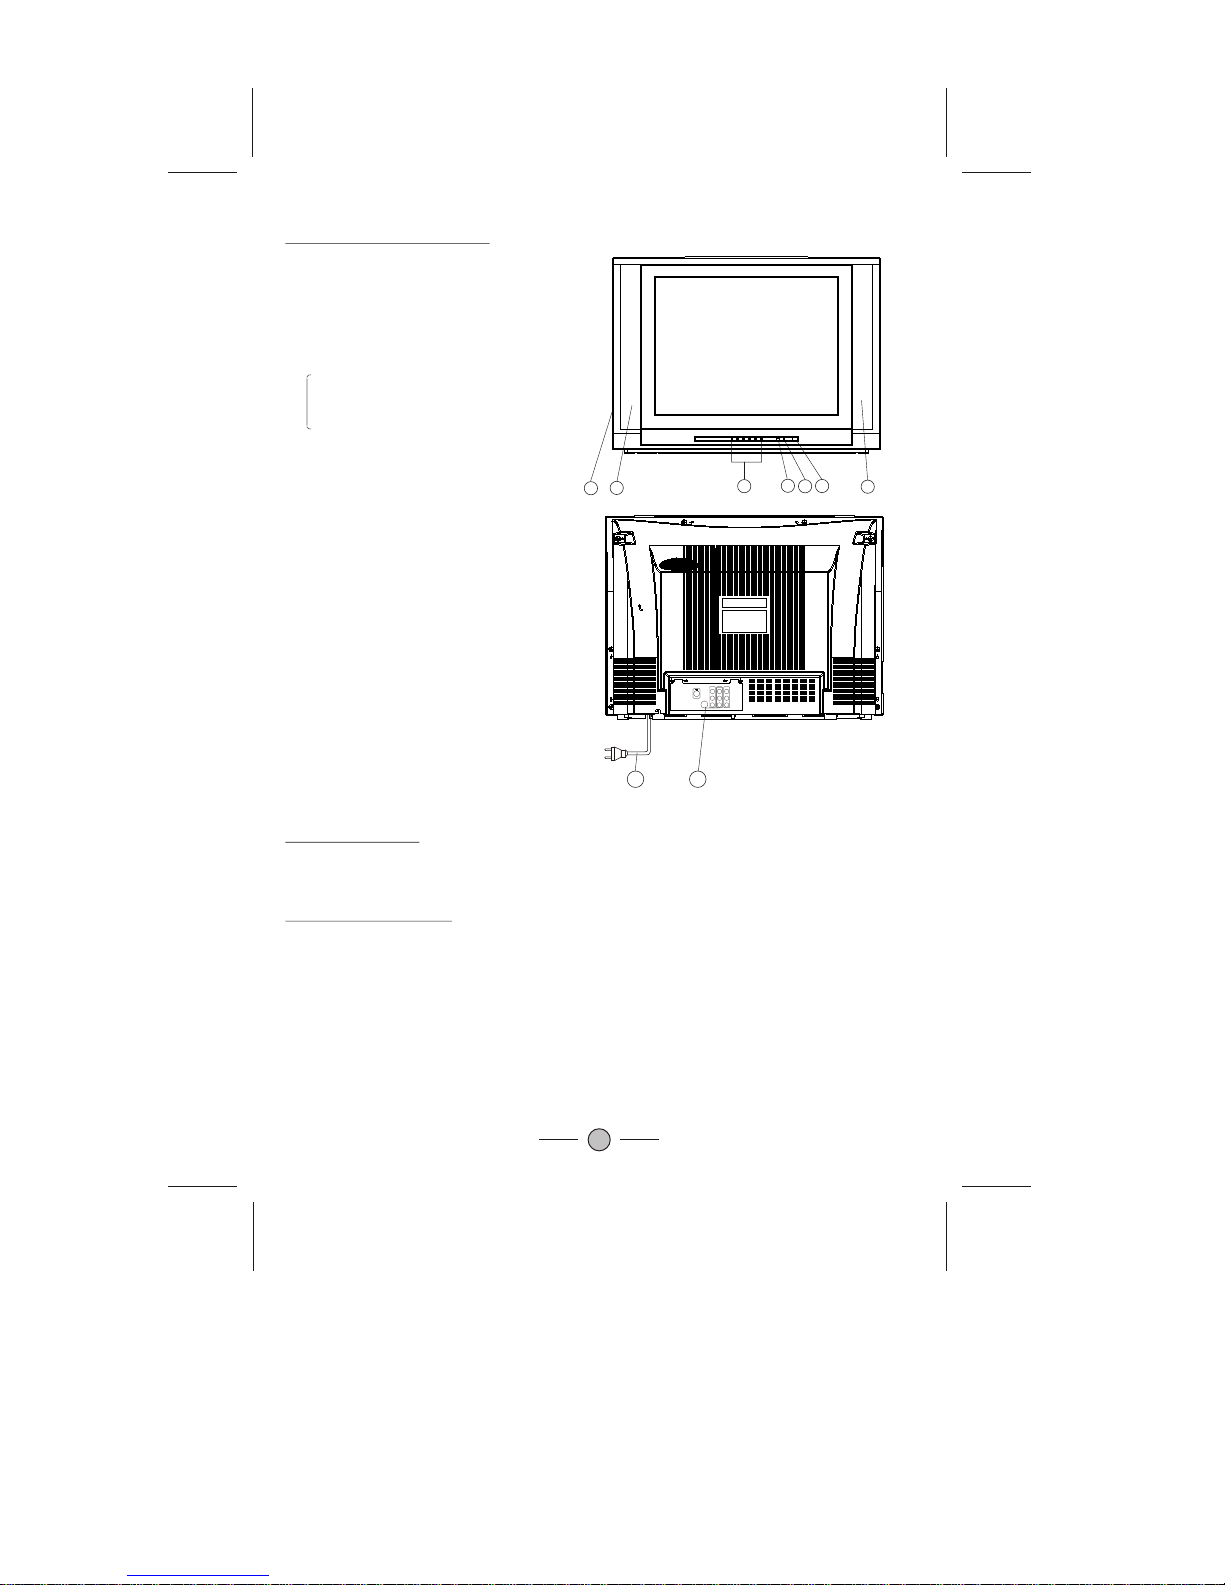
CONTROL PANEL BUTTONS
Power Connection
(AC 110-240V50/60 Hz).
Rear View ofthe TV Set
Video AndAudio Input/ Output Terminals
1. Video /Audio input for playback for VCR.
2. Video /Audio output for TV program.
Connections ToThe Antenna Input Socket
Connect the aerial or cable TV plug to the Antenna Input Socket located at the back of the
TV and connect the cable plug coming out from the TV out socket located at the devices
(VCR, DVB, etc.)to this socket as well.
Only use the adaptor supplied with this product, connect the AC plug to the socket at the
back of the TV. This TV must be operated only from the type of power source indicated on
the marking label
3
1. Main Switch
2.
3. Remote Sensor
4. Side AV In
5. Speakers
Power Indicator
6. Key Buttons
Channel Down / Up Button
Volume Down / Up Button
Menu Button
7Video
8. AC Power Cord
AV/TV Button
. In2
AV Out
YUV(Y,Cb,Cr)In
S-Video In
Antenna Input Socket (75 ohm)
565
21
43
8
7
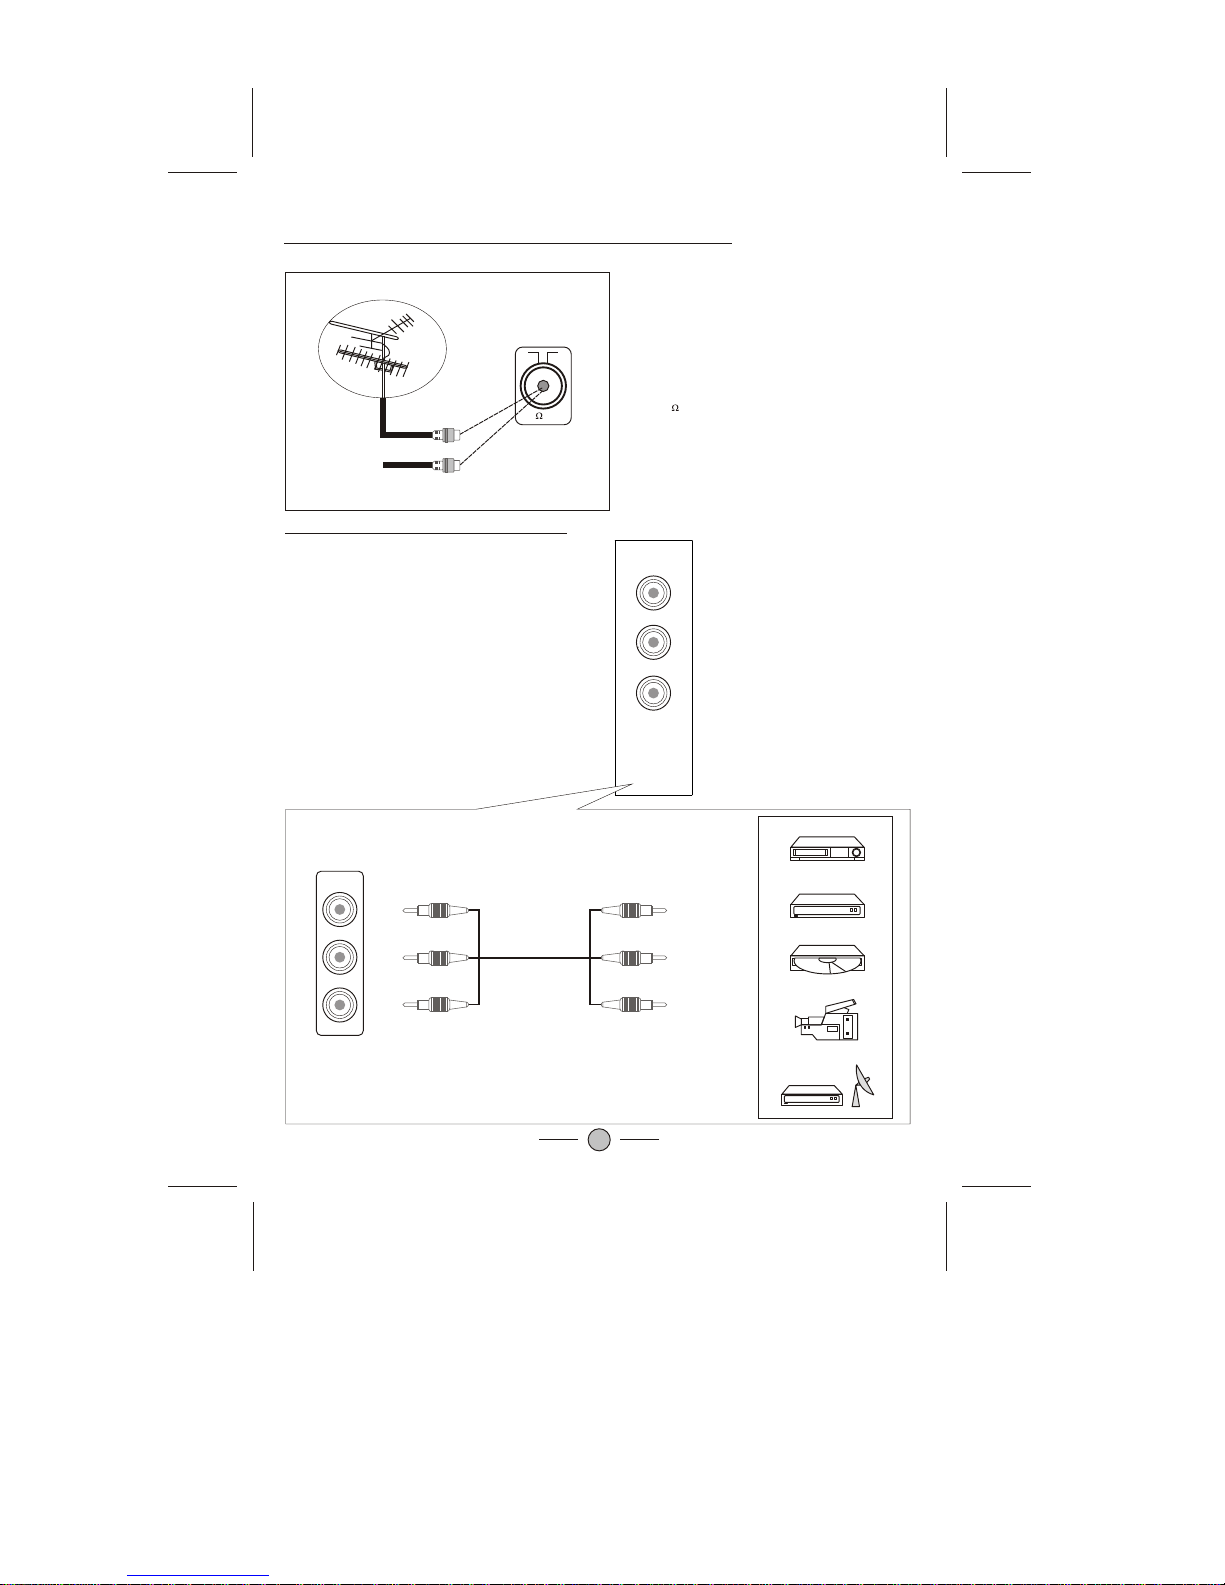
Connecting the Aerial(or Cable Television Network)
4
75 ANT
Cable
Television
Network
To view television channels correctly ,a signal
must be received by the set from one of the
following sources:
*An outdoor aerial
*A cable television network
Plug the aerial or cable network input cable to
the 75 coaxial socket on the rear of the
television.
AV IN 1
VIDEO
LEFT
RIGHT
VIDEO
LEFT
RIGHT
VCR
Decoder/
video game device
Video disc player
Camcorder
Satellite receiver
V
L
R
V
L
R
Front(or side) Audio/Video Input
5
VIDEO
LEFT
RIGHT
S-VIDEO
YUV IN
Y
Cb
Cr
VIDEO
LEFT
RIGHT
AV OUT
AV IN 2
75 ANT
Cable
Television
Network
VIDEO
LEFT
RIGHT
AV IN 2
AV OUT
VIDEO
LEFT
RIGHT
VCR
Decoder/
video game device
Video disc player
Camcorder
Satellite receiver
VCR
TV
Amplifier
V
L
R
V
L
R
V
L
R
V
L
R
L
R
L
R
YC YC
LEFT
RIGHT
S-VIDEO
LEFT
RIGHT
YUV IN
Y
Cb
Cr
L
R
L
R
Y
Cb
Cr
Y
Cb
Cr
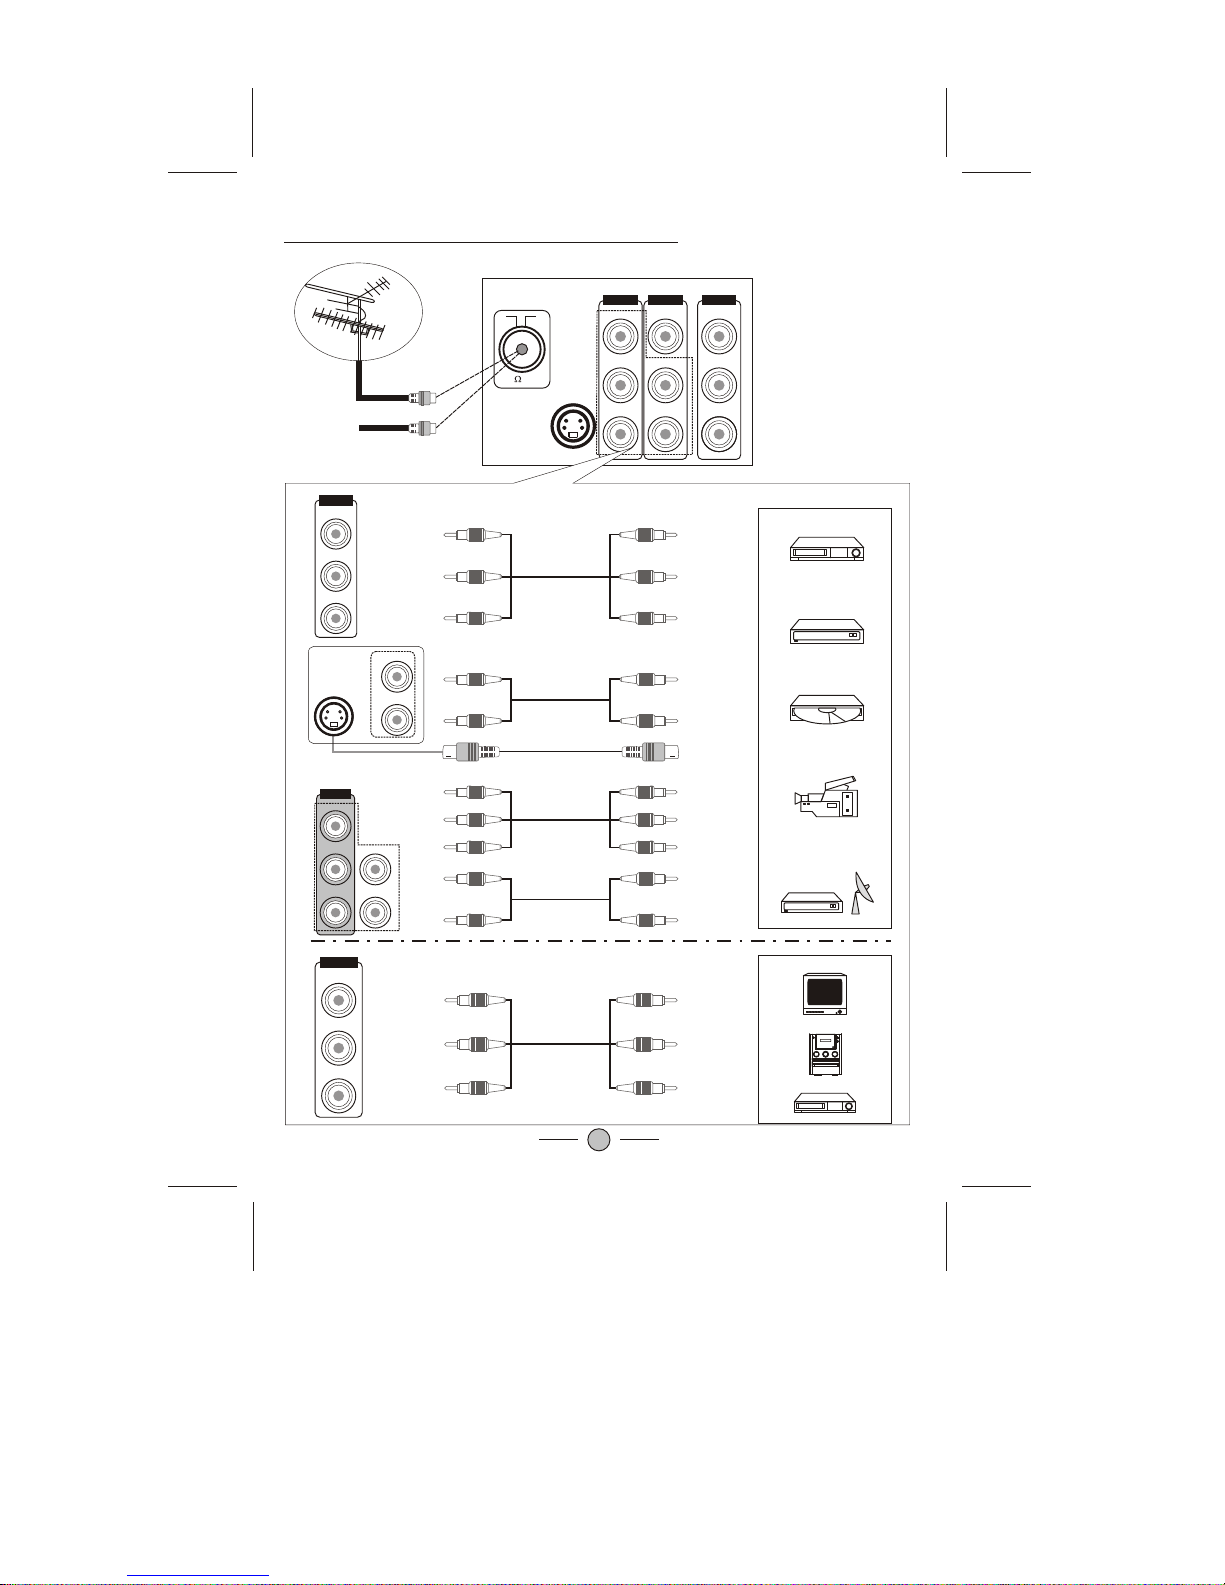
Connecting to the Audio/Video Input/Outputs

PERIPHERAL EQUIPMENT CONNECTIONS
There is awide range ofaudio and videoequipment that canbe connected toyour TV.
Connection diagrams at the end of this section show you where the different equipment
should be connectedat the backsideof the TV.
Aerial socket
1. Connect theRF out socketof the VCRto the aerialsocket on theback of the set.
2. Connect theaerial cable tothe RF aerialin socket ofthe VCR.
3. Select theprogram number wherethe VCR channelis stored.
4. Press thePLAY button on the VCR.
Audio/ Video insockets
1. Connect theaudio/video out socketsof the VCRto audio/video insockets of theset.
2. Press theAV/TVbutton to select AV.
3. Press thePLAY button on the VCR.
The VCR playbackpicture appears onthe screen.
Precautions when connectingto other equipments
When using external equipment with this TV, please read the instruction manual of the
external equipment.
Switch off allpower supplies to the equipment and TV before connection.
Always ensure that the input and output terminals are correctly connected..
6

USING THE REMOTECONTROL
Batteries
Please follow the below instructions to install the supplied batteries into the remote control
to make itoperate.
1. Remove thebattery cover.
2. Insert two1.5V (AAA size) batteries making sure
The polarity (+or -) of the batteries
matches the polarity marks inside the unit.
3. Replace thebattery cover.
Precautions when usingbatteries
Do not use old and new batteries together.
Do not use different types ofbatteries (for example,Manganese and Alkaline batteries)
together.
Note that there are chargeable and non-chargeable batteries. Do not attempt to charge
non-chargeable batteries.
If the remote control unit is not used for a long period of time, remove the batteries
Precautions when usingthe remote control unit
Do not drop the remote control unit.
Do not subject the remote control unit to physical shocks.
Keep the remote control unit dry. Wetting itmay cause theunit to malfunction.
Replace the batteries with new ones when operation of the unit deteriorates.
NOTE: If there isan object between the remote control and the signal remote control
sensor window onthe TV, the remote may not operate. Please make sure the remote
control is aimingat the remote control sensor window on the TV.
7

8
REMOTE CONTROL BUTTONS
2
456
8
79
- - /- - -
MENU
CH.-
VOL.+VOL.-
MTS
P.P.
AV/TV
0
3
CH.+
Q.VIEW
Mute Button
Digit Buttons
Program
Selection
Button
Menu Button
Sleep Timer
Button
Quick.View Button
Power Button
(Standby)
AV/TV Button
Program up/down Buttons
Volume up/down
Buttons
Scan Button
Display Button
Personal Presets Button
CCD V-CHIP
LOCK SCAN
CCD Button
V-CHIP Button
MTS Button
Lock Button

9
Remote Control Buttons
1.POWER (STANDBY) BUTTON ( )
Press this buttonto turn the TV on/off.
2. MUTE BUTTON ( )
Press this buttonto temporarily cut off the sound output, press it again to
restore the sound level.
3.DIGIT BUTTONS (0-9)
Press the number for your desired program and the program indicator will be
displayed on the screen. To select a single-digit program, press the
corresponding number key0 - 9 button on theremote control unit.
4. PROGRAM SELECTION BUTTONS (--/---)
Press --/--- key to select one to three digits entry.
If you want to select 0 -9 program channel other than usingthe Digit Buttons,
please press "--/---" key until display "-" on the screen right-top corner,
then press digital number key 0-9.
If you want to select 10-99 program channel, please press "--/---" key until
display "--" on the screen right-top corner, then press digital number key 0-9.
If you want to select 100-125 program channel, please press "--/---" key until
display "1--" on the screen right-top corner, then press digital number key 0-9.
Channel numbers available for program:
AIR Channel: 2-69
CATV Channel: 1-125
5. AV/TV BUTTON (AV/ TV)
Inputs can beset for TV or AV mode. Press this button to display external
video signal such as DVD, VCR or VCD video player. AV will be displayed on
the screen. Press this button again toswitch back to TV signal from AV.
6. PROGRAM UP/DOWN BUTTONS (CH. +/-)
Press the Program Up Buttonto select the program forwards.
Press the Program Down Buttonto select the program backwards.
7. VOLUME UP/DOWN BUTTONS (VOL.+/-)
Press Volume +/- Buttons to adjust sound level.
8. MENU BUTTON (MENU)
Press "MENU" buttonto display the OSD (On-Screen Display)menu for
adjusting the image,sound and functions. Pressing this buttonagain to out
from the OSD.
Please refer topage 12-18 for the details.

10
9. PERSONAL PRESETS BUTTON (P.P.)
You can select USER, STANDARD, SOFT or RICH mode by pressing this
button.
10.QUICK VIEW BUTTON (Q.VIEW)
Press this button to return to the previously viewedprogram.
11. DISPLAY BUTTON( )
Press this buttonsequentially to display the current program number on the
screen.
12. SLEEP TIMER BUTTON ( )
Press the "SleepTimer" button on your remote control to startsetting the
automatic sleep timer. Press the button to adjustthe time inincrements of
30 minutes, from0 to 180 minutes. Whenthe preset time runs to 0, TV set
will go intostandby mode. To switch off this function, press this key stepby
step until " OFF" is displayed on the screen.
13.LOCK BUTTON
The TV set can provide the locked key for control or prevent your children
from watching theprogram.
SETTING UP THE CHILD LOCK FUNCTION:
Press the "LOCK" button on remote control unit. The key locked symbol( )
will be displayed on the screen and entered into the child locked mode.
While in Lock mode, any keys on the TV set will be disabled.Except the key
on the Remote control.
RELEASE CHILD LOCK:
Press again the'LOCK" button on the remote control unit to cancelthis
function.
14.SCAN BUTTON
Press the SCAN button toautomatically browse every channel which you
have stored.
15. V-CHIPBUTTON
When V-Chipfunction turned "ON" in the Features Menu£¬you can press
the V-Chipbutton to go to the V-Chip menu. When V-CHIP in "OFF" mode,
the V-Chip button on the remote control will be disabled.
For the V-CHIP MENU function, pleaserefer to page 14 forthe details.
11
16. CLOSE CAPTIONDISPAY BUTTON( C C D )
Closed-Captions aim to describe all significant audio content, as well as
"non-speech information," such as the identity of speakers andtheir
manner of speaking.Press this button to select theClosed-Caption
Display Mode:
C1 C2 C3 C4 TEXT1 TEXT2 TEXT3 TEXT4 OFF.
17. MTS (MultichannelTelevision Stereo)
You can select therequired sound effect by pressing this MTS buttonto
choose between Mono,Stereo, or separate Audio Program (SAP broadcast).
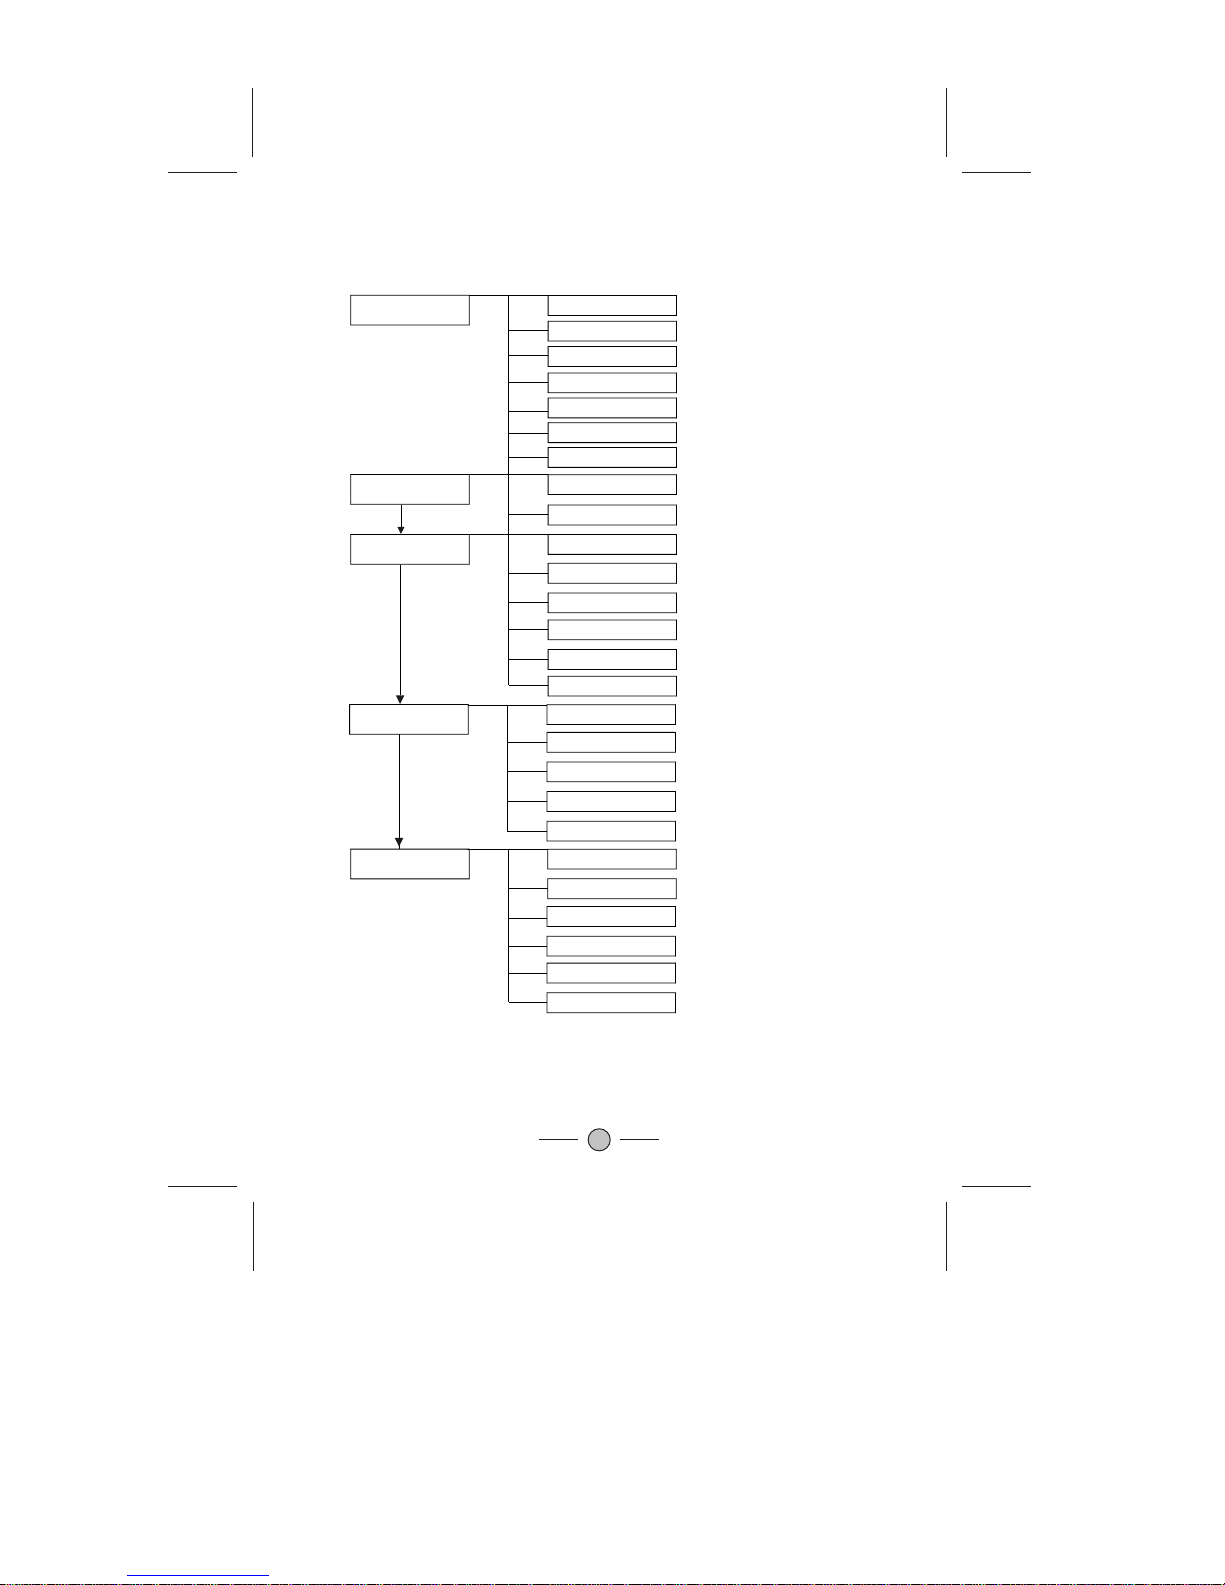
MENU SYSTEM
This TV allowsyou to adjust the settings from the menu screens.
* In theAV mode, menus appear the same asin TV modeexcept the installmenu.
Picture
Sound
TINT
SHARPNESS
BRIGHTNESS
COLOR
VOLUME
BALANCE
12
CONTRAST
Features
Timer
LANGUAGE
COLOR SYS
CCD
TIME
STOP TIME
CH SWITCH
SWITCH TO
Install
V-CHIP
CALENDAR
SKIP
RECEPTION
FINE
PROG. NO.
GAME
START TIME
AFT
AUTO STORE
CROING
BLACK STRETCH

13
Picture Menu
PICTURE
CONTRAST
BRIGHTNESS
COLOR
SHARPNESS
TINT
CORING
BLACK STRETCH
55
55
55
50
00
ON
ON
Press the MENU button to enter the menu screensfor the following
settings.
PICTURE Menu -> SOUND Menu-> FEATURES Menu -> TIMER
Menu -> INSTALL Menu -> EXIT
-Select the desireditem using the CH. + / - Buttons.
-Use the VOL. +/- buttons to adjust the item settings.
The item selected will be highlighted in red
* The menu screen will time out automaticallyafter few seconds if it isleft
idle on the screen.
""
You can select CONTRAST, BRIGHTNESS,
COLOR, SHARPNESS, and TINTitems by
pressing CH. +/- Buttons, and pressing the
VOL.+/- Buttons to adjust the item ofwhich you
selected.
1.CONTRAST
Press the VOL. + / - buttons to enhance or reduce
the contrast between objects and the background
from 00 to 100 .
2.BRIGHTNESS
Using the VOL.+ / - buttons to adjust the lightness
and darkness of the picture from 00 to 100 .
3.COLOR
Press the VOL. + / - buttons to increase or decrease
the color saturation from 00 to 100 .
4.SHARPNESS
Adjust the outline of objects to either sharpen or
more dull from 00 to 100 .
5. TINT (NTSC Only)
Adjust the color of objects from 50 to +50 ,
making them more red or green for a more natural
look.
6. CORING
You can select toturn ON or OFF the CORING.
7. BLACK STRETCH
You can select to turn ON or OFF the BLACK
STRETCH.
"" " "
"" " "
"" " "
"" " "
"- " " "
Features Menu
FEATURES
LANGUAGE
COLOR SYS
CCD
V-CHIP
CALENDAR
GAME
ENGL ISH
AUTO
OFF
ON
14
1.LANGUAGE
You can change menulanguage in thisitem. Press
VOL. +/- Buttonsto select your desired language.
All the onscreen displays will appear in the
selected language.
2.COLOR SYS
Press VOL +/- buttons tochange the colorsystem
to AUTO, PAL-M, PAL-N NTSC.
3.CCD (CloseCaption Display)
Closed captioning allowspersons with hearing
disabilities to haveaccess to television
programming by displayingthe audio portion of a
television program astext on the television screen.
Set the closed-captionOFF or display C1, C2, C3,
C4, TEXT1, TEXT2,TEXT3 and TEXT4. Youcan
also set upthis function by using the remote
control unit.
4.V-CHIP
The V-chipis a technology that allow viewer to
block television programmingthat they do not want
children to watch.Most television programs now
include a rating,as established by the broadcasting
industry. This rating is encoded into the programs,
and the V-chip technology reads the encoded
information and blocksshows accordingly. Using
the remote control,parents can program
Sound Menu
SOUND
VOLUME
BALANCE
51
00
1.VOLUME
Press VOL +/- buttons to adjust the Volume
between 00 and 100 .
2.
"" " "
"" " "
BALANCE
Press VOL +/- buttons to adjust the Balance
between L50 and R50 .

15
the V-chip to block certain programs based on their ratings. If you lose your
remote or need help programming the V-chip, contact the manufacturer of
your television fora replacement or operating instructions.
Ratings appear in the corner of your television screen during the first 15
seconds of each television program. There are six ratings that a program
can receive:
-TV-Y (All Children): found only in children's shows, means that the show is
appropriate for all children;
-TV-7 (Directed to Older Children): found only in children's shows, means
that the show is most appropriate for children age 7 and up;
-TV-G (General Audience): means that the show is suitable for all ages but is
not necessarily a children's show;
-TV-PG (Parental Guidance Suggested): means that parental guidance is
suggested and that the show may be unsuitable for younger children (this
rating may also include a V for violence, S for sexual situations, L for
language, or Dfor suggestive dialog);
-TV-14 (Parents Strongly Cautioned):means that the show may beunsuitable
for children under 14 (V, S, L, or D may accompany a rating of TV-14); and
-TV-MA (Mature AudienceOnly): means that the show is for mature audiences
only and may be unsuitable for children under 17 (V, S, L may accompany a
rating of TV-MA).
Press VOL +/- buttons onthe remote controlunit to entre the password to
activate the V-CHIP function. When V-CHIPturned on, you can press the
V-CHIP button directly on the remote control unit to enterinto the menu of
V-CHIP. If V-CHIP in OFF mode, the V-CHIP button on the remote control
unit will not function.

16
Master Password:
If you turn on the V-Chipfunction but failed to remember the password, you
can enter the Master Password 1980 to enter into the V-Chip menu.
The MPAA filmrating system is a system used in the UnitedStates and
territories and institutedby the Motion Picture Association of Americato
rate a movie based on its content, being used to decide which movies may
be appropriate forchildren and/or adolescents.
The current MPAA moveratings consist of:
Rated G General Audiences
a.Rated PG Parental guidance suggested
b.Rated PG-13 Parents strongly cautioned
c.Rated R Restricted. Under 17 requires accompanying parent or legal
guardian.
d.Rated NC-17 & X No 17 and under admitted. Also called Youth Restricted
Viewing.
-Press the V-Chip button togo to theMPAARating menu. Press CH. +/-
and Menu buttons to select.
-Press the V-Chip button again to return.
1.Calendar
-Press VOL+/- button to enter into Calendar menu.
-Press CH. +/-buttons to select Year, Month and Date. Press VOL+/-
button to adjust the value.
-Press MENU button again to return.
2.
""
""
""
""
MPAARating
Game : Catching Coin(OPTION)
Game Rules: Six kinds of bag will drop down, include moneybag, coin,
snowflake, umbrella, heart and bomb. If you catch the moneybag and coin,
ten points and five points will be received respectively. After entering the
game, press "VOL.+" and "VOL.-" to shift the figure from leftto right and vice
versa.
When you start the game, the color of the figure is green.
-If you catchthe snowflake, the figure will turn into white, andthe
movement of the figure will slow down. However, the figure can be escaped
from this state by receiving the umbrella.

Timer Menu
TIMER
TIME
START TIME
STOP TIME
CH SWITCH
SWITCH TO
-- --
-- --
-- --
-- --
--
--------
1. TIME
To adjust the current time by this item. Press the
VOL. - button to set hour, and the VOL. +
button to set minute.
2. START-TIME
To set the time when the TV set to turn on
automatically.
3. STOP-TIME
To set the time when the TV set to turn off
automatically.
4. CH SWITCH
Topreset the time that the TV will switch to the
selected channel (Position) automatically.
5.SWITCH TO
To set the program that will switch automatically
at the CH SWITCH.
"" " "
17
- If you catch a bomb, the figure will turn to red
and the game will over.
- If you catch a heart, thefigure will change to
purple, which last for five seconds, and at this
time, even you catch a bomb, the game will go
on.
The game goesup a level in every threeminutes.
If the level is higher, the drop speed of bags would
become more quicker.
NOTE: All the timer functions will only be
effective if the power of the TV set is switched
off using the remote control unit. If the power
is switched off by thepower button on the TV
set or a power failure occurs, the timer will
be reset.

Install Menu
INSTALL
PROG NO
SKIP
RECEPTION
FINE
AFT
AUTO STORE
02
ADD
CATV-HRC
00
OFF
18
1.PROG. NO.
CH
4. FINE
You can use this FINE tuning process for fine
adjustment by pressingVOL.+/- Buttons between
-50 and +50. Normally fine tuning is only
necessary if reception is poor.
5.AFT (AutoFine Tuning)
When selecting theAIR,CATV or CATV-STD,
CATR-IRC ,CATV-HRC Signals, there are 01-125
channels available. There are 02 - 69 channels
in the AIR signal.
2.SKIP
You can skip unnecessary program channels of
your choice not to be displayed during viewing
and scanning whenpressing the . -/+
buttons.Select "Skip Del" by pressing VOL. + / -
Buttons to selectthe channel that would like to
skip from the channel scan operation.
3.RECEPTION
You can switch signals:AIR,CATV or CATV-STD,
CATR-IRC ,CATV-HRC.
Select "AFT ON" by pressing VOL. + / - buttons
to AutoFine Tuning. The FINE tuning function
will be disabledonce this AFT is ON
""
""
""
""
""
6.AUTO STORE
Press VOL.+/- Buttons, the TV setwill automaticaly
search from V-L band to U band. The channels are
stored in the order in which they appear in the
frequency bands.

TROUBLESHOOTING
The following problemsdo not always indicate a hardware failure. Therefore, pleaseuse the
troubleshooting guide below before calling for repair service. If, after following the guide
none of theremedies work, unplug the TV and call for service.
Make sure the power cord is plugged in,
then press POWER button.
Check battery in the remote control.
(Maybe batteries aredead.)
Ensure the TV power isON .
Check antenna/ cableconnections.
Try different channel.
Maybe sound is muted. Try pressing
VOL+ button is not setto minimum.
Try another channel.
Check the AV cables for disconnection.
Maybe the TV is being affected by
interference from automobiles,trains,
high-voltage transmission lines, neon
signs or another sources of interference.
Try redirecting or relocating your antenna
to reduce the affects of the interference.
Change channels to confirm if the
symptom is stillpresent.
Try another channel.
Check antenna connections.
If using VCR, check TV/VCR button.
Adjust fine tuning control.
Probably local interference, such as an
appliance.
When the VCR test signal (TSG) is
received, the lowerside of the test
pattern is distorted as shown in the
figure. This is not a malfunction and the
playback picture isnot influenced by it.
That channel maybe locked out with
SKIP CHANNELfunction.
Problem Checks and Adjustments
TV will not turn on
No picture, no sound
No sound, pictureOK
Spots on the screen (Snow)
Poor reception ofbroadcast
channels
VCR
Cannot select a certain channel
19
This manual suits for next models
1
Table of contents
Other Selectron TV manuals


