Senna LightWall User manual

LightWall
by SENNA
User Manual

1. Introduction
1.1 Features:
Wireless light control
6 bank/24 channel system (4 channel per bank)
Remote dimmer and temperature regulation
6 light scene storages
Auto memory recall and cycle option
Fade speed
Strobe and running lights–adjustable speed
Special effect presets–fire, candle lights, thunder lights, TV, police lights…
DMX converter built in
1.2 Specifications:
CONTROL PLATE
Parameter
Description
Control plate dimensions
19*7*19cm
Control plate weight
0,6 kg
Operating voltage
7,4 v
Operating temperature
0 ÷ 45 °C (or more if connected to power adapters)
Wireless frequency
431 ÷ 478 MHz, frequency is preset on 444 MHz and
cannot be changed on device, only in factory when
ordering, in steps of 200 KHz (235 channels)
Wireless output power
20 mW
Wireless range
up to 300 m line of sight
LED PANEL
Parameter
Description
Dimensions
100*100*20 cm
Weight
25 kg
Bulbs
13.440 psc
Operating voltage
220/110V
Operating temperature
0 ÷ 45 °C (or more if connected to power adapters)
Wireless frequency
431 ÷ 478 MHz, frequency is preset on 444 MHz and
cannot be changed on device, only in factory when
ordering, in steps of 200 KHz (235 channels)
Wireless output power
20 mW
Wireless range
up to 300 m line of sight
Luminous intensity
80.000 lux
Power consumption
1400V
Color temperature
3200K-5600K
Beam Angle
75°
Flicker
Flicker-free

1.3 Components:
Light Wall panel
Package
Stand adapter
Multicore cable
Power supply
Accessories (if ordered):
4 Grid/diffusor holders
Foldable Grid with diffusor(1m*1m)
GafferStation control
V-mount adapter
LightStation Control
motorized

2. Mounting the system
2.1. Mounting the panel
To mount the LightWall panel, please follow the steps:
1. Fold the Stand adapter to form
U shape
2. Attach the Wall to
the Stand Adapter
using enclosed
screws
3. Mount the Wall on your
stand
3.2 Mounting Diffusor and Grid
To attach the Grid, Unfold it and simply hook it on all 4 angles of the Wall.

4. Getting started
1. Connect the Wall to the power supply using multicore cable.
2. Connect the power supply to the mails power.
3. Turn the power supply on.
4. Turn the power switch of the control plate on.
5. The control plate will start establishing wireless connection with panels and the lights will flash on all
buttons.
6. When the lights on buttons turn off, wireless connection is established and your LightStation system
is ready for use.
4.1. Setting the panel address
In order to be able to control the panel with the light control plate, you need to set the address of the channel.
You can control the whole Wall with one channel or you can split the panels in the Wall on 4 different channels.
The address of the panel shows which channel controls it. To set the address of the panel please open the Wall
coverage to reach the panels. Than press the Address button on the back of the panel as many times as needed to
set the channel number as shown in the pictures below:

Channel 1
Channel 2
Channel 3
Channel 4
5. Manual control
5.1. Entering Manual mode
If you would like to control the LightWall manually, use commands at the back side of the wall (picture
below).

When the Wall is turned on (on the
power supply), display at the back will
show “WAITING COMMANDS”.
If you turn wireless control plate on,
the connection will soon be established
and the display will show “
WIRELESS MODE”
To enter manual mode, press shortly two memory buttons simultaneously. Display will show
“MANUAL MODE”
5.2. Manual dimmer and temperature regulation
Daylight Wall
-If the Wall you have is daylight, you can use the knob INTENSITY to change dimmer. The display will
show percentage of light intensity. (see the photo below)
Bi-colour Wall
-If the Wall you have is bi-colour, you can the knob INTENSITY to change dimmer, and the knob
COLOR TEMP. to change colour temperature.

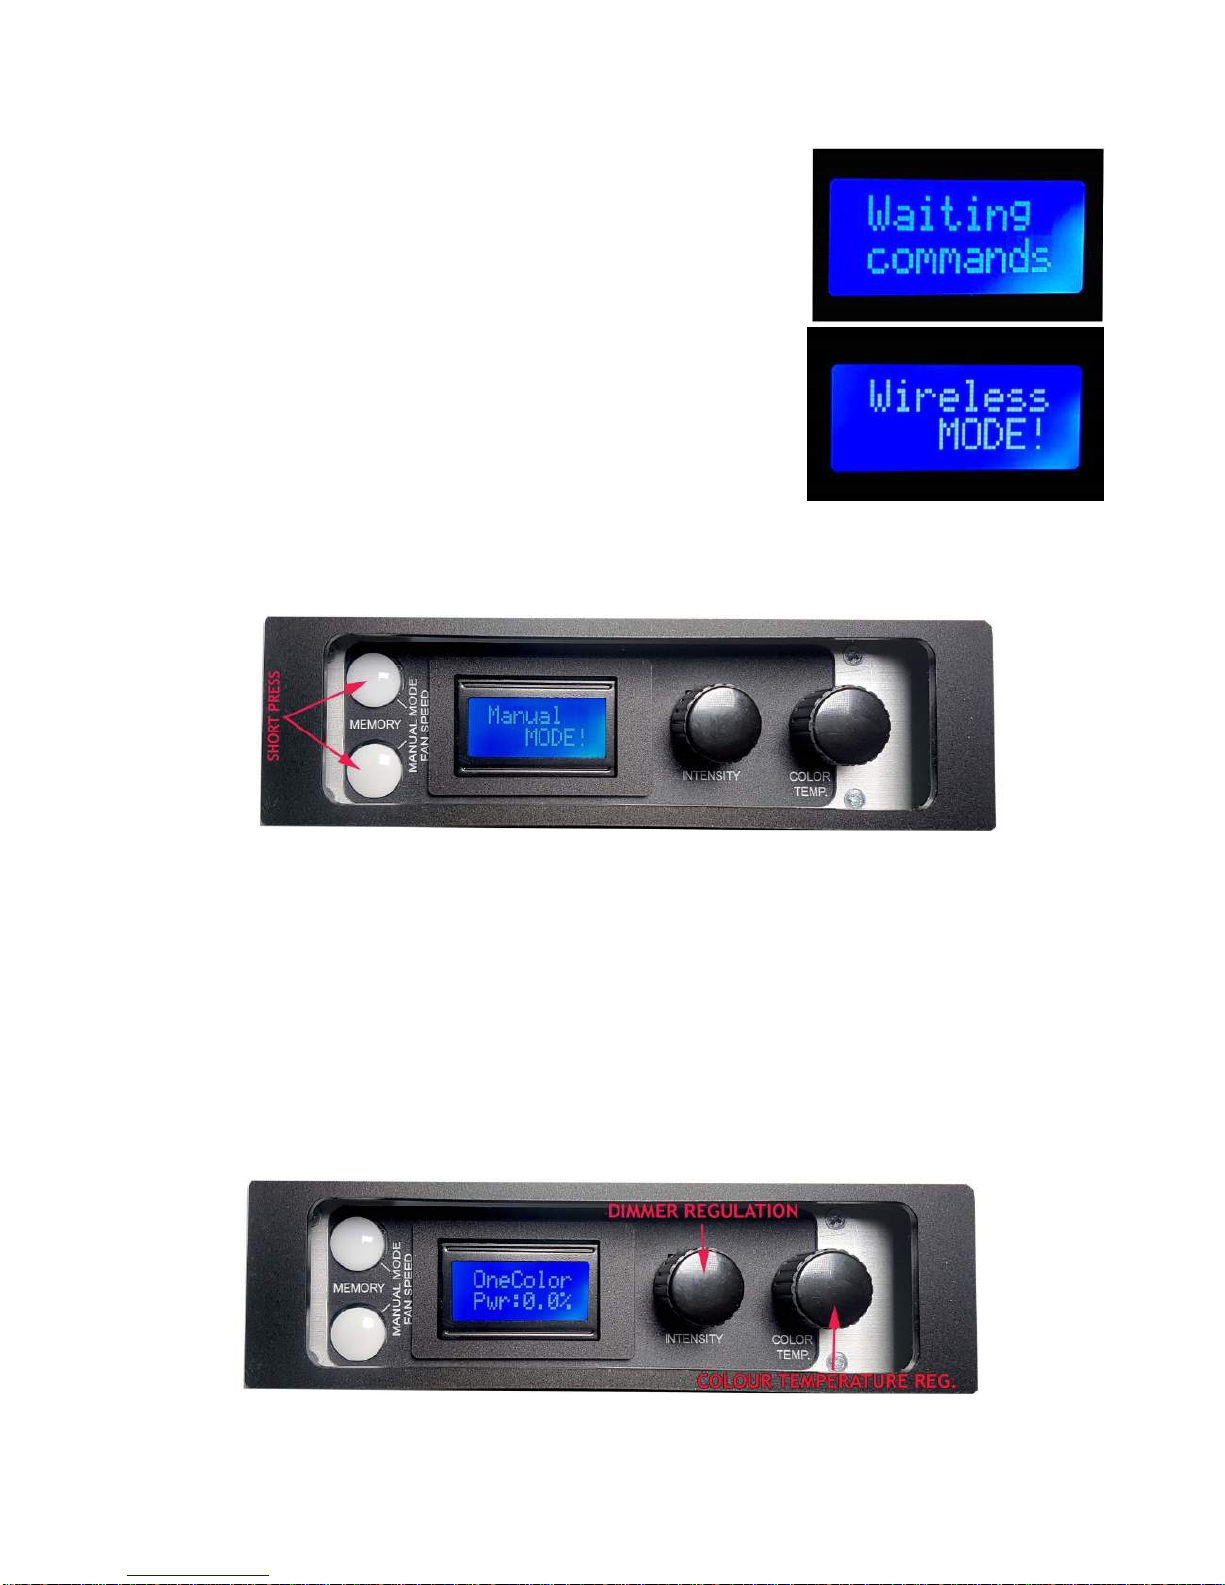
5.3. Fan speed regulation (Silent and Maximal Mode)
When the Wall is turned on, Fans are automatically set to maximum speed.
If you don’t shoot audio, it is recommended to leave the fans that way.
If you need to operate in silence, you can turn SILENT MODE on.
In order to do that, please follow the steps:
1. Press two memory buttons simultaneously and hold them for 5 seconds.
2. Display will show “FAN MODE”
3. Now you can release two memory buttons
4. Fans will go quite, and the display will show “SILENT MODE”
To set the fans back to maximum speed, repeat the same procedure above, the display will show
“MAXIMAL MODE”
5.4. Memory buttons
There are two memory presets available in Manual mode.
In order to set the light memory presets, please follow the steps:
1. Set desirable intensity and colour temperature of your LightWall
2. Press and hold memory button 1 until it turns green
3. The memory preset 1 has been saved and can be recalled by short pressing of memory button 1
4. Set different intensity and colour temperature of your LightWall
5. Press and hold memory button 2 until it turns green
6. The memory preset 2 has been saved and can be recalled by short pressing of memory button 2
5.5. Menu options (available in wireless mode only!)
Even when you are using wireless control plate to control your LightWall, you can manually change the
channel or bank number on the Wall.
In order to enter the MENU, please press and hold INTENSITY knob for a few seconds.
(You must be in wireless operating mode!)

To navigate the Menu, turn the INTENSITY knob to the right.
-The options of the Menu are:
5.5.1. Change Bank
1. Enter the Menu - press and hold INTENSITY knob for a few
seconds
2. Turn the INTENSITY knob to the right until you find the
option CHANGE BANK
3. Press the INTENSITY knob shortly to enter the option
4. The display will show which bank is being used at the moment.
5. Turn the INTENSITY knob to the right in order to choose
other bank (1-6)
6. When you have find desirable bank, press INTENSITY knob to
confirm.
7. Display will show “BANK SAVED”
8. The bank has been changed on your control plate.
5.5.2. Change Channel
In order to change channel number of a Wall on your control plate, please follow the steps:
1. Enter the Menu - press and hold INTENSITY knob for a few
seconds
2. Turn the INTENSITY knob to the right until you find the
option CHANGE CHANNEL
3. Press the INTENSITY knob shortly to enter the option.
4. The display will show which channel is being used at the
moment.
5. Turn the INTENSITY knob to the right in order to choose
other channel (1-4)
6. When you have find desirable channel, press INTENSITY
knob to confirm
7. Display will show “WIRELESS SAVED”
8. The channel has been changed on your control plate.

5.5.3. DMX Change
1. Enter the Menu - press and hold INTENSITY knob for a few
seconds
2. Turn the INTENSITY knob to the right until you find the
option DMX CHANGE
3. Press the INTENSITY knob shortly to enter the option
4. The display will show WHITE DMX channel
5. Turn the INTENSITY knob to the right in order to choose the
channel on DMX control plate that you would like to change
daylight bulbs with.
6. When you have find desirable channel, press INTENSITY
knob to confirm.
7. Display will show YELLOW DMX channel
8. Turn the INTENSITY knob to the right in order to choose the
channel on DMX control plate that you would like to change
tungsten bulbs with.
9. When you have find desirable channel, press INTENSITY
knob to confirm.
10. Display will show CHANGING DMX ADDR.
11. You have now set the channels on other DMX control plate.
5.5.4. LED Type Panel
This option is only used for factory settings, and you SHOULD NOT CHANGE IT!
5.5.5. Display backlight
1. Enter the Menu - press and hold INTENSITY knob for a
few seconds
2. Turn the INTENSITY knob to the right until you find the
option DISPLAY BACKLIGHT
3. Press the INTENSITY knob shortly to enter the option.
4. The display will show which channel is being used at the
moment.
5. Turn the INTENSITY knob to the right in order to change
the intensity of display backlight
6. When you have find desirable strength, press INTENSITY
knob to confirm
7. Display will show
8. The display backlight intensity has been set.

6. Wireless control
In order to control the LightWall wirelessly, you can use one of three types of control plates:
-LightStation control plate
-LightStation motorized control plate
-GafferStation control plate
Use of each control plate will be described in the following text.
6.1. LightStation control plate
6.1.1. Control plate diagram

6.1.2. Turn on the control plate
Insert the battery into battery adapter on the control plate. Press the battery bumper, insert the battery safety into
battery adapter and release the battery safety bumper.
Turn the control plate on using power button.
The display with show:
1. Control plate is ON
2. The bank of control plate
and the state of battery
3. Set strength of each channel in
percentage
6.1.3. Change the bank of control plate:
There are 6 banks available and each one has 4 channels. This way the control plate can control total of 24
channels.
In order to be able to control LED panel/s by control plate, the bank of the panel and the control plate must
be the same.
When you turn the control plate ON the display will show the bank number you are currently using and the
memory button (1-6) that blinks also shows the number of the bank.
To change the bank you are currently using please follow the steps:

1. Press the hold Running (bank select) button.
2. Press very shortly the memory button (1-6) of desirable
bank number.
3. Running and Strobe buttons will light.
4. Release the Running (bank select) button.
5. Display will show “Bank changed”
6. Bank you are using is now changed.
Important:
When you change the bank, control plate will remember the last light preset you made. So when you are
back to previous bank once again, the panels will light as you set them previously –no matter the position
of the dimmer/temperature knobs is changed!
Only when you turn the dimmer/temperature knobs the panels will recognize their position.
If you want to change the dimmer/temperature of a single channel, you needn’t turn the knobs of other
channels. The lights will remain as set before.
6.1.4. Dimmer and temperature regulation
Now that the address of the panels are set, you can easily regulate dimmer and color temperature of each panel
remotely using dimmer/temperature regulation knobs on the control plate.
Any change you make with be shown on display –in percentage and Kelvins (see the photos below)
6.1.5. Advanced settings
6.1.5.1. Scene settings
Scene settings allow you to set and store six different light scenes - combinations of light presets of LED panels.
To set and store light scenes, please follow the steps:
1. Adjust dimmer and colour temperature of 4
channels using dimmer/temperature knobs.
2. Press and hold scene button (1-6).
3. All scene buttons will flash red.
4. The desirable light scene is now stored.
5. Repeat the steps 1-3 until you have stored all six
light scenes.
To recall the scene:
Stored scenes now can be recalled at any time by short
press to the memory button.
When recalled, memory button will turn green.
The display with show dimmer and temperature settings of
each channel of the stored scene.

6.1.5.2. Scene Fade speed
Fade speed between recalled light scenes can be easily adjusted using the Fade speed knob.
6.1.5.3. Auto Scene recall
After you have stored the desired light scenes, you can set the automatic scene recall.
To set auto scene recall, please follow the steps:
1. Press and hold Menu button and while holding it press scene button with which you would like to
start the recall session. Green light on the memory button will turn on.
2. Now press scene button where the second wanted scene is stored. Green light on the first scene
button will turn on, and then on the second scene button (the lights will constantly loop showing the
order of scene recall session)
3. Repeat the step 2 until you have set all wanted scenes in desired recall session. (You can set the same
light scene in session more than once)
4. Now you can release the Menu button.
5. Auto scene recall session is now stored.
IMPORTANT: Start pressing the memory buttons right after you have
pressed Menu, otherwise you will enter the Menu.
To activate Auto scene recall press the Menu button shortly.
The panels will turn to the first stored light scene, and then to each
next added scene and they will stop at the last scene stored in session.
Display with indicate that scene recall is active and the length of the
session recalled.
Fade speed between recalled light scenes can be adjusted with the Fade speed knob.
6.1.5.4. Scene Loop cycle
This option allows the system to constantly loop over the stored light scenes in the order you have set.
To set scene loop cycle option, you should follow the steps 1-5 in the charter Auto Scene Recall, but pay
attention to set the same light scene as the first and the last in the scene recall session!
Set as described, the light will keep looping as long as you do not press the Menu button shortly once again.
6.1.5.5. Running lights
The option of running lights can be activated by
pressing the Running button
The green light indicator will turn on and the
lights will shift one by one.
The speed of running lights can be adjusted using
Strobe/Running Speed knob.
To deactivate running lights option just press
Running button once again.
The green light indicator will turn off and the
lights will stop running.

6.1.5.6. Strobe
The Strobe option can be activated by pressing the Strobe button
The green light indicator will turn on and the lights will start flashing.
The strobe speed can be adjusted using Strobe/Running Speed knob.
To deactivate strobe option just press Strobe button once again.
The green light indicator will turn off and the lights will stop flashing.
Note! Strobe and Running lights option cannot be activated at the same time.
6.1.6. Menu options
To enter the Menu, please press and hold the Menu button for a few
seconds.
To navigate through the Manu, use Strobe (for previous) and
Running lights (for next) buttons.
The options of the menu are:
1. Change channel
2. Change bank
3. Change settings (available for customised orders)
4. Console settings
5. Change DMX (available for customised orders)
6. Exit menu
7. Choose effects
6.1.6.1. Change channel:
In order to be able to change the channel of the LightWall/s, control plate and the Wall/s must be set
on the same bank.
To change the channel of the LightWall/s, please follow the steps:
1. Press the hold Menu button for a few seconds to enter the Menu.
2. Use Stobe/Running buttons to find the option “Change channel”
3. Press the Menu button to confirm the request
4. Use Stobe/Running buttons to choose the channel (1-4)
5. Press the Menu button to confirm the request
6. The display with show “Send to ALL” meaning that the channel of
all panels that are turned on at that moment will be changed.
7. To confirm the request press and hold Menu button until the
display shows counting down (from 30s to 0)
8. The panel/s will start blinking
9. Press Menu button once again to confirm.
10. Display with show “Channel changed”

If you don’t want to change the channel of all panels, please follow this
procedure:
1. Keep the Wall you want to change the channel to turned OFF.
2. Follow the steps 1-6 from the instructions above.
3. Use Stobe/Running buttons to change the option to “Send to New”
4. Press and hold the Menu button to confirm the request
5. The display will show counting down (from 30s to 0)
6. Now turn the panel ON (within this 30 seconds)
7. The panel will start blinking
8. Press Menu button once again to confirm.
9. Display with show “Channel changed”
6.1.6.2. Change bank
This option refers to the bank of the panel/s. You can use control plate to easily change the bank of the
panels. This is the procedure:
1. The control plate must be set on the same bank as the Wall/s
you want to effect on.
2. Press the hold Menu button for a few seconds to enter the
Menu.
3. Use Stobe/Running buttons to find the option “Change bank”
4. Press the Menu button to confirm the request
5. Use Stobe/Running buttons to set the desirable bank number
(1-6)
6. Press the Menu button shortly to confirm the request
7. The display with show “Send to ALL” meaning that the bank
of all LightWalls that are turned on at that moment will be
changed.
8. To confirm the request press and hold Menu button until the
display shows counting down (from 30s to 0)
9. The panel/s will start blinking
10. Press Menu button once again to confirm.
11. Display with show “Finished, exiting”
12. Bank is changed..

If you don’t want to change the bank of all panels, please follow this procedure:
1. The control plate must be set on the same bank as the Wall/s you want
to effect on.
2. Keep the LightWall/s you want to change the channel to turned OFF.
3. Follow the steps 1-7 from the instructions above.
4. Use Stobe/Running buttons to change the option to “Send to New”
5. To confirm the request press and hold Menu button until the display
shows counting down (from 30s to 0)
6. Now turn the LightWall/s ON (within 30 sec)
7. LED panels will start blinking.
8. Press Menu button once again to confirm.
9. Display with show “Finished, exiting”
10. Bank is now changed.
IMPORTANT: To be able to control the LightWall/s, the bank of the control plate and the Wall/s
must be the same!
6.1.7. Console settings
With console settings you can change display backlight intensity or the color of control plate light:
1. RGB LED color:
13. Press the hold Menu button for a few seconds to enter
the Menu.
14. Use Stobe/Running buttons to find the option “Console
settings”
15. Press the Menu button to confirm the request
16. Use Stobe/Running buttons to find the option “RGB
LED color”
17. Press the Menu button to confirm the request
18. One Dimmer knobs (Daylight) of the Channel 1, 2 and 3 to mix the colors.
19. When you have reached desirable intensity, press Menu button shortly to confirm the request.
2. Display backlight:
1. Press the hold Menu button for a few seconds to enter
the Menu.
2. Use Stobe/Running buttons to find the option “Console
settings”
3. Press the Menu button to confirm the request
4. Use Stobe/Running buttons to find the option “Display
backlight”
5. Press the Menu button to confirm the request
6. The display will show “ Move WhitePOT”
7. Use the Dimmer knob (Daylight) of the Channel 1 to change the intensity of display backlight.
8. When you have reached desirable intensity, press Menu button shortly to confirm the request.

6.1.8. Choose effect
There are 10 special effect presets available:
1. Warning light
2. Police effect (Red color filter should be added on one panel and the blue one on the other)
3. Security escort (Red color filter should be added on one panel and the blue one on the other)
4. Fire effect (It is recommended to add orange color filter on the panel)
5. Candle light (It is recommended to add orange color filter on the panel)
6. Sunrise
7. Sunset
8. Watching TV
9. Thunder Type I
10. Thunder Type II
To activate desirable effect:
1. Press the hold Menu button for a few seconds to enter the Menu.
2. Use Stobe/Running buttons to find the option “Choose effect”
3. Press the Menu button to confirm the request
4. Use Stobe/Running buttons to find choose desirable effect
5. Press Menu button shortly
6. The effect with start playing, and the display will show “Playing effect”
7. To change the intensity of the effect, use the Dimmer knob (Daylight) of the Channel 1.
8. To stop the effect, press Menu button shortly.
9. To exit the option, choose “Exit menu” and press the Menu button once again to confirm.
6.2. LightStation motorized control plate
LightStation motorised control plate has a special option of motorised potentiometers. When a light scene is
recalled, potentiometers automatically take positions of the memorised scene, so you can correct light scene presets in
reply more easily.
Other options are the same as options on LightStation control plate, so please follow the instructions for
LightStation control plate above.

6.3. GafferStation control plate
GafferStation is simplified model of
LightStation control plate.
Dimmer/Temperature regulation for 4
channels is available the same way as no
LightStation control plate.
There are 2 light Scenes available (the
procedure of storing light scenes is the
same as on LightStation control plate)
There are no Strobe/running options
7. Running the Wall on V-mount batteries
LightStation control plate runs on 7.4v
rechargeable battery. The batteries capacity of
the system is 2 working hour
To run the Wall on V-mount batteries, use the
V-mount adapter. Attach the batteries and
connect it to the Light Wall using multicore
cable. The Wall will work 2 hours on full
power.
7.1. Checking the state of batteries:
The state of the control plate battery is shown
on the display when you turn ON the console.
If the voltage is under 6,5 battery needs to be charged.
Please attach the power adapter.
If the voltage is 7,4 battery is fully charged.
To check the state of the V-mount batteries, please
read the voltage indicator on the V-mount adapter.

7.2. Charging the batteries
When the batteries get empty, you should attach the power adapter on the control plate. With the power adapter
attached, the system can work on mains power and charge the batteries at the same time.
Power adapter inputs
Table of contents