Sensica sensiLight User manual

User Guide


3
Table of Contents
What is sensiLight™ 4
How to Use sensiLight™ 5
Device Description 5
Device Set-Up 8
Preparing yourself 8
Working with sensiLight™ 9
Preliminary Test 10
Recommended Treatment Protocol 11
Facial Treatment 12
Post-Treatment Care 15
Cleaning and Troubleshooting 15
When Shouldn’t sensiLight™ Be Used? 16
Possible Side Eects 19
What to Expect When Using sensiLight™ 20
Frequently Asked Questions 20
Device Specication Parameters 22
© All rights reserved to Home Well Trading Ltd.

4
What is sensiLight™
sensiLight™ is a personal use device
intended for the reduction of unwanted hair.
sensiLight™ uses the most advanced RPL™
Technology (Reactive Pulsed Light)™.
RPL™ (Reactive Pulsed Light)™
How Does it Work?
sensiLight™ is based on the scientific
principle of selective photothermolysis.
sensiLight™ RPL™ (Reactive Pulsed Light)™
advanced technology uses IPL technology
along with a combination of unique skin
condition sensors. The light penetrates the
epidermis to the dermis and is absorbed
by the melanin in the hair shaft. The heat
generated by the absorbed light then
dissipates into the follicle and generates
local thermal damage, causing a reduction
in hair growth.
Long-Term Hair Reduction – Hair
Growth Cycle
Two factors play an important role in
optimal long-term hair reduction:
• Hair growth cycle involves three phases:
Anagen, Catagen, and Telogen. Anagen
is the growth phase, while Catagen and
Telogen are the resting phases. Permanent
hair reduction can only occur during the
Anagen phase.
• Skin types (according to the Fitzpatrick
scale) are illustrated on the diagram at
the outer cover: darker skin contains
more melanin, which competes with the
targeted hair for energy light absorption.
When more light energy is absorbed
into the skin, there is a greater risk of
adverse effects, and the epidermis may be
damaged.
PLEASE MAKE SURE TO CAREFULLY
READ THIS USER GUIDE BEFORE YOU
START TREATING WITH sensiLightTM.
THE USER GUIDE, AS WELL AS AN
INSTRUCTIONAL VIDEO, CAN ALSO BE
FOUND AT WWW.SENSICA.COM

5
How to Use sensiLight™
Device Description
sensiLight™ kit includes the following main
components:
• sensiLight™ handheld device
• External power supply
Handheld Description
Lamp
Treatment
window
Skin tone and
contact sensor
(Fitzpatrick Sensor)
Power
socket
Trigger
button
and energy
selection button
ON/OFF button
Status indicator:
·Lack of contact
·Non-allowed skin tone
·Device not usable
1-3 Energy
level lights
1
2
3
5
8
6
4
7

6
sensiLight™ Activation Buttons and
Status Indicators:
1. ON/OFF and energy selection button
single button used for the device activation,
deactivation, and energy selection.
• Pressing the button (after the device is
connected to the power supply) will turn
on the device at energy level 1. Each press
will change the energy, from the lower
level to the higher, for a total of 3 different
energy levels.
• The device will switch to standby mode
when left unattended or by pressing the
ON/OFF button for 3 seconds.
2. Trigger button (flash pulse activation)
marked on the left side of the device. The
trigger button will activate the flash lamp if
the treatment window is in full contact with
the skin and the skin tone is in within the
allowed range. Pressing the button once will
activate a single pulse, pressing and holding
the button will activate pulses continuously
as long as the button is pressed.

7
Indicator Mode
No Light OFF Device not working (not connected to the power supply).
“Blinking”
Green Light
Standby Device is in standby mode (before powering on or when
left unattended for 3 minutes).
Green
Light 1-3
Energy
level 1-3
The three energy levels are indicated by three green LED
lights.
“Blinking”
Red Light
Activation
(pulse)
blocked
The device does not deliver a pulse due to either the lack of
full skin contact or non-allowed skin tone (high Fitzpatrick
level as described in the beginning of this User Guide).
“Blinking”
Orange Light
Close to
end of life
Indicates the close end of the lamp lifetime.
“Steady”
Orange
Shutting
down
Indicates the device shutdown by pressing the Off button
for 3 seconds.
“Steady”
Red Light
End of life/
Blocked
Device is permanently blocked, either the lamp has
reached the end of its life time or due to a safety related
malfunction.

8
Device Set-Up
sensiLight™ should ideally be used on areas
such as your underarms, bikini line, arms,
back, shoulders, chest, legs and on allowed
facial areas.
1. Remove all components from the box
(handheld device and power supply).
2. Before beginning the treatment, make
sure the device is clean, dry, and intact.
3. Plug the power supply end into an
electrical outlet and the cord end into the
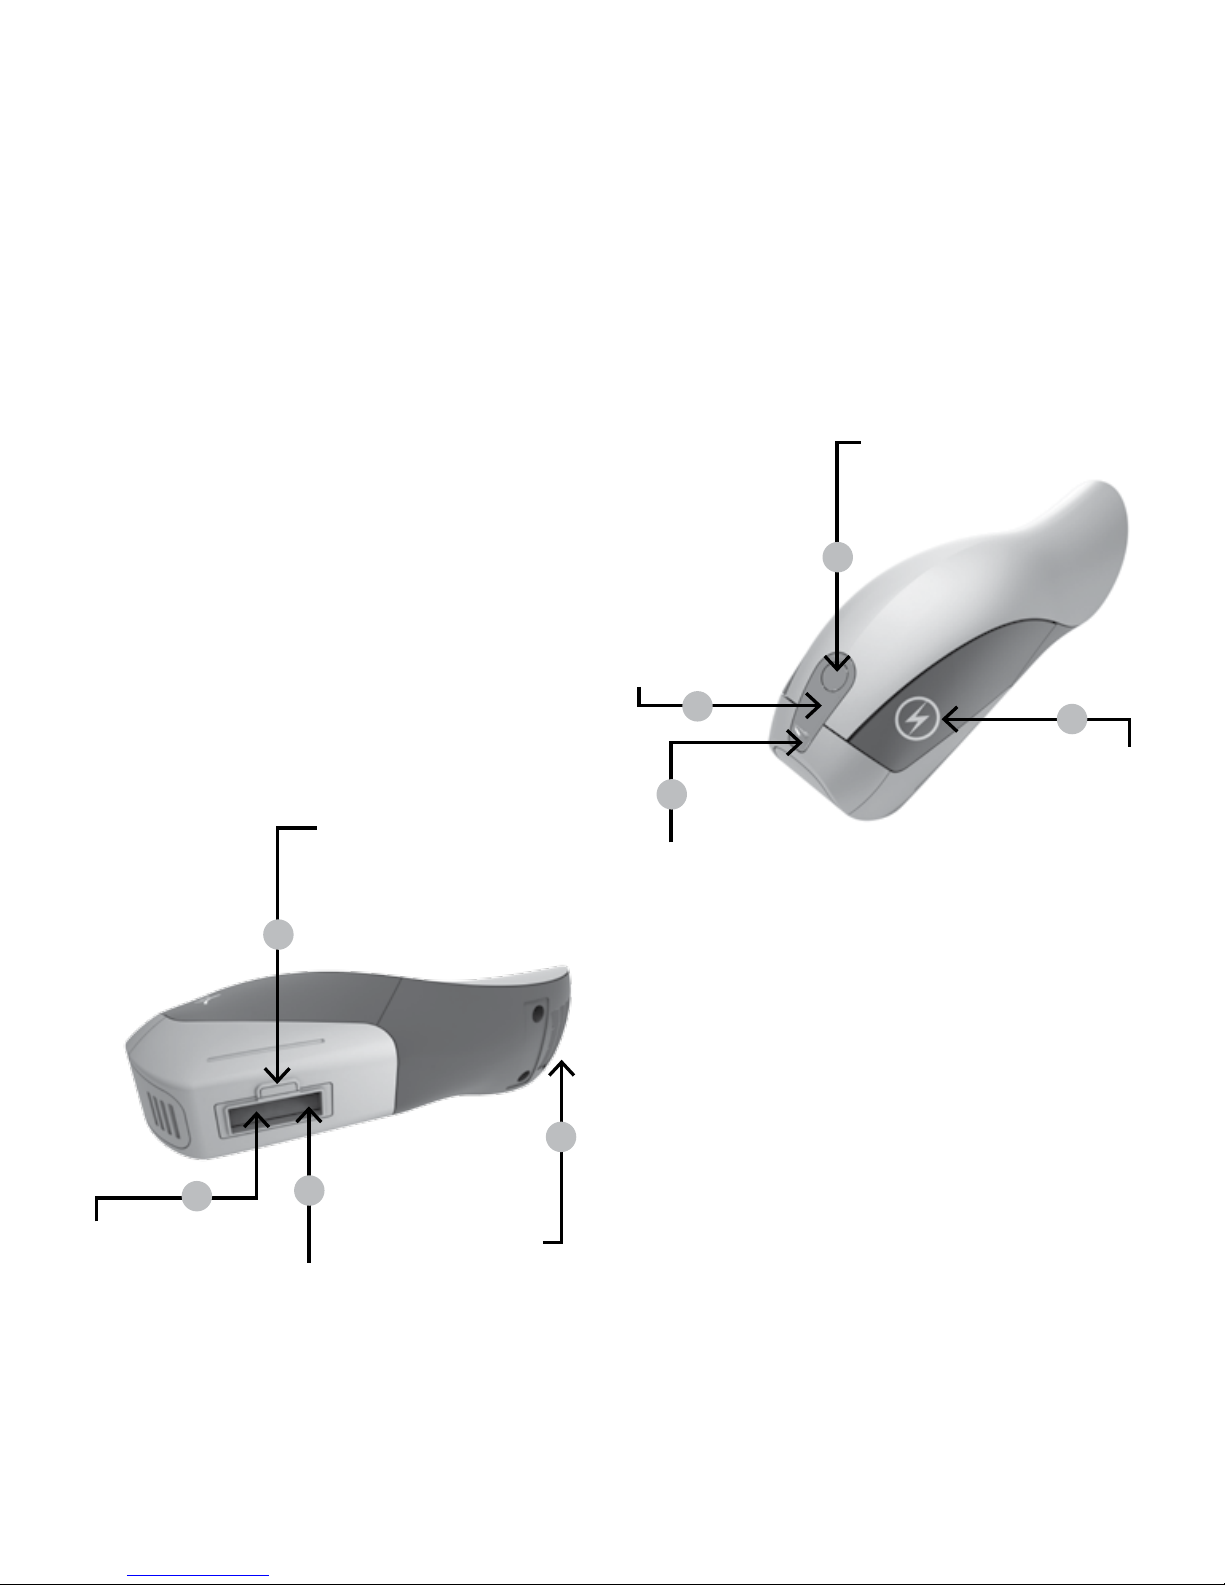
device socket (see image - item 6).
sensiLight™ is now ready to be used.
Preparing yourself
1. Prior to use, make sure your skin is
shaved, clean, and dry (free of any residue
such as powders, creams, makeup,
antiperspirants, or deodorants).
2. Do not use sensiLight™ on tanned skin,
during the 4 weeks after sun exposure
(more than 15 minutes in direct sunlight
without any protection) as this can cause
serious burns or skin injury. Treating
skin that has recently been exposed to
sunlight can result in adverse effects such
as burns, blisters, and skin color changes
(hyper- or hypo-pigmentation).
Remember: sensiLight™ comes with a
built-in skin-tone sensor, enabling the
application only on a suitable skin range.
This unique safety feature will not let you
treat areas where your skin is too dark or
too tanned, even if your general skin type
is lighter.
3. Avoid more than 15 minutes of direct
sun exposure for at least 2 weeks post
treatment. If recently treated skin is
exposed to sunlight in this time period,
make sure to apply SPF 30 or
higher sunscreen.
4. Do a preliminary test on a small patch of
skin in the intended treatment area 48
hours prior to first use of sensiLight™ to
determine energy level settings for your
treatment (as depicted in the preliminary
test section).
5. Do not use sensiLight™ on the face
above the cheek line: around the eyes,

9
eyebrows, or eyelashes as this could
cause serious eye damage.
Working with sensiLight™
Note: A preliminary test should be
conducted before proceeding to a full
treatment. See “preliminary test section”
below.
sensiLight™ should ideally be used on areas
such as your underarms, bikini line, arms,
back, shoulders, chest, legs and on allowed
facial areas.
1. To turn sensiLight™ on, press the ON/
OFF
button (see image - item
1
). Energy level 1
green indicator will light on.
2. The device sets itself on the lowest energy
level - level one. For other energy
levels
press the Energy level selection button.
3. You may decrease or increase the energy
level according to your convenience
(to reach the level determined in the
preliminary test section). The energy level
lights will light up green on the level scale
according to the selected energy level.
4. Place sensiLight™ treatment window (see
image - item 6) on the desired body area
with full contact to the skin. If sensiLight™
is not properly applied or your skin tone
is too dark/tanned, the indicator light on
the applicator will be“blinking”red. In this
case, sensiLight™ will not trigger a pulse
in that area of skin.
5. Press the trigger button (see image - item
2) and hold it pressed for continuous
pulsing.
6. Press the trigger button once for single
pulse.
7. While pressing the trigger button, you
will see a bright flash, you will hear a
popping noise, and you may feel a mild
stinging and/or heat sensation.
8. Keep the trigger button pressed and start
moving the device with each pulse to
the next spot without detaching it from
the skin. The device will immediately
recharge and will be ready for the next
pulse. Repeat process until the entire
treatment area has been covered.

10
9. After the treatment, turn off the device by
pressing the“ON/OFF”button; an orange
indicator will light up while the device is
in the shutdown mode.
Unplug the unit after each treatment
session.
Important notes:
• Try not to overlap pulses on the same
spot. Repeated pulses on the same spot
may cause burns.
• Do not treat the same area of skin more
than once per treatment as it may cause
skin irritation.
• sensiLight™ will not trigger a pulse if:
• There is no full contact of the treatment
window with the body skin
• Your skin tone is too dark or tanned
• Never look directly at the light coming
from sensiLight™, as it may be harmful
to the eyes.
• sensiLight™ may cause temporary
pigmentation changes.
Preliminary Test
The preliminary test is intended to
determine your skin’s reaction to the
sensiLight™ treatment and help you set the
optimal energy level for each treatment area.
Do a preliminary test on each area you
intend to treat 48 hours prior to the full
treatment.
1. Select the lowest level and deliver a pulse
on the selected preliminary test skin area.
2. If you feel comfortable with the energy
level, increase it to level 2 and perform an
additional pulse on the next spot.
3. Only if you feel comfortable, you may
reach the maximum energy level of 3.
4. Stop the test once you do not feel
comfortable, as increasing the energy
level increases the risk of adverse effects.
5. If you see adverse effects such as severe
redness or blistering stop the test
immediately.
6. Wait 48 hours and examine the tested area.

11
If the skin in the test area seems normal
(no response or mild redness), you can
proceed with a full treatment in the highest
comfortable energy level that you tested.
Note:
Do not treat full areas with energy levels
that you have not tested before!
Do not treat the tested area for at least 1
week after the preliminary test is done.
Recommended Treatment
Protocol
Energy Levels:
1 2 3 4 5 6
Black Energy 2-3 Energy 2-3 Energy 2-3 Energy 1-2 Energy 1-2
Dark brown Energy 2-3 Energy 2-3 Energy 2-3 Energy 1-2 Energy 1-2
Brown Energy 2-3 Energy 2-3 Energy 2-3 Energy 1-2 Energy 1-2
Dark blonde Energy 2-3 Energy 2-3 Energy 2-3 Energy 1-2 Energy 1-2
Light brown Energy 2-3 Energy 2-3 Energy 2-3 Energy 1-2 Energy 1-2
Red head Energy 2-3 Energy 2-3 Energy 2-3 Energy 1-2 Energy 1-2
Gray/ white Energy 2-3 Energy 2-3 Energy 2-3
Skin type
Hair
Recommended energy levels are dependent
on both your hair color and skin tone in the
treated area. For convenience – below is a
table of recommended energy levels per
each option.
Important: Facial treatment should always
be on energy levels 1-2.
Treatment Schedule:
Body: The 1–4 treatments will be
approximately two weeks apart, followed by
four-week time intervals.
Face: The 1–6 treatments will be
approximately two weeks apart, followed by
four-week time intervals.
See color skin type at the outer cover.

12
Notes:
1. Response to sensiLight™ hair reduction
differs between individuals, depending
on biological factors.
2. sensiLight™ works best on dark hair or
hair that contains more melanin. Brown
and light brown hair will respond, but
typically will require more treatment
sessions. Red hair may show some
response. White, grey or blond hair shows
a more limited response.
3. Treating the same area more than once in
two weeks is not effective.
4. sensiLight™ should be used again when
needed until the required long-term
results are achieved. Due to hormonal
or other physiological changes, dormant
hair follicles may become active -
maintenance hair reduction sessions may
be required from time to time.
5. The number of sessions required for
achieving long term results is different for
every treatment area and changing for
every user, as it is effected by type of skin,
hair and hormonal changes.
6. Facial hair may be hormonal, and as such,
it may require additional sessions to
achieve a permanent hair reduction.
Facial Treatment
The Facial skin is a sensitive area that
requires special care and caution. Make
sure you follow all instructions and safety
precautions carefully in order to avoid
adverse effects.
It is recommended you first do a body
treatment and get to know the device,
before moving on to facial treatments.
The sensiLight™ can be used to treat all
facial areas below the check line such as
upper lip, check, jaw, chin and neck.
WARNINGS
• Don’t use energy levels higher than level 2
since this may cause burns.
• Do not use the sensiLight™ on the face
above the cheek line or around the eyes,
eyebrows and eyelashes as this could
cause serious eye damage.

13
• Do not use the sensiLight™ over mucous
membranes as in the nose and ears as it
may cause burns.
• Make sure you do a spot test 48 hours
prior to treatment. The spot test should be
done in a hair-free area such as below the
ear or the side of the neck to determine
the energy level.
• Do not treat the tested area for at least 1
week after the spot test is done in order to
assess skin reaction
1. Mark the treatment area with a white
eye pencil. Use the mark as guidance
for delivering the pluses. In this way
you can avoid overlapping treatment
areas or treating unwanted facial areas.
2. Use a mirror to help you place the
treatment window correctly on the
treatment area.
3. Follow the instructions for use with
additional care to the following
specific area instructions.
Note:
Facial hair may be hormonal and as such,
it can take more sessions to achieve a
permanent hair reduction.

14
Upper Lip, Cheek, Jaw, Neck and
Chin Treatment
Upper Lip:
Avoid the nostrils and lip, as
these areas are more sensitive.
You can“fold”your lip inward
or press the lips together
to achieve a better spread
treatment area.
Cheek and Jaw
Place the Applicator treatment
area as indicated in the picture.
Trigger one pulse on each spot,
moving from one side of the
jaw/cheek to the other
Neck and Chin:
Place the Applicator treatment area as
indicated in the picture. Trigger one pulse
on each spot, moving from one
side of the neck/chin to the
other.
Note: The skin on lower third of
the neck is more sensitive, avoid
overlapping treatment areas.
For Male Users
Take care while treating the beard area;
the density of hair growth means a large
amount of melanin which absorbs the heat.
It is recommended doing the first treatment
in low energy levels (1 to 2).
It is not recommend doing a full beard
reduction as this may change the facial
characteristics and result in a feminine look.
Note:
Premature aging characteristics can
emerge due to complete loss of facial hair.

15
Post-Treatment Care
• Apply Sensica post-treatment cream or
any calming lotion such as Aloe Vera.
• Avoid using peeling and bleaching creams
or products for at least 24 hours as this
irritates the treated skin.
• Avoid more than 15 minutes of direct
sun exposure for at least 2 weeks post
treatment. If recently treated skin is
exposed to sunlight in this time period,
make sure to apply SPF 30 or higher
sunscreen (Sensica post-treatment cream
comes with sunscreen).
• Do not wax or pluck hairs from treated areas.
• Remember! It may take up to 2 weeks for
the hair to grow and be fully out if the hair
follicle is still active.
Cleaning and
Troubleshooting
Cleaning
• Make sure to turn off and unplug unit
before cleaning.
• It is recommended to clean the treatment
window after every session by using a dry,
clean cloth to gently wipe the device.
• Keep sensiLight™ dry. Never submerge the
device or any of its parts in water as it may
lead to an electrocution risk.
• Store sensiLight™ in a safe and protective
place.
Troubleshooting
If you experience any problems with
sensiLight™, please refer to below
information to try to resolve it.
• If sensiLight™ does not turn on:
Make sure that the power supply is
plugged properly into the device and the
electrical outlet.

16
• If sensiLight™ does not trigger a pulse:
1. Verify there is full contact with the skin.
The trigger button will activate a flash
pulse only when the device is in full
contact with the skin.
2. If the skin color level identified by
sensiLight™ is too dark, the flash
activation will be blocked.
3. In the case of a safety issue or when the
lamp has reached its end, a steady red
light will come on. The device will shut
down.
• If you still have problems with your
sensiLight™, please contact customer
service.
When Shouldn’t sensiLight™
Be Used?
WARNINGS
• Do not open or repair the device
as it contains dangerous electrical
components, which may cause physical
damage.
• Do not use near bathtubs, showers, basins,
or other vessels containing water as it may
lead to an electrocution risk.
• Do not use if:
• The device is not working properly,
appears damaged or broken (UV and IR
emitted from this device)
• The cord or plug are damaged
• You see or smell smoke
• The outer shell is damaged or loose
• The lamp or Treatment Window is
damaged/missing
• The device becomes damp or wet

17
• Possibly hazardous optical radiation
emitted from this product. Never
look directly at the light coming from
sensiLight™. Eye injury may result.
• NEVER use flammable liquids such as
alcohol or acetone to clean the skin before
using sensiLight™ as it may cause burning
of the skin.
• Do not use if you have an active implant
such as a pacemaker, insulin pumps,
or similar devices since it may cause
interference.
• The use of sensiLight™ by pregnant
(suspicion of pregnancy) or nursing
women has not been established.
• Do not use if you have skin cancer or on
areas at risk of malignancy.
• Do not use if you suffer from epilepsy, as it
could trigger a seizure.
• The use of sensiLight™ by someone
under radiation therapy or chemotherapy
within the past 3 months has not been
established.
CONTRAINDICATIONS
THE CONSEQUENCES OF THE
FOLLOWING CONTRAINDICATIONS
ARE NOT YET ESTABLISHED AND
MAY CAUSE ADVERSE EFFECT
• Do not use on damaged or broken skin
or if you have a history of a Herpes or
Psoriasis outbreak in the treatment area.
• Do not use if you suffer from keloid
scar formation.
• Do not use if you have taken Tetracycline
antibiotics within the last two weeks.
• Do not use if you have been taking
medication with the following active
ingredients within the last two weeks:
Retinoid, Accutane, and Retina-A.
• Do not use if you are photosensitive
or have other diseases related to light
sensitivity.
• Do not use if you suffer from metabolic
conditions, such as diabetes.
• Do not use if you have had a skin peel or
other skin resurfacing procedure within
the last 6–8 weeks.
• Do not use if you were exposed to strong

18
sunlight or an artificial tanning machine
during the past 30 days.
• Do not use if you have dark spots such
as large freckles, moles, or blisters on the
treatment area.
• Do not use on the face above the cheek
line: around the eyes, eyebrows, or
eyelashes as this could cause serious
eye damage.
• Do not use over mucous membranes as in
the nose and ears.
• Do not over piercings or any metal items
such as earrings or jewelry as it may
cause burns.
• sensiLight™ should not be used on tattoos,
permanent makeup, and intimate body
areas such as nipples, genitalia, or around
the anus.
• If you see extreme redness of the
skin, blistering, or burns - STOP USING
IMMEDIATELY!
• Use of sensiLight™ may cause temporary
skin color changes.
Note:
If you have undergone any other
aesthetic procedures or any uncertainty
regarding potential side effects, consult
your physician before using sensiLight™.
Note:
sensiLight™ is designed for use by a
single user. For multiple users, read the
cleaning instructions before using.
CAUTIONS
• KEEP OUT OF CHILDREN’S REACH.
• This appliance is not intended for use by
persons with reduced physical, sensory, or
mental capabilities.
• Do not use with any additional accessories
that are not part of its intended use as
there is no data supporting this kind of use
of the device.
• sensiLight™ is a home use device intended
for hair reduction. Do not use for any other
purpose.
• Use sensiLight™ according to the

19
instructions for use only.
• Do not leave the device unattended when
plugged into an electrical outlet.
• If you have undergone any other aesthetic
procedures or any uncertainty regarding
potential side effects, consult your
physician before using sensiLight™.
Possible Side Effects
When using sensiLight™ according to
the instructions for use, side effects are
rare. However, every aesthetic procedure
including the usage of home use devices
may cause some degree of side effects. If
any of the following conditions appear and
last more than 24 hours, you should consult
your physician:
Degree of
Side Effects
Side Effects
Minor
Side-Effects
Irritation
Redness
Sun Sensitivity
Rare
Side-Effects
Burns
Scarring
Pigment Changes
Excessive Redness
Swelling
Extremely Rare
Side-Effects
Infection
Bruising

20
What to Expect When Using
sensiLight™
• During your hair removal treatment it is
normal to experience:
• A flash of light on each press of the
activation bottom. The light will not
harm the eyes when the device is applied
with full contact to the skin on the
recommended treatment areas.
• A pop noise with each pulse - occurs
whenever a pulse is activated.
• A sensation of warmth - radiates from the
light energy after each pulse.
• A mild stinging sensation - can be felt,
similar to being snapped with a rubber
band.
• Some mild red or pink color - appears
during and just after the treatment.
Frequently Asked Questions
Does sensiLight™ actually work?
Yes, sensiLight™ has been proven to achieve
long-term hair reduction results. The use of
light energy has been well documented for
over 17 years in professional journals and by
well-respected institutions.
Which body areas can sensiLight™ be used
on?
sensiLight™ is designed to remove hair in areas
such as underarms, bikini line, arms, back,
shoulders, chest, legs and parts of the face.
Why do I need to shave my hair before
using sensiLight™?
RPL™ Technology is aimed for the energy of
the light to work on the hair follicle. When
treated area is not shaved, large part of the
energy will be absorbed by the hair itself
and less energy will travel into the follicle,
therefore treatment effectiveness will be
significantly lower.
What effect does sensiLight™ have on
different colored hair?
sensiLight™ works best on dark hair or hair
that contains more melanin. Brown and light
brown hair will respond, but typically will
require more treatment sessions. Red hair
may show some response. White, grey, or
blond hair shows a more limited response.
Nevertheless, some users have noted hair
reduction after multiple treatment sessions.
Does it hurt to use sensiLight™?
Some users may have a slight sense of
Other manuals for sensiLight
1
Table of contents