Sensio CRUXGG TRNR User manual

FRONT Cover
TRNR
ROTATING DOUBLE WAFFLE MAKER
INSTRUCTION MANUAL

THANK YOU CARD - inside Front Cover

THANK YOU CARD - inside Front Cover
TABLE OF CONTENTS
Important Safeguards ............................................................................................................................................... 2-3
Additional Important Safeguards ............................................................................................................................4
Notes on the Plug.............................................................................................................................................................5
Notes on the Cord............................................................................................................................................................5
Electric Power.....................................................................................................................................................................5
Plasticizer Warning..........................................................................................................................................................6
Getting to Know Your CRUXGG™ Rotating Double Wale Maker......................................................... 7
Before Using for the First Time............................................................................................................................ 8-9
Operating Instructions...........................................................................................................................................10-12
Wale Baking Tips ...................................................................................................................................................13-14
User Maintenance Instructions...............................................................................................................................15
Care & Cleaning Instructions.............................................................................................................................15-16
Storing Instructions.......................................................................................................................................................16
Warranty ........................................................................................................................................................................ 17-18

2
IMPORTANT SAFEGUARDS
When using electrical appliances, basic safety precautions should always be
followed including the following:
. READ ALL INSTRUCTIONS.
2. The cord to this appliance should be plugged into a 120V AC electrical
outlet only.
3. To protect against risk of electric shock, do not immerse the cord, plug or
cooking body in water or any other liquid.
4. Do not touch hot surfaces. Use handles or knobs.
5. CAUTION HOT SURFACES: THIS APPLIANCE GENERATES HEAT
DURING USE. PROPER PRECAUTIONS MUST BE TAKEN TO PREVENT
THE RISK OF BURNS, FIREOROTHER DAMAGE TO PERSONS OR
PROPERTY.
6. When using this appliance, provide adequate ventilation above andon all
sides for air circulation. Do not allow this appliance to touch curtains, wall
coverings, clothing, dish towels or other flammable materials during use.
7. This appliance is not intended for use by persons (including children) with
reduced physical, sensory or mental capabilities, orlack ofexperience
and knowledge, unless they have been given supervision or instruction
concerning use of the appliances byaperson responsible for their safety.
8. Children should be supervised to ensure that they do not play withthe
appliance.
9. Push the ON/OFF switch to (O) OFF. Unplug from outlet whennotin use and
before cleaning. Allow to cool before cleaning orstoring this appliance.

3
10. Never yank the cord to disconnect the cooking unit from the outlet. Instead,
grasp the plug and pull to disconnect.
11. Do not operate any appliance if the cord is damaged. Do not use this
appliance if the unit malfunctions, if it is dropped or has been damaged in
any manner. In order to avoid the risk of an electric shock, never try to repair
the Rotating Double Wale Maker yourself. Bring it to a qualified technician
for examination, repair or electrical ormechanical adjustment. An incorrect
reassembly could present arisk of electric shock when the Rotating Double
Wale Maker isused.
12. The use of accessories or attachments not recommended
bythemanufacturer may cause fire, electrical shock or injury.
13. Do not use outdoors or for commercial purposes.
14. Do not let the electrical cord hang over the edge of the table orcounter top,
or touch hot surfaces.
15. Do not place on or near a hot g as or electric burner or heated oven.
16. Use on a heat-resistant, flat level surface only.
17. Use extreme caution when moving any appliance containing hot food, water,
oil or other liquids.
18. To connect/disconnect, Push the ON/OFF switch to (O) OFF. Then unplug
the power cord from electric outlet.
19. Do not use for other than intended use.

4
ADDITIONAL IMPORTANT
SAFEGUARDS
CAUTION HOT SURFACES: THIS APPLIANCE GENERATES HEAT AND
ESCAPING STEAM DURING USE. PROPER PRECAUTIONS MUST BE
TAKEN TO PREVENT THERISK OF BURNS, FIRES OR OTHER DAMAGE TO
PERSONS OR PROPERTY.
CAUTION: THIS APPLIANCE IS HOT DURING OPERATION AND RETAINS
HEAT FOR SOME TIME AFTER UNPLUGGING. ALWAYS USE OVEN MITTS
WHEN HANDLING HOT MATERIALS AND ALLOW METAL PARTS TO
COOL BEFORE CLEANING. DO NOT PLACE ANYTHING ON TOP OF THE
APPLIANCE WHILE IT IS OPERATING OR WHILE ITIS HOT.
1. All users of this Rotating Double Wale Maker must read andunderstand this
instruction manual before operating or cleaning thisappliance.
2. If this Rotating Double Wale Maker begins to malfunction during use,
immediately push ON/OFF switch to OFF. Then unplug thepower cord from
electric outlet. Do not use or attempt to repair themalfunctioning appliance.
3. Do not leave this Rotating Double Wale Maker unattended duringuse.
4. Do not overfill wale compartments. Lids must be fully closed
toaccommodate full plate rotation.
FOR HOUSEHOLD USE ONLY
SAVE THESE INSTRUCTIONS

5
NOTES ON THE PLUG
This appliance has a polarized plug (one blade is wider than the other). Toreduce
the risk of electric shock, this plug will fit in a polarized outlet only one way. If the
plug does not fit fully into the outlet, reverse theplug. If it still does not fit, contact
a qualified electrician. Do not modify the plug in any way.
NOTES ON THE CORD
a) A short power-supply cord (or detachable power-supply cord)
istobeprovided to reduce risks resulting from becoming entangled in or
tripping over a longer cord.
b) Longer detachable power-supply cords or extension cords areavailable and
may be used if care is exercised in their use.
c) If a long detachable power-supply cord or extension cord is used:
1) The marked electrical rating of the detachable power-supply cord or
extension cord should be at least as great astheelectrical rating of
the appliance;
2) If the appliance is of the grounded type, the extension cord should be
a grounding- type 3-wire cord;
3) The longer cord should be arranged so that it will not drape over
the counter top or table top where it can be pulled onbychildren or
tripped over unintentionally.
ELECTRIC POWER
If the electrical circuit is overloaded with other appliances, your appliance may
not operate properly. It should be operated on a separate electrical circuit from
other appliances.

6
PLASTICIZER WARNING
CAUTION: TO PREVENT PLASTICIZERS FROM MIGRATING TO THE FINISH
OFTHECOUNTER TOP OR TABLE TOP OR OTHER FURNITURE, PLACE
NONPLASTIC COASTERS OR PLACE MATS BETWEEN THE APPLIANCE
AND THE FINISH OFTHECOUNTER TOP OR TABLE TOP. FAILURE TO
DO SO MAY CAUSE THE FINISH TODARKEN; PERMANENT BLEMISHES
MAY OCCUR OR STAINS CAN APPEAR.

7
GETTING TO KNOW YOUR CRUXGG™ ROTATING DOUBLE WAFFLE MAKER
Product may vary slightly from illustration
Upper Lid Handle
Upper Lid
Lower Lid
Lower Lid
Handle
Base
Base
Browning
Control Dial
POWER
Switch
READY
Light #1
Brush READY
Light #2
Drip Tray
Measuring
Cup
Upper Wale
Compartment #1
Upper Wale
Compartment #2
Non-Stick Upper
and Lower Wale
Plates
Figure 1
8
BEFORE USING FOR THE FIRST TIME
1. Carefully unpack the Rotating Double Wale Maker and remove all packaging
and materials.
2. Set the Rotating Double Wale Maker on a dry, clean and flat surface.
3. Wipe outer surfaces with a slightly damp, soft cloth or sponge.
4. Press the top plate release button and lift the top cooking plate to expose the
upper wale compartment #1 (see fig 2). Wipe the cooking plates with a damp
cloth to remove all dust, and then dry.
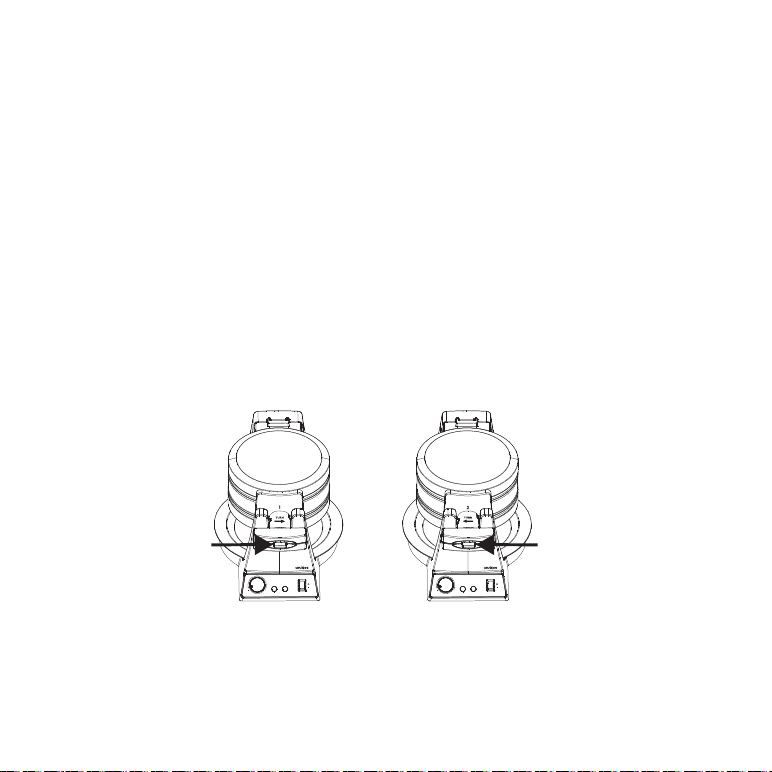
5. Lower the top cooking plate to close the Rotating Double Wale Maker and
rotate thehandle (in the direction of the arrow) 180° to the bottom side.
6. Press the top plate release button and lift the top cooking plate to expose the
lower wale compartment #2 (see fig 3). Wipe the cooking plates with a damp
cloth to remove all dust, andthen dry. Close the lid and rotate the unit 180°
counter-clockwise to the top side.
Figure 2 Figure 3

9
. CAUTION: TAKE CARE TO PREVENT WATER FROM RUNNING INTO THE
APPLIANCE. NEVER IMMERSE THE ROTATING DOUBLE WAFFLE MAKER
BODY INWATER OR ANY OTHER LIQUIDS!
. NOTE: WHEN YOUR ROTATING DOUBLE WAFFLE MAKER IS HEATED
FOR THE FIRST TIME, IT MAY EMIT SLIGHT SMOKE OR ODOR. THIS IS
NORMAL AND SHOULD DISAPPEAR AFTER ONE OR TWO USES. THIS
DOES NOT AFFECT THE SAFETY OF THE APPLIANCE. HOWEVER, AS
IT MAY AFFECT THE FLAVOR OF THE FIRST WAFFLES PREPARED IN
THE ROTATING DOUBLE WAFFLE MAKER, IT IS RECOMMENDED THAT
THESE BE DISCARDED.
9. Keep the Wale Maker closed until use.

10
OPERATING INSTRUCTIONS
IMPORTANT: BEFORE OPERATING YOUR ROTATING DOUBLE WAFFLE
MAKER, MAKE SURE THE DRIP TRAY ISINPLACE IN THE BASE OF THE
WAFFLE MAKER.
1. Plug Wale Maker into a 120V AC electrical outlet.
2. Press the POWER switch to ( | ) ON. The POWER button will illuminate and
remain lit during use. An audible beep can be heard and both red READY
lights (#1 and #2), willilluminate.
NOTE: WHEN YOUR ROTATING DOUBLE WAFFLE MAKER IS HEATED
FOR THE FIRST TIME, IT MAY EMIT SLIGHT ODOR OR SMOKE. THIS IS
NORMAL AND SHOULD DISAPPEAR AFTER ONE OR TWO USES. THIS
DOES NOT AFFECT THE SAFETY OF THE APPLIANCE. HOWEVER, AS IT
MAY AFFECT THE FLAVOR OF THE FIRST WAFFLES PREPARED IN THE
WAFFLE MAKER, IT IS RECOMMENDED THAT THESE BE DISCARDED.
4. Turn the browning control dial to 6 (DARK) to preheat.
5. While preheating, prepare wale batter.
6. After approximately 5 minutes, 3 audible beeps can be heard and both
red READY lights illuminate, indicating both the upper and lower wale
compartments are preheated andready for use.
7. Turn the browning control dial down to the desired wale browning level.
NOTE: THE LOWEST BROWNING SETTINGS PRODUCE A LIGHTLY
BROWNED WAFFLE, OR CAN BE USED TO REHEAT WAFFLES. WAFFLES
BAKED AT HIGHER SETTINGS ARE DARKER AND CRISPIER. WHEN
PREPARING ARECIPE FOR THE FIRST TIME, SET THE BROWNING
CONTROL BETWEEN AND MEDIUM;
IMPORTANT: RECIPES WILL VARY IN BAKE TIME AND BROWNNESS;
LIGHTER BATTERS WITH MORE SUGAR WILL BROWN QUICKER. NOTE
THE PERFECT BROWNING SETTING AND BAKE TIMES FOR EACH
BATTER RECIPE FOR FUTURE USE.

11
8. Press the top plate release button and lift the lid to expose the lower wale
plate. Rest lid inthe open position.
9. Fill the measuring cup with batter (a heaping 3/4 cup) and pour onto the
center of the lower wale plate. If necessary, use a spatula to spread the
batter into the corners of the plate. Trynot to overfill, batter will expand when
cooked.
CAUTION: DO NOT USE COOKING SPRAYS. THEY CAN CAUSE
ABUILDUPONTHECOOKING PLATES.
10. Use the lid handle to close the lid; the lid will automatically lock when closed.
Rotate theunit 180°.
WARNING: TO AVOID SPILLAGE, ALWAYS MAKE SURE THE LIDS ARE
PROPERLY LOCKED INTO POSITION BEFORE ROTATING AND BAKING.
11. Rotate the handle (in the direction of the arrow) 180°, press the handle lock
button; thenlift the lid to expose the empty lower wale plate. Rest lid in the
open position. Repeat theprocedure, filling the lower wale compartment.
12. As the Rotating Double Wale Maker cooks, both red READY lights will be
turned o.
13. In approximately 4 minutes, 6 audible beeps can be heard and red READY #1
light willilluminate.
14. Rotate the Wale Maker 180° until it is flat and locked into a stable position.
Press thetop plate release button and lift the top cooking plate. Check for
desired doneness andifneeded, continue cooking for 30 seconds to 1 minute
until perfectly browned toyourliking.
15. Wearing oven mitts, remove cooked wale from the upper wale
compartment using non-metallicutensils. A plastic spatula will help to remove
the wale in one piece.

12
16. When the red READY #2 light turns on, rotate the Wale Maker 180° until it is
flat andlocked into a stable position. Press the top plate release button and
lift the top cooking plate. Remove baked wale when baked to your liking.
NOTE: WAFFLES SHOULD BE BAKED ACCORDING TO THE BROWNING
CONTROL SETTING CHOSEN. IF WAFFLES NEED TO BAKE TO A
DARKER FINISH, TURN THE BROWNING CONTROL DIAL TO INCREASE
THE SETTING, CLOSE THE LID AND CONTINUE TO BAKE FOR
ADDITIONAL SECONDS, CHECKING UNTIL THE DESIRED COLOR
ISACHIEVED.
17. Wearing oven mitts, remove wale from the cooking plates using a using a
rubber spatula or any non-metallic utensil.
CAUTION HOT SURFACES: WAFFLE MAKER COOKING PLATES ARE
VERY HOT DURING USE. USEOFOVEN MITTS IS RECOMMENDED WHEN
POURING BATTER AND REMOVING BAKED WAFFLES TOPREVENT THE
RISK OF BURNS.
NOTE: IF ADDITIONAL WAFFLES ARE TO BE BAKED, KEEP THE LID
CLOSED TO RETAIN HEAT. ALWAYS BESURE THE RED READY LIGHT IS
ILLUMINATED BEFORE BAKING MORE WAFFLES.
NOTE: WAFFLES MADE LATER WILL BAKE FASTER BECAUSE EXTRA
HEAT HAS BEEN RETAINED.
18. When baking is complete, press the ON/OFF switch to (O) OFF, then remove
plug from theelectrical outlet. Make sure the Rotating Double Wale Maker’s
bottom cooking plate ispositioned flat and locked into a stable position. Lift top
cooking plate and allow to cool.
WARNING: DO NOT CLEAN UNTIL WAFFLE MAKER HAS FULLYCOOLED.

13
WAFFLE BAKING TIPS
• Sift all dry ingredients together. It is not necessary to beat egg yolks and milk
separately.
• Beat egg whites until they form sti peaks. Stir 1/4 of the beaten whites into
the batter tolighten it, and then gently fold in the rest. There should be white
streaks in the batter. Donot over-mix batter when adding egg whites.
• Some recipes may be doubled. Do not make large batches of batter when
whipped egg whites have been used to lighten the wale.
• Do not open the Rotating Double Wale Maker during the first minute of
baking orthewale will separate. Completely bake wales before removing.
• When preparing wale batter with gluten flour, do not over-mix or wales will
be tough. Stir batter only until large lumps of dry ingredients disappear.
• The optimal amount of batter to produce a full-shaped wale, without
overflowing, will vary with dierent wale batters. Pouring batter from a
measuring cup will help to gauge howmuch batter to use each time. Fill
bottom cooking plate of Rotating Double Wale Maker with enough batter
to cover peak areas. Begin with 1 scant cup (1/4 cup per quarter wale). Add
more if needed.
• For more evenly shaped wales, spread thick batters to the outer edge of the
cooking plate using a heat-proof rubber spatula or other non-metallic utensil
before closing the lid.
• To retain crispness, move baked wales to a wire cooling rack. To keep
wales warm, place on an ovenproof dish on an oven rack and warm at about
200-250°F (90-120°C). Wales will keep for about 20 minutes before they
begin to dry out.
• Baked wales freeze well. Cool completely on a wire rack. Store in a plastic
freezer bag orina covered container, separating wales with wax paper.

14
• Reheat frozen wales in a microwave, toaster oven, convection or
conventional oven ortoaster until hot and crisp.
For gluten-free wales:
• Use gluten-free baking mixes.
• Use gluten-free flour.
• Replace flour in recipes with combinations of: coconut flour, rice flour, almond
flour, oatflour, corn meal.
For lower fat, lower cholesterol wales:
• Use skim milk.
• Replace full fat milk with nut or seed milks: almond, cashew, soy, flax, or hemp
seed milk.
• Use whites only, eliminate the egg yolk.
• Always use liquid vegetable oils such as canola, coconut, corn or sunflower,
insteadof butter.
• Replace 1 egg with 3 tablespoons cold water + 1 tablespoon ground flax seed.*
• Replace 1 egg with 3 tablespoons cold water + 1/2 tablespoon ground
chiaseed.*
For higher fiber wales:
• Substitute 1/2 cup or more of white flour with whole-wheat flour.
• Substitute 1/4 cup of white flour with wheat or oat bran.
• Replace 1 egg with 3 tablespoons cold water + 1 tablespoon ground flax seed.*
• Replace 1 egg with 3 tablespoons cold water + 1/2 tablespoon ground
chiaseed.*

15
USER MAINTENANCE INSTRUCTIONS
This appliance requires little maintenance. It contains no user-serviceable parts.
Any servicing requiring disassembly other than cleaning must be performed by a
qualified appliance repair technician.
CARE & CLEANING INSTRUCTIONS
WARNING: TO PROTECT THE PREMIUM QUALITY NONSTICK CERAMIC
COOKING PLATES, USE ONLY PLASTIC, NYLON OR WOODEN UTENSILS TO
REMOVE WAFFLES.
CAUTION: UNPLUG FROM ELECTRICAL OUTLET AND ALLOW TO COOL
THOROUGHLY BEFORE CLEANING.
1. The Rotating Double Wale Maker does not disassemble for cleaning.
2. Never immerse appliance in water or other liquids. Never place Rotating
Double Wale Maker in a dishwasher.
3. If batter has dripped onto the drip tray, remove drip tray immediately after
use and rinse with warm water. Wash with mild dishwashing liquid. Remove
stubborn stains with a plastic mesh pu or pad. Do not use steel wool or
coarse scouring pads. The drip tray is top rack dishwasher-safe.
4. Use the brush to wipe down and remove cooked-on batter from the plates.
5. Wale cooking plates should be cleaned and conditioned before each heating.
6. To condition cooking plates, lightly coat the cooking surfaces with solid vegetable
shortening orvegetable oil. After a time, if wales show signs of sticking,
recondition as needed.
WARNING: TO PROTECT THE PREMIUM QUALITY OF THE NON
STICK CERAMIC COATING, USE ONLY PLASTIC, NYLON OR WOODEN
UTENSILS. NEVER USE STEEL WOOL OR COARSE SCOURING PADS.

16
7. To remove any batter baked onto the ceramic cooking plates, add water to
moisten baking soda and mix into a paste. Add paste to any hardened batter
and allow to stand for5to 10 minutes (not more than an hour). Use a plastic
scouring pad to lightly scrub thearea or rub with a soft damp cloth.
Wipe clean with a damp cloth or paper towel, anddry thoroughly.
NOTE: DO NOT RUB VIGOROUSLY WHEN USING A PLASTIC SCOURING
PAD AND NEVER USE A METAL SCOURING PAD AS THIS MAY DAMAGE
THE NONSTICK CERAMIC COATING.
8. Repeat with baking soda paste if necessary.
NOTE: THE PERFORMANCE AND NONSTICK PROPERTY OF THE NON
STICK CERAMIC COATING WILL NOTBEAFFECTED DUE TO STAINS
9. For best results, use only products with directions stating that are safe for
cleaning non-stick cooking surfaces.
10. Use a soft kitchen brush and water to remove baked-on batter from the base
andtheexterior of the Wale Maker. The exterior finish should be cleaned
using a non-abrasive cleanser and a soft, damp cloth. Dry thoroughly.
STORING INSTRUCTIONS
1. Make sure unit is unplugged and fully cooled before storing.
2. Never wrap cord tightly around appliance. Do not put any stress on cord
where it enters unit, as this could cause cord to fray and break.
3. After cleaning, store the Wale Maker closed in a clean, dry area for future
use.

LIMITED TWO-YEAR WARRANTY
SENSIO Inc. hereby warrants that for a period of TWO YEARS from the date of purchase,
this product will be free from mechanical defects in material and workmanship, and for
90 days inrespect to non-mechanical parts. At its sole discretion, SENSIO Inc. will either
repair orreplace the product found to be defective, or issue a refund on the product during
thewarranty period.
The warranty is only valid for the original retail purchaser from the date of initial retail
purchase and is not transferable. Keep the original sales receipt, as proof of purchase
isrequired to obtain warranty validation. Retail stores selling this product do not have
theright to alter, modify, or in any way revise the terms and conditions of the warranty.
Exclusions:
The warranty does not cover normal wear of parts or damage resulting from any
ofthefollowing: negligent use of the product, use of improper voltage or current, improper
routine maintenance, use contrary to the operating instructions, disassembly, repair,
oralteration by anyone other than qualified SENSIO Inc. personnel. Also, the warranty
doesnot cover Acts of God such as fire, floods, hurricanes, or tornadoes.
SENSIO Inc. shall not be liable for any incidental or consequential damages caused
by thebreach of any express or implied warranty. Apart from the extent prohibited
byapplicable law, any implied warranty of merchantability or fitness for a particular
purpose is limited in time to the duration of the warranty. Some states, provinces or
jurisdictions do not allow the exclusion or limitation of incidental or consequential
damages, or limitations on how long an implied warranty lasts, and therefore, the above
exclusions or limitations may not apply to you. The warranty covers specific legal rights
which may vary by state, province and/or jurisdiction.
17

1818
How To Obtain Warranty Service:
You must contact Customer Service at our toll-free number: 1-866-832-4843. A Customer
Service Representative will attempt to resolve warranty issues over thephone. If the Customer
Service Representative is unable to resolve the problem, you will be provided withacase
number and asked to return the product to SENSIOInc. Attach a tag to theproduct
that includes: your name, address, daytime contact telephone number, case number,
anddescription of the problem.
Also, include a copy of the original sales receipt. Carefully package the tagged product
with the sales receipt, and send it (with shipping and insurance prepaid) to SENSIO Inc.’s
address. SENSIO Inc. shall bear no responsibility or liability for the returned product while
in transit to SENSIO Inc.’s Customer Service Center.
Table of contents


