Sensory Solar 100 User manual

Solar Projectors
User Instructions
Contents
1 Introduction to the Solar Projectors
3 Solar Projector Product Information
3 Guidelines for Best Practice
3 The User Instructions
3 Questions and Concerns
3 Delivery
General Operation of the Solar Projectors:
4 Wheels
4 Cassettes
5 Electrical Considerations
5 Electrical Details
5 Operation
5 Positioning the Projector
6 Ideas for using the Projectors
7 Ideas for Wheels and Cassettes
8 Accessories
10 Care and Maintenance
10 Helpline
11 Potential risks, cautions and warnings
Solar 250 and Solar 100 User Information
October 2007
Introduction to the Solar Projectors
What are the Solar 250 and Solar 100 Projectors?
The purpose of the Solar Projectors is to project images and patterns onto walls, projection
umbrellas and other surfaces. Both the Solar 250 and Solar 100 projectors are highly practical
tools that can be combined with a range of 6” Liquid and Effects Wheels as well as 3” Cassettes
to create moods and environments that either promote relaxation or encourage learning and skill
development. The Solar 250 is ideal for large sensory environments whilst the Solar 100
projector is ideal for small sensory environments. Determining which projector to install depends
on the size of the sensory environment and the size of the projected images required.
Page 1
Solar 100 Projector
Solar 250 Projector

Why is there a need for this type of
product?
Our senses tell us about the world in which
we exist. Our sense of smell, taste, touch,
sight and sound provide the foundation for
our understanding and actions. It is only
when one or a number of these senses are
impaired that parts of the world are less
accessible and understanding is
diminished.
Multi sensory environments support
interaction, discovery and communication
encouraging stimulation of the senses vital
for those with some sensory impairment
and for children at the very beginning of
their learning and development.
These environments facilitate faster
learning and development through
increased awareness of the surroundings
and stimulation of the senses - sight,
sound, touch and smell.
Such environments are challenging and
stimulating for both children and adults, in
particular for those with special needs.
They provide interactivity for those
developing cognitive and physical skills and
encourage communication within a unique
learning environment.
Multi sensory environments can provide a
calming and relaxed atmosphere where
professionals are able to observe and
assess clients and monitor and detect
changes in ability or just simply promote
relaxation for the agitated or stressed.
Multi Sensory environments have now
become commonplace in a variety of
learning arenas from nurseries and
playgroups through to special schools,
family centres and nursing homes as a
means of education, relaxation and play.
At the heart of any successful environment
is its appropriateness to the users.
Whether the envir
onment is a safe soft play
area for a group of toddlers at a nursery
school where they can explore and develop
social skills or a calm, non-threatening
environment within a nursing home to
promote relaxation, it is the understanding
of the users needs and appropriate
application of the underlying principles of
sensory to ensure the best possible
environment.
Solar projectors can form part of a sensory
environment and can play either a major
role as a learning tool for example, story-
telling or theming or a lesser role in the
form of a mood developer, creating a
relaxed, calming environment.
Who should consider using the
Solar 250 and Solar 100 Projectors?
More or less any individual can benefit from
the properties that a Multi Sensory
environment can pr
ovide and thus one of
the key components, the Solar projector.
From active and demanding toddlers at a
nursery or play group where a soft play
area and a selection of portable sensory
equipment provide fun, exploration and
interaction; to adults and child
ren with
learning difficulties where the integration of
a switching system can help to develop co-
ordination and motor skills; through to the
development of an area for relaxation for
the elderly or maybe pre and post operative
care areas in hospitals for
adults and
children.
It must however be noted that for some
individuals Multi Sensory may not be
appropriate as it can confuse and frighten
that in turn can lead to aggression, agitation
and mistrust. It is important to minimise the
propensity for thi
s to occur by creating a
non-
threatening environment but also to
monitor closely the reaction of individuals,
keep records and follow a good practice
when using any type of environment.
Page 2

The User Instructions
The purpose of the following user
instructions is to provide a guide on
how to
utilise, adjust and maintain the Solar
projectors.
These instructions should be read by all
those involved with the supervision of the
user and/or the care of the product before
use.
The projector must
be set up in terms of
positioning and applica
tion of its
accessories to ensure safe and problem-
free use.
Please retain these instructions for future
reference.
Questions and Concerns
Should you experience any difficulties or
have any concerns regarding the initial
purchase or subsequently adjust
ing the
Solar projector or have any concerns
regarding its use or operation then
immediately contact either your
SensoryPlus/Kirton representative or our
Customer Services Team on
Freephone
0800 212709 or +44 (0) 1440 705352,
they
will be delighted to help
you.
Delivery
•
The Solar 250 or Solar 100 projectors
are delivered in a damage proof box.
•
When unpacking please make sure
the projector is not damaged.
•
If the unit is damaged please report it
to SensoryPlus immediately on our
Freephone 0800 212709 or +44
(0)
1440 705352
•
The projector should already be
labelled with SensoryPlus’s name and
telephone number for future reference.
•
Please retain all packaging as you
may need to send the projector back
at a later date for servicing.
• Ensure the plug on the projec
tor mains
lead has a 5amp fuse fitted. This is the
maximum rating for the Solar 250 or
Solar 100 projector.
The projector is now ready for use.
Page 3
Solar Projector Produ
ct
Information
Range
• Solar 250 Projector with a 60mm lens
• Dimensions:
13cm (w) x 33.3cm (l) x 14cm (d)
• Solar 100 Projector
• Dimensions:
12.5cm (w) x 34cm (l) x 8.1cm (d)
Accessories
• 60mm wide angle lens
• 85mm lens
• Kaleidoscope lens
• Lamps
• Deflector Mirror
• Wheel Rotators
• Wheel Safe Rotator
• Wall Bracket
• Kick Step
• Spektraflash Wheel
• Blank Wheel
• Distortion Wheel Set
• Panoramic Rotator
• Curtains and Netting
• Projection Umbrella
• Effects and Liquid Wheels
• Projection Cassettes
Guidelines for Best Practice
To ens
ure good practice when considering
purchasing a Solar projector and effective
use post purchase we advise that the
following guidelines are considered:
1. Seek advice and input from a qualified
therapist/professional and/or
SensoryPlus/Kirton representative.
2. If unsure when ordering the projector
and any accessories contact your
SensoryPlus/Kirton representative or
our Customer Services Team on
Freephone 0800 212709 or
+44 (0) 1440 705352 to discuss further.
3.
It is recommended that following receipt
of the projector all staff members that
will be working with the projector should
be trained in its operation.

Page 4
General Operation of the Solar
250 and Solar 100 Projectors
To operate the projector you will need to
use an effects wheel or cassette together
with the wheel rotator or cassette rotator
respectively.
Wheels
•
Wheels are the most commonly used
effect with the projector.
• Firstly take the effects whe
el and
wheel rotator and fit them together.
•
Place the wheel onto the centre
spindle
of the rotator. If you are using
a plastic or glass effects wheel (not a
liquid wheel) push it onto the motor
spindle. If necessary secure the wheel
with the retaining scre
w using a small
Philips screwdriver.
• Slide the rotator into the rear gate
of
the projector. It may be a little stiff
when the projector is new.
•
When using a liquid wheel slide the
rotator into the gate of the projector
before fitting the wheel to the rotator.
•
Care should be taken when fitting the
liquid wheel, as it is glass and can
easily be damaged (using a Wheel
Safe Rotator to protect the wheel is
highly recommended).
•
Take the small lead and plug attached
to the rotator, and plug it into any of
the thre
e accessory sockets on the
side of the projector. All three sockets
are the same but typically the rotator is
fitted into the rear socket.
•
Ensure the rotator is pushed all the
way down into the gate then switch the
projector on.
• To focus the projector, sim
ply rotate
the lens on the front of the unit.
Cassettes
•
Cassettes require a different type of
rotator to effects wheels, known as a
cassette rotator.
•
To install the cassette into the
projector, first take your cassette and
ca
ssette rotator. Take hold of the
cassette rotator and take note that if
you move the motor upwards it will
move up, and then spring back into
place.
•
To fit the cassette, lift the motor
upwards and carefully push the
cassette onto the round lip of the
rotat
or, then let the motor drop down
onto the cassette.
•
The drive wheel of the rotator should
now be touching the cassette.
•
Next simply slide the cassette rotator
into the rear gate of the projector.
•
Take the small lead and plug attached
to the rotator, and pl
ug it into any of
the three accessory sockets on the
side of the projector. All three sockets
are the same but typically the rotator is
fitted into the rear socket.
•
Ensure the rotator is pushed all the
way down into the gate and switch the
projector on.
• To
focus the projector, simply rotate
the lens on the front of the unit.
•
When removing the cassette be very
careful, if the cassette is stiff you can
remove it with the aid of a small flat
headed screwdriver.
•
Over a long period of time the cassette
may not b
e held as securely on the
rotator or may even persist in falling
off. Check that the cassette is firmly
pushed onto the rotator.
•
When the rotator is older the circular
flange on the rotator may become
pushed inwards. Take a pair of pliers
and bend out slig
htly to ensure a firm
fit.
Wheel Rotator
Cassette Rotator
Rear gate
Spindle

Page 5
Electrical Considerations
Now the projector is ready for use,
please consider these initial safety
issues:
•
The projector does get hot when in
use and is powered by 240-
volt mains
electricity.
•
The projector may be used in many
different pl
aces like a shelf, table or
floor; its flexibility is a strong
advantage however, care should be
taken to avoid contact by untrained
personnel
Electrical Details
• Power rating – 350w
• Operating voltages – 220-240V~ 50-
60Hz or 110-120V~50-60Hz
• Before use please ensure the voltage
selector switch, which is located on
the back panel of the projector, is set
to the same voltage as your local
mains supply
• Fuses (situated on the back panel) –
T2A/250V @ 220 –240V
• Mains (situated on the back panel) –
T4A/250V @ 110 – 120V
• 12V~ (Situated on the side of the
projector) – T4A/250V
• Mains connection - The projector is
supplied with a 2 metre, 3 core IEC
lead with 5A fused UK mains plug. If
another plug is required it should be
connected as follows: BROWN =
LIVE; BLUE = NEUTRAL;
GREEN/YELLOW = EARTH.
Operation
These effects projectors are designed for
use with the Opti Solar range of effects and
accessories only.
Before switching on the Solar projector:
1. Select the effect and appropriate effect
accessory.
2. Fit the effect onto the effect accessory.
3. Place the effect and accessory into the
gate of the projector. Image altering
effects can be fitted into the front gate
runners. The main effect should be
fitted into the rear gate runners for
maximum life and object illumination.
4.
Once the effects and accessories are
in place, fit plug into one of the 12V~
sockets on the side of the effects
projector.
5.
When plugged in turn the projector on
by the ON ‘I’ / OFF ’O’ switch on the
back panel.
6. Adjust the angle and position of the
effects projector by using the knobs,
which connect the bracket to the unit.
7. Focus your effect by twisting the lens
in and out until the desired focus is
achieved.
Positioning the Projector
Floor Use
•
The Solar 250 or Solar 100
projectors can be used with g
reat
success on the floor when using a
box or any type of low-
level
projection.
•
When using the unit on the floor the
stand should be in the down
position. If the stand is above the
projector it will over heat, as you will
be blocking any airflow to the fan.
•
It should always be placed in a
position where the mains lead will
not be pulled, snagged or run over.
•
Always use the projector near a plug
socket and try not to use long
extension leads, as this will increase
the possibility of the lead being
damaged.
• N
ever use the projector on soft play
floor padding as this may damage
the soft play, as well as overheating
the projector.
•
When using the projector on the
floor never cover the unit, as the air
needs to flow around the projector to
keep it cool.

Page 6
Ideas
for using the Projectors
Pointing the projected image onto the
wall is typical projection, although it is a
good place to display the image, it may
not always be the most accessible place
for the person(s) viewing.
•
Project your image onto a dark
coloured
surface to give the brightest
visual effect and use lighter colours
when working with people who do not
like bright, intense light.
•
For sensory work to be effective it is
important to get the image to the
individual(s) in the most accessible
and comfortable place.
•
If a person can be taken close to a
wall perhaps in a chair, that is fine, but
they may not be at their most
comfortable in a chair looking at the
wall. Experiment with the distance and
size and think about the surface you
are going to project on
to. Why not try
a projection brolly or netting as an
alternative.
•
Consider whether the image moves
when using different angles or lenses.
•
Remember that the closer the
projected surface is to the lens then
the smaller the image will be and if
you project o
ver a long distance the
image will be larger.
•
When using a small image you will
also notice that the image is brighter.
Ceiling Projection
Using the ceiling to project upon can be
effective although it may not always be
the most accessible place for the
person(s) viewing the image.
•
A deflector mirror is recommended for
this, as the image can be moved
without moving the body of the
projector to either the ceiling, wall or
the floor.
Floor Projection
Floor projection will normally require the
use of a
deflector mirror if the projector
is mounted high on a shelf or table. At
floor level a person can get very close to
the image.
•
Try a crumpled up silver survival
blanket and watch as the blanket
sparkles and shimmers with colour.
They also make a noise whe
n moved,
but remember that survival blankets
retain the heat so we do not advise
wrapping anybody in one.
•
Try shining the projector into a large
box on the floor with one end closed
and one end open. Use the projector
a slight distance away from the box
and project the image inside.
•
Always remember the rules on floor
use (refer above to Positioning the
Projector, Floor Use).
•
By using the box method you are
creating a small “total” environment.
This may increase and direct the
concentration of the effect as
there is
no outside stimulus.
•
When shining the image into the box,
experiment by shining the images on
the sides, top or filling the entire box.
•
Not everyone will enjoy being inside
and remember that cardboard has
very good insulation properties that
may mean it will get warm inside.
•
Never put the Solar 250 or Solar 100
projector inside the box.
•
You could put a piece of netting over
the open end of the box and use the
back projection techniques described
next.
Back Projection
• For back projection you will
require a
piece of plain white netting.
When you project onto it, the image
will appear on both the front and rear
side of the netting, hence the term
“back projection”.
•
Utilising tents can be a very good way
to project. Make a tent over the person
and t
hey will see the image above
them, but close as well.
This often
means the person can touch the
image.
•
Try using a white umbrella, opening
and placing it on the floor. Lay the
person with their back on the floor and
head under the umbrella.
• Effects wheels
like Fireworks, Maze

and the Liquid Wheels can be less
bright on the eyes for back projection.
•
Back projection can also be used for
mid-
air effects. Again using back
projection makes the image more
accessible to the person.
• You can make net screens that ha
ng
from the ceiling, but remember people
may want to pull the netting down, so
Velcro can be helpful here.
•
The technique we advise is to screw
two hooks into the ceiling about 4ft to
5ft apart. Then wrap a thin doweling
pole in self-adhesive backed Velcro,
make sure the pole will fit into the
hooks. Put some Velcro onto the top of
the net screen and stick the netting
onto the pole. This will ensure that if
the netting is pulled, it will fall down
without pulling the hooks, pole or
anything else from the ceiling.
•
This idea is not practical if you have a
20ft high ceiling so you may need to
resort to using two cup hooks in
opposite walls and hanging sheets or
nets from string (a little like a washing
line).
•
Try simply hanging a net between two
bubble tubes. Yo
u could even use thin
strips of netting at varying distance
from the projector.
•
This idea can be used to great effect
when trying to create depth with the
Deep Effects Wheel (underwater
scene). Make the netting move,
perhaps by using a fan and the fish wil
l
appear to be moving.
•
As you experiment more, you will find
many uses for back projection.
Ideas for Wheels and Cassettes
The 6” Wheels encourage tracking
movements from left to right or right to
left. The rotational movement is
dependent on the speed o
f the rotator
used to turn the wheel. The speed of
the rotator is measured in revolutions
per minute or RPM.
•
Generally we could recognise the
Balloons or Fireworks Effects Wheels,
however we may not be working with
somebody who interprets the image in
Page 7
the expected way.
•
When using the effect wheels think
about how the person or user will
visualise the effect. An example is
balloons: this may be interpreted as a
very bright light with dark images
floating across the screen.
• With the Fireworks Effects whee
l, the
colour will appear brighter simply
because they are on a dark
background. So when choosing an
Effects wheel, think about the colours
and the background they will be on.
•
The wheels like Deep and Space may
be useful for scenario work as well as
colour imagery.
•
Using the wheels for scenario and
theme work can make the projector
more fun.
•
If using the Deep Effects Wheel you
could have a sea theme for the room
including tactile seaweed and smells of
the sea.
•
Wheels like the Dot or Beam can be
used for just simple tracking skills.
•
The Dot effect can be made to change
colour by using a colour Spektraflash
wheel in the front gate of the projector.
You will need two rotators to do this
and we would suggest a 5rpm rotator
with the Spektraflash wheel and a ½
rpm with the Dot Effects wheel.
•
You can use two effects wheels at one
time with two rotators, try a colour
wheel with the Liquid or Fireworks
Effects wheel, the effect is very
different.
Making your own wheels
You can make your own wheel by
purchasing blank wheels
•
Cut circles out of some clear plastic
sheeting the shape of the wheel and
you can use anything that is going to
make a mark on the sheet, for
example you could use overhead
projector pens.
•
Be careful with overhead projector
pens, as they may not b
e safe for
children to use. You may also consider
using non-
permanent pens for safety.
If you are working with specific visual
skills you can draw defined lines or
simple faces that may help with visual

stimulation.
•
You can also use coloured slides (out
of
their plastic cases). This technique
may help when you have a need for
familiar visual images like objects or
people. Put the slide (coloured sheet)
between the two parts of the blank
wheel.
• Never use the wheel stationary on the
projector as this may melt
the wheel. If
you are going to use the projector on
white or without an Effects wheel
always remove the lens. This is
because the wheel acts as a cooling
filter for the lens and failure to do so
will melt the front lens.
• The 3” cassettes act differently t
o the
wheels, they have a rotational
movement rather than a tracking. Also
they have a kaleidoscopic effect in
general however, the number 13
cassette has been favoured as it is
deemed to have the ideal pattern for
stimulating the rods and cones of the
eye.
Accessories
All the ideas for the use of wheels can
be applied to cassettes. However it is
not possible to make your own
cassettes. There are many other effects
that may be used with the Solar 250 or
Solar 100 projector.
Panoramic Rotator
This is a front lens attachment that splits
the image into three. One image is left
central and two images will orbit around the
room.
It fits to the front lens by placing the
panoramic rotator over the collar on the
lens and then finger tighten th
e small
screws. Plug the attachment into one of the
Page 8
three small sockets on the side of the
projector body. The two images can be
made to move around the wall or by
rotating the panoramic sideways on the
lens it will go over the ceiling or floor.
Deflector Mirror
Similar to the Panoramic Rotator, the
Deflector Mirror attaches to the front lens
and allows the image to be moved around
the room without moving the projector. As
described previously it is very useful when
access to the unit is difficult.
Kaleidoscope Lens
This lens simply replaces the normal front
lens of the Solar 250 or Solar 100 and will
focus by turning. This is very useful lens
when making your own wheels.
Wheel Safe Rotator
Assuring safety and stability par
ticularly for
Glass Effects Wheels or Liquid wheels, the
wheel safe’s metal casing protects the
wheels from damage or breakage when in
use.

Page 9
Kick Step
A simple Kick Step that allows easy reach
of wall mounted equipment such as the
Solar projectors.
Blank Wheel
Enabling the creation of your own effects
wheels. Experiment using different lenses
– we recommend the Kaleidoscope lens for
amazing results!
Projection Umbrella
An effective and immediate projection
screen that is easily transportable and ideal
for close up visual projection work where it
is important to control the image size.
Projection Netting
Hung from various points or draped across
the ceiling, different undulations and
projection surfaces are created.
Cassette Autochanger
The Cassette Autochanger holds up to six
cassettes and projects at set intervals
between 12 and 15 minutes for each different
cassette.
Multi Coloured Opti CDs or Cassettes
Effects Cassette No. 13
Vivid coloured cassettes for use with a
cassette rotator or autochanger creating
striking patterns that rotate and change within
themselves.
Projection Wheels
Planets
Effects wheels are exceptional tools when
used with either a Solar 250 or Solar 100
projector and should always be used in
conjunction with a wheel rotator for the simple
creation of relaxation with moving images.
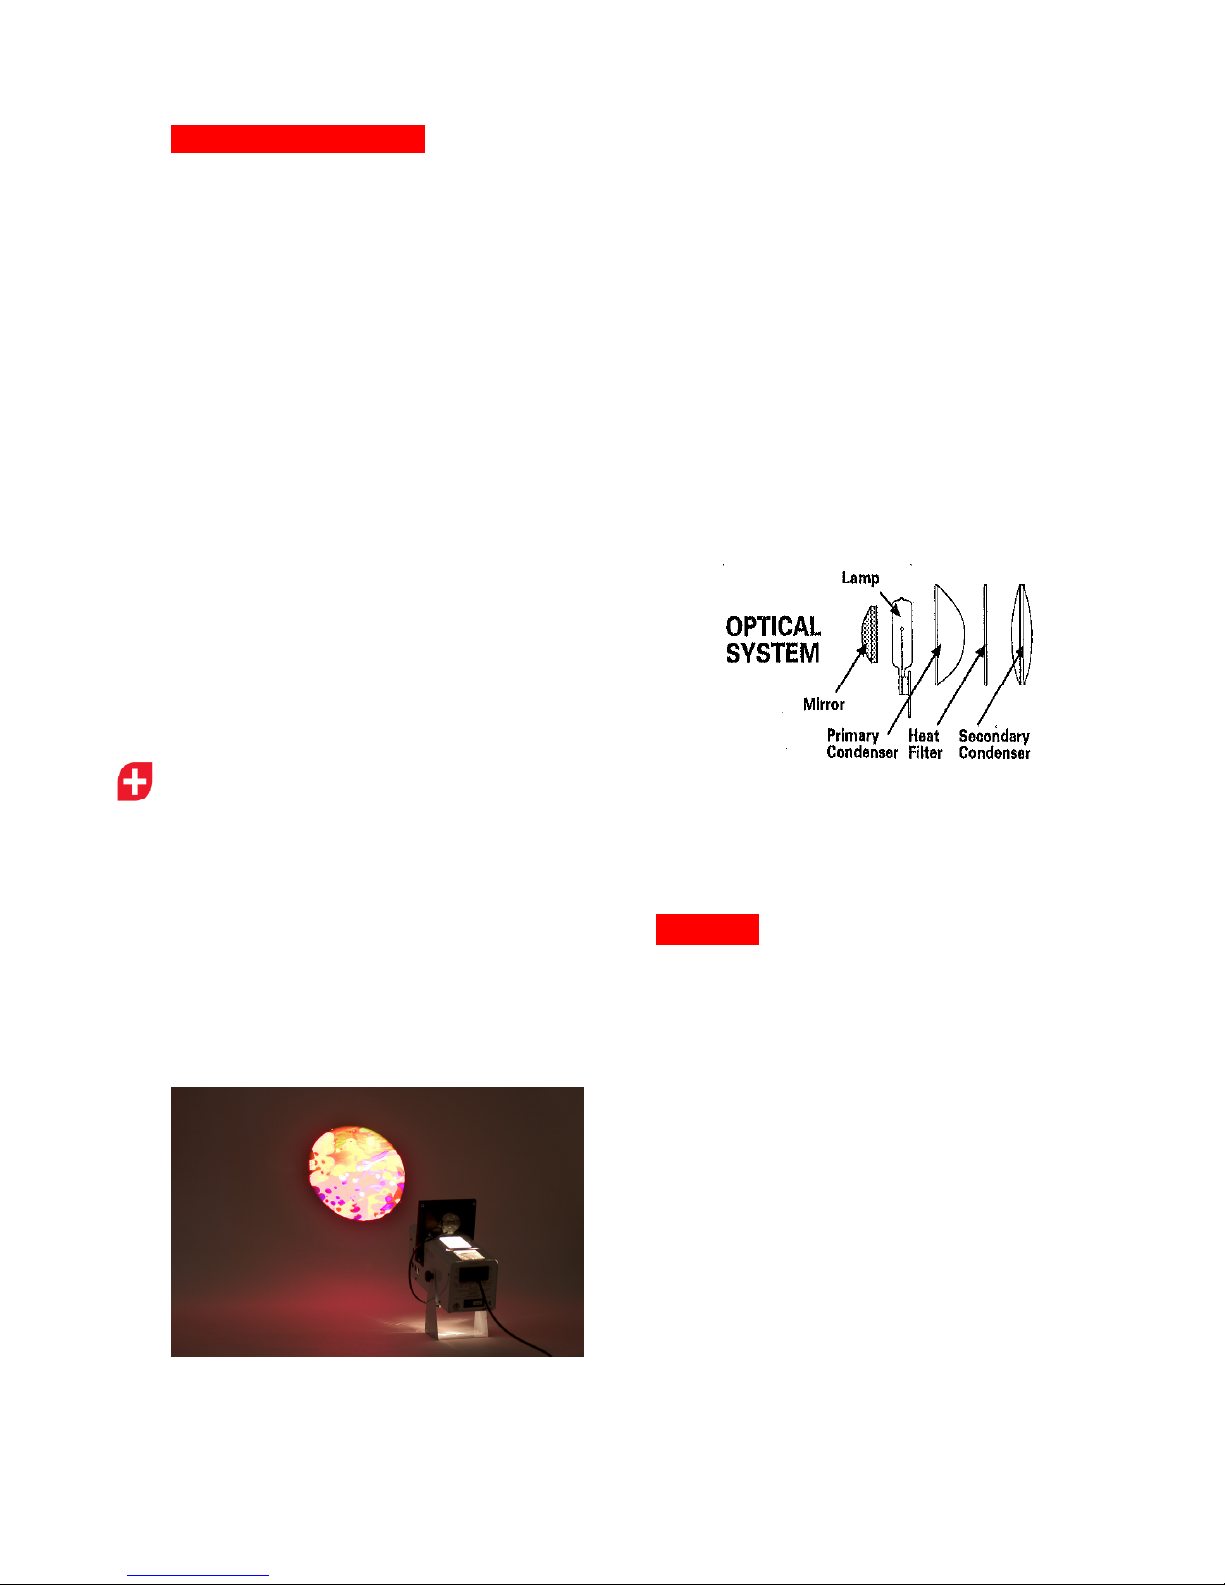
Cleaning
After 3 months use, or when changing the
lamp the optical system may need cleaning.
Switch off the projector, disconnect from the
mains and allow to cool for 20 minutes, then:
1. Remove cover plate screw and
remove cover plate.
2. Use a soft tissue or lens cloth with
a little methylated spirit or pure
alcohol to clean lenses.
3. To clean the mirror, first remove
the lamp as detailed in the diagram
below, then wipe with a soft tissue
as before.
Helpline
Should you have any concerns either pre or
post purchase of your Solar projector contact
our Customer Services Team on Freephone
0800 212709 or from outside the UK +44 (0)
1440 705352 to discuss further.
Alternatively, if you purchased your
projector from a Kirton/SensoryPlus
distributor in the first instance please contact
your point of reference there.
If your call concerns
a specific product please
have ready your sales order number before
you telephone, it helps us identify your details
and deal with your enquiry efficiently.
Care and Maintenance
•
An effect must always be in the gate of
the projector when in use. Failure to
do so will cause the plastic parts in the
lens assembly to melt. This is also the
case for the effects accessory. If the
effects accessory is not plugged in to
one of the 12V~ sockets on the side of
the projector, this will cause the effect
to melt.
•
The projector must only be used within
90 degrees of horizontal positioning.
•
Do not touch the lamp with bare hands
and never touch a hot lamp. Use a soft
cloth or tissue.
•
Do not attempt to service the projector
unless you are qualified and working
under the direction of the supplier or
manufacturer.
Changing the Lamp
You will require a cross
-headed screw
driver
Switch off the projector, disconnect from the
mains and allow 20 minutes for the lamp to
cool, then:
1. Remove cover plate screw and
remove cover plate.
2. Remove the old lamp without
touching with bare hands.
3. Replace with new 250W/24V
M33 lamp.
4. Replace and secure cover plate.
Page 10

Potential Risks, Cautions and
Warnings
When using the projectors basic safety
precautions should be followed including:
1.
Read and understand all instructions
before using the equipment.
2.
Close supervision is necessary when
any appliance is used by, or near,
children. Do not leave appliance
unattended while in use.
3.
Care must be taken, as burns can
occur from touching hot parts.
4.
The appliance switch is provided with
the symbol ‘O’ indicating ‘OFF’ and ‘I
’
indicating ‘ON’.
5.
Do not operate appliance with a
damaged cord, or if the appliance has
been dropped, or damaged, until it has
been examined by a qualified service
person.
6.
Position the cord so that it will not be
tripped over, pulled, or come into
contact with hot surfaces.
7.
If an extension cord is necessary, a
cord with a current rating at least equal
to that of the appliance should be used.
8. Always unplug appliance from el
ectrical
outlet before cleaning and servicing and
when not in use. Never yank the cord to
pull plug from outlet. Grasp plug and
pull to disconnect.
9.
Let appliance cool completely before
packing. Loop cord loosely around
appliance when storing.
10. To reduce ris
k of electrical shock, do
not immerse product in water or other
liquids.
11.
To reduce the risk of electrical shock,
do not dismantle this appliance, but
take it to a qualified repairer when
servicing is required. Incorrect
reassembly can cause electrical shock
when the product is used subsequently.
12.
The use of an accessory attachment
not recommended by the manufacturer
may cause risk of fire.
13.
Connect this appliance to a grounded
outlet.
14.
Disconnect this unit from its source of
supply before replacing the lamp.
15. The axis across the width
of the
projector should remain horizontal if
possible. Tilting the projector along this
axis may reduce lamp life.
16.
During focusing of the projected image
beware of rotating the lens too far anti-
clockwise, as this may cause the lens
to become separated fro
m the
projector, and perhaps dropped and
broken which may cause injury.
17.
Do not attempt lamp replacement while
unit is still hot as there is a risk of burns
from the lamp.
18.
Qualified service personnel who should
work under the authority of the
manufacturers
recognised agent must
carry out the procedures described in
the operating instructions.
19.
After any maintenance or cleaning all
parts must be dry before refitting to the
projector.
20.
When replacing the cover of the
projector always ensure that the wiring
to la
mp and 12V~ sockets is correctly
engaged within the slots in the cover
and not trapped.
Page 11

23 Rookwood Way
Haverhill
Suffolk
CB9 8PB
England
Telephone: +44 (0) 1440 705352
Facismile: +44 (0) 1440 706199
Freephone: 0800 212709
Email: info@ sensoryplus.co.uk
www.
sensoryplus.co.uk
This manual suits for next models
1
Table of contents


