Sentry Surveillance RealEyes 17 Series Instruction manual

RealEyes Series 17 NVR
Manual
http://www.sentrysurveillance.com

Welcome to the Sentry Surveillance NVR quick start manual. This manual will give you a good, general
overview of all the most common features needed to use your new Sentry Surveillance RE17 series
surveillance video recorder.
Live View
When you first look at your system, you should see a screen very similar to the one above. There are only
a few key features you may use regularly.
First look at your top toolbar to familiarize yourself with some of the information and options available:
1. Storage remaining
2. Current system date and time
3. Current username logged into the system
4. Volume adjustment
5. Live view button
6. View log button
7. Tools button
8. Exit/Minimize icon
1 2 3 4 5 6 7 8

Most of these options will not be necessary for everyday use. The main items to be concerned about are
the Live View and Video Log buttons. Clicking on each one will switch between them as needed. We’ll start
with how to navigate the Live View options.
Here you will find useful information about the options that you may use most often while monitoring your
camera system.
Zooming In and Out
To view one of the cameras in full
screen, you can either double click the
left mouse button on the camera you
wish to expand or click the Zoom
button located in the top right
corner as shown in the image on the
right.
You can also zoom in
closer within the image
by placing your mouse
point over the area you
wish to zoom in and roll
your mouse wheel
forward. You can then
roll it backward to zoom back out to
the full view. The images to the right
demonstrate how this may look to you
when you’re looking at the camera
view.
IN
OUT

Live View Tools
You also have additional tools at the bottom. When you move your mouse pointer over a camera view you
will see these options appear at the bottom of the live view panel. You can see these options
and where they are located in the top image of the previous page.
Instant Play
The first one, Instant Play ,
allows you do a quick review of the
last 10 seconds to the last 5
minutes. When you click on it a
menu will open. Select the
appropriate time frame you want to
view: 10 sec, 30 sec, 1 min, or 5
min. The panel will change and
looks like the image to the right.
You can use the slider to quickly
move back and forward through a
clip to find what you are looking for.
Click on the curved arrow at the far
right end to return to the normal
live view of the camera.
1 2 3 4 5 6 7

Saving a Snapshot
Click on the snapshot button to save a
snapshot of the current live view. The box to
the right opens and gives you options for what
information you want to include in the
snapshot. Pick a location you wish to save the
snap shot to.
We recommend either the Documents or
Pictures folder as those are easy to find so you
can transfer the pictures to a flash drive or
burnable CD or DVD later on.
You can also directly save the files to a USB
drive. Click on Computer in the left column and
you’ll see the disks available in the main
window. USB drives typically have the name
Removable Storage but it can vary.
Monitoring Tools
The final option is Monitoring Tools . These give you different options for when you’re monitoring a
system. The only one you should have to worry about is “Set to Wave Out”. This option allows you to
listen to any audio being recorded by that camera if it is one that is audio capable.

Playing back Recorded Footage (Video Log)
Important: Marking Footage to Never Recycle
Before we get into reviewing footage we want to go ahead and show how to mark footage to never be
recycled.
As you are reviewing footage you may find clips you need to save across multiple cameras and time
frames. One of the most important things you can do as you’re reviewing the footage is to mark the
footage to never be recycled. The main reason to do this is that is locks the footage into the system so it
is never deleted. As the days, weeks, and months pass on, old footage is written over by new footage
regularly. To prevent important clips from getting erased, mark the footage so it is never recycled. The
second reason is that it makes it a lot easier to create a backup of the footage to a CD, DVD, or external
drive.
To do this, place your mouse over the start time that
you want to mark to never recycle. Click and hold your
right mouse button and drag it to the time you wish to
stop at. This will highlight the area in blue as you’re
doing so. When you release the right mouse button a
menu like the one shown in the image to the right will
open. Select the Mark Never Recycle option and then
click on Focused Camera. This marks it specifically for
the camera you have selected.
Do this for each and every clip you come across. You can go back later to unmark footage if you need
more storage space for footage.
We will show how this is used when creating a backup in the chapter on creating a backup.

When you wish to review footage that has been recorded, you can either click on the button located at
the top of screen with your mouse or press the F10 key on your keyboard. This will switch over to the
view log. The screen will change to look like this:
The first thing to take notice is the bottom two bars. They indicate
how much footage is available for the date you have currently
selected.
Start by changing the date you want to view. To change dates, click
on the date located in the bottom left corner. The calendar opens as
shown on the right. Click on the Arrows pointing left and right to
change the month. You can also change the month or year by
clicking on the Month/Year bar then navigating with the arrows to
the year you want. Click on the date you need and you’ll see the
bars at the bottom of the view log change.
Click either of these arrows to navigate
forwards or backwards through the months on
the calendar.
Date. Click here to change.
View Log Navigation Bar
Available Footage
Display All
Currently selected camera

After selecting your date, take a look at the two red bars located at the bottom. The top red bar shows all
of the available footage for the selected date for the camera you have currently selected on the left side.
The white bar indicates what time you currently have selected as shown in the image below. The bottom
red bar shows all footage available for all cameras in the layout. Also note the bar located to the right of
the date. Those are your times and they are shown in Military time so it ranges from 00:00 (Midnight) to
23:59 (11:59 PM). Just click close to the time frame you want.
Tip: You can even zoom in with your mouse wheel to click on a more accurate time. For example, place
your mouse pointer between the 04:00 and 05:00 hours and roll it forward. You’ll see the hours expand
towards the sides and start to see the 10 minute marks appear.
To change camera, just click on the camera panel that you wish to view. You’ll see the top bar footage
change to the corresponding camera that you selected.
To play the footage use the navigation bar located at the far bottom of the screen. It should look like this:
Options available in the navigation bar are as follows:
1. Current time being played. You’ll notice the white, vertical line crossing the red bars move to the
left or right as the time progresses.
2. Previous Frame: Recorded footage is recorded in frames per second. This allows you to go through
each individual frame in reverse at your own pace.
3. Rewind: Plays footage backwards.
4. Play: Plays footage forwards.
5. Next Frame: Similar to Previous Frame but you’re going forward.
6. Audio On/Off: Allows you to turn the audio on or off. Audio is disabled when viewing footage at any
speed above or below 1 as well as in Frame by Frame mode.
7. Real Time/Frame by Frame: Changes between viewing in real time or frame by frame.
8. Modes A & B: Allows you to set two points in the footage bar to play footage within a range.
Further explanation on the next page.
9. Fast Forward/Slow Motion: Allows you to speed up or slow down footage being played in powers of
two.
The basic controls, Previous Frame, Rewind, Play, and Next Frame are simple. Click on the button in the
direction in which you wish to view the footage. You do have the option of speeding up or slowing down
the footage and that is where the fast forward and slow motion option comes in. If you click on the or
buttons as shown at section 9, you’ll be able to speed up so you’re not waiting as long to review
footage or to slow down footage to help catch quick events. Also when you press either the play or rewind
buttons, it will change into the pause button . Click that to pause the footage at the exact moment you
click it.
Selected Camera
Footage Available
No Footage Available
1 2 3 4 5 6 7 8 9
Hours (In Military)

Playing a Specific Time Frame
You do have the option to watch only a specific time frame. Click on the Mode A button shown at
section 8 in the navigation bar image, then click the starting time you wish to view. This places a yellow
line with a triangle on top similar to the white one which shows the current time you’re viewing. After that,
click on the Mode B button . This lets you place a second yellow line as your end time. You’ll also notice
that it places the times in the boxes located next to the A & B buttons in the navigation bar.
Your footage bar should now look similar to the image on the right.
When you click the play button, the white line will start from the
first yellow mark and play through all of the footage within that
range. When it reaches the second yellow mark, it will go back to the first yellow mark and repeat playing
the footage.
Creating a Backup
There are multiple ways to create a backup but we will go over the best, most efficient way of doing so
using your RealEyes system.
While in the Video Log you can either press the letter B on the keyboard or select the backup option in the
menu by going to the Toolbar icon in the top right and then clicking on the tools icon in the tool
bar. Click on Backup in the menu.
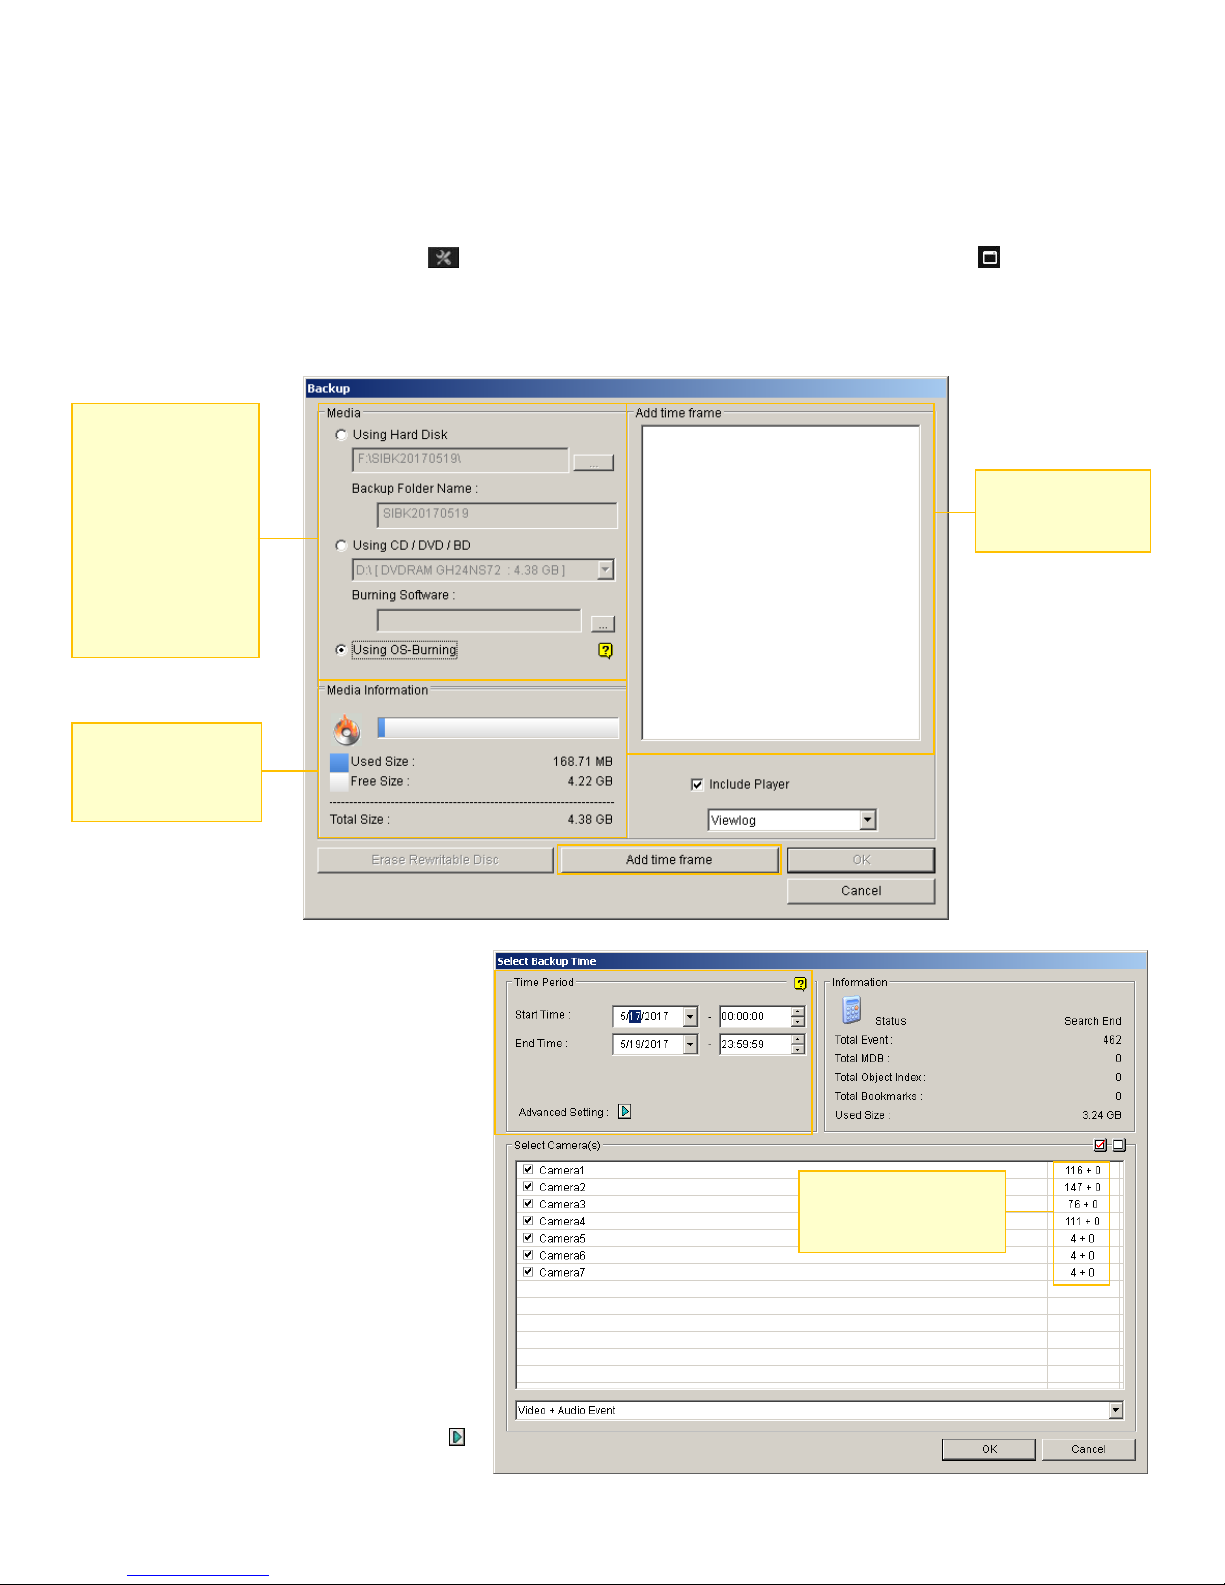
The Backup window will open up and should look like this:
The first thing you want to do is add
the time frames you want to add in.
Click on the Add Time Frame button
and the box to the right will open.
Remember when we brought up in the
beginning on how you want to mark
footage to never recycle? One of the
great functions of that is to make it
easier to select your footage that you
want to back up.
First you want to select your dates.
Click on the drop down button next to
the date to open a calendar. Do that
for both the Start Time date and the
End Time date.
Click on the Advanced Setting button
and a box like at the top of the next
page opens.
Here, you select the
media type you wish
to save to in this
section. USB drives,
CD-Rs, and DVD-Rs
are all supported.
While you can use
CD-RW and DVD-RW
it is strongly not
recommended.
Shows how much
space is available for
the selected media
Displays the
footage you have
selected for backup.
Shows how many video
and audio clips available
for each camera.

Select the option “Never-recycle events only” then click
the OK button.
You’ll notice that the numbers on the right hand side of
the camera list change. By using this, you don’t have to
select the cameras you want or type in your time
frames. Simply click OK to return to the main backup
window.
While this is a wonderful way to do a backup, you still have the option to manually select clips you want to
back up without having anything marked. Simply select your dates, type in your times, and uncheck any
cameras you don’t want then press OK. This works perfect if you want to backup blocks of times without
the need for reviewing the footage.
Once you are back to the main backup window,
it should now look similar to the screen shot to
the right.
Time to select what media and where you want
to save the backup footage. In the image
above I have gone ahead and select Using
Hard Disk. This is for backing up to a USB
drive, usually a flash drive, but you can also
use an external hard drive.
Click on the folder selection button to
select the location you want to save. For this
example I have Removable Disk (F:) selected.
Also if you want you can choose to name the
folder to something more recognizable.
Once you have your media selected, have your
time frames added, go ahead and click the OK
button. A progress box will pop open showing
you how much is left to write to the flash drive.
When it’s done you’ll get a final pop up box
that says it is done at which point it is safe to
remove
the USB
drive.
Rename the
folder here.
Note: If you see
a red bar here,
that means you
do not have
enough space
on your selected
media to save
the files.
You will either
need to remove
footage from the
list or find
storage media
with more room.

Saving to a CD-R or DVD-R
You do have the option to save the footage to
a CD-R or DVD-R. As stated before you can
use CD-RW or DVD-RW but it is not
recommended as those medium are not as
secure. You could inadvertently write over the
backup and also they are prone to
degradation over a long period of time.
It is highly recommended to save the footage
to a CD-R or DVD-R when providing footage
to police since discs are very cheap compared
to a USB drive. If the investigator or officers
have an available USB drive though, use that
if there is enough room.
To start, when in the backup window, click on
the option that says Using OS-Burning. You
can use the option Using CD / DVD / BD
option however the process takes longer and
requires more steps. Using OS-Burning saves a
bit of time and effort when doing a backup.
Use the Add Time Frame button at the bottom and use
the same exact steps outlined previously used to save
to a USB drive. After you add your times, and have your
disc inserted, click OK and you’ll get a progress bar
similar to the one used for the USB drive but when
complete, you’ll get a popup asking to name the disc as
shown on the right. For the disc title, I recommend
naming it something related to the incident and the
date, IE: 12-17-16 THEFT. The disc name helps you
identify it when you insert it into another computer.
Leave the recording speed options alone, and if you
have no other discs to burn, just click on the checkmark
box next to “Close the wizard after the files have been
burned. “ Click Next.
A new window will open saying the disc is burning just
like the one shown on the right. Once it is done, the
disc drive will automatically eject the disc for you.
Give the disc a
name here.
Check this option if
you are not burning
any other discs.

Support
If you have any issues or questions about your RealEyes RE17 Series NVR, please feel free to contact us
Monday through Friday, 8:00 AM to 5:30 PM ET. Our technical support staff is waiting and happy to help
with any problems you may have with your system.
Contact Us
Toll Free: 1-800-228-8909
Atlanta, GA: 770-592-0400
Dallas, TX: 972-850-7999
Houson, TX: 832-384-9500
Email: info@sentrysurveillance.com
http://www.sentrysurveillance.com
Table of contents


