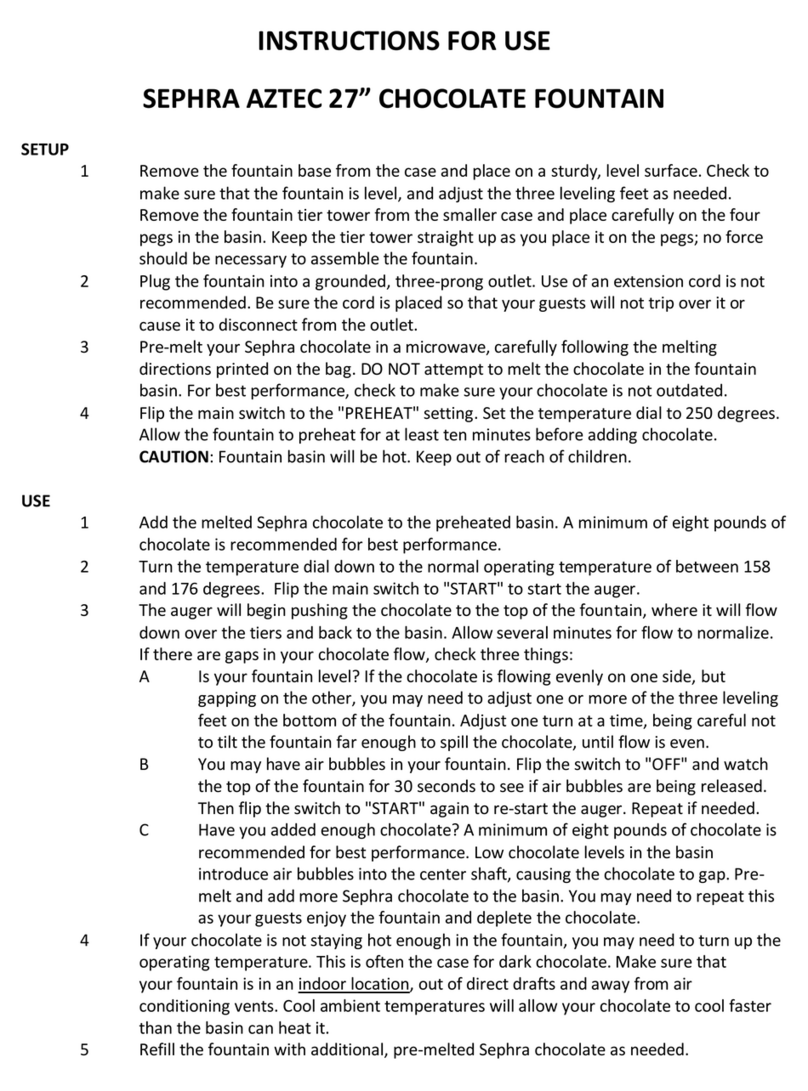
Sephra Aztec User manual

Sephra Chocolate Fountain Instructions
** All tier set components should be at room temperature before adding chocolate to the fountain.
Chocolate will harden if it comes into contact with cold metal and can cause the auger to bind**
CHOCALATE PREPARATION
We strongly encourage you to use Sephra Fondue Chocolate or Chocolate Melts, available in dark, milk
and white varieties. Sephra chocolate is specially formulated with the proper viscosity to flow perfectly
through the fountain every time. Our unique fondue chocolate is exquisite in taste and aroma and your
guests and clients are sure to be delighted.
Before using the chocolate, store it in a cool, dry place. Do NOT freeze or refrigerate it as moisture affects
the chocolate’s consistency.
BEFORE STARTING THE FOUNTAIN
1. Ensure that the fountain is on a sturdy, LEVEL surface.
2. The fountain itself must be level in order to operate and curtain properly.
3. Check to see that the fountain basin (bowl) is securely tightened.
4. Place the auger with the stabilizer into the cylinder and turn it clockwise to check that it is locked
in place over the center square drive shaft. Place the crown on top of the cylinder.
5. Ensure that the fountain vent holes and the bottom of the base housing are not covered. These
areas allow heat to escape from the motor and heating element during use. Obstruction of the
air flow will cause damage to the motor and internal electrical components.
“CHOCOLATE PREPERATION”
6. Melt chocolate directly in the fountain basin.
7. Melting chocolate directly in the fountain basin takes approximately 35-60 minutes. Add
chocolate 1-2 pounds at a time to expedite the melting process. Stir chocolate every 2-3 minutes,
scraping it from the basin with a spatula to prevent scorching. Milk and white chocolate are
more susceptible to scorching so be sure to stir more frequently (every 1-2 minutes)
and use appropriate temperature settings.
Melting chocolate in fountain basin –Sephra and Montezuma
Chocolate
Heat Setting
Approx. melting time
Dark
8
45
Milk
7
60
White
7
60
*CAUTION: The heat setting should never be higher than 7 when melting white
chocolate. Overheating white or milk chocolate causes it to thicken or become clumpy and it will
not flow properly. If this happens, see “troubleshooting”.
ONCE CHOCOLATE IS MELTED:
8. Press the toggle switch to START. The auger will turn and carry the chocolate up through the
cylinder, causing it to flow over the crown and tiers and back into the basin. Ass the cylinder fills
with chocolate, there may be a knocking noise from the auger spinning against the cylinder.
This noise will go away quickly as the auger is coated with the chocolate.

Recommended Chocolate Amounts
Fountain
model
Guest
served
Minimum
choc.
(lbs)
Minimum
fondue
(qts)
Maximum
choc.
(lbs)
Maximum
Fondue
(qts)
Suggested
amt. to
begin
event
Aztec (CF
27)
<100
6
3.5
10
5
10
Adding Additional Chocolate to the fountain
Twenty pounds of chocolate will serve approximately 200 people. Additional chocolate can be added
using the following methods:
ADDING CHOCOLATE CHIPS:
Pour chips directly on top of the fountain crown or around the perimeter of the bowl, approx. 1 cup at
a time. Allow chips to become melted before adding more.
ADDING MELTED CHOCOLATE:
To add a large amount of chocolate, melt it prior to adding it to the basin. You can melt it in its
microwavable bags or in a chocolate melter.
Chocolate operating temperatures
Chocolate
Heat Setting
Approx. Choc. Temperature
Dark
6
115-125
Milk
6
115-125
White
5
105-115
Chocolate temperature may be affected by the addition of chocolate or by environmental factors, such
as operating the fountain in a cold area. In such conditions the fountain temperature may need to be
adjusted accordingly.
Generally, if white or milk chocolate becomes too thick, decrease the temperature. If dark chocolate
becomes too thick, increase the temperature. Scrape sitting chocolate from the bottom of the basin
and stir frequently throughout event.
CLEANING THE FOUNTAIN
Recommended cleaning supplies:
Food Handler Gloves
Spatula
Dish Soap
Small Brush
Large Sponge
Large container or sturdy plastic bag for leftover chocolate
Large plastic bags for tier set parts
Paper towels
Soft cloth
Glass cleaner
Before Cleaning:
Turn the toggle switch to OFF. Always unplug the power cord from the electrical outlet
before cleaning the fountain. Never permit the electrical cord to come into contact with water.

Do not use abrasive scouring pads or powders to clean the stainless steel basin or other components.
Doing so will mar the finish.
Cleaning Sephra Chocolate Fountain:
1. Wearing food handler gloves, scrape excess chocolate from the crown and stabilizer with a
spatula. Remove crown and stabilizer and place them directly in the sink.
2. Pull the auger out of the cylinder by its knob, scraping the excess chocolate off with a spatula or
gloved hands as you go so that it falls back into the cylinder. Move the auger t the sink.
3. Use a spatula to scrape excess chocolate from the tiers. Remove the tiers and cylinder and place
them in the sink.
4. Twist off the removable basin and pour left over chocolate into a bag-lined container for easy
disposal. Scrape the remaining chocolate out with a spatula and move basin to sink. NEVER
pour chocolate directly down the drain. Chocolate can harden in the pipes and
damage the drain system.
5. The basin should NOT be placed in the dishwasher but should be washed by hand.
The extreme heat of the dishwasher will potentially damage the seals and bearing grease. The
bottom of the basin holding the seals and bearings should also NOT be submerged
in liquid. All other removable fountain parts are dishwasher-safe. They may also be hand
washed with warm, soapy water and a large sponge. Use degreasing dish soap when washing
components in the sink. Make sure the chocolate is broken up by warm, soapy water before it goes
down the drain.
6. Carefully clean around the cylinder sleeve and square pin in basin. If necessary, use a soft
toothbrush to remove all chocolate.
7. Once tier set components are clean and dry, return them to your sephra tier set or catering case
for transport.
8. Once basin is thoroughly cleaned and dried, twist it back onto the fountain base.
9. Spray the outside of the fountain base with glass cleaner and polish with a soft cloth. Return base
to your sephra base case for transport.
Proper cleaning after each use will keep the fountain in excellent working condition for years of
continued use and enjoyment. Always store fountain components in their cases to help protect them
from damage or loss.
TROUBLESHOOTING
This manual suits for next models
1
Table of contents
Other Sephra Kitchen Appliance manuals
