Sercomm BC950 User manual

BC950
LTE Battery Camera
Setup Guide
Copyright 2018. All Rights Reserved.
Document Version: 1.0

Table of Contents
Chapter 1 Introduction..........................................................................................................1
Overview ............................................................................................................................1
Package Contents ..............................................................................................................2
Chapter 2 Setup ......................................................................................................................3
System Requirements........................................................................................................3
Physical Details - LTE Battery Camera ..........................................................................3
Physical Details - Battery charging station .....................................................................6
Pre-Installation..................................................................................................................7
Installation .........................................................................................................................8
Mounting Installation......................................................................................................12
Chapter 3 Ovu App...............................................................................................................13
Overview ..........................................................................................................................13
OVU Application Installation.........................................................................................13
Account Registration.......................................................................................................15
Camera Settings...............................................................................................................18
Chapter 4 Troubleshooting................................................................................................25
Overview ..........................................................................................................................25
Problems...........................................................................................................................25
Appendix A Specifications.................................................................................................26
LTE Battery Camera ......................................................................................................26
Regulatory Approvals.....................................................................................................27
P2-01 Battery Caution.....................................................................................................28

1
Chapter 1
Introduction
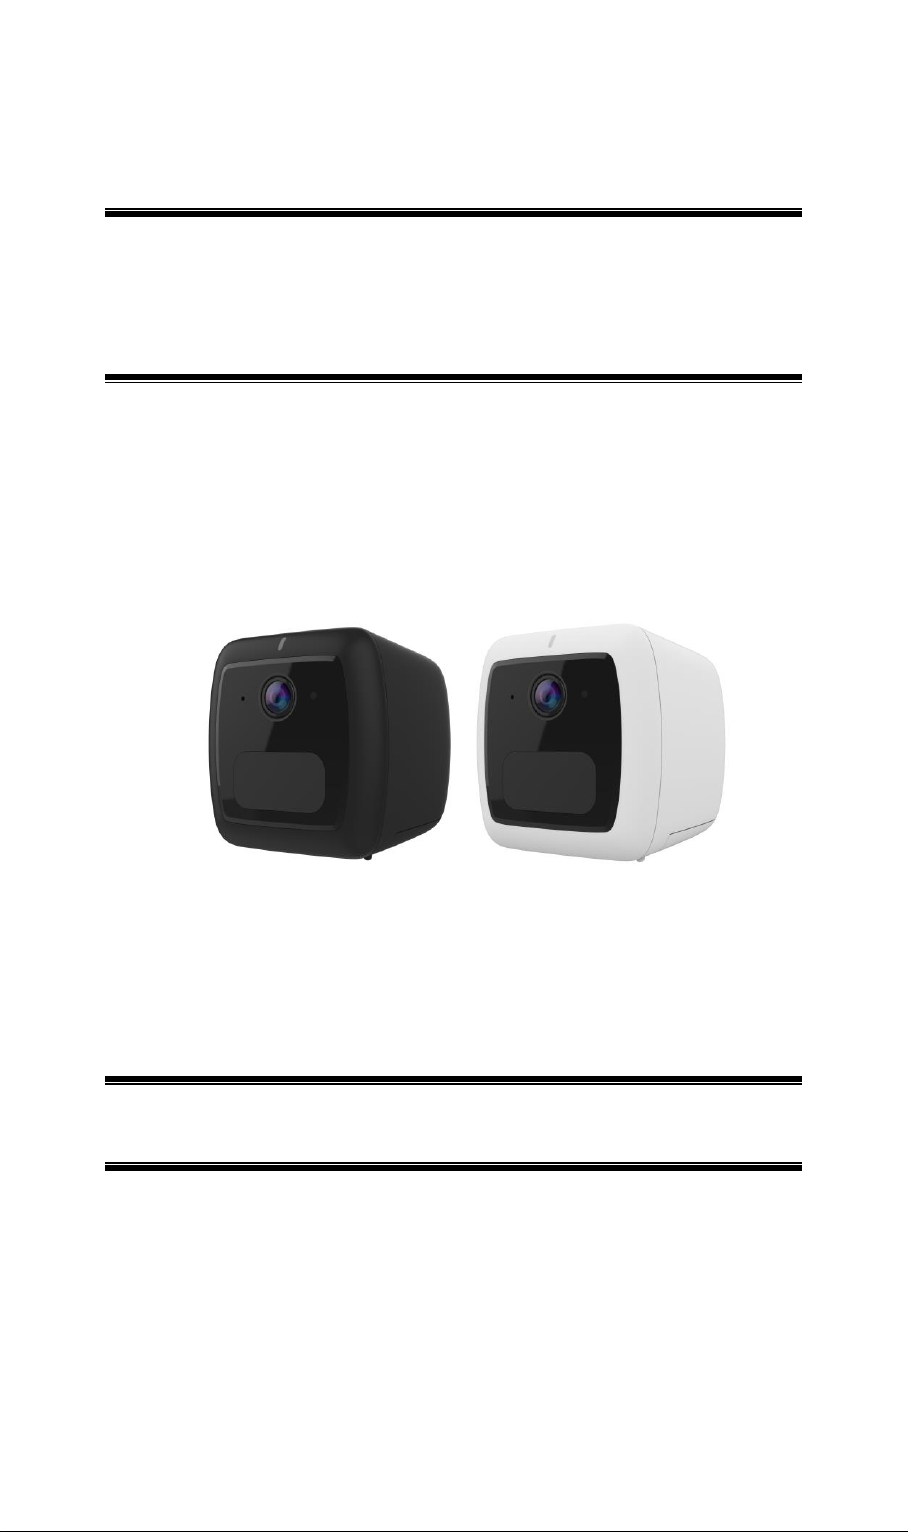
This Chapter provides details of the LTE Battery Camera's features,
components and capabilities.
Overview
This LTE Battery Camera that includes built-in LTE, which is designed for use in locations
that need to be monitored but don’t have power or Wi-Fi, like a construction site. That means
it’s powered by a rechargeable battery. The camera can be set up and controlled from your
smartphone or device with the OVU app. Users can be alerted when they detect sound or
motion and watch live video straight from the app.
Using enhanced H.264 technologies, the LTE Battery Camera is able to stream high quality
video and audio directly to your mobile device or PC. The high compression capabilities of
H.264 reduce network bandwidth requirements to amazingly low levels
This weather-resistant camera, which let you keep an eye on your belongings - even in harsh
conditions such as rain and dust. It is also an all-in-one camera that has automatic and manual
day/night switching, IR illumination and PIR sensor.
Features
Dual Video Support. The LTE Battery Camera can support H.264 and MJEPG video for
different image compression.
Suitable for Home, Business or Public Facilities. Whether for Home, Business or
Public Facility surveillance, or just for entertainment and fun, the LTE Battery Camera has
the features you need.
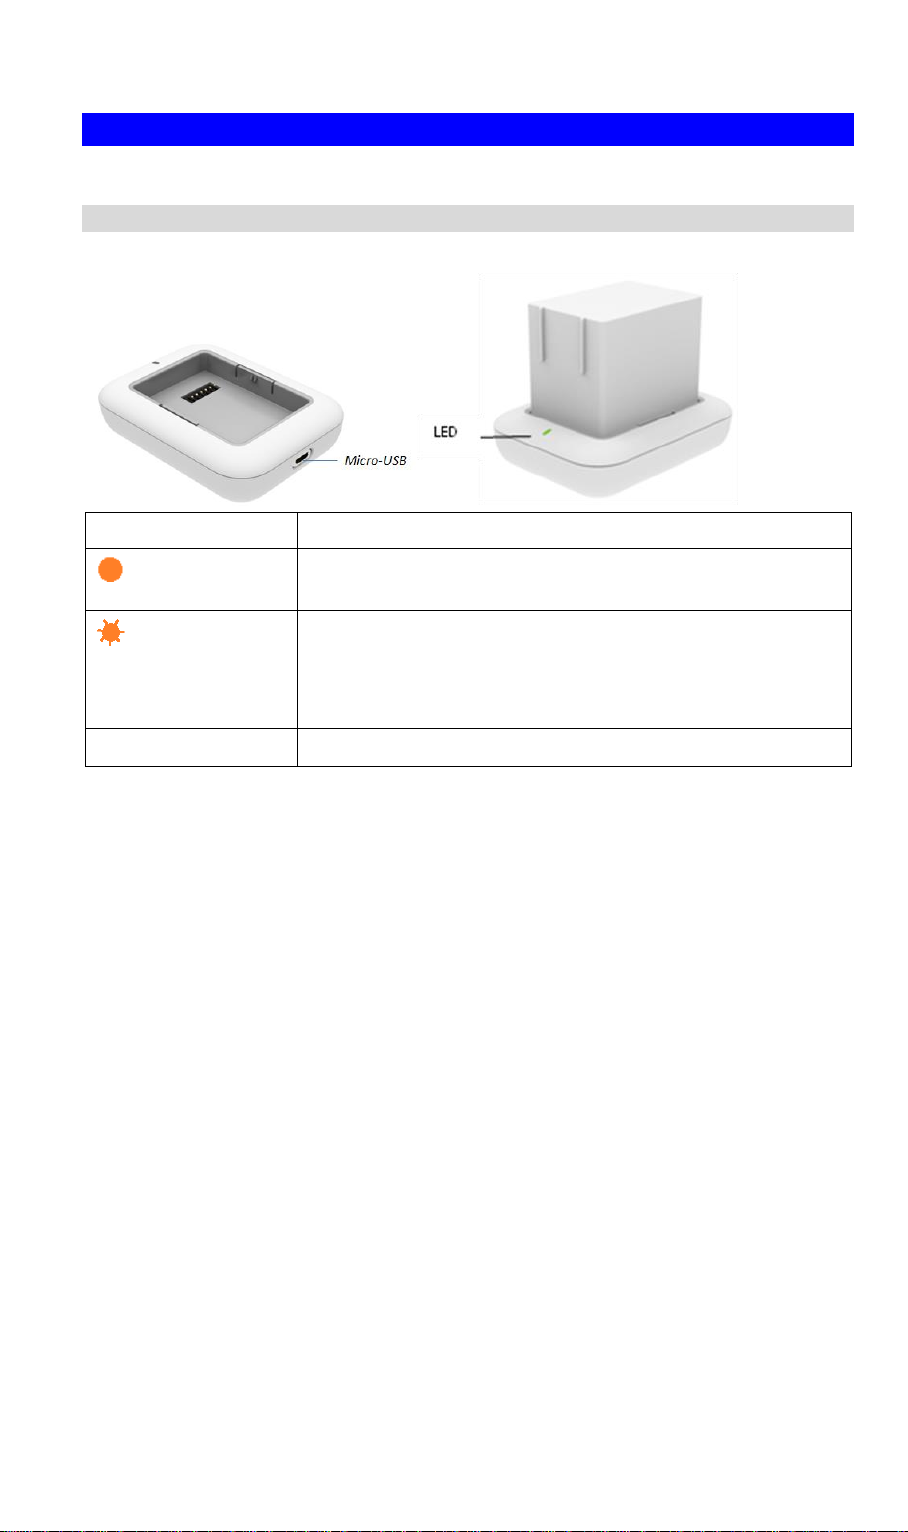
Micro-SD Card Slot. With the slot, you can insert the Micro-SD card to store recording
files.
Day/Night Switch. With the day/night switching feature, you are able to view and
record better images even in the dark of night.
Motion Detection. This feature can detect motion in the field of view. The LTE Battery
Camera will compare consecutive frames to detect changes caused by the movement of
large objects. This function only works indoors due to the sensitivity of the CMOS sensor.
When motion is detection, an E-mail alert can be sent, or some other action may be
triggered.
Audio Support. You can listen as well as look! Audio is encoded with the video if
desired. With built-in microphone, it is useful for bi-direction voice conversation.
NTP (Network-Time-Protocol) Support. NTP allows the LTE Battery Camera to
calibrate its internal clock from an Internet Time-Server. This ensures that the time stamp
on Video from the LTE Battery Camera will be correct.
PIR (Passive Infrared Sensor) Support. The Camera is embedded with a PIR Sensor,
which senses infrared light radiating from human bodies in its field of view. This feature is
very helpful in enhancing home security systems.
1

2
Package Contents
The following items should be included: If any of these items are damaged or missing, please
contact your dealer immediately.
1. LTE Battery Camera x 1
2. Battery(P2-01) x 1
3. Stand x 1
4. Power MicroUSB cable x 1
5. Screw/Anchor x 3
6. USB Type Charger x 1
7. Battery Charging Station(BCSP2-01) x 1

3
Chapter 2
Setup
This Chapter provides details on how to install and configure the LTE
Battery Camera.
System Requirements
1A mobile device with Internet access
• iOS based Smart Phone
• Android based Smart Phone
• Minimum OS Requirement:
iOS 9.0 or later version
Android 6.0 or later version
2An activated SIM card with a data plan
2.1 Confirm APN of your SIM
2.2 To Confirm your SIM card isn’t locked by pin code
3An Email account for Ovu APP using
Physical Details - LTE Battery Camera
LED
Color
Status
Solid Green
The camera is registered and connected to the mobile network.
(Keep on for 30 seconds)
Slow Blinking Green
The camera is ready to be paired.
Fast Blinking Green
The camera is connecting to the cloud.
Solid Red
Connected to the 4G network but it cannot connect to the
Cloud.
Blinking Red Timely
Low Battery alarm(once blinking per 2sec).
Blinking Red
The 4G network is not available.
(No SIM card is inserted or SIM card can’t be actived.)
Solid Amber
4G network coverage is weak. (only when connected with
server)
Solid Blue
The camera is charging.
Blinking Blue
The camera is booting.
2

4
Blinking Green/Blue
The camera is receiving a firmware upgrade.
Front Panel
Microphone
The built-in microphone is useful for bi-direction voice
conversation.
PIR Sensor
This is hardware sensor to detect motion
Light Sensor
This is hardware sensor to detect LUX.
Lens
No physical adjustment is required or possible for the lens, but
you should ensure that the lens cover remains clean. The image
quality is degraded if the lens cover is dirty or smudged.
IR LEDs
It is used to provide illumination for night time.

5
Rear Panel
Micro-USB Connector
This connector is used for charging the power. Connect the
supplied Micro-USB cable to this port.
Top Panel
Sync./Reset
This button has two functions:
Pairing - When the green LED is flashing slowly, press the
button until the green LED is flashing rapidly. And then use
the Ovu app to scan the QR code.
Reset: When pressed and held over 10 seconds, the LED will
be flashing red and hearing a “ding” sound, which means the
settings of Camera will be set to their default values.

6
Physical Details - Battery charging station
LED
Color
Status
Solid Amber
Battery Charging is on going
Amber blinking three
times, and then off
Battery can’t be charged because battery level has been
over 95%.
(**Battery can be charged to 100% once battery level under
94%.)
Off
Battery Charging is completed

7
Pre-Installation
The camera sends the videos to the account in the cloud via the mobile network. To do this, the
user needs an activated SIM card installed in the camera. See the instruction from your service
provider for more information about how to activate the SIM card.
Please ensure SIM card and the battery are inserted into the camera before using the camera.
Insert a SIM Card
Please make sure that the SIM card is activated before using it.
1. Pull the battery cover up and then open the compartment.
2. Align the SIM card with the gold contacts facing up.
3. Insert the SIM card into the SIM card slot.
Insert the Battery
1. Align the battery contacts and then insert the battery into the camera.
2. Close the Battery cover.
Note: Be sure to charge the battery when use it for the first time.
Charge the Battery
You can charge your camera battery indoors by using the supplied charging cable.
Note: For safety reasons, the battery charging temperatures are from 5°C to 30°C.
1. Put the battery into the charging station.
2. Connect the supplied power MicroUSB cable to the charging station.
Note: You must use the provided power MicroUSB cable and charger to charge the
battery. Do not try to power the camera or charge the battery with other charger or cable
than the ones provided with the camera.
3. Connect the other end of power MicroUSB cable to the charger.
4. Plug the charger into an electrical outlet.
Note: You read no light or suddenly the light goes out once charging battery via battery
charging station, the ambient temperature may be over requested charging temperature. Please
move it to requested charging temperature and re-power it.

8
Installation
Please refer to Chapter 3 to know Ovu app installation first from Page.12.
Use the Ovu app and your account to set up your camera. If you already set up an account, you
can add the camera to your account. During setup, the camera must be connected to the mobile
network. This requires that you are using the camera that is with an activated mobile service
plan. After you add your camera to your account, you can place the camera anywhere in your
mobile network coverage area.
1. Locate the camera in the desired position
2. Make sure that you activate the SIM card, and the SIM card is inserted in the camera as
well.
3. Tap the Ovu icon on your mobile device.
4. If you already set up an Ovu account, log in, and click Add Camera icon.
5. Select BC950. Then press "NEXT".

9
6. Read and follow the on-line instructions. Press "NEXT".
7. Press the Sync button on the camera.
8. Read and follow the on-line instructions.

10
9. Let the App scan the QR code on the camera with an appropriate distance. Be sure to
hold the cell phone steady while scanning the QR code.

11
10. The pairing is in process and it may take a while to connect the camera to the cloud
server.
11. Enter desired names for the camera and zone in the following screen. Then press
"DONE".

12
Mounting Installation
Place the camera in a flat surface or mount it on the wall/ceiling.
For best results, we recommend to locate the camera in a location where the Ovu app
displays at least three bars of mobile network signal strength.
Check the mobile network signal strength in the place where you want to locate the
camera.
Avoid placing the camera in an area that gets a lot of light directly into the camera lens.
Wall Mounting
1. Identify the location for mounting the Wireless IP Camera.
Recommend: Set the camera around 2.1Meters height and tilt down 10degree.
2. Place the mounting plate and secure it with three screws.
Note: Use anchors if necessary.
3. Attach the camera onto the camera stand.

13
Chapter 3
Ovu App
This Chapter describes how to use the Ovu App to get the access to the
camera system.
Overview
This Ovu app can help you to get more from your surveillance system. With this easy to use
app, now it's simple to be in control, get alerts and watch videos in the palm of your hand.
Note: Features may differ according to camera models.
OVU Application Installation
Ovu App is now available for FREE download on Apple and Android store.
Android
Simply select install followed by accept to start the installation process from the Android store.
1. Go to Google ″Play Store″ and tap the search tab.
2. Type "Ovu" on the search bar and tap ″Search″button″.
3. Click the ″FREE″button to download the app.
4. Once installed, tap the ″Ovu″app icon from your screen to open it.
Apple
1. Open your ″Safari″ browser. In the address bar, type
https://kronos.smartgaiacloud.com/ovu.html
Or scan the QR code as below:
2. Click ″Install″.
3. The following sample massage box will pop up.
3

14
4. Click the following link to trust the App.
5. Once installed, tap the ″Ovu″app icon from your screen to open it.

15
Account Registration
Simple setup is required only for the first time you launch the App. If you access the Mobile
App for the first time, you will be asked for account registration:
1. Press the "Ovu" icon in the desktop.
2. Click "SING UP".
3. Enter the email address, password and confirm password in the following screen. Then
press the "SING UP" button.
Note: The requirements of the password: minimum of 8 characters in length; it contains
lowercase letters, uppercase letters, numbers and special symbols.
4. You will receive an email in your email box. Click on a link in the email to activate the
registration within 24 hours.

16
5. When the app launched, enter the e-mail address and password. Then tap "SIGN IN" to
login.
6. The following sample screen will be displayed when you logged in successfully.
Note: The user needs to tab the icon to add a camera if the camera intended to use is not
added.
7. The user can follow Chapter2 Set up to know the instruction on the App screen to add a
new IP CAM for use.

17
Forget Password
1. Press "FORGET PASSWORD"in the login screen,
2. Enter the email address.
3. Press "RE-SENDING EMAIL" button.
4. Click "OK".
5. You will receive an email in your email box. Click on a link in the email and follow the
instructions to reset the password.

18
Camera Settings
The camera screen will display the still picture of the added camera (updated every 10 minutes).
The camera name is displayed in the upper right corner. The setting button is located in the
upper left corner. Other information like camera location, battery status, WIFI signal and Share
button are located in the lower edge.
The user can press the camera picture to enter the corresponding camera live video screen if
desired. Or press "SHARE"button to share with others by entering the Email addresses.
Note: The shared account should be the existing registered Ovu account. It does not have
camera configuration rights and can only watch live videos and events.
Note: It will be good to continues living streaming within 5mins due to battery life concern.
Table of contents