serva BlueLine BlueSpin Cryo User manual

BlueLine
Instruments for Electrophoresis
SERVA Electrophoresis GmbH - Carl-Benz-Str. 7 - -69115 Heidelberg
Phone +49-6221-138400, Fax +49-6221-1384010
INSTRUCTION MANUAL
___________________________________________________________________
BlueSpin Cryo
(Cat. No. BS -CRYO)

1
Index
1 Meanings of Symbols & Safe y Precau ions ........................................................ 2
1.1 Symbols on he device .................................................................................. 2
1.2 Safe y Precau ions ........................................................................................ 2
2 Packing Lis & Technical Specifica ions ............................................................... 4
2.1 Packing Lis ................................................................................................... 4
2.2 Technical Specifica ions ................................................................................ 4
3 Ins alla ion ............................................................................................................ 5
4 Opera ion ............................................................................................................. 8
4.1 Con rol panel ................................................................................................. 8
4.2 Se ing RPM / RCF ........................................................................................ 9
4.2.1 Se ing RPM ............................................................................................ 9
4.2.2 Se ing RCF ............................................................................................ 9
4.3 Se ing Time ................................................................................................ 10
4.4 Se ing Tempera ure and Fas Cool ............................................................. 10
4.4.1 Se ing Tempera ure ............................................................................. 10
4.4.2 Fas Cool............................................................................................... 11
4.5 Accelera ion / Decelera ion .......................................................................... 11
4.6 Program Saving & Recalling ........................................................................ 12
4.6.1 Saving ................................................................................................... 12
4.6.2 Recalling ............................................................................................... 12
4.7 S ar /S op .................................................................................................... 12
4.8 Pulse ........................................................................................................... 13
4.9 Emergency Door Open ................................................................................ 13
4.10 Fuse replacemen ........................................................................................ 13
5 Main enance ...................................................................................................... 14
5.1 Ou er par of Ins rumen .............................................................................. 14
5.2 Chamber ...................................................................................................... 14
5.3 Shaf ............................................................................................................ 14
5.4 Ro or ............................................................................................................ 14
5.5 Transpor a ion of Ins rumen ....................................................................... 14
6 Trouble Shoo ing ................................................................................................ 15
6.1 Check Lis .................................................................................................... 15
6.2 Error code .................................................................................................... 16
7 Ro ors and Accessories ..................................................................................... 18
Vers. 04/13

2
1 Meanings of Symbols & Safety Precautions
1.1
1.11.1
1.1 Symbols on the device
Symbol Meaning Symbol Meaning
Indica e a hole for
manual door
opening in case
of emergency
A en ion and
warning for
elec ric shock
A en ion and
warning for ro or
coupling.
A en ion and
warning for door
opening and
closing
A en ion and
warning for
correc way of
sample
balancing in he
ro or.
1.2 Safety Precautions
Before using he ins rumen , please read his opera ion manual o ensure correc
usage hrough unders anding. Incorrec handling of he ins rumen could possibly
resul in personal injury or physical damage on he ins rumen or i s accessories.
• ALWAYS loca e he ins rumen on a fla , rigid and s able able capable of
wi hs anding he weigh of he ins rumen and i s spinning opera ion.
• ALWAYS make a safe y zone of 30 cm around he cen rifuge o indica e ha
nei her hazardous ma erials nor persons should be permi ed wi hin he area
during opera ion.
• ALWAYS posi ion he ins rumen wi h enough space on each side of
ins rumen o ensure proper air circula ion.
• ALWAYS ins all he ins rumen wi hin a empera ure and humidi y con rolled
environmen . (Permissible ambien empera ure: +5 °C ~ +35 °C, Rela ive
humidi y: ≤ 85 %)
• Before connec ing he power, check he ra ed vol age.

3
• Unapproved ro ors and associa ed accessories should no be used.
• Before opera ing he ins rumen , check if he ro or and he ro or lid are
securely fas ened.
• The ins rumen should be opera ed wi h a ro or properly ins alled and secured
o he mo or shaf .
• Moun he ro or on he mo or shaf properly, check i wi h spinning manually.
• Do no s op he ro or by ouching wi h hand during he ins rumen is running.
• Emergency door open should be performed only when spinning is comple ely
s opped.
• The ra ed speed or specific gravi y should no be exceeded. Samples whose
densi y is grea er han 1.2 g/ml mus have reduced maximum ro a ional speed
o avoid ro or failure.
• The sample con en should no exceed 80 % of o al capaci y of a ube.
O herwise, i would cause spillage of sample fluid and even he ube breakage.
• ALWAYS load he ubes symme rically wi h evenly weigh ed samples o avoid
ro or imbalance. If necessary, use he wa er blank o coun erbalance he
unpaired sample.
• The opera ion speed should no exceed he highes value of he individual
guaran eed g-forces of each cen rifuge, ro or, bucke or adap ors and sample
con ainer, especially he guaran eed g-force of sample con ainer should no be
neglec ed.
• The ro ors should be cleaned and kep dry af er every use for longer life and
safe y.
• ALWAYS disconnec he power supply prior o main enance care and service
o avoid elec rical shock.
• ALWAYS use proven disinfec ion procedures af er cen rifuging biohazardous
ma erials.
• Flammable, oxic, radioac ive, explosive, or corrosive ma erials should no be
cen rifuged.
• When i is necessary o use oxic or radioac ive ma erials or pa hogenic micro-
organisms which belong o he Risk Group II of WHO: “Labora ory Bio- safe y
Manual,” should follow na ional regula ions.
Attention
• o not place dangerous materials within 30 cm distance around the
instrument, and that is also recommended by IEC 61010-2-020.
• Use the emergency door open function only when the door button on the
control panel is dumb under the condition of complete stop of rotor
running.
• Never try to open or move the instrument if it is not completely stopped.
• If the power input is more than +/- 10% of the recommended voltage or
fluctuates frequently, it may cause malfunction of the instrument and
often result in serious damage.
• Install the instrument at a place without any kinds of corrosive gases.

4
2 Packing List & Technical Specifications
2.1 Packing List
• Microcen rifuge
• 6 mm Wrench
• Ro or Locking Tool
• Emergency Open Tool
• Power cord
• Manual
2.2 Technical Specifications
Max. RPM / RCF 17,000 rpm / 27,237 xg
Max. capaci y 30 x 2.0 ml ubes 8 x 8- ube PCR s rips
Temp. range (°C) -20 ~ +40
FAST COOL bu on Yes
Time con rol Pulse, imed < 100 min or con inuous
RPM / RCF conversion Yes
Noise level ≤ 56 dB
Acc / Dec 9 / 10 s eps
Program memory 100
Ro or Iden ifica ion Au oma ion
Imbalance cu ou Yes
Display Blue LCD
Safe y lid lock Yes
Power supply 220 V / 50~60 Hz
Power requiremen 2 kVA
Dimension (W x D x H) 310 mm x 620 mm x 265 mm
Weigh wi hou ro or 43 kg

5
3 Installation
1. Connec he AC Power cord o he power socke on
he back of he ins rumen .
2. Turn on he ins rumen by pressing he swi ch on he
back of he ins rumen .
3. For opening he door, press he [DOOR] bu on.
4. Close he door un il hearing a clank shu .
5. When he door is opened, he door LED urns on.
When he door is closed, he door LED urns off.
• If he door is opened, he ins rumen could no be opera ed even wi h
pressing he [S ar ] bu on.
• For opera ional safe y, his ins rumen has an au oma ic ro or recogni ion
func ion.
• When you supply he power, he display shows "Searching Ro or" / “Change
o Ro or ID”. If he ro or is absen , “Error 9” will be displayed. This message
will be cleared af er ro or coupling and running.
• The door is no au oma ically opened af er finishing opera ion o keep he
sample a proper empera ure.
• Power Failure: If here is any power failure during opera ion, he door can no
be opened by using he [Door] bu on. The door can be opened only when
he opera ion is comple ely s opped and he power is on again. If you wan o
open he door during he power failure, please refer o chap er: “Emergency
Door Open”.
6. Before coupling a ro or, clean he mo or shaf and chamber wi h sof dry owel.

6
7. Moun a proper ro or in o he mo or shaf .
8. Grasp he ro or wi h one hand, and place Ro or
Locking Tool a he cen er hole of he ro or.
To assemble he ro or: Ro a e he Ro or Locking
Tool clockwise un il igh ly assembled.
To disassemble he ro or: Ro a e he Ro or Locking
Tool coun erclockwise
9. To close he ro or lid, ro a e he ro or lid nu
clockwise. For opening lid: ro a e he ro or lid nu
coun erclockwise.
When you run a fixed angle ro or, make sure ha he
ro or lid is igh ly closed. If you don’ close he ro or
lid comple ely, i will be crushed.
10. Posi ioning of sample ubes:
• Before loading sample ubes, check for wa er drops or dir in he ro or hole
or inner adap or.
• If here is a wa er drop or dir in he ro or hole or inner adap or, remove i
wi h sof dry clo h.
• Tubes should be placed in he ro or wi h same amoun of samples a
symme rical posi ions.
• Only use appropria e cen rifugal ubes and do no exceed he speed beyond
he ube’s max g-force.
• For safe y, fill he sample for 70 ~ 80 % in he ubes.
• If he number of samples is no in pair, please load he con rol ubes a each
symme rical posi ion. O herwise, i resul s noise and vibra ion, and
even ually damages he ins rumen .

7
Correct Ways of Sample Balancing & Tube usage
:
8
4 Operation
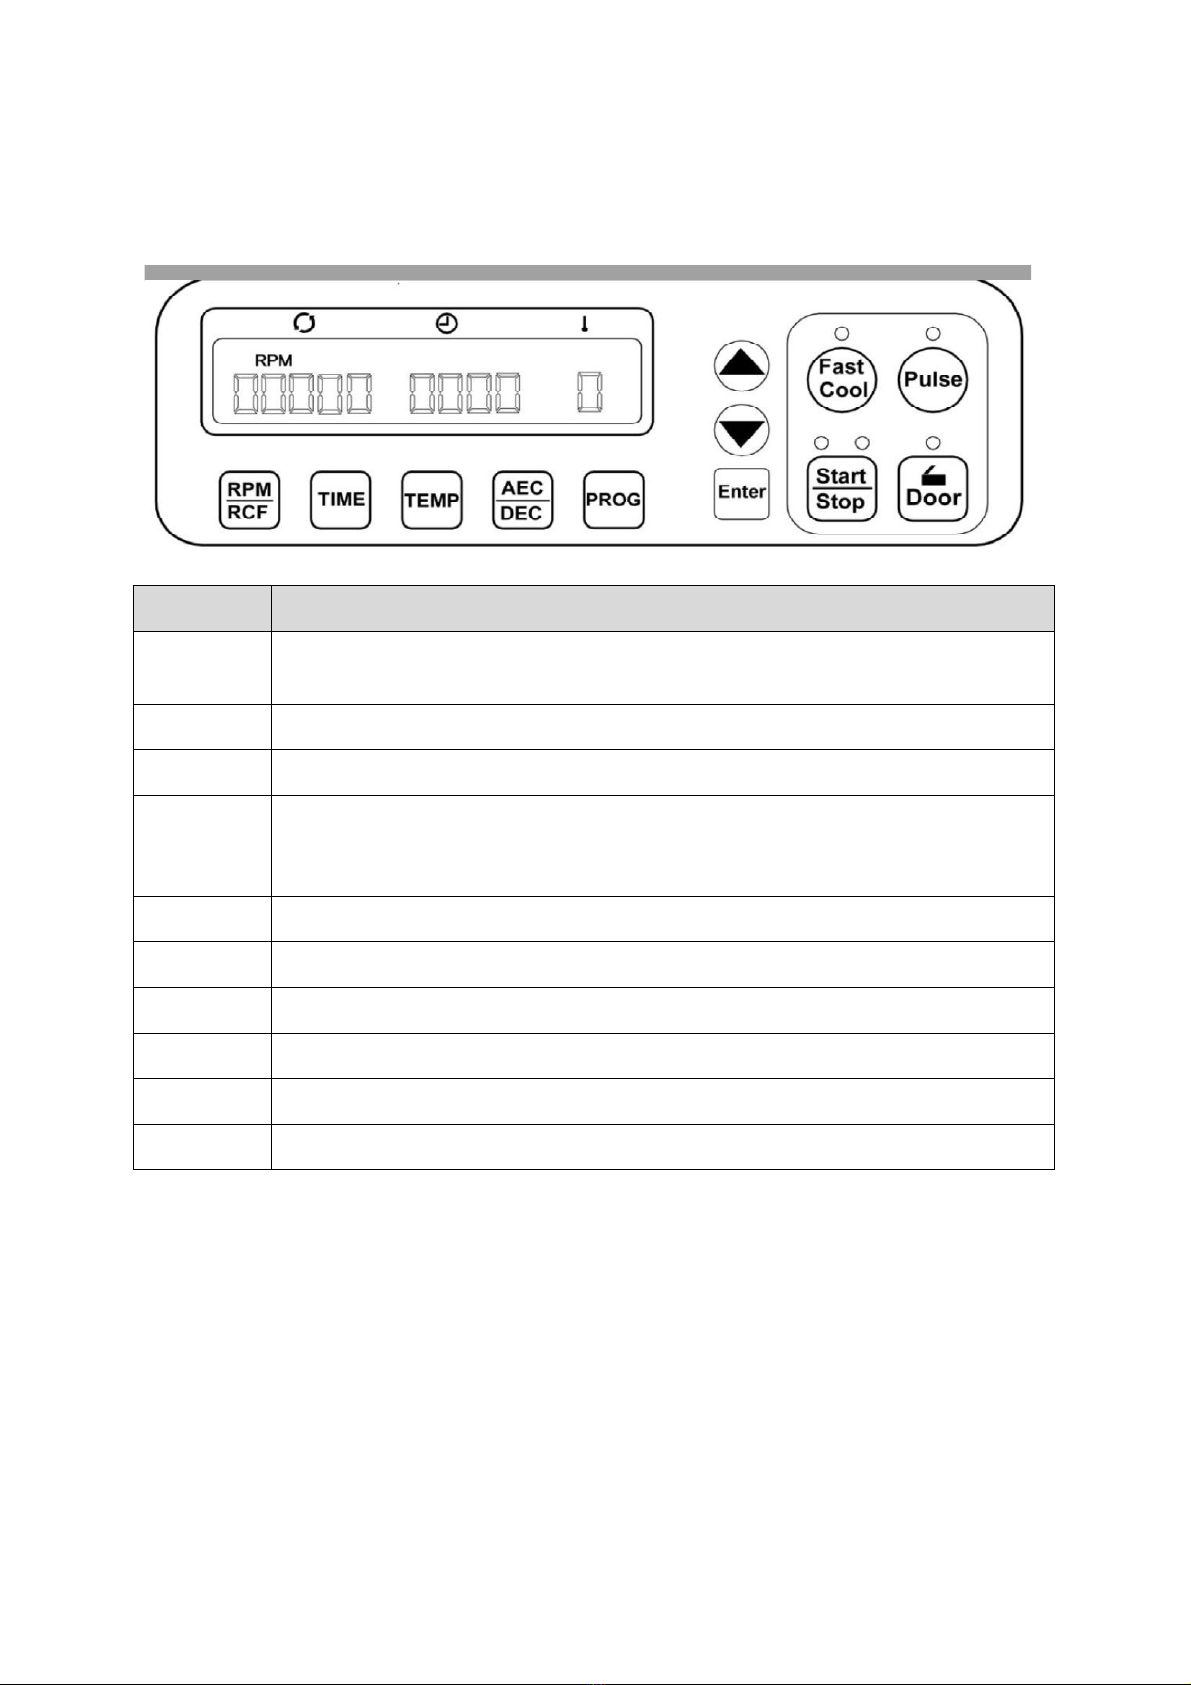
4.1 Control panel
Button
Function
RPM /
RCF For au oma ic conversion of RPM / RCF and o se he speed
TIME Use o se ime, available range up o 99 min 59 sec (00:00: con inuous)
Temp Use o se empera ure (-20 °C ~ 40 °C)
ACC / DEC
Use o se he accelera ion & decelera ion level from 1 o 9 s eps. ‘0’ in
decelera ion s ep means na ural decelera ion. Larger number means
fas er accelera ion or decelera ion.
PROG Use o save a se of se ing values or recall he saved program number
Fas Cool Use o reach rapid refrigera ion up o he se ing empera ure.
Pulse Use for quick runs
En er Use for comple ion of da a se ing
S ar /S op Use o s ar and s op opera ion
Door Use o open ins rumen lid

9
4.2 Setting RPM / RCF
4.2.1 Setting RPM
1. Speed se ing uni : 10 rpm or 100 rpm
RPM MODE is genera ed by pressing he [RPM /
RCF] bu on once.
RPM LED is flickering on he display window.
2. Press he [▲▼] bu ons o change inpu value.
Af er 5 seconds from ouching he [▲▼] bu ons, he
uni of se ing value is changed from 10 rpm o 100
rpm. If you do no ouch he [▲▼] bu on for 5
seconds, he se ing mode is cleared.
Touch he [En er] bu on o save and comple e he
se ing.
4.2.2 Setting RCF
1. Speed se ing uni : 1 rcf or 10 rcf
RCF MODE is genera ed by pressing he [RPM /
RCF] bu on wice.
RCF LED is flickering on he display window.
2. Press he [▲▼] bu ons o change inpu value.
Af er 5 seconds from ouching he [▲▼] bu ons, he
uni of se ing value is changed from 1 rcf o 10 rcf. If
you do no ouch he [▲▼] bu on for 5 seconds, he
se ing mode is cleared.
Touch he [En er] bu on o save and comple e he
se ing.

10
4.3 Setting Time
1. Speed se ing uni : 1 min or 10 min / 1 sec or 10 sec
Time is down-coun ed af er s ar ing cen rifuga ion.
Press he [TIME] bu on once.
MIN LED is flickering.
2. Press he [▲▼] bu ons o change he minu e value.
Af er keeping holding finger on he [▲▼] bu ons for
5 seconds, he uni of se ing value is changed from
1 min o 10 min. If you do no ouch he [▲▼] bu on
for 5 seconds, he se ing mode is cleared.
3. Press he [ENTER] bu on o pass he sec value
se ing.
Af er keeping holding finger on he [▲▼] bu ons for
5 seconds, he uni of se ing value is changed from
1 sec o 10 sec. If you do no ouch he [▲▼] bu on
for 5 seconds, he se ing mode is cleared.
4. Touch he [En er] bu on o comple e he se ing.
4.4 Setting Temperature and Fast Cool
4.4.1 Setting Temperature
1. Tempera ure can be se from -20 °C o 40 °C
Temp se ing uni : 1 °C
Touch he [TEMP] bu on.
Tempera ure value blinks on he display window.
2. Press he [▲▼] bu ons o change inpu value.
If you do no ouch he [▲▼] bu on for 5 seconds,
he se ing mode is cleared.
Touch he [En er] bu on o save and comple e he
se ing.

11
4.4.2 Fast Cool
1. Se he empera ure as described in he chap er:
“Se ing empera ure”
2. Touch he [Fas Cool] bu ons for fas cooling.
“Fas Cool” on LED is urned on. The display shows
a message as follows: “Searching Ro or” >>
“recogni ion OK!”
By ouching he [Fas Cool] bu on, he ins rumen is
refrigera ed down o he se empera ure in a shor
ime. During he fas cooling, he ro or runs a low
speed (1,000 rpm). The passed ime is showed on
he display window.
If you’d like o load your sample ubes before
pressing he [Fas Cool] bu on, please check if he
sample is safe during spinning a 1,000 rpm. Before
s ar ing Fas Cooling, please check he ro or
coupling and symme ry of sample ubes.
4.5 Acceleration / eceleration
1. Touch [ACC / DEC] bu on.
2. Touch he [▲▼] bu ons o change inpu ACC value.
ACC blinks on he ACC / DEC display. Inpu he
desired level of ACC from 1 o 9 (Level 9: The
fas es accelera ion).
If you do no ouch he [▲▼] bu on for 5 second,
he se ing mode is cleared.
3. Fix he ACC level by ouching [En er] bu on.
4. Touch he [▲▼] bu ons o change inpu DEC value.
DEC blinks on he ACC / DEC display. Inpu he
desired level of DEC from 0 o 9 (Level 0: Na ural
decelera ion / Level 9: The fas es decelera ion).
If you do no ouch he [▲▼] bu on for 5 second,
he se ing mode is cleared.
5. Fix he DEC level by ouching [En er] bu on.

12
4.6 Program Saving & Recalling
4.6.1 Saving
1. Se parame ers.
2. Touch he [PROG] bu on longer han 3 seconds.
3. Touch he [▲▼] bu ons o change inpu Program
number. If you do no ouch he [▲▼] bu on for 5
second, he se ing mode is cleared.
Save up o 100 programs. (Program numbers from
00 o 99)
4. Touch he [En er] bu on o comple e he saving
4.6.2 Recalling
1. To recall he saved program, jus ouch he [PROG]
bu on shor ly (less han 1 sec).
2. Touch he [▲▼] bu ons o selec program number
you wan o recall and hen ouch he [En er] bu on.
If you do no ouch he [▲▼] bu on for 5 second,
he se ing mode is cleared.
When you ouch he [En er] bu on, display window
shows he saved se ing parame ers (RPM / RCF,
TIME, TEMP).
4.7 Start/Stop
1. Af er se ing RPM / RCF, Time and Temp., press
[S ar / S op] bu on.
During running, a ‘S ar LED’ is urned on. The
ins rumen is running only when he door is closed.
By ouching he [S ar / S op] bu on during
cen rifuga ion, he opera ion is s opped.

13
4.8 Pulse
1. If you press he [Pulse] bu on and release a he
poin you wan o s op, he cen rifuge decelera es
immedia ely.
4.9 Emergency oor Open
1. The door can be unlocked manually using he
Emergency Door Open Tool hrough he emergency
opening hole. Find he emergency hole on he lef side of
he ins rumen . Inser he Emergency Door Open Tool
in o he hole and push i un il he door is released.
Manual opening should be performed only when spinning is
comple ely s opped. O herwise, harmful damage will be
accompanied o no only opera ors bu samples.
Af er opening he door manually, i is recommended o wai
un il normal elec rici y comes back.
4.10 Fuse replacement
1. Replace he fuse only if he cen rifuge is swi ched off
and he power cord is disconnec ed from he device.
You find he fuse case below he power ou le . Push
wi h a fla -head screwdriver for bring ou he fuse
case.
Replace he damaged fuse wi h new one from he
fuse case and hen re-connec he power.

14
5 Maintenance
5.1 Outer part of Instrument
• Clean he ou side of he ins rumen wi h dry sof clo h. If necessary, dip he
clo h in neu ral de ergen and clean con amina ed area. Keep comple ely dry
af er cleaning.
• Do no use any vola ile chemicals such as alcohol and benzene, e c.
• Be careful no o make scra ches on he surface of he ins rumen . The
scra ches can cause corrosion on he surface of he ins rumen .
• If any rus appears, clean i wi h neu ral de ergen s and keep dry.
5.2 Chamber
• Keep dry inside he chamber af er every use.
• If he chamber is con amina ed, dip he clo h in neu ral de ergen and clean
con amina ed area.
5.3 Shaft
• Always make special a en ion o clean he mo or shaf o avoid any imbalance
problem due o he con aminan s.
• Af er using he ins rumen , ake ou he ro or from he shaf , and clean he
shaf wi h dry sof clo h o keep dry.
5.4 Rotor
• If any par s are con amina ed wi h samples, clean he ro or wi h sof we clo h
and keep he ro or dry.
• Be careful no o make scra ches inside or on he surface of ro ors. Any small
scra ches can cause corrosion of he ro or and big damage o he ins rumen .
• If you do no use he ins rumen , keep he ro or separa ely from he mo or
shaf and s and i upside down.
5.5 Transportation of Instrument
• If you need o move or ship he ins rumen , be cau ious o pro ec he mo or
shaf from any physical impac or urbulence.
• Do no moun a ro or in any cases of movemen . Fill inside he chamber wi h
proper ma erials o keep he mo or shaf on place and no o be influenced by
physical pressure.

15
6 Trouble Shooting
6.1 Check List
Symptom Check list
Power failure
Connec he AC Power cord and make sure ha he line is
comple ely connec ed be ween he ins rumen and power
ou le . Check he power swi ch is urned on.
Can’ be s ar ed
If he door is no closed comple ely, he ins rumen can’
run.
Check he Door LED on he display window and close he
door comple ely.
Can’ open he door
If he power is ou , check he main fuse for he labora ory
o supply he power. If i is no solved in shor ly, open he
door wi h spikes for safe y of sample.
Can’ close he door
Remove he dir a he door la ch and hen close he door
comple ely again. If he door seems no being closed by
mechanical reason, please con ac your dis ribu or.
Noise and vibra ion
during running
Please check he balanced s a us of bo h he able and
he ins rumen .
Please re-check he coupling s a us of he following hree
ma ches o minimize he noise
1. he balanced way of coupling of he ro or in o he
mo or shaf
2. he comple eness of fixing of he Ro or Locking Nu
on he ro or
3. he ma ching s a us of Ro or Lid wi h he ro or
Check balances of samples in he ro or. Load he same
weigh of samples symme rically.

16
6.2 Error code
If he ins rumen shows he error code wi h beeping sound, press [STOP] bu on o
s op he beeping sound and press [En er] bu on o release of he error s a us and
make he ins rumen go o he defaul se ing again.
Error Possible Causes Actions
Error 1 RPM Sensor
•
Shu off he power supply, and hen, urn on he
power swi ch again o check he ins rumen .
• If he error code shows con inuously al hough
you ry o opera e again, please con ac your
dis ribu or.
Error 2 Door
•
The door is no closed comple ely.
• Remove he dir a he door la ch and hen close
he door comple ely again. Check he Door LED
on he display window. If i is no solved in
shor ly, open he door wi h emergency door ool
manually for safe y of sample.
Error 3 Mo or Overhea ing
•
The mo or is overhea ed.
• Shu off he power supply for an hour, and hen
urn on he power swi ch for checking he
ins rumen .
• If he error code shows con inuously, please
con ac your dis ribu or.
Error 4 Low Vol age
•
The power inpu of Power supply (V / Hz) is
10 % less han required power.
• Shu off he power supply and hen check he
vol age of he Power supply (V / Hz).
• Use AVR o provide proper power.
Error5 High Vol age
•
The power inpu of Power supply (V / Hz) is
10 % more han required power.
• Shu off he power supply and hen check he
vol age of he Power supply (V / Hz).
• Use AVR o provide proper power.
Error 6 Over Speed
•
The ins rumen is spun wi h over speed, due o
problems in he overload of mo or and he
ou pu of mo or.
• Shu off he power supply, and hen, urn on he
power swi ch again o check he ins rumen .
Error 7 Sof ware
•
The ins alled sof ware has bugs.
• Tuning he firmware (Download)
Error 8 Imbalance
•
Check weigh -balances of samples. Turn off and
on he ins rumen for checking.

17
Error 9 Ro or ID or RPM
Sensor
•
If he func ion of ro or recogni ion is failed, his
message is appeared.
• This message will be cleared by coupling an
appropria e ro or.
• If he error code shows con inuously, please
con ac your dis ribu or.
Error 11 Chamber Temp.
Error
•
The ins rumen is no reached o se ing
empera ure wi hin an hour.
• No user ac ion. Please con ac your dis ribu or.
Error 12 Temp. Sensor
Error
•
There is a faul y in he empera ure sensing of
chamber or over hea ed.
• No user ac ion. Please con ac your dis ribu or.
Error 15 Mo or Temp.
Sensor
•
The mo or empera ure sensor can’ recognize.
• No user ac ion. Please con ac your dis ribu or.
Error 16 Comp. Temp.
Sensor
•
The empera ure of compressor is over hea ed.
• No user ac ion. Please con ac your dis ribu or.

18
7 Rotors and Accessories
Product
Cat. No.
A Fixed Angle Micro ube Ro or wi h aluminum lid for 24
micro ubes
BS-MRR24
A Fixed Angle Micro ube Ro or wi h aluminum lid for 30
micro ubes
BS-MRR30
A Fixed Angle PCR- ube Ro or for 8 rows of PCR s rips, no lid BS-MRP64
0.2 ml Adap or of micro ube ro ors BS-A02
0.5 ml Adap or of micro ube ro ors BS-A05

EC-
eclaration of Conformity
We
hereby cer ify ha he following described machine in i
cons ruc ion and
form is in accordance wi h all h
safe y requiremen s of he EC
EC Low Vol age Direc ive 2006/95/EC (12
direc ives.
This declara ion is no longer valid if he
Au horized represen a ive:
SERVA Elec rophoresis GmbH
Carl-Benz-S r. 7
D-69115 Heidelberg
Tel: +49-6221-13840-0
Descrip ion of he machine:
Func ion: Cen rifuge
Type/modell :
BlueSpin Cryo
The agreemen wi h fur her valid guidelines/regula ions following for he produc is
explained:
• EN 61010-1:2001
: Safe y requiremen s for elec rical equipmen for measuremen ,
con rol, and labora ory use
• EN 61010-2-
020:2006: Safe y requiremen s for elec rical equipmen for
measuremen , con rol, and labora ory use
for labora ory cen rifuges
• EN 61326-
1:2006: Elec rical equipmen for measuremen , con
use -
EMC requiremen s
•
EN 55011:2007: Indus rial, scien ific and medical (ISM) radio
equipmen -
Elec romagne ic dis urbance charac eris ics
measuremen
Au horized person
for he echnical documen a ion:
Dr. Marc Seidler
SERVA Elec rophoresis GmbH
Carl-Benz-S r. 7
D-69115 Heidelberg
Heidelberg, 23.04.13
19
eclaration of Conformity
hereby cer ify ha he following described machine in i
form is in accordance wi h all h
e relevan essen ial heal h and
safe y requiremen s of he EC
EMC Direc ive 2004/108/EC (21s
May 2007)
EC Low Vol age Direc ive 2006/95/EC (12
h December 2006)
is
This declara ion is no longer valid if he
machine is modified wi hou
SERVA Elec rophoresis GmbH
Descrip ion of he machine:
BlueSpin Cryo
The agreemen wi h fur her valid guidelines/regula ions following for he produc is
: Safe y requiremen s for elec rical equipmen for measuremen ,
con rol, and labora ory use
- Par 1: General requiremen s
020:2006: Safe y requiremen s for elec rical equipmen for
measuremen , con rol, and labora ory use
- Par 2-
020: Par icular requiremen s
for labora ory cen rifuges
1:2006: Elec rical equipmen for measuremen , con
rol and labora ory
EMC requiremen s
- Par 1: General requiremen s
EN 55011:2007: Indus rial, scien ific and medical (ISM) radio
-
frequency
Elec romagne ic dis urbance charac eris ics
-
Limi s and me hods of
for he echnical documen a ion:
SERVA Elec rophoresis GmbH
______________________
Heidelberg, 23.04.13
Dr. Marc Seidler, CE official
hereby cer ify ha he following described machine in i
´s concep ion,
e relevan essen ial heal h and
May 2007)
and he
is
adop ing hese
machine is modified wi hou
our consen .
The agreemen wi h fur her valid guidelines/regula ions following for he produc is
: Safe y requiremen s for elec rical equipmen for measuremen ,
020:2006: Safe y requiremen s for elec rical equipmen for
020: Par icular requiremen s
rol and labora ory
frequency
Limi s and me hods of
______________________
Dr. Marc Seidler, CE official
This manual suits for next models
1
Table of contents


