Sesamo Icon User manual


2 (SUMMARY)
Sesamo - Icon
EN
SUMMARY
SUMMARY.............................................................................................................................................................................2
GENERAL INFORMATION - INSTALLATION AND WIRING.....................................................................................................3
KEY FUNCTIONS - LED INDICATIONS.....................................................................................................................................5
FUNZIONALITÀ BASE - LOGICHE ...........................................................................................................................................6
FUNCTIONALITY - SERVICE KEYS...........................................................................................................................................7
PROGRAMMING MODES ......................................................................................................................................................8
TRASPONDER FUNCTIONALITY...........................................................................................................................................12
MICRO-USB FUNCTIONALITY ..............................................................................................................................................19

3 (SUMMARY)
Sesamo - Icon
EN
GENERAL INFORMATION - INSTALLATION AND WIRING
The "ICON" selector was created to work with all SESAMO operators, designed to be used both by the user for
managing the door functionality and by the installer for adjusting the basic parameters of the door.
ICON must be installed inside of buildings.
H=118mm
B=81mm
SP=18mm


5 (SUMMARY)
Sesamo - Icon
EN
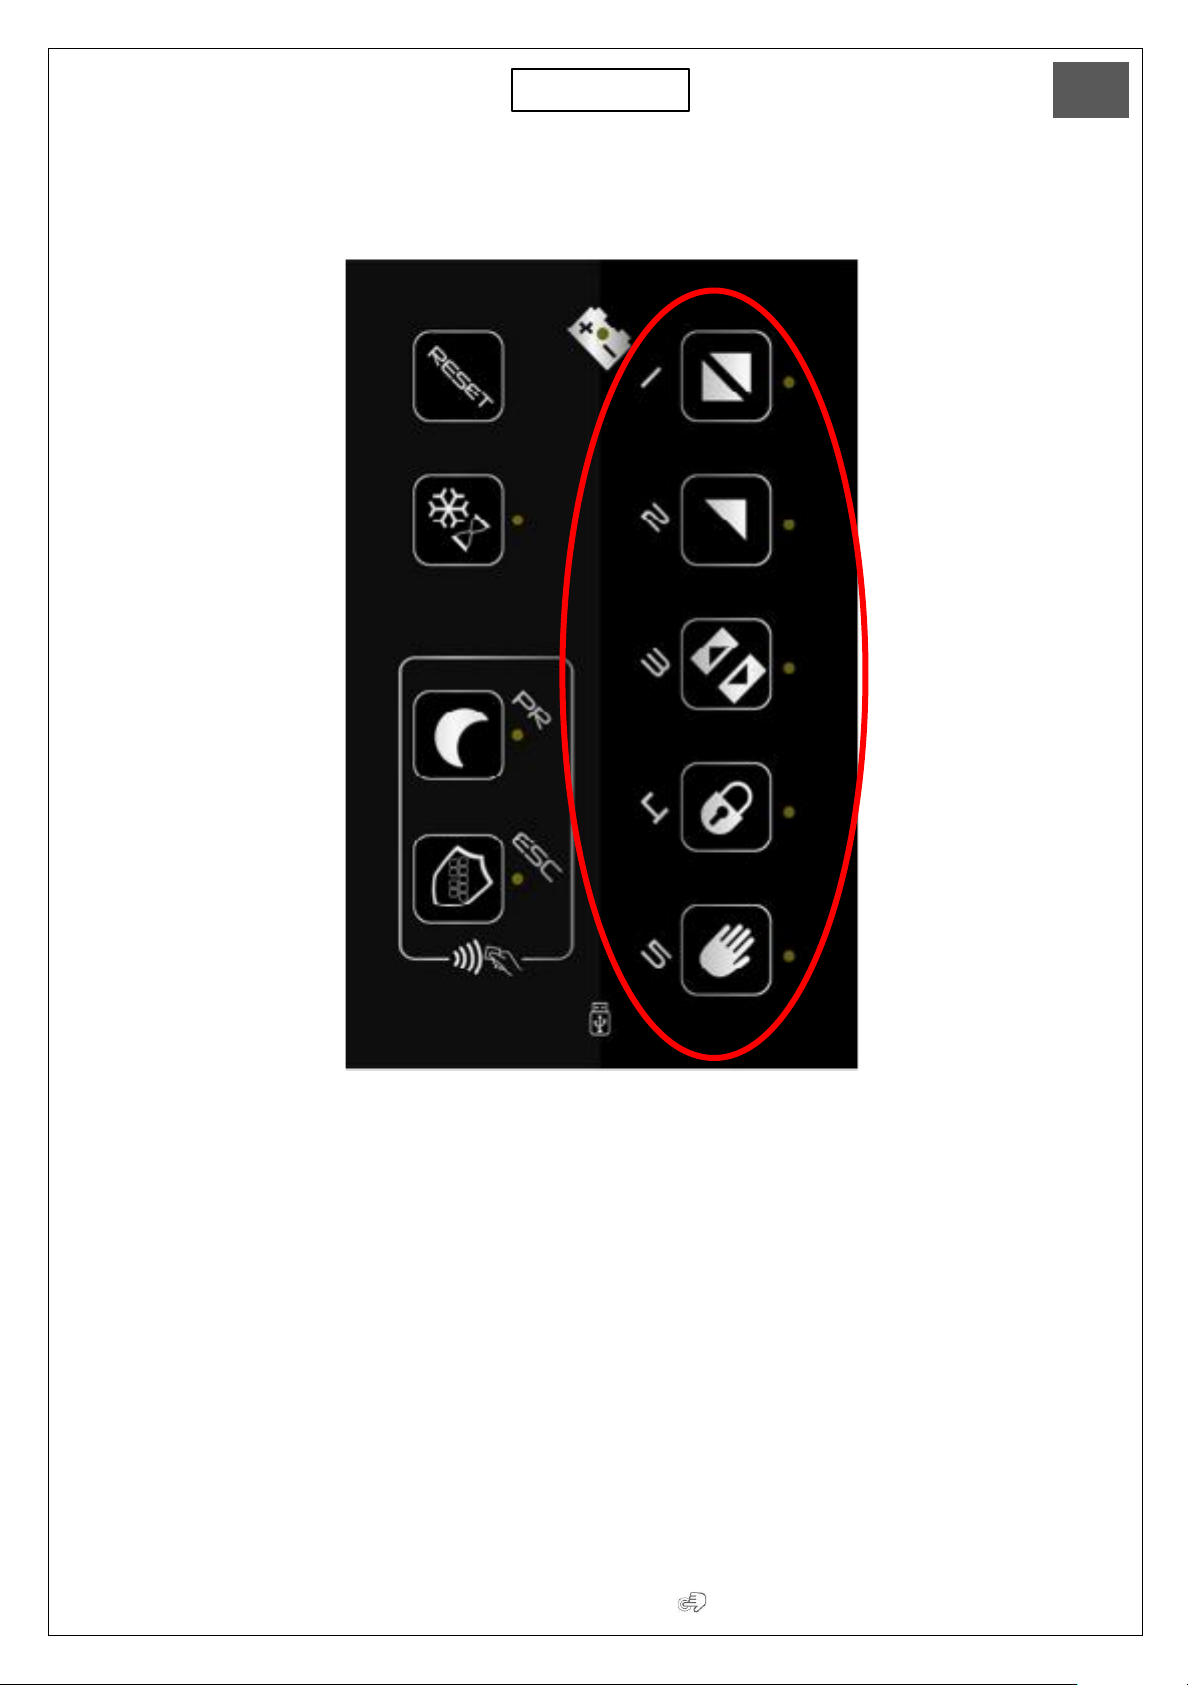
KEY FUNCTIONS - LED INDICATIONS
•To activate a logic / programming / choice, place your finger inside the key area indicated with a rectangle
•Keep your finger resting 1 second
•The LEDs next to the key areas indicate, if fixed, that the logic has been set correctly.
•The LEDs, if flashing, may have various indications based on the action you want to perform (they will be
explained in the various paragraphs dedicated to the selector functions).
•The icon with the battery drawn and a LED in the center indicates:
oif it is fixed that the automation is battery powered
oif flashing that the batteries may be flat, malfunctioning or with a possible anomaly.
•The Micro - usb icon indicates the presence of a micro - usb port. To gain access, remove the upper body of the
selector applied by interlocking.
Led batteries
Key
Led
Transponder functionality area
Icon Micro-usb
6 (SUMMARY)
Sesamo - Icon
EN
FUNZIONALITÀ BASE - LOGICHE
List of logics available:
1. 2 Radar (automatic)
2. 1 Radar (only exit)
3. Stop open
4. Stop close
5. Manual
Actions to be performed in order to set the chosen logic:
1. Place your finger in the desired key area for 1 second.
2. You will hear 1 beep.
3. The LED will turn on steadily
4. Logic is set.

7 (SUMMARY)
Sesamo - Icon
EN
FUNCTIONALITY - SERVICE KEYS
Read the warnings carefully!!!!
RESET - by placing the finger for 3 seconds, a reset command is confirmed to the main board
For sliding: by placing your finger (1 beep plus fixed LED) I link the "partial opening" logic to the logic
previously preset (on the selector I will find two LEDs lit, one on the logic and the other on the
snowflake icon)
For swing: not used
1. In case of partial opening selection with Stop
open logic already active, it will be necessary
to let the automation perform a complete
opening cycle to make the partial opening
settings active.
2. In case of Reset, partial opening is disabled,
unless a logic after reset (with Digidor) has
been set already.
3. The stop close logic is the only logic that
cannot be combined with partial opening.

8 (SUMMARY)
Sesamo - Icon
EN
PROGRAMMING MODES
To be able to enter programming mode:
PR+ESC at the same time:
placing your fingers on the two keys at the same time for more than 3 ”(1 beep as an indication) you
enter the programming menu of the selector from where you can adjust some basic parameters. (see
list with relative sequence explained below).
ATTENTION!!!
I understand that I have entered the programming menu because all the LEDs are flashing.
9 (SUMMARY)
Sesamo - Icon
EN
Sequence for setting parameters:
At this stage they are inside programming and all LEDs are flashing - choose the parameter to be set by placing your
finger on the corresponding button.
Once the parameter to be adjusted has been chosen, the lit LEDs will indicate the adjustment level (1 minimum - 5
maximum - see tables for automation references / values). By placing your finger on the button, I increase (if the LED is
not on) or decrease (if the LED is on) the adjustment level
1 –Opening speed
2 –Closing speed
3 –Idle time
4 –% Partial opening
SLIDING
5 –Anti-crashing
SLIDING
Minimum value
4 –Anti-crashing
in opening - SWING
5 –Anti-crashing
in closing - SWING
Maximum value

10 (SUMMARY)
Sesamo - Icon
EN
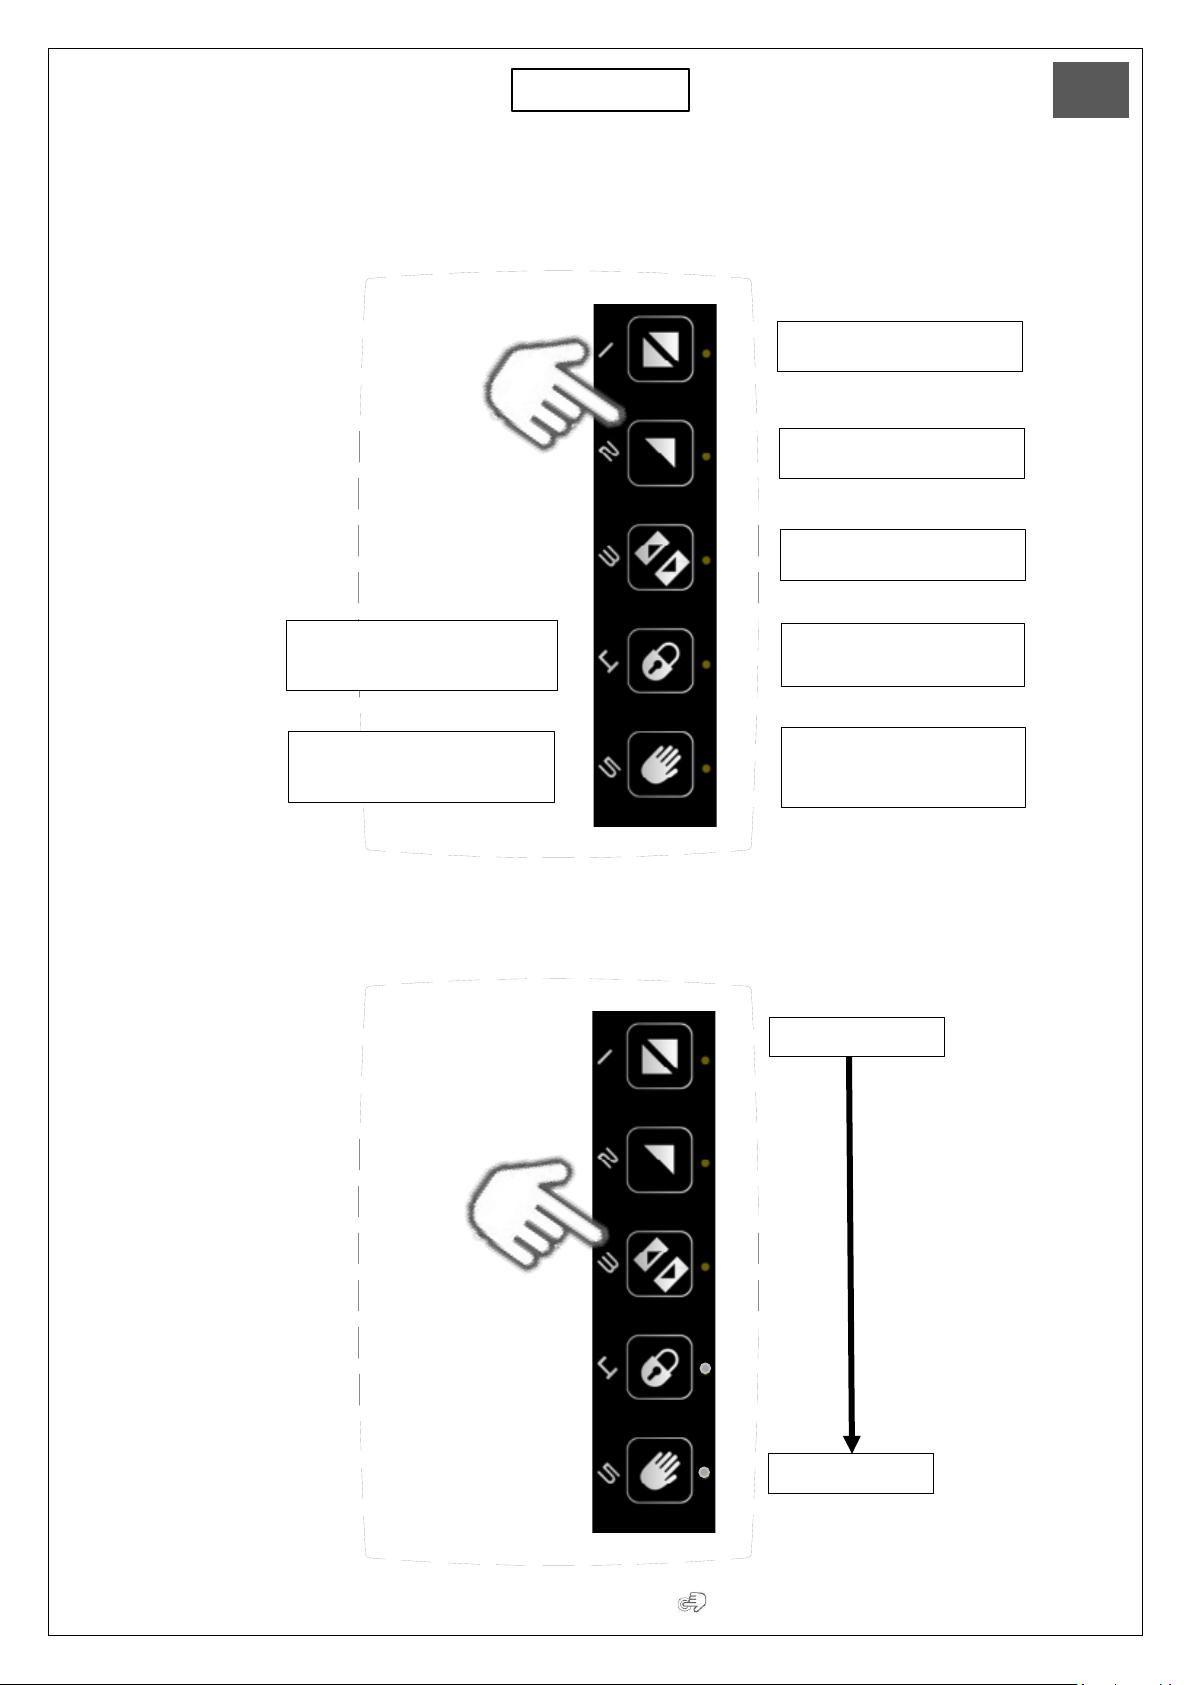
After adjusting the selected parameter to be able to store the adjustment:
In case you do not want to memorize the adjusted parameter:
By placing your finger once
I STORE ONLY THE SETTING
SET, I automatically return to
the parameter selection mode
(to be able to choose and set
another parameter if
necessary).
By placing your finger once
I EXIT WITHOUT SETTING,
I automatically return to the
parameter selection mode (to
be able to choose and set
another parameter if
necessary).
Placing the finger a
second time I ACTIVATE
THE SET VALUES and go
back to the logic selection
Placing the finger, a second
time I RETURN TO THE
LOGIC SELECTION
WITHOUT ACTIVATING
ANYTHING
1° press
2° press
1° press
2° press
11 (SUMMARY)
Sesamo - Icon
EN
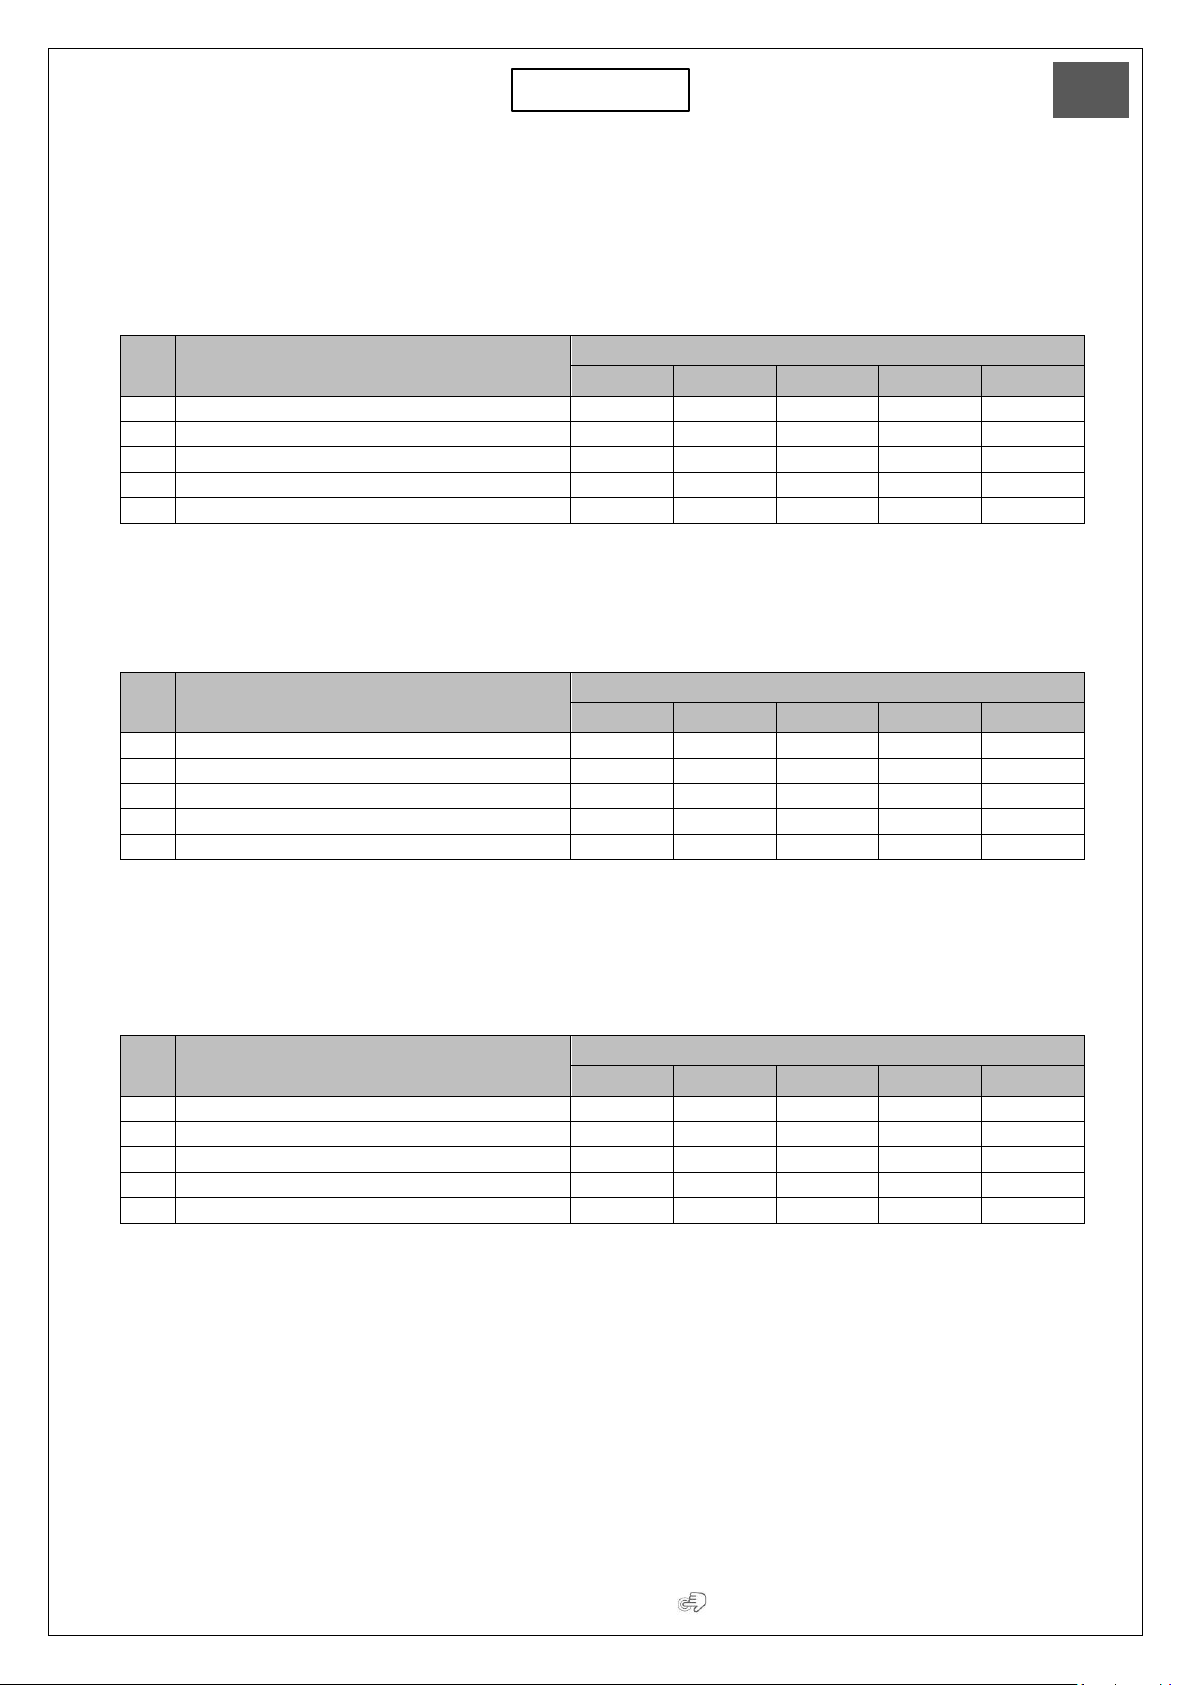
Parameter adjustment tables based on the automation installed
Dualcore –sliding
N
Description
Levels
1
2
3
4
5
1
Opening speed
100mm/s
250mm/s
400mm/s
550mm/s
700mm/s
2
Closing speed
100mm/s
200mm/s
300mm/s
400mm/s
-
3
Idle time
0”
1”
3”
5”
10”
4
% Partial opening
30%
40%
50%
60%
70%
5
Anti-crashing
1
3
5
7
9
Smartpro / Proswing –swing
N
Description
Levels
1
2
3
4
5
1
Opening speed
20°/s
30°/s
40°/s
50°/s
60°/s
2
Closing speed
10°/s
20°/s
30°/s
35°/s
40°/s
3
Idle time
0”
1”
3”
5”
10”
4
Anti-crashing in opening
1
3
5
7
9
5
Anti-crashing in closing
1
3
5
7
9
Swingo –swing
N
Description
Levels
1
2
3
4
5
1
Opening speed
20°/s
30°/s
40°/s
50°/s
-
2
Closing speed
10°/s
20°/s
30°/s
35°/s
40°/s
3
Idle time
0”
1”
3”
5”
10”
4
Anti-crashing in opening
1
3
5
7
9
5
Anti-crashing in closing
1
3
5
7
9


13 (SUMMARY)
Sesamo - Icon
EN
Attention read the following points carefully:
1. Number of usable TAGs = 3
2. The TAGs are already enabled as factory setting with functionality 2
3. In the event that the installer finds himself with some TAGs not enabled or wants to change the preset function,
follow the operations described on page 14.
4. To change the factory setting of the TAG you must first perform the deletion procedure, see page 15.
5. In Proswing and Swingo operators the function TAG IS NOT AVAILABLE!!!!
6. To understand if a TAG is enabled, just bring it close to the detecting area:
•if you hear a long beep it indicates that it is not enabled
•if 1 beep is heard and the function is set or the two functions flash alternately (alternating flashing indicates
the possibility to choose one of the two functions available) indicates that it is enabled.
7. TAG functions (can only be set on the electronic board and only by the installer):
•0 = Keyboard lock and unlock
•1 = Activation / deactivation of the first opening / night mode lock
•2 = Enabling of both functions

14 (SUMMARY)
Sesamo - Icon
EN
TAG Configuration:
The intervention of the installer is required as they must be enabled with an interaction between
the automation electronic board and the ICON selector.
Sequence:
A.t. will start flashing on the
board display. while the two LEDs
of the TAG area will start to flash
alternately on the selector.
All this indicates that you are
ready to store the TAG.
The TAG will be enabled with the
function previously chosen on
the card.
To enable it, bring the card in the
dedicated area, 3 beeps will be
heard and the TAG will be
enabled.
Once all the TAGs
have been enabled,
press ENTER or ESC
to exit programming.
Search A.t. (Add-tag) on
menu –press ENTER
Enter the menu and select the type of I want
to enable (0,1,2) –press ENTER
15 (SUMMARY)
Sesamo - Icon
EN
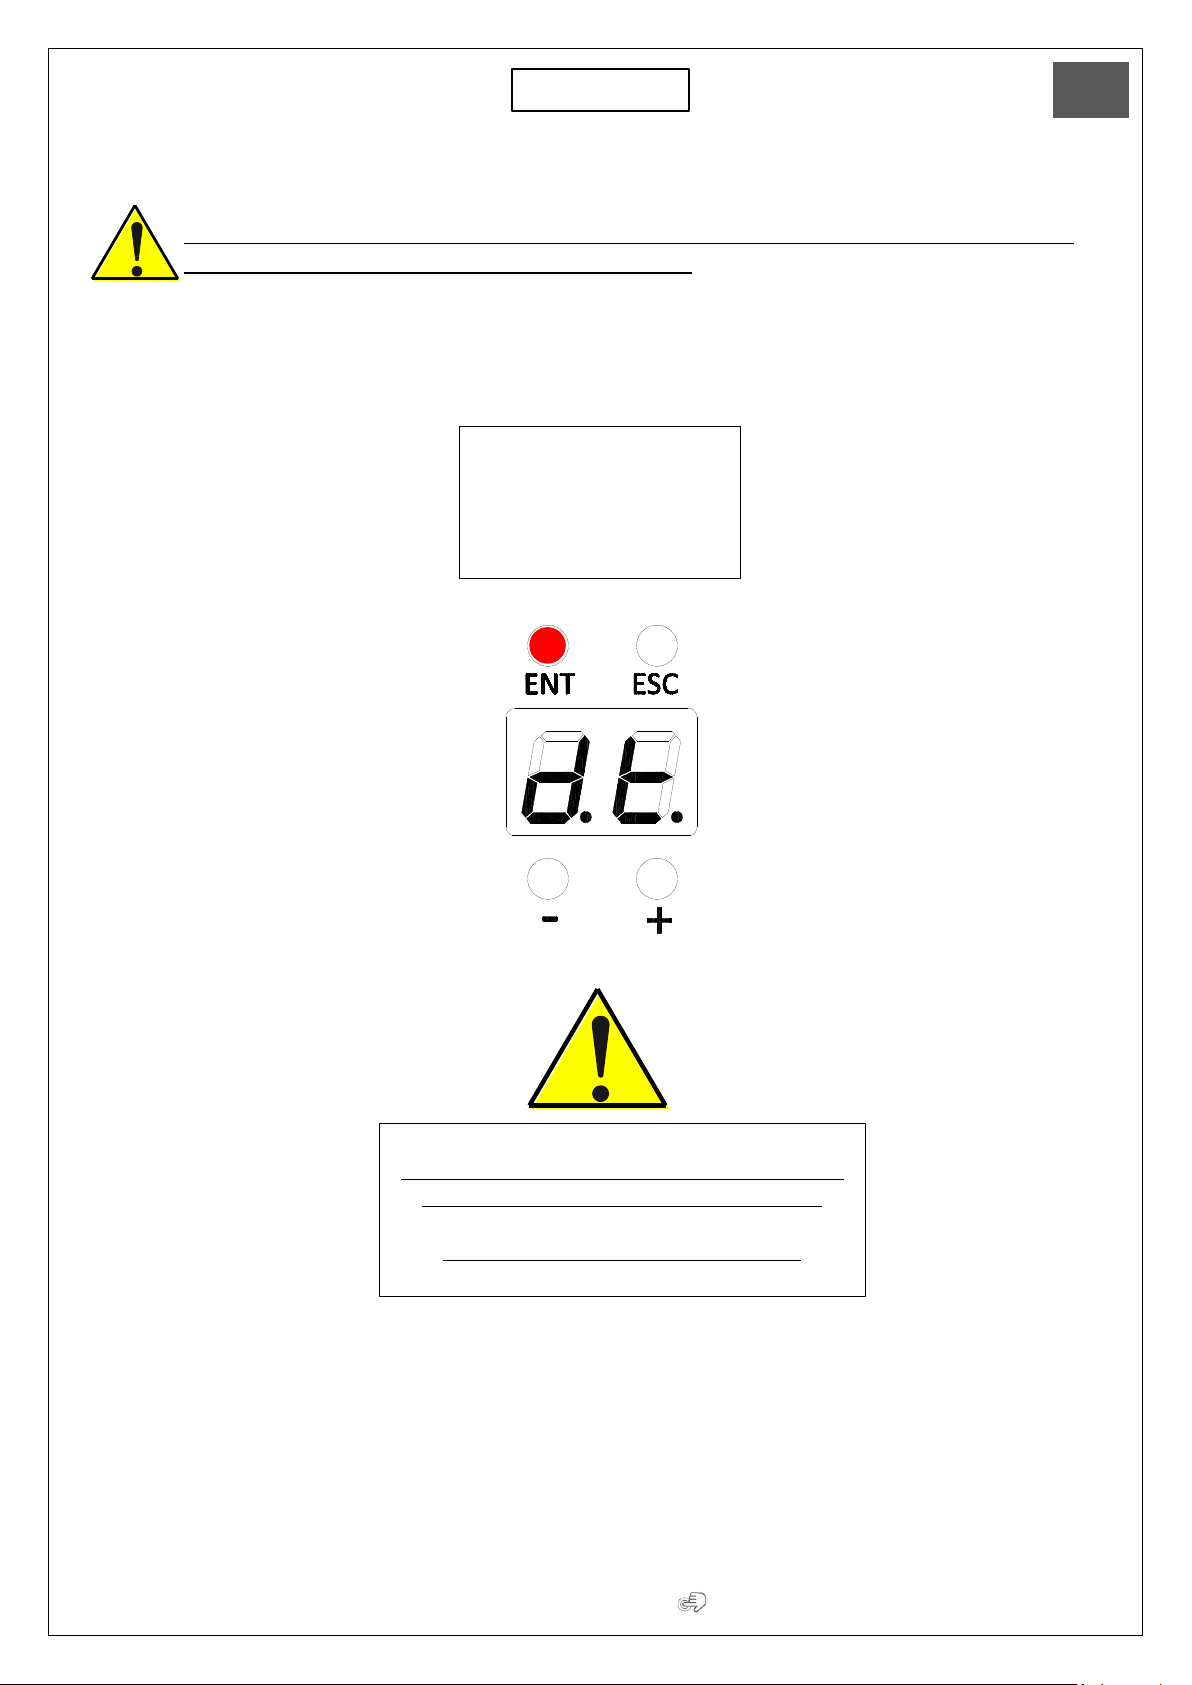
Cancellation of enabled TAGs:
The intervention of the installer is required as they must be disabled with an interaction between
the automation electronic board and the ICON selector.
it is possible to cancel the enabling of TAGs in the following way:
Search for d.t. (delete-tag) on
board menu display - press
ENTER for 5 ”automatically all
stored TAGs will be disabled.
5”
The TAGs CANNOT be disabled individually, you must
disable them all and re-enable the desired ones.
The intervention of the installer is required

16 (SUMMARY)
Sesamo - Icon
EN
Use of enabled TAGs:
TAG enabled with value 0 = Keypad lock and unlock function
If the keypad lock is not yet activated:
approach the TAG once and activate the keypad lock
function (1 beep - the LED next to the icon lights up).
If the keypad lock is activated:
approach the TAG once and disable the keypad lock
function (1 beep - the LED next to the icon turns off).
TAG enabled with value 1= Activation / deactivation of the first opening - night lock mode
If the first opening is not yet activated:
approach the TAG once and activate the first input
function (1 beep - the LED next to the icon lights up).
If the first opening is activated:
approach the TAG once and disable the first input function
(1 beep - the LED next to the icon turns off).
ATTENTION!!!!! WHEN I ACTIVATE THE FIRST OPENING LOGIC FROM THE SELECTOR, THE ICON LED WILL BE FIXED
AND I WILL BE ABLE TO DEACTIVATE IT WITH MY TAG CARD. IF, HOWEVER, I FIND THE LOGIC ACTIVE BUT WITH THE
LED FLASHING, IT INDICATES THAT IT HAS BEEN INSIDE WITH A KEY CONTACT AND I WILL NOT BE ABLE TO
DEACTIVATE IT WITH MY CARD.
17 (SUMMARY)
Sesamo - Icon
EN
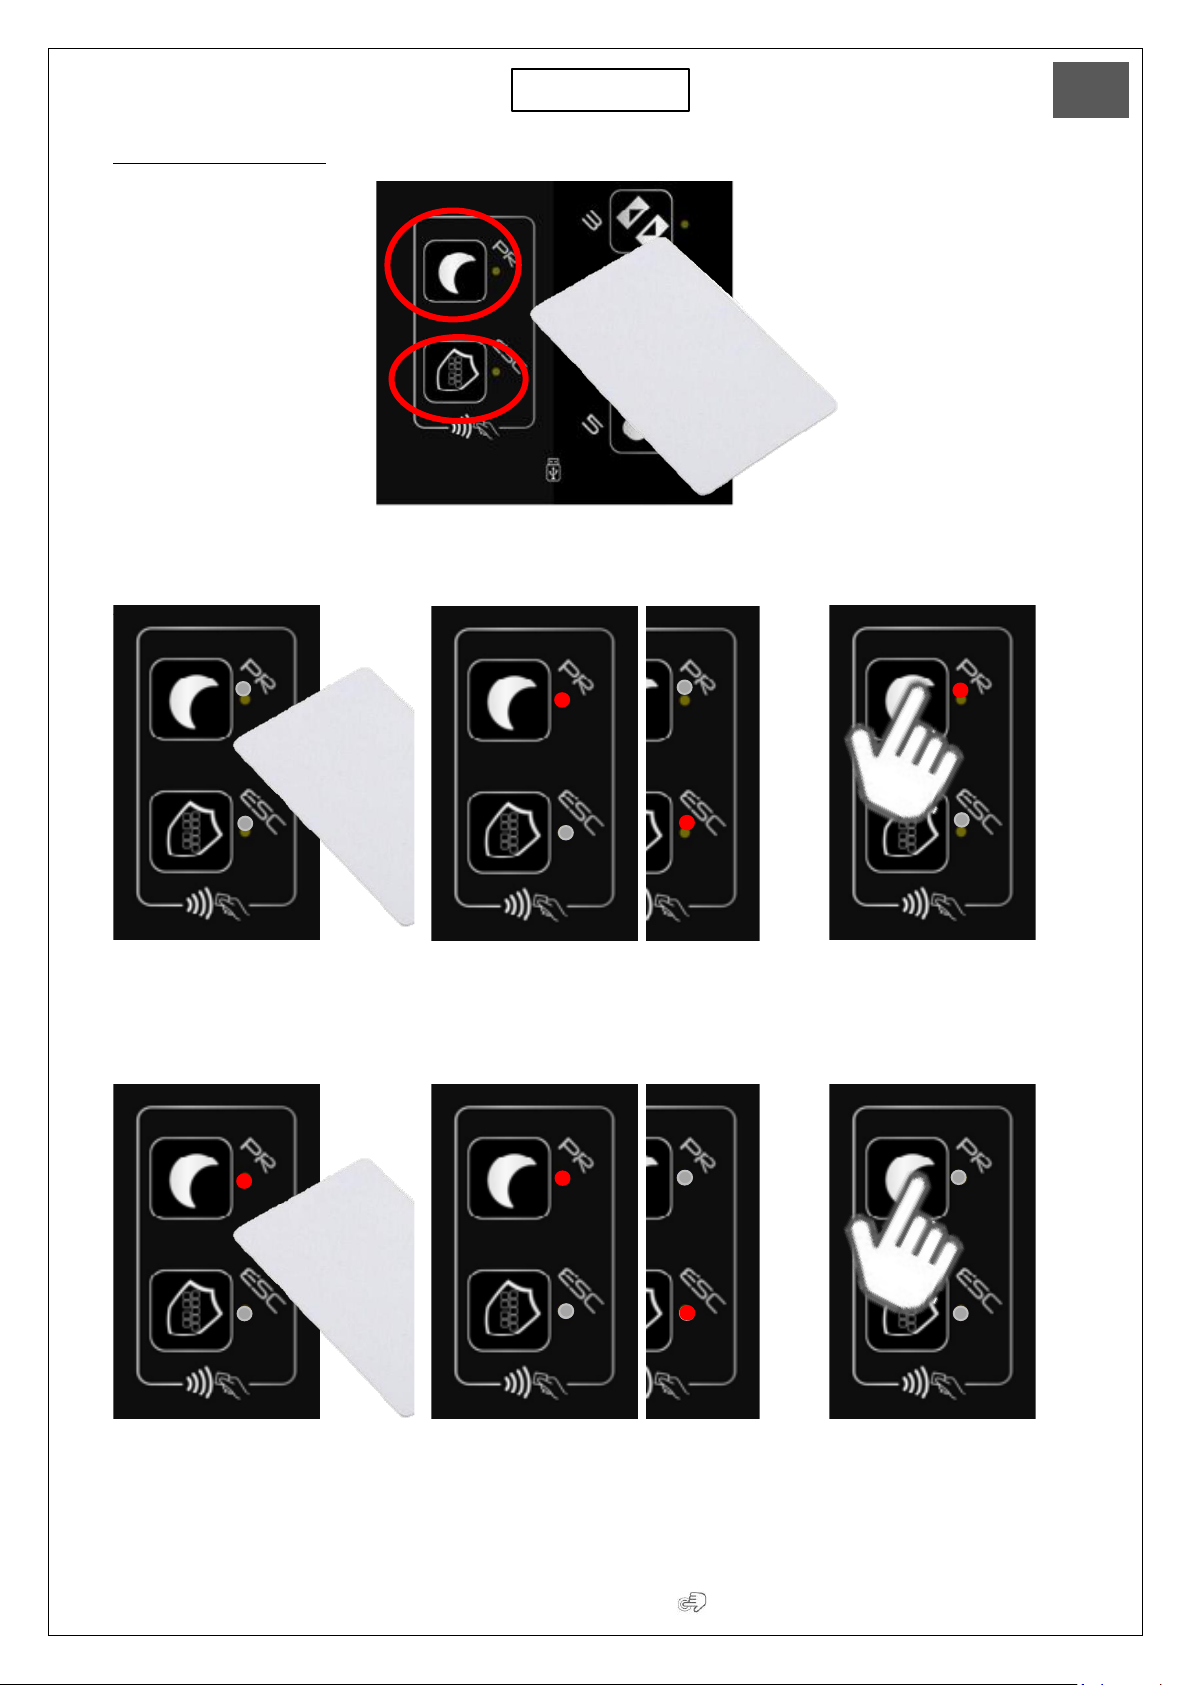
TAG enabled with value 2= Enabling of both functions: keypad lock + first opening - follow table
Case A: No function set on the selector
1 –Bring TAG closer 2 –Alternating flashing of LEDs 3 –Place finger on selected logic
function to set
This procedure must always be used to activate a function
Case B: A function already set, example "First opening"
1 –Bring TAG closer 2 –Alternating flashing of LEDs 3 –Place finger on selected logic
This procedure must always be used to deactivate a function

18 (SUMMARY)
Sesamo - Icon
EN
Case C: A function that has already been set for example “Night mode”
1 –Bring TAG closer 2 –Alternating flashing of LEDs 3 –Place finger on selected logic
This procedure must always be used to activate the function that has not yet been set
Case D: Both functions set
1 –Bring TAG closer 2 –Alternating flashing of LEDs 3 –Place finger on
the function to deactivate
If you repeat the sequence and place your finger on the other icon of the active function, that will also be disabled.
ATTENTION!!!!! WHEN I ACTIVATE THE FIRST OPENING LOGIC FROM THE SELECTOR, THE ICON LED WILL BE FIXED
AND I WILL BE ABLE TO DEACTIVATE IT WITH MY TAG CARD. IF, HOWEVER, I FIND THE LOGIC ACTIVE BUT WITH THE
LED FLASHING, IT INDICATES THAT IT HAS BEEN INSIDE WITH A KEY CONTACT AND I WILL NOT BE ABLE TO
DEACTIVATE IT WITH MY CARD.

19 (SUMMARY)
Sesamo - Icon
EN
MICRO-USB FUNCTIONALITY
In order to access the micro-usb port, remove the front cover by using a screwdriver in the appropriate clicks indicated
in the figure with arrows.
The micro-usb port is for exclusive use for the connection, using commercial cables not supplied, of the Digidor or
Digidor T or Digidor BT (EXCLUDING BLUETHOOT FUNCTION - NOT WORKING). Once connected, the Digidor will be
functional and usable (for functionality see Digidor manual).
ATTENTION!!!!!! The following peripherals CANNOT be connected to the Micro-usb:
•PC
•USB Keys
•Selector ICON

20 (SUMMARY)
Sesamo - Icon
EN
ATTENZIONE! Questo prodotto rientra nel campo di applicazione della Direttiva 2012/19/UE riguardante la gestione dei
rifiuti di apparecchiature elettriche ed elettroniche (RAEE). L’apparecchio non deve essere eliminato con gli scarti
domestici in quanto composto da diversi materiali che possono essere riciclati presso le strutture adeguate. Informarsi
attraverso l’autorità comunale per quanto riguarda l’ubicazione delle piattaforme ecologiche atte a ricevere il prodotto
per lo smaltimento ed il suo successivo corretto riciclaggio. Si ricorda, inoltre, che a fronte di acquisto di apparecchio
equivalente, il distributore è tenuto al ritiro gratuito del prodotto da smaltire. Il prodotto non è potenzialmente pericoloso
per la salute umana e l’ambiente, non contenendo sostanze dannose come da Direttiva 2011/65/UE (RoHS), ma se
abbandonato nell’ambiente impatta negativamente sull’ecosistema.
Il simbolo del bidone barrato indica la rispondenza di tale prodotto alla normativa relativa ai rifiuti di
apparecchiature elettriche ed elettroniche. L’abbandono nell’ambiente dell’apparecchiatura o lo
smaltimento abusivo della stessa sono puniti dalla legge.
Table of contents


