Seuic AUTOID PAD User manual

Jiangsu SEUIC Technology Co., Ltd.
SEUIC
Reference Manual
AUTOID PAD Air Rugged Tablet PC
AUTOID product manual
Version 1.2

Jiangsu SEUIC Technology Co., Ltd.
Copyright notice
The information contained in this manual is provided "as is" and is subject to change
without prior notice.
The company makes no warranties of any kind with respect to the contents of this
manual, including, but not limited to, warranties of merchantability and fitness for
specific purposes. The company shall not be liable for any errors contained in this
manual or for any accidental or incidental loss arising out of the supply, execution or
use of this manual or the examples therein.
Software Copyright 2019-2021 SEUIC Company
This manual contains proprietary information protected by copyright. All rights
reserved. Except as permitted by the Copyright Law, no part of this manual may be
photocopied, reprinted, adapted or translated without the prior written permission of
the company.
The Copyright of this manual and related application software is owned by Taiwan and
protected by International Copyright Law.
The brand names and product names referred to in this manual are the trade names,
service marks, trade marks or trademark of their respective owners.
If you need more product information and support, please contact our sales
representative or directly to our website.
Jiangsu SEUIC Technology Company Co. , Ltd.
No. 15 Xinghuo Road, high-tech Industrial Development Zone, Jiangsu Province
POSTCODE: 210061
Tel: 86-25-52261298
Fax: 86-25-52268995
Www.seuic.com
Product website: www.chinaautoid.com
Service hotline: 400-677-0876
Service address: AUTOID@SEUIC. com

Jiangsu SEUIC Technology Co., Ltd.
Record of document issue
Version
number
Modify the content Revision
date
Modifiers
V1.0 Android 9.0 initial version of Chinese instructions 20190918 Jiang Mingan
V1.1 Add options, and modify the graphics 20191202 Jiang Mingan,
Zhou Zhen
V1.2 Change the relevant content 20200610 Jiang Mingan,
Zhou Zhen

目录
Chapter 1, notes for use ...............................................................................................................1
1.1 points to note for laser scanning engines .......................................................... 1
1.2 safety precautions.............................................................................................. 1
1.3 maintenance considerations .............................................................................. 1
Chapter 2, Appearance Introduction .........................................................................................4
Chapter 3, the keyboard ...............................................................................................................6
Chapter 4, quick use .....................................................................................................................7
4.1 initial use ........................................................................................................... 7
4.2 boot ................................................................................................................... 7
4.3 shutdown ........................................................................................................... 7
4.4 reboot ................................................................................................................ 7
4.5 Sim card installation ......................................................................................... 7
4.6 install the memory card ................................................................................... 10
Chapter 5, on charging .............................................................................................................. 11
5.1 charging time .................................................................................................. 11
5.2 charging temperature ...................................................................................... 11
5.3 battery powered ............................................................................................... 11
5.4 points to note when using batteries ................................................................. 11
5.5 LED indicator.................................................................................................. 12
Chapter 6,Main screen .............................................................................................................. 13
6.1 status bar icons ................................................................................................ 14
Chapter 7, settings ..................................................................................................................... 15
7.1 Wlan ................................................................................................................ 15
7.2 Bluetooth ......................................................................................................... 18
7.3Sim card ........................................................................................................... 23
7.4 traffic usage ..................................................................................................... 23
7.5 more ................................................................................................................ 25
7.5.1 flight mode ............................................................................................ 25
7.5.2NFC ........................................................................................................ 25
7.5.3 ANDROID BEAM ................................................................................ 26
7.5.4 network sharing and portable hotspots ................................................. 26
7.5.5 VPN ....................................................................................................... 27
7.5.6 mobile networks .................................................................................... 28
7.5.7 RESET NETWORK SETTINGS ......................................................... 30
7.6 display ............................................................................................................. 32
7.7 notification ...................................................................................................... 35

7.8 sounds ............................................................................................................. 35
7.9 apps ................................................................................................................. 36
7.10 storage ........................................................................................................... 37
7.11 batteries ......................................................................................................... 38
7.12 location information ...................................................................................... 39
7.13 clear ............................................................................................................... 40
7.14 accounts......................................................................................................... 41
7.15 language and input methods.......................................................................... 42
7.16 backup and reset ............................................................................................ 43
7.17 date and time ................................................................................................. 44
7.18 accessibility ................................................................................................... 45
7.20 developer options .......................................................................................... 46
7.21 about wireless data terminals ........................................................................ 47
Chapter 8, introduction of typical application ..................................................................... 50
8.1 scanning tools.................................................................................................. 50
8.2 System upgrade ............................................................................................... 56
8.3 Mobile Butler .................................................................................................. 58
8.4 quick configuration ......................................................................................... 65
8.4.1 import .................................................................................................... 66
8.4.2 export .................................................................................................... 70
8.5 feature settings ................................................................................................ 74
8.5.1 no state drop down ................................................................................ 74
8.5.2 disables passing the key value of the scan key to the application ........ 74
8.5.3 display the scan hover button ................................................................ 75
8.5.4 no drop detection................................................................................... 75
8.6 white list of digital certificates ........................................................................ 75
Chapter 9, troubleshooting ....................................................................................................... 78
INTRODUCTION OF OPTIONAL ACCESSORIES ....................................................... 81

1
Chapter 1, notes for use
1.1 points to note for laser scanning engines
Laser radiation, users should not look directly at the laser beam.
1.2 safety precautions
Your equipment can only use the batteries and chargers specified by our company;
use of other products may cause battery leakage, overheating, burst and fire.
Do Not Short circuit charger, otherwise it will cause electric shock, smoke and
damage to the charger.
Please do not use the charger in case the power cord is damaged, otherwise it will
cause fire and electric shock.
Please do not remove or modify the charger, otherwise it will cause personal injury,
electric shock, fire and charger damage.
Hold the charger while pulling the plug, pulling the power cord will damage the
wire and cause electric shock and fire.
Clean Equipment, batteries and chargers with a soft dry cloth.
Do not use alcohol, diluent or benzene and other solutions to wipe equipment.
The suitable temperature for the product and accessories is -20℃-50℃.
Caution risk of explosion if battery is replaced by an incorrect type. Dispose of
used batteries according to the instructions.
The device is restricted to indoor use when operated in 5150MHz~5350MHz to
reduce the potential for interference.
The manufacturer is not responsible for any radio or TV interference caused by
unauthorized modifications to this equipment. Such modifications could void the
user’s authority to operate the equipment.

2
This device complies with part 15 of the FCC rules. Operation is subject to the
following two conditions: (1) this device may not cause harmful interference, and
(2) this device must accept any interference received, including interference that
may cause undesired operation.
1.3 maintenance considerations
This product has the function of water-proof and dust-proof grade, but it should be
avoided to operate in extremely high temperature, extremely low temperature or
wet environment. Please refer to the temperature and humidity standard of the
product specification.
Pressing down hard on the screen can damage it. Do not touch the screen with a
resistive Stylus to avoid scratching or damaging the screen. To clean the screen,
spray a small amount of commercial LCD screen cleaner on a soft cloth. Do not
spray the cleaner directly onto the screen.
Do not use any chemical cleaner to wipe the LCD screen.
Keep the scanning window clean and free of stains, do not use sharp objects to
depict.
If you do not use this product for a long time, be sure to download the data to the
computer storage.
It takes a long time to recharge the machine's batteries, either for the first time or
after storage.
If the machine is out of order, please write down the condition information and
contact the Repairman.
1.4 Other notes
This equipment has been tested and found to comply with the limits for a Class B

3
digital device, pursuant to part 15 of the FCC Rules. These limits are designed to
provide reasonable protection against harmful interference in a residential
installation. This equipment generates uses and can radiate radio frequency
energy and, if not installed and used in accordance with the instructions, may cause
harmful interference to radio communications. However, there is no guarantee
that interference will not occur in a particular installation. If this equipment does
cause harmful interference to radio or television reception, which can be
determined by turning the equipment off and on, the user is encouraged to try to
correct the interference by one or more of the following measures:
Reorient or relocate the receiving antenna.
Increase the separation between the equipment and receiver.
Connect the equipment into an outlet on a circuit different from that to which the
receiver is connected.
Consult the dealer or an experienced radio/TV technician for help
This device and its antenna(s) must not be co-located or operating in conjunction
with any other antenna or transmitter.
1.5 SAR warning
The SAR limit of USA (FCC) is 1.6 W/kg averaged over one gram of tissue. Device
has also been tested against this SAR limit. This device was tested for typical body-
worn operations with the back of the handset kept 10mm from the body. To
maintain compliance with FCC RF exposure requirements, use accessories that
maintain a 10mm separation distance between the user's body and the back of the
handset. The use of belt clips, holsters and similar accessories should not contain
metallic components in its assembly. The use of accessories that do not satisfy these
requirements may not comply with FCC RF exposure requirements, and should be
avoided.
4
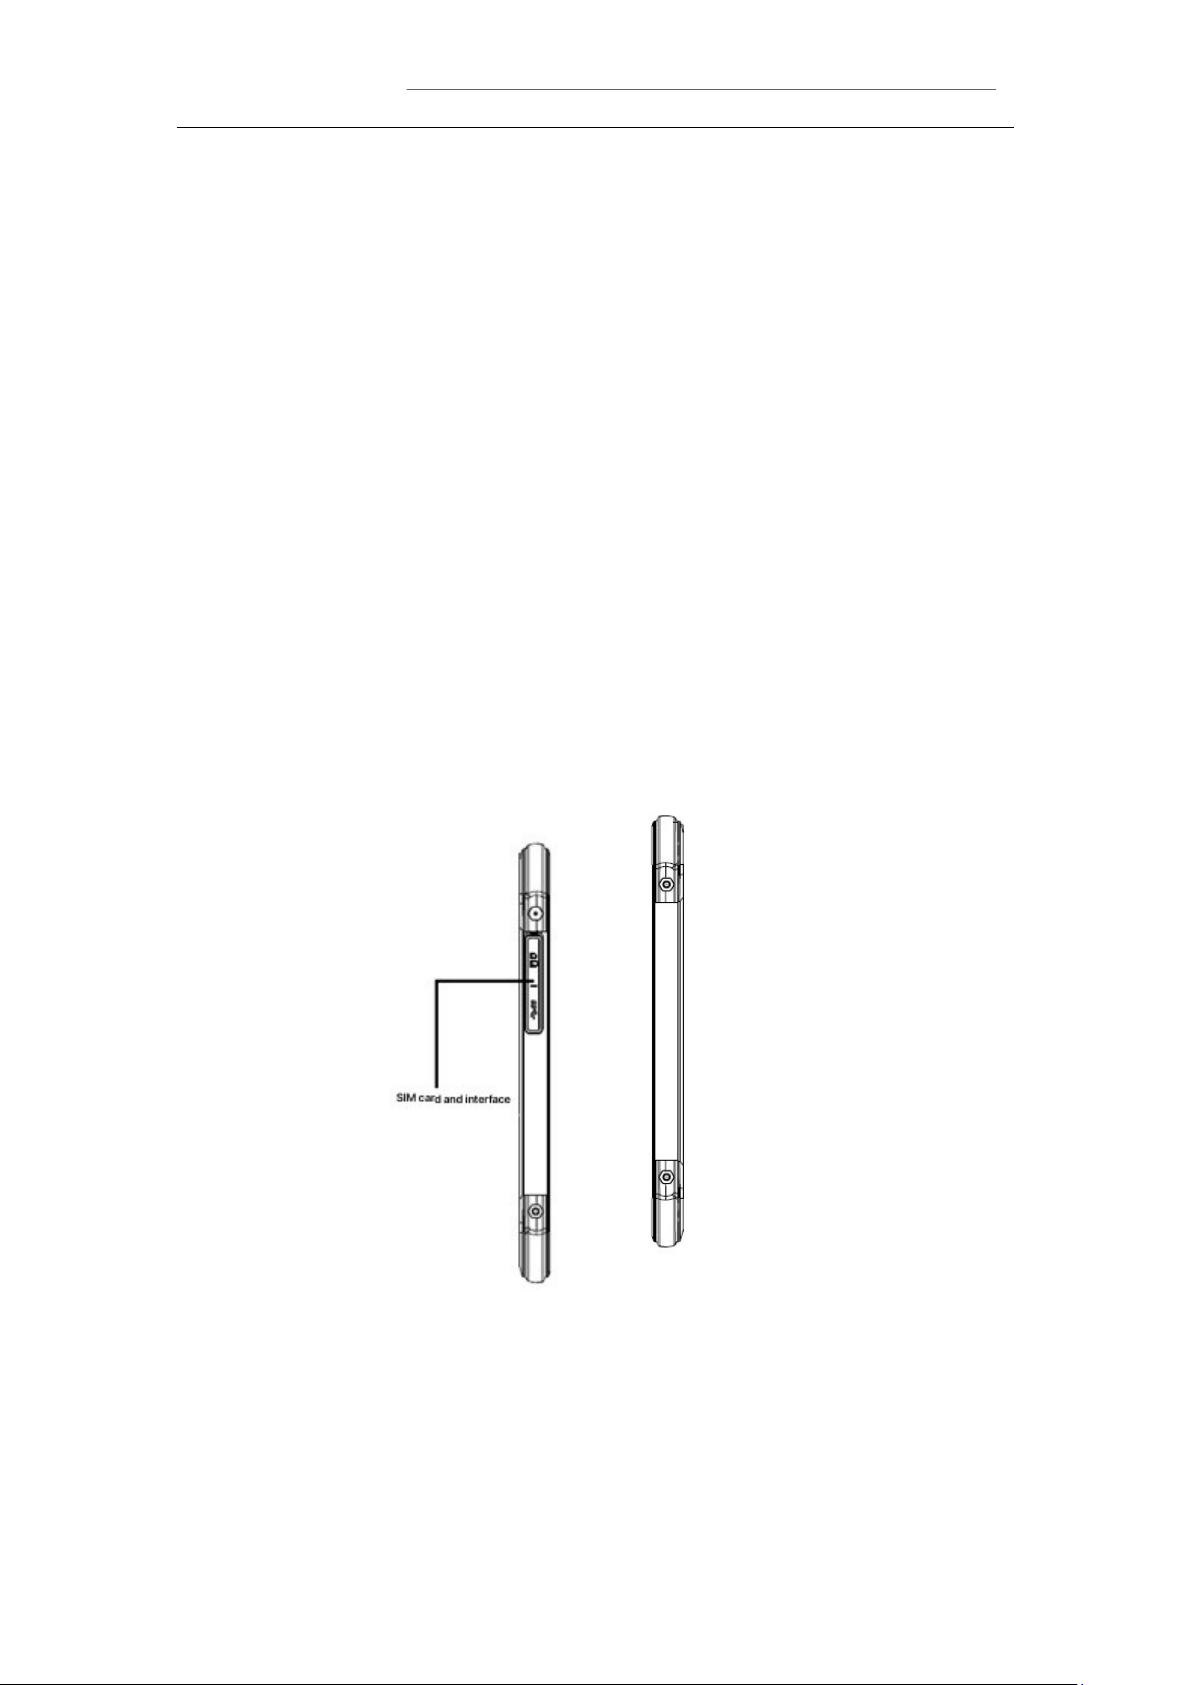
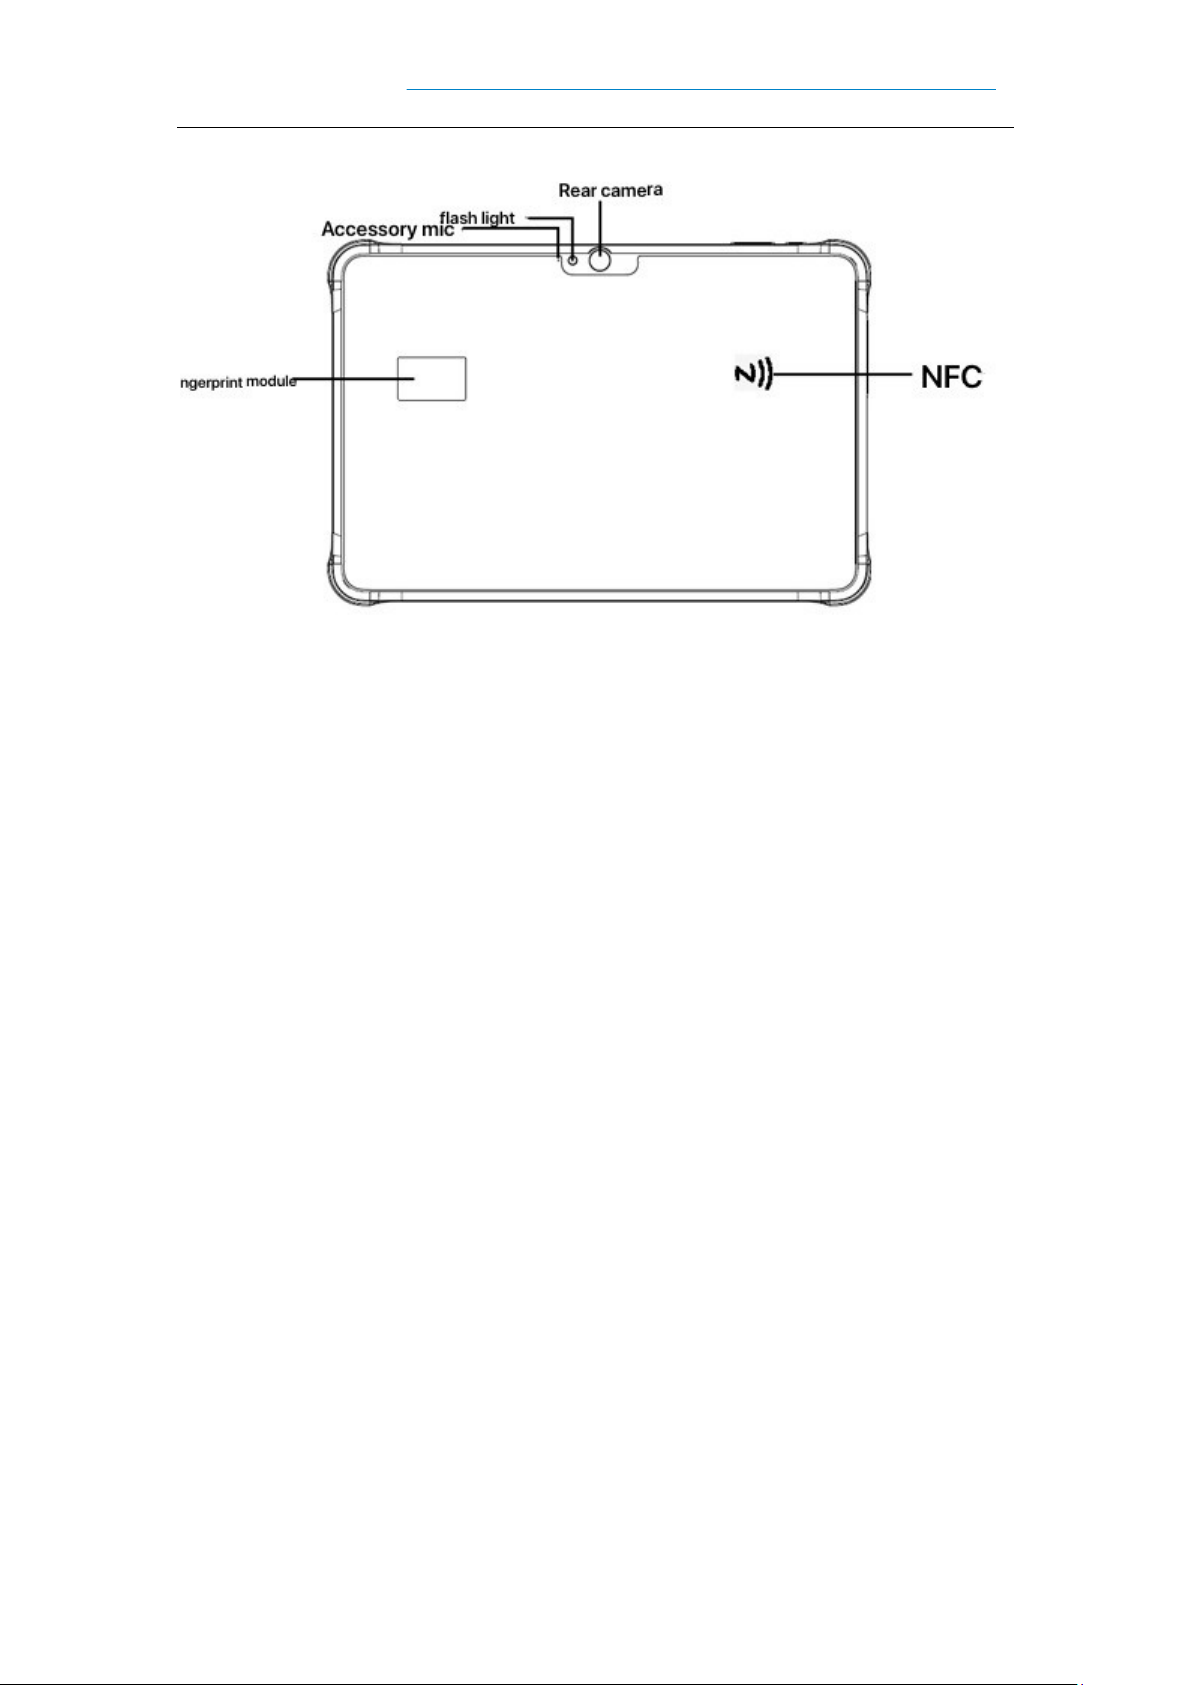
Chapter 2, Appearance Introduction
Figure 2-1 front view
Figure 2-2 side view
5
Figure 2-3 back view

6
Chapter 3, the keyboard
The new Pad Air device has a total of five keys, including three virtual buttons on the
screen touchpad (Back, Home, Menu) and two buttons on the side of the device (power
and volume) .
Button description:
Table 3-1 key presentation
Push the
button Primary function Function description
Home Button Click to return to the home screen.
Menu key Click on the task manager.
Back key
Click to return to the parent screen or exit the application.
In the text entry interface, click to close the on-screen
keyboard.
Power key
Short press to hibernate / Wake up the device in standby
mode and long press 3s to start the device in shutdown
mode
Volume Key Press the top half to increase the system volume, press the
bottom half to reduce the system volume
1.The three keys for screen printing, no key lights
2.SCREENSHOT SHORTCUT: Press and hold power + down volume at the same time

7
Chapter 4, quick use
4.1 initial use
Long press the Power key 3S to Power up, short press the Power key when the
system is working, and the device will go into hibernation.
4.2 boot
You can turn the machine on by pressing the power button. In deep sleep mode,
short press the power button to wake up the system. If the machine is powered by a
battery, make sure the battery is in contact and reliable.
4.3 shutdown
When the machine opened, non-dormant state, long press the power key 2s, open
the options menu, select shutdown, click confirm, then normal shutdown.
4.4 reboot
When the machine open, non-dormant state, long press the power key 2s, open the
options menu, select restart, click confirm, then normal shutdown restart.
4.5 Sim card installation
To install a SIM card, please follow the instructions below:
Place the SIM Card & Memory Card in the Kato along the direction shown in
figure 1.
Open the USB plug in the direction shown in figure 2,3, and 4 and Insert Catto.
Sim Card, memory card installation, need to open the USB plug
Sim Card, memory card installation, after completion, you need to tighten the USB

8
plug.
Figure 4-1 placement of SIM card
Figure 4-2 turn on the USB plug

9
Figure 4-3 inserts Catto into the device
Figure 4-4 fastening USB plug

10
4.6 install the memory card
To install a memory card, follow these instructions:
Place the memory card in the Kato as shown in figure 4-5.
Insert Catto in figure 4-2,4-3,4-4.
Figure 4-5 placement of Memory Card
Note: 1. The PSAM card is not supported on this computer
2. The Native Sim card only supports Nano Cards.
3. This machine does not support dual SIM cards.

11
Chapter 5, on charging
Since the battery only has a small amount of power for testing when it leaves the
factory, it must be recharged before you use it when you receive the machine.
5.1 charging time
BATTERY: It takes about 3.5 hours for the battery to be first charged through the
adapter, and the LED lights turn red when charged and green when fully charged.
5.2 charging temperature
The optimum operating temperature is 18 ~ 25 °C.
Temperatures Below 0 °C or more than 55 °C will not charge the battery.
5.3 battery powered
If you turn on wireless Internet service or data acquisition programs, your battery
will be severely depleted. Be Sure to turn off the power of these programs to save power
when you're not using them.
Tip: If you do not use the product for a long time, please charge the whole machine
at least once every two months.
Tip: Limited by the computer port, the computer charging current is small, bright
screen use will appear to charge less than discharge, power decline.
5.4 points to note when using batteries
If the battery is drained, you may not be able to turn it on immediately after you
plug it in. This is normal. Please keep charging for a period of time, then turn on the
machine to use.
The battery can be recharged repeatedly, but the battery is perishable. If you find

12
that the standby time of the device has been greatly reduced, please replace the battery.
Battery charging time varies with temperature conditions and battery life. Please
charge within a reasonable temperature range.
When the battery is low, the device will pop up a low power prompt. When the
battery is too low, the device will automatically shut down.
5.5 LED indicator
The LED indicator in the middle of the top left of the machine shows the battery
status and charging status according to different colors:
If the USB is not plugged in, the charging adapter or tail plug is not plugged in,
the red light flashing indicates that the battery is too low,
Please charge in time;
Plug in USB, charging adapter, tail plug case, long light for the Red Battery is
charging;
Plug in USB, charging adapter, tail plug case, Long Light Green indicates that the
battery is fully charged.
The LED light in the upper left center of the machine flashes blue (in the form of
Suction Light) , indicating unread information, please check in time.
The LED indicator on the upper left of the machine flashes red once when the Bar
Code is scanned; if the Bar Code is not scanned, it is not lit.
Note: The Blue Indicator will not indicate when the system is charging.

13
Chapter 6,Main screen
Find this icon and set it to use, click on the settings button in the upper
right corner to enter the settings home screen, the new padAir default has two home
screen, can be set
Figure 6-1 home screen (Trebuchet)
①
②
③
④

14
Table 6-1 home screen items
1 Status Bar: displays notifications and status icons.
2 Display Area: for placing application icons, desktop folders, and widgets.
3 SHORTCUT BAR: Click to enter the corresponding application.
4 APP TRAY: Click or swipe up to go to the home screen to view all APPS.
6.1 status bar icons
The status icon and notification bar icon at the top of the screen display device
status information and notifications, as shown in the following table.
ICONS
Account for ICONS
Account for
Available Wlan Network detected
Signal strength
WLAN NETWORK
CONNECTED UNPLUGGED SIM card
UPLOADING data now Downloading data now
Portable WLAN is enabled MOBILE NETWORK CONNECTED
Do not disturb mode Flight Mode
Vibration mode Scanning engaged
Missed call Battery charging
New Information The battery is fully charged
Screen capture captured Low Battery
Alarm clock Headphones plugged in
MICROSD CARDS ARE BEING
PREPARED Bluetooth
USB debugging, USB connection
Table 6-2 status icons and notification bar icons

15
Chapter 7, settings
7.1 Wlan
FIND THIS ICON:
- Settings
- Internet and Internet
- WLAN
WI-FI 2.4 g provides up to 450ft 150M, and 5G provides up to 300ft 100m of Wi-
Fi access. To use Wi-Fi on your device, you must connect to a wireless access point or
hotspot.
Note: Wi-Fi signal availability and coverage depend on the number, infrastructure,
and other objects that the signal penetrates.
Turn on Wi-Fi and connect to Wi-Fi
1. Click the WLAN off / on Button to enable Wi-Fi. Automatic scanning of
available wireless networks.
2. The WI-FI network list then displays the network name of the found Wi-Fi
network and security settings for the open network or encrypted network.
3. Touch one of the Wi-Fi networks to connect. When you select an open network,
it is automatically connected to that network. If you are selecting an encrypted network,
you must first enter the password and then touch the connection.
Table of contents


