Seura SSB-1 User manual

2
Welcome and Thank
you
Table of Contents
(Katy)

3
*Installation in sunlight reduces the maximum permitted air temperature.
HñļÑķ¼°üÑçã÷
SSB-1 SSB-2
GENERAL
OPERATING TEMPERATURE RANGE -40°F to 140°F* -40°F to 140°F*
OPERATING HUMIDITY RANGE 10–90% RH, non-condensing 10–90% RH, non-condensing
WATERPROOF RATING IP55 Minimum Rating IP55 Minimum Rating
INTEGRATION
POWER CONSUMPTION 100-240V, 50-60Hz, 60W RMS,
80W Peak
100-240V, 50-60Hz, 60W RMS,
80W Peak
OPTICAL AUDIO INPUT 1 1
ANALOG AUDIO INPUT 1 (3.5 mm) 1 (3.5 mm)
AUDIO
DRIVERS ɂƸɃƷ#ã¼ÐƼȩƴʞôÑĐÄô÷ ɂƸɃƷ#ã¼ÐƼȩƴʞôÑĐÄô÷
FREQUENCY RESPONSE 40Hz-20kHz 40Hz-20kHz
SPEAKER OUTPUT #ãüÄôã°ÝâñÝÑķÄôȤƸĒƵƹXE3H #ãüÄôã°ÝâñÝÑķÄôȤƸĒƵƹXE3H
INSTALLATION
GRILL TYPE Powder Coated
PRODUCT DIMENSIONS 37.8" w x 5.5" h x 3.5" d 57.0" w x 5.5" h x 3.5" d
PRODUCT WEIGHT 13.0 lbs 20.0 lbs
MOUNTING Includes wall mounting bracket and compatible mounting rails for
Outdoor TVs via TV VESA pattern
OTHER
CERTIFICATIONS AND COMPLIANCE UL, FCC
WARRANTY Séura warrants Outdoor Soundbars with respect to labor and
parts for two (2) years.

4
This symbol is intended to alert the user
to the presence of uninsulated “dangerous
voltage” within the product’s enclosure
üаüâ°ē»ÄçÍ÷þÍķ¼ÑÄãüâ°ÎãÑüþÀÄüç
constitute a risk of electric shock to
persons.
This symbol is intended to alert the user
to the presence of important operating
and maintenance instructions in the
literature accompanying the appliance.
WARNING: READ ALL INSTRUCTIONS BEFORE ATTEMPTING TO
INSTALL OR SERVICE THIS PRODUCT.
Warnings:
Do not handle or remove your outdoor display from the packaging until it is ready to be installed.
To avoid damage to the outdoor display, only transport it in a vertical position.
It is highly recommended that at least two (2) persons assist in the installation of the outdoor display.
CAUTION
RISK OF ELECTRIC SHOCK
DO NOT OPEN
CAUTION: TO REDUCE THE RISK OF ELECTRIC SHOCK DO
48L8B4-B4.Ȥ48NHEɒHEW#.BELH
INSIDE, REFER SERVICING TO QUALIFIED SERVICE
PERSONNEL.
Do not submerge Séura® Outdoor Display in water:
The Séura®Outdoor Display will resist water
exposure from normal rain, sprinklers, snow, etc.;
however, it is not designed to be submerged in
water.
Do not wash with garden hose or pressure-wash:
Séura®Outdoor Display will resist water exposure
from normal rain, sprinklers, snow etc.; however,
it is not designed to withstand pressure washers,
high-pressure water jets, projected snow from a
blower, or hurricane-type weather.
Do not let metal pieces or objects of any kind fall
into the display. "ÑÎÐĐçÝü°ÎÄĸçđ÷ÑãüÐÄñôçÀþ¼üȤ
and inserting an object can cause electric shock
and/or short internal parts.
To prevent fire, never place any type of candle or
ĸ°âÄ÷çãüÐÄüçñçôãÄ°ôüÐÄÀÑ÷ñÝ°ēȩ
To prevent fire or shock hazard, do not place the AC
cord under the display or other heavy items.
Power Lines
An outside antenna system should not be located in
the vicinity of overhead power lines or other electric
light or power circuits, or where it can fall into such
power lines or circuits. When installing an outside
antenna system, extreme care should be taken to
keep from touching such power lines or circuits as
contact with them might be fatal.
Accessories
çãçüþ÷Ä°¼¼Ä÷÷çôÑÄ÷ãçü÷ñļÑķ¼°ÝÝē
recommended by the manufacturer. Use of improper
attachments can result in accidents.

5
Ce symbole est destiné à alerter l’utilisateur
de la présence d’une «tension dangereuse»
non isolée à l’intérieur de l’enceinte du
produit qui peut être d’une amplitude
÷þÍķ÷°ãüÄñçþô¼çã÷üÑüþÄôþãôÑ÷óþÄÀļÐç¼
électrique pour les personnes.
Ce symbole est destiné à alerter l’utilisateur
de la présence d’instructions importantes
d’utilisation et de maintenance dans la
documentation accompagnant l’appareil.
AVERTISSEMENT: LIRE TOUTES LES INSTRUCTIONS AVANT
D’INSTALLER OU SERVICE CE PRODUIT.
Avertissements:
Ne pas manipuler ou supprimer votre moniteur extérieure de l’emballage jusqu’à ce qu’il soit prêt à être installé.
Pour éviter d’endommager la moniteur en plein air, seul le transporter dans une position verticale.
Il est fortement recommandé qu’au moins deux (2) personnes aident à l’installation de la moniteur en plein air.
CAUTION
RISQUE DE CHOC
ELECTRIQUE. NE PAS
OUVRIR.
ATTENTION: POUR RÉDUIRE LE RISQUE DE CHOC
ÉLECTRIQUE, NE RETIREZ PAS LE CAPOT (NI L’ARRIÈRE),
AUCUNE PIÈCE RÉPARABLE PAR L’UTILISATEUR, RÉFÉREZ
L’ENTRETIEN AU PERSONNEL DE SERVICE QUALIFIÉ.
N’immergez pas le Séura® Outdoor moniteur dans l’eau:
le moniteur Séura® Outdoor résistera à l’exposition
à l’eau causée par la pluie, les gicleurs, la neige, etc.
Cependant, il n’est pas conçu pour être immergé dans
l’eau.
Ne lavez pas avec un tuyau d’arrosage ou avec un
nettoyeur haute pression: Séura® Outdoor moniteur
résistera à l’exposition à l’eau causée par la pluie, les
sprinklers, la neige, etc. Cependant, il n’est pas conçu
pour résister aux laveuses à pression, aux jets d’eau à
haute pression, aux projections de neige d’un ventilateur
ou aux intempéries de type ouragan.
Ne laissez pas de morceaux de métal ou d’objets de toute
sorte tomber dans la moniteur. Une tension élevée circule
dans le produit et l’insertion d’un objet peut provoquer
un choc électrique et / ou un court-circuit des pièces
internes.
Pour éviter les incendies, ne placez jamais de bougies ni
_g¿Û>g¸¿¸Éµ¿g¿_g¸¸É¸¿É¿D¿¡µÒÁh¿_É¿Ágɵ¦
Pour éviter tout risque d’incendie ou d’électrocution, ne
placez pas le cordon d’alimentation sous le moniteur ou
d’autres objets lourds.
Les lignes électriques
Une antenne extérieure ne doit pas être située à proximité
de lignes électriques aériennes ou d’autres circuits
d’éclairage ou de circuits électriques, ni à un endroit
où elle pourrait tomber dans de telles lignes ou circuits.
Lorsque vous installez une antenne extérieure, veillez à
ne pas toucher ces lignes ou circuits électriques, car tout
contact avec ces derniers pourrait être fatal.
Accessoires
²ÉÁ¸g׿¡>¸¿_²>UUg¸¸µg¸¿¿¸¡hUÚªÉggÁ¿
recommandés par le fabricant. L’utilisation d’accessoires
inappropriés peut entraîner des accidents.

6
HñļÑķ¼°üÑçã÷çÍüÐÑ÷ñôçÀþ¼ü°ôÄ÷þ»Ûļüüçþã°ããçþã¼ÄÀ¼Ð°ãÎÄ÷ȮüÐÑ÷â°ãþ°Ýâ°ēüÐþ÷ãçüôÄĸļüüÐļþôôÄãüüļÐãѼ°Ý÷ü°üþ÷ȩ
-¡hUÚU>Á¸¿_g¿Ug¿¡µ_ÉÁ¿¸Á¿¸ÉgÁÁg¸¿D¿_ÚU>Á¸¿¸>¸¿¡µh>и»¿Ug¿>Ég¿g¿¡gÉÁ¿_U¿¡>¸¿Ágµ¿U¡Ág¿_g¿²hÁ>Á¿¿¿_g¿>¿ÁgUªÉg¿>UÁÉgg¦
WARNING: Cancer and Reproductive Harm: www.p65warnings.ca.gov.
Never place a television set in an unstable
location. A television set may fall, causing serious
personal injury or death. Many injuries, particularly
to children, can be avoided by taking simple
precautions such as:
• Using cabinets or stands recommended by the
manufacturer of the television set.
• Only using furniture that can safely support the
television set.
• Ensuring the television set is not overhanging
the edge of the supporting furniture.
• Not placing the television set on tall furniture
(for example, cupboards or bookcases) without
anchoring both the furniture and the television
set to a suitable support.
• Not placing the television set on cloth or other
materials that may be located between the
television set and supporting furniture.
• Educating children about the dangers of
climbing on furniture to reach the television set
or its controls.
If your existing television set is being retained
and relocated, the same considerations as above
should be applied.
Ne placez jamais un téléviseur dans un endroit instable. Un
téléviseur peut tomber
et causer des blessures graves ou mortelles. Beaucoup de
blessures, en particulier aux enfants, peuvent être évités en
prenant des précautions simples telles que:
• Utilisation des armoires ou des supports recommandés
par le fabricant du téléviseur.
• Seulement en utilisant des meubles qui peuvent
supporter en toute sécurité le téléviseur.
• Assurer le téléviseur est pas surplombant le bord du
meuble de support.
• Non placer le téléviseur sur un grand meuble (par
exemple, des armoires ou des bibliothèques ) sans
accrocher à la fois les meubles et le téléviseur sur un
support approprié.
• Non placer le téléviseur sur le tissu ou d’autres matériaux
qui peuvent être situés entre le téléviseur et le mobilier
de soutien.
• Éduquer les enfants sur les dangers de grimper sur un
meuble pour atteindre le téléviseur ou ses commandes.
Si votre téléviseur existant est conservé et transféré,
les mêmes considérations que ci-dessus doivent être
appliquées.
WARNINGS ATTENTION
7
WARNINGS
LçôÄÀþ¼ÄüÐÄôÑ÷ÜçÍķôÄȤÄÝļüôѼ°Ý÷Ðç¼Ü
and other injuries, keep these safety
precautions in mind when installing, using,
and maintaining your outdoor display. The
socket-outlet should be installed near the
equipment and be easily accessible. The
display should be connected to a grounded
GFCI protected main socket outlet.
WARNING: If you manipulate against the
recommended usage, serious injury or
death to user may result.
AVERTISSEMENTS
Pour réduire le risque d’incendie, de choc électrique
et d’autres blessures, garder ces consignes de
sécurité à l’esprit lors de l’installation, l’utilisation
et l’entretien de votre moniteur en plein air. La prise
de courant doit être installée près de l’équipement
et être facilement accessible. Le moniteur doit être
relié à une prise de courant avec terre protégé par
disjoncteur différentiel.
ATTENTION: Si vous manipulez contre l’utilisation
recommandée, des blessures graves ou la mort à
l’utilisateur peuvent en résulter.
FCC Supplier’s Declaration of Conformity
Séura Outdoor 80W Soundbar
SSB-1, SSB-2
This device complies with part 15 of the FCC Rules. Operation is subject to the follow two
conditions: (1) This device may not cause harmful interference, and (2) this device must accept any
interference received, including interference that may cause undesired operation.
Séura
Address: 1230 Ontario Road, Green Bay, WI 54301 United States
Phone number: 920-857-9069
This equipment complies with FCC radiation exposure limits set forth for an uncontrolled environment. This
equipment should be installed and operated with a minimum distance of 20 cm between the radiator and any part
of your body.
• Reorient or relocate the receiving antenna.
• Increase the separation between the equipment and receiver.
• Connect the equipment into an outlet on a circuit different from that to which the receiver is connected
• Consult the dealer or an experienced radio/TV technician for help.
Caution:LÐÄþ÷ÄôÑ÷¼°þüÑçãÄÀüаü¼Ð°ãÎÄ÷çôâçÀÑķ¼°üÑçã÷ãçüÄĒñôÄ÷÷Ýē°ññôçĐÄÀ»ēüÐÄñ°ôüēôÄ÷ñçã÷Ñ»ÝÄÍçô
compliance could void the user’s authority to operate the equipment.
Note: This equipment has been tested and found to comply with the limits for a Class B digital device, pursuant to
part 15 of the FCC Rules. These limits are designed to provide reasonable protection against harmful interference in
a residential installation. This equipment generates uses and can radiate radio frequency energy and, if not installed
and used in accordance with the instructions, may cause harmful interference to radio communications. However,
there is no guarantee that interference will not occur in a particular installation. If this equipment does cause harmful
interference to radio or television reception, which can be determined by turning the equipment off and on, the user
is` encouraged to try to correct the interference by one or more of the following measures:
8
1. Read these instructions.
2. Keep these instructions.
3. Heed all warnings.
4. Follow all instructions.
5. Clean only with a dry cloth.
6. Do not block any of the ventilation openings. Install in
accordance with the manufacturer’s instructions.
7. Do not install near any heat sources such as radiators,
heat registers, stoves,or other apparatus (including
°âñÝÑķÄô÷ɃüаüñôçÀþ¼ÄÐÄ°üȩ
8. Do not defeat the safety purpose of the polarized or
grounding type plug. A polarized plug has two blades
with one wider than the other. A grounding type plug has
two blades and a third grounding prong. The wide blade
or the third prong is provided for your safety. When the
ñôçĐÑÀÄÀñÝþÎÀçÄ÷ãçüķüÑãüçēçþôçþüÝÄüȤ¼çã÷þÝü°ã
electrician for replacement of the obsolete outlet.
9. Protect the power cord from being walked on or pinched
particularly at plugs, convenience receptacles, and the
point where they exit from the apparatus.
10. 8ãÝēþ÷ÄüÐÄ°üü°¼ÐâÄãü÷ȯ°¼¼Ä÷÷çôÑÄ÷÷ñļÑķÄÀ»ēüÐÄ
manufacturer.
11. Use only with the cart, stand,
üôÑñçÀȤ»ô°¼ÜÄüȤçôü°»ÝÄ÷ñļÑķÄÀ
by the manufacturer, or sold with
the apparatus. When a cart is used,
use caution when moving the cart/
apparatus combination to avoid injury
from tip-over.
12. Unplug this apparatus during lightning
storms or when unused for long
periods of time.
13. EÄÍÄô°ÝÝ÷ÄôĐѼÑãÎüçóþ°ÝÑķÄÀ÷ÄôĐѼÄñÄô÷çããÄÝȩ
Servicing is required when the apparatus has been
damaged in any way, such as power supply cord or plug
is damaged, liquid has been spilled or objects have fallen
into the apparatus, the apparatus has been exposed to
rain or moisture, does not operate normally, or has been
dropped.
14. LçôÄÀþ¼ÄüÐÄôÑ÷ÜçÍķôÄçôÄÝļüôѼ÷Ðç¼ÜȤÀçãçüÄĒñç÷Ä
the inside of this apparatus to rain or moisture. The
inside of this apparatus shall not be exposed to dripping
or splashing.
15. The apparatus shall not be exposed to dripping or
÷ñÝ°÷ÐÑãΰãÀüаüãçç»Ûļü÷ķÝÝÄÀđÑüÐÝÑóþÑÀ÷Ȥ÷þ¼Ð°÷
vases, shall be placed on the apparatus.
16. The apparatus shall be connected to a MAINS socket outlet
with a protective earthing connection. Where the MAINS
plug or an appliance coupler is used as the disconnect
device, the disconnect device shall remain readily operable.
17. The disconnect device shall remain readily operable.
18. The socket-outlet shall be installed near the equipment
and shall be easily accessible.
19. Inspect the desired location for installation and be aware
of all electrical wiring pathways, water pipes, gas lines, or
other potentially hazardous conditions that may exist to
protect from accidental damage during creation of on-site
conditions.
20. ã÷þôÄ°ÝÝôÄóþÑôÄÀÄÝļüôѼ°Ý÷ñļÑķ¼°üÑçã÷°ôÄ°ÀÐÄôÄÀüç
and have been installed by the appropriate individuals and
are code approved.
21. Ensure all framing requirements, if needed, have been
completed to building code and pose no structural issues.
22. It is REQUIRED that this product is plugged into an
electrical outlet protected by a Ground Fault Circuit
#ãüÄôôþñüÄôɂ #Ƀüçñôçüļü°Î°Ñã÷üÄÝļüôѼ÷Ðç¼ÜȤķôÄȤ
and/or injury. Failure to do so will void any warranty for
this product.
23. 8ãÝēóþ°ÝÑķÄÀÑãÀÑĐÑÀþ°Ý÷÷ÐçþÝÀ°üüÄâñüüç÷ÄôĐѼÄüÐÄ
product. Removing covers can expose you to high voltage
and other dangerous conditions.
24. Do not overload AC outlets or extension cords. Overloading
¼°ã¼°þ÷ÄķôÄçôÄÝļüôѼ÷Ðç¼Üȩ
25. Close adult supervision is necessary when any product is
used by or near children.
26. Do not operate any product with a damaged cord or plug
or operate it after the appliance malfunctions or has been
damaged in any manner.
27. To electrically disconnect the product, turn OFF the
product, then remove the electrical power plug from the
outlet.
28. This Séura product is intended for use indoors and
outdoors.
29. If you notice any smoke or scorched smell near the
ñôçÀþ¼üȤþãñÝþÎñçđÄô¼çôÀ°ãÀôÄÍÄôüçóþ°ÝÑķÄÀ
personnel for service and/or repair.
30. çãçüþ÷ÄçôñÝ°¼Ä°ãē¼çâ»þ÷üÑ»ÝÄçôĸ°ââ°»ÝÄ
substances near the product.
31. Do not use this product for other than intended use.
32. This product is water resistant. Do not immerse this
product in water.
33. The cable distribution system should be grounded
(earthed) in accordance with ANSI/NFPA 70, the National
Electrical Code (NEC), in particular Section 820.93,
Grounding of Outer Conductive Shield of a Coaxial Cable.
Important Safety Instructions

9
1. Lisez ces instructions.
2. Conservez ces instructions.
3. Respectez tous les avertissements.
4. Suivez toutes les instructions.
5. Nettoyer uniquement avec un chiffon sec.
6. Ne pas bloquer les ouvertures de ventilation. Installez
conformément aux instructions du fabricant.
7. Ne pas installer près de sources de chaleur telles que des radiateurs,
registres de chaleur, poêles ou autres appareils (y compris les
>¡ÚU>Ágɵ¸¤¿ªÉ¿¡µ_ɸgÁ¿_g¿>¿U>gɵ¦
8. ¿ g¿¡>¸¿UÁɵgµ¿g¿_¸¡¸Át¿_g¿¸hUɵÁh¿_g¿>¿ÚUg¿¡>µ¸hg¿
É¿¸g¿D¿>¿Ágµµg¦¿1g¿ÚUg¿¡>µ¸hg¿¡¸¸k_g¿_gÉÒ¿>g¸¿_Á¿
une plus large que l’autre. Une prise de terre a deux lames et une
troisième broche de mise à la terre. La lame large ou la troisième
LµUg¿g¸Á¿tɵg¿¡Éµ¿ÐÁµg¿¸hUɵÁh¦¿-¿>¿ÚUg¿tɵg¿g¿µgÁµg¿
pas dans votre prise, consultez un électricien pour remplacer la
prise obsolète.
9. Protégez le cordon d’alimentation d’être piétiné ou pincé, en
¡>µÁUÉgµ¿>É¿Ðg>É¿_g¸¿ÚUg¸\¿_g¸¿¡µ¸g¸¿_g¿Uɵ>Á\¿gÁ¿g¿¡Á¿Í¿
ils sortent de l’appareil.
10. ¿1Á¸g׿ɪÉggÁ¿g¸¿ÚÒ>Á¸¿¾¿>UUg¸¸µg¸¿¸¡hUÚh¸¿¡>µ¿g¿
fabricant.
11. Utilisez uniquement avec un chariot, un
support, un trépied, un support ou une table
¸¡hUÚh¿¡>µ¿g¿t>LµU>Á¿É¿Ðg_É¿>ÐgU¿
l’appareil. Quand un chariot est utilisé, faites
attention lorsque vous déplacez l’ensemble
chariot / appareil pour éviter les blessures en
cas de chute.
12. Débranchez l’appareil en cas d’orage ou
lorsqu’il est inutilisé pendant de longues
périodes de temps.
13. g¸¿Áµ>Ð>ÉÒ¿_g¿¡gµ¸g¿ªÉ>Úh¦¿1g¿µh¡>µ>Á¿g¸Á¿hUg¸¸>µg¿
lorsque l’appareil a été endommagé de quelque façon que ce
Uµ_¿_²>gÁ>Á¿É¿>¿ÚUg¿g¸Á¿g_>yh\¿_É¿ªÉ_g¿>¿hÁh¿
renversé ou des objets sont tombés dans l’appareil, l’appareil a été
exposé à la pluie ou à l’humidité, ne fonctionne pas normalement,
ou est tombé.
14. Pour réduire le risque d’incendie ou de choc électrique, ne pas
exposer l’intérieur de cet appareil à la pluie ou à l’humidité.
L’intérieur de cet appareil ne doit pas être exposé à des gouttes ou
des éclaboussures.
15. L’appareil ne doit pas être exposé à des gouttes ou des
éclaboussures et aucun objet rempli de liquide, comme des vases,
ne doit être placé sur l’appareil.
16. L’appareil ne doit être relié à une prise secteur dotée d’une
connexion de terre de protection. Lorsque la prise du RESEAU
D’ALIMENTATION ou une prise placée sur l’appareil est utilisée
comme dispositif de déconnexion, ce dispositif doit demeure
aisément accessible.
17. Le dispositif de déconnexion doit rester facilement accessible.
18. La prise de courant doit être installée près de l’équipement et doit
être facilement accessible.
19. Inspecter l’emplacement souhaité pour l’installation et être
conscient de toutes les voies de câblage électrique , les
canalisations d’eau , conduites de gaz , ou d’autres conditions
potentiellement dangereuses qui peuvent exister pour protéger
contre les dommages accidentels lors de la création des conditions
sur place.
20. ¸¸Éµg×Ðɸ¿ªÉg¿ÁÉÁg¸¿g¸¿¸¡hUÚU>Á¸¿hgUÁµªÉg¸¿µgªÉ¸g¸¿¸Á¿
respectées et ont été installées par les personnes appropriées et
sont approuvées par le code.
21. S’assurer que toutes les exigences d’encadrement , si nécessaire
, ont été achevés au code du bâtiment et ne posent pas de
problèmes structurels.
22. Il est REQUIS que ce produit soit branché dans une prise électrique
protégée par un disjoncteur de fuite à la terre (GFCI) pour se
protéger contre les chocs électriques, les incendies et / ou les
blessures. Le non-respect de cette consigne annulera toute garantie
de ce produit.
23. -gÉg¸¿g¸¿¡gµ¸g¸¿ªÉ>Úhg¸¿_ÐgÁ¿ÁgÁgµ¿_g¿µh¡>µgµ¿g¿¡µ_ÉÁ¦¿
Le retrait des capots peut vous exposer à de hautes tensions et
d’autres situations dangereuses.
24. Ne surchargez pas les prises de courant ou les rallonges. Une
surcharge peut causer un incendie ou un choc électrique.
25. Fermer surveillance d’un adulte est nécessaire lorsque tout appareil
est utilisé par ou près des enfants.
26. g¿¡>¸¿ÉÁ¸gµ¿É¿¡µ_ÉÁ¿>ÐgU¿É¿Uµ_¿É¿Ég¿ÚUg¿_hÁhµµh¸¿
fonctionner après un mauvais fonctionnement de l’appareil ou a été
endommagé d’une manière quelconque.
27. Pour débrancher électriquement le produit, éteignez le produit , puis
µgÁµg׿>¿ÚUg¿_²>gÁ>Á¿hgUÁµªÉg¿_g¿>¿¡µ¸g¦
28. Ce produit Séura est destiné à un usage intérieur et extérieur.
29. Si vous remarquez de la fumée ou une odeur de brûlure à proximité
du produit, débranchez le cordon d’alimentation et consultez un
¡gµ¸g¿ªÉ>Úh¿¡Éµ¿g¿¸gµÐUg¿gÁ¿¾¿É¿>¿µh¡>µ>Á¦
30. N’utilisez ni ne placez aucune substance combustible ou
Û>>Lg¿D¿¡µÒÁh¿_É¿¡µ_ÉÁ¦
31. N’utilisez pas ce produit pour un usage autre que celui prévu.
32. Ce produit est résistant à l’eau. Ne pas plonger ce produit dans
l’eau.
33. Le système de distribution par câble doit être mis à la terre (mise
à la terre) conformément à la norme ANSI / NFPA 70, le National
Electrical Code (NEC), en particulier la section 820.93, Mise à la
terre du blindage conducteur externe d’un câble coaxial.
Consignes De Sécurité Importantes

10
Operation and Storage Requirements
The maximum ambient temperature range for operating the device is -40°F to 140°F*. The screen is most
optimally viewed at ambient temperatures of 32°F to 122°F. Do not install the device in the proximity of
ÐÄ°ü÷çþô¼Ä÷Ȥ÷þ¼Ð°÷ÐÄ°üÑãÎñÑñÄ÷ȤÐÄ°üÄô÷ȤÍþôã°¼Ä÷çôçüÐÄôÀÄĐѼÄ÷üаüô°ÀÑ°üÄÐÄ°üȩLçñôÄĐÄãüķôÄçô
electric shock, never allow liquids to enter the unit. The uninstalled product must be stored in dry and well
ĐÄãüÑÝ°üÄÀôççâ÷ȤđÑüÐçþüÄĒüôÄâÄüÄâñÄô°üþôÄĸþ¼üþ°üÑçã÷ȩ"Ä°ü÷çþô¼Ä÷°ãÀ°ÎÎôÄ÷÷ÑĐÄ°¼üÑĐÄ÷þ»÷ü°ã¼Ä÷
may not be stored in the proximity of the device. The required storage temperature is -40°F to 140°F at
an air humidity of 10 - 90% RH non-condensing. The device must be stored in the complete packaging, as
delivered. The product must not operate on average more than twelve (12) hours per day on a permanent or
ÄĒüÄãÀÄÀñÄôÑçÀѼ»°÷Ñ÷ȩLÐÄñôçÀþ¼üâþ÷üаĐÄñôçñÄôȤ¼çôôļü°ãÀ÷þÍķ¼ÑÄãü÷þññÝēĐçÝü°ÎÄȩ
When the unit is used in temperatures below the ideal operating temperature range, the picture may appear slightly delayed or
blurred. This is normal, and the picture will return to normal aer the temperature increases to the ideal operating temperature
range.
Séura Full Sun Series TVs are the only outdoor TVs with internal fans that actively heat and cool the electronics, a feature
necessary for controlling the internal TV temperature in environments from -40° F to 140° F. The fans are performing as designed
when creating a low-level hum when activated. Séura’s cooling system volume specification is <40dB from 1 meter away from TV,
with thermostatically control and modifiable control curve. The fan speed will increase in hoer temperatures in order to keep
the TV cool. Fan speeds, as a percentage with 100% = full speed, at various TV temperatures are approximately: 104F = 26%
113F = 58% 122F = 89% 131F = 100%
*Installation in sunlight reduces the maximum permitted air temperature.
The screen is most
optimally viewed at ambient
temperatures of 32°F to 122°F
IMPORTANT
The display should not be installed directly over a
ĸ°ü÷þôÍ°¼ÄÑÍÐÄ°ĐēçôÀôÑĐÑãÎô°Ñãâ°ēñþÀÀÝÄ°ãÀ
splash up onto the lower portion of the display.
Direct sunlight on the display screen will heat
internal components and should be avoided.
IMPORTANT
Le moniteur ne doit pas être installé directement sur une
surface plane, si de fortes pluies ou de conduite peut
Û>ªÉg¿_²g>É¿gÁ¿hU>Lɸ¸gµ¿¸Éµ¿>¿¡>µÁg¿thµgɵg¿_É¿
moniteur. Lumière directe du soleil sur l’écran du moniteur
va chauffer les composants internes et devrait être évitée.

11
Get to know your Séura®Full Sun Series™Outdoor Display
If you have questions, call Séura at 1-800-957-3872 to speak to a design expert.
Selecting the Installation Location
#ã÷ü°ÝÝ°üÑçãçĐÄô°Î°÷ķôÄñÝ°¼ÄÑ÷°¼¼Äñü°»ÝÄÑÍ
the distance from the heat source is such that
the air temperature surrounding the display does
not exceed the maximum operating temperature.
A mantle or other heat shield is recommended to
further protect the display from heat. Installation
çĐÄô°đççÀķôÄñÝ°¼ÄçôãÄ°ôÐÄ°üÄô÷çô»ÝçđÄô÷
is not recommended and may result in damage to
the electronics. If you have questions about your
situation, you may call Séura at 1-800-957-3872 to
speak to a design expert.
Not for installation in a sauna or directly above a hot
tub where extreme heat and steam could damage
the electronics.
Ventilation
Adequate ventilation must be maintained to ensure
reliable and continued operation and to protect the
display from overheating. There must be at least 1.5
inches of space on all sides. Do not install inside a
cabinet, kiosk, or other enclosure.
Cable Management
When running cables from inside the compartment
to the sources, allow adequate spacing at the foam
entry to the cabinet that allows the foam seal to
completely surround each cable. Bunching the
cables together can create gaps in the foam that
allows moisture and insects to enter the cabinet
that may result in damage.
When running HDMI cables longer than 30 feet,
¼ÐļÜēçþô¼°»ÝÄ÷ñļÑķ¼°üÑçã÷ȩ"3#¼°»ÝÄ÷Ýçç÷Ä
signal over long distances and your media setup
may require a signal booster or HDMI balun.
Once connections are made, the media
compartment cover must be secured. Failure to
close the media compartment exposes the ports
and components to the elements and has the
potential to permanently damage electronics.
Screen Health
The 4K liquid crystal panel is a high technology product
đÑüÐƼȤƶƽƸȤƸƴƴñÑĒÄÝ÷ȤÎÑĐÑãÎēçþķãÄñѼüþôÄÀÄü°ÑÝ÷ȩ
Occasionally, a few non-active pixels may appear on
üÐÄ÷¼ôÄÄã°÷°ķĒÄÀñçÑãüçÍ»ÝþÄȤÎôÄÄãçôôÄÀȩBÝÄ°÷Ä
note that this does not affect the performance of
ēçþôñôçÀþ¼üȩBÑĒÄÝÄôôçô÷çþü÷ÑÀÄçÍHÅþô°ɛ÷÷ñļÑķÄÀ
and permitted area are covered under Séura’s limited
product warranty. Please inquire directly with Séura
Technical Support regarding Séura’s Pixel Policy.

12
Meet Séura®80W Outdoor Soundbar
Power Cable
(pre-installed to soundbar)
3.5mm RCA Cable
(pre-installed to soundbar)
Photo (katy)
In the Box
Resource Information
Product Manuals
WARRANTY REGISTRATION
REGISTER FOR
EXTRA BENEFITS
Activate within 30 days of purchase:
seura.com/activate
Access product set-up and installation
Ñã÷üôþ¼üÑçã÷ȤñôçÀþ¼ü÷ñļÑķ¼°üÑçã÷Ȥđ°ôãÑãÎ÷
and safety information, product warranty, and
additional product information.
www.seura.com/manuals Open and Scan
13
VESA/Display Mount
Wall Mount
Wall Mount Block
Wall Mount Bar
Wall Mount Block
Wall Mount Bar
Mounting Screw
(not included)
Wall Mount Block
Mounting Screw
Wall Mount Block
Wall Mount Block
Leveling Set Screw
“A”
“C”
“B”
CLEAT
CC
SHIM
SHIM
Beveled
Edge
Below illustrations not applicable.
Mounting Screw
Storm Ultra Bright Storm
Mounting Screw
(not included)
Wall Mount Block
Wall Mount Bar
Wall Mount Block
Wall Mount Bar
Mounting Screw
(not included)
Wall Mount Block
Mounting Screw
Wall Mount Block
Wall Mount Block
Leveling Set Screw
“A”
“C”
“B”
CLEAT
CC
SHIM
SHIM
Beveled
Edge
Below illustrations not applicable.
Mounting Screw
Storm Ultra Bright Storm
Mounting Screw
(not included)
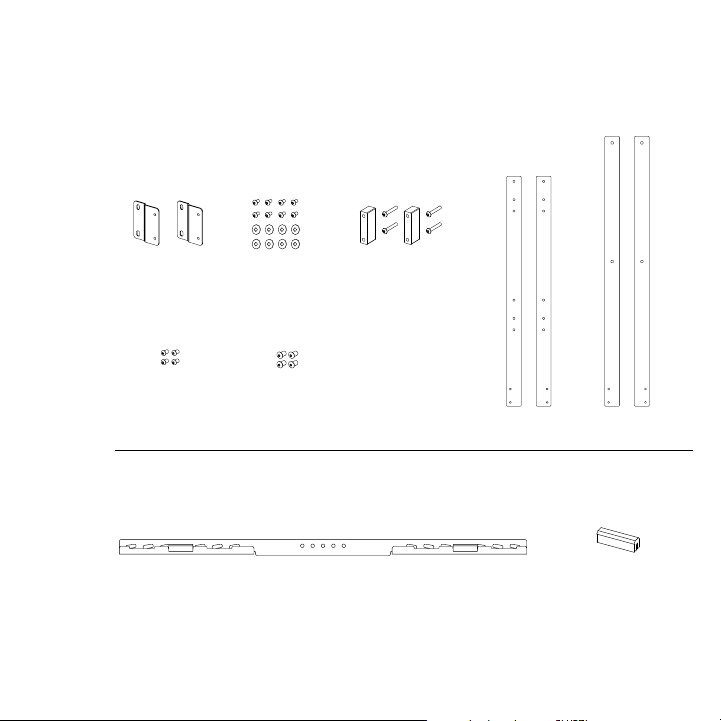
Wall Mount Bar Wall Mount Block
36” Vertical Bars
(SPK-86 Only)
30.5” Vertical Bars
(SPK-49, SPK-55,
SPK-65 Models)
(2) Brackets (4) Spacer Blocks
and Extended Bolts
M5 x 35mm
(Storm Ultra Bright Only)
(4) VESA Bolts
M6 x 16mm
(4) VESA Bolts
M8 x 16mm
(8) Bracket Bolts
with Washers
M5 x 10mm

14
Parts
Optical Digital
Audio Input
Aux In
Power
Input
Micro USB
BT/Pair

15
Vesa/Display Mount Instructions
1. Carefully lay the display face down on a non-marring surface.
Position the soundbar face down, with the grill attached, along
the desired edge of the display. This will help ensure that the
ķã°ÝâçþãüÄÀñç÷ÑüÑçãçÍüÐÄ÷çþãÀ»°ôÑ÷ĸþ÷ÐȯÄĐÄãđÑüÐ
the display.
WARNING: Ensure the Séura Display is properly supported on a flat
surface at least as large as the Display. Pressure on the front of
the LCD panel will damage the unit.
2. For Storm Ultra Bright Displays, use the included spacer blocks
and longer hardware to accommodate the additional width of
the display. For Storm Displays, use the brackets without the
÷ñ°¼Äô»Ýç¼Ü÷Íçô°ĸþ÷Ðķüȩ
3. Attach the bracket to the selected vertical bars using the
included short bolts. Attach vertical bars to the soundbar.
4. Attach the VESA mount to the display via the display VESA
pattern and the soundbar mount bars according to the mount
instructions.
Wall Mount Block
Wall Mount Bar
Wall Mount Block
Wall Mount Bar
Mounting Screw
(not included)
Wall Mount Block
Mounting Screw
Wall Mount Block
Wall Mount Block
Leveling Set Screw
“A”
“C”
“B”
CLEAT
CC
SHIM
SHIM
Beveled
Edge
Below illustrations not applicable.
Mounting Screw
Storm Ultra Bright Storm
Mounting Screw
(not included)
Wall Mount Block
Wall Mount Bar
Wall Mount Block
Wall Mount Bar
Mounting Screw
(not included)
Wall Mount Block
Mounting Screw
Wall Mount Block
Wall Mount Block
Leveling Set Screw
“A”
“C”
“B”
CLEAT
CC
SHIM
SHIM
Beveled
Edge
Below illustrations not applicable.
Mounting Screw
Storm Ultra Bright Storm
Mounting Screw
(not included)

16
Wall Mount Block
Wall Mount Bar
Wall Mount Block
Wall Mount Bar
Mounting Screw
(not included)
Wall Mount Block
Mounting Screw
Wall Mount Block
Wall Mount Block
Leveling Set Screw
“A”
“C”
“B”
CLEAT
CC
SHIM
SHIM
Beveled
Edge
Below illustrations not applicable.
Mounting Screw
Storm Ultra Bright Storm
Mounting Screw
(not included)
Wall Mount Block
Wall Mount Bar
Wall Mount Block
Wall Mount Bar
Mounting Screw
(not included)
Wall Mount Block
Mounting Screw
Wall Mount Block
Wall Mount Block
Leveling Set Screw
“A”
“C”
“B”
CLEAT
CC
SHIM
SHIM
Beveled
Edge
Below illustrations not applicable.
Mounting Screw
Storm Ultra Bright Storm
Mounting Screw
(not included)
Wall Mount Instructions
Waterproofing Inputs
Connecting your Soundbar
1. Mount the wall mount bar to the wall using appropriate
screws. Make sure the bar is installed level with the display.
When installed, the top of the soundbar will sit approximately
3/8” higher than the top edge of the wall mount bar. The
bottom of the soundbar will be approximately 5.75” below the
top edge of the wall mount bar.
2. Place one wall mount block on either side of the bar, making
sure the set screw is centered in the block prior to placing
it on the bar. Each block should be placed in the recess just
to the outside of the mounting screw for that side of the bar.
The soundbar will rest on these blocks when installed and a
wider placement gives the soundbar more stability. Placing
the blocks too far from the mounting screws may allow the
bar to bend.
3. Place the soundbar on the wall mount, taking care to not
disturb the wall mount blocks. It may be necessary to level
the soundbar slightly if mounted very close to the display.
To adjust, shift the bar slightly to the right or left, using the
angled slots to level.
Included are input caps for the back of the Soundbar. To ensure
proper operation in all weather conditions, these caps must be
used to cover any exposed connections not in use.
Connect any line level audio input to the RCA connectors.
The Soundbar uses an auto detection feature to determine which
RCA input is active.
Cover any unused connections
with included input caps
Wall Mount Block
Wall Mount Bar
Wall Mount Block
Wall Mount Bar
Mounting Screw
(not included)
Wall Mount Block
Mounting Screw
Wall Mount Block
Wall Mount Block
Leveling Set Screw
“A”
“C”
“B”
CLEAT
CC
SHIM
SHIM
Beveled
Edge
Below illustrations not applicable.
Mounting Screw
Storm Ultra Bright Storm
Mounting Screw
(not included)
17
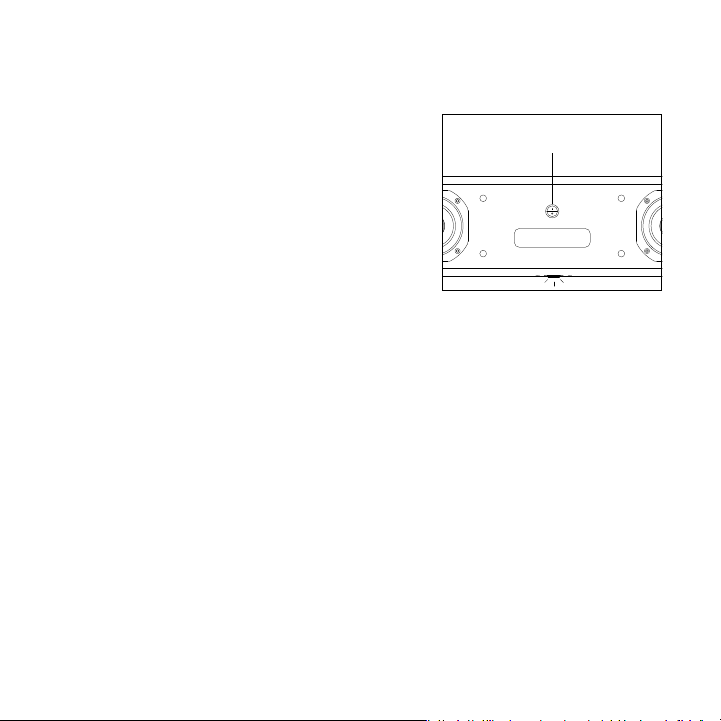
Powering On Your Soundbar
Power Switch
To power on your Séura soundbar, remove the magnetic grill from the front
of the soundbar. Press the power switch in the center of the soundbar. The
side with the line should be depressed to power on.
When powered on, the indicator light will turn on but will turn off 5
minutes later.
To power off your Séura Soundbar, press the rocker switch so that the side
with the circle is depressed. Powering off your Soundbar is recommended
if not in use for long periods of time.
Wall Mount Block
Wall Mount Bar
Wall Mount Block
Wall Mount Bar
Mounting Screw
(not included)
Wall Mount Block
Mounting Screw
Wall Mount Block
Wall Mount Block
Leveling Set Screw
“A”
“C”
“B”
CLEAT
CC
SHIM
SHIM
Beveled
Edge
Below illustrations not applicable.
Mounting Screw
Storm Ultra Bright Storm
Mounting Screw
(not included)

18
Caring for your Séura®Full Sun Series™
While Full Sun Series may be safely exposed to weather and moisture, the use of a Séura Outdoor Cover
when not in use is recommended.
Transporting the Display
When transporting Full Sun Series, never carry it by holding or putting pressure on the screen. Screen
pressure may damage the LCD or weaken the waterproof seal. Be sure to always transport with two people
supporting it with both hands.
Caring for the Screen
To clean the screen, gently wipe the surface of the front
panel with a clean, soft and lint-free cloth. If needed, dampen
the cloth with distilled water or isopropyl alcohol and lightly
wipe the screen. Do not use force as pressure on the screen
may damage the LCD or weaken the waterproof seal. Do not
use solvents or chemical cleaners as they may damage the
screen. Do not use a garden hose or pressure washer on the
display.
Caring for the Cabinet
Clean regularly with a clean, soft and lint-free cloth. Do not
use a chemical cloth (wet/dry sheet type cloth). Use a mild
detergent, isopropyl alcohol or multi-use cleaner to remove
dust and debris. Stubborn stains such as mineral water
deposits may be removed with a calcium or lime remover
such as CRL®. However, DO NOT allow CRL®to touch the LCD
screen as it will distort the surface. Cleaning with an abrasive
cloth or using strong force may scratch the surface of the
cabinet. Do not apply insecticides or other volatile liquids.
Use of a Séura Outdoor Cover when not in use is highly recommended to protect your display. Do not allow
the cabinet to remain in contact with rubber or vinyl products for a long period of time. Plasticizers inside
the plastic may cause the cabinet to deform and cause the paint to peel off.

19
Challenge Possible Solution
Will Not
Power Up
• Make sure to check that the AC power cable is connected to an outlet and the
display
• Make sure that the power outlet is receiving power
• Try pressing POWER button on the display to make sure the problem is not the
remote.
If the display turns on, refer to ‘Remote control does not work’ troubleshooting guide.
Remote
Control
Not Working
• Make sure that there is known working batteries in the remote and in the correct
polarity
• Make sure there are no obstacles in between the IR receiver and the remote (ex.
sunlight or tape)
• Try pointing the remote directly at the display from 5 feet away.
Signal Issue
• Check cable connections to ensure they are connected.
• Plug the video source directly into the display which will remove any potential issues
associated with an extender or matrix switch device. (if applicable)
• Replace cables with known working cables.
• Make sure the connected devices are powered ON.
• Make sure that the source is on the correct INPUT.
• Power cycle the video source device by unplugging the device and plugging the
device back in.
No Sound
Soundbar
• Make sure your cables are connected properly
• Make sure the display is not on MUTE / turn up the volume.
• Make sure the soundbar is connected to the power supply
External Sound System
• Make sure your cables are connected properly
• Make sure the display is not on MUTE / turn up the volume.
• Make sure the Digital Audio Settings within the display is not set to OFF
• Test the external sound system with another device to ensure that it is working.
For additional technical support, please contact Séura at 1-800-957-3872
during regular business hours: M-F 8:00 am - 4:30 pm, Central Time.
Troubleshooting
If the product is not working properly, please check the following troubleshooting solutions before you
contact customer service:

Publish date: November 19, 2021
Information is subject to change without notice.
© 2021 Séura
1230 Ontario Road Green Bay, Wisconsin 54311
1-800-957-3872 contacts@seura.com
www.seura.com
Control Documentation
To access current control documents, please visit www.seura.com/download-center
For responsible recycling information, please contact Séura or visit the following URL:
https://www.seura.com/support/recycling/
LIMITED PRODUCT WARRANTY
For information regarding Séura’s warranty policy, please visit our website: www.seura.com/warranty.
If the current Séura warranty policy is after your product purchase date, please contact Séura
Customer Support to request warranty documentation from the date of your purchase.
For additional customer support, please contact Séura.
Toll Free: 1-800-957-3872 (Monday - Friday 8:00 am – 4:30 pm, Central Time)
Website: www.seura.com/support
Other manuals for SSB-1
1
This manual suits for next models
1
Table of contents
Other Seura Speakers System manuals


Popular Speakers System manuals by other brands


Electro-Voice
Electro-Voice EVID C8.2 Ceiling specification

Yamaha
Yamaha NS125FP owner's manual

anko
anko 42661054 user manual

APOGEE ACOUSTICS
APOGEE ACOUSTICS Full Range Ribbon Speaker System Owner's manual and assembly instructions

Pioneer
Pioneer HTP-2900 operating guide

Denver
Denver TP04-180200E user manual


