SGM FOGGER 1500 User manual

SGM GB
Fogger 1000 - Fogger 1500
1
Sommario
1 Introduction............................................................................................................. 2
2 Important safeguards ............................................................................................... 2
Danger of Electric Shoc ............................................................................................ 2
Danger of Burns ....................................................................................................... 2
Danger of Explosion.................................................................................................. 3
3 Unpac ing & Inspection............................................................................................. 3
4 Setup...................................................................................................................... 3
5 Operation ................................................................................................................ 4
6 Technical Specifications............................................................................................. 5
7 Remote Control Operation ......................................................................................... 5
8 Performance Note..................................................................................................... 6
9 Maintenance ............................................................................................................ 6
10 Storage ................................................................................................................... 7
11 Limited Warranty...................................................................................................... 7
12 SGM Fogger 1000 & Fogger 1500 on-board DMX fog machine Settings............................ 8
13 Addressing .............................................................................................................. 8
1.00 10/07/2008 SGM Starting Document
Revision Date
(mm/gg/aa)
Author Description
www.audiovias.com

GB SGM
Fogger 1000 - Fogger 1500
2
1INTRODUCTION
Than you for choosing a SGM Fogger series fog machine. You now own a rugged and powerful state-of-
the-art machine. Prior to use, we suggest that you carefully read all of the instructions. By following the
suggestions found in this user manual, you can loo forward to the reliable and satisfactory performance
of your SGM fog machine for years to come.
lease follow these operation, safety and maintenance instructions to ensure a long and safe
life for your fog machine.
Caution!
Ris of electric shoc . Disconnect the appliance from the electric supply before
refilling liquid, cleaning or performing maintenance on the machine.
2IM ORTANT SAFEGUARDS
Danger of Electric Shock
Keep this device dry.
For inside use only. Not designed for outside use.
For all models, use 3-prong grounded electrical outlet only. Prior to use ta e care to
determine that the unit is installed at the rated voltage.
Always unplug your SGM Fogger series fog machine before filling its tan .
Always eep fog machine in upright position.
Turn off or unplug the machine when not in use.
This machine is not water-proof. If moisture, water, or fog fluid gets inside the
housing, immediately unplug the unit and contact a service technician or your SGM
dealer before using it again.
No user serviceable parts inside. Refer to your SGM dealer or other qualified service
personnel.
Danger of Burns
This device is for adult use only and must be installed out of the reach of children.
Never leave the unit running unattended.
Never aim the output nozzle directly at people.
Fog machine output is very hot. Avoid coming within 60 cm of the output nozzle
during operation.
Locate the fog machine in a well-ventilated area. Never cover the unit’s vents. In
order to guarantee adequate ventilation, allow a free air space of at least 20 cm
around the sides and top of the unit.
Never aim the output nozzle at open flames.
If the supply cord is damaged, it must be replaced by manufacturer or its service
agent or similarly qualified personnel in order to avoid a hazard.
The output nozzle becomes very hot during operation (200°C). Keep flammable
materials at least 50 cm away from the nozzle.
Always allow your SGM fog machine to cool down before attempting to clean or
service it.
www.audiovias.com

SGM GB
Fogger 1000 - Fogger 1500
3
Danger of Explosion
Never add flammable liquids of any ind (such as oil, gas, perfume) to the fog liquid.
Use only high-quality, water-based fog liquid that your dealer recommends. Other fog
liquids may cause clogging or “spitting”.
Always ma e sure there is sufficient liquid in the tan . Operating this unit without liquid
will cause damage to the pump as well as over-heating of the heater.
If your SGM Fogger 1000 and Fogger 1500 fog machine fails to wor properly,
discontinue use immediately. Drain all fog liquid from the tan , pac the unit securely
(preferably in the original pac ing material), and return it to your SGM dealer for
service.
Always drain tan before mailing or transporting this unit.
Never drin fog liquid. If it is ingested, call a doctor immediately. If fog liquid comes in
contact with s in or eyes, rinse thoroughly with water.
Important!
Pay attention to all warning labels and instructions printed on the exterior of your SGM fog
machine
3UN ACKING & INS ECTION
Open the shipping carton and verify that all equipment necessary to operate the system has arrived
intact.
The shipping carton should contain the following items:
1. One unit of Fogger series fog machine
2. Power cord
3. Z-10 Remote Control
4. User Manual
5. Mounting brac ets with washers/screws (for FOGGER 1500)
If any equipment is missing contact your SGM dealer immediately.
Before beginning your initial setup on SGM Fogger 1000 or Fogger 1500 fog machine, ma e sure that
there is no evident damage caused by transportation. In the event that the unit’s housing or cable is
damaged, do not plug it in and do not attempt to use it until after contacting your SGM dealer for
assistance.
4SETU
Remove all pac ing materials from shipping box. Chec that all foam and plastic padding is removed,
especially in the nozzle area.
Place fog machine on a flat surface and remove fog liquid tan cap.
Fill with high-quality, water-based fog liquid recommended by SGM dealer. Any other types of fluid
can damage the unit resulting in spitting and serious clogging problem. When filled, place cap bac
on liquid tan . Be careful not to exceed the maximum fluid level. DO NOT OVERFILL.
Firmly attach the remote control cable to the proper input on the bac of the machine.
www.audiovias.com

GB SGM
Fogger 1000 - Fogger 1500
4
5OERATION
Add fluid carefully to the liquid tan . Do not overfill the tan .
Plug power cord into a grounded electrical outlet. Turn the power switch to “ON” on the bac of the
machine. The unit will ta e a couple of minutes to warm up the heater. During this time the machine
cannot generate fog. When the remote control is attached the red lights and green light (on the
remote) will flash and stay ON when the warm-up time is complete.
To emit fog press the button on the remote (if it is connected) for the desired length of time.
For further information on operating your Fogger 1000 and Fogger 1500 fog machine, see the section
titled “Remote Control Operation”.
Important!
Always monitor tan fluid level as you are fogging. Running a fog machine with no fluid can
permanently damage the unit.
FOGGER 1500: Your model includes a mounting brac et designed for overhead installation; it may be
installed at floor level or suspended overhead. If the unit is to be mounted using the
brac et, it is important that the fog does not shoot directly at any one’s face.
Whatever installation method you choose, do not allow the unit to have more than a
25 degree angle of inclination.
FOGGER 1500 Description
Front
Safety Eyelet
Fluid Tan
Rear
Dip Switches
Fluid Level
Jac Plug for Z
-
10
Power Supply
Power Switch
DMX Receiver
www.audiovias.com

SGM GB
Fogger 1000 - Fogger 1500
5
Adapte and Nut must be tightly connected
Assemble 2 washers in both inner sides o the
mounting bracket with ixation screws on the
outer sides
Note: A luid level sensor is installed on the unit. The machine will stop to og i the luid is lower than
usable level.
I you experience low output, pump noise or no output at all, unplug immediately. Check luid level, the
external use, remote control connection and power rom the wall. I all o the above appears to be O.K.,
plug the unit again. I og does not come out a ter holding the remote button down or 30 seconds, check
the hose attached to the tank to make sure there is luid going through the hose. I you are unable to
determine the cause o the problem, do not simply continue pushing the remote button, as this may
damage the unit. Return the machine to your SGM dealer.
6TECHNICAL SPECIFICATIONS
Model FOGGER 1500 FOGGER 1000
Power Supply AC100V - AC120V - AC230V - AC240V, 50Hz-60Hz
Power Co sumptio 1,500 W 1,000 W
Output Volume 600 m³/min. 300 m³/min.
Ta k Capacity 6 liters 2.4 liters
Fluid Co sumptio 8,5 min./ liter 13 min./ liter
Weight 15 kg 9.8 kg
Dime sio s (LxWxH) 552 x 230 x 155 mm 370 x 295 x 135 mm
Remote I cluded Z-10 Z-10
Optio al Remote Z-40, Z-50 Z-40, Z-50
Warm-up Time 8.5 min. 10 min.
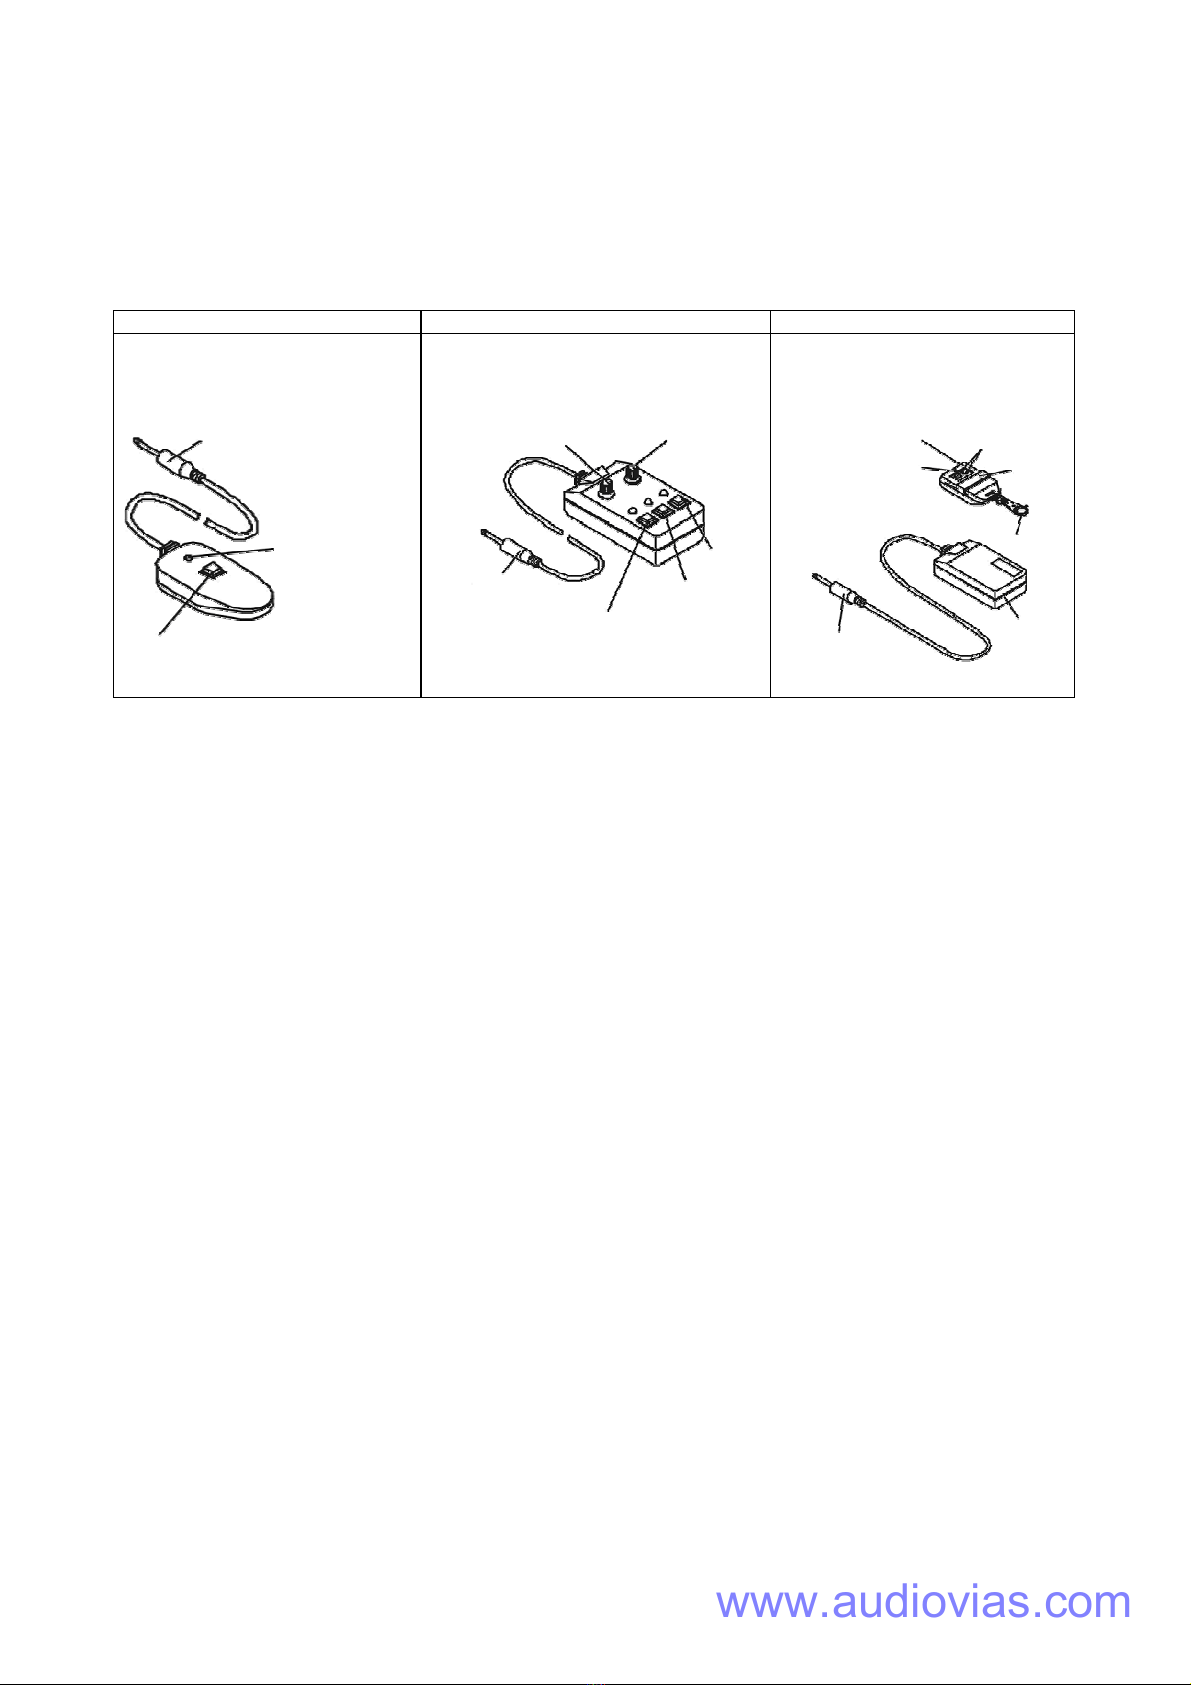
7REMOTE CONTROL OPERATION
Z-10: 10 meter wired remote controller with 6,3 mm jack plug o SGM og machine models Fogger
1000 and Fogger 1500. The red lamp indicates that the unit is receiving power. When the og
machine has reached operating temperature the green light on this remote control will light up,
indicating that the operator may begin og emission by pressing the red button. The green light
lashes during og machine warm-up and re-heating cycles (approx. 1-2 minutes), and stays ON
when the machine becomes operational. The Z-10 eatures the “toggle switch’’ unction: press once
or continuous “on”, press again to release continuous “on” unction
Z-40: 10 meter wired remote controller with 6,3 mm jack plug or SGM og machine models Fogger
1000 and Fogger 1500. Its two knobs allow the operator to customize og machine unctions by
adjusting output duration and interval. Press the yellow TIMER-button to activate the timer unction.
Adjust the interval between each og emission (within the range o 1 second to 250 seconds) by
means o the INTERVAL control knob. Adjust the duration o each og emission (within the range o 1
to 15 seconds) by means o the DURATION control knob. When pressed, the green FOG button
Tank Kap
PU Tube
Filter
Tank
Mounting Bracket
Fixation Screw
Fixation Screw
Washer
Washer
www.audiovias.com
GB SGM
Fogger 1000 - Fogger 1500
6
overrides all other control functions and activates maximum output. Press the red POWER ON/OFF
button for continuous output.
Z-50: Wireless remote controller with 6,3 mm jac plug for SGM fog machine models Fogger 1000
and Fogger 1500. A remote operation is possible up to a distance of 50 meters. Keep the red button
pressed for fogging.
Z-10, Z-40, Z-50 REMOTE CONTROLLER
Z-10 Z-40 Z-50
Cable length: 10m
Connector: 6,3 mm jac
Function: On/Off Toggle Switch
Cable length: 10m
Connector: 6,3 mm jac
Function: Timer wih interval and
duration; manual On/Offt
Cable length: wireless, up to 50m
Connector: 6,3 mm jac
Function: wireless ON/Off
8ERFORMANCE NOTE
All fog machines develop condensation around the output nozzle. Because this may result in some
moisture accumulation on the surface below the output nozzle, consider this condensation when
installing your unit.
All fog machines may sputter small amounts of fog occasionally during operation and for a minute or
so after being turned off.
All fog machines have a recycling period after long bursts when the machine will shut itself down for
a short period in order to heat up again. During this time no fog can be produced.
9MAINTENANCE
Do not allow the fog liquid to become contaminated. Always replace the caps on the fog liquid container
and the fog machine liquid tan immediately after filling. After every 40 hours of continuous operation, it
is recommended to run a cleaning solution composed of 80% distilled water and 20% ACETIC ACID
through the system to prevent the accumulation of particulate matter in the heating element.
The recommended cleaning regimen is as follows:
1. Empty all fog liquid from the machine. Add cleaning solution to tan . Plug unit in and begin warm up.
2. Run the unit in a well-ventilated area until the tan is almost empty. Do not allow the pump to run
dry.
3. Cleaning is now complete. Refill with fog liquid. Run the machine briefly to clear any cleaning solution
from the pump and heater.
4. Do not operate the fog machine without liquid at any time.
Note: All fog machines are prone to clogging due to the thic consistency of fog liquid and the high
temperature at which it vaporizes. However, a properly maintained fog machine should provide
years of reliable use.
Clean with a dry cloth only. Store dry.
Cleaning your fog machine regularly will help reduce costly replacement and repair charges.
Interval
Duration
6,3mm jac
Timer On/Off
Power On/Off
FOG
6,3mm jac
Power
indicator
(green)
On/Off Switch
Transmitter
Control B
utton
Indicator
6,3mm jac
Cover
Receiver
box
Hoo
www.audiovias.com

SGM GB
Fogger 1000 - Fogger 1500
7
10STORAGE
1. When storing run distilled water (not tap water) through the system as described in the cleaning
regimen above. This will help avoid any particles condensing inside the pump or heater.
2. It is strongly recommended to test-run the machine on a monthly basis in order to achieve its best
fogging condition. A test-run consists of warming up the machine followed by a few minutes of
emission. After that, follow Step 1 under Storage.
lease read and save these instructions.
11 LIMITED WARRANTY
•The unit is guaranteed for 24 months from the date of purchase against manufacturing material
defects.
•Brea down caused by carelessness and improper use of the fixture is excluded.
•The guarantee is no longer valid if the unit has been tampered with or repaired by
unauthorized personnel.
•Replacement of the fixture is not foreseen by the guarantee.
•External parts, nobs, switches, removable parts and lamps are excluded from the guarantee
•Transport costs and related ris s are borne by the fixture’s owner.
•The guarantee is valid to all effects only on presentation of the guarantee certificate to the
manufacturer or the nearest SGM technical assistance centre.
•Always quote the unit’s serial number and model when contacting your reseller for information
or assistance.
NOTE: USE OF ANY FLUID OTHER THAN SGM FOG FLUID WILL VOID WARRANTY.
www.audiovias.com

GB SGM
Fogger 1000 - Fogger 1500
8
12SGM FOGGER 1000 & FOGGER 1500 ON-BOARD DMX FOG MACHINE
SETTINGS
DMX Setting for Fogger1500 and Fogger 1000 fog machines with on board DMX
Channel A
0 - 128 = OFF
129 – 255 = Maximum Volume Output (100%)
The Fogger 1500 and Fogger 1000 fog machine have on-board DMX control. These two models
use 1 channel to control on/off operation. Each channel has a value range of 0 to 255. On/Off function
can be programmed using the DMX controller or the DMX control software being
used by lighting and effects operator.
If Channel A has a value from 0 to 128, the unit is OFF.
Between the values 129 to 255 the volume of fog output is is at maximum.
Note: In the example above, if the machine were assigned the DMX address of 130, Channel A would
correspond to DMX address 130.
In general, SGM fog machines with onboard DMX conform to the following performance specifications:
1. Average Operating temperature = 250ºC
2. Fogger can maintain maximum output for 30 seconds or more
13ADDRESSING
Each device occupies 1 channel. To ensure that the control signals are properly directed to each device,
they require adressing. This is to be adjusted for every single device by changing the DIP-switches as set
out in the table below.
The starting address is defined as the first channel from which the device will respond to the controller.
Please ma e sure that you do not have any overlapping channels in order to control each device correctly
and independently from any other fixture on the DMX data lin . If two, three or more devices are
addressed similarly, they will wor similarly.
Occupation of the DI -switches:
Setting the DMX- ddress: DI -switch no. 1 2 3 4 5 6 7 8 9
Device & channels Starting address 1 2 4 8 16 32 64 128
256
On ▲
Device 1 – channel 1 Off
On ▲
Device 2 – channel 2 Off
On ▲ ▲
Device 3 – channel 3 Off
On ▲
Device 4 – channel 4 Off
On ▲ ▲
Device 5 – channel 5 Off
www.audiovias.com
This manual suits for next models
1
Table of contents
Other SGM Fog Machine manuals


