Shanling T600 User manual

T600
CD TRANSPORT
CD


1.
3.
7.
6.
5.
4.
8.
2.
10cm 20cm
9. 2000m
1
10.
2
CD
1
T600 CD
CLASS 1 LASER PRODUCT
1
1.
2. 1 1
3. 1
1.
2.
12
3.

CD TRANSPORT T600
on/standby
prev next play/pause stop
POWER
/AC IN
DIGITAL OUTPUT
COAXIAL OPTICAL BNC I S
2
25W
T600
CD
CLASS 1 LASER PRODUCT
1
AES EBU/
ON/
OFF/
SERIAL NO.: FUSE 100V - 120V : T1.6AL
220V - 240V : T800mAL
WORD SYNC CLOCK
IN
IN
OUT
IR
USE ONLYWITH A 250V FUSEUSE ONLYWITH A 250V FUSE
~/220V 50Hz~/220V 50Hz
CD TRANSPORT T600
on/standby
prev next play/pause stop
2
1.
2. AES/EBU
3.
4. BNC
5. I S
2
6.
7.
8.
9. ( )
10.
21 3 5
2 3 4 56 89
10
T600 CD
4 6 7
17
1.
2.
3.
12 3
1.
2.
3.
4.
7.5.
6. /

POWER
DISPLAY DIMMER MUTE
FILTER
PROG
RANDOM
SRC
W. S Y N CW. SYNC
REPEAT A-BA - B
VOL
VOL
56 7
123 4
8
90
AUX
CD
INPUT DAC
INPUT
3
T600 CD
1. 10 30
2.
1
1.
2.
3.
4.
5.
6.
7.
8.
9.
10. /
11.
12.
13.
14.
15.
16.
CD/DAC CD
9
2
13
3
124
6
5
7
8
10
15
14
16
11

4
T600 CD
/
1. [stop]
[ ]
2.
[stop] [ ]
1.
[play/pause]
[ ]
2. [play/pause]
[ ]
/
2. [next] [ ]
1. [ ]
2. [ ]
/
1. 1 9
19
2. 10
1.
[REPEAT]
"Rep One"
[REPE
AT] "Rep All"
[REPEAT]
2.
A-B
1.
[A-B] "Rep A-"
[A-B]
"Rep A-B"
AB
[A-B]
2.
1. [prev] [ ]
/
1.
[ON/ ]
[on/standby] [POWER]
30
2. [on/
standby] [POWER]
[OFF/ ]
3.

5
T600 CD
1.
(44.1KHz)
[W.SYNC]
"sync"
"sync"
3.
1. [PROG]
"Prog 00-00"
[ ]
"Mem"
2. [ ]
2.
[RANDOM] [ ]
1.
[DIMMER]
""
2. ""
1. [RA
NDOM] "Rand"
T600
44.1KHz
D600
T600
44.1KHz
2.
[W.SYNC]
"sync"

6
T600 CD
CD CD PRO
CD, CD-R, CD-RW
25W
0.5W
(x x ) 480 x 400 x 142mm
19.5kg
: 1
3.5mm : 1
: 1
: 1
: 1
: 1
(I S, BNC, OPTICAL, AES/EBU, COAXIAL)
2

7
T600
CD TRANSPORT
Dear customer
Thank you for buying cd transport. We would like
to take this opportunity to express our sincere
appreciation to you. We recommend you to read
this user's manual carefully before operating the
unit and keep it available for reference when
needed.
Safety Instructions
1.
2.
3.
4.
5.
6.
7.
8.
Do not open this unit for repair or
modification by anyone other than a qualified
technician! This product has no user-
serviceable parts. Opening the unit and
modifying the internal circuitry can make
subsequent maintenance difficult or
impossible and affect performance and
sound quality.
For good ventilation, a minimum of 10cm
clearance shall be maintained at the back
and two sides and 20cm at the top of the
unit.
Allow no water dripping or splashing into the
unit. Place no object containing liquid on the
unit, e.g. Vase.
Do not cover any ventilation hole with
newspaper, cloth, curtain, etc. in case of
ventilation blocking.
Allow no exposed flame source on the unit,
e.g. burning candle.
The unit shall be connected to AC power
output socket with grounding protection.
If power plug and appliance coupler are used
as disconnecting device, the disconnecting
device shall be easily operable.
The waste battery must be treated
according to relevant local battery wasting
regulations.
9. Only applicable for safe use in the
area with elevation under 2000m.
See Fig. 1 for the sign. Fig. 1
CAUTION
RISK OF ELECTRIC SHOCKRISK OF ELECTRIC SHOCK
DO NOT OPENDO NOT OPEN
Caution: Risk of electric shock. DO NOT OPEN.
The sign with arrowed lightning inside an equilateral
triangle warns the user that the unit has high voltages
inside which can cause electric shock.
The sign with an exclamation mark inside an
equilateral triangle warns the user that the unit has
important operation and maintenance instructions.
Safety Precautions
Operation Precautions
1.
2.
3.
10. Only applicable for safe use under
non-tropical climate conditions.
See Fig. 2 for the sign. Fig. 2
1. Since the laser beam in this unit can damage
the eye, please do not open the enclosure.
Only a qualified technician should carry out
repairs.
2. This unit is classified as a Class 1 laser
product, and is identified as such on the
label located on the rear of the enclosure.
3. The laser components of this product can
generate laser radiation above the Class 1
limit.
Laser Warning
CLASS 1 LASER PRODUCT
1
Before Turning on
About Condensation
If a great temperature difference exists
between the unit interior and the
environment, humidity may condense on the
internal parts and the unit will not function
normally. If this happens, please disconnect
power and wait for one or two hours until the
temperature difference almost completely
disappears.
Moving the Unit
Please turn it off and disconnect it from
power socket. Then disconnect all cables
connecting with other system devices before
moving the unit.
Please check again the accuracy of all
connections cables.
CD TRANSPORT T600
on/standby
prev next play/pause stop
POWER
/AC IN
DIGITAL OUTPUT
COAXIAL OPTICAL BNC I S
2
25W
T600
CD
CLASS 1 LASER PRODUCT
1
AES EBU/
ON/
OFF/
SERIAL NO.: FUSE 100V - 120V : T1.6AL
220V - 240V : T800mAL
WORD SYNC CLOCK
IN
IN
OUT
IR
USE ONLYWITH A 250V FUSEUSE ONLYWITH A 250V FUSE
~/220V 50Hz~/220V 50Hz
CD TRANSPORT T600
on/standby
prev next play/pause stop
8
21 3 5
2 3 4 56 89
10
4 6 7
17
12 3
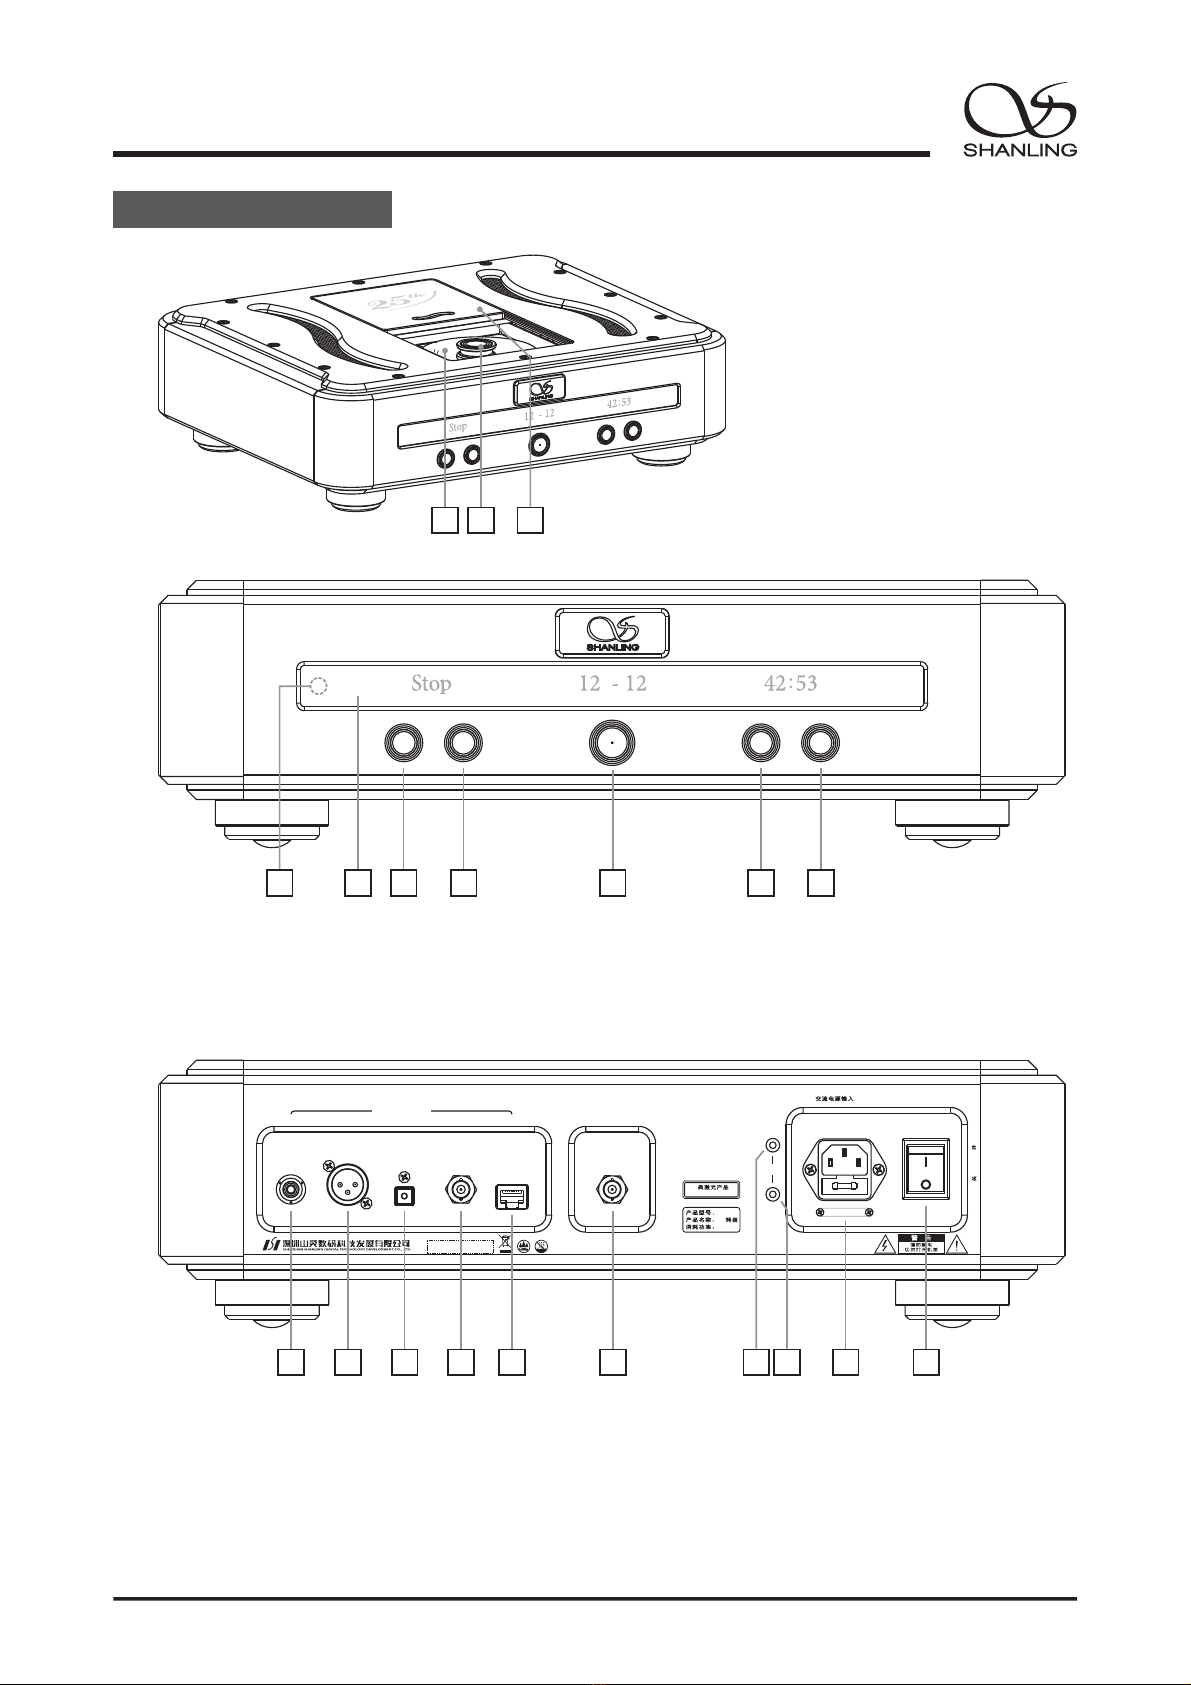
Parts Identification
T600
CD TRANSPORT
1. Disc
2. Disc clamp
3. Disc cover
Note:
Push the disc cover backwards to
open the compartment and pull
forwards to close the compartment.
1. Remote control receiving window
2. Multifunction display window
3. Previous track selection key
4. Next track selection key
5. Standby switch key
6. Play/pause key
7. Stop key
1. Coaxial digital signal output interface
2. AES/EBU digital signal output interface
3. Optical fiber digital signal output interface
4. BNC digital signal output interface
5. I S digital signal output interface
2
6. Word sync clock signal input interface
7. Remote control signal input interface
8. Remote control signal output interface
9. AC power input socket (with fuse)
10. Main power switch

POWER
DISPLAY DIMMER MUTE
FILTER
PROG
RANDOM
SRC
W. S Y N CW. SYNC
REPEAT A-BA - B
VOL
VOL
56 7
123 4
8
90
AUX
CD
INPUT DAC
INPUT
9
1
9
2
13
3
124
6
5
7
8
10
15
14
16
11
T600
CD TRANSPORT
Remote Control Diagram
1. CD/DAC switch, located at CD position
2. Track number selection key
3. Fast backward search key
4. Fast forward search key
5. Previous track selection key
6. Next track selection key
7. Stop key
8. Time display mode key
9. Screen brightness adjustment key
10. Play/pause key
11. Word sync clock key
12. Random play key
13. Programming play key
14. Replay key
15. Segment replay key
16. Standby switch key
Note:
1. The valid distance of the remote controller is not more than 10m and the included angle of remote control is
not more than 30 .
o
2. Keys without function names on the remote controller are useless for this product. It is normal that there will
be no response when you press them.

10
T600
CD TRANSPORT
Operation Instructions
Turn on/off
1. First connect the unit power line and
signal line. Locate the power switch on
the rear panel at the position [ON], and
the power indicator on the panel turns
red. At this time, press [on/standby]
key or [POWER] key on the remote
controller, and the indicator turns green
and blinks. The unit enters warming-up
status. After about 30 seconds, the unit
enters normal working status.
2. To turn off this unit, first press [on/
standby] key on the panel or [POWER]
key on the remote controller, and then
locate the power switch on the rear
panel at the position [OFF]. At this time,
the unit is in off status.""
3. If the unit is not to be used for some
time, it should be unplugged to
disconnect it from AC power.
Backward Search/Forward Search
Track Selection with Numeric Key
Stop Key
1. In play status, press [stop] key on the
front panel or [ ] key on the remote
controller to stop playing.
2. In play status, to change a disc, first
press [stop] key on the front panel or [ ]
key on the remote controller to stop
playing the current disc, and then open
the disc cover.
Play/Pause
1. After the disc is well placed or when the
disc is in stop status, press [play/pause]
key on the panel or [ ] key on the
remote controller to play the current disc.
2. In play status, press [play/pause] key on
the panel or [ ] key on the remote
controller to pause the current disc play.
Then, press this key again to go back to
normal play status.
Previous Track/Next Track
1. Press [prev] key on the panel or [ ] key
on the remote controller, and the player
will skip to the previous track.
2. Press [next] key on the panel or [ ] key
on the remote controller, and the player
will skip to the next track.
1. In normal play status, keep pressing [ ]
key on the remote controller to enable
fast backward search; release this key to
go back to normal play status.
2. In normal play status, keep pressing [ ]
key on the remote controller to enable
fast forward search; release this key to
go back to normal play status.
1. Directly press a numeric key from 1 to 9
on the remote controller to select a
track from 1 to 9.
2. To select a track over 10, first press the
numeric key corresponding to the
number in the tens place, and then
press the numeric key corresponding to
the number in the ones place within 2
seconds.
Replay
1. To continuously replay the current track,
press [REPEAT] key on the remote
controller once, and the screen will
display Rep One before the track. To
continuously replay all the tracks on the
disc, press [REPEAT] key on the remote
controller again, and the screen will
display Rep All before the track. To
cancel the replay function, press
[REPEAT] key on the remote controller
again, and the screen will go back to
normal display.
""
""
2. In stop status, there will be no response
when you press this key.

11
T600
CD TRANSPORT
A-B Segment Replay
1. Press [A-B] key on the remote controller
at the starting point of your desired
segment, the screen will display Rep A-
before the track. When the end point of
your desired segment is reached, press
[A-B] key on the remote controller again,
and the screen will display Rep A-B
before the track. At this time, the unit
will replay from the starting point A to
the end point B, until [A-B] key on the
remote controller is pressed again. At
that time, the segment play function will
be cancelled.
""
""
2. In stop status, there will be no response
when you press this key.
Word Sync Clock Input
1. Input a high-accuracy word sync clock
signal (44.1KHz) from the outside to the
word sync clock input interface of the
unit. Press [W.SYNC] key on the remote
controller and switch the unit to external
word sync clock status, and the screen
displays sync and the internal phase
locked loop controller will automatically
lock the word sync clock signal inputted
from the outside. If the inputted clock
frequency is inaccurate, the phase
locked loop controller will not lock, and
the sync displayed on the screen will
keep blinking and the clock signal of the
unit will automatically go back to internal
clock status.
""
""
2. In the status of external word sync clock,
press [W.SYNC] key on the remote
controller, and the unit will go back to
internal clock status and sync displayed
on the screen will disappear.
""
3. Schematic Diagram of Word Sync Clock
Connection:
Programming Play
1. In stop status, press [PROG] key on the
remote controller, and the screen will
display Prog 00-00 . At this time, you
can press the track to be programmed.
After programming finishes, press [ ]
key to play the programmed track, and
the screen will display Mem before the
track.
""
""
2. To cancel the programming play function,
press [ ] key twice.
Random Play
Screen Brightness Adjustment
Use [DIMMER] key on the remote
controller to adjust the brightness of
display based on the brightness of
surrounding environment. Each press will
circularly change the screen brightness
from bright , dim to off .
""""""
The screen brightness is automatically
set as bright at startup.
""
1.
2.
1. In stop or play status, press [RANDOM]
key on the remote controller. The screen
will display Rand before the track,
which indicates that the random play
function has been started. The random
play function is to automatically play the
tracks on the disc with the unit, until all
the tracks are played.
""
To cancel this function during random play,
press [RANDOM] key or [ ] key once.
2.
44.1KHz
D600 word sync clock output
T600 word sync clock input
High-accuracy clock signal source
T600 word sync clock input
44.1KHz
or
12
T600
CD TRANSPORT
Technical Specifications
Accompanying Accessories
General
parameters
Technical
parameters
Power consumption: 25W
Standby power consumption: <0.5W
Dimension (W x D x H): 480 x 400 x 142(mm)
Net weight: about 19.5kg
Power cord w/3-prong plug: 1
3.5mm double channel earphone connection line: 1
Remote controller: 1
Disc clamp: 1
User's manual: 1 copy
Warranty card:1
CD servo system: Philips CD PRO core
Disc compatibility: CD, CD-R, CD-RW
Audio output: only digital audio signal output
(I S, BNC, OPTICAL, AES/EBU, COAXIAL)
2


:
: 0755-26887659
Email:shanling @szonline.net
http: www.shanling.com//
:10
Due to continuous improvement, every specification and design is
subject to change at any time without further notice.
Table of contents
Other Shanling Turntable manuals


