Sharp 14D2-SS User manual

Printelligence (M) Sdn. Bhd
Dimension: 352 x 250 mm
ENGLISH
FRANÇAIS
OPERATION MANUAL
MODE D’EMPLOI
TÉLÉVISEUR COULEUR
COLOUR TELEVISION
14D2-SS
20D2-SS
21D2-SS
TINS-B721WJZZ
05P01-MSP
Please read this operation manual
carefully before using the colour
television.
Veuillez lire attentivement ce mode
d’emploi avant d’utiliser ce
téléviseur couleur.
TINS-B721WJZZ
05P01-MSP
14D2-SS
20D2-SS
21D2-SS
21D2-SS(FRONT) 30/10/04, 9:42 AM1

‰1
Dimension: 176 x 250mm
Printelligence Sdn. Bhd. (Malaysia)
To prevent fire or electrical shock, do not use the TV set in an excessively damp
place.
Do not cover the ventilation holes at the back of the TV set, this can cause fire or
other serious problems. Leave an adequate open space behind the TV set for good
ventilation.
Do not place this set in confined spaces, such as a bookshelf or built-in case.
Position the TV set out of direct sunlight and away from heat, as high temperatures
can damage the cabinet, CRT, or other electronic parts.
Never insert or drop any metallic or inflammable objects into the ventilation holes of
the TV set, this can cause fire, electrical shock, or electrical failure. Do not place a
flower vase or anything else containing liquid on the TV set, as liquid spilt on the TV
set can cause serious problems.
Do not place this television equipment on an unstable cart, stand or table. The
television equipment may fall, causing serious injury to a child or an adult and
serious damage to the equipment.
Use only with a cart or stand recommended by the manufacturer, or sold with the
television equipment.
Page
Safety Precautions................................................ ‰1
Accessories ........................................................... ‰3
Antenna Connection ............................................. ‰3
Headphone Jack ................................................... ‰3
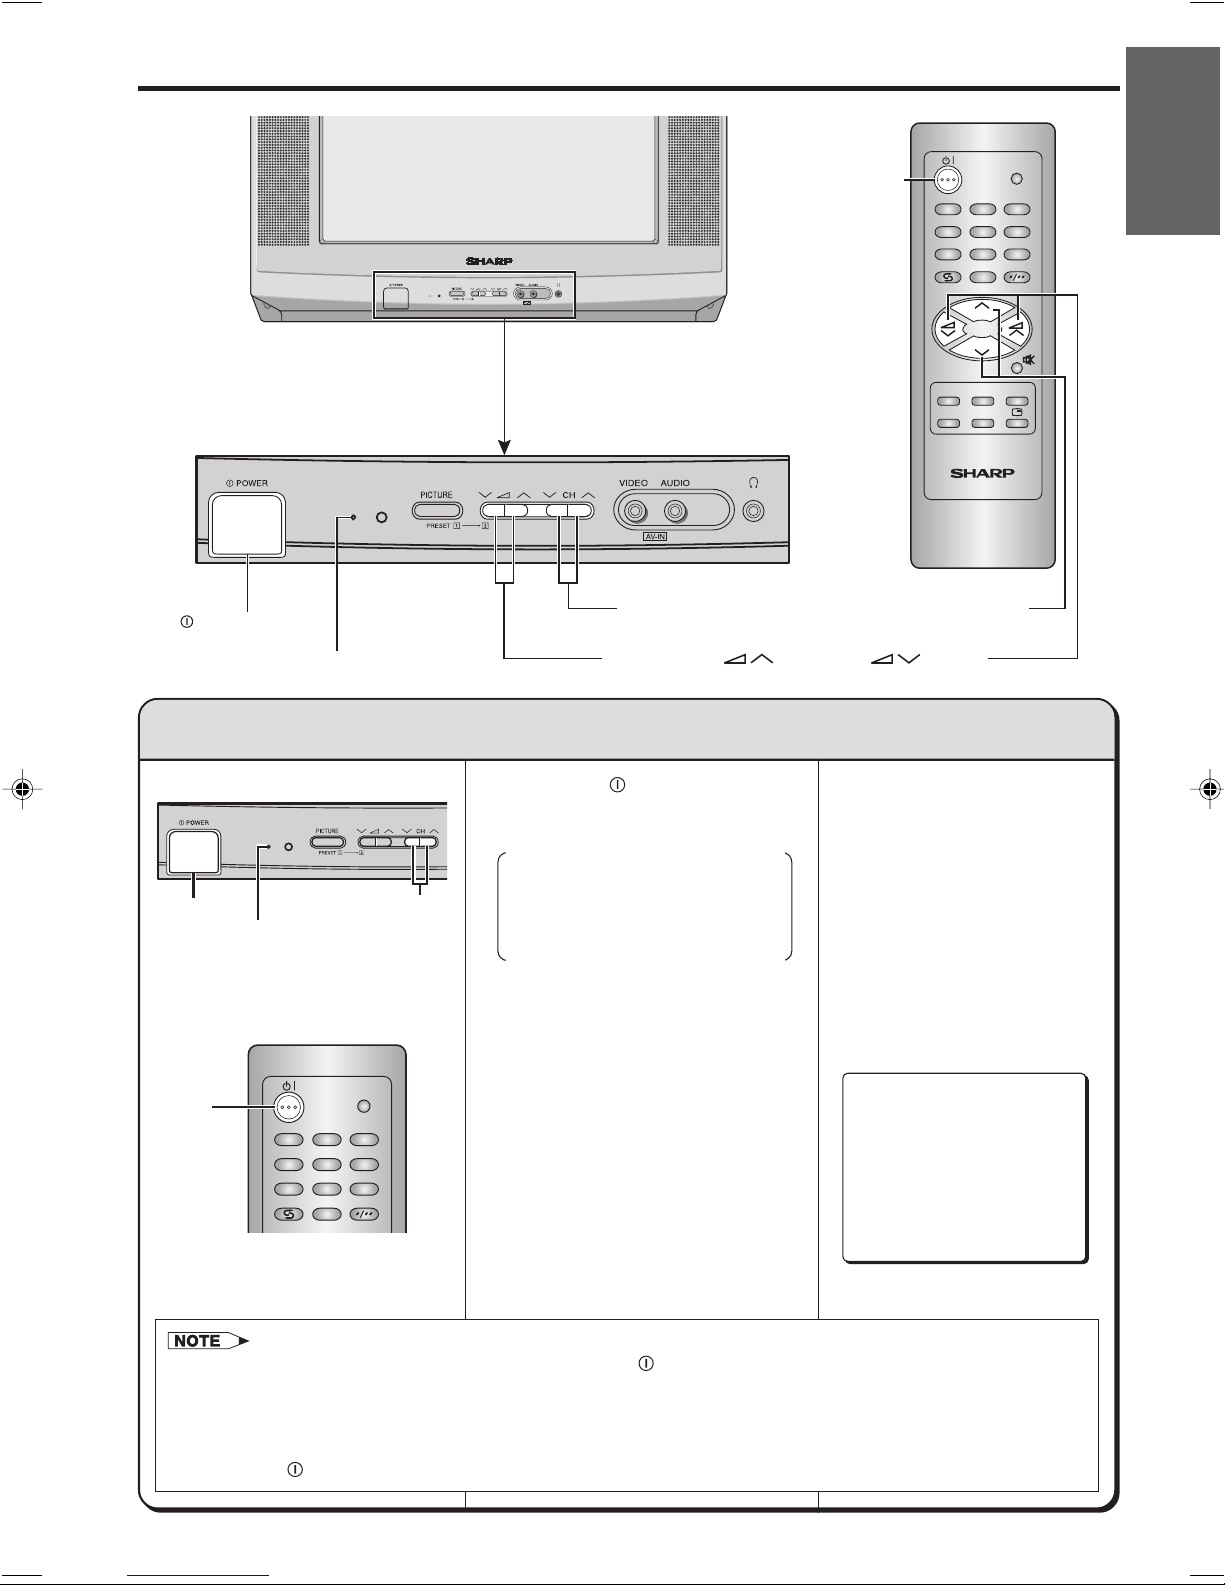
Location of Controls.............................................. ‰4
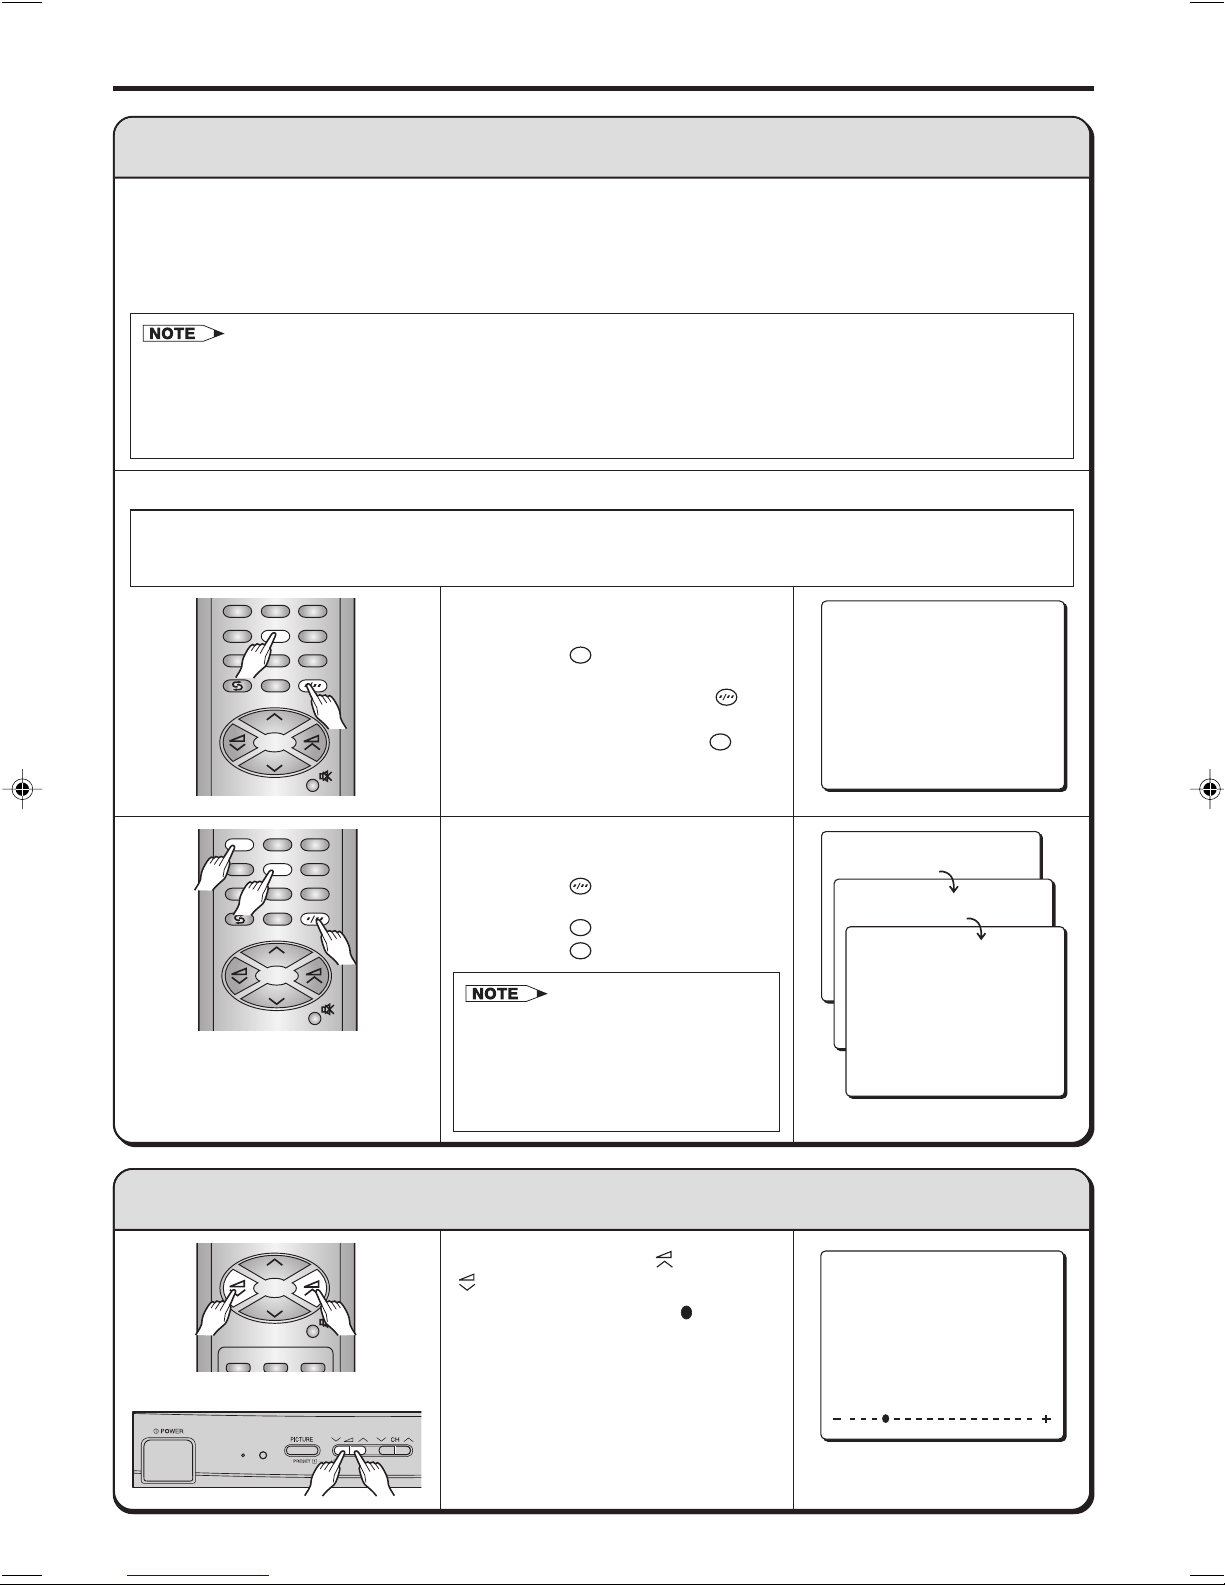
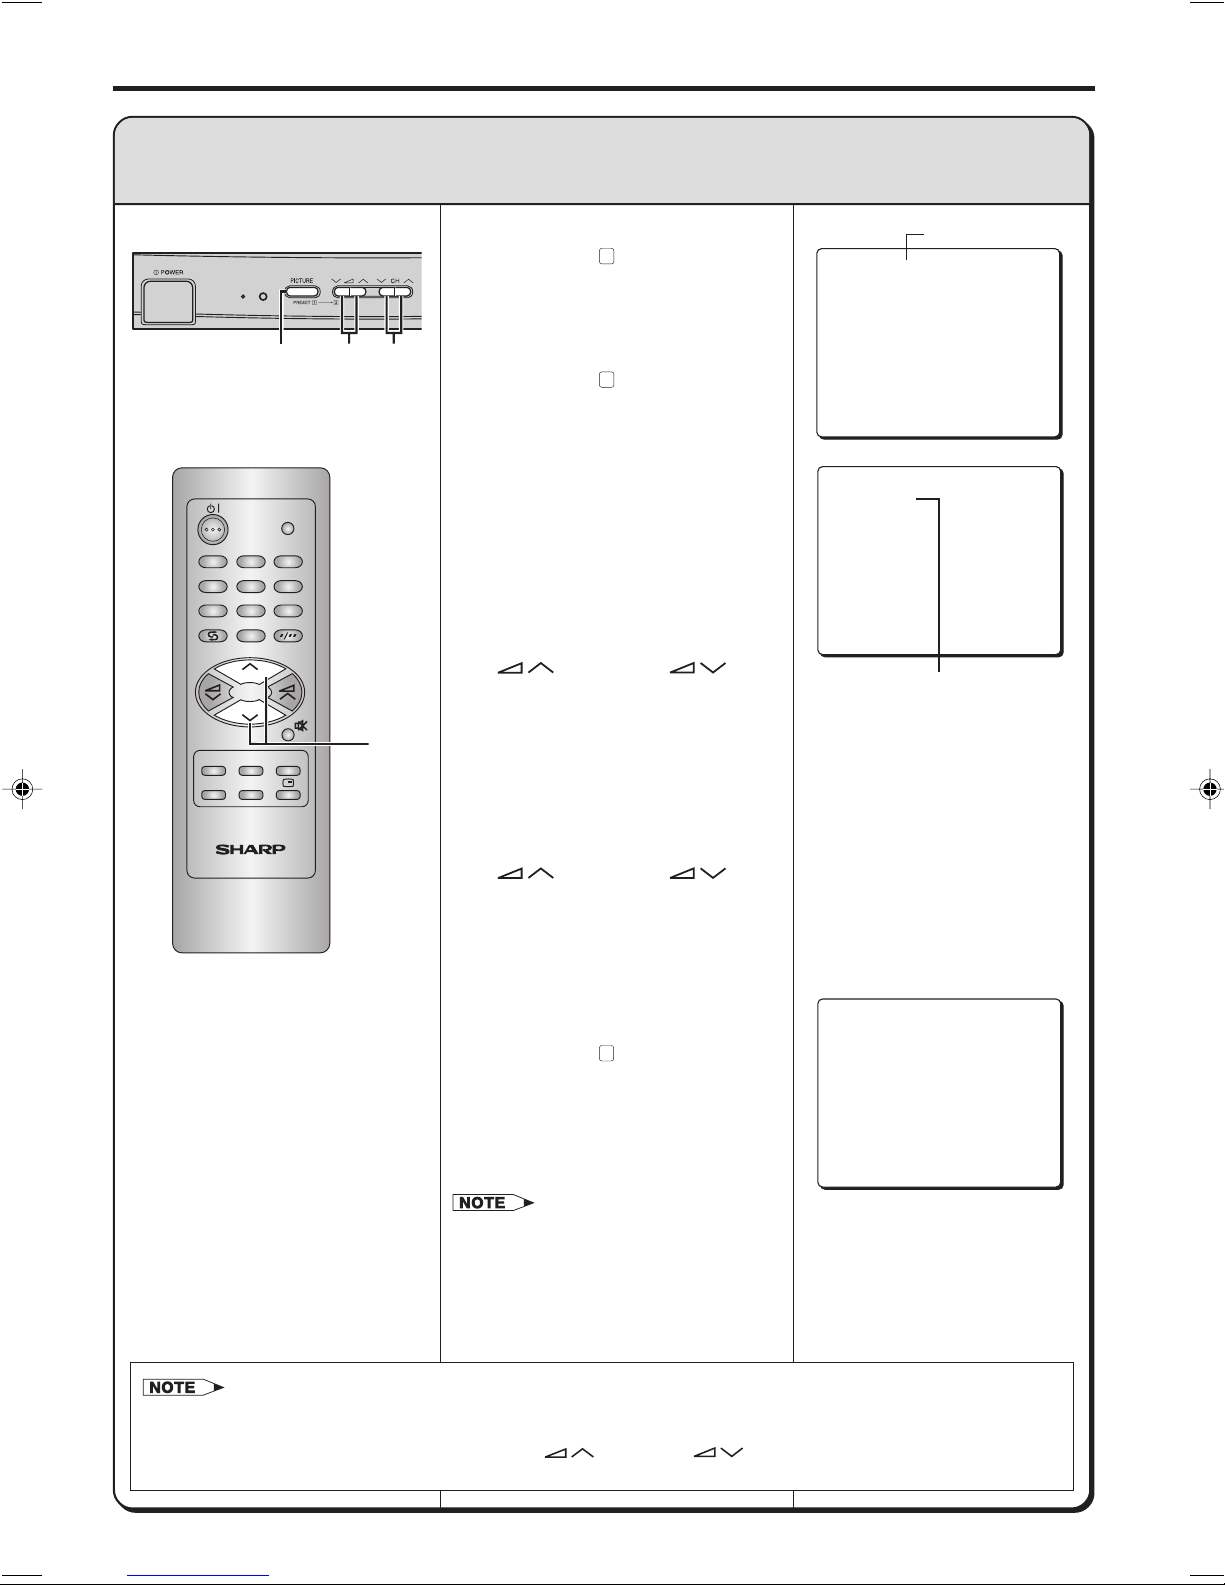
Basic Operation .................................................... ‰6
OSD (On-Screen Display) Language Selection ... ‰8
Presetting Channels ............................................. ‰8
• Full Auto Channel Preset (AUTO)
• Manual Channel Preset (MANUAL)
Fine Tuning ............................................................ ‰10
Flashback .............................................................. ‰10
Skipping Channels ................................................ ‰11
Picture Adjustment ............................................... ‰12
Page
Timers .................................................................... ‰13
• Reminder
• OFF Timer
• ON Timer
Colour and Sound System ................................... ‰16
Functions Adjustment ........................................... ‰17
• Blue Back
• White Temp
•uSound Mute
•∫Call
• TV/VIDEO
Video Equipment Connections............................. ‰20
Troubleshooting ..................................................... ‰21
Specifications ........................................................ ‰22
Contents
Dear Sharp Customer
Thank you for buying SHARP Colour Television Receiver. To ensure proper operation, please read this
manual carefully. After reading, keep this manual in a safe place for future reference.
Safety Precautions
21D2-SS[01-05]EN 30/10/04, 9:43 AM1

‰2
Dimension: 176 x 250mm
Printelligence Sdn. Bhd. (Malaysia)
ENGLISH
Television equipment and cart combination should be moved with care. Quick stops,
excessive force, and uneven surfaces may cause the equipment and cart
combination to overturn.
Do place the TV set onto an even stand, table or track which size is bigger than the
TV set. If the TV set is put onto a smaller size or uneven stand, table or track may
cause the TV cabinet distort.
Do not put or insert anything between TV set and the stand, table or track.
Wall or shelf mounting should follow the manufacturer’s instructions, and should use
a mounting kit approved by the manufacturer.
To prevent electrical shock, do not subject the AC power cord to damage by bending
or twisting it, or by placing heavy items on top of it and do not place the AC power
cord under the TV set. If the AC power cord becomes damaged, unplug it from the
wall outlet immediately and call your dealer for service.
Never remove the back of the cabinet, as there is high voltage inside the TV set.
Unplug the power cord from the wall outlet immediately if the TV set begins to make
unusual noises or give off smoke or an odd smell, then call our service centre for
service.
To prevent fire, never place any type of candle or naked flames on the top or near
the TV set.
To prevent fire or shock hazard, do not expose this products to dripping or
splashing. No objects filled with liquids, such as vases, should be placed on the
products.
Safety Precautions (continued)
21D2-SS[01-05]EN 30/10/04, 9:43 AM2

‰3
Dimension: 176 x 250mm
Printelligence Sdn. Bhd. (Malaysia)
After unpacking, check to make sure that the following accessories are included:
Accessories
Remote control Size-AA dry batteries
TV/VIDEO
TV
0
NORMAL
TIMERFUNCTION
SYSTEM
PICTURE
1
4
7
2
5
8
3
6
9
CH
CH
Antenna Connection
• The following is a brief explanation of the types of connection that are used for coaxial cables:
• Remove the power cord from the electrical outlet before connecting the antenna to the rear of the TV set.
• If you are using a rod antenna and the signal from TV station is weak or not clear, the picture may not display clearly
or properly. In this case, we recommend that you use an outdoor antenna.
(1) If your outdoor antenna uses a 75-ohm coaxial cable, then
the connection to the TV is via DIN45325 plug (shown at
right). Plug this into the antenna jack at the rear of the TV
set.
(2) If your outdoor antenna uses a 300-ohm twin-lead flat
feeder, change this for a 300-ohm to 75-ohm impedance
converter and plug it into the antenna jack at the rear of the
TV set.
75-ohm coaxial cable (round cable)
300-ohm twin-lead feeder
Rod antenna (dipole)
with ribbon feeder
300 - 75 impedance converter
(Only for 14D2-SS)
• Rod Antenna Connection
AV-IN OUT
AUDIO
VIDEO
Rod Antenna
Antenna
mounting socket
Antenna jack (14D2-SS)
Feeder
Impedance
Converter
(1) Insert the rod antenna’s base post into the
antenna mounting socket until it clicks into
position.
(2) Connect the feeder to the impedance converter.
(3) Plug the impedance converter into the antenna
jack at the rear of the set.
•Rod antenna and impedance converter are only
included in model 14D2-SS.
Headphone Jack
Insert headphone plug into headphone jack to listen to audio with
headphone.
•The audio from the speakers is turned off.
•Select an appropriate volume so as not to injure your hearing.
•To avoid injure your hearing, do not put on the headphone on your ear before plug in the headphone to the headphone
jack and before the power is turn on.
•Take out the headphone from your ear before unplug the headphone from headphone jack and before the power is turn off.
•The proper impedance for the headphone is 32 ohms.
•Remove the headphone plug from the jack when not using the headphone.
21D2-SS[01-05]EN 1/11/04, 8:04 AM3

‰4
Dimension: 176 x 250mm
Printelligence Sdn. Bhd. (Malaysia)
ENGLISH
Location of Controls
TV/VIDEO
TV
0
NORMAL
TIMERFUNCTION
SYSTEM
PICTURE
1
4
7
2
5
8
3
6
9
CH
CH
Q
)
W
E
*
(
$
#
!
@
%
^
&
Remote Control
Infrared Transmitter Window
• Aim this window at the infrared
sensor window on your TV set.
!STANDBY/ON (ø) button
@FLASHBACK (z) button
• Returns to previously viewed channel.
#VOLUME UP () or DOWN ( ) button
• Used to adjust the volume.
• These buttons are also used to control
FUNCTION, TIMER, PICTURE, COLOUR and
SOUND SYSTEM.
$TIMER button
• For Reminder, OFF Timer and ON Timer
%FUNCTION button
• Each time you press the FUNCTION button, the
mode changes in the following order:
^SYSTEM button
• For COLOUR SYSTEM and SOUND SYSTEM.
&NORMAL button
• Resets all settings.
*TV/VIDEO Select button
(CHANNEL SELECT buttons
(
1
-
9
,
0
and button)
)CHANNEL UP (CH∑) or DOWN (CH≈)
button
• Used to select the CHANNEL.
• These buttons are also used to control the OSD
LANGUAGE.
QSOUND MUTE (u) button
• Press →Mutes sound.
• Press again →Restores sound to previous level.
WPICTURE button
• For adjusting the PICTURE.
ECALL (∫) button
• Displays the channel and timer settings on the
screen.
ËInstalling dry batteries in the remote control unit
When using the TV set for the first time, install the supplied dry batteries in the remote control.
Inserting Batteries !With your thumbnail, pull up the slit as indicated by the arrow
to remove the back cover.
@Insert two batteries (size “AA”). Be sure to match the battery
j/kterminals with the j/kmarks inside the compartment.
#Put back the battery cover.
• Remove batteries if weak or if the unit is not in use for long periods.
• Do not mix old and new batteries.
• Incorrect installation of the batteries may damage the remote control.
Pull up
FINE SKIP WHITE TEMP
BLUE BACKLANGUAGE
NORMAL SCREEN
21D2-SS[01-05]EN 1/11/04, 9:28 AM4

‰5
Dimension: 176 x 250mm
Printelligence Sdn. Bhd. (Malaysia)
POWER switch
PICTURE/PRESET button
POWER indicator
VIDEO INPUT terminal (AV-IN)
AUDIO INPUT terminal (AV-IN)
Infrared sensor window
HEADPHONE jack
VOLUME UP ( ) or DOWN ( ) button
(These are also used to make adjustment in PRESET mode).
CHANNEL UP (CH
∑
) or DOWN (CH
≈
) button
Location of Controls (continued)
TV Front
This operation manual is for 14D2-SS, 20D2-SS and 21D2-SS.
The illustration of 21D2-SS is used in this operation manual.
21D2-SS[01-05]EN 1/11/04, 9:28 AM5

‰6
Dimension: 176 x 250mm
Printelligence Sdn. Bhd. (Malaysia)
ENGLISH
Basic Operation
(1) Turn On the Power
(TV set)
(On-screen display)
!@
POWER indicator
@
TV/VIDEO
0
1
4
7
2
5
8
3
6
9
1
PAL
B/G
• Due to factory setting, when the first time you press the POWER switch on the TV set, a picture appears and
the POWER indicator lights up brightly.
• The STANDBY/ON (ø) button on the remote control lets you switch between ON and Standby mode when the
main power is ON.
• If you will not be at home for a considerable length of time, as a safety precaution, turn off the main power by
pressing the POWER switch on the TV set and unplug the cord from the outlet.
!Press the POWER switch on
the TV set to turn the TV set
ON.
TV ON mode: POWER
indicator lights up brightly.
TV Standby mode: POWER
indicator lights up dimly.
@Press the STANDBY/ON (ø)
button on the remote control or
any of the CHANNEL UP
(CH∑) or DOWN (CH≈)
button on the TV set.
The POWER indicator changes
from dimly to brightly and a
picture appears on the screen.
TV/VIDEO
TV
0
NORMAL
TIMERFUNCTION
SYSTEM
PICTURE
1
4
7
2
5
8
3
6
9
CH
CH
STANDBY/ON (ø)
button
POWER indicator
CHANNEL UP (CH
∑
) or DOWN (CH
≈
) button
VOLUME UP ( ) or DOWN ( ) button
POWER switch
21D2-SS[06-10]EN 30/10/04, 10:39 AM6

‰7
Dimension: 176 x 250mm
Printelligence Sdn. Bhd. (Malaysia)
Basic Operation (continued)
(2) Changing the Channels
Changing channels with the CHANNEL UP (CH
∑
) or DOWN (CH
≈
) button on the remote control
Press the CHANNEL UP (CH∑) button and the channels change in the order shown below:
1 →2 →3 →… →98 →99 →0 →1 →2 →3 →…
Press the CHANNEL DOWN (CH≈) button and the channels change in the order shown below:
3 →2 →1 →0 →99 →98 →… →3 →2 →1 →…
•Channels that have been set to SKIP cannot be selected. (Please see page 11 for details on Skipping Channels.)
•When selecting the channel using the CHANNEL UP (CH∑) or DOWN (CH≈) button on the TV set, AV mode
is positioned as follows:
Channel up: 1 →2 →3 →… →98 →99 →AV →0 →1 →2 →3 →…
Channel down: 3 →2 →1 →0 →AV →99 →98 →… →3 →2 →1 →…
Changing channels using the CHANNEL SELECT buttons on the remote control
•To handle the increasing number of channels available, this TV set allows you to select up to 100
positions (Channel 0 to 99). One-digit and two-digit methods of selection can be used. Follow the
procedure shown below to select channels.
0
1
4
7
2
5
8
3
6
9
CH
CH
To select a one-digit channel (e.g.,
Channel 5):
(1) Press the
5
button.
(2) If “5-”is indicated and the picture
does not change, press the
button to switch over to the 1-digit
select mode and press the
5
button again.
To select a two-digit channel (e.g.,
Channel 15):
(1) Press the button to set the
2-digit select mode.
(2) Press the
1
button.
(3) Press the
5
button.
5
PAL
B/G
0
1
4
7
2
5
8
3
6
9
CH
CH
•In this mode entering a 0 first will
enable selection of single digit
channels e.g. 07.
•Complete this procedure within 6
seconds, otherwise the selection
will not be made.
(3) Adjusting the Volume
15
1
-
-
-
PAL
B/G
TIMERFUNCTION PICTURE
CH
CH
Press the VOLUME UP ( ) or DOWN
() button to adjust the volume.
The number of oval blocks “ ” indicates
volume level.
The display disappears approximately 3
seconds after the volume adjustment
has been completed.
VOLUME
(TV set)
21D2-SS[06-10]EN 30/10/04, 10:39 AM7

‰8
Dimension: 176 x 250mm
Printelligence Sdn. Bhd. (Malaysia)
ENGLISH
OSD (On-Screen Display) Language Selection
On-Screen Display language selection
•If approximately 6 seconds pass without a button being pressed, the mode setting is automatically terminated
and the TV set returns to normal mode.
!Press the FUNCTION button 5
times.
@Press the CHANNEL UP
(CH∑) or DOWN (CH≈)
button to move the :mark on
the screen when selecting
“ENGLISH”, “CHINESE”,
“FRENCH”, “MALAY”or
“ARABIC”.
#Press the FUNCTION button
again.
The on-screen display
disappears.
0
NORMAL
TIMERFUNCTION
SYSTEM
PICTURE
1
4
7
2
5
8
3
6
9
CH
CH
@
!,#
ENGLISH
FRANCAIS
BAHASA MELAYU
Full Auto Channel Preset (AUTO):
Automatically tunes in and presets receivable TV stations.
!Press the PICTURE
(PRESET -
1
) button on the TV
set for more than 2 seconds, to
turn on Full Auto Channel
Preset Mode.
@Press the VOLUME UP ( )
or DOWN ( ) button on the
TV set. All the TV stations in
your area that can be received
by the TV set are automatically
preset between channels 1 to
99.
#When full auto channel preset
is finished, the screen shows
whatever is on channel 1.
•Unused channels are automatically
skipped.
Presetting Channels
!@
(TV set)
Sound system
AUTO(B/G)
VHF 1
48.25MHz
1
PAL
B/G
21D2-SS[06-10]EN 30/10/04, 10:40 AM8

‰9
Dimension: 176 x 250mm
Printelligence Sdn. Bhd. (Malaysia)
Presetting Channels (continued)
Manual Channel Preset (MANUAL):
Setting a channel to a desired TV station.
•If you use Manual Channel Preset in a weak reception area, or under bad reception conditions, you might not
pick up the broadcast you expect, instead you might skip to another broadcast. If this happens, when the picture
appears on the screen, press the VOLUME UP ( ) or DOWN ( ) button to force Manual Search to stop,
then first adjust the picture to optimum using FINE TUNING (Please see page 10).
(TV set)
!,@,^$#
TV/VIDEO
TV
0
NORMAL
TIMERFUNCTION
SYSTEM
PICTURE
1
4
7
2
5
8
3
6
9
CH
CH
#
Sound system
MANUAL(B/G)
VHF 1
48.25MHz
Channel position number
MANUAL(B/G)
VHF 5
107.50MHz
29
PAL
B/G
!Press the PICTURE
(PRESET -
1
) button on the
TV set for more than 2
seconds. The AUTO mode
screen appears.
@Press the PICTURE
(PRESET -
1
) button again to
display the MANUAL mode
screen.
#Press the CHANNEL UP
(CH∑) or DOWN (CH≈)
button to choose the channel
position to be set. (The
illustration on the right shows
that channel 5 has been
selected to be set.)
$Press the VOLUME UP
() or DOWN ( )
button on the TV set to locate
the channel you want to preset
to the position. Search is
initiated and when a TV signal
is received during the search,
the search stops.
•This step can only be done by
pressing the VOLUME UP
() or DOWN ( )
button on the TV set.
%Repeat steps 3 to 4 above to set
the channel position for other
broadcast, cable channels, etc.
^After the above operation,
press the PICTURE
(PRESET -
1
) button on the
TV set again.
The TV set returns to normal
mode and the channel number
last preset is displayed on the
upper right corner.
•SOUND SYSTEM may not have been
set correctly, if noise can be heard or if
there is no sound.
In such case, reset the SOUND
SYSTEM using the SYSTEM button on
the remote control.
21D2-SS[06-10]EN 30/10/04, 10:40 AM9

‰10
Dimension: 176 x 250mm
Printelligence Sdn. Bhd. (Malaysia)
ENGLISH
Fine Tuning
This function lets you easily fine-tune the TV set to improve reception
and picture quality
•When using FINE TUNING, the channel number changes from green to yellow.
•To return the channel to its original frequency setting, follow the manual channel preset procedure. (Please see
page 9 for details on Manual Channel Preset.)
•If approximately 6 seconds pass without a button being pressed, the mode setting is automatically terminated
and the TV set returns to normal mode.
!Press the FUNCTION button 1
time.
@Press the VOLUME UP ( )
button. The reception
frequency signal is adjusted
upward.
Press the VOLUME DOWN ( )
button. The reception
frequency signal is adjusted
downward.
•Use a combination of the
above operations to tune in the
optimum picture.
#Press the FUNCTION button 5
times. The on-screen display
disappears.
TV/VIDEO
TV
0
NORMAL
TIMERFUNCTION
SYSTEM
PICTURE
1
4
7
2
5
8
3
6
9
CH
CH
@
!,#
z Flashback:
Switches back to the previous channel.
!Press the FLASHBACK (z)
button. The channel previously
viewed returns to the screen.
Example :
After switching from channel 5 to
channel 7 the FLASHBACK (z)
button is pressed, the channel will
change to channel 5. Press the
FLASHBACK (z) button again to
return to channel 7.
Flashback
TV/VIDEO
0
NORMAL
TIMERFUNCTION
SYSTEM
PICTURE
1
4
7
2
5
8
3
6
9
CH
CH
!
Press the 7 button
Press the zbutton
Press the zbutton
21D2-SS[06-10]EN 30/10/04, 10:40 AM10

‰11
Dimension: 176 x 250mm
Printelligence Sdn. Bhd. (Malaysia)
Skipping Channels
This function lets you skip vacant channels or channels that you never
watch when you select channels using the CHANNEL UP or DOWN button
• If a channel that has been set to SKIP is selected using the CHANNEL SELECT buttons on the remote control,
the “◊” mark will be displayed on the left of the channel number.
• If approximately 6 seconds pass without a button being pressed, the mode setting is automatically terminated
and the TV set returns to normal mode.
HSetting Skip
!Use the remote control or TV
set CHANNEL UP (CH∑) or
DOWN (CH≈) button to
select the channel to skip.
@Press the FUNCTION button 2
times.
#Press the VOLUME UP ( ) or
DOWN ( ) button.
The SKIP mode is set and the
“◊” mark is displayed on the
left of the channel number.
$Press the FUNCTION button 4
times. The on-screen display
disappears.
Example:
When pressing the CHANNEL UP
(CH∑) or DOWN (CH≈) button,
Channel 25 is skipped as shown
below.
Channel up: … →23 →24 →26 → …
Channel down: … →27 →26 →24 →…
TV/VIDEO
0
NORMAL
TIMERFUNCTION
SYSTEM
PICTURE
1
4
7
2
5
8
3
6
9
CH
CH
#
!
@,$
SKIP mode mark
S
K
I
P
S
K
I
P
25
25
25
(TV set)
!
TV/VIDEO
TV
0
NORMAL
TIMERFUNCTION
SYSTEM
PICTURE
1
4
7
2
5
8
3
6
9
CH
CH
!
#
@,$
HCancelling Skip
!Use the remote control
CHANNEL SELECT buttons to
select the skipped channel.
@Press the FUNCTION button 2
times.
#Press the VOLUME UP ( ) or
DOWN ( ) button.
The “◊”mark on the left of the
channel number disappears
and the SKIP mode is
cancelled.
$Press the FUNCTION button 4
times. The on-screen display
disappears.
SKIP mode mark
S
K
I
P
S
K
I
P
25
25
25
21D2-SS[11-15]EN 30/10/04, 10:41 AM11

‰12
Dimension: 176 x 250mm
Printelligence Sdn. Bhd. (Malaysia)
ENGLISH
Picture Adjustment
Adjusting the Picture
•TINT can only be selected and adjusted when receiving NTSC broadcasts. (AV only)
•If approximately 6 seconds pass without a button being pressed, the mode setting is automatically terminated
and the TV set returns to normal mode.
!Press the PICTURE button to
enter Picture Adjustment
mode.
@Each time you press the
PICTURE button, the mode
changes as shown on the right.
#Press the VOLUME UP ( ) or
DOWN ( ) button.
TV/VIDEO
TV
0
NORMAL
TIMERFUNCTION
SYSTEM
PICTURE
1
4
7
2
5
8
3
6
9
CH
CH
#
!,@
(TV set)
!,@#
(Example)
Press the
NORMAL button
←
TINT is displayed only for NTSC and
is not displayed for PAL or SECAM.
•When the NORMAL button is
pressed while a PICTURE
selection is displayed on the
screen, only the selected mode
on the screen is reset to the
standard (factory setting)
position.
•When the NORMAL button is
pressed during NORMAL-
MODE, all PICTURE
selections are reset to the
standard (factory setting)
positions.
HPICTURE menu screen
The following table lists the adjustment items shown in the PICTURE menu screen and how they
change as you press the VOLUME UP ( ) or DOWN ( ) button.
Selected item Press the ( ) button Press the ( ) button
CONTRAST To decrease To increase
contrast contrast
COLOUR For less colour For more colour
intensity intensity
SHARPNESS For less For more
sharpness sharpness
BRIGHTNESS For less For more
brightness brightness
TINT To move tint To move tint toward
toward purple green
21D2-SS[11-15]EN 30/10/04, 10:41 AM12

‰13
Dimension: 176 x 250mm
Printelligence Sdn. Bhd. (Malaysia)
Timers
Reminder:
This function lets you know when a preset length of time has passed by displaying a
“” mark on the TV set. This is useful for timer cooking while you watch TV.
•To cancel the Reminder, press the NORMAL button during the Reminder mode.
•The minute setting of the timer is in 10-minute units.
•The Reminder is cancelled if the POWER switch on the TV set is turned off or if the power is otherwise cut off.
•If approximately 6 seconds pass without a button being pressed, the mode setting is automatically terminated
and the TV set returns to normal mode.
HSetting the Reminder
!Press the TIMER button and
the “ ” mark appears.
@Press the VOLUME UP ( ) or
DOWN ( ) button to set the
time. (Maximum time that can
be preset is 12 hours and 50
minutes.) In this state, the
Timer starts to count down.
#When you have finished setting
the time, press the TIMER
button 3 times. The on-screen
display disappears.
TV/VIDEO
TV
0
NORMAL
TIMERFUNCTION
SYSTEM
PICTURE
1
4
7
2
5
8
3
6
9
CH
CH
@
!,#
HAction of the Reminder
5 minutes before the preset length
of time has passed, the remaining
time is displayed on the screen for
10 seconds.
When the preset length of time (in
the above example 3 hours and 30
minutes) has passed, the “”mark
turns red.
The Reminder function also works
when the TV set is in Standby mode.
Power is automatically turned on 5
minutes before the preset length of
time has passed. After completion of
above steps, the TV set returns to
Standby mode automatically.
(If you press any key before the TV
set returns to Standby mode, the
TV set remains on and does not
return to Standby mode.)
Flashing
Flashing
Tu r n s
red for
1 minute
(Example)
21D2-SS[11-15]EN 30/10/04, 10:41 AM13

‰14
Dimension: 176 x 250mm
Printelligence Sdn. Bhd. (Malaysia)
ENGLISH
Timers (continued)
OFF Timer:
Automatically turns to Standby mode after the set length of time has passed.
•To cancel the Off Timer, press the NORMAL button during the Off Timer mode.
•The minute setting of the timer is in 10-minute units.
•The Off Timer is cancelled if the power is turned off with the STANDBY/ON (ø) button on the remote control or
the POWER switch on the TV set or if the power is otherwise cut off.
•If approximately 6 seconds pass without a button being pressed, the mode setting is automatically terminated
and the TV set returns to normal mode.
HSetting the Off Timer
!Press the TIMER button 2
times and the OFF display
appears.
@Press the VOLUME UP ( ) or
DOWN ( ) button to set the
time. (Maximum time that can
be preset is 12 hours and 50
minutes.) In this state, the
Timer starts to count down.
#When you have finished setting
the time, press the TIMER
button 2 times. The on-screen
display disappears.
TV/VIDEO
TV
0
NORMAL
TIMERFUNCTION
SYSTEM
PICTURE
1
4
7
2
5
8
3
6
9
CH
CH
@
!,#
HAction of the Off Timer
5 minutes before the Off Timer
activates, the remaining time is
displayed on the screen for 3
seconds, and reappears at the
start of every remaining minute.
A flashing display of the remaining
time appears on the screen during
the last five seconds before the Off
Timer activates.
When the preset length of time (in
the above example, 2 hours and 30
minutes) has passed, the TV set
enters Standby mode.
Flashing for 5 seconds
(The power turns off)
21D2-SS[11-15]EN 30/10/04, 10:41 AM14

‰15
Dimension: 176 x 250mm
Printelligence Sdn. Bhd. (Malaysia)
Timers (continued)
ON Timer:
Automatically turns power on after the set length of time has passed.
•To cancel the On Timer, press the NORMAL button during the On Timer mode.
•The minute setting of the timer is in 10-minute units.
•Always use the STANDBY/ON (ø) button on the remote control to turn off the power. The On Timer setting is
cancelled if power is turned off using the POWER switch on the TV set.
•The Off Timer is automatically set to turn the TV set off in 2 hours, if the TV set is turned on by the On Timer. To
cancel the Off Timer, press the NORMAL button during the Off Timer mode.
•The picture which appears on the screen, having been turned ON by the On Timer, is set at the channel and
volume prior to Standby mode.
•If approximately 6 seconds pass without a button being pressed, the mode setting is automatically terminated
and the TV set returns to normal mode.
HSetting the On Timer
!Press the TIMER button 3
times and the ON display
appears.
@Press the VOLUME UP ( ) or
DOWN ( ) button to set the
time. (Maximum time that can
be preset is 12 hours and 50
minutes.) In this state, the
Timer starts to count down.
#When you have finished setting
the time, press the TIMER
button. The on-screen display
will disappear and the Timer
function is turned on.
$Press the STANDBY/ON (ø)
button to put the TV set into
Standby mode. (POWER
indicator will flash to indicate
On Timer is set.)
When the preset length of time
(in the above example, 9 hours
and 20 minutes) has passed,
the power turns on and a
picture appears on the screen.
TV/VIDEO
TV
0
NORMAL
TIMERFUNCTION
SYSTEM
PICTURE
1
4
7
2
5
8
3
6
9
CH
CH
@
$
!,#
(TV set)
POWER indicator (Flashing)
PAL
B/G
39
21D2-SS[11-15]EN 30/10/04, 10:41 AM15

‰16
Dimension: 176 x 250mm
Printelligence Sdn. Bhd. (Malaysia)
ENGLISH
Colour and Sound System
Switching Systems:
Set the system to AUTO for normal TV reception. The AUTO mode automatically
detects the receiving signal system and changes the reception system of the TV set.
When the picture or sound is not stable, switching to an appropriate system may
improve the picture or sound quality.
!Press the SYSTEM button 1
time.
@Press the VOLUME UP ( ) or
DOWN ( ) button.
COLOUR SYSTEM mode
changes as shown on the right
each time you press the
VOLUME UP ( ) or DOWN ( )
button.
#Press the SYSTEM button 2
times. The on-screen display
disappears.
• When you select the channel position to
AV by pressing the TV/VIDEO button,
COLOUR SYSTEM mode changes in
the following order:
TV/VIDEO
TV
0
NORMAL
TIMERFUNCTION
SYSTEM
PICTURE
1
4
7
2
5
8
3
6
9
CH
CH
@
!,#
AUTO PA L
N358 N443
SECAM
!Press the SYSTEM button 2
times.
@Press the VOLUME UP ( ) or
DOWN ( ) button.
SOUND SYSTEM mode
changes as shown on the right
each time you press the
VOLUME UP ( ) or DOWN ( )
button.
#Press the SYSTEM button
again. The on-screen display
disappears.
•System indication during reception
The colour system is automatically detected and selected.
The selected system appears.
The mark indicates that the colour system is set manually.
The sound system that was set manually appears.
PAL
B/G
5
PAL
B/G
5
<When set to AUTO>
<When set to a specific system mode>
•If approximately 6 seconds pass without a button being pressed, the mode setting is automatically terminated
and the TV set returns to normal mode.
21D2-SS[16-20]EN 30/10/04, 10:42 AM16

‰17
Dimension: 176 x 250mm
Printelligence Sdn. Bhd. (Malaysia)
Function Adjustment
Blue Back:
Automatically turns the screen blue after 5 seconds if the broadcast signal is not
received (e.g. when a TV station closes down). After 15 minutes of non-reception, the
TV set enters Standby mode.
•Poor reception due to weak signals, and too much noise might activate the BLUE BACK function, despite the
presence of a broadcast signal. To continue watching TV under these conditions, switch the BLUE BACK “OFF”.
•If approximately 6 seconds pass without a button being pressed, the mode setting is automatically terminated
and the TV set returns to normal mode.
!Press the FUNCTION button 4
times.
@Press the VOLUME UP ( ) or
DOWN ( ) button to select ON
or OFF.
#Press the FUNCTION button 2
times. The on-screen display
disappears.
TV/VIDEO
TV
0
NORMAL
TIMERFUNCTION
SYSTEM
PICTURE
1
4
7
2
5
8
3
6
9
CH
CH
@
!,#
When the BLUE BACK is set to “ON”
after 5
seconds
No signal Blue screen Screen off (Indicator)
POWER indicator
lights up dimly
Standby mode
after 15
minutes
21D2-SS[16-20]EN 30/10/04, 10:42 AM17

‰18
Dimension: 176 x 250mm
Printelligence Sdn. Bhd. (Malaysia)
ENGLISH
Function Adjustment (continued)
White Temp:
This function changes the white colour background to reddish white or bluish white.
•If approximately 6 seconds pass without a button being pressed, the mode setting is automatically terminated
and the TV set returns to normal mode.
!Press the FUNCTION button 3
time.
@Press the VOLUME UP ( ) or
DOWN ( ) button. The function
changes as shown on the right
each time you press the
VOLUME UP ( ) or DOWN
() button.
: Normal white colour
(“”appears in white)
: Reddish white
(“”appears in red)
: Bluish white
(“ ” appears in blue)
#Press the FUNCTION button 3
times. The on-screen display
disappears.
TV/VIDEO
TV
0
NORMAL
TIMERFUNCTION
SYSTEM
PICTURE
1
4
7
2
5
8
3
6
9
CH
CH
@
!,#
u Sound Mute:
Silences the sound.
•Sound Mute will be cancelled if the VOLUME UP ( ) or DOWN ( ) button is pressed at anytime.
!Press the SOUND MUTE (u)
button. This SOUND MUTE (u)
symbol appears on the screen
and the sound is silenced.
@Press the SOUND MUTE (u)
button again and the volume
returns to its previous level.
TV/VIDEO
TV
0
NORMAL
TIMERFUNCTION
SYSTEM
PICTURE
1
4
7
2
5
8
3
6
9
CH
CH
Press the SOUND
MUTE (u) button
21D2-SS[16-20]EN 30/10/04, 10:42 AM18

‰19
Dimension: 176 x 250mm
Printelligence Sdn. Bhd. (Malaysia)
Function Adjustment (continued)
∫Call:
Displays the current channel number, the timer and other settings on the screen.
•
When no Timer is set, the channel
number, colour and sound system
appear on the screen. Press the
CALL (
∫
) button again to clear these
current settings display on the screen.
!Press the CALL (∫) button.
The time remaining on the Off
Timer, On Timer and Reminder
appear on the screen.
TV/VIDEO
TV
0
NORMAL
TIMERFUNCTION
SYSTEM
PICTURE
1
4
7
2
5
8
3
6
9
CH
CH
about 3
seconds later
(Time remaining on the Timer)
5
PAL
B/G
TV/VIDEO:
Switches between TV broadcasts and AV input programs.
•Each time you press the
TV/VIDEO button, the input
switches over between AV and
TV program.
TV/VIDEO
TV
0
NORMAL
TIMERFUNCTION
SYSTEM
PICTURE
1
4
7
2
5
8
3
6
9
CH
CH
25
AV
PAL
B/G
@Press the CALL (∫) button
again. The channel number,
colour and sound system are
display on the screen.
#Press the CALL (∫) button
once again. The channel
number display disappears and
the screen returns to normal
screen.
•If Sound Mute is also set, the
above display disappears after
about 3 seconds and the
SOUND MUTE (u) symbol is
displayed.
•The front AV terminals have the priority over the rear AV terminals.
•If 2 equipments are connected to the TV set from the front AV terminals and rear AV terminals, unplug the front
AV terminals cable to view the input from the rear AV terminals.
21D2-SS[16-20]EN 30/10/04, 10:43 AM19
This manual suits for next models
2
Table of contents
Other Sharp CRT TV manuals

Sharp
Sharp 32NS350 User manual

Sharp
Sharp 37ET-35H User manual

Sharp
Sharp 32R-S450 User manual

Sharp
Sharp 63AS-03S User manual

Sharp
Sharp 51DS-02H User manual

Sharp
Sharp 51FS-51H User manual

Sharp
Sharp DV-5407S User manual

Sharp
Sharp 59CS-03IR User manual

Sharp
Sharp 59CS-03H User manual

Sharp
Sharp DV-5151S User manual

Sharp
Sharp 37ET-35H User manual

Sharp
Sharp CR13M10 User manual

Sharp
Sharp 29S-FX10U User manual

Sharp
Sharp 14AG2-DC User manual

Sharp
Sharp 54DS-03S User manual

Sharp
Sharp 14J1-GF User manual

Sharp
Sharp 37GT-25H User manual

Sharp
Sharp 14R2F User manual

Sharp
Sharp 72FF-57E User manual

Sharp
Sharp MX-2610N User manual