Sharper Image SI777 User manual

Sharper Image Electric®
Cruiser
SI777 Instructions
Call The Sharper Image Electric® Hotline For:
• Help with assembly.
• Operating advice.
• Repair advice and service.
Call 1-877-325-4079 Toll Free
Read and save these instructions.

2
Dear Sharper Image Customer,
Thank you for your purchase of a Sharper Image product. We appreciate your business very much.
This item was created by Sharper Image Design, our company’s own product deve opment group. P ease accept my persona
assurance of your comp ete satisfaction with this product’s qua ity and performance. We offer generous return privi eges
and exce ent warranties on a our products.
For more than 25 years, The Sharper Image has shared the fun of discovering innovative products that make ife better
and more enjoyab e. We’ve been in business a ong time because we are an exciting p ace to shop and — just as important y
— we strive to de iver great customer service that exceeds your expectations.
Enjoy your purchase!
Respectfu y,
Richard Tha heimer
Founder, Chairman and Chief Executive Officer
About This Manual
WHY YOU SHOULD READ THIS MANUAL
This manual was written to help you achieve the greatest performance, comfort, enjoyment and safety from your
new Electric Cruiser. Please read this manual before your first ride.
BEFORE YOU GO
Test ride the bike and make sure you are comfortable with its operation before you ride it in the vicinity of cars,
obstacles or other cyclists. You must be able to control the bike and stop it safely.
GENERAL WARNING:
• Bicycling can be a hazardous activity even under the best of circumstances.
• Proper maintenance of your bike is your responsibility as it helps reduce the risk of injury.
• This manual contains WARNINGS and CAUTIONS concerning the consequences of failure to maintain or
inspect your bike.
• Many of the warnings and cautions say, “you may lose control and fall.”
• Because any fall can result in serious injury or even death, we do not repeat warnings of possible injury or
death whenever the risk of falling is mentioned.
Ca 1-800-344-4444 for 24-7 ordering and customer service,
or go to , our comp ete on ine store.

3
Table of Contents
Important Safety Instructions........................................................................................4-5
Battery Pack and Charging Information .............................................................................6-7
Operation — Power Switch and Hand Controls ......................................................................8
Operation — Bicycle Features ........................................................................................9
Bicycle Fit ........................................................................................................10-11
Brake Adjustment....................................................................................................12
Safety Equipment & Safety Check ...................................................................................13
Riding Safety.........................................................................................................14
Rear Wheel Removal and Servicing Your Electric Cruiser............................................................15
Warranty.............................................................................................................16

Important Safety Information
Understand the features of your bicycle and be aware of the challenges that you will meet on the road.
Always Wear a Helmet
Helmets significantly reduce the number and severity of head injuries! Always wear a helmet that complies with
your state laws when riding the bike. Check with your local police department for requirements in your communi-
ty. Do not wear loose-fitting clothing that can become tangled in the moving parts of the bike. Wear sturdy shoes
and eye protection. Also check your state laws concerning other protective gear that may be required when riding
the bike.
WARNING: Not wearing a helmet significantly increases the chance of serious injury or death in a
crash. Be sure that you wear a helmet, eye protection and appropriate apparel when you ride.
Know Your Bike
Your new electric bicycle incorporates many features and functions. Read this manual thoroughly to understand
how those features enhance your riding pleasure and safety.
Ride Defensively
Frequent bicycle accidents occur when the driver of a parked car opens his door into a bike rider’s path or when
a car or another cyclist suddenly moves into the rider’s path. Always be aware of other vehicles around you. Don’t
assume that the driver or other cyclist sees you. Always be prepared to take evasive action or stop suddenly.
Make Yourself Easy To See
Make yourself more visible by wearing bright reflective clothing. Keep you reflectors clean and properly aligned.
Use head and taillights in reduced lighting conditions. Signal your intentions so that drivers and other cyclists can
anticipate your actions. Use your bell when necessary to make your presence known.
Ride Within Your Limits
Take it slow until you are familiar with the riding conditions you may encounter. Be especially careful in wet condi-
tions, as traction can be greatly reduced and brakes may become less effective. Never ride faster than conditions
warrant or beyond your riding abilities. Remember that alcohol, drugs, fatigue and inattention can significantly
reduce your ability to make good judgments.
Keep Your Bike in a Safe Condition
Follow suggested inspection and maintenance guidelines. Check critical safety equipment before each and every
ride.
Know the Law
Cyclists are required to follow the “Rules of the Road.” Additionally, some communities regulate the use of
motorized bicycles with regard to minimum age requirements and necessary equipment. Check with your local
police department for specific details.
Off-Road Riding
Off-road riding is not recommended because the Electric Cruiser tires are for street use only. Dust and extreme
impacts from off-road riding can cause electrical system problems .
4

5
Important Safety Information
Reporting Safety Defects
If you believe your vehicle has a defect which could cause a crash or could cause injury or death, you should
immediately inform the National Highway Traffic Safety Administration (NHTSA) in addition to notifying The
Sharper Image.
If NHTSA receives similar complaints, it may open an investigation, and if it finds that a safety defect exists in
a group of vehicles, it may order a recall and remedy campaign. However, NHTSA cannot become involved in
individual problems between you and your place of purchase or The Sharper Image.
To contact NHTSA, you may either call the Auto Safety Hotline toll free at 1-800-424-9393 (or 202-366-0123
in the Washington, DC, area) or write to: NHTSA, U.S. Department of Transportation, Washington, DC 20590.
You can also obtain other information about motor vehicle safety from the Hotline.
Inspection and Maintenance
For your safety and enjoyment, and to ensure a long life for your Cruiser, inspect and maintain your bike regularly.
The proper condition and function of the key systems is critically important to your safety. Refer to the list below
for guidance.
Your bike should be serviced at least twice a year with a complete and thorough inspection and tune-up. If a problem
arises that is not described in this manual, discontinue riding the bike and call The Sharper Image Electric toll free
hotline immediately: 1-877-325-4079.
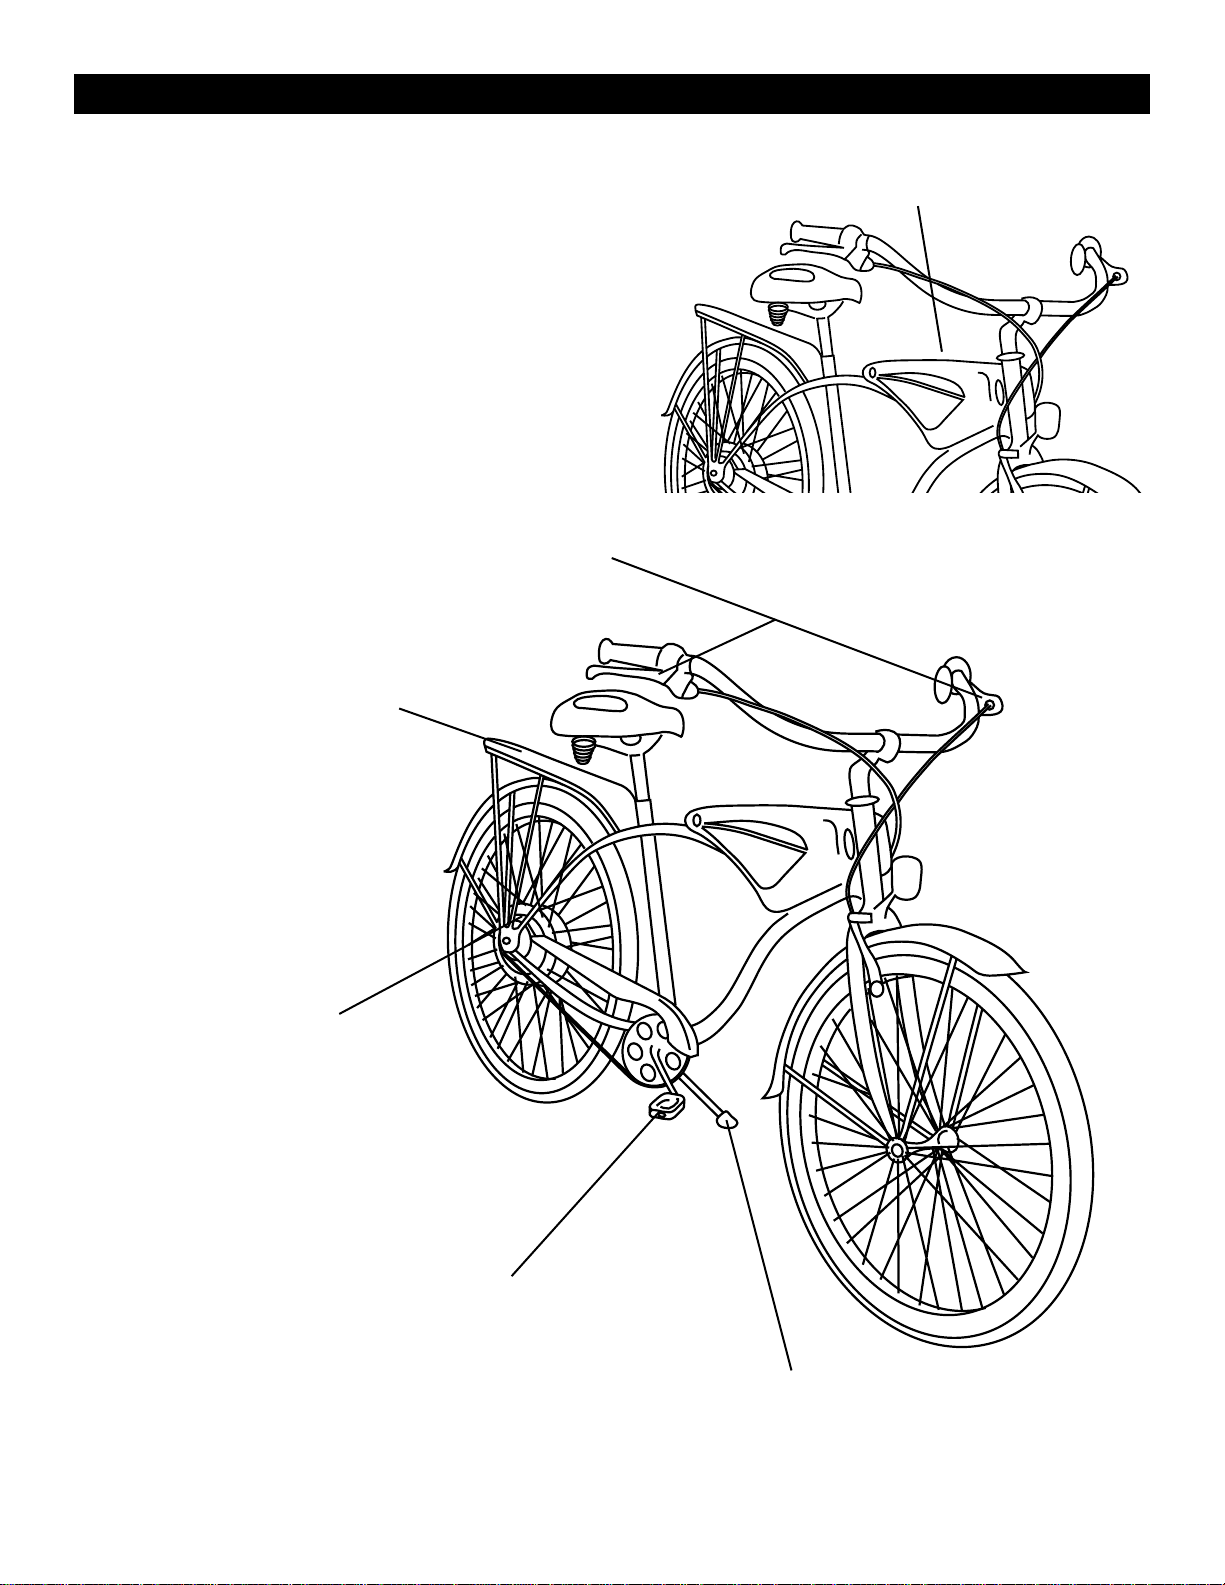
Brake mechanism Inspect before every ride Adjust as needed
Wheel axle nuts Inspect before every ride Adjust as needed
Tire pressure Inspect before every ride Adjust as indicated on tire
Tire wear or damage Inspect before every ride Replace as needed
Seat post Inspect before every ride Adjust as needed Replace if damaged
Brake pad condition Inspect before every ride Replace if worn beyond wear limit line on the pad
Brake cable tension Inspect periodically Tighten as needed Replace as needed
Spoke tension Inspect periodically Tighten as needed
True front wheel Inspect periodically Adjust as needed
Hub bearings Inspect periodically Clean and lubricate Adjust as needed
Chain lubrication Inspect periodically Clean and lubricate
Reflectors Inspect before every ride Clean and tighten as needed
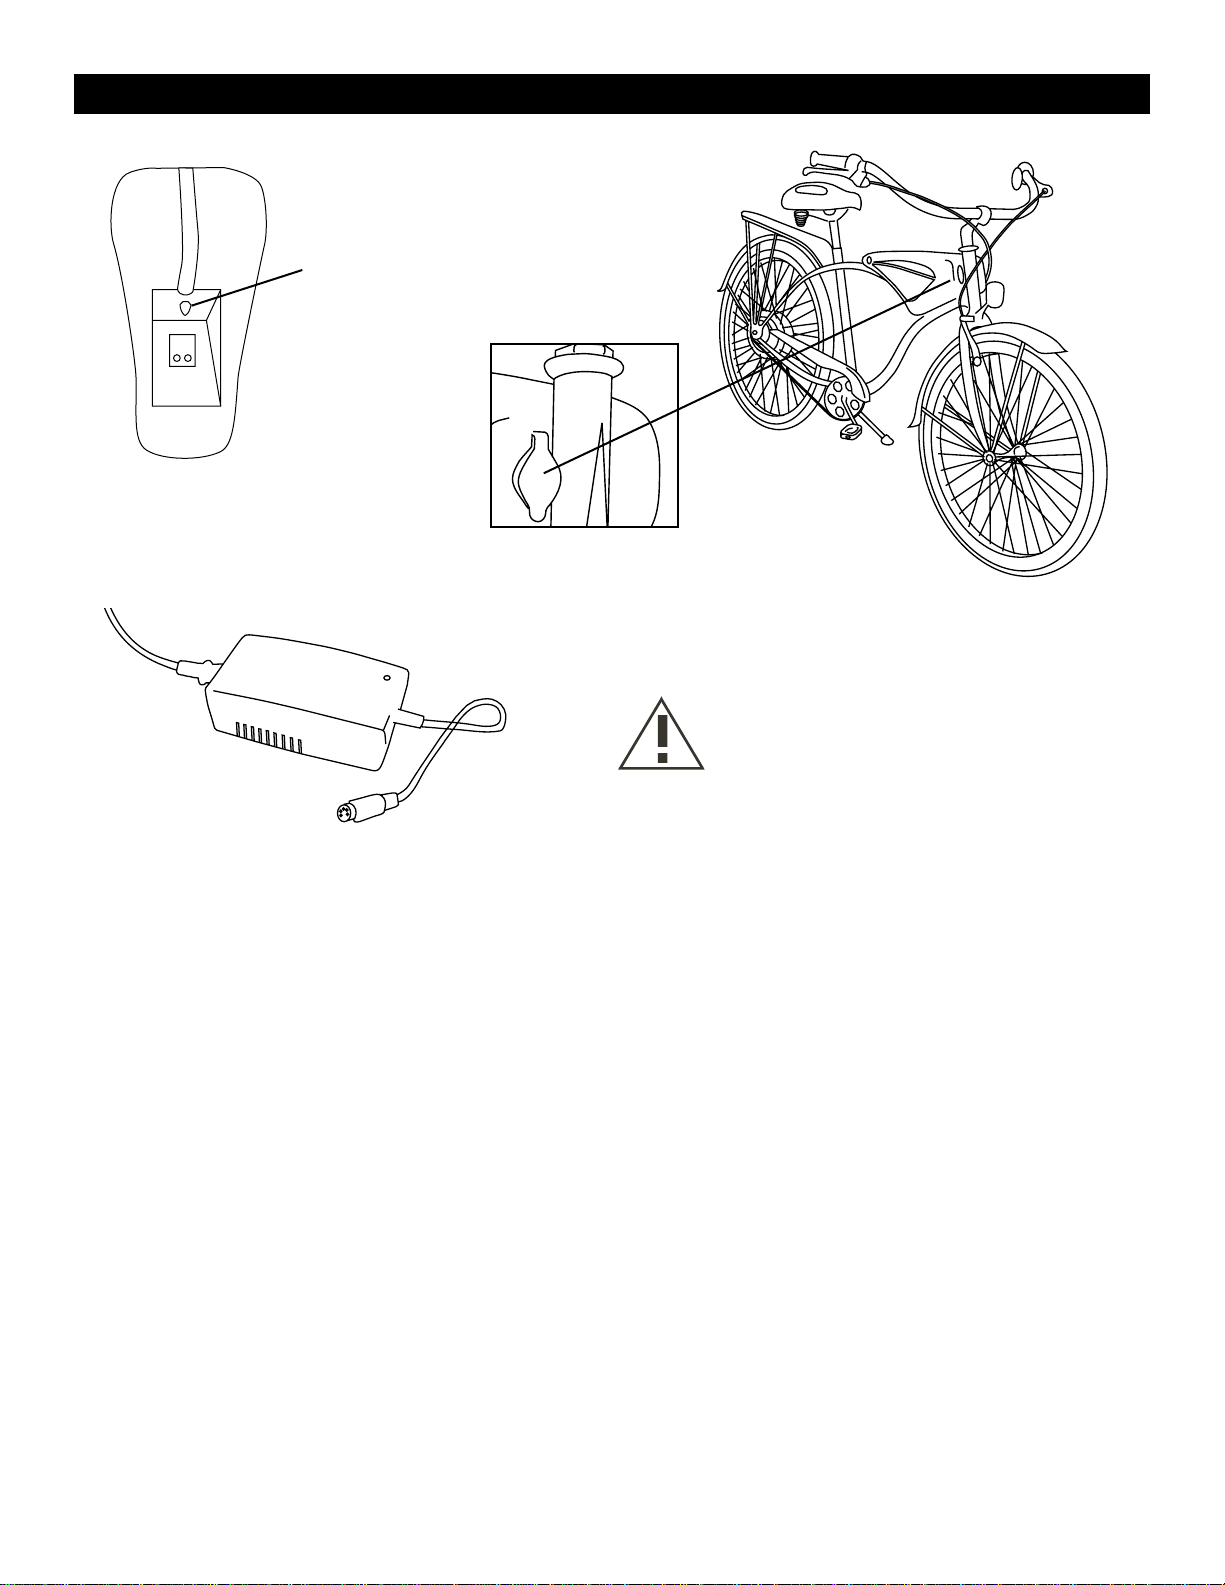
Battery and charger Inspect periodically Replace if worn or damaged
All hardware Inspect before every ride Tighten as needed
All moving parts should occasionally be cleaned and lubricated as needed.
This chart is not an exhaustive list and you should have the bicycle regularly maintained and inspected
by a bicycle shop mechanic twice a year. Most bicycle parts will eventually wear and need to be replaced.
It is up to the owner of the bicycle to keep it in safe operating condition.
In general, the basic inspection points listed above as “Inspect periodically,” should be carried out about
every 10 riding hours (more often when riding in adverse conditions).

Battery Pack and Charging Information
Installing the Battery Pack
Always use two hands to support and lift the battery pack.
Insert the key, press in and rotate to the UNLOCK position.
Slide the large end of the battery at an angle onto the frame.
Guide the battery over the connection box on the bike frame and push
down to lock into place. (NOTE: The red index lines on the bike frame
will not be visible if the battery is properly pressed in place. Remove
and reposition the battery if the red index lines remain visible.)
Turn the key to the LOCKED position.
Removing the Battery Pack
Always use two hands to support and lift the battery pack.
Insert the key, press in and rotate to the UNLOCK position.
Lift the small end of the battery up from the frame.
Guide the battery off and away from the bike frame.
Charging the Battery Pack
The battery power pack can be charged while it is installed or it can be removed
for charging away from the bike:
The battery cannot be charged while the key is in the ON position.
Lift the cover on the battery pack to access the connection jack.
• Connect the DC cord to the battery pack connection jack.
• Connect the AC power cord to a wall outlet.
When using a new battery pack, charge the battery pack for a minimum of 5 hours.
LED indicators on the charger will display the current condition of the charger
and battery pack. Refer to the label on the charger to understand what these
indicators mean.
Always unplug the charger when not in use.
Extend Battery Life
Do not operate the motor with a weak or low battery. Recharge immediately.
The battery will slowly drain even when the motor is not in use.
WARNING: Unless riding, do not leave the key in the ON position. Doing so could risk
activation of the motor, causing the bike to move forward if the throttle is accidentally
turned and activated.
6
Power and Lock
Push key in to turn.
Key must be in
UNLOCKED position to
install or remove battery.
Battery will not charge if
key is in ON position.
Key must be in LOCKED
position to be removed.

7
Battery Pack and Charging Information
Battery pack warning: If handled improperly, the battery pack poses a risk of fire or chemical burns.
• Use ONLY the included charger to recharge the battery pack.
• Do not use the battery pack with equipment other than the specified battery.
• Do not use the charger outside.
• Do not get dirt, sand, liquids or other foreign matter on the terminals.
• Do not disassemble, crush or puncture the battery pack.
• Do not touch the plug terminals with metal objects.
• Do not dispose of the battery pack in fire or water.
• Do not heat the batteries above 140°F (60°C).
• Do not attempt to open or service the battery pack.
• Replace only with a battery pack designed specifically for this product. Use of other batteries may present a risk
of fire or explosion.
• Dispose of the battery in an environmentally safe manner and recycle whenever possible. Check and follow
local regulations for disposal of batteries.
Fuse
If the battery pack becomes
overheated, the fuse will blow.
Unscrew cover to access old fuse
and replace with a new 30A fuse.
(Two replacement fuses are included.)
WARNING: Keep charger and battery
pack away from water to prevent
electric shock and shorting. The charger
is intended for indoor use only.
Connection Jack
Lift cover to access
charger connection.
Battery Charger

8
Operation — Power Switch
Push to turn.
The key must be pushed in while turning.
Insert the key, press in and rotate to the ON position.
Switch to the LOCKED position to turn the power off and
keep the battery pack locked to the frame. (Note that the
bike can still be operated manually by pedaling.)
Switch to the UNLOCKED position to turn the power off
and to release the battery pack from the frame. This allows
the battery pack to be carried to a suitable location for “remote” charging.
Key can only be removed in the LOCKED position.
NOTE: Check the battery pack fuse if the battery is charged but the voltmeter does
not power up in the ON position. (See battery section for fuse location.)
Operation — Hand Controls
WARNING: It is very important that you pedal while operating the motor up inclines. Failure to do so could rapidly
weaken the battery charge and may result in permanent damage to the battery.
Throttle
Grip and gently turn the throttle on the right hand grip to apply power to the motor. Turn the throttle completely to
apply full power and obtain maximum speed; turn it partially for variable speed. Pedaling first to get forward
motion started will increase battery efficiency.
Front Brake Lever
The front brake is activated by squeezing the left-hand lever.
Rear Brake Lever
The rear brake is activated by squeezing the right-hand lever.
Rear Brake
Throttle
Front Brake
Locked

9
The voltmeter indicates the stored energy status of
the battery pack from low to high. The meter can
only be accurately read while the power is on and
the throttle is idle.
When the motor is engaged, the voltmeter will
appear to indicate a low battery. Check the actual
charge status by releasing the throttle.
Operation — Bicycle Features
Kickstand
Useful for quickly “parking” bike
in an upright position.
Voltmeter
Located on the top of the battery pack.
Automatic Brake Shutoff
When either brake lever is applied,
the motor is automatically shut off.
Cargo Rack and Bungee Cord
Hub Motor
This motor directly drives
the rear wheel, propelling
the bike forward.
Pedal Assist
Forward motion pedals can be used with or without the
motor engaged. It’s necessary to use the pedals to assist
the motor when riding up inclines.

10
Bicycle Fit
A bike that’s too big or too small for the rider is difficult to control and can be uncomfortable.
WARNING: If your bike does not fit properly, you may lose control and fall. If your new bike
doesn’t fit, return it to your dealer.
Stand-Over Height
The first check for correct size is stand-over height. That’s the dis-
tance from the ground to the top of the battery pack at the point
where your crotch would be if you were straddling the bike and
standing halfway between the saddle and the handlebar stem. To
check for safe stand-over height, straddle the bike while wearing
your bike-riding shoes, and bounce vigorously on your heels. If
your crotch touches the frame, the bike is too big for you. Don’t
ride the bike even a short distance.
A bike that is operated only on paved surfaces should give you a
minimum stand-over height clearance of one inch. A bike that
will be operated on unpaved surfaces should give you a minimum
of three inches of stand-over height clearance.
Saddle Height
Correct saddle adjustment is important for optimum
performance and comfort. If you find the saddle position
is not comfortable, there are adjustments you can make.
Your leg length determines the correct saddle height. The
saddle is at the correct height for you when, while seated
on the saddle and with the crank arms parallel to the seat
tube, you can just reach the “down” pedal with one heel.
If your
leg is not completely straight and your heel just touches
the center of the pedal, your saddle height needs to be
adjusted.
Length/Height Adjustment
To adjust the saddle height, open the seat Quick Release
and move the seat post up or down as required. Make
sure the saddle is parallel to the top tube. Tighten the seat
binder nut so that you cannot twist the saddle out of
alignment once the Quick Release is returned to the
closed position. Close the Quick Release to lock the seat
post in position.
The seat post must not be raised beyond the
“Minimum Insertion” mark indicated directly on the seat post.
Binder Nut
Quick Release
WARNING: If your seat post projects from the frame beyond the Minimum Insertion mark the seat
post may break, which could cause you to lose control and fall.
Minimum standover height of 30 inches.
30"
MIN

11
Bicycle Fit
Tilt Adjustment
Some riders prefer to have the saddle nose slightly tilted up or down. Adjust the saddle tilt by loosening the clamp-
ing mechanism, tilting the saddle and retightening the saddle clamping mechanism enough so that it cannot be
moved by aggressive force. Make changes in small increments until you find the most comfortable position for you.
WARNING: After any saddle adjustment, be sure to tighten the saddle adjusting mechanism
properly before riding. A loose saddle clamp or seat post binder can cause damage to the seat
post or can cause you to lose control and fall.
Periodically check to make sure the saddle adjusting mechanism is properly tightened.
CAUTION: Extended riding with a saddle that’s incorrectly adjusted or that does not support your pelvic area
correctly can cause short-term or long-term injury to nerves and blood vessels. If your saddle causes you pain
or numbness, adjust the saddle position and your riding position. If pain or numbness persist, talk to a bike
mechanic about fitting a different saddle to your Cruiser.
Handlebar Adjustment
Use the provided Allen wrench to change the angle of the
handlebar by loosening its binder bolt, rotating the bar or
extension to the desired angle, recentering it and retightening
the binder bolt enough so that the bars or extensions can’t
move in relation to each other and the stem.
Stem Alignment
If the stem is not properly aligned with the front wheel, it will need to
be adjusted. Loosen the binder bolt on the stem. Place the front wheel
of the bike between your legs and twist the handlebar/stem assembly to
align the handlebars in relation to the stem; tighten the bolt.
Periodically check that the stem binder bolt is tight and that the handle-
bar/stem assembly cannot be twisted.
WARNING: By overtightening or failing to properly tighten the stem binder bolt or the
handlebar binder bolt you may compromise steering action, which could cause you to lose
control and fall.

12
Brake Adjustment
Brakes must be adjusted to allow you to adequately slow down and stop when the brake lever is squeezed. Your
local bike shop can help you adjust your Sharper Image Electric Cruiser brakes and fittings and The Sharper Image
will reimburse you up to $50 to have this done for the first time. Save your receipt and call 1-800-344-5555 to
receive reimbursement.
To tighten the brake cable:
Rear Brake Front Brake
WARNING: The shorter the brake lever reach, the more critical it is to have correctly adjusted
brakes, so that full braking power can be applied within available brake lever travel. Brake lever
travel insufficient to apply full braking power can result in loss of control, which may result in
serious injury or death.
1 - Rotate the locknut counterclockwise.
2 - Rotate the tension barrel counterclockwise.
3 - Rotate the locknut clockwise.
1 - Counterclockwise
to loosen locknut.
2 - Counterclockwise
to tighten cable.
3 - Clockwise
tighten cable.
To loosen the brake cable:
Reverse the procedure for step 2, turning the
tension barrel clockwise.

Safety Equipment & Safety Check
WARNING: Many states require specific safety devices. It is your responsibility to familiarize
yourself with the laws of the state where you ride and to comply with all applicable laws,
including properly equipping yourself and your bike as the law requires.
WARNING: Do not remove the reflectors or lights from your bike. They are an integral part of
the bike safety system. Removing the reflectors or lights may reduce your visibility to others
using the roadway. Being struck by other vehicles often results in serious injury or death.
Reflectors are not a substitute for lights. Always ensure your bike is equipped with all state and locally
mandated lights.
Eye Protection
Bicycle riding involves contact with airborne dirt, dust and bugs. We recommend that you ride with protective
eyewear —tinted when the sun is bright, clear when it’s not. Most bike shops carry protective eyewear.
Safety Helmet and Protective Pads
Because accidents do happen, it is important that you wear a helmet and protective gear every time you ride.
Failure to do so can result in serious injury, including death.
Safety Check
Before every ride you should perform a brief check of the bike and its fixtures:
Nuts, Bolts and Straps: Lift the front wheel off the ground a few inches, then let it bounce on the ground, listening
for loose fixtures. Do a quick visual and tactile inspection of the whole bike. If there are any loose parts, secure
them. If you’re not sure, ask someone with experience to check it for you.
Tires and Wheels: Check tire inflation by putting one hand on the saddle, one on the intersection of the stem and
handlebars, then bouncing your weight on the bike while looking at tire deflection. Compare what you see with
how it looks when you know the tires are correctly inflated and adjust if necessary. Use a dial gauge to accurately
measure the air in your tires at least after every 10 hours of riding or any time they appear to be under-inflated
during the pre-ride inspection. The maximum suggested pressure for the tires that come with your Electric
Cruiser is 40psi.
Spin each wheel slowly and look for cuts in the tread and sidewall. Replace damaged tires before riding. Spin each
wheel and check for brake clearance and side-to-side wobble. If a wheel wobbles or hits the brake pads, take it to
a qualified bike shop to have the wheel trued.
CAUTION: Wheels must be true for the brakes to work effectively. Wheel truing is a skill that requires special
tools and experience. Do not attempt to true a wheel unless you have the knowledge and tools needed to do
the job correctly.
Brakes: Check that the brake quick releases are closed and the straddle cable is securely engaged. Squeeze the
brake levers. Confirm that the brake shoes are contacting the wheel rim within an inch of brake lever movement.
You must be able to apply full braking force at the levers without having them touch the handlebar. Otherwise,
your brakes need adjustment. Do not ride until the brakes are properly adjusted.
WARNING: Riding with improperly adjusted brakes or worn brake shoes is dangerous and can
result in serious injury or death.
Handlebar and saddle alignment: Confirm that the saddle and handlebar stem are parallel to the bike’s top tube
and tight enough so that they will not twist out of alignment.
Handlebar ends: Replace any handlebar grips that are not secure or grips that are in poor shape.
WARNING: Loose or damaged handlebar grips or extensions can cause you to lose control and fall.
Uncovered handlebars can pierce your body, causing serious injury in an otherwise minor accident.
13

Riding Safety
Like any sport, bicycling involves risk of injury and damage. By choosing to ride any bike, you assume the
responsibility for that risk. It is important that you know and follow the rules of safe and responsible riding.
Basic Bicycle Safety
•Always perform the mechanical check explained in this manual before every ride.
•Always wear a helmet and safety gear that complies with state and local laws.
•Keep body parts and clothing away from the chain ring and other moving parts on the bike.
•Wear shoes that fit, will stay on your feet and properly grip the pedals. Never ride with unprotected or poorly
protected feet. Do not ride wearing sandals or other open footwear.
•Wear bright, visible clothing that does not restrict movement but is not so loose that it can be caught by the
moving parts on the bike or objects as you ride past them.
•Do not jump or otherwise stress the frame of this bike.
•Travel at or below the speed where you can comfortably react to any problem that could occur during your ride.
Allow for ample time to brake slowly and safely avoid obstacles.
Traffic Rules
•Roads are shared by many types of traffic. Respect the rights of others and be tolerant of infringement or errors
on the part of pedestrians and other vehicles.
•Ride defensively. Be prepared for any emergency or neglect on the part of others on the road.
•Look ahead of where you are and be aware of what is coming up behind you. Be prepared to avoid:
- Car doors suddenly being opened in your path
- Pedestrians stepping into your path
- Children playing near or in your path
- Damaged roadways, slick surfaces or open gratings that can catch your wheel or otherwise cause you to lose
control of your bike
•Think ahead of your ride, but always be prepared for a potential accident.
•Use hand signals for turning, slowing down and stopping.
•Do not ride while using headphones. You must be alert to traffic and emergency vehicle sirens. Wires may also
become entangled and cause you to lose control of your bike.
•Never carry a passenger or sit directly on the battery pack or rear rack.
•Never carry anything that obstructs your vision or could cause you to lose control of your bike.
•Do not do stunts or stunt riding with this bike.
•Do not weave through traffic or otherwise make unpredictable moves that could surprise other drivers or riders.
•Observe and yield the right of way.
•Never ride while under the influence of alcohol, medication or any substance that interferes with your ability to
ride safely.
•Avoid riding in bad weather or poor visibility situations. Do not ride when tired or otherwise able to make good
riding decisions.
Night Safety
•Make sure your bike is equipped with correctly positioned reflectors and an adequate head and taillight.
•Wear bright, reflective clothing.
•Make sure your clothing or objects are not obstructing your bike reflectors or installed lights.
•Ride slowly and on routes that are already familiar to you.
WARNING: Wet weather impairs traction, visibility and braking for the rider and for other
vehicles sharing the road. The risk of accident is dramatically increased in wet conditions.
14

Servicing Your Electric Cruiser
Periodically wash the bike using a sponge and bucket with mild soap and water. Rinse with water but do not
use a hose or other high pressure water device. Water under high pressure will tend to work itself into the
electrical system of the bike and could cause damage to the bike or battery pack.
Before each ride, inspect the bike and parts for wear and damage. Examine the wheels, chain and brakes. Check
for cracking or visible weakening on the bike. It is possible for a worn part to break during use, causing the rider
to be thrown from the bike.
This bike should not be operated if any part appears to be worn, cracked or otherwise weakened.
Most bicycle shops will be able to provide the normal servicing required for the Sharper Image Electric Cruiser.
We recommend that you have the bike professionally serviced at least twice a year.
Servicing information and replacement parts are available from our service center. To arrange for shipping instruc-
tions and servicing, contact:
Sharper Image Electric Service
1081 Johnson Drive
Buffalo Grove, IL 60089
Or call the toll-free hotline: 1-877-325-4079
Rear Wheel Removal
We recommend that the bike be supported on a bike stand capable of supporting at least 65 pounds.
To remove the rear wheel:
•Remove the battery pack to reduce the total weight.
•Lift the bike onto a bike stand and secure it according to the stand manufacturer’s directions.
•Squeeze the edges of the power connector and pull it downward from the battery connection jack.
•Slide the power cable out and away from the cable guides on the bicycle frame.
•If present, sever the nylon tie wrap holding the cable next to the rear axle.
•Support the wheel as you loosen and remove the rear wheel nuts.
•Guide the wheel down and off of the frame, allowing the chain to slide free and drop from the wheel.
Rear Wheel Nuts
Cable Guides
Power Connector
Nylon Ties
(May not be
present.)

FULL ONE-YEAR WARRANTY
What Is Covered
This warranty covers any defects in materials or workmanship, with the exceptions stated below.
How Long Coverage Lasts
This warranty runs for one year from the date of original purchase.
What Is Not Covered
This warranty does not cover damage caused by misuse or use other than as intended and described in the product
instruction manual, or loss or damage to batteries or removable parts.
What The Sharper Image Will Do
The Sharper Image will repair any defects in materials or workmanship. In the event repair is not possible,
The Sharper Image will either replace this product with one of similar features and price, or refund the full
purchase price of the product, whichever you prefer.
How to Obtain Service
Return the product and receipt, along with a brief explanation of the problem, to:
T.S.I. - Returns Department
2901-A West 60th Street
Little Rock, AR 72209
If you have questions please feel free to contact our customer service representatives at 1-800-344-5555 or by email
This warranty gives you specific legal rights, and you may have other legal rights that vary from state to state.
Copyright 2003
Sharper Image Corporation
650 Davis St., San Francisco, CA 94111
(415) 445-6000
Shop online:
Due to continuing improvements, actual product may differ slightly from the product described herein.
V2 08/03
Table of contents