Sharper Image 207051 User manual

- 1 -
Item No. 207051
12X ZOOM DIGITAL CAMERA BINOCULARS BY SHARPER IMAGE
User Guide
Thank you for purchasing the 12X Zoom Digital Camera Binoculars by Sharper Image. Please
take a moment to read this guide and store it for future reference.

- 2 -
INTRODUCTION
The 12X Zoom Digital Camera Binoculars by Sharper Image combine an advanced digital binocular
system with a high-definition digital camera. Now you can get an up-close view of your subjects and
capture images as stills or videos.
IDENTIFICATION OF PARTS
1. LCD Screen
2. Optical Lens
3. Power On/Off
4. Left Button
5. Menu Button
6. Right Button
7. Focus Ring
8. Mode Button
9. Camera/OK Button
10. Eyepiece
11. Micro USB Port
12. Led Indicator
13. MicroSD Card Slot
14. Reset
15. Diopter Ring
HOW TO USE YOUR BINOCULARS
You can use these binoculars just like any other pair of binoculars. Place your eyes against the rubber
rims, adjust the spacing of the two vision tubes and use the dial located above to focus. You can also
turn the dial directly on the right side viewfinder at the level of the rubber where you place your eyes.
CHARGING THE BATTERY
Connect to the device to the AC adaptor, using the dedicated USB cable supplied. The device can also
be charged by connecting it to a computer using the included USB cable.
Charging Indicator:
RED LIGHT ON = charging
RED LIGHT OFF = fully charged
INSERTING A MEMORY CARD
Insert the included MicroSD card into the Micro SD card slot. (Max capacity 32 GB.)
TURNING THE BINOCULARS ON
Press and hold the Power button (3) until the LCD screen turns on. The binoculars are now ready to
take photos or videos.
SETTING THE LANGUAGE AND TIME
After turning on the binoculars for the first time, you can change the language (default is English)
and set the correct time.

- 3 -
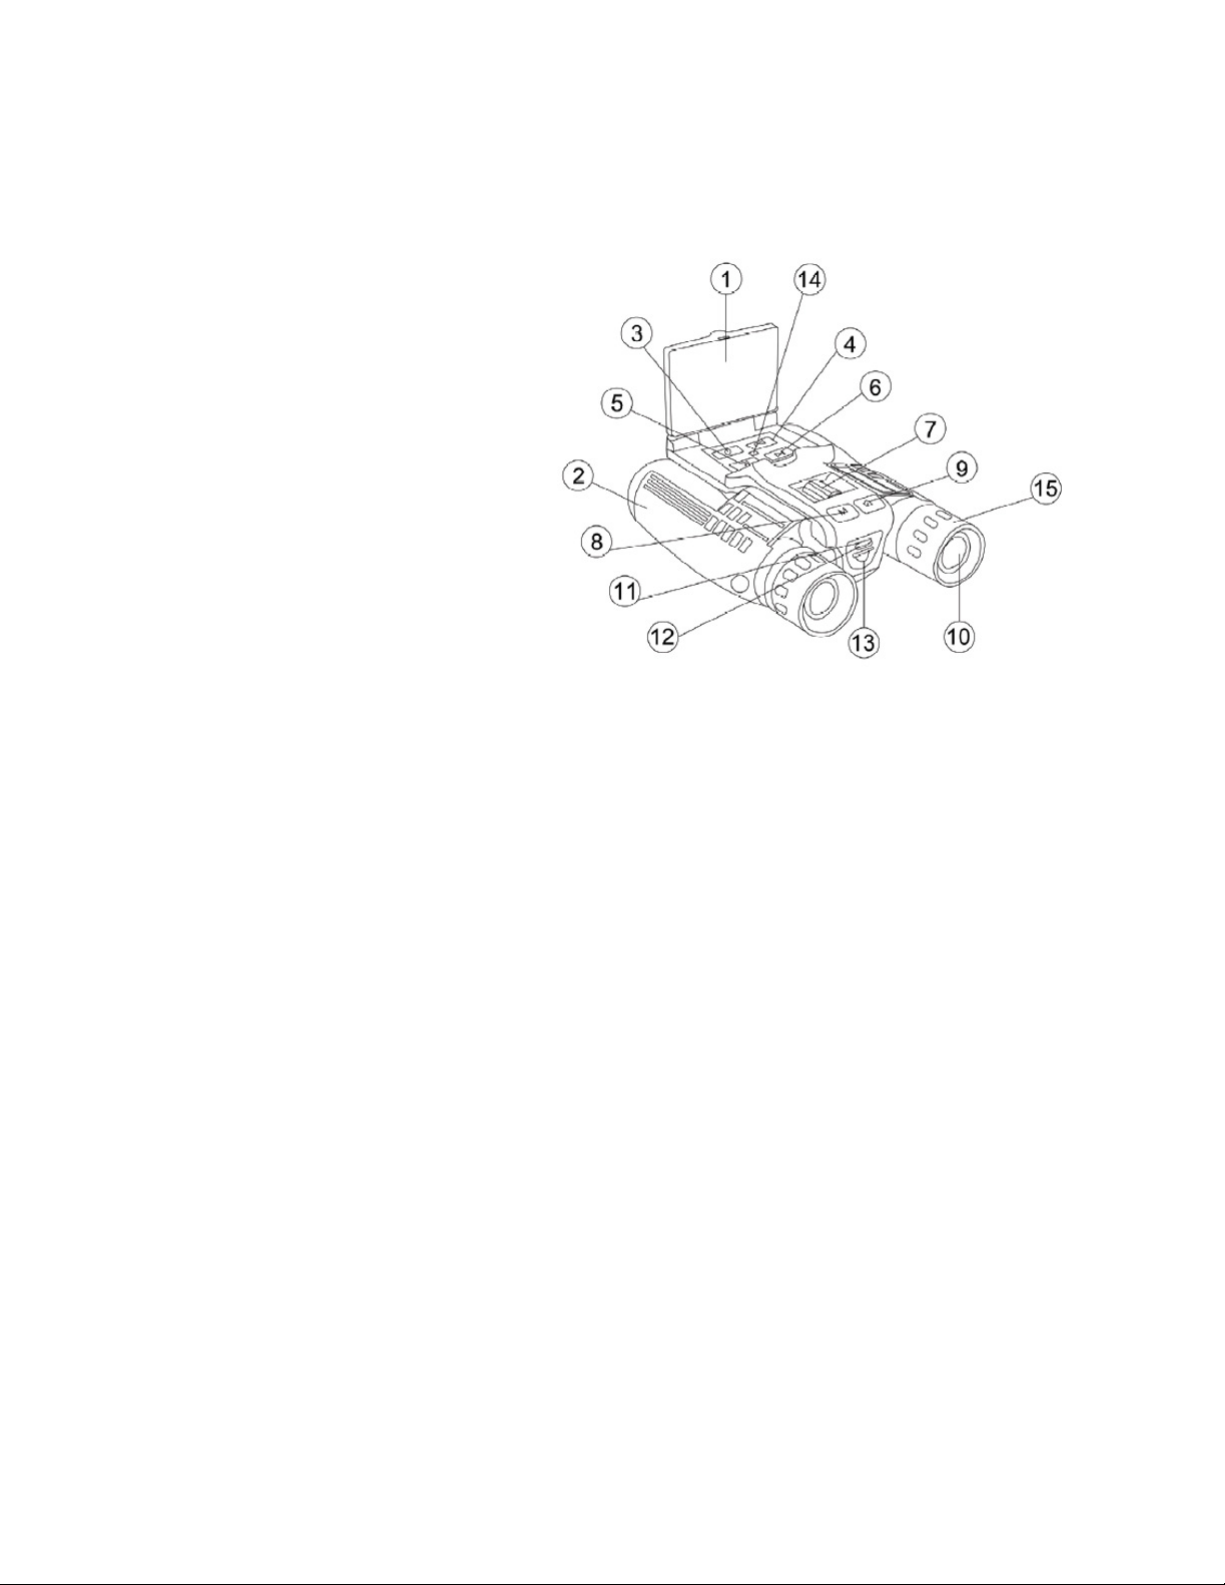
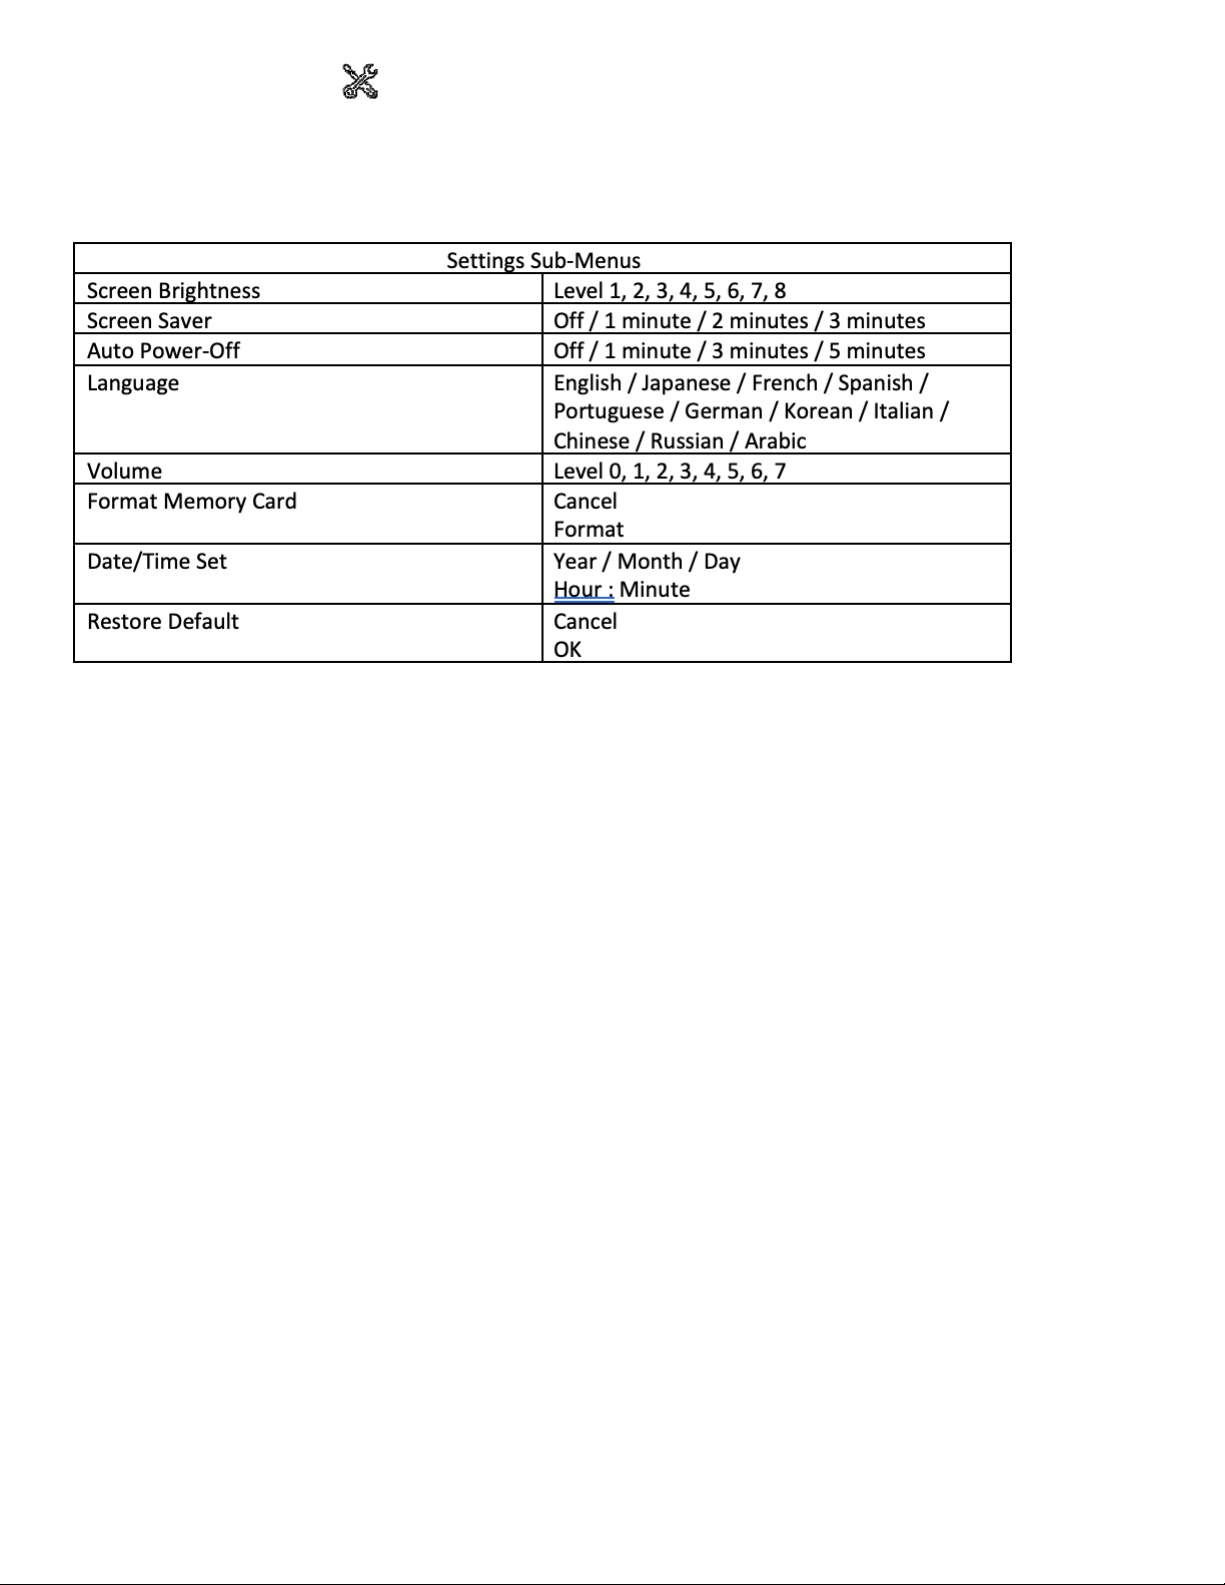
First, open the system settings by pressing the menu button (5). Now use the Left (4) and
Right (6) buttons to navigate to “Language” and “Date & Time.” Press the Camera button (9)
to open the Settings page. Use the Left (4) and Right (6) buttons to navigate through the
languages and set the Date and Time. Confirm and exit by pressing the Camera button (9).
SELECTING THE MODES
When the blue LED of the binoculars is lit, press the Mode button (8) to switch between Video,
Photo and Replay modes.
In Video mode: Press the Camera button (9) to start shooting. Press again to stop shooting.
In Photo Mode: Press the Camera button (9) to take a picture. Press again to shoot additional
photos
In Replay Mode: Use the Left (4) and Right (6) buttons to select the file you want to watch. Press
the Camera button (9) to play a video on the screen.
NOTE: To experience photos and videos in their highest quality, you must download and view
them on your computer (using the USB cable or directly from the SD Card). The built-in LCD
screen will not display your files in their true full resolution.
TURNING THE BINOCULARS OFF
Press and hold the Power button (3) until the screen shuts off.
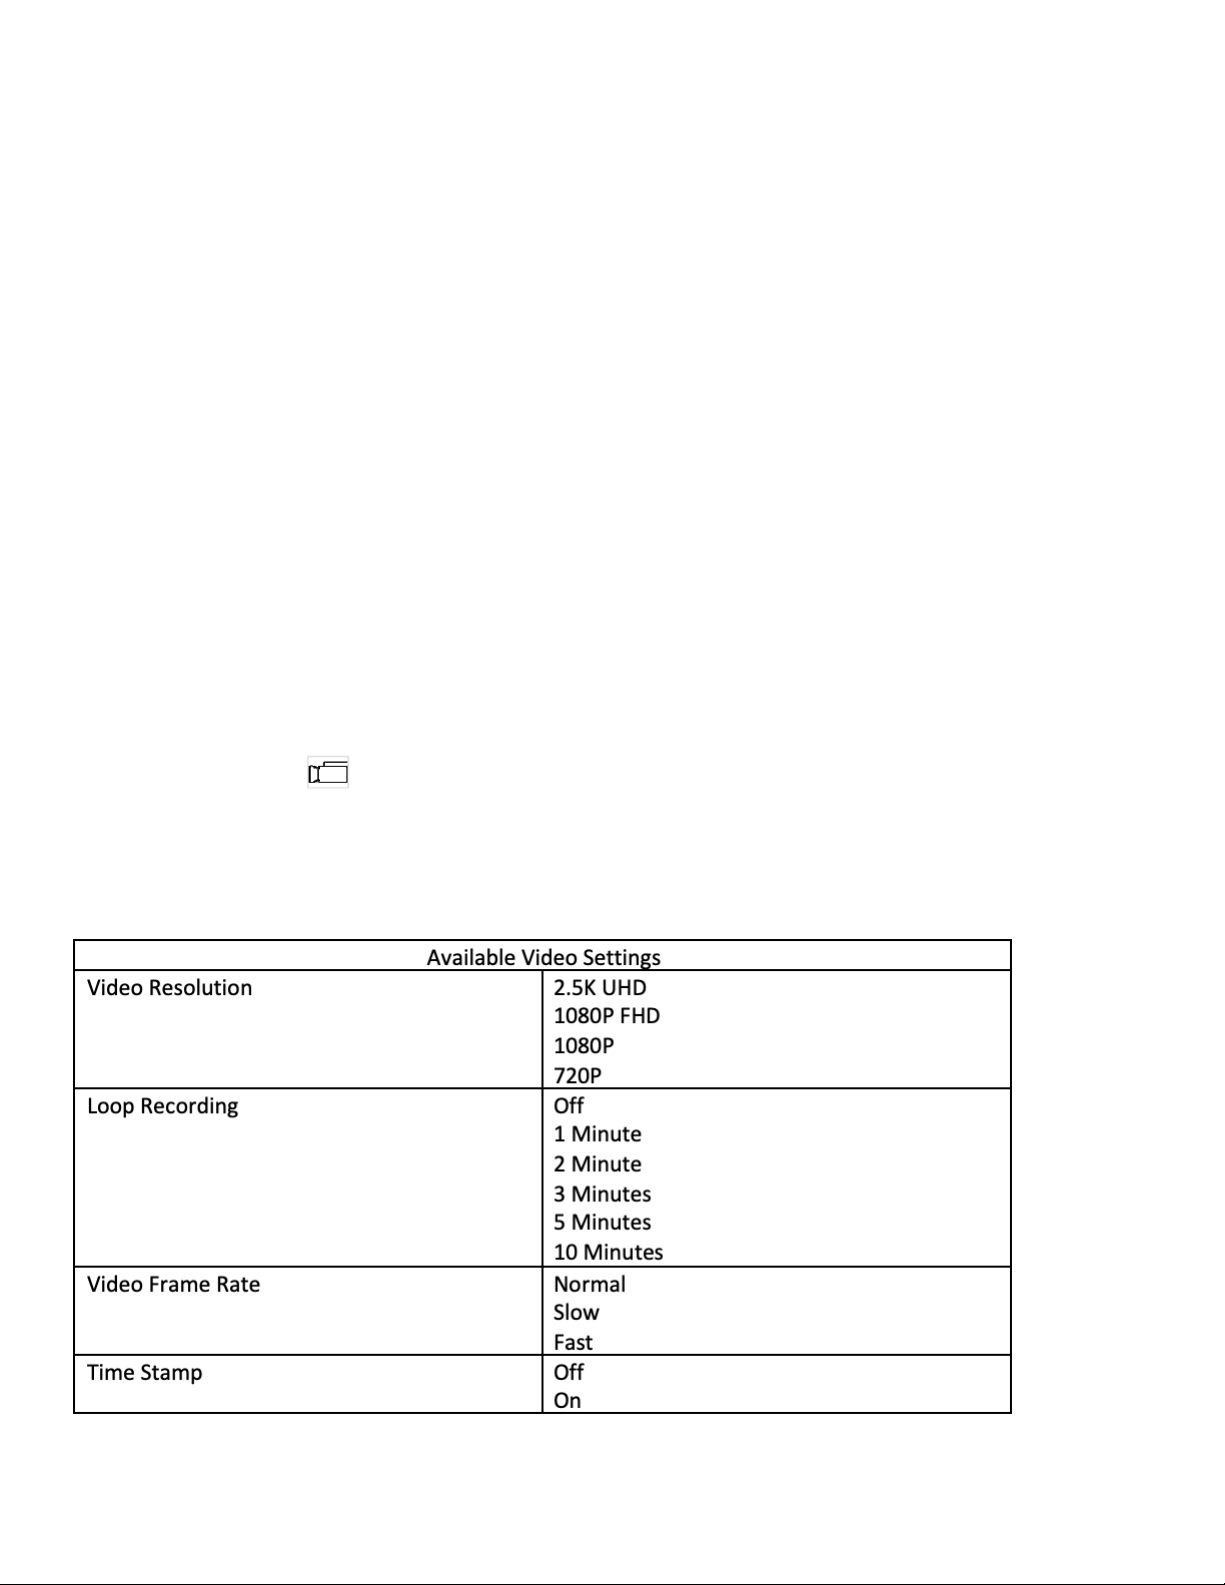
VIDEO SETTINGS
Turn on the binoculars, press the Menu button (5) and then use the Left (4) and Right (6) buttons
to navigate the video settings. Press the Camera button (9) to enter the sub-menus and set the
video resolution. Press the Camera button to confirm your choices and exit Settings. Press the
Menu button or Mode button to return to the main screen.

- 4 -
PHOTO SETTINGS
Turn on the binoculars, and select the photo mode. Press the Menu button (5) and then use the
Left (4) and Right (6) buttons to navigate the Photo menu. Press the Camera button (9) to enter
the sub-menus and confirm your choices and exit Settings. Press the Menu or Mode button (8) to
return to the main screen.
REPLAY SETTINGS
Turn on the binoculars and select the Replay mode. Press the Mode button (8) to enter Replay
mode and then use the Left (4) or Right (6) buttons to navigate to your photo or video file. Press
the Camera button (9) to replay the video. Press the Menu button (5) and Camera button (9) to
delete the file. Press the Mode button to return to the main screen.
EXPOSURE SETTINGS
The Exposure Value (a.k.a. “EV” or brightness) function can be set to auto (“EV-A”) when the light
is sufficient. In low light conditions, the EV (brightness) can be adjusted from 1 to 9. If possible,
adjust the peripheral light of the photographed object to achieve the clearest images.
Turn on the binoculars. In Video or Photo standby mode, short press Left (4) or Right (6) buttons
to set the Exposure Value.

- 5 -
SYSTEM SETTINGS
Turn on the binoculars and press the Menu button (5) to open the Settings menu. Use the Left (4)
or Right (6) buttons to navigate the menu. Press the Camera button (9) to enter the sub-menus
and confirm your choices. To exit Settings, press the Menu button (5) or Mode button (8) to return
to the main screen.
CONNECTING TO A COMPUTER
You can connect this device to a computer via USB. First, connect the device to your computer
with the included USB cable. Then, power on the binoculars. The computer can then read the files
on your binoculars.
RESETTING THE DEVICE
In the unlikely event of a malfunction, the device may not connect to your computer. In that
situation, please reset the binoculars by pressing the Reset button (14). The device will stop and
restart. Neither the settings nor the recorded files on the MicroSD card will be affected.
CARE AND MAINTENANCE
• Clean this device with a dry or slightly damp, lint-free cloth when necessary.
• Do not use abrasive cleaners.
• Do not use this device in extreme (hot or cold) temperatures.
• Do not use this device in a moist environment.
• Do not use this device in the rain or other wet conditions.
• Do not drop or mishandle this device.
• Do not open or disassemble this device. There are no user-serviceable parts.

- 6 -
SPECIFICATIONS
Magnification 12X
Effective diameter of objective lens 32mm
Angular field of view (real) 5.5°
Field of view at 1000m 96m/1000m
Exit pupil 2.6mm
Eye relief 13mm
Close focusing distance 5m
Interpupillary distance adjustment 65-80mm
Digital zoom 8X
Photo resolution 48M / 30M / 25M / 20M / 10M / 8M / 5M / 3M
Video resolution 2.5K UHD / 1080 FHD / 1080P / 720P
Screen 2.4” IPS Screen
Languages English / Japanese / French / Spanish / Portuguese /
German / Korean / Italian / Chinese / Russian / Arabic
Memory Micro SD card (32 GB MAX)
USB Port Type-C
Battery Built-in Rechargeable Lithium Polymer battery
WARRANTY AND CUSTOMER SERVICE
This item from SharperImage.com includes a 1-year limited replacement warranty. If you have any
questions not covered in this guide, please call our Customer Service department at 1 (877) 210-
3449. Customer Service agents are available Monday through Friday, 9:00 a.m. to 6:00 p.m. ET.
The SHARPER IMAGE® name and logo are registered trademarks.
©Sharper Image. All Rights Reserved.
Table of contents
Other Sharper Image Digital Camera manuals