SHENZHEN CHANGTAIWEI ELECTRONIC TWINTALKER User manual
T wintalker
EN USER INSTRUCTIONS
T A L K
SCAN
Shenzhen ChangTaiWei Electronic CO.,LTD

19.CTCSS / Menu option
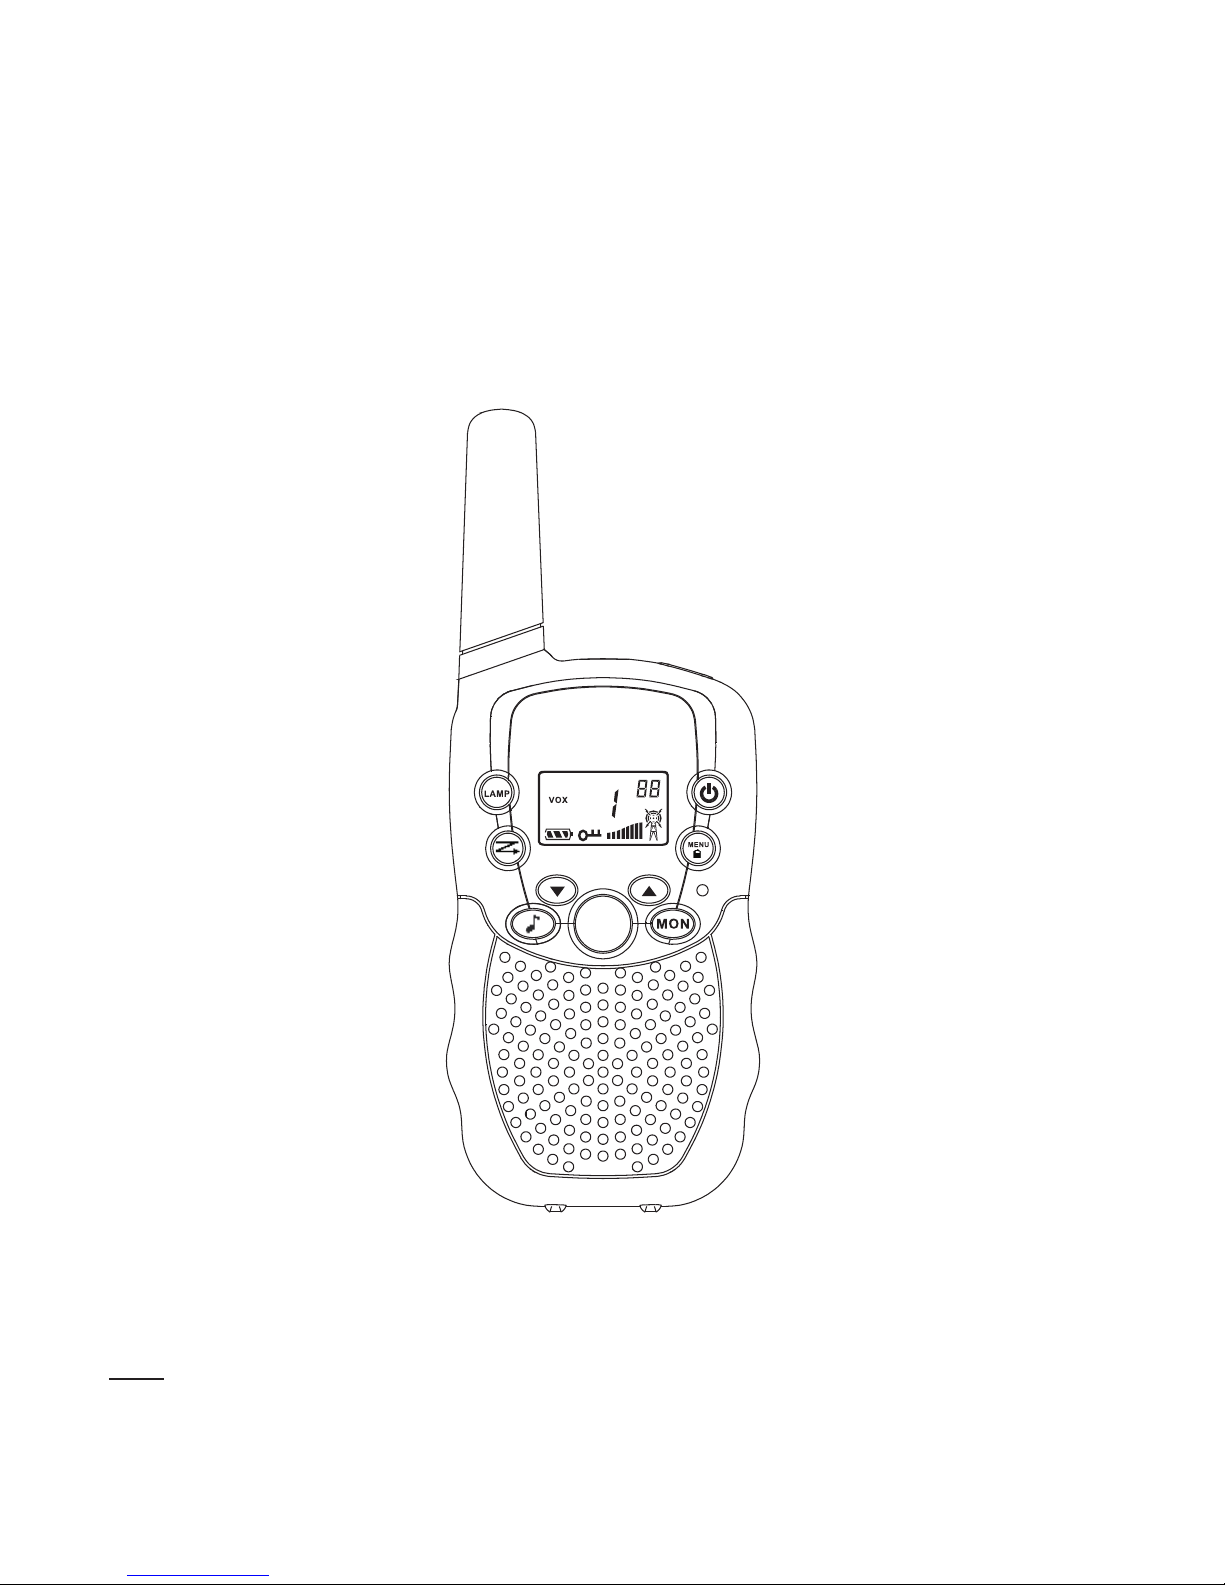
PIC 01
TALK
SPK/MIC
/CHG
8.Speaker /Mic
/Charge Jack
15.Talk Button
12.Call Button 5.Monitor Button
6.Power Button
9.Speaker
11.MENU Button
4.Up Button
7.Down Button
10.Microphone
1.Antenna
21.Scan Button
20.Lamp Button
22.Lamp
SCAN
18.Channel/Menu item
17.Scanning
16.Vox
14.Battery Level
13.Keypad Lock
2.TX/RX Icon
3.Volume
23
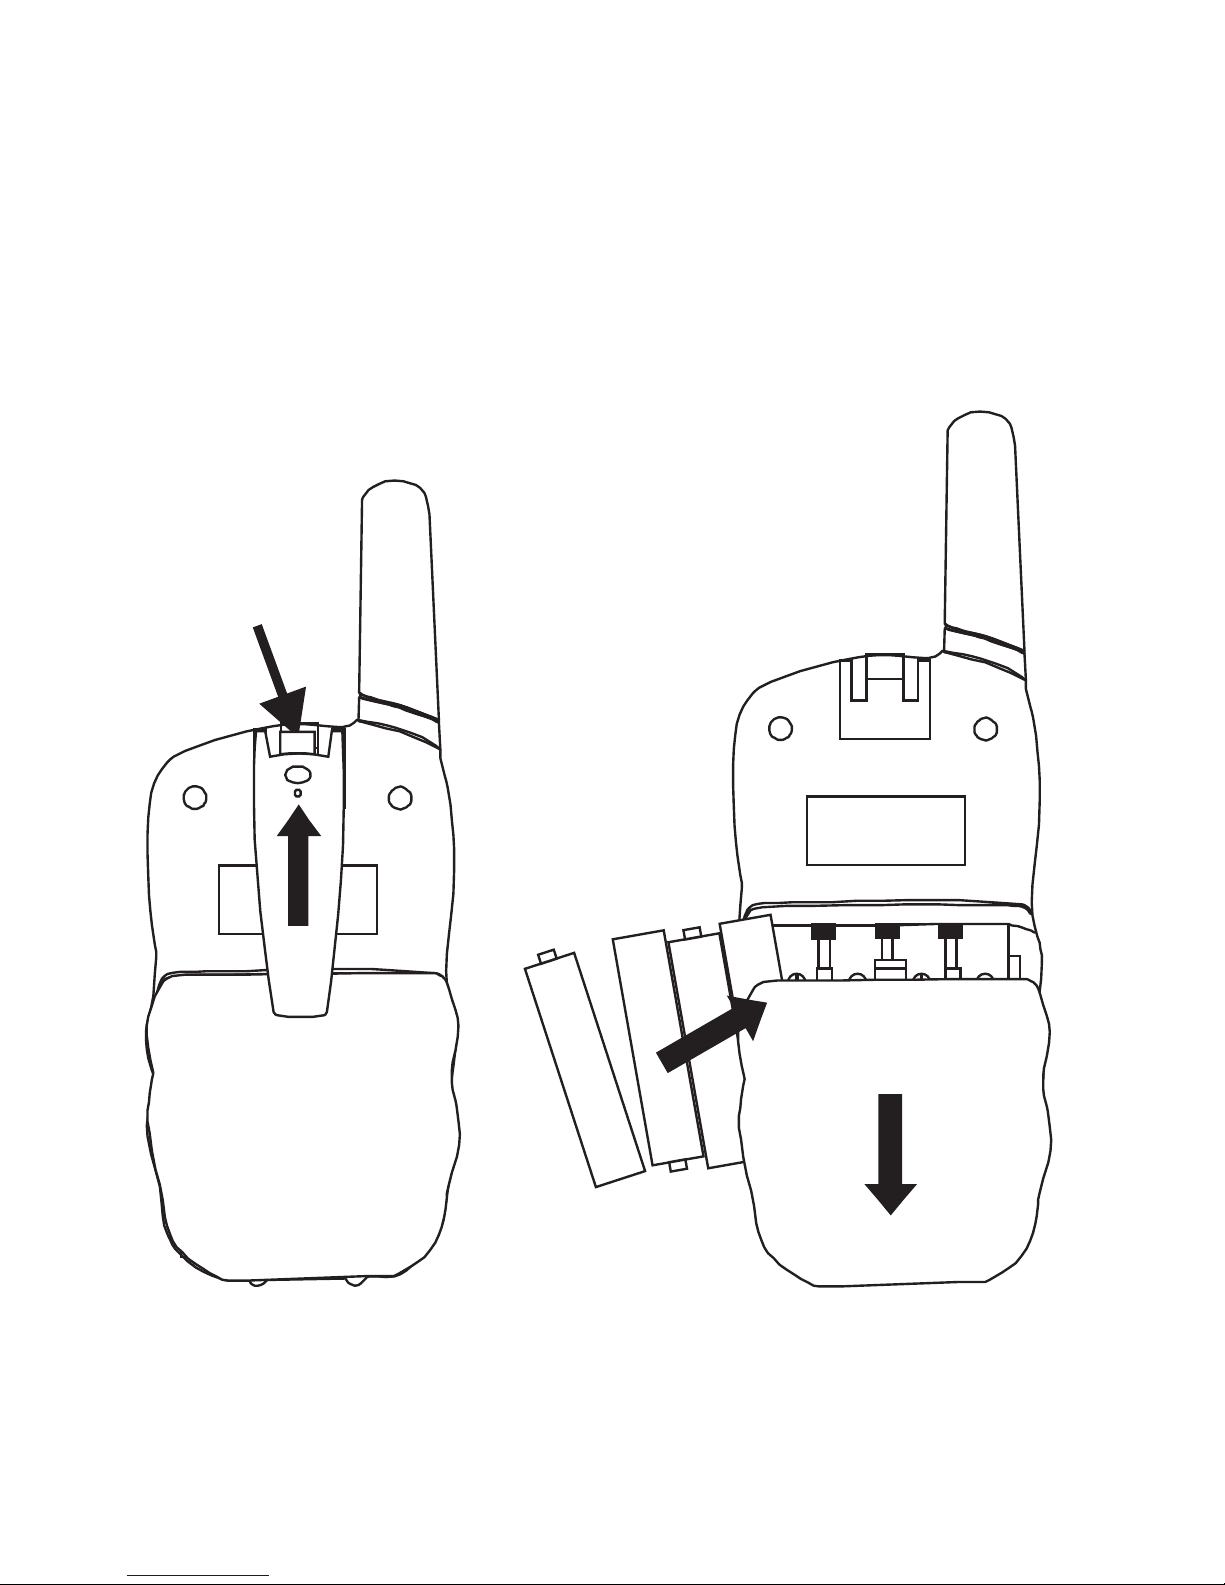
PIC 02
24
25 26

EN~ Instructions foruse
This set includes2 walkie-talkie units:these are
communication devices whichoperate on mobileradio
frequencies. Theycome with 8channels as well
as a back-litLCD screen, enablingyou to communicateover
several kilometres free-of-charge (up to3 km inopen areas)
NOTE: Please readthese user instructionscarefully before
using the equipmentand retain forfuture consultation!
SPECIFIC RECOMMENDATIONS
· If youcarry any kindof personal medicaldevice, consult a
doctor before use.
· To avoid therisk of burns,do not usethe device ifthe aerial
is damaged inany way.
· Do notuse the devicein a potentiallyexplosive setting
(e.g. around petrolpumps, on thelower deck ofa boat or
around a fuelstorage installation orchemical products)
· If travellingin a caror by bike,stop before usingthe device.
Switch off thedevice if onan aeroplane orin a hospital.
· Never usethe device inclose proximity toa radio toavoid
interference.
· Remove thebatteries if thedevice is notin use foran
extended period oftime. Never mixused and newbatteries.
· Position thetransmitter and antennaat least 5cm from your
face. Direct theantenna upwards andspeak normally.
· Clean thedevice with adamp cloth.Avoid theuse of cleaning
agents and solvents.
· Do notmodify the devicein any way. In theevent of damage
occurring, ensure thatthe device ischecked by aqualified
professional.
· The devicecannot be usedto contact theemergency services.

ITEM DESCRIPTION (Pic01,02)
1. Antenna
2. RX icon -Displayed when receiving
TX icon -Displayedwhen transmitting
3. Volume level indicator
4. Adjustorbutton Up ( )
5. Continued reception( )
6. On /off button( )
7. Adjustorbutton Down ( )
8. Earphone socket
9. Loud speaker
10.Microphone
11. Menu:
Enter the menusettings
12. Call button(CALL)
13. Keypad lockindicator
14. Battery levelindicator
15. Push totalk (TALK)button
16. VOX indication
17. Scanning indication:
Displayed during scanmode
18. Channel/Menu itemindication
19. CTCSS /Menu option -value
23. Belt attachmentclip
24. Belt attachment
25. Batteries (notsupplied)
26. Battery compartment
20.Lamp Button
21.Scan Button
22.Lamp

BEFORE USE (Pic02)
To insertbatteries into thedevices, first removethe belt attachment:
lift the attachmentclip (23) andpress the beltattachment upwards
(24).
Open the batterycompartment (26) and insert4 AAAbatteries (25)
(not supplied), ensuringthat the polesare correctly aligned.Then
close the lid.
USING THE TWINTALKER
1. Turning the deviceon/off: To turnthe devices onor off, hold
down the on/off button (6) for 3seconds a BEEPsound will be
played to confirm.
2. Adjustingthe volume: To increasethe volume, pressthe Up
adjustor button (4) and pressthe Down (7) button todecrease
volume.
Note: The volumelevel (3) is displayedon the screen.
3. Battery ChargeLevel/Low Battery Indication
The battery chargelevel is indicatedby the numberof squares
present inside thebattery icon onthe LCD Screen.
Battery Full
Battery 2/3 charged
Battery 1/3 charged
Battery empty
When the batterycharge level islow, thebattery icon willflash and a
beep will beheard to indicatethat the batteriesneed to bereplaced or
recharged.

4. Receiving/transmitting communications:
The devices arein 'Reception' modewhen lit up,i.e. they areready to
receive a callor sound transmittedon the activatedfrequency.
· When youpress the Calltone button (12), the deviceswitches to
'Transmission' mode.You are thentransmitting a soundsignal to the
other device.
· To senda voice message,press the TALKbutton (15) and speak
into the microphone(10). Continue topress the buttonuntil you
have finished transmittingyour message.
Hold the microphonea minimum of5 cm fromyour face.
Note:
- The otherdevice must beset to thesame channel andhave set the
same CTCSS code(seepoint 7)
- When thetransmission is completeand the TALKbutton (15) is no
longer held down,the other devicewill emit asound (BEEP) to
indicate that thisdevice is readyto transmit.
5. Changing Channels
• Press theMENU button (11)once, the currentchannel number
flashes on thedisplay.
• Press the- button (4) or the- button (7) to changethe channel.
• Press theTALK- button to(15) confirm andreturn to stand-by
Mode.
Note:If no buttonis pressed within15 seconds duringsetting, the
unit will returnto standby.
6.CTCSS (Continious Tone Coded SquelchSystem)
License free radio'soperating on the446 MHz frequencyband, like
the Twintalker , have8 available radiochannels. If thereare many
radio's users inyour neighborhood, thereis a chancethat

some of theseusers are operatingon the sameradio channel.
To preventthat you receivesignals from otherusers, sub-channels
have been integrated.
Two radio'swill only beable to communicatewith each otherwhen
they are operatingon the sameradio channel andwhen they have
selected exactly thesame sub-channel.There aretwo kind ofsub-
channels :
• Continuous Tone Coded SquelchSystem (CTCSS)
When using CTCSS,a low frequencytone (between 67and 250 Hz)
will be transmittedalong with thevoice signal. Thereare 38 available
tones to choosefrom. You are freeto choose oneof these 38available
tones. Due tofiltering, these toneswill generally notbe audible so
they will notdisturb the communication.
7.CTCSS
• Press theMENU-button(11) twice :The current CTCSScode flashes
on the display.
• Press the -button(4) or the -button(7) to changeto another code.
• Press theTALK-button(15) to confirmand return tostand-by mode.
Note:To disableCTCSS, select code"0F” for CTCSSin the
menu.When the entryis confirmed, "OF"will be displayed.
8.Monitor
Youcan use themonitor feature tocheck for weakersignals in the
current channel.
• Press theMON-button to activatechannel monitoring.
• Press theMON-button to stopchannel monitoring.
Note:During channel monitoringthe receiver circuitin the Radio’s
will not listento CTCSS codes.

9. VOX Selection
The Radio’sis capable ofvoice activated (VOX)transmission. In
VOX mode, theradio will transmita signal whenit is activatedby
your voice orother sound aroundyou. VOX operationis not
recommended if youplan to useyour radio ina noisy orwindy
environment.
Note:VOX mode willbe overrided whenyou press theTALK- button
“.
• Press theMENU- button(11) three times,the current VOXsetting
flashes on thedisplay and theVOX icon isdisplayed.
• Press -button(4) to setthe VOX sensitivitylevel between 1and 3
(level 3 isthe most sensitivelevel).
• Press -button(7) until “OF” appears on thedisplay,to turnVOX
OFF.
• Press theTALK-button(15) to confirmand return tostand-by mode.
10. Scanning foran active radiochannel
• Press theSCAN -button(21) : The'Scan' function indicator(17)
will appear onthe screen andthe channel (18) will scancontinuously
from 1 to8.
• Press the -button(7) to startthe channel scanfrom 8 to1.
Once an activechannel is found,the scanning willstop and youcan
listen to thetransmission.
When the transmissionon the foundchannel stops, thescanning will
resume automatically.
NOTE:If you press the TALK button(15)while listening toa found
channel, the Radio’s will goback in stand-bymode on thefound
channel.
15”

11. CallTones
A calltone alerts othersthat you wantto start talking.
11.1Setting the Call Tone
The Twintalker has 10call tones.
• Press theMENU- button(11) four times,“CA” is displayed andthe
current call toneis flashing.
• Press the -button(4) or the -button(7) to changeto another Call
Tone.
• Press theTALK- button(15) toconfirm and returnto stand-by Mode.
11.2 Sendinga call Tone
Press the CALL-button(12) briefly.The call tonewill be transmitted
on the setchannel.
12. Key-Tone On/Off
When a buttonis pressed, theunit will beepbriefly.
To setthe key-tone.
• Press theMENU- button(11) five times.“tO” will be displayed.
• Press to enable (ON) or disable the KeyTones(OF).
• Press theTALK- button(15) toconfirm your selectionand return to
the standby mode.
13. Roger BeepOn/Off
After the TALK-button is released,the unit willsend out aroger beep
to confirm thatyou have stoppedtalking.
To setthe Roger Beep.
• Press theMENU- button(11) six times.“rO” will be displayed.
• Press to enable (ON) or disable the RogerBeep (OF).
• Press theTALK- button(15) toconfirm your selectionand return to
the standby mode.

14.Button Lock
• Press andhold the MENU- button(11)for two secondsto
activate the Buttonlock mode.The button lockicon is
displayed on theLCD Screen.
• Press andhold the MENU- button(11)again for twoseconds
deactivate button lock
Note:The PTT -button(15) , theCALL -button(12), MON-button(5)
and the on/off button (6) willstill be functionalwhen the Button
Lock is activated.
15. Display backlight
To activatethe backlight ofthe LCD display, press anybutton
except the MENU- button(11) or theMON-button(5) .
The LCD backlightwill light upfor 5 seconds.
16. Earpiece connection
The Twintalker can beused with theincluded earpiece.
The connector islocated on theupper side ofthe unit(8) .
Insert the earpieceplug into theconnector (2,5mm jack).
The small buttonon the earpiecehas the samefunction as theTALK
- button(15) onthe unit
When you usethe TALK - button(15) from theEarpiece, you must
also use themicrophone from theearpiece to talkinto.
Note:Do not connectother earpieces. Thismay damage yourdevice.
17. Battery savingfunction:
When the devicehas not beenused for 6seconds, the economy
mode is automaticallyactivated. This doesnot affect thereception
of transmissions andthe standard modeis automatically re-
activated as soonas a signalis detected.

18.BUILT-IN FLASH LIGHT
As an addedfeature,your Radio’shas a built-inflashlight that can
be used insending light signalsor for yourlighting needs
19 Technical specifications
Channels 22
Sub-code
Frequency CTCSS 99
462.5625-467.7250MHz
Range Up to3 Km (Openfield)
Battery 4xAAA
Transmission Powe =< 500mWERP
Modulation Type FM -F3E
Channel spacing 12,5kHz
Duo Chargeradapter Output :7 VDC / 400mA
Operating Temperature 0~50
Disposal of OldElectrical & Electronic
Equipment (Applicable inthe European
Union and otherEuropean countries with
separate collection systems)Thissymbol
on the productor on itspackaging
indicates that thisproduct shall notbe
treated as householdwaste. Instead itshall
Be handed overto the applicablecollection
point for therecycling of electricaland electronic
equipment. By ensuringthis product isdisposed of correctly, you will
help prevent potentialnegative consequences forthe environment and
human health, whichcould otherwise becaused by inappropriatewaste
handling of thisproduct. The recycling of materialswill help toconserve
natural resources. Formore detailed informationabout recycling ofthis
product, please contactyour local cityoffice or yourhousehold waste
disposal service.
Table of contents
Other SHENZHEN CHANGTAIWEI ELECTRONIC Two-way Radio manuals


