Shenzhen Mele Digital technology CHD-6 User manual

CHD-6
User Manual
Version:1.0
Car 6 disk HDD multimedia player
*Movies of 750MB in average
Photos of 1MB in average
Songs of 3.5MB in average
Base on 40GB.
MOVIE
Playback on TV up to
50 MPEG4 movies.*
PHOTO
Playback on TV up to
40000 JPG photos.*
MUSIC
Playback music up to
12000 MP3 songs.*
ADVERTISEMENT
Automatically Insert Advertisement
340-4000015-91

End-User License Agreement
This End User License Agreement is a legal agreement between
you and us for the unit application/driver software program and
associated documentations.
ACKNOWLEDGMENT
BY INSTALLING THE SOFTWARE, COPYING OR
OTHERWISE USING THE PROGRAM, YOU ACKNOWLEDGE
AND AGREE THAT YOU HAVE READ THIS AGREEMENT,
UNDERSTAND IT, AND AGREE TO BE BOUND BY ITS TERMS
AND CONDITIONS.IF YOU DO NOT AGREE TO THE TERMS
OF THIS LICENSE AGREEMENT, DO NOT INSTALL THE
SOFTWARE AND/OR DO NOT USE THE PROGRAM.
LICENSE RESTRICTIONS
a) Except for the licenses expressly granted to you in this
Agreement, no other licenses are implied.
b) You may not modify, translate, reverse engineer, decompile,
disassemble (except to the extent that this restriction is expressly
prohibited by law) or create derivative works based upon the Program
or copy the Program, except as expressly permitted herein. You agree
that you shall only use the Program in a manner that complies with
all applicable laws in the jurisdictions in which you use the Program,
including, but not limited to, applicable restrictions concerning
copyright and other intellectual property rights.
c) Updated versions of the Program can be downloaded from our
website.
d) We are not obligated to provide support services for the
Program.

TERM AND TERMINATION
a) The license is effective when you accept this Agreement, and
remains effective until terminated by either party terminate this license
without any notice or delay, by destroying or permanently erase the
Program and all copies thereof.
b) If you use, copy, modify, or transfer the Program, or any copy,
in whole or part, except as expressly provided for in this license, your
license will be automatically terminated.
c) When the license is terminated, you must destroy or
permanently erase the Program and all copies thereof.
OWNERSHIP RIGHTS
All title and intellectual property rights in and to the Program
and any copies thereof are owned by us or its suppliers. All title
and intellectual property rights in and to the content which may be
accessed through use of the Program is the property of the respective
content owner and may be protected by applicable copyright or other
intellectual property laws and treaties. This license grants you no
rights to use such content.
GENERAL TERMS
Any changes from the terms and conditions of this Agreement
made in other manner will be not effective. If any part of this
Agreement shall be held invalid, illegal, or unenforceable, the validity,
legality, and enforceability of the remainder of the Agreement shall
not in any way be affected or impaired thereby. This Agreement is the
complete and exclusive statement of the agreement between you and
us, which supersedes all proposals or prior agreements, oral or written,
and all other communications between you and us, relating to the
subject matter of this Agreement.
Table of Contents
1. Packing List........................................................................3
1.1 Supplied Parts.............................................................3
1.2 Optional Parts.............................................................4
2. Cautions..............................................................................5
2.1 Cautions during usage................................................5
2.2 Power usage...............................................................5
2.3 Radio Interference/compatibility...............................5
2.4 Hazardous locations...................................................6
2.5 Repair.........................................................................6
2.6 Road Safety................................................................6
2.7 Avoid hearing damage...............................................7
2.8 Disposing of the player..............................................7
2.9 Hard disk cautions.....................................................7
3. Overview............................................................................9
3.1 Device overview........................................................9
3.2 Remote Control........................................................11
3.3 Connection and Installation......................................15
4. First Time Usage..............................................................22
4.1 Preparation before usage..........................................22
4.2 Power on, Pause, Power off, CD/DVD changer
control, change language.......................................................22
5. FUNCTION DESCRIPTION.........................................24
5.1 Professional CDC-BUS cable connection operation24
5.1.1 Power on, power off and playback memorization................................24
5.1.2 Select virtual disk directly....................................................................24
5.1.3 Fast Forward, Rewind..........................................................................24
5.1.4 Previous song, next song......................................................................25
5.2 Car charger or AC adapter usage operation..............25
5.2.1 Virtual disk selection............................................................................24

CHD-6
User Manualt
1
5.2.2 Multimedia Playback...........................................................................26
5.2.3 Browser................................................................................................36
5.2.4 USB2.0.................................................................................................37
5.2.5 USB-OTG............................................................................................41
5.2.6 FM Audio Transmitter..........................................................................43
5.2.7 Firmware upgrade................................................................................45
5.2.8 Hardware reset.....................................................................................46
5.2.9 System setup........................................................................................46
5.2.10 Advertisement Setup..........................................................................47
6. Troubleshooting...............................................................49
7. Additional Information...................................................54
7.1 Technical Specication.............................................54
7.2 Supported File Format..............................................55
7.3 Playback Mode Denition........................................55
7.4 Icon Description.......................................................57
7.5 Advertisement playback configuration editor
instruction......................................................................58
7.6 Copyrights and Trademarks......................................61
7.7 Warranty...................................................................61
Dear Customer,
Thank you very much for choosing CHD-6 (car 6 disk
HDD multimedia player). In this digital world, CHD-6 not
only provides reliable, easy-to-use car culture, it also provides
digital multimedia mass storage and hi-fi playback. CHD-6
is smaller in size and larger in storage capacity than normal
car use DVD player, it also provides advertisement playback
function for commercial customer, USB-OTG function for
home use customer. CHD-6 not only can provide enjoyment
in the car, but also can become a portable home theater.
CHD-6 (car 6 disk HDD multimedia player) main
functions are:
● Movie Playback – support MPEG4/2/1, DIVX, XVID,
AVI le format;
● DVD Whole Disk Playback – support IFO, BUP file
format;
● Music Playback – support MP3, WMA le format;
● Photo Playback – support digital camera JPEG file
format;
● Advertisement Playback – can playback advertisement
during playback, can setup your own advertisement list;
● USB-OTG – directly transfer les from digital camera
or U disk to this product;
● Data Storage – work as a portable hard disk using
USB2.0 port;
We wish this product will give you a lot of enjoyment.
Please check our website for obtaining technical support and
get latest rmware to upgrade. Thank you again for choosing
CHD-6.

CHD-6
User Manualt 2
CHD-6
User Manualt
3
Disclaimer:
This document may describe features that are not
currently implemented or available for the player. Please visit
our website for more information about the latest software
and updates available for the player. Specications are subject
to change without notication. Errors and omissions accepted.
Images and illustrations may not always match contents.
1. Packing List
1.1 Supplied Parts
CHD-6 comes with the following items, please check
when you purchase the player.
CHD-6 Remote control A/V cable
CD User Manual AC adapter
USB cable USB-OTG adapter Car charger
Special Note: the supplied parts is according to the actual player.

CHD-6
User Manualt 4
CHD-6
User Manualt
5
1.2 Optional Parts
This player comes with the CDC-BUS cable for
connecting to CD/DVD changer; the following are CDC-BUS
cables for different brand CD/DVD changer.
SANYO Panasonic JVC
2. Cautions
For your own safety and player care, please read the
following before usage.
2.1 Cautions during usage
Customer should not modify this player.
Please keep the player away from water or other
chemical. If any of them contacts the player, please dry the
player with dry cloth. Electronic device are very sensitive,
when using this player, do not shake or do any physical
impact on it, also do not press the buttons too hard.
If using industrial class car use hard disk, the working
area temperature should within –20°C~+60°C, if using
commercial hard disk, the working area temperature should
within +5°C~+35°C.
2.2 Power usage
CHD-6 power voltage: DC +9V ~ +28V.
When using this player, properly connect the supplied AC
adapter to the player’s power jack. When placing the adapter
or the cable, make sure they won’t get damage or pressure.
To reduce the risk of electric shock, unplug the adapter rst
before cleaning it. Never connect the adapter to the player
in humid or dusty area. Do not replace the adapter or cable’s
wire or connector.
2.3 Radio interference/compatibility
- If not properly shielded or fully radio compatibility

CHD-6
User Manualt 6
CHD-6
User Manualt
7
supported, almost all electronic device will get radio
interference. Under some conditions, your player might get
interference.
- The design of this player has followed the FCC
standard, and has followed the following rules:
(1) This player may not cause harmful interference;
(2) This player must accept any interference received
including interference that may cause undesired operation.
2.4 Hazardous locations
When entering hazardous locations, please turn off the
player, unless your player is design to use in these areas and
was “explosion proof”.
Note: The hazardous locations mentioned above includes:
fuel servicing areas, gasoline storage and dispensing areas,
places that have combustible dust. Usually places that might
cause explosion will have warning signs, but there might have
some exceptions.
2.5 Repair
If the player has any problem, you should bring it to
appointed repair center and let specialist to do the repair,
never repair the player yourself, you might damage the player
or danger might occur.
2.6 Road Safety
Use of earphones while operating a vehicle is not
recommended. Stop using this product if you nd it disruptive
or distracting while operating any type of vehicle. Keep the
volume at a level where you can still hear outside trafc and
emergency signals while driving. Driving while unable to
hear these sounds could cause an accident.
2.7 Avoid hearing damage
Avoid using earphones at high volume. If you experience
a ringing in your ears, reduce volume or discontinue use.
Listening to very loud sound levels may lead to hearing loss.
Also, listening through the earphones for a long period of
time, even at normal sound levels, may lead to hearing loss.
2.8 Disposing of the player
When you dispose of the player, be sure to dispose it
properly. Some country or area may regulate disposal of
electrical device, please consult with your local authority.
2.9 Hard disk cautions
CHD-6 uses an internal hard disk for data storage, in
normal case, format or repair is not required.
You should carefully read the <Troubleshooting>
chapter, and check our website for latest information before
formatting the hard disk. Only in our company suggested
condition should you format the hard disk.
If you need to format CHD-6, please note the following:
1.When formatting the hard disk, remember to choose
FAT32 as the system format. Never use NTFS system format
in any condition, or else the player will not operate.
2.The player cannot be formatted in non-Windows OS
(example: Mac), or else the player will not operate.

CHD-6
User Manualt 8
CHD-6
User Manualt
9
- Physical impact may create bad sector in the hard disk,
you can use CHKDSK to x the problem.
- All data store in the player may be lost due to physical
impact, electrical shock, power lost, etc. Please backup your
data.
- It is suggested to do delement after a long period of
usage.
- Regularly backup the data in the hard disk so that it
can be recovered in the event of data corruption or loss. Our
company takes no responsibility on loss of data stored on the
hard disk.
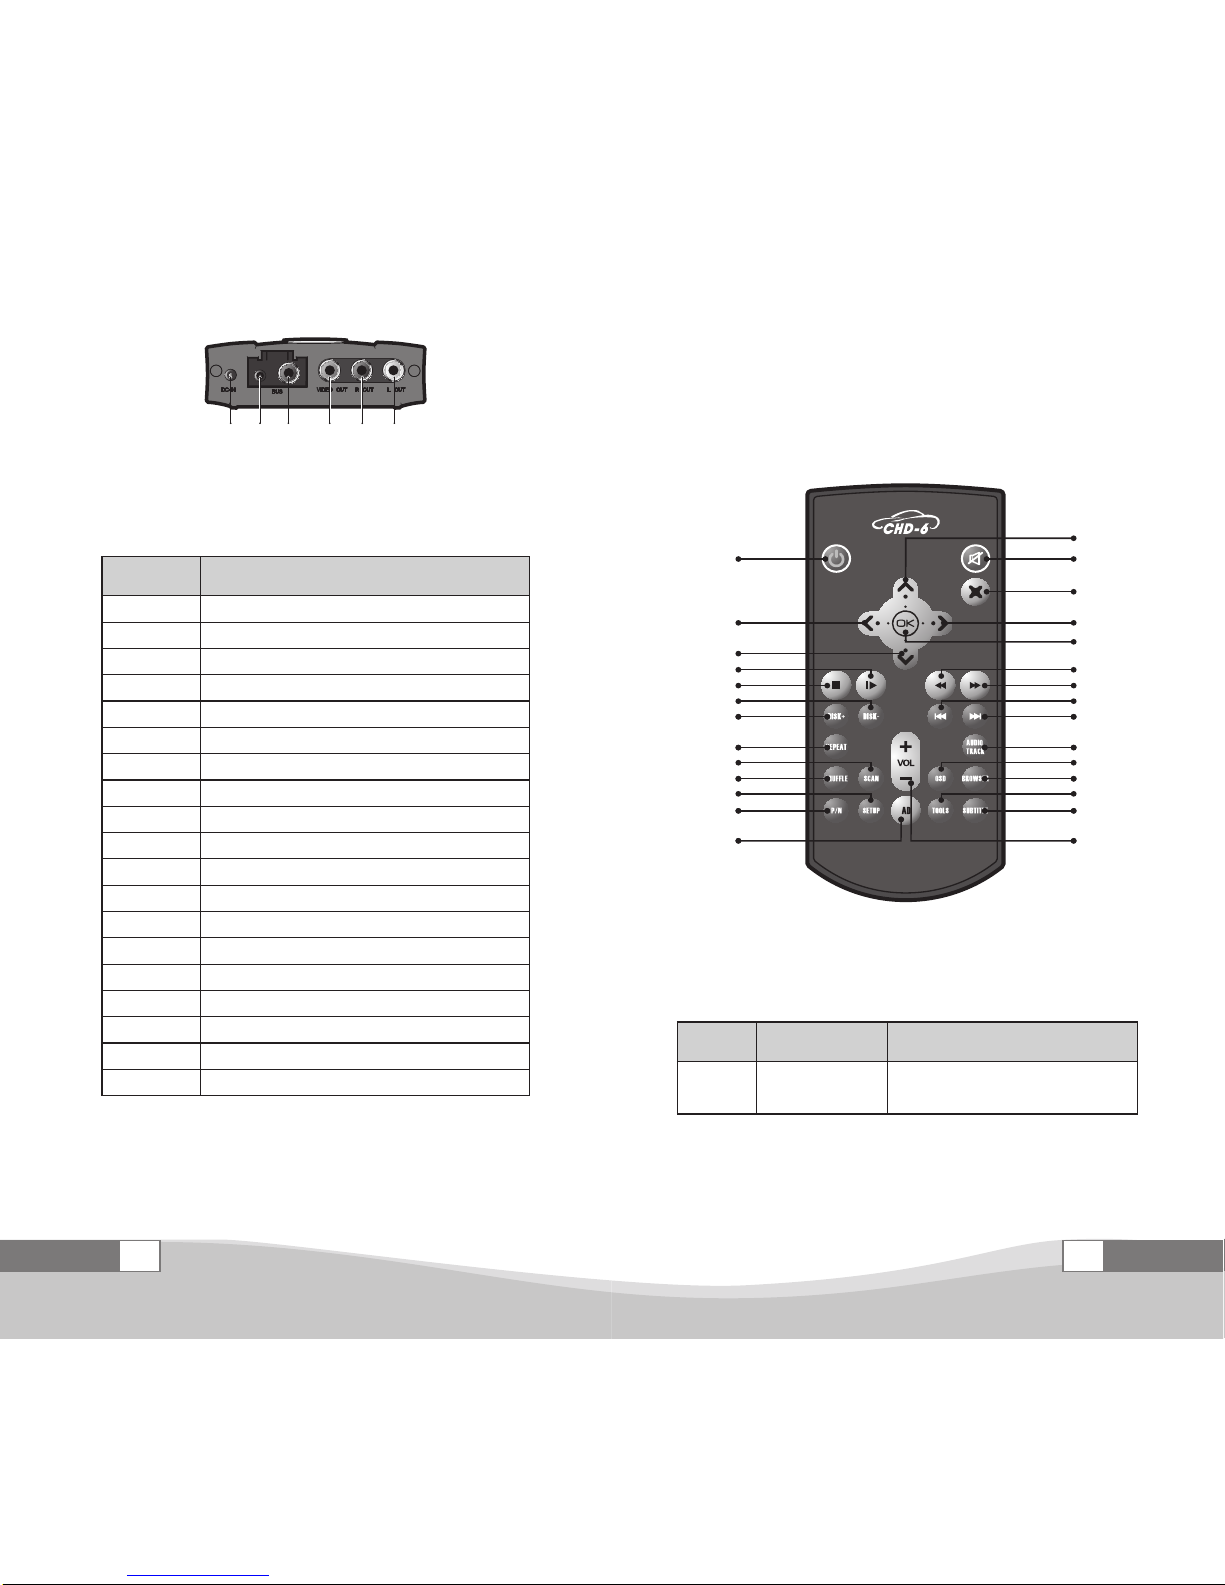
3. Overview
3.1 Device overview
CHD-6 can perform some of the frequently use operation
by using the buttons on the device. Picture 1.1 ~ 1.4 shows all
the buttons, switches and jacks on the device, description of
the buttons, switches and jacks are listed in table 1 < CHD-6
buttons/jacks list >.
3
2
1
4
5
Picture 1.1 CHD-6 Top view
6 987 1210 11
Picture 1.2 CHD-6 Right side view
13 1514 1716
Picture 1.3 CHD-6 Left side view (Professional version)
CHD-6
User Manualt 10
CHD-6
User Manualt
11
13 151918 1716
Picture 1.4 CHD-6 Left side view (DIY version)
Table 1 CHD-6 buttons/jacks list
Number Button/Jack Name
1 PLAY/PAUSE/STOP button
2 VOL-
3 PREVIOUS SONG button
4 NEXT SONG button
5 VOL+
6 Earphone jack
7 FM Transmitter switch
8 CDC protocol selection switch
9 Remote control receiver
10 Power switch
11 USB2.0/USB-OTG port
12 Indicator
13 DC IN jack
14 CDC-BUS port (professional)
15 Video Output jack
16 Right Audio Output jack
17 Left Audio Output jack
18 Y/U/V OUT jack (DIY version)
19 Audio OUT jack (DIY version)
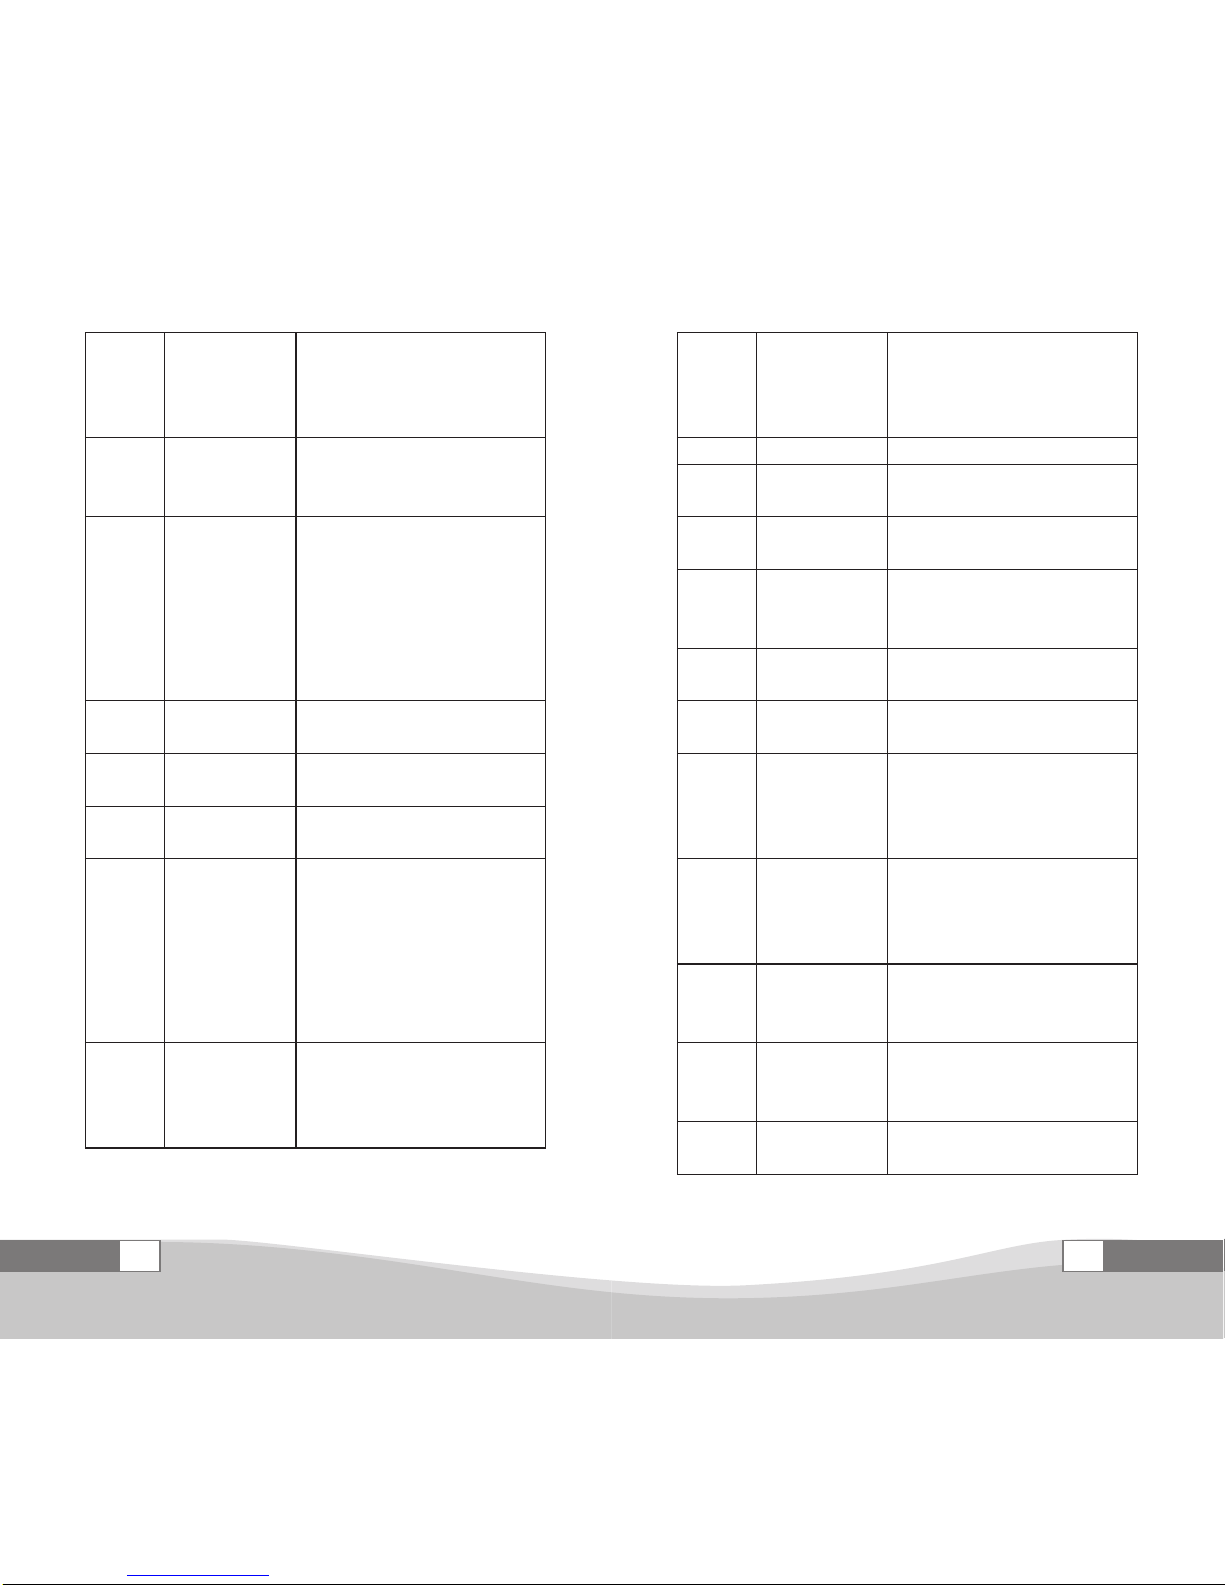
3.2 Remote Control
All CHD-6 functions can be controlled by the remote
control. Picture 2 shows the remote control and Table 2 lists
the buttons name and function of the remote control.
15
14
1
12
11
10
9
8
6
5
4
2
13
3
7
16
17
18
19
20
21
22
23
24
25
26
27
28
C 0601
Picture 2 CHD-6 Remote control
Table 2 Remote control button list
Number Button name Function
1 POWER button Standby
Power on
CHD-6
User Manualt 12
CHD-6
User Manualt
13
2 LEFT button
Move the highlight towards left hand
side once or upwards ve rows
When playing video, decrease the
screen’s width
3 DOWN button
Move the highlight downwards one row
When playing video, decrease the
screen’s height
4PLAY/PAUSE
button
Play the current le in normal playback
mode
Pause the playback
Change the current playback mode to
normal playback mode
Goes into the selected directory or play
the selected le
5 STOP button Stop the playback and return to virtual
disk selection interface
6 DISK- button Playback the files from the previous
disk; playback mode stays the same
7 DISK+ button Playback the files from the next disk;
playback mode stays the same
8 REPEAT button
Change the current playback mode to
repeat one mode, repeat all mode or
normal mode, this function will not stop
the playback.
During DVD whole disc playback mode
can switch between: repeat chapter,
repeat title and cancel repeat.
9 SCAN button
Change the current playback mode
to scan track, scan disk or normal
playback, this function will stop the
playback.
10 SHUFFLE button
Change the current playback mode to
random track, random disk or normal
playback, this function will stop the
playback.
11 SETUP button Enter System setup interface
12 P/N button Switch the video output system between
PAL or NTSC
13 AD button Enable advertisement
Disable advertisement
14 UP button
Move the highlight upwards one row
When playing video, increase the
screen’s height
15 MUTE button Disable sound
Enable sound
16 ESC button Back to last page
Back to browser interface
17 RIGHT button
Move the highlight towards right hand
side 1 column or downwards 5 rows
When playing video, increase the
screen’s width
18 OK button
Play the le in normal playback mode
Pause the playback
Change the current playback mode to
normal playback mode
19 REW button
Start rewind, no effect if the video is
already fast forwarding; (no effect on
music les and photo les)
20 FF button
Start fast forward, no effect if the video
is already rewinding; (no effect on
music les and photo les)
21 PREVIOUS
SONG button
Change to previous song
Change to previous chapter

CHD-6
User Manualt 14
CHD-6
User Manualt
15
22 NEXT SONG
button
Change to next song
Change to next chapter
23 AUDIO TRACK
button Switch audio channel (need support le)
24 OSD button Display current le’s information
25 BROWSER button Enter le browser interface
Enter virtual disk selection interface
26 TOOLS button Pop-up tools menu
27 SUBTITLE Switch subtitle (need support le)
28 VOL+ button/
VOL- button
Disable mute function and increase
volume
Disable mute function and decrease
volume
3.3 Connection and Installation
3.3.1. Connecting the player with car charger
LD
h TUNE m
ASC AUDIO
C/F CD ST
SCN
+
112233BNDBND
445566ASTAST
FM1.
87.70
ST
-
||||||||||||
+
Car HDD MPEG4/MP3 Player
PMC-700
黄
黄
Picture 3 CHD-6 car charger connection diagram
3.3.2. Using Professional CDC-BUS cable
3.3.2.1. CD/DVD changer connection
This player now supports SANYO, PANASONIC and
JVC protocol, please refer to table 3 <K-CDC setup> in this
yellow
yellow

CHD-6
User Manualt 16
CHD-6
User Manualt
17
user manual for more detail.
Special Note:
1.Different protocol might require different CDC-BUS
cable.
2.When connecting CHD-6 with CD/DVD changer,
please turn CHD-6 POWER switch to “OFF”, or else this
player might not function normally.
LD
h TUNE m
ASC AUDIO
C/F CD ST
SCN
+
112233BNDBND
445566ASTAST
DISK
5. 8
CD1
Car HDD MPEG4/MP3 Player
PMC-700
4
1
2
3
Picture 4.1 CHD-6 Professional CDC-BUS cable
connection diagram
开关1 开关2
Switch1 Switch2
Table 3 K-CDC setup
SANYO PANASONIC JVC
K-CDC switch 1 UP UP DOWN
K-CDC switch 2 UP DOWN DOWN
SANYO PANASONIC JVC
Picture 4.2 K-CDC switch position diagram
CDC-BUS cable connector: connector 1(red) – right
audio output; connector 2(white) – left audio output;
connector 3(black) – protocol connector; connector 4(yellow)
– video output.
(1) Setup the K-CDC switch according to the CD/DVD
changer’s protocol.
(2) Connect the CDC connector of CDC-BUS cable (16
pin) to the CDC jack of CHD-6(16 pin) as shown in Picture 4.1
(3) Connect the connector 3 of the CDC-BUS cable with
the CD/DVD changer and connect the connector 4 with the
screen.

CHD-6
User Manualt 18
CHD-6
User Manualt
19
3.3.3. Home AC adapter connection Diagram
Please only use the original AC adapter for this player,
this player’s AC adapter AC IN 110V~240V, DC OUT +12V.
1
2
3
Picture 5 CHD-6 AC adapter connection and TV
connection diagram
Audio and video connector: connector 1(yellow) – video
output; connector 2(red) – right audio channel; connector
3(white) – left audio channel.
(1) Connect the power adapter to CHD-6 as shown in
Picture 5;
(2) Connect one side of the audio and video connector to
the CHD-6 audio and video jacks by color;
(3) Connect the other side of the audio and video
connector to the TV or audio device’s audio and video input
jacks.
3.3.4. Hard disk installation diagram
1.Open the case
①
②
③
④
⑤ ⑥
⑦
Picture 6 CHD-6 disassemble diagram
(1) As shown in picture 6, take out the plastic covers and
screws in order. (①,②,③,④)
(2) Hold and pull out the main board ⑤from the case
(3) Unplug the key pad cable ⑥from ⑦

CHD-6
User Manualt 20
CHD-6
User Manualt
21
2.Hard disk installation
⑧
⑨
⑩
Picture 7.1 CHD-6 Install hard disk
⑧ ⑨
CON 2
Blue surface
a b c
Picture 7.2 CHD-6 install hard disk
(1) As shown in picture 7.2, connect the IDE cable ⑧ to
the hard disk IDE port, when connecting the IDE cable, make
sure the “CON2” red line is facing the same direction as the
hard disk label. Line up the IDE cable and the hard disk and
plug in the cable vertically, or the legs will bend;
(2) As shown in picture 7.1, connect ⑨to the main board
⑩ FPC port, tighten the FPC port ⑩and make sure the hard
disk label are facing up and lay on the middle of the main
board;
(3) When all the main board screw holes line up with
the hard disk screw holes, screws in all the hard disk support
screws ⑾, do not let the IDE cable lay on the screw holes,
should look like picture 7.2c when nish.
3. Assembling the player
⑤ ⑥
⑦
Picture 8 CHD-6 assemble diagram
(1) Connect the key pad cable ⑥to the cable port on the
main board ⑦;
(2) Hold ⑤, push the main board and hard disk inside the
case;
(3) Screw in the screws ③, ④and put back in the plastic
covers ①,②, this ends the installation of the hard disk.

CHD-6
User Manualt 22
CHD-6
User Manualt
23
4. First Time Usage
4.1 Preparation before usage
1. First time using the remote control
Take out the plastic cover before using the remote
control, as shown in picture 9a.
2. Changing battery for the remote control
If the battery needs to be changed, follow the steps as
shown in picture 9b,c. First remove the battery cover, then
exchange the battery, then plug back in the battery cover with
the new battery.
a b
1
2
3
4
5
6
7
8
9
10
11
12
13
c
Picture 9 Changing battery for the remote control
4.2 Power on, Pause, Power off, CD/DVD
changer control, change language
1. Power on
Make sure the AC adapter is properly connected to the
AC outlet on the wall, then turn the POWER switch to “ON”.
2. Pause
When the player is power on, press the POWER button
on the remote control will change the player to pause mode,
press again to restart the player.
3. Power off
When the player is power on, turn the POWER switch to
“OFF”.
4. CD/DVD changer control
When using the professional CDC-BUS cable connection,
the CHD-6 power on and power off will control by the CD/
DVD changer, please refer to chapter 5.1 <Professional CDC-
BUS cable connection operation> for more detail.
5. Change language
The system language of this player can be either Chinese
or English, you can change the system language by selecting
the language function under the system setup interface
– system language, change “system language”, the new
language will take effect immediately.

CHD-6
User Manualt 24
CHD-6
User Manualt
25
5. FUNCTION DESCRIPTION
5.1 Professional CDC-BUS cable
connection operation
Connect the CHD-6 as shown in picture 4.1, turn the
POWER switch of the CHD-6 to “OFF”, then you can use the
CD/DVD changer to control CHD-6.
5.1.1 Power on, power off and playback memorization
1. Power on and playback memorization
After properly connecting the CD/DVD changer and this
player and turning the POWER switch to “OFF”, press the
POWER button on the CD/DVD changer or change the CD/
DVD changer to CDC disk drive mode, CHD-6 will power on
and enter playback memorization mode.
2. Power off
Press the CD/DVD changer’s POWER button or change
the CDC disk drive mode to radio/cassette tape mode, both
can power off CHD-6.
5.1.2 Select virtual disk directly
When power on, you can use the 1 ~ 6 number buttons
on the CD/DVD changer to select the virtual disk directly, or
use previous disk, next disk button to select a virtual disk for
playback.
5.1.3 Fast Forward, Rewind
During video playback, you can use the fast forward,
rewind buttons on the CD/DVD changer to control the video.
5.1.4 Previous song, next song
During music playback, you can use the previous song,
next song buttons on the CD/DVD changer to control CHD-6
music selection.
5.2 Car charger or AC adapter usage
operation
5.2.1 Virtual disk selection
5.2.1.1 Screen Description
①②③
Picture 10 Virtual disk selection interface
Table 4 Virtual disk selection interface
description
1Press the PLAY/PAUSE button to play the le
2 Press the BROWSER button to enter browser interface
3 Press the SETUP button to enter system setup interface

CHD-6
User Manualt 26
CHD-6
User Manualt
27
5.2.1.2 Function Description
(1) After turning on the player, the system will
automatically enter virtual disk selection interface, as shown
in picture 10;
(2) Select a “Disk”, press OK button or PLAY/PAUSE
button to play the selected “Disk” contents.
In virtual disk selection interface, only functions stated
at the bottom of the screen, UP button, DOWN button, LEFT
button, RIGHT button, POWER button and P/N button has
effect, please refer to 3.2 <Remote Control Button list> for
details.
Special Note:
1.After turning on the player, if the first operation is
pressing the OK button or the PLAY/PAUSE button, the
player will playback the le that was playing before last time
shut down.
2.When pressing the UP, DOWN, LEFT or RIGHT
button, the highlight only moves to another virtual disk.
5.2.2 Multimedia Playback
CHD-6 can play video, music and photo files, please
refer to additional information <Supported File Format List>
for all the supported le format. If the supported le format of
the actual player is different from the <Supported File Format
List>, the system is according to the actual player.
CHD-6 has two interfaces to playback les:
1.In virtual disk interface using the UP button, DOWN
button, LEFT button, RIGHT button to choose the virtual
disk, then press the OK button to play the selected virtual
disk’s contents.
2.In virtual disk interface, press the BROWSER button
of the remote control to enter the browser interface, nd the
desire file location and use the UP button, DOWN button,
LEFT button, RIGHT button to select the le and press the
OK button to play the le.
During file playback the interface above have different
functions and button usage.
When playing files under the virtual disk interface, the
player will playback all the contents of the selected virtual
disk regardless of type, you can change the playback mode
during playback and advertisement playback can be activated.
There are seven playback modes you can use in this interface,
they are normal mode, scan track mode, scan disk mode,
shufe track mode, shufe disk mode, repeat one mode and
repeat all mode. The default mode is normal mode. Please
refer to additional information <Playback Mode Denition>
for details.
When playing les under the browser interface, the le
will not continuously playback, cannot use any playback
mode, advertisement playback nor change to another le. The
playback will stop and return to the browser interface if you
try to use these functions forcefully. When the player nishes
playing the current le, it will return to the browser interface.
Special Note:
This player can only play les within root directory, if it
CHD-6
User Manualt 28
CHD-6
User Manualt
29
is different from the actual player, the system is according to
the actual player.
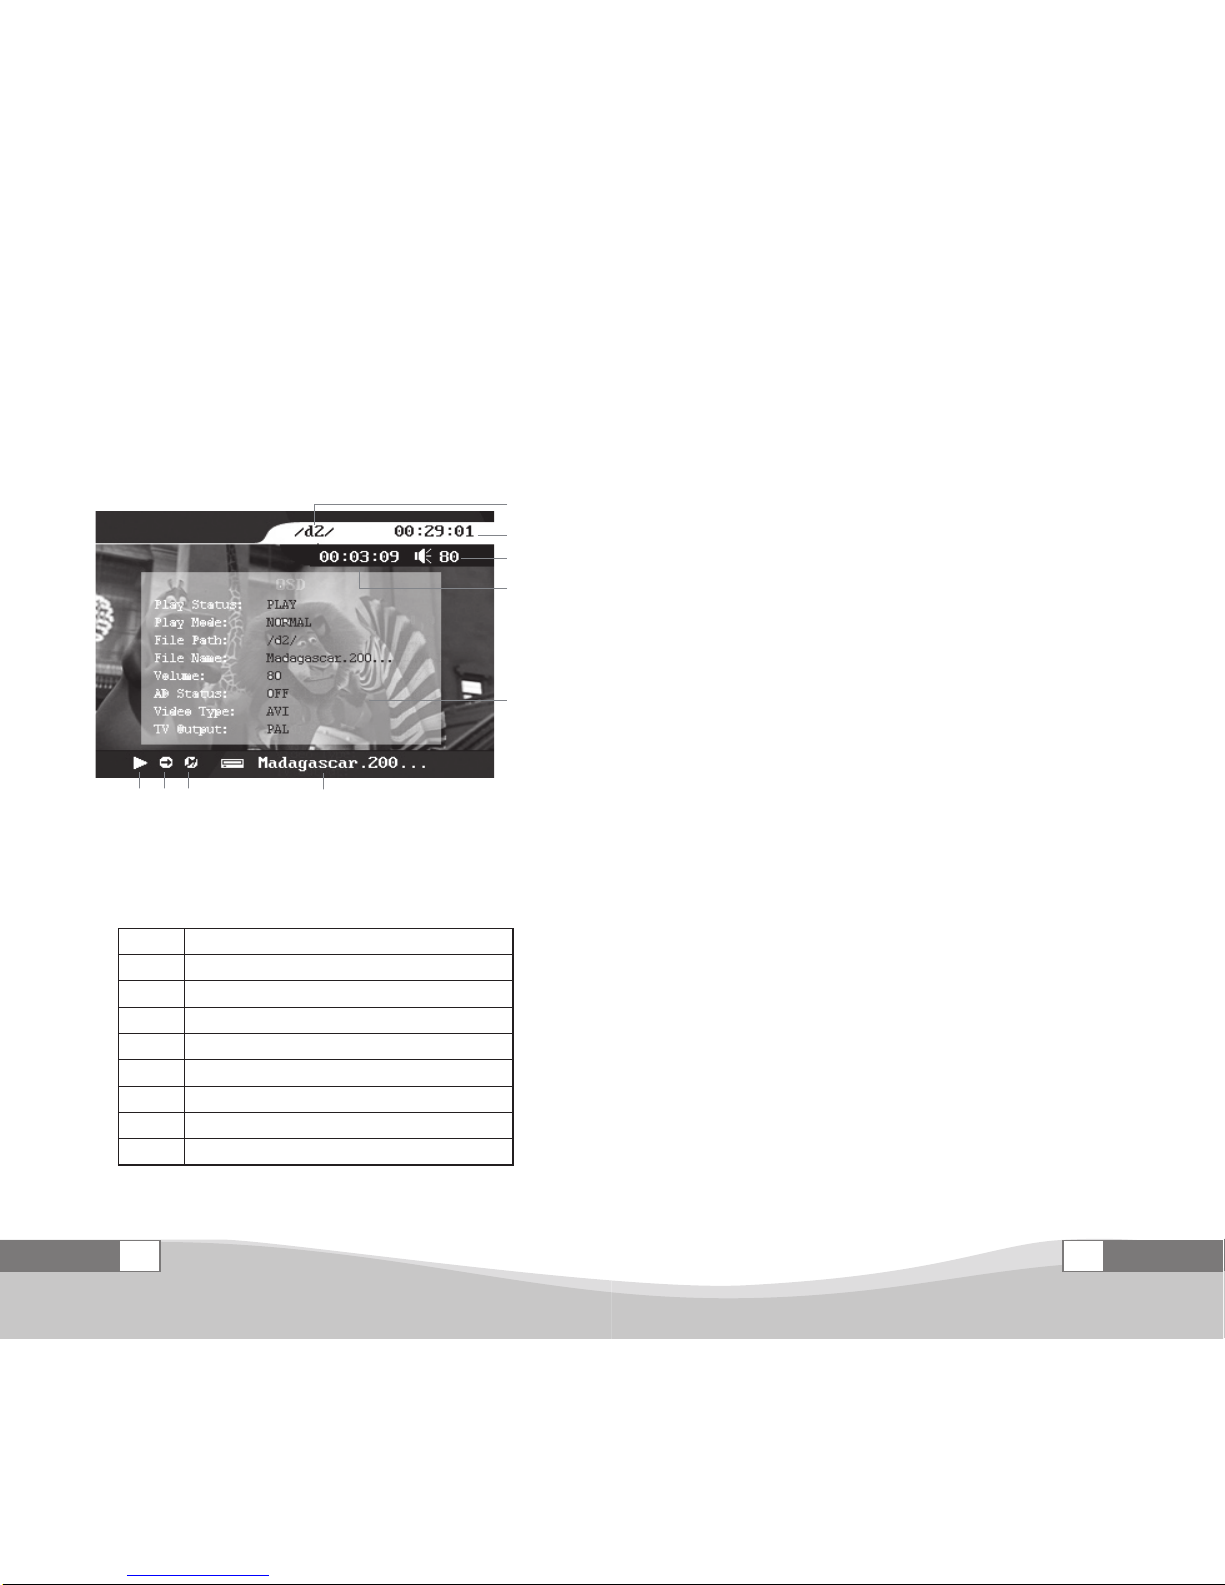
5.2.2.1 Video Playback
5.2.2.1.1 Screen Description
①
②
④
③
⑨
⑧⑦⑥⑤
Picture 11 Video Playback Interface
Table 5 Video Playback Interface Description
1The location of the playing le
2The total time of the playing le
3The time the playing le being played
4 Volume
5 The current playback status
6 The current playback mode
7 The advertisement playback status
8The name of the playing le
9The OSD interface, information of the playing le
5.2.2.1.2 Function Description
1.AVI, MPG, VOB, DAT le playback
In virtual disk selection interface, press the OK button
to play the le, the interface will be as shown in picture 11.
When playing AVI, MPG, VOB and DAT file, the SETUP
button, TOOL button, SUBTITLE button, BROWSER button
and AUDIO TRACK button will have no effect. Please refer
to 3.2 <Remote Control Button list> for details about other
button’s function.
In le browser interface, when playing AVI, MPG, VOB
and DAT file, only VOL+ button, VOL- button, FF button,
REW button, POWER button, ESC button, MUTE button,
STOP button, OK button, PLAY/PAUSE button, P/N button,
OSD button, UP button, DOWN button, LEFT button, RIGHT
button will have effect, all other are not useable. Please refer
to 3.2 <Remote Control Button list> for details
CHD-6 also support SRT format subtitle, when using this
function please note:
(1) The subtitle le and the corresponding video le must
be in the same folder;
(2) Make sure both le has the same le name (extension
name is different)
(3) Subtitle function only works with AVI format video
le.
Special Note:
1.When the video is rewind to the beginning, the player
will start playback the video from the very beginning.
2.When the video is fast forward to the end, the device
will start playback the next video.
CHD-6
User Manualt 30
CHD-6
User Manualt
31
3.Specifications are subject to change without
notication. The system is according to the actual player.
2.DVD Whole Disk Playback
(1) Connect to a computer.
(2) Create a new folder inside the CHD-6 root directory,
suggest to name the folder using the DVD movie title.
(3) Using the computer, copy all the files inside the
VIDEO_TS folder from the DVD to the folder you just create
in step (2).
(4) Disconnect from the computer, enter the player file
browser interface, then enter the folder that holds all the
copied les, select any IFO le or BUP le and press the OK
button.
When playing DVD file, the SHUFFLE button, SCAN
button, SETUP button, AD button, BROWSER button,
PREVIOUS DISK button and NEXT DISK button will have
no effect. Please refer to 3.2 <Remote Control Button list>
for details about other button’s function.
a. Tools Menu
When playing DVD file, press the TOOL button and a
menu will pop-up. The following table shows all the function
in the tools menu.
Table 6 DVD Menu Function
Title Back to the DVD title
Menu Back to the DVD Menu, if the DVD support
Time Search Select a specic time, click the OK button, the system will
start the DVD at the specic time
Zoom Enlarge the movie screen, has 3 levels
AB repeat Repeat a certain part of the DVD selected by the user
Slow Play the DVD in slow motion, has 1/2, 1/4, 1/8 speed
Angle Use different angel to view the movie, if the movie support
b. AB Repeat
From the starting point of the video that needs to be
repeat press the TOOL button and select “AB repeat”, then
the video continues to play, at the ending point of the video
press the TOOL button and select “AB repeat” again, that part
of the video will start repeat playback. If you want to cancel
the A-B repeat playback, just press the TOOL button and
select “AB repeat” again.
c. Setup bookmark
1.During DVD playback, press ESC button.
2.Under setup bookmark choose “Yes”.
3.Next time when playing this DVD again, choose “Load
bookmark” to start the playback from where the bookmark
was set.
d. Fast Forward, Rewind
When pressing the FF button or REW button in normal
mode, the first time will be 8 times speed fast forward or
rewind, two times in a row will become 16 times speed fast
forward or rewind, three times will become 32 times speed
fast forward or rewind, four times will become 48 times speed
fast forward or rewind, pressing the fth time will be back to
8 times speed fast forward or rewind, press the OK button to
return to normal playback.
f. Slow
Pressing the first time will enable 1/2 playback speed,

CHD-6
User Manualt 32
CHD-6
User Manualt
33
second time will become 1/4 playback speed, third time will
become 1/8 playback speed, fourth time will return back to
1/2 playback speed, press the OK button to return to normal
playback.
Special Note:
1.When using the DVD function, you need to put all
the les under VIDEO_TS folder into the same folder, after
copying do not rename any les
2.Inside the DVD le folder, play any IFO or BUP le
will start playback the whole DVD
3.When playing VOB le, the player will only playback
the selected VOB file and won’t start playback the whole
DVD
4.You can change audio track only if the DVD support,
not all the DVD has multiple audio track.
5.You can change subtitle only if the DVD support, not
all the DVD has multiple subtitle, some even don’t have any.
6.Not all DVD disk includes multiple chapters, so
the operation of switching chapter by pressing the LEFT,
RIGHT button may be unavailable. Some DVD many only
contain one chapter in a title, the system will display invalid
command at that time.
7.In Virtual Disk selection interface, the player will not
play IFO and BUP les, instead it will play all the VOB le
one by one.
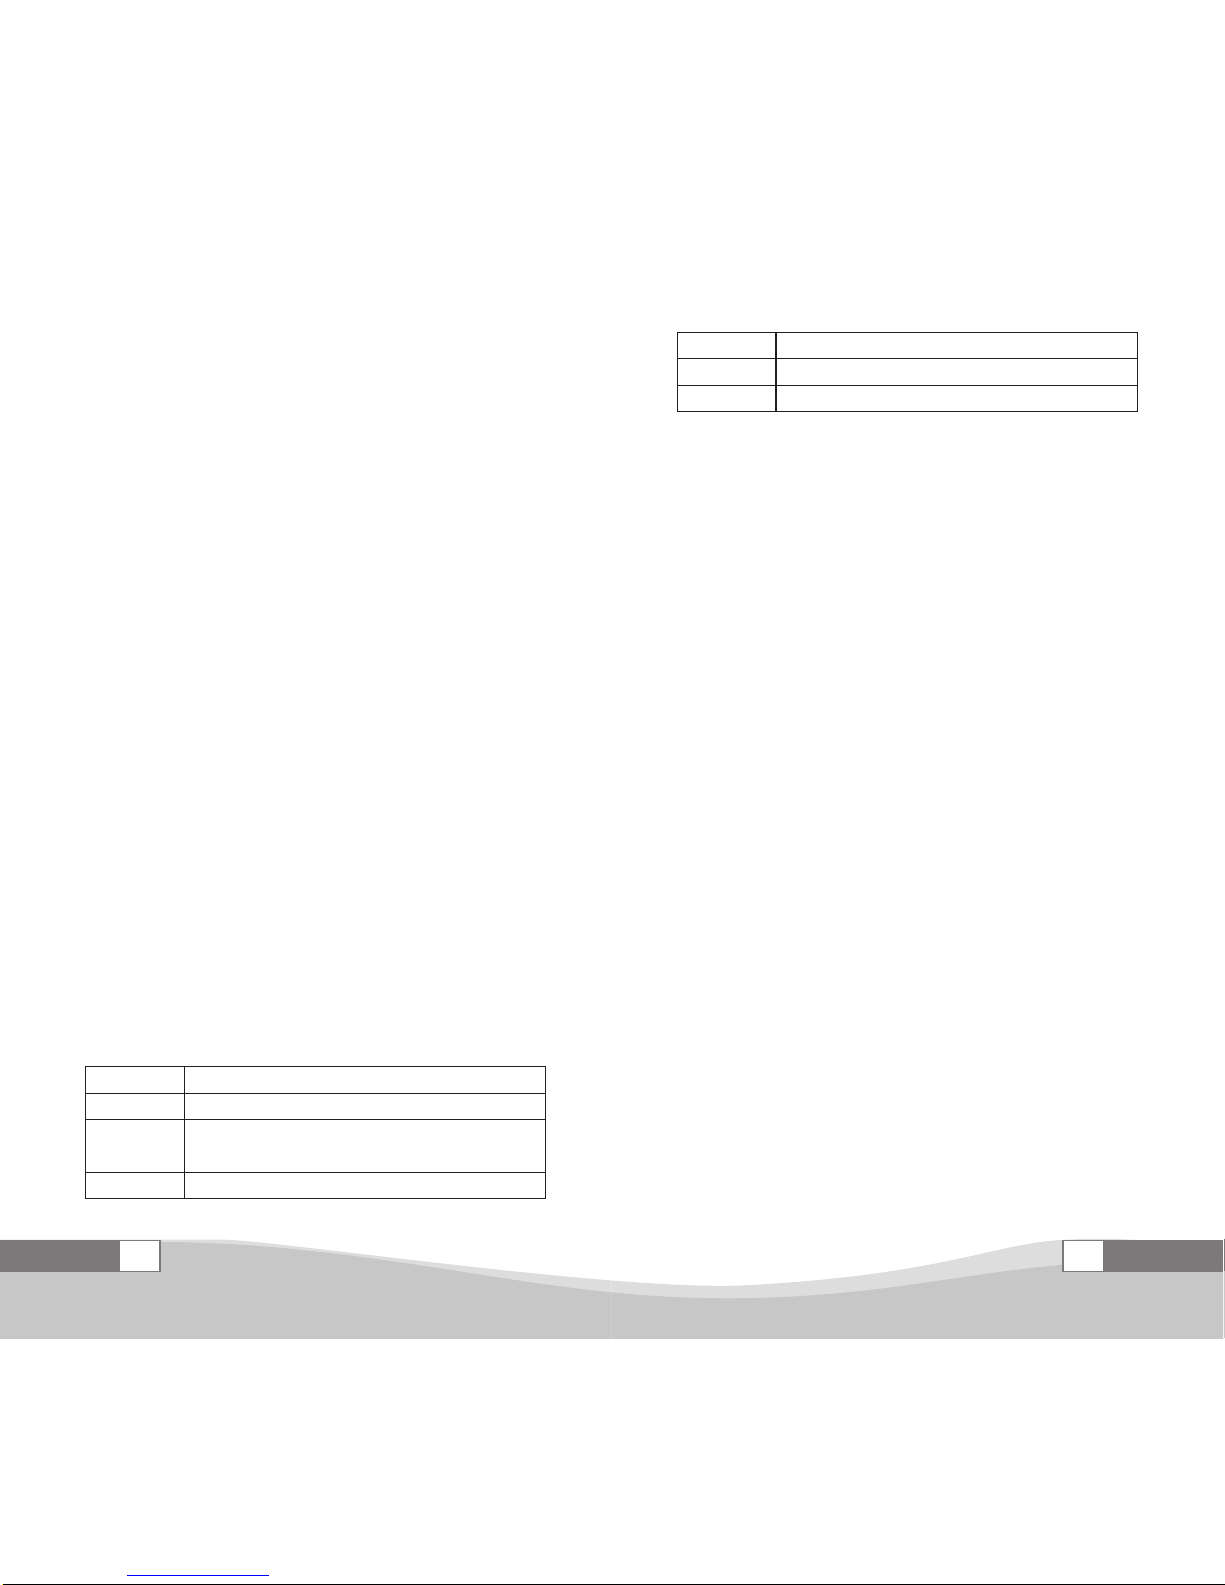
5.2.2.2 Music Playback
5.2.2.2.1 Screen Description
①
②
③
④
⑤
⑤
Picture 12 Music Playback Interface
Table 7 Music Playback Interface Description
1 The artist of the song
2 The title of the song
3 The album name of the song
4 Playback bar
5 Please refer to 5.2.2.1.1 <Movie Playback Interface Description>
5.2.2.2.2 Function Description
This player supports MP3, WMA and WAV le format,
please refer to additional information <Supported File Format
List>.
In virtual disk selection interface, press the OK button
to play the le, the SETUP boon, TOOL button, SUBTITLE
button, BROWSER button, AUDIO TRACK button, FF
button, REW button, UP button, DOWN button, LEFT button
and RIGHT button will have no effect. Please refer to 3.2
Table of contents
Popular Car Receiver manuals by other brands

JVC
JVC KD-AR8500J Installation & connection manual

Pioneer
Pioneer FH-S720BS quick start guide

Alpine
Alpine CVA-1003R owner's manual

Antique Automobile Radio
Antique Automobile Radio 1956 Installation and operating instructions

Kenwood
Kenwood KRC-366 Service manual

Kenwood
Kenwood KMM-361SD instruction manual


Pioneer
Pioneer Premier DEH-P8MP installation manual

Pioneer
Pioneer Super Tuner IIID+ DEH-P800PRS Operation manual

Alfa Series
Alfa Series ALFA 12 smart user manual

Blaupunkt
Blaupunkt ACD 9430 operating instructions

Audio Analogue
Audio Analogue CRECSENDO owner's manual

Rockford Fosgate
Rockford Fosgate RFX9000 Installation reference sheet