Shock Line MA PREGI 35N1 Manual

SHOCK LINE S.R.L.
Head office and plant: via dei Gelsi, 65b – 86039 Termoli (CB) - ITALY
HEAT – TRANSFER PRESS
FOR FABRICS AND OTHER MATERIALS
MA PREGI 35N1
operati g a d mai te a ce i structio s

SHOCK LINE S.R.L.
Head office and plant: via dei Gelsi, 65b – 86039 Termoli (CB) - ITALY
Dear Customer,
Dear Customer,Dear Customer,
Dear Customer,
Thank you for having chosen our heat-transfer press.
The manual we have prepared for you contains all the details, features, suggestions and notices about our heat-transfer press. In
the following pages you’ll find useful hints on how to use your press correctly and everything you must know about maintenance.
ur company builds these machines with maximum care so please keep this booklet in a safe place. We’re sure that you will find
it very useful and that it will help you use your heat-transfer press through the years safely and with great results.
Yours sincerely
S
SS
S
H CK LINE S
H CK LINE SH CK LINE S
H CK LINE S
.
..
.
R
RR
R
.
..
.
L
LL
L
.
..
.

I N D E X
Pag. 3 di 3
1 GENERAL INFORMATION 4
1.1 IDENTIFICATION OF THE HEAT-TRANSFER PRESS 4
Legal references and laws 4
Uses 4
Company data 4
Customer service 5
Assistance notices 5
1.2 DESCRIPTION OF THE HEAT PRESS AND COMPONENTS 5
Metal frame 5
Lower platen 5
Heat platen 5
Electrical parts box 5
1.3 TECHNICAL DETAILS 6
1.4 IMPORTANT SAFETY NOTICES 7
Safety rules and symbols 7
Rules for using the machine 7
Maintenance organization 8
Notices on risks when using a heat-transfer press 8
Danger from electricity 9
Danger from heat 9
2 SHIFTING, CARRYING AND SHIPPING 10
General information 10
3 USE 12
3.1 What must not be done with a heat-transfer press 12
3.2 Preliminary notices and starting up 12
3.3 Description of the control devices 12
3.4 How to use the press 14
4 TROUBLE SHOOTING AND MAINTENANCE 15
How to change the fuse 15
Electrical problems 15
5 DISMANTLING 16
6 APPENDIX A – APPLICATION GUIDE 17

G E N E R A L I N F O R M A T I O N
Pag. 4 di 4
GENERAL INFORMATION
IDENTIFICATION OF THE PRODUCT
This manual refers to the Heat-transfer press for fabrics and other materials.
Company Shock Line s.r.l.
Name of product Heat-transfer press for fabrics and other materials
Model MA PREGI 35N1
Serial number
Date of construction
Test certificate
Legal references and laws
UNI EN 292-2
UNI EN 292-2/A1
UNI EN 294
UNI EN 349
UNI EN 563
CEE irective 73/23/ (low tension)
EN 60335-1
EN 60335-2-45
CEE irective 89/336/ - . Lgs. 476 - 04/12/92 – . Lgs. 615 - 12/92 (EMC)
EN 55014
EN 61000-3-2
EN 61000-3-3
Uses
The heat-transfer press must be used for the application of thermo-adhesive products on several surfaces and materials such
as fabrics, paper, plastic, metal, wood, etc.
Company Data:
S
INTEC S
.
R
.
L
.
Head office and plant: via dei Gelsi, 65b – 86039 Termoli (CB) – Italy - Tel. +39 (0)875 751194
Customer assistance:
via dei Gelsi, 65b– 86039 Termoli (CB) – Italy - Tel. +39 (0)875 751194
E-mail:
Website:
www.shockline.it

G E N E R A L I N F O R M A T I O N
Pag. 5 di 5
Customer service
Whenever you need to communicate with our company about any technical problem you must always refer to:
• Customer I
• Model and serial number of the machine
• Exact nature of the problem
Assistance notices
In this manual we have considered all normal applications for a heat-transfer press.
o not try any kind of adjustment on the press or change its factory settings except for those described in this booklet.
Any operation on the machine like reparation, replacement of parts or maintenance, must be done by trained personnel.
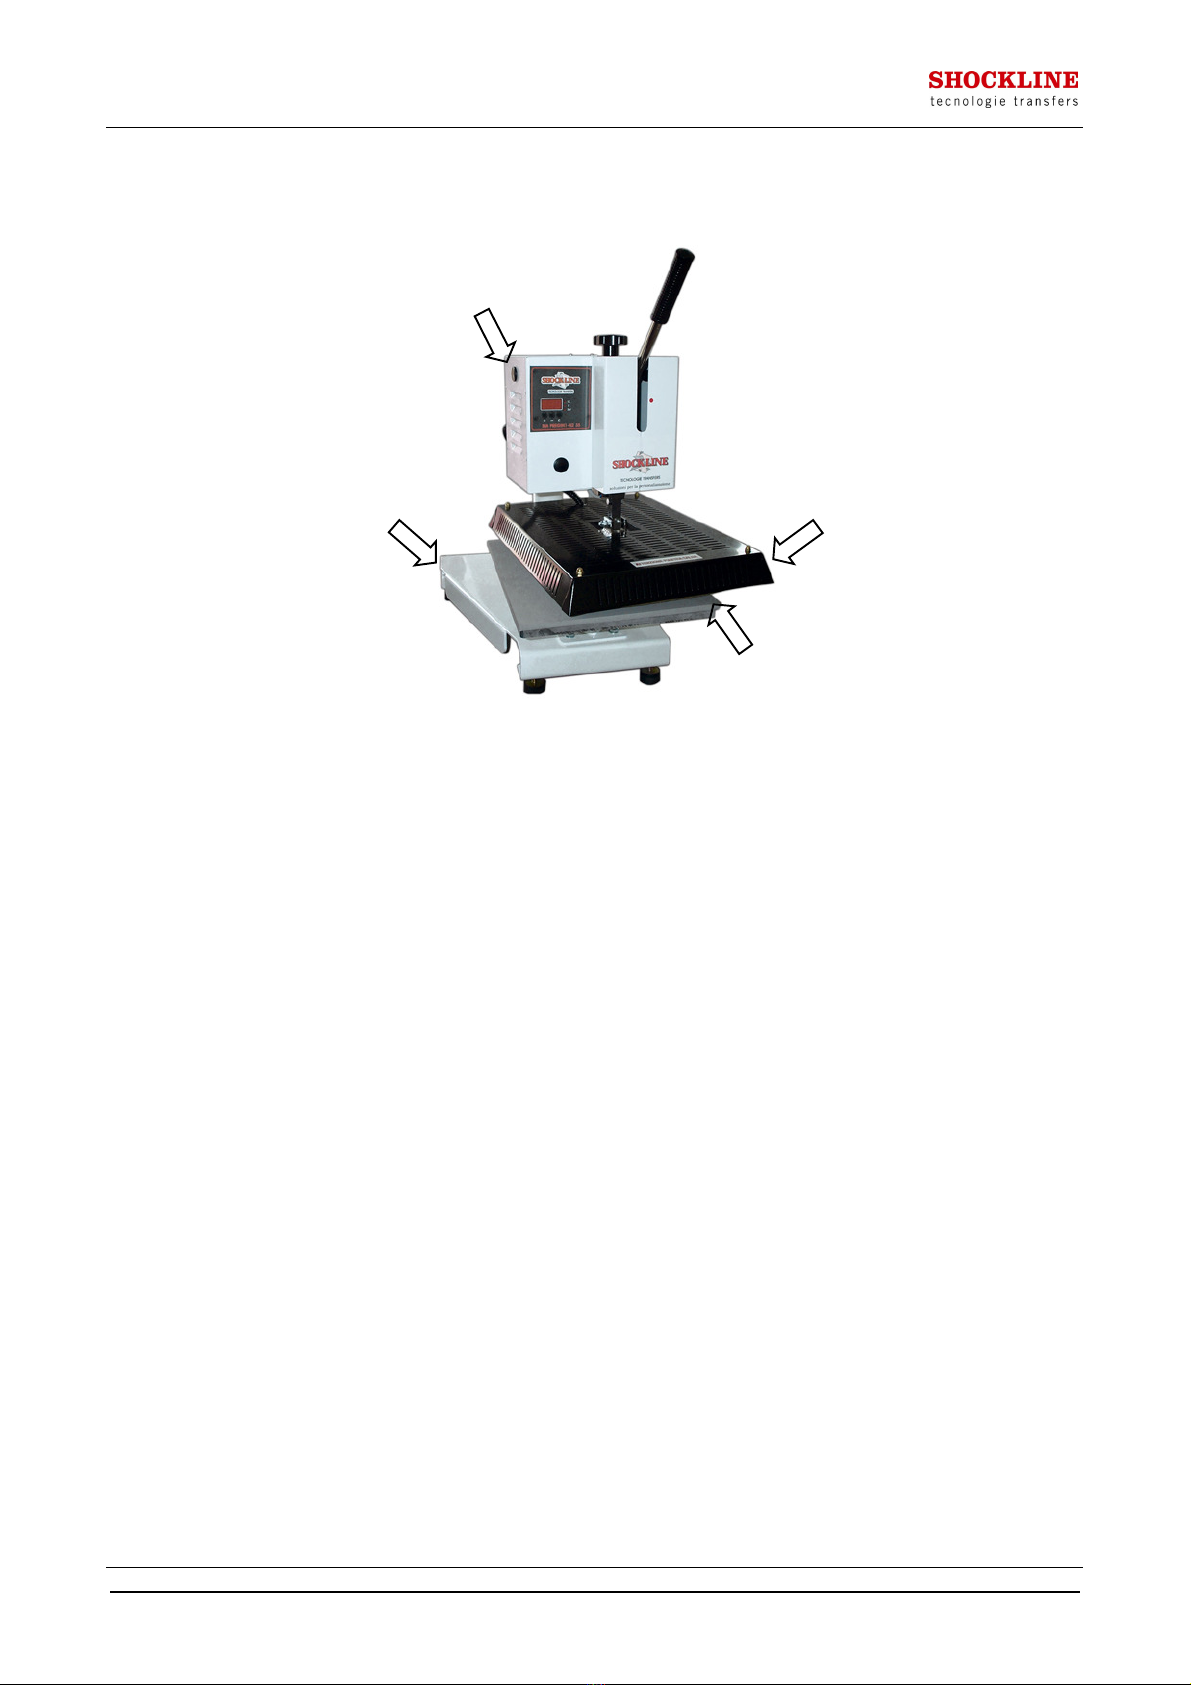
DESCRIPTION OF THE HEAT PRESS AND COMPONENTS
Steel frame
The frame is made of welded steel bars and supports the weight of the press. Its characteristics make the structure
withstanding and extremely steady.
Lower platen
The lower platen is fixed to the frame and is fitted with a soft rubber pad which helps to keep any object firmly in place
while pressing. The rubber pad also allows the same distribution of pressure and heat across the entire surfaces of the
platens when pressing.
Heat platen
The upper platen is heated by an electric resistance and can be set to different temperatures. This platen allows thermo-
adhesive materials to stick on various objects. A steel protection grid is placed around the platen to prevent accidents.
Electric elements box
The electrical parts of the press are assembled inside the box placed on top of the heat platen. On the front of the box you
will find: timer and temperature adjustment device with a 3 digit display, (details on settings will follow). On the rear side
you will find the ON-OFF switch, fuses, power cable and the heat platen’s mains connection.
G E N E R A L I N F O R M A T I O N
Pag. 6 di 6
Figure 1 – parts of the heat-transfer press
TECHNICAL DETAILS
Voltage: 220 V
Power consumption: 1800 W
Input frequency: 50 Hz
Weight 70 kg
Size [LxWxH] 600 mm x 780 mm x 750 mm
Steel frame
Lower platen
Heat platen
Electric parts box

G E N E R A L I N F O R M A T I O N
Pag. 7 di 7
IMPORTANT SAFETY NOTICES
Safety rules and symbols
This booklet is not only an operating instructions manual but a very important guide for installing and
maintenance personnel and contains notices on risks that may derive from improper use.
Installing and maintenance personnel must read the following instructions very carefully. In the next part of this booklet you
will find the following symbols which warn you about danger :
warning!
warning! Notices on the proper use of the machine.
D
ANGER
!
A
TTENTION
,
DANGER
! – P
ARTICULAR ADVICE AND RULES TO PREVENT ACCIDENTS
.
These instructions and warnings alone cannot replace injury prevention laws but are just as important.
warning!
These warnings alone will not eliminate danger!
warning!
warning! If you don’t comply to these warnings and don’t use the machines properly
you and the people near you may get injured.
Rules for using the machine
The heat-transfer press has been built with technical know-how and complies to accident prevention laws but in spite of
this, accidents may occur to users or maintenance personnel and the machine may get damaged. You must observe
maintenance instructions since they are part of the instructions.
warning!
Before using the heat-transfer press, carefully read all of this manual and respect the
rules contained in it.
warning!
Do not modify any part of the machine. The constructor is not responsi le for any
damage occuring to people or things due to non-o servance of the rules in this manual.
warning!
This manual and all the danger signals, warnings and sym ols on the press must e
replaced if damaged or lost.

G E N E R A L I N F O R M A T I O N
Pag. 8 di 8
Maintenance organization
Maintenance personnel must read these instructions and rules before beginning to work on the press and should pay most
attention to the safety section of the manual.
warning!
Always keep this ooklet on hand near the machine.
Notices on risks when using a heat-transfer press
Always remember that working near a heat-transfer press may involve risks. Before starting any work with the machine,
concentrate on what you are going to do. Be very careful and keep your attention on what you are doing: these are
fundamental conditions for the user. If you think you’re not in excellent conditions for any reason at all, avoid working with
the heat-transfer press.
warning!
Do not use the heat-transfer press if you have een taking drugs, alcohol, etc.
warning!
Do not operate if you are not sure a out the machines safety devices.
warning!
Every time you operate on the machine’s safety devices e sure that they are
reassem led in the proper way and that they are efficient.
D
ANGER
!
U
SE THE PRESS ONLY IF YOU ARE SURE THAT ALL THE SAFETY DEVICES WORK
.
Check the heat-transfer press periodically by following the rules contained in this booklet.
D
ANGER
!
K
EEP HANDS
,
ARMS AND ANY PART OF THE BODY FAR AWAY FROM THE MOVING PARTS
AND THE HEATED PARTS OF THE PRESS
.
D
ANGER
!
W
HILE USING THE HEAT
-
TRANSFER PRESS DO NOT REMOVE ANY OF THE MACHINE
’
S
SAFETY DEVICES
. T
HIS COULD CAUSE HARM TO PEOPLE AND DAMAGE TO THINGS
,
THEREFORE ALL THE SAFETY DEVICES MUST BE KEPT IN PERFECT EFFICIENCY
. T
HE INJURY
PREVENTION PLAQUES AND ALL THE SAFETY RULES AND NOTICES MUST
BE KEPT WITHIN
REACH
.
Repairing and maintenance must be done only when the press is not working and only by qualified personnel.
After a reparation tighten up every bolt, screw and mechanical element without over-tightening and use the proper tools.
Always keep the press clean and use it in a floodlit area.
isposal of changed parts must be done with safe and ecological procedures.

G E N E R A L I N F O R M A T I O N
Pag. 9 di 9
Danger from electricity
Make sure that the machine is connected to a valid ground rod.
The grounded electrical line must be controlled by trained personnel before connecting the heat-transfer press.
All operations concerning electric wiring must be carried out by trained personnel.
Use only original fuses with correct amperage rating.
D
ANGER
!
B
EFORE ANY INSPECTION
,
MAINTENANCE OR REPARATION BE SURE TO DIS
CONNECT THE
MACHINE FROM THE ELECTRIC OUTLET
.
Danger from heat
The upper platen of the press reaches high temperatures and must never in any way get in contact with any part of the body
before it cools down. The platen’s temperature level can be controlled on the display. The platen’s protection grid and the
screws can also get very hot.
D
ANGER
!
B
EFORE PLACING ANY OBJECT ON THE LOWER PLATEN
,
SHIFT ASIDE THE HEAT
-
PLATEN
COMPLETELY WITHOUT TOUCHING THE HOT PARTS
.

S H I F T I N G , C A R R Y I N G A N D S H I P P I N G
Pag. 10 di 10
SHIFTING, CARRYING AND SHIPPING
This part of the manual contains information on shifting, carrying and transporting the press. These manoeuvres can be
dangerous and may expose users to extremely serious injuries. Carefully read the following notices.
General information
All the information about shipping is on the labels on the packing. Here you will find details and instructions on how to
carry, lift, move or transport the heat-press.
These labels contain the following information:
• model
• addressee and order reference
• packing total weight
• packing size
• possibility of stacking
• opening instructions (no pointed tools)
• lifting instructions
The packs are made of a wooden platform on which the press is fixed with plastic supports. The press is wrapped up in
clear nylon and covered by a stiff cardboard box. The wooden platform can be shifted with a fork-lift.
On request it is possible to have a wooden case.
The packs must be shifted with fork-lifts or other means especially meant for this kind of operation.
warning!
Make sure that when press is on the lift it is securely fixed and sta ile.
warning!
Follow the instructions efore any kind of shifting.
If you have to shift the press manually, please use protective shoes and gloves that give you a secure grip especially in case
of greasy/oily surfaces.
D
ANGER
!
N
EVER LIFT THE HEAT
-
TRANSFER PRESS BY HAND
,
TWO STRONG AND HEALT
HY PEOPLE ARE
NECESSARY
.
The press must be lifted by a crane with proper capacity and rope slings or chains.
warning!
Make sure that the chain or sling’s resistance are adequate.
warning!
Make sure that the slings are in excellent conditions.
warning!
The sling’s hooks must have a safety device to prevent rope slipping away
warning!
When lifting, avoid any movement that could damage the machine’s parts or external
protection..
warning!
Lift the press slowly avoiding sudden movements. The press must not sway.
D
ANGER
!
D
ANGEROUS HANGING WEIGHT
. I
T IS ABSOLUTELY FORBIDDEN TO STAY UNDERN
EATH OR
NEAR THE PACKING
SHIPPING AREA
Transport the machine only with an adequate vehicle with adapt capacity. You must fix the press inside the vehicle.
warning!
Make sure that the cargo isn’t too ig for the vehicle and that it doesn’t “stick out” of it.

S H I F T I N G , C A R R Y I N G A N D S H I P P I N G
Pag. 11 di 11
warning!
Make sure that the cases are fixed to the vehicle so they won’t move during
transportation.
D
ANGER
!
A
SUDDEN MOVEMENT OF THE LOAD DURING TRANSPORT COULD CAUSE A S
ERIOUS
INCIDENT
.

U S E
Pag. 12 di 12
USE
The heat-transfer press is to be used for decorating fabrics and other materials by means of heat-transferable films as
reported in the APPLICATION GUI E in APPEN IX A.
warning!
Always read the film’s instructions on it’s packet.
warning!
Always e careful when using a heat-transfer press. Even if equipped with safety
devices a careless mistake could e very dangerous.
WHAT MUST NOT BE DONE WITH A HEAT-TRANSFER PRESS
The following operations with a press can be dangerous for users and will not make the machine work in a proper way.
Avoid them!
• ecorating uneven or very bumpy surfaces.
• ecorating any object containing liquid or gas that can expand by heat.
• ecorating inflammable or non heat-resistent objects.
• Other uses similar to the ones to the above.
PRELIMINARY NOTICES AND STARTING
Before using the heat-transfer press prepare the working area and control the electric connection as follows:
1. Prepare a firm, flat surface which will support the weight of the press so that it won’t fall and damage
things or hurt people;
2. Make sure there is a power outlet available with the correct voltage near the machine;
3. Make sure there is no humidity and avoid dirty or dusty places;
. Good ventilation is recommended;
Remove the packing and assemble the control lever by screwing it in it’s socket completely.
DESCRIPTION OF THE CONTROL DEVICES
The devices are described in figure 2.
1. on/off switch. The red or green switch lights up when the press is turned on.
2. The manual control lever moves the heat-platen up, down and sideways.
3. 3 digit temperature-timer display: shows platens temperature and allows adjustment. It also displays
timing and allows count down function. When press is turned on, the display will show heat platen
temperature (the upper light °C will turn on). To adjust temperature press “C”, you will see the set
temperature (the °C and SET lights turn on). Adjust the temperature with “+” and “-“ and press “C” to
confirm. The desired temperature setting will be set and the display will automatically show time setting
(the T and the SET lights will turn on). Adjust the timer with “+” and “-“ and press “C” to confirm. The
display panel will now automatically show the current heat platen temperature ( °C light will turn on). To
check the heat setting press 1 time “C” . To check the time setting press 2 times “C”. Countdown starts
when lever is lowered (T light turns on). When countdown finishes an acoustic signal will warn you.
. The fuse socket allows you to check the 10A fuse and change it if necessary. The fuse protects the heat-
transfer press against electrical overload.
5. The flywheel allows you to adjust the height of the heat platen.

U S E
Pag. 13 di 13
Fig.2 – control devices
Control lever
Flywheel
On/off switch
Fuse socket
Temperature adjustment panel
And electronic timer

U S E
Pag. 14 di 14
HOW TO USE THE PRESS
warning!
Please keep to the instructions. Different manoeuvres will not simplify or reduce
working time in any way.
For decorating objects proceed as follows:
1. Make sure that the power chord and socket and the heat-press are in good conditions.
2. Connect the machine to the power socket.
3. Turn on the heat-transfer press.
. Adjust the height of the heat platen;
o not decorate objects thicker than 50mm;
5. Set the temperature.
6. Adjust timer.
7. Wait until the set temperature appears on the display.
8. Shift the heat platen sideways to the right and place the object on the lower platen;
Place the object in the perfect centre of the platen.
Thoroughly stretch out fabrics and other non stiff materials.
9. Place the transfer paper on the object;
For best results on bumpy surfaces place soft silicone rubber mat or a cloth over the object and the
transfer.
10. Bring back the heat platen in it’s original position.
11. Pull down the lever until the platen touches the object.
12. Keep the lever in this position until you hear the acoustic signal. Remaining time appears on the display;
13. When the acoustic signal rings, push up the lever completely, swing aside the platen and remove the
object;
1 . For objects requiring same settings repeat point 8 to 13;
15. For objects requiring different settings repeat point 4 to 13;
16. Turn off the press;
17. isconnect the power cord.
warning!
Always make sure that the power ca le isn’t too close to the heat-platen. The ca le
should never come in contact with the heat-platen.

T R O U B L E S H O O T I N G A N D M A I N T E N A N C E
Pag. 15 di 15
TROUBLE SHOOTING AND MAINTENANCE
How to change the fuse
If the heat-press doesn’t turn on (the display panel doesn’t light up) in spite the machine is correctly connected to the mains,
the probable cause may be the fuse. In this case check the fuse by unscrewing it from the socket and if necessary change it
with another of the same type (10A).
D
ANGER
!
B
EFORE CHANGING THE FUSE
,
TURN OFF THE MACHINE AND DISCONNECT THE
POWER
CABLE FROM THE MAINS OUTLET
.
Electrical problems
If the on/off switch doesn’t light up this means there is no electric power
supply. Check the mains.
If any of the following events occur:
• The display does not work in spite the fuse is good;
• The heat-platen doesn’t get hot;
• The heat-platen temperature exceeds the designated level;
send the electric elements box back (to Shock Line - Termoli).
Remove the box as follows:
1. Turn off the heat-press;
2. isconnect from the mains;
3. isconnect the heat-platen power cable;
4. Unscrew the screw on the upper side (fig.4) and shift the
box first sideways and then downwards.
5. Unscrew the microswitch conneceted to the lever device.
If the timer doesn’t start when you pull down the control lever try to operate directly on the timer’s switch. Pull away the
electric box (point 4) and check if the timer works. If it works correctly fold the tab so that it starts when the lever is pulled
down. If the switch doesn’t work send the box back (to Shock Line -Termoli).
D
ANGER
!
D
ON
’
T TRY TO OPEN OR FORCE THE ELECTRIC BOX IN ANY WAY
.
In case the machine’s power cable gets damaged contact the producer for it’s replacement.
Fig. 4

D I S M A N T L I N G
Pag. 16 di 16
DISMANTLING
When dismantling the heat-press turn to specialised personnel . No particular dismantling procedure is necessary for the
materials used in building the press.
warning!
Do not use parts of a dismantled heat-press for other uses ecause they may e
harmful when used for other purposes.

A P P E N D I X A
Pag. 17 di 17
APPENDIX A – APPLICATION GUIDE
Use Transfer Temperature
(°C)
Press. Time
(sec) Notices
White / light coloured
fabrics
FC Morbi
FC Trans
FC Super
150 180 15 30 Consider the kind of fabric
Coloured fabrics FC Blanc 150 25 15 Consider the kind of fabric
Wood, canvas, cork,
cardboard FC Sheeb 150 10 40 Consider the kind of material and
the transfer’s instructions.
Coated thermo-plastic –
light colours FC Sheeb 80 110 10 25 Test before using
Coated thermo-plastic –
dark colours FC Unilea 80 120 10 25 Test before using
Plexiglas, metal,
aluminium,
FC Clesd
FC Polart 150 40 120
Test before using. Use the
accessories listed on the transfer’s
instructions
Glass, ceramics FC Clesd
FC Polart 150 180 120 240
120 – 240 Test before using. Use
the accessories listed on the
transfer’s instructions
Covering designs on
natural/synthetic fabrics
(Thermoadesives Plotter
Films)
Pt40
Pt70 150 180 15 25 Test before using
Labels for working
apparel. 90°C wash
resistant
FO Tex 90
FO Pla 90
Combined with:
FC Morbi
FC Super
PR Inkjt…
210 6 25
Carefully read and follow the
instructions on the transfer’s
package
Jigsaw puzzles AC Puzzle
FC Gloss 190 80 110 Use the accessories listed on the
transfer’s instructions
FC Clesd 145 100 140
Book covers written in
silver or gold RT Orosl 145 120 160
Use the accessories listed on the
transfer’s instructions
Table of contents


