Showa Denki KAIRYU User manual

MAA4060-Y004E
Fan Instruction Manual
Axial fan with adjustable-at-rest blades
®
(KAIRYU / smooth flow)
[Instruction manual for motor direct drive type]
- 1 -
Fan Instruction Manual
Introduction
Thank you for purchasing a Showa Denki KAIRYU fan. As a specialized manufacturer of fans and
dust collectors, Showa Denki works diligently to manufacture products with our flow technology
and rotary equipment technology at their cores. The KAIRYU series are high-performance,
low-energy-consumption axial fans based on these core technologies. In order to obtain the best
performance from this product and use it safely for a long time without problems, please handle
and operate this product according to this instruction manual. Store this instruction manual
carefully for future reference.
Applicable types for this instruction manual
This manual provides instructions on how to set up and use the following fan types:
Fan type: KAIRYU series (Axial fan with adjustable-at-rest blades)
Fan models: AD-
The characters in will vary according to the fan specifications, including
size, compatible motor, performance, etc. For details, refer to p. 5 "Types
and meanings of model indications".
Fan drive system: Motor direct drive type
Marks used in this manual
The marks used in this manual have the following meaning:
Warning
Indicates a point, action, etc. for which improper
handling may result in death or serious injury.
Caution
Indicates a point, action, etc. for which improper
handling may result in injury or damage to
property.
indicates a prohibited action.
indicates a point requiring care.
indicates a compulsory action.

- 2 -
Contents
Page
1Safety precautions.......................................................................................................- 3 -
2Product overview.........................................................................................................- 6 -
2.1 Types and meanings of model indications ...........................................................................- 6 -
2.2 Product structure and names of parts ..................................................................................- 7 -
3Receiving.....................................................................................................................- 8 -
3.1 Unloading upon receipt and product verification ..................................................................- 8 -
3.2 Movement/transportation......................................................................................................- 8 -
3.3 Storage until installation .......................................................................................................- 8 -
4Installation ...................................................................................................................- 8 -
4.1 Mounting ..............................................................................................................................- 8 -
4.2 Connection to ducts..............................................................................................................- 9 -
4.3 Electrical wiring ..................................................................................................................- 10 -
4.4 Test operation.....................................................................................................................- 10 -
5Operation................................................................................................................... - 11 -
5.1 Operation and maintenance/inspection............................................................................. - 11 -
5.2 Stopping operation and restarting after stopping................................................................- 12 -
6Warranty....................................................................................................................- 14 -
7 Malfunction causes and countermeasures ............................................................... - 11 -
- 3 -
1 Safety precautions
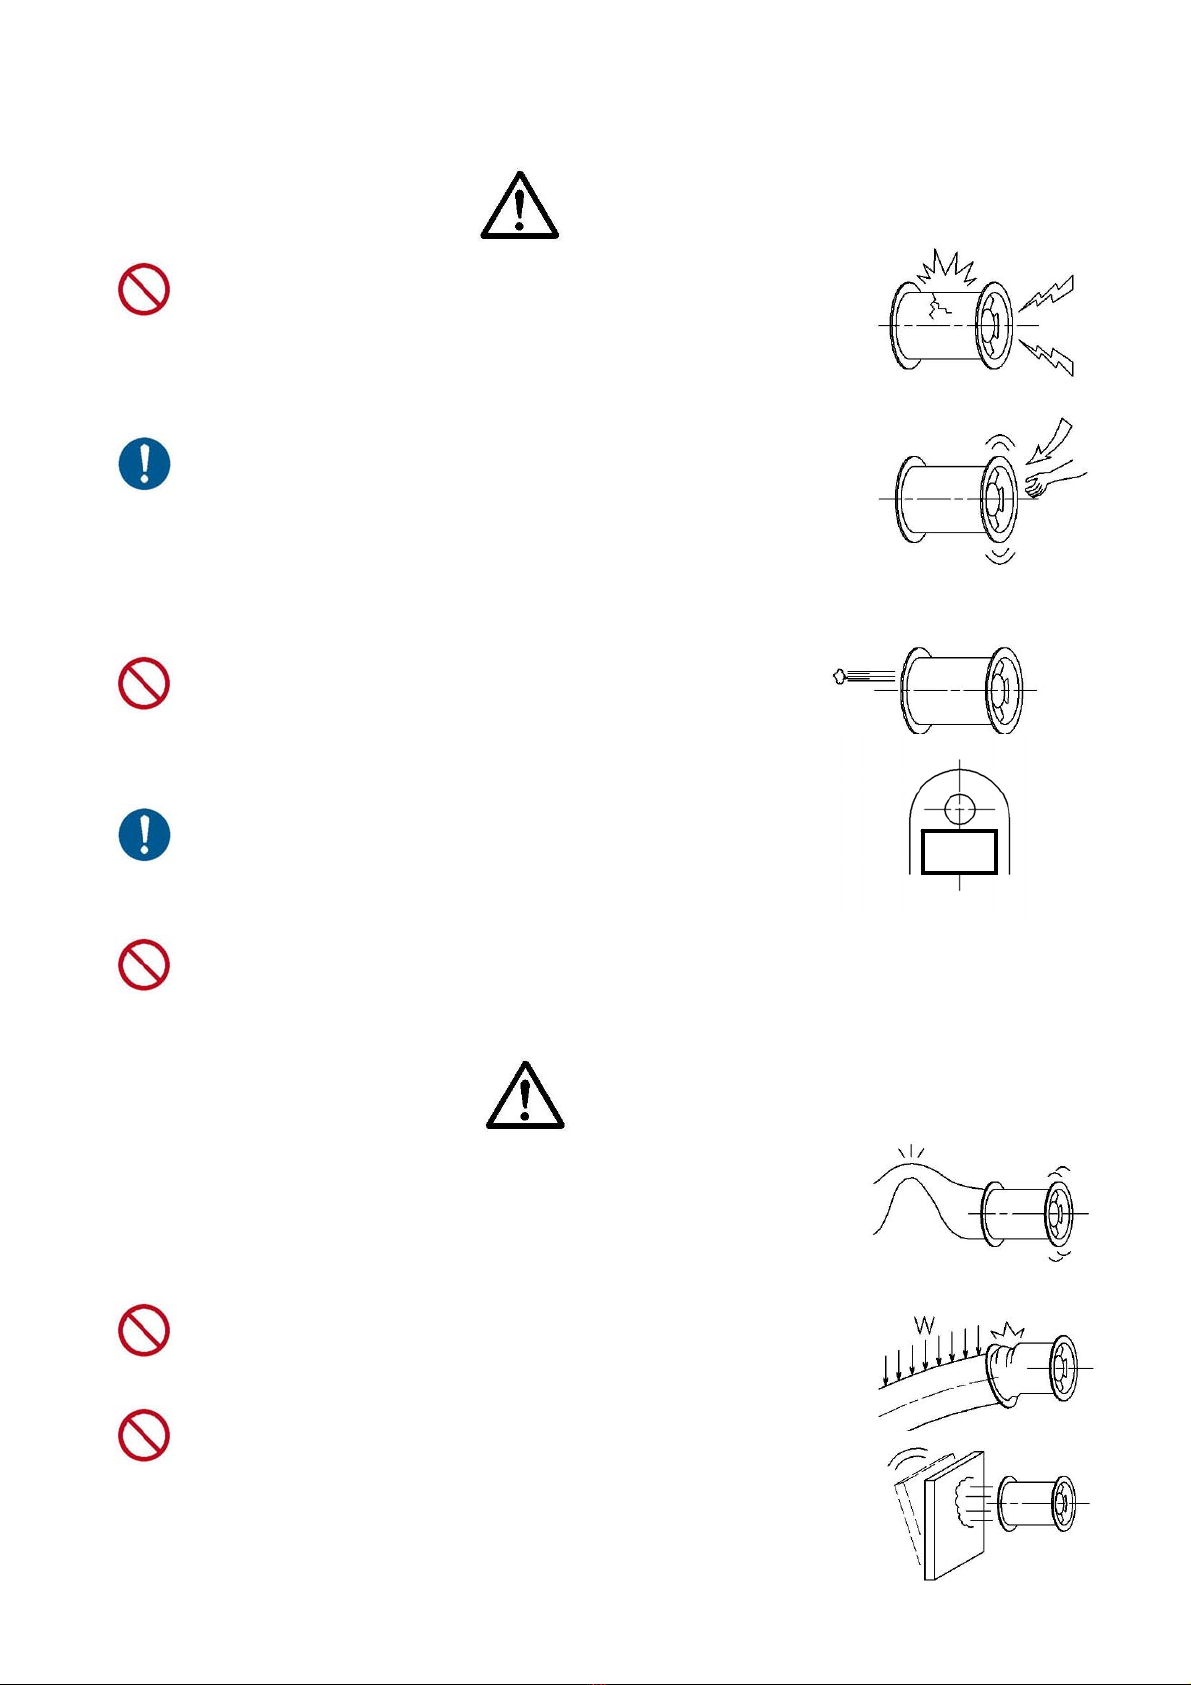
Warning
Intake of dangerous gases or installation in dangerous
locations is prohibited.
This product does not have an explosion-proof structure. Intake of
flammable gases or operation in an explosive atmosphere may
result in an explosion caused by sparks due to static electricity,
electrical devices, metal contact, etc.
Attach metal screens to the inlets and outlets of fans and
ducts.
If ducts are not attached to the inlets and outlets of fans or if the
ends of the attached ducts are left open, be sure to attach a screen
to cover the opening.
If no screen is attached, parts of a person's body or objects may
get sucked in or sucked-in objects may be blown out, leading to a
serious accident.
Do not place your face close to the outlet.
Small debris, etc. sucked in by the fan may fly out of the outlet at
high speed. If such objects get in the eye, it may result in loss of
eyesight. Because of this, do not place your face close to the
outlet.
When hanging, be sure to use the holes labeled "つり位置"
(Hang here).
Hanging by other parts may result in deformation of the fan, or
cause an accident by tipping over or falling down.
Do not increase speed using an inverter, etc.
Doing so increases the centrifugal force and air flow pressure force on the rotator, which may cause
the impeller to break, burnout of the motor due to excessive loads, etc.
Caution
When planning ductwork layout, plan it so that resistance is
extremely low and air can flow smoothly through the ducts. If fan is
operated with duct shaped so that it is blocked, it may result in stall
operation. Abnormal vibrations due to stall operation may cause
impeller blades to be broken.
Do not transfer the load of the ductwork to the fan. Doing so may
result in deformation of the fan, causing the rotator to come in
contact with the housing, resulting in a fire or breakage.
Be sure that there are no objects which may tip over or fall due to
vibrations or air flow force in the area around fans or ducts. Such
objects may result in an accident in such cases.
つり位置
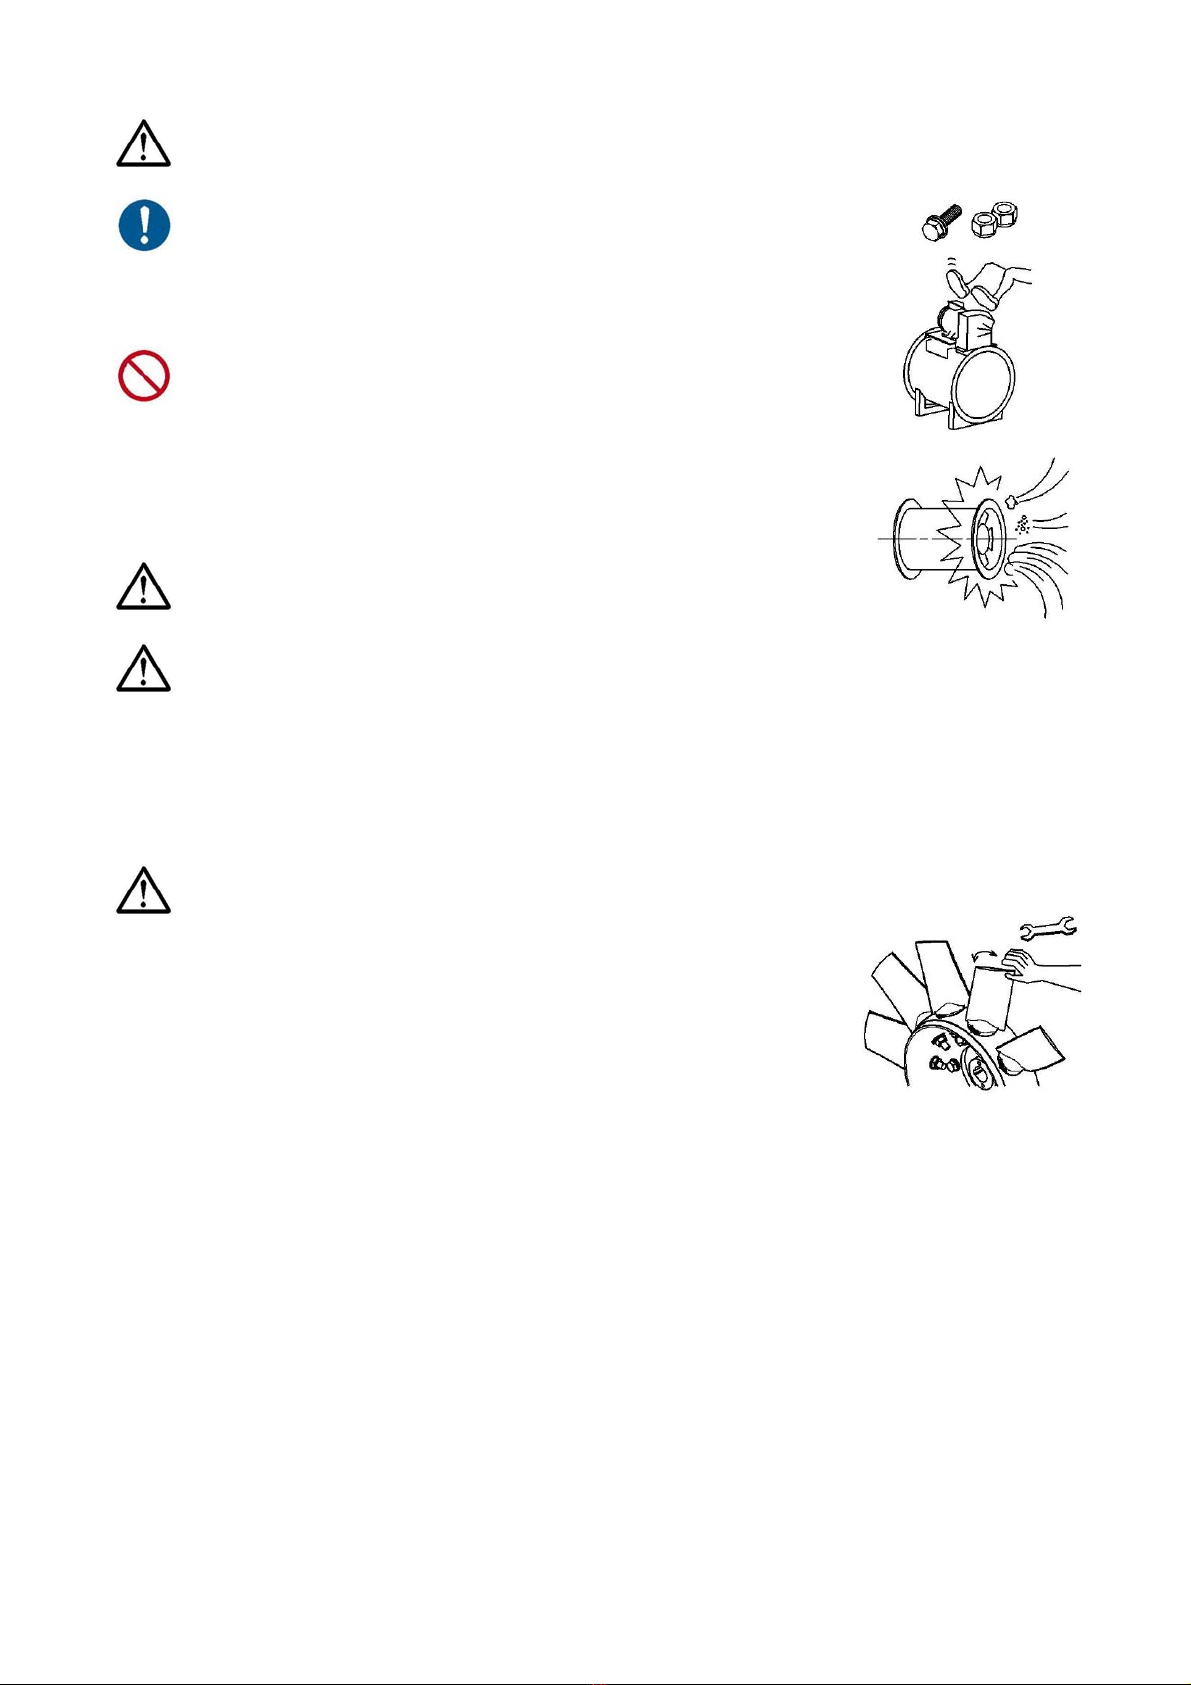
- 4 -
Wiring of the motor should be performed according to Electrical Installation Technology Standards and
Internal Wiring Standards by a licensed electrician. (Also refer to the instruction manual of the motor.)
Before performing test operation, make sure that there are no
materials, bolts, nuts, tools, etc. left behind after installation inside
the connected ducts or casing or near the inlet or outlet. If such
objects are left behind, they may be sucked in or blown out during
test operation, resulting in damage.
Do not climb or stand on the fan. Doing so may result in
deformation and damage of the fan or falling off of the worker.
Intake of gases at temperatures outside the specified temperature
range may result in failure of the motor or wiring section or in
breakage of the impeller.
(Temperature range: -10 to 40°C; Relative humidity: 90% or less)
Solid objects, dust, or liquids cannot be sucked in. Doing so may
result in damage.
When speed is reduced using an inverter, etc., vibration amplification or sound may occur at
specific frequencies (rotation speeds) due to resonance between the fan body, surrounding
ductwork, and mounting plates. If this occurs, avoid operation at those frequencies. Shipment
inspection* of the fan is performed only at the rated rotation speed. Operation at other speeds
(frequencies) is not guaranteed.
* Operation testing cannot be performed for non-standard products or parts in some cases.
Cautions regarding adjustable-at-rest impeller blades
Although with this fan the angle at which the blades are attached to
the impeller can be changed to achieve other performance
characteristics, it is also possible that problems may occur due to
the following factors if the blade angle is changed by the customer.
There is a danger of damage. The blade attachment angles are set
at the factory to meet the performance requirements of customers;
if the blade angle must be changed later, please consult our
company's service personnel. (Service charges will apply.) For
details, please contact your dealer or sales office.
Factors causing problems due to angle change
• Power may be increased, causing the motor to become overloaded and burned out.
• Changes in the attachment positions of blades may make the impeller unbalanced.
• If the angle change is non-uniform, abnormal flow may occur, causing malfunctions due to abnormal
noise or vibration.
• If nut tightening torque is insufficient, the nut may become loose, allowing the blade to rattle and
causing a malfunction.

- 5 -
Precautions for the use of an inverter to operate the blower.
1) The standard motor may not be used for the operation in some cases as shown below.
・ In the case of no margin for temperature rise in the motor
2) At factory shipment, the setting of a commercial inverter is not suitable for the blower.
Change the following values at least.
・Base frequency: Adjust to the rated frequency of the blower (50 Hz or 60 Hz).
・Highest frequency: Adjust to the rated frequency of the blower.
・Maximum output voltage: Adjust to the rated voltage of the motor.
・Upper-limit frequency: Highest frequency: Adjust to the rated frequency of the blower.
・Lower-limit frequency: 25 to 30 Hz (based on the cooling characteristics of the motor).
・V/f characteristics: Change to square reduction torque.
・Acceleration time: 30 to 60 sec. or more If the acceleration time is short, an over-current error
may occur.
・Deceleration time: 30 to 60 sec. or more If the decceleration time is short, a regenerative current
error may occur.
3) Other precautions
・ Vibrations of components (belt, casing, etc.) making up the blower may increase at a specific
frequency. If the increase in vibration cannot be eliminated even after other set values are
changed, a resonance point may be causing it. In such a case, set the jump frequency to
prevent the increase in frequency.
・If the blower is installed on a vibration isolation table (rubber, spring, etc.), a decrease in
frequency may become a resonance frequency. In such a case, set the jump frequency to prevent
this symptom (otherwise, the blower and motor are individually affected).
・If the carrier frequency is set higher, current leakage may increase, and the earth leakage
breaker may be activated.
・Do not use the inverter output power for applications other than electric motors.
For details, see “Use of inverter (frequency converter)” on page 20.

- 6 -
2 Product overview
2.1 Types and meanings of model indications
The types and meanings of model indications for standard specifications are shown in the table below.
The model indication is shown on the product nameplate on the side of the fan body (casing).
1 2 3 4 5 6 7 8 9
Indication
example
A 1 D 6 E - 4 1 2
Indication
meaning
Classification
Type
(Motor
rotation
speed)
Drive
system
Casing
diameter
(mm) /
100
Motor
output
(kW)
-
Performance
number
(Blade angle
number)
Voltage
(V)
Frequency
(Hz)
Indication types/contents
A
Axial fan
1
Low-noise type
(low-speed
specifications)
D
Motor direct drive
type
3 300 A 0.4 1
Large Air volume Small
1 200
150
4 400 B 0.75 2 2 230
5 500 C 1.5 3 3 346
6 630 D 2.2 4 4 380
2
High-pressure type
(high-speed
specifications)
V
V-belt drive type
7 710 E 3.7 5 5 400
260
8 800 F 5.5 6 6 460
9 900 G 7.5 7
10 1000 H 11
I15
J 18.5
K22
L30
M37
N45
The combination of type (motor rotation speed)
indication and motor pole count are shown
below.
Indication
Motor pole count
Small type;
Diameter: <7
Large type;
Diameter >7
1 4P 6P
2 2P 4P

- 7 -
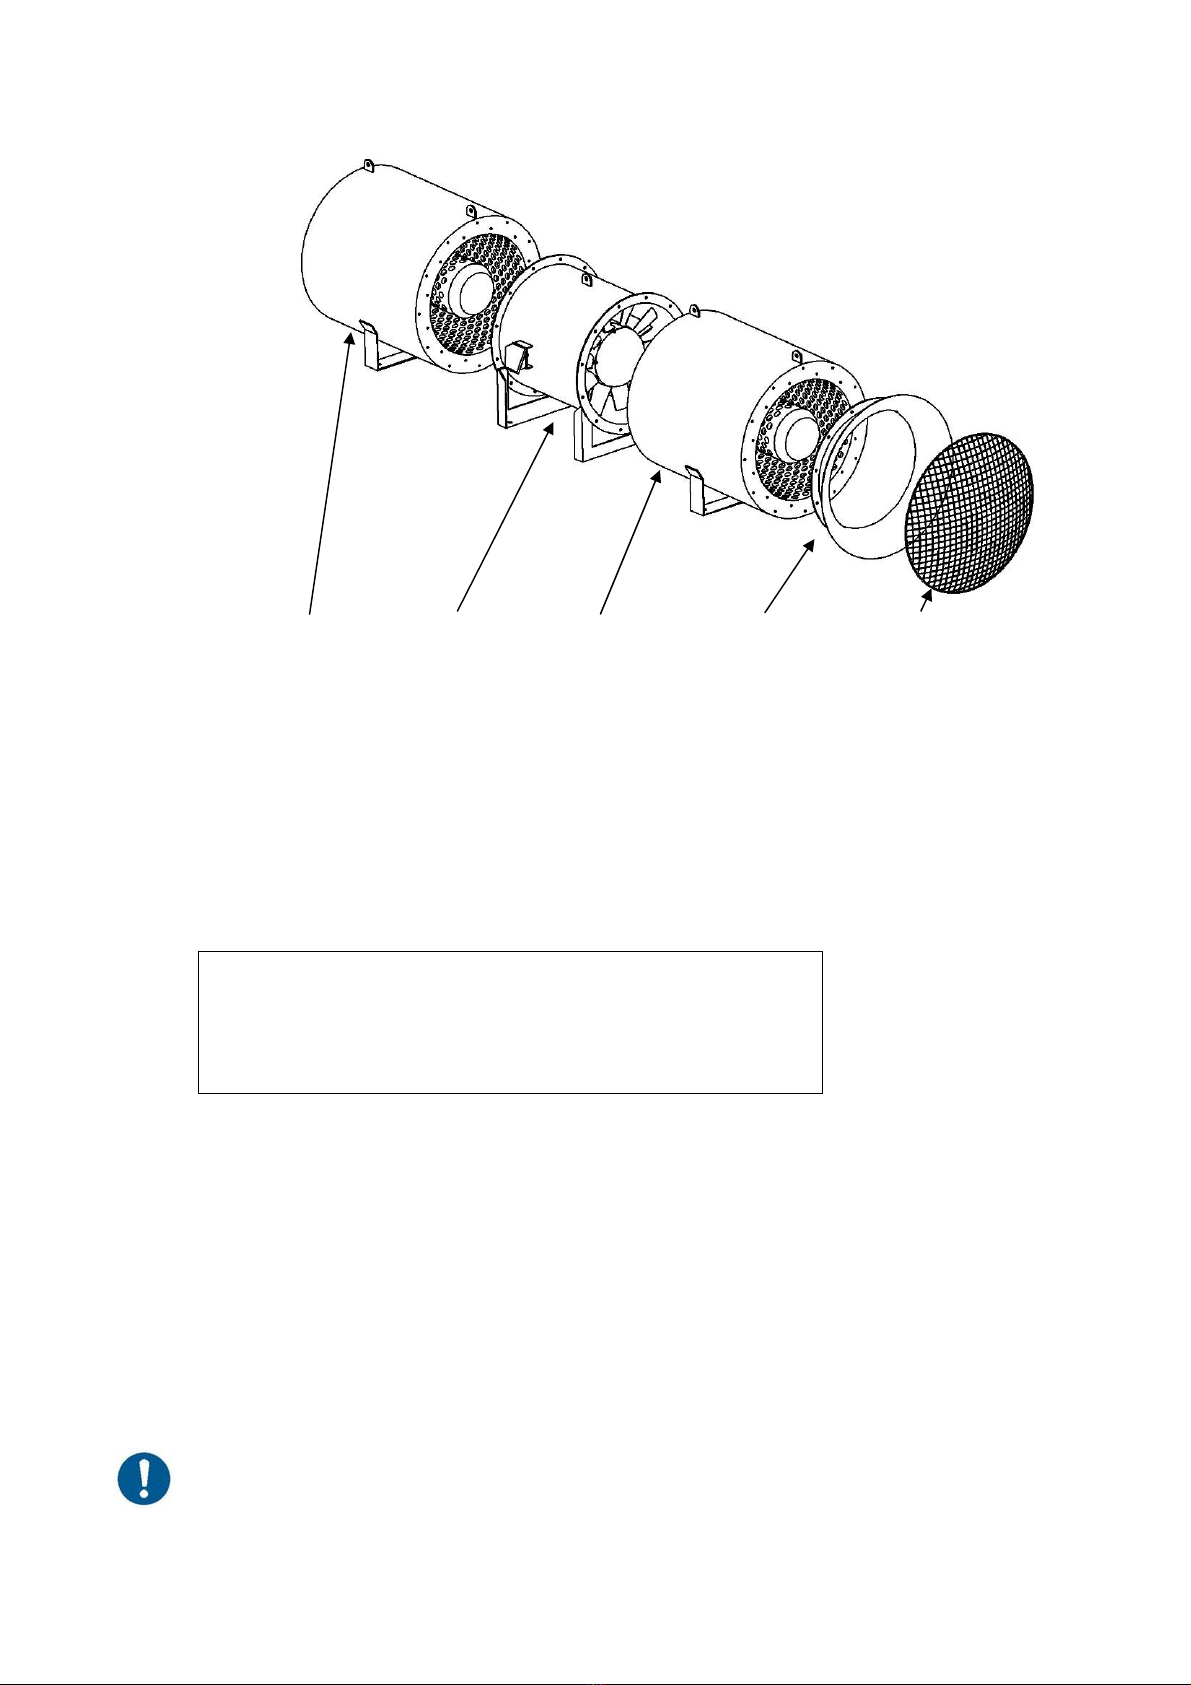
2.2 Product structure and names of parts
2.2.1 Outline view 2.2.2 Parts list
2.2.3 Exploded view
2.2.4
No. Part name Material
1 End cover A1050P
2 Holder SS400
3 Impeller blade AC4A or AC4C
4 Wheel hub AC4A or AC4C
5 Impeller hub FC200
6 Casing SS400, SPHC
7 Motor -
8 Terminal box -
When using a
flange-mounted motor
When using a
foot-mounted motor
Note: The diagram is an example and shows
typical part shapes and counts. Part shapes
and counts may be different depending on
the product.
Models which casing diameter is under φ400 are one casting type for the part No.3, 4 and 5 on upper
diagram (some models are excluded).
- 8 -
Options
Silencer: Reduces drive noise by approximately 10dB*.
Inlet cone: When using fan with inlet side open, this cone should be attached to
maintain performance.
Inlet screen: When using fan with inlet side open, this screen should be attached to
ensure safety.
* Degree of sound reduction depends on installation conditions.
3 Receiving
3.1 Unloading upon receipt and product verification
Although each product undergoes thorough inspection and only products that pass inspection are
shipped, please verify the following points upon receipt of the product:
* Fan is as ordered.
* No abnormalities such as breakage, deformation, etc. occurred
during shipment.
* All accessories are included.
* Bolts and nuts have not loosened.
3.2 Movement/transportation
When lifting the fan to move or transport it, always be sure to use the holes labeled "つり位置" (Hang
here) for lifting. For safety, the fan should be lifted by at least 2 labeled hangers (except for products
with only 1 hanger). Lifting should be performed by licensed personnel only.
3.3 Storage until installation
When fan will be stored until installation, even if the storage location is indoors, cover the entire unit
with waterproof sheeting. (This is also true for outdoor specifications.) Also, to prevent rusting of the
bearings, etc., turn the impeller about 10 times once per month. If turning by hand, be careful that your
hand does not get caught.
4 Installation
4.1 Mounting
4.1.1 Selecting mounting location
The fan should be installed in locations that meet the following conditions:
Locations which are within the temperature range where condensation does not occur.
(Temperature range: -10 to 40°C; Relative humidity: 90% or less)
Location where daily inspection and maintenance can be performed easily.
Indoors where rain water will not fall on it.
Stable location which is not subject to vibrations.
Silencer Fan Silencer Inlet cone Inlet screen
- 9 -
Location where no dangerous chemicals are present.
4.1.2 Foundation and mounting
For the amount of foundation concrete to use, a general reference is that an amount equal to 3
times the weight of the fan is suitable.
When mounting on top of a frame, be sure to mount it on a surface having sufficient structural
strength.
If there is a gap between the fan and the foundation surface, use liner plates (steel plates for filling
gaps) to fill the gap and verify that the fan does not rock before tightening the foundation bolts.
When mounting in the middle of a duct, take the weight of the fan into consideration and be sure to
use duct having sufficient strength. In addition, if necessary use hanging bolts, wire cables, etc. to
support the weight of the fan.
Be sure to fully tighten bolts and nuts.
Mounting orientation should be horizontal or with the inlet facing down. Mounting with inlet facing
upward is non-standard. In addition, vertical mounting of fans with foot-mounted motors is not
correct.
If the fan will be mounted in a high location and especially frequent inspection or repairs are
expected, lifting equipment should be installed.
4.2 Connection to ducts
Install removable ducts for maintenance and inspection holes before and/or after the fan. (Be sure to
provide enough space for removing ducts and performing inspection.)
Install screens at the duct inlet and/or outlet for safety. (Screens are optional accessories.)
If the ductwork is not suitable, not only will resistance be increased and air flow be insufficient, the
fan may operate stalled. This may result in breakage. Be careful of the following points when
installing ductwork.
(1) When using expansion/contraction joints, be sure to apply sufficient tension. In particular, install a
collapse-prevention reinforcement ring on the inlet-side expansion/contraction joint so that it does
not collapse due to vacuum and use the minimum possible length.
(2) For small-radius-curve elbows, install corner vanes.
Horizontal mounting Inlet facing down Inlet facing up
(non-standard) Foot-mounted motor
- 10 -
(3) Avoid sudden expansions or shrinkage in diameter.
(4) When the inlet will be left open, install the inlet cone to maintain performance.
(5) When the outlet will be left open, install the diffuser to maintain performance.
(6) Leave at least the diameter of the fan casing between the wall and the fan inlet or outlet.
4.3 Electrical wiring
Wiring of the motor should be performed according to Electrical Installation Technology Standards
and Internal Wiring Standards by a licensed electrician.
For the power source for this fan, check the product nameplate and use the specified power
source. If operation is performed using a different power source, there is a danger of malfunction.
The product nameplate is attached to the fan casing.
Select an earth leakage circuit breaker and/or circuit breaker that is suitable for the starting
current.
Be sure to connect the earth wire to prevent electrical shock.
Also refer to the motor instruction manual.
Be sure to wire the fan properly so that the rotation direction is correct. (For details, refer to section
4.4).
4.4 Test operation
Before performing test operation, be sure to inspect the following points and verify that there are no
abnormalities before starting operation.
Make sure that there are no materials, bolts, nuts, tools, etc. left behind after installation inside the
connected ducts or casing or near the inlet or outlet.
Check that there is no looseness in the mounting and that all bolts and nuts have been securely
tightened.
If the inlet or outlet is open, be sure that metal screens are installed.
Check wiring.
After verifying that there are no abnormalities in the above items, switch on the power and
immediately switch it off again (momentary operation). In addition to checking whether there are
any abnormal vibrations or contact noise, also check the rotation direction. (There is a sticker on
the fan casing indicating the rotation direction.) If the rotation direction is opposite, the air from this
fan will also flow in the opposite direction.
d or more d or more
- 11 -
If the rotation direction is opposite, switch off the main power. Swap the connections of two of the
three power cables. Then test operation again and check the rotation direction. Since the wire
color and power source phase may vary according to the power company, rotation may be
opposite even if the matched wire colors are connected. When first applying power, be sure to
check the rotation direction.
If no abnormalities are found during momentary operation, start continuous operation. Record that
there are no abnormal noises, measure and record the vibration value and current value, and
check whether they are acceptable or not.
When using a flow volume adjustment damper, set it to full open before starting, and then after
starting gradually close the opening. When closing and opening the damper, there may be an
increase in noise or vibrations or a drop in pressure. If this occurs, do not close the opening
further; instead, open it more. These phenomenon are due to stall operation. For these reasons,
controlling the flow volume by adjusting the impeller blade angle or by inverter speed control is
recommended instead of using a damper.
5 Operation
5.1 Operation, maintenance, and inspection
Periodic maintenance and inspection are required to operate the blower safely. If the daily inspection is
performed on the following items and the results are recorded, abnormalities can be detected early to
prevent problems.
1)Check for vibration or abnormal sound once every three months and inspect the insulation once a year.
Inspect the motor while referring to its instruction manual.
2)It is recommended to replace the shaft seal or packing at the same time as the bearing is replaced even
though the replacement cycle may vary depending on the deterioration status or operating
environment.
3)When the blower used is an air-cooling type or quasi-moisture-proofing type blower, or when air
containing dust is taken in, gas contact parts (e.g., inside of the casing, impeller, etc.) can be badly
corroded and the rotation contact portion can be significantly worn. Therefore, the inspection cycles
should be shortened.
Inspection item
Recommended inspection cycle
Inspection contents
3 months
6 months
12 months
Condition inspection
Abnormal
noise
Blower
■
□
□
Check for abnormal noise due to rattles.
Check for metal contact noise.
Check for other noise considered to be
abnormal.
Motor
■
□
□
Check the grease.
Check for loose bolts.
Check the bearings for abnormal noise.
Vibration
■
□
□
Check the vibration value and any changes to
it.
Temperature
■
□
□
Check the temperature near the bearing and
any changes to it.
Electrical section
□
■
□
Check the current value and voltage value,
and any changes to them.
Component
inspection
Coupling
Rubber bushing
□
■
□
Check for hardening.
Check for wear or cracks.
Anti-vibration
rubber
□
■
□
Check for hardening.
Check for wear or cracks.
Shaft seal □ □ ■ Check for cracks or damage.
Packing □ □ ■ Check for damage or hardening.

- 12 -
5.1.1 Abnormal noise
If an abnormal noise occurs, stop operation immediately and perform inspection.
Possible types and causes of abnormal noise:
◇Bearing noise
Abnormality or end of service life of motor bearings
◇Contact noise
Impeller or casing deformation/damage
Intake of foreign object
Looseness due to loose bolt
◇Vibration noise
Please refer to the following section “Vibrations”.
◇Pulsating noise (unsteady flow noise)
Excessive closing off of flow volume
Excessive resistance of equipment
5.1.1 Vibrations
If vibrations exceed the acceptable values, stop
operation and perform inspection.
Reference values for acceptable vibration
Motor pole count
(P) - Frequency
(Hz)
Rotation
speed
(min-1)
Acceptable
vibration value
(µm; p-p)
6 - 50 Approx. 970 Approx. 118
6 - 60 Approx. 1170 Approx. 97
4 - 50 Approx. 1450 Approx. 79
4 - 60 Approx. 1750 Approx. 65
2 - 50 Approx. 2950 Approx. 38
2 - 60 Approx. 3500 Approx. 32
Acceptable value at vibration speed of 6mm/s
Possible causes of vibrations:
Unbalance of impeller due to dust adhesion
Deformation/damage of impeller or casing
Abnormality of motor shaft or bearings
Looseness due to loose bolt
Stall operation; unsteady flow
Transfer or resonance of vibrations from ducts or base
Insufficient rigidity of ducts or base
5.2 Stopping operation and restarting after stopping
When operation will be stopped, consideration should be given to the storage conditions even if the stopped
period will be short. To prevent rusting of the bearings, etc. during the stopped period, turn the impeller by hand
about 10 times once per month, or run it empty for about 5 minutes once per month. Also, when restarting
operation, be sure to perform the same inspections as were done for test operation. In particular, be sure that
nothing is adhered to the impeller and check that there is no corrosion.
Rotation speed (min-
1
)
Acceptable vibration value diagram
Acceptable
vibration value
Acceptable vibration
value when using
vibration-damping
equipment
Total amplitude (µm)
Acceptable
Unacceptable
Rotation speed (min-
1
)
Acceptable vibration value diagram

- 13 -
6 Warranty
Scope of warranty
Repair service is provided free of charge for a failure during the warranty period, as long as the
blower has been used in compliance with these Operating Instructions, labels attached to the
body, and other instructions.
In the case that this product is incorporated into other equipment used by the customer, the
warranty does not cover costs for removal from such equipment, reattachment to such
equipment, costs of other incidental work, costs of transportation etc., resulting opportunity loss
incurred by the customer, lost operation, or any other indirect loss or damage suffered by the
customer.
•For requests for repair service, please contact our nearest branch or sales office.
Warranty period
One (1) year from the date of delivery of the product.
Even during the warranty period, only charged service is provided in principle, if any of the
following applies:
•Failure or damage due to incorrect use that is not compliant with these Operating Instructions,
labels attached to the body, or other instructions, and/or unauthorized repair or modification
•Failure or damage due to transportation, dropping, etc. after the purchase
•Failure or damage due to fire, earthquake, storm, flood, lightening or other natural disasters,
environmental factors such as salt damage and public pollution, abnormal voltage, use of a
power supply (voltage or frequency) other than that specified, or the like
•Failure or damage due to repair or modification (including punching, etc. in the product) not
conducted by our company
•Failure or damage due to the use of parts other than those designated by our company
•Failure or damage due to the entry of foreign material
•Discoloration, scratching, natural consumption of consumable parts or other defects due to
use or deterioration over time
•Failure or damage caused by neglecting the maintenance and inspection described in the
Operating Instructions
We will not compensate for any loss or damage resulting from defects that occur during the
use of this product.
[Notices]
(1) The descriptions in these Operating Instructions are subject to change without prior
notification in the future.
(2) We have made all possible efforts to prepare these Operating Instructions. However, if you
have any questions about them or find any inquiries, errors, omissions, etc., please contact
our nearest branch or sales office.
(3) If the power supply frequency changes due to a change in the location where the blower is
used, it may not be used as it is. We will consider a measure in each case where it is
required. In such a case, please contact our nearest branch or sales office.
(4) At the time of inquiry, please describe the product type and the manufacturing number
indicated on the product nameplate.
- 14 -
7 Malfunction causes and countermeasures
Fan malfunction causes and countermeasures
Malfunction status
Malfunction cause
Overs and shorts of quantity
of wind, the static pressure
Excess/short of motor
Bearing overheat/burnout
Abnormal vibration
Peculiar noise
Corrosion and wear
Abnormal contact
Motor not activated
Measures
Defective installation
○○○○○Re-installation
Poor foundation ○○○Renovation
Contact with the rotator? ○○○○○○Processing of contact part,
and re-installation
Defective duct/duct joint ○○○○○○Renovation
Defective lubricating oil ○Replenishment
Inappropriate oil quality,
contamination, excessive
amount of oil
○Replacement or recycling
Inappropriate material ○○○Replacement
Unbalanced impeller ○○○○Correction
Deformation or damage of
impeller ○Repair or replacement
Wear or corrosion of impeller ○○
Repair or replacement
Operation at a dangerous speed ○○○○
Renovation or remodeling
of operation point
Abnormal bearing of the motor ○○○Replacement
Wrong rotation direction ○○○○○Change
Malfunction of the motor ○○○○○Repair or replacement
Intake of light gas ○
Renovation/replacement of
impeller
Intake of heavy gas ○○
Renovation/replacement of
impeller
Mixture of foreign object or
adhesion of scale ○○○○○○○Cleaning
Surging operation ○○○Change of operation point
Resistance to the pipe system ○○Renovation
Failure of damper ○○○○○Repair
Accumulation in the drain ○○○○○Draining
There is less pressure loss than
a plan ○○
Damper adjustment,
change of the rotary speed

Note on your purchased blower
Fan identification information that you may need when making an inquiry of us.
Model Serial No.
Purchased on Date Starting day Date
Distribution
agent TEL ( ) Incharge:
SHOWA DENKI CO., LTD.
1-25 Shinden, Kita-machi, Daito City, Osaka 574-0052, Japan
http://www.showadenki.co.jp
Table of contents
Popular Fan manuals by other brands

RenewAire
RenewAire Breeze BR70 Installation and operation manual

Omega Altise
Omega Altise OAELITEB Operation, maintenance and safety instructions

BLAUBERG
BLAUBERG Sileo V2 Operation manual

Today's Design House
Today's Design House HUGGER SERIES Z442 installation instructions

Savoy
Savoy 52-EUP-5RV-WH owner's manual

nilan
nilan Combi S 302 Polar Top user manual


