SHRC H1GPS User manual

Thank you for your purchase of this product. Please read the
Operation Instruction carefully and conduct operation and usage
according to the Operation Instruction. Please keep this User
Manual for your reference when conducting daily maintenance
and adjustment.
INSTRUCTION
GPS GLOBAL POSITIONING

Safety instructions
1.please keep the parts of drone out of the reach of children.
2.this drone is very powerful. When using it for the first time, you should push the left
control lever slowly to prevent the drone from rising too fast and causing
unnecessary collisions and injuries.
3.when a flight is ended, please turn off the power switch of remote control first and
turn off the power switch of the drone then.
4.do not place the drone battery in high temperature condition or near flammable or
explosive materials.
5.please keep the drone at a distance of 4.5 meters from humans and animals to
ensure safety and prevent injury.
6.this drone is suitable for people aged 14 and over, and it should be within the sight
of the operator's (coach) to ensure safe flight.
7.do not charge the battery of remote control if the battery is a non-rechargeable
battery. The drone must be used with the original batteries.
8.if the drone will not be used for a long time, please take the batteries out of the
remote control unit.
9.do not cause a short circuit during the charging.
10.if you do not use the drone for more than 10 days, please discharge the battery of
drone to 40-50%(flight for a certain time). In this way, the life of battery will be
extended greatly.
11.please keep a safe distance from the rotating propeller to prevent injury.
12.all operators should abide by the electromagnetic environment regulations of
China on the aeronautical radio (station), which remote control radios are
prohibited from being used within 500 meters of the airport pavement, they are
also required to comply with the certificate and broadcasting regulations made by
the relevant regulatory authorities, including flight time and area.
13.please assemble the drone under the supervision of an adult.
14.operators are responsible for their safe flight and safe distance. Do not hover and
fly over the crowd (more than 12 people).

Items List
----------------------------------------------------------------
Drone
Remote Control
Installation and replacement of propeller blades
--------
Installing The Protection Ring
----------------------------------
Instructions on remote control function keys
--------------------------
Instructions of battery of remote control
------------------------------
3
3
3
5
6
Preparing for flight
Flight environment requirements
--------------------------------------
Preflight inspection
------------------------------------------------------
Frequency matching between remote control and drone
----------
7
7
7
Control with a mobile phone
Downloading APP
--------------------------------------------------------
Opening and connecting the software on your phone
---------------
13
13
Advanced Function
Common matters needing attention
---------------------
Hover mode
---------------------------------------------------------------
Track and waypoint mode
-----------------------------------------------
Follow mode
---------------------------------------------------------------
Set-circle mode
------------------------------------------------------------
Gesture recognition and photographing mode
------------------------
14
14
15
15
15
15
Advanced Flight Function
Speed gear adjustment
-------------------------------------------------
Photographing and video recording
-----------------------------------
One-click return
-----------------------------------------------------------
One-click stop
-------------------------------------------------------------
Headless mode
-----------------------------------------------------------
Altitude hold mode
-------------------------------------------------------
Safety measures
---------------------------------------------------------
10
10
10
10
10
12
12
8
4
4
First use
Calibration of compass
--------------------------------------------------
9
Calibration of compass and head-free flighit direction
Basic flight
-----------------------------------------------------------------
Drone description
--------------------------------------------------------
Battery Charging Steps
--------------------------------------------------

Items list
Drone
Please check the items in package before you start.
Mini drone: 1
Screws on protective ring: 12
Propeller blade:
Remote control: 1
USB cable: 1
Screwdriver: 1
Instruction of product 1
2 type A propeller blades
2 type B propeller blades
Battery charging steps
Lithium battery is used in this product, which has charging and discharging functions
with a battery voltage of 7.4V. The battery must be charged with a factory-provided
charging cable.
Description of drone
This drone has good controllability and stability. Besides supporting ordinary flight, it
also has many other functions, such as GPS outdoor fixed point, real-time image
transmission, information transmission, mobile phone control, photographing and
video recording, gesture recognition, surround flight, track flight, follow flight,
One-click return, head-free flight mode,etc., it is also with many safety measures
such as propeller blade stuck protection, low battery alarm, automatic low battery
return, height and flight fence restrictions.
Connect the battery of this product to the USB charging cable and connect the USB
charging cable to the computer or adapter of smart phone (5v,1A/2A). When the
USB charging cable is powered on, its indicator light is red, if the battery is being
charged, the red light on it will be always on and the green light on it will be flashing,
if the battery is fully charged, the red light on it will be off and the green light on it will
be always on. Please disconnect the power supply and unplug the battery when the
battery is fully charged to prevent risks. Please ensure that the battery is fully
charged before each using.
Please charge fully the battery when the battery is used for the first time

Installing the Propellers
Model A propeller blade Model B propeller blade
Front
Back
The Drone comes with replaceable propellers if the originals are broken or badly
damaged.
(1) When installing for the first time, please carefully distinguish the propellers type.
(2) Referring to Figure 3, insert the groove of propeller opener into the bottom of
propeller which needs to be replaced. And press the handle of the opener to take
down the propeller.
(3) Referring to Figure 4, distinguish between type A and type B propellers, and press
the propeller vertically to install them on the motor shaft. The mark can be found on the
rotor. It is extremely important to use the correct propeller (A or B) for
replacement. Using the incorrect propeller will make the drone out of to control.
Installing the protection ring
The protecting ring should be installed from the bottom in the direction as shown.

Remote Control
Function Instructions
One button
ascend
Indoor/Outdoor switch
Follow mode
One button return
Power
Speed switch
Set circle mode
Right control lever
Left control lever
Video
Photography
Calibrated
geomagnetism
One button landing
NO. Function keys Function Description
Speed gear shifting
Push the control lever upward,the drone will ascend vertically;
Push the control lever downward,the drone will descend vertically;
Push the control lever leftward,the drone will rotate
counterclockwise;
Push the control lever rightward,the drone will rotate clockwise;
Push the control lever upward,the drone will be level flight forward;
Push the control lever downward,the drone will be level flight backward;
Push the control lever leftward,the drone will be level flight leftward;
Push the control lever rightward,the drone will be level flight rightward;
Left control lever
(ascend/descend/turn
left/turn right)
Power switch
Right control lever
(level flight)
Press the button of power switch the remote control light
will be on/Press again the remote control light will be off.
Changing speed gear

Installation of battery of remote control
Open and remove the battery cover, put into 3 AA batteries in correct polarity
(batteries installation directions are shown in pictures below), close the battery cover
and screw on it.
Set-circle mode The drone will center around the curret head at 2 meters
and make a surround flight.
Photography connecting the drone to APP,then press the photography
button,drone will taking photo and saving into APP.
One button taking off If the drone is in a state of stationary frequency,pressing
this button it will taking off.
One button landing If the drone is in a state of flight,pressing this button it will
landing.
Video Connecting the drone to APP,then press the video
button,the drone will recording video and saving into APP.
One button return Pressing this button,the drone will fly back and sound
“deep”,press again,the drone will stop return and hover.
Follow mode Switch to follow mode by APP,the drone will follow the
connecting mobile phone within a certain distance.
Indoor/Outdoot flight Please refer to page tenth.
Calibrated copass Please refer to page eighth.

Flight Preparation
Applying Environment
(1) Choose an open place to fly where having no tall buildings.
(2) Do not use this product in severe weather,such as strong wind,heavy snow,rain or
fog days.
(3) Please keep away from obstacles, crowds,high-voltage wires,trees,water,etc,when
flying.
(4) Do not fly in the area where there is complex electromagnetic environment (as
near communication base station, signal transmission tower, or high-voltage station,
etc.).
(5) Do not fly in the area where it is not allowed to fly by laws and regulations.
(6) Do not use this product in airports, stations and their surroundings.
Please have flight training before using the product (User should be guided by a
professional.). Please choose appropriate flight environment when using the product.
Preflight Inspection
Please inspect the following items before flying:
(1) Whether the drone and remote control are both with fully battery power.
(2) Whether the propellers are installed correctly and without any damage.
(3) Whether the propellers can ran normally when the produce is started.
Linking Remote Control and the Drone
(1) Place the drone on the level ground.
(2) Turn on the switch of the drone first, and then turn on the switch of the remote
control.
(3) As shown in figure, push the left lever of remote control fully forward, wait for a
chime to sound, then pull the lever fully rearward, and wait for a second chime. When
this last chime has sounded,the lights on drone turn from flashing to constant, the
drone is ready to fly.
If the linking is not successful or the waiting time is too long, you should turn off both
drone and remote control power and repeat the steps above.

Calibrated geomagnetism
First use
Calibration of compass and head-free flight direction
If this product is used for the first time, you should conduct a compass calibration
after the frequency match step is completed.
Calibrated geomagnetism
Press the No.13 key on remote control unit for 2 seconds, when the four indicator lights on the drone are flashing quickly, the drone
is in the calibration state.
Steps
①firstly, perform a horizontal direction calibration: take the middle part of the drone, try to keep it parallel with the ground, and
slowly rotate the drone 4 times clockwise with the main body as the center;
②secondly, perform a vertical direction calibration: lift upwards the head of the drone vertically, keep it perpendicular to the ground,
and slowly rotate the drone clockwise with the main body as the center until the four indicator lights begin to flash slowly or keep
on, which represents the completion of the operation.
Note:
①when you use this product for the first time, please be sure to complete the steps carefully. If this product is only used in one
area, you do not need to repeat this operation in the future, if this product is taken 400 km away from the area where you calibrate
the compass last time, you will need to repeat this operation.
②please complete this operation carefully, this operation is related to whether the drone can fly in the correct direction following
the indication of remote control.
③If the four indicator lights on the drone are in the cycle state of“slow flash once and quick flash twice”, it means the compass is
not successfully calibrated, you need to place the drone on a horizontal plane and repeat the above operation.
④until this operation is to be done, the drone can begin to search satellites.
Please complete “calibration of compass and head-free flight direction” each time.
Press the No.12 key on remote control unit for 2 seconds, when the four indicator lights on the drone flash quickly on the same time
and then return to flash slowly or light on state, it means that the operation is completed.
Note:
①Please put the drone on the level ground or flat surface to operate, this step will be a key to the normal flight of drone, if the
calibration of gyroscope is not on level ground or flat surface, the drone may deviate toward a certain direction after took off,
sometimes, and it may damage the drone motor.
②It is recommended to repeat this step before starting the flight.
③It may cause gyroscope fail if the drone is collided or dropped seriously, which will affect the flight; please calibrate the
gyroscope again in that case.
④Refer to “headless flight mode” on page 10 of this manual for the meaning of calibrating the headless flight direction.
Search satellites and position
After completing the above steps, you still have to wait for the drone to complete the satellite positioning. When the four indicator
lights on the drone have changed from slow flashing to continuous light, it indicates that the drone has completed satellite
positioning and reached the take-off condition. Now you can conduct the next step to start up the motor and fly.
Note:
①The speed of searching satellites and positioning depends on environmental disturbances and weather conditions.
②In the case of cold start (more than 1 hour from the last flight), the time for searching satellites and positioning is from 40 to 90
seconds, usually it is within 60 seconds after the drone is started.
③In the case of warm start (within 1 hour from the last flight), the time for searching satellites and positioning is from 10 to 40
seconds, usually it is within 20 seconds after the drone is started.

Applying Environment
Startup
Stop
Fly upward
Fly downward
Spin clockwise
Spin anticlockwise
Roll leftward Roll rightward
Pitch backward
Pitch forward
Startup the drone motors
pull the two remote control levers as
shown in the figure, and hold for 1-2
seconds to start the motors. After the
motors start, release levers and push the
levers to start flying.
Remote control Drone Control method
Stop the drone motors
Stop the drone motors after drone lands
to ground or other expected place,
repeat the operation above for 1-2
seconds, the motors will be stop. The
drone will have no reaction if you push
the levers after this operation. The motor
should be re-started if you want to play
again.
Push left control lever forward, the
drone ascends vertically. Pull left
control lever rearward, the drone
descends vertically.
Push left control lever rightward, the
drone spins clockwise. Push left control
lever leftward, the drone spins
anticlockwise.
Push right control lever forward, the
drone pitches forward. Pull right control
lever rearward, the drone pitches
backward.
Push right control lever rightward, the
drone rolls rightward. Push right control
lever leftward, the drone rolls leftward.
Advanced flight function
Speed gear adjustment
Press the No.4 key on the remote control unit to change the speed of drone. When the
drone is switched into low speed gear, the remote control unit will make a beep sound,
when the drone is switched into high speed gear, the remote control unit will make two
beeps. The speed gear will be kept in low speed gear automatically after the drone or
battery power of remote control unit is shut down and restarts again.
Photographing and video recording
Short press the No.5 key on remote control unit, the remote control unit will make a
short beep and then begin to take pictures; long press the No.5 key on remote control
unit, the remote control unit will make a long beep and then begin to record a video,
long press again to terminate the recording. The camera and video documents that
are recorded will be saved in the mobile that is connected with drone, you can read
them directly in the control software.
Note: This feature is only available when the phone is connected.
One-click return
Altitude hold mode (indoor mode, please use it cautiously)
Each time, when the drone takes off, the Global Position System of the drone will
automatically remember the takeoff point. When you press the No. 6 key on the
remote control unit in the flight, the remote control unit will make continuously beeps,
and the drone will automatically return to the takeoff point. If you press this key again
when the drone is on the way back, the drone will stop returning back and keep
hovering.
After calibrating the gyroscope and headless flight direction, you can press the No.11 key on the remote control unit to turn off the
GPS, the drone can be started up and fly under situation of unfinished satellite positioning (or in indoor environment). You can
press this key again; the remote control unit will make a long beep to restart the GPS.
Note:
①If you turn off the GPS in indoor environment, the drone can take off, but it is easy to be disturbed by indoor radio signals, which
may cause the drone to lose control and hit indoor persons or articles. Please use this function cautiously.
②When the outdoor wind is strong, it is not recommended to open the altitude hold mode, which will cause the wind resistance
ability of the drone dropping, the drone can be blown away by the wind.
3 Do not use altitude hold mode in the air to conduct satellite positioning, the return point will be on the ground below the position
vertically, which may cause the drone to misjudge the return point. If you want to switch back GPS mode from the altitude hold
mode, please take back the drone and place it on the ground, then restart the GPS (press No. 11 key again) and the motor.
Safety Measures
1. Signal loss protection Signal loss protection means that the drone will automatically return to the takeoff point if it has
successfully searched satellites and positioned before taking off, and kept the GPS turning on after losing the remote control signal.
Drone will run Off Signal Safe Mode in following cases:
①Remote control loses power or is shut down suddenly.
①Disconnect mobile's wifi, exit related software, power off, etc. if the drone is controlled by a phone
③Remote control signal or mobile phone signal is interfered by other electromagnetic wave.
④Drone is beyond the effective distance of remote control signal or mobile phone wifi signal due to wind or inertia reason.
⑤There is an obstruction between the drone and the remote control unit or mobile phone to affect the signal transmission.
2. Low battery protection Low battery protection means that the drone has a smart power calculation system, which can calculate
the flight time based on the flight speed and remaining power, when the remaining power is lower than protection value, the drone
will automatically return to the safe range, when the remaining power is nearly exhausted, the drone will automatically return to the
takeoff point and force to land. When the drone is with the low battery protection mode, the four indicator lights will flash
simultaneously. It is recommended that you purchase more spare batteries and charge the batteries before using to ensure
sufficient power.
The remote control unit also has the low battery protection function. When the remote control unit is with the low battery protection
mode, it will continuously make beeps to remind. At this time, you should take back the drone and replace the remote control
batteries.
3. Emergency stop When the drone is out of control or in an emergency: winding with branches, wires, hair, etc., or when the
blades hit an obstacle, the drone will automatically enter the emergency stop mode and shut down. When the outdoor wind is
higher than level 5 or strong gust, the drone will also enter this mode. In the event of other emergency situations, the drone motor
has not be shut down, you should refer to the one-click stop function to shut down the motor. Note: In this mode, the drone will fall
from the air, it may be destroyed and hurt people and animals below, so please ensure that the flight environment and operation
methods meet the safety conditions. You can use the "one-click landing" function as appropriate.

Control with a mobile phone
Downloading APP
Scanning the QR code below and downloading the software
Foreign Android System Apple System
Android version LW FPV
Opening and connecting the software on your phone
Enter the “Settings” function of the mobile
phone, open the MF option, find the device
WF name “WIFI-720P-GPS-XXXXXX” and
connect.After the connection is completed
successful, return to the desktop, open the
downloaded application, and enter the
program.
Click "Start Flight" to
enter the control page
Before using the software, you should familiarize the functional meaning of the keys and icons.
Basic keys and information description
① Return to the home page
② Select flight mode
③ Control lever on/off
④ Return / hover
⑤ Unlock / lock
⑥ Takeoff / landing
⑦ Setup menu
⑧ Map / preview
⑨ VR mode
⑩ Take photos.
Video recording.
Album
Return message meaning
Height
(m, distance from the takeoff point)
distance
(m, distance from the takeoff point)Vertical speed Longitude and
latitude of the drone
Remaining capacity
of drone
Level speed
Number
of satellites
Signal level for image
transmission
(It is a reference value based on
the distance and speed of the flight)
Function definition
1. Return to the home page 2. Select the flight mode. 3. Turn the control remote on or off. (Only available in the "mobile
phone takeover" mode, please refer to the function of the left and right control levers of remote control unit in the basic
flight.) 4. When the drone is hovering, click this key to execute the "one-click return" function. During the return flight,
click this key to execute the “hovering" function. 5. After the searching satellites and positioning are successfully, click
the key to take over the drone by a mobile phone, click the key again to exit the mobile phone.
(Always keep the remote control turned on) 6. One-click take off and land. 7. Open the settings menu. 8 Switch to map
or image transmission display frame. 9. VR mode (VR glasses are required). 10. Click to take photos. 11. Click this key
to start recording, and click the key again to end recording.
(When the signal is poor or interrupted, the software will automatically end recording and save). 12. Open the album to
view the recorded files.
WIFI-720P-GPS-XXXXXX
Hover mode
When the drone is in other flight modes, you can press this mode and make the
drone enter normal hover mode.
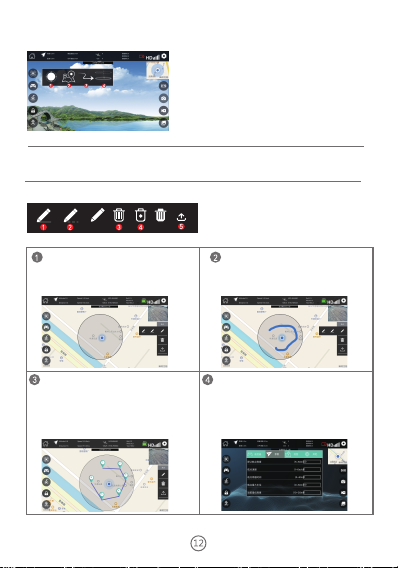
1. Sketch flight path 2. Set flight waypoints
3. Delete all flight paths and waypoints
4. Delete a single waypoint
5. Send instruction
Track and waypoint mode
Before using this function, you should familiarize the meaning of icons.
The following functions must be used after the
drone has completed the searching satellites and
positioning.
1. Hover mode
2. Track and waypoint mode
3. Follow mode
4. Rotation around a point mode
Figure 1
Figure 2
Figure 3
Figure 4
Click on “flight path and waypoint mode”, the
screen will switch to the map display frame and a
circular area (50m radius) will appear. The blue point
is the location of the phone (as shown in Figure 1).
Open the right setup menu, click the “set flight
waypoints” key, and draw the points you want the
drone to move in the circular area (as shown in
Figure 3), then click “send instruction”, the drone
will fly according to what you have drawn. You can
set 24 waypoints at most. When you want to delete
all or individual waypoints, you can use the delete
function.
You can set the waypoint parameters in the
parameter bar of the setup menu in advance (as
shown in Figure 4).
Open the right setup menu, click the “sketch
flight path” key, and draw the flight path you want
the drone to move in the circular area (as shown in
Figure 2), then click “send instruction”, the drone
will fly according to what you have drawn.

Follow mode
Gesture recognition and photographing mode
Rotation around a point mode
(Figure 2)
Gesture video pose
(Figure 1)
Gesture photo pose
In the case of close range (it is recommended that the height is not exceeded for 10
meters and the distance is not exceeded for 20 meters), when this mode is opened, the
drone will follow the mobile phone to move at a fixed distance from the current
distance.
Click on “rotation around a point mode”, the screen will switch to the map display
frame and a circular area (50m radius) will appear. The blue point is the location of the
phone. Click once in the circular area to mark the center point of the flight. Click the
center point to display the parameter setting window. You can set flight height and
radius. Click the center point again to save the parameters and close the setting window.
Click the "Delete" key to delete the center point and the parameters. Click the “send
instruction” key to send an action instruction to the drone to execute the set flight.
1. When searching satellites and positioning, the more the satellites, the higher the
precision, the returning error is usually within 1 meter radius.
2. In the return mode, the drone can only land by “one-click landing”. If you want to
control the drone, please cancel the return mode.
3. When the image transmission signal is poor, the photographing and video recording
functions will be invalid.
4. The image transmission signal is related to the flight environment. The area with large
flow of people and many buildings will have strong interference. Communication
towers, network base stations, WIFI transmitters and monitors are all sources of
interference. Please avoid the environments above.
5. The image transmission effect is also related to your phone configuration and
memory. When using this product for image transmission, please close other
background softwares to make the image transmission effect better.
Enter the "other" option in the setup menu, select open in the "gesture capture" column,
and exit the window. Move the drone to a distance of 1-2 meters from the person who is
ready to take photos, the person can made the following gesture (Fig. 1) and the drone
will take a photo after 3 seconds. If the person make the following gesture (Fig. 2). The
drone will record video after 3 seconds, repeating the gesture will stop recording.

Head Flying
Forward/forward
Left Flying To Left/
Left Side
Right Flying To
Right/ Right Side
Tail Flying
Backward/backward
SWEEP THE QR CODE
WATCHING FLIGHT TEACHING
VIDEOS REFUSED TO LOSE,
REFUSED TO LOSE CONTACT
Geomagnetism
Calibration Course
Out Of Control Return Course
Electronic fence Course
Low-voltage Return Course
Identification Of The Drone

Kindly reminde
1. it is recommended to connect the mobile phone app before completing the take-off
operation to ensure that the mobile app is connected successfully with the aircraft.
2. when outdoor wind is large, it is not recommended to open the altitude hold mode.
3. When the signal becomes worse, the picture and control delay may appear. At this
time, the remote controller should be kept electrically waiting for the signal to be
reconnected or press the key to return.
4. in case of emergency, press the "one button stop" button, and the propeller will stop
immediately and start to fall.
5. it is recommended to open headless mode in outdoor flight to identify direction
6. charging must use the cable supplied to prevent accidents or battery damage.
Set Point Course Set Circle Fly Course
One Button Return Course Gps Follow Course
Table of contents


