Dragon Touch DF01 User manual

USER MANUAL
Dragon Touch DF01 DRONE
V1.0
Please read this manual before operating your drone,
and keep it for further reference.
AGES

CONTENTS
45 - 55
01 - 11 12 - 22
34 - 44
23 - 33

DISCLAIMER & SAFETY GUIDELINES
1. For novices, please fly no higher than 20 meters (65 feet).
2. Do not look directly into the drone light.
3. Do not treat this product as household waste.
4. Do not fly above or near obstacles, crowds, open water, public roads,
high-voltage power lines, or trees.
5. Do not use the drone in severe weather conditions such as wind, snow, rain,
smog, hail, lightning, tornadoes, or hurricanes.
6. Stay away from the rotating propellers and motors.
7. Keep your drone in eyesight at all times. Please do not rely solely on a first-
person-view camera to control your drone.
8. This product is NOT a toy and is not recommended for users under the age of 14.
9. Be sure to observe all local regulations, obtain appropriate authorizations, and
understand the risks.
Note: It is solely your responsibility to comply with all flight regulations.
DRAGON TOUCH accepts no liability for damage, injury, or any legal responsibility
incurred directly or indirectly from the use of this product. The user shall observe
safe and lawful practices including, but not limited to, those set forth in these
Safety Guidelines.
MAINTENANCE AND CARE
1. Thoroughly check the drone after a crash or violent impact.
2. Do not charge the battery before it cools down.
3. Remove the batteries if you don't plan on using the drone for a long time.
4. Do not overcharge the battery. Unplug the charger once it's fully charged.
5. Store the drone and remote in a cool dry place away from direct sunlight.
6. Avoid bringing the camera into direct contact with water or other liquids.
Wipe dry with a soft absorbent cloth if it gets wet.
7. Do not charge the battery next to flammables, such as carpets, timber floors, or
on the surface of electro-conductive objects. Please always keep an eye on the
battery while charging.
8. To avoid losing your drone, fly it in the open air after you've gained plenty of
experience and are very confident in handling it.
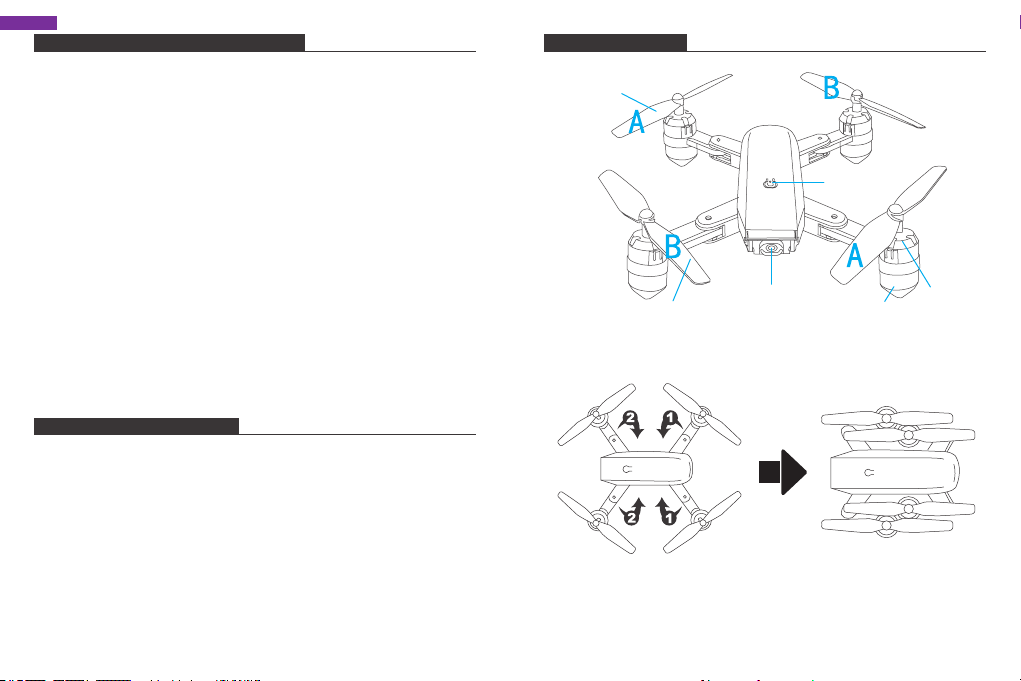
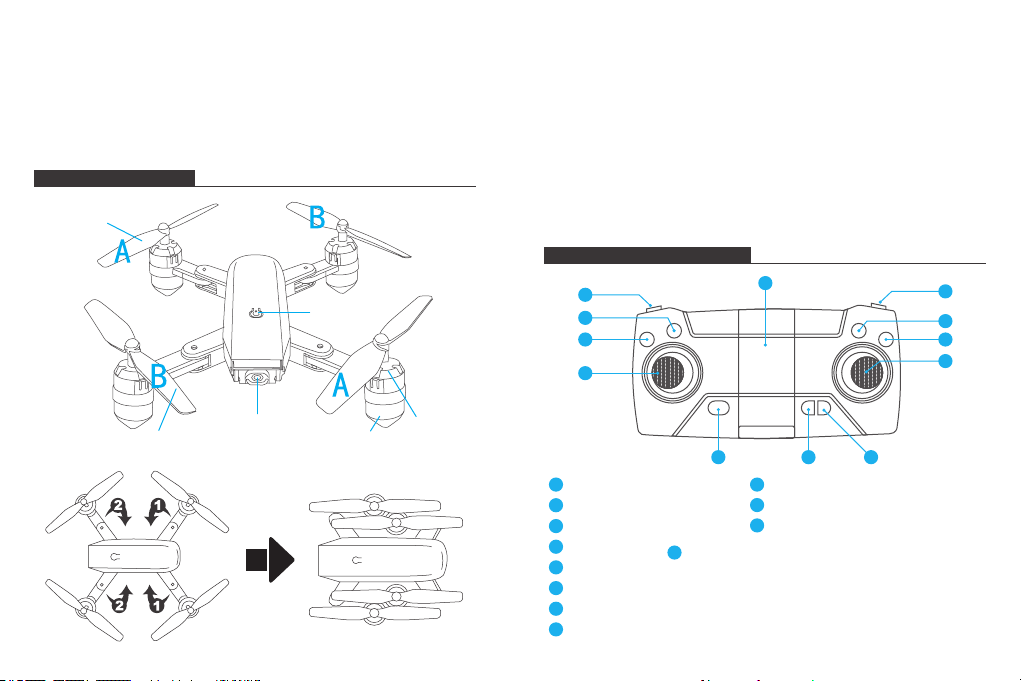
DRONE DIAGRAM
Propeller B
Wi-Fi Camera
LED
Power Switch
Motor
Propeller A
English
1 2

TRANSMITTER DIAGRAM
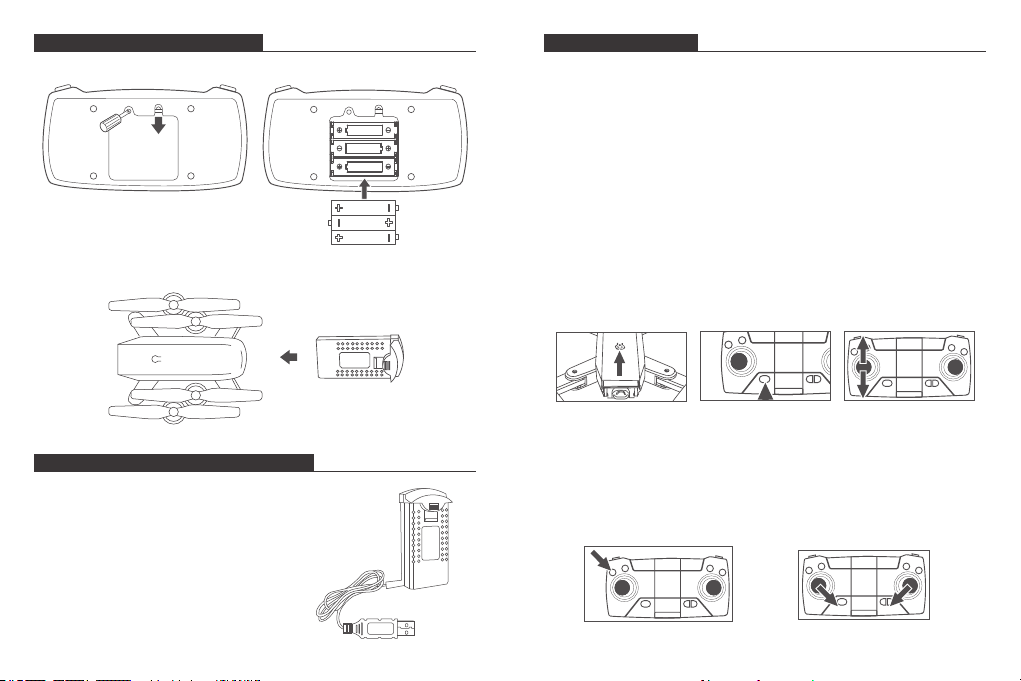
INSTALLING THE BATTERY
REPLACING THE PROPELLER
1. The propellers are not identical. Propellers have either an "A" or "B" mark at the
bottom and they should be installed in the position with a corresponding mark.
Make sure you install them in the correct positions. Failure to do so will result in
an inability to control the drone.
2. When flying, propeller A rotates clockwise and propeller B rotates
counterclockwise.
INSTALLING THE PROTECTIVE COVER
Snap the protective frame connectors into the shackles.
Speed switch
1One-key Return
2One-key Takeoff/landing
3
Headless Mode
7Emergency stop
8
(Short press to enter fine-tuning mode, press the
joystick to slightly adjust the front, back, left and
right. Press again to exit fine adjustment.Long
press for an emergency stop.)
9
Turn left/turn right
ascend/descend
4Phone Clamps
5360° Flip
6
Video
10
Photo
11
Turn on/off
12
16
2
3
49
7
8
12 11 10
5
Transmitter: 3x 1.5V AA Battery (Batteries not included)
RECHARGING THE DRONE BATTERY
Take the battery out of the drone. To charge the battery,
plug the battery's USB connector into a USB port on a
computer (or USB power adapter). The LED indicator
light on the cable will turn red while it is charging and
turn off when it is fully charged. The charging time is
about 120-150 minutes.
Note: Only use the provided charging cable to
charge the battery. It is forbidden to use the
provided charging cable to charge other products.
MADE IN CHINA
AA 1.5V
AA 1.5V
AA 1.5V
Insert the battery into the drone (3.7V 1000mAh Li-Po battery included)
Direction
3 4

READY TO FLY
Note:
①Make sure the propellers and propeller protective covers are correctly installed
and tightened.
② Before flying, please pair the drone with the remote control and calibrate the
drone and the remote control.
1. HOW TO PAIR YOUR DRONE WITH THE REMOTE CONTROL
① Turn on the fuselage power switch and place the drone on a level surface.
② Turn on the remote control power switch.
③ Place the drone on a level surface. Push the left joystick upwards to the top,
then pull downwards as far as possible. At this time, you will hear two beeps
from the remote control, and the indicator light will change from quick flashing
to constant on, indicating that pairing is successful.
①②③
2. HOW TO CALIBRATE AND TAKE OFF
① Place the drone on a level surface. Push the left and right joysticks as shown
above simultaneously for 2-3 seconds. The drone lights will flash fast and
turn to constant 'on' in 2-3 seconds, indicating the calibration is successful.
② To take off, the first method is to press the one-key takeoff button. The second
method is to operate the two joysticks at the same time as shown above for
2-3 seconds to unlock the drone, then slowly push the left joystick upwards.
3. HOW TO LAND
Method 1: Slowly push the left joystick down until the drone descends slowly to
the ground. Hold the left joystick at the lowest position for 2 seconds,
the motor will stop and the drone is landed successfully.
Method 2: When the drone is flying, press the one-key takeoff button again and
the drone will land slowly.
5 6

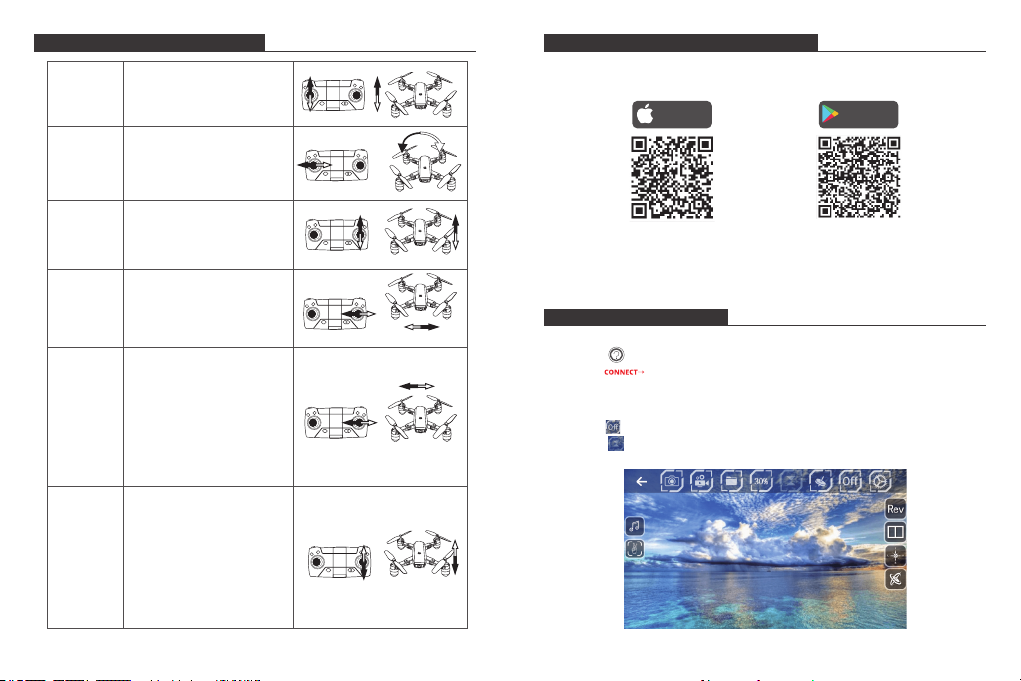
FLIGHT OPERATION METHOD CONNECTING YOUR MOBILE DEVICE
1. Download the VS FPV app onto your mobile device from the App Store/
Google Play or by scanning the QR code below.
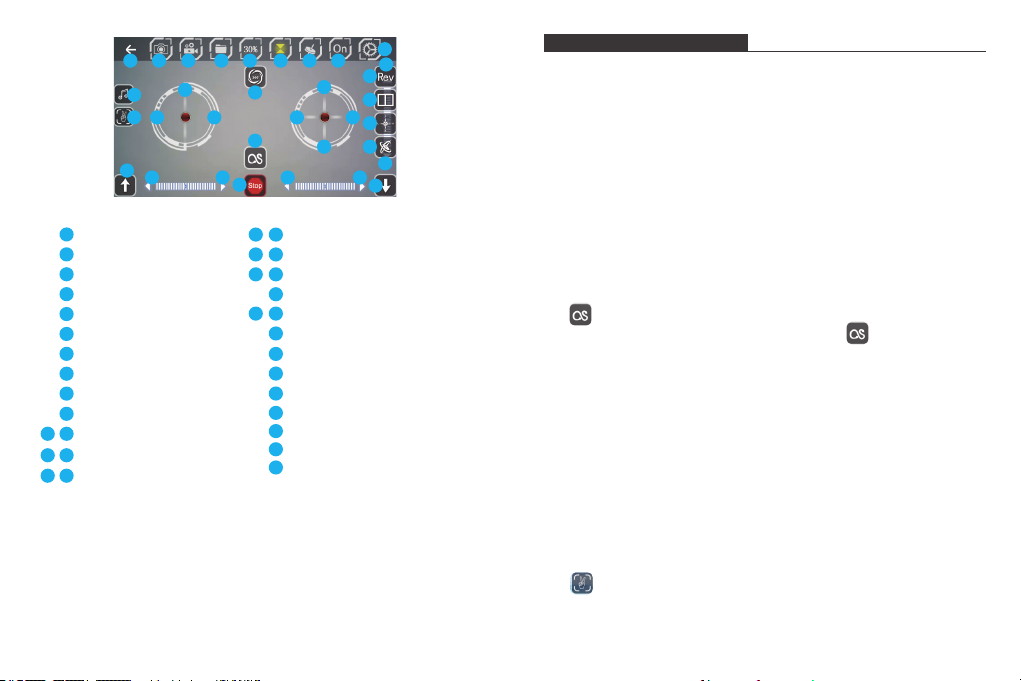
APP OPERATION PANEL
1. RUN THE APP "VS FPV"
①Tap the button to enter the Help interface.
②Tap the button to enter the control interface.
2. CONTROL INTERFACE
①Tap the button to open the control interface.
②Tap the button to open the altitude hold mode control button.
Download on the
App Store
GET IT ON
Google Play
2. Power on the drone and the LED lights will flash. Go to Wi-Fi settings on your
mobile device. Connect to the network (DF01-xxxx).
Ascending/
Descending
Push up or pull down the
left joystick, and the drone
will ascend or descend.
Turning
Forward/
Backward
Side Fly
Side-fly
Fine-tuning
Forward/
Backward
Fine-tuning
Push the left joystick to the
left or right, and the drone
will turn left or right.
Push up or pull down the
right joystick, and the drone
will fly forward or backward.
Push the right joystick to the
left or right, and the drone
will fly horizontally to the left
or right.
When the drone is hovering
in the air, in the event that
the drone is automatically
advancing forward or
backward, it can be rectified
by pushing the right joystick
upward or downward until
the drone keeps the balance.
When the drone is hovering
in the air, in the event that
the drone is automatically
flying sideward on the left or
right, it can be rectified by
pushing the right joystick to
the right or left until the
drone keeps the balance.
7 8

FLIGHT OPERATION GUIDE
HEADLESS MODE
Press the Headless Mode button to activate. In this mode, the drone will fly in the
direction as controlled by your right joystick regardless of the position of your
drone's head or the tail. Press the same button to exit this mode.
ONE-KEY RETURN
Press the One-key Return button, the drone will roughly fly back along its original
take-off path. Press the button again to exit the mode.
360° FLIP
Fly the drone to a height of over 3 meters, press the Flip button, and move the
right joystick to flip the drone 360° accordingly.
TRAJECTORY FLIGHT
Tap to activate the Trajectory Flight mode. Draw a path in the blank area on
the screen and the drone will fly following the path. Tap again to exit this
mode.
SPEED SWITCH
The drone's default speed is low speed. Press the Speed Switch button once for
medium speed, press again for high speed. A third press will revert back to low
speed.
ALTITUDE HOLD/HOVER
This is one of the default settings on the drone. When you release the Left Joystick
after an ascending/descending action, the drone will hover at the current flight
height.
GESTURES FOR PHOTO
Tap to activate. Facing 2-3m from the camera, make a V sign and the
camera will take a photo.
1 2 3 4 5 6 7 8 9
10
24
12
28
29 11
19 20
23
26
27 21 22
18
25
30
31
32
33
15
13 14
16
Back
Photo
Video
Files
Speed Switch
Altitude Hold
Gravity Induction
App ON/OFF
More Settings
Left Joystick (Accelerator)
Left/Right Flip and Roll
Left/Right Sideward
Forward/Backward
Forward/Backward Fine-tuning
Left/Right Flip and Roll Fine-tuning
Left/Right Sideward Fine-tuning
360° Flip&Roll
One-key Takeoff/Landing
Trajectory Flight
Emergency Stop
Music
Gestures For Photo
Camera Reverse
3D Display
Headless Mode
Calibration
17
1
2
3
4
5
6
7
8
9
10
1211
13 14
15 16
1817
19 20
21 22
24
23
25
26
27
28
29
30
31
32
33
9 10

Q1: Why aren't the drone LEDs lighting up?
• Press the power switch on the drone.
• Replace or recharge your drone's battery.
• Make sure the battery connectors are firmly plugged in.
Q2: Why do the drone's LEDs keep flashing, but it never responds to any
command from the transmitter?
• Pair the drone with the transmitter again.
• Replace or recharge the drone's battery.
• Make sure the transmitter's batteries have enough power.
Q3: Why is the flight unstable?
• Return the drone and perform a flight calibration as instructed.
• Ensure flight trimming accordingly.
• Fly the drone in suitable weather conditions.
Q4: Why is the drone unresponsive control inputs?
• Make sure the distance between the drone and the mobile device is within range.
• Stay away from open water, high-voltage power lines, or trees.
FAQ
For any inquiries about Dragon Touch products, please feel free to contact us,
and we will respond within 24 hours.
E-mail: [email protected]
Tel: 888-811-1140 (US) Mon-Fri 9am-5pm (EST)
Official website: www.dragontouch.com
CONTACT US
HAFTUNGSAUSSCHLUSS & SICHERHEITSRICHTLINIEN
1. Überprüfen Sie die Drohne nach einem Absturz oder einem heftigen Aufprall gründlich.
2. Schauen Sie nicht direkt in das Drohnenlicht.
3. Behandeln Sie dieses Produkt nicht als Hausmüll.
4. Fliegen Sie nicht über oder in der Nähe von Hindernissen, Menschenmassen,
offenem Wasser, öffentlichen Straßen, Hochspannungsleitungen oder Bäumen.
5. Verwenden Sie die Drohne nicht bei Unwettern wie Wind, Schnee, Regen, Smog,
Hagel, Blitz, Tornados oder Hurrikanen.
6. Halten Sie sich von den rotierenden Propellern und Motoren fern.
7. Halten Sie Ihre Drohne immer im Blickfeld. Bitte verlassen Sie sich nicht nur auf
eine First-Person-View-Kamera, um Ihre Drohne zu steuern.
8. Dieses Produkt ist KEIN Spielzeug für Kinder und wird nicht für Benutzer unter
14 Jahren empfohlen.
9. Beachten Sie alle örtlichen Vorschriften, holen Sie die entsprechenden
Genehmigungen ein und verstehen Sie die Risiken. HINWEIS: Es liegt in Ihrer
alleinigen Verantwortung, alle Flugbestimmungen einzuhalten.
DRAGON TOUCH übernimmt keine Haftung für Schäden, Verletzungen oder
rechtliche Verantwortung, die direkt oder indirekt aus der Verwendung dieses
Produkts entstehen. Der Benutzer muss sichere und rechtmäßige Praktiken
einhalten, einschließlich, aber nicht beschränkt auf die in diesen
Sicherheitsrichtlinien festgelegten.
WARTUNG UND PFLEGE
1. Für Anfänger fliegen Sie bitte nicht höher als 20 Meter.
2. Laden Sie den Akku nicht auf, bevor er abgekühlt ist.
3. Entfernen Sie die Batterien, wenn Sie die Drohne längere Zeit nicht benutzen
möchten.
4. Laden Sie den Akku nicht über. Trennen Sie das Ladegerät vom Artikel, sobald
es vollständig aufgeladen ist.
5. Bewahren Sie die Drohne und die Fernbedienung an einem kühlen, trockenen
Ort ohne direkte Sonneneinstrahlung auf.
6. Vermeiden Sie es, die Kamera in direkten Kontakt mit Wasser oder anderen
Flüssigkeiten zu bringen. Wischen Sie es mit einem weichen, saugfähigen Tuch
trocken, wenn es nass wird.
English Deutsch
11 12

7. Laden Sie den Akku nicht neben brennbaren Stoffen wie Teppichen, Holzböden
oder auf der Oberfläche von elektrisch leitenden Gegenständen auf.
Bitte behalten Sie den Akku beim Laden immer im Auge.
8. Um zu vermeiden, dass Sie Ihre Drohne verlieren, fliegen Sie sie im Freien,
nachdem Sie viel Erfahrung gesammelt haben und sehr sicher damit umgehen
können.
DROHN-DIAGRAMM
Propeller B
Wi-Fi-Kamera
LED
Netzschalter
Motor
Propeller A
TRANSMITTER DIAGRAMM
ERSETZEN DES PROPELLERS
1. Die Propeller sind nicht identisch. Propeller haben unten entweder die
Markierung "A" oder "B" und sollten an der Position mit einer entsprechenden
Markierung installiert werden. Stellen Sie sicher, dass Sie sie an den richtigen
Positionen installieren. Andernfalls kann die Drohne nicht gesteuert werden.
2. Beim Fliegen dreht sich Propeller A im Uhrzeigersinn und Propeller B gegen
den Uhrzeigersinn.
INSTALLIEREN DER SCHUTZABDECKUNG
Rasten Sie die Schutzrahmenverbinder in die Schäkel ein.
Geschwindigkeitsschalter
1EIN-SCHLÜSSEL-RÜCKKEHR
2
EIN-SCHLÜSSEL-START/Landung
3
Headless-Modus
7Not-Aus
8
(Drücken Sie kurz, um den Feinabstimmungsmodus
aufzurufen, und drücken Sie den Joystick, um die
Vorder-, Rückseite, links und rechts leicht einzustellen.
Drücken Sie erneut, um die Feineinstellung zu beenden.
Langes Drücken für einen Notstopp.)
9
Nach links/rechts auf-/absteigen drehen
4
Handyklemme
5360° Flip
6
Video
10
Foto
11
Ein-/Ausschalten
12
16
2
3
49
7
8
12 11 10
5
Richtung
13 14

INSTALLATION DER BATTERIE
Transmitter: 3 x 1.5V AA Batterie (Batterien nicht im Lieferumfang enthalten).
AUFLADEN DER DROHNENBATTERIE
Nehmen Sie die Batterie aus der Drohne. Stecken Sie zum
Laden des Akkus den USB-Anschluss des Akkus in einen
USB-Anschluss eines Computers (oder eines USB-Netzteils).
Die LED-Anzeigelampe am Kabel leuchtet während des
Ladevorgangs rot und erlischt, wenn der Akku vollständig
aufgeladen ist. Die Ladezeit beträgt ca. 120-150 Minuten.
HINWEIS: Verwenden Sie zum Laden des Akkus
nur das mitgelieferte Ladekabel. Es ist verboten,
das mitgelieferte Ladekabel zum Laden anderer
Produkte zu verwenden.
MADE IN CHINA
AA 1.5V
AA 1.5V
AA 1.5V
Legen Sie den Akku in die Drohne ein (3,7 V, 1000 mAh Li-Po-Akku enthalten).
BEREIT ZU FLIEGEN
HINWEIS:
① Stellen Sie sicher, dass die Propeller und Propellerschutzabdeckungen korrekt
installiert und festgezogen sind.
② Bitte koppeln Sie die Drohne vor dem Flug mit der Fernbedienung und
kalibrieren Sie die Drohne und die Fernbedienung.
1. SO PAAREN SIE IHRE DROHNE MIT DER FERNBEDIENUNG
① Schalten Sie den Rumpfschalter ein und stellen Sie die Drohne auf eine ebene
Fläche.
② Schalten Sie den Netzschalter der Fernbedienung ein.
③ Stellen Sie die Drohne auf eine ebene Fläche. Schieben Sie den linken Joystick
nach oben und dann so weit wie möglich nach unten. Zu diesem Zeitpunkt
hören Sie zwei Pieptöne von der Fernbedienung, und die Anzeigelampe
wechselt von schnellem Blinken zu konstantem Licht, um anzuzeigen, dass das
Pairing erfolgreich ist.
①②③
2. WIE KALIBRIEREN UND ABNEHMEN
① Stellen Sie die Drohne auf eine ebene Fläche. Drücken Sie den linken und
rechten Joystick wie oben gezeigt gleichzeitig 2-3 Sekunden lang.
Die Drohnenlichter blinken schnell und schalten sich in 2-3 Sekunden konstant
ein, um anzuzeigen, dass die Kalibrierung erfolgreich ist.
15 16

② Zum Abheben drücken Sie zunächst die "EIN-SCHLÜSSEL-START ". Die zweite
Methode besteht darin, die beiden Joysticks gleichzeitig wie oben gezeigt 2-3
Sekunden lang zu betätigen, um die Drohne zu entsperren, und dann den
linken Joystick langsam nach oben zu drücken.
3. WIE MAN LANDET
Methode 1: Drücken Sie den linken Joystick langsam nach unten, bis die Drohne
langsam zu Boden fällt. Halten Sie den linken Joystick 2 Sekunden lang
in der niedrigsten Position, der Motor stoppt und die Drohne landet
erfolgreich.
Methode 1: Wenn die Drohne fliegt, drücken Sie erneut die “Ein-schlüssel-start”,
und die Drohne landet langsam.
FLUGBETRIEBSMETHODE
Aufsteigend/
Absteigend
Drücken Sie den linken Joystick
nach oben oder unten, und die
Drohne steigt auf oder ab.
Drehen
Vorwärts/
Rückwärts
Seitenflug
Seitenflugs-
feinabsti-
mmung
Vorwärts-/
Rückwärts-
Feinabstim-
mung
Drücken Sie den linken Joystick
nach links oder rechts, und die
Drohne dreht sich nach links
oder rechts.
Drücken Sie den rechten
Joystick nach oben oder unten,
und die Drohne fliegt vorwärts
oder rückwärts.
Drücken Sie den rechten
Joystick nach links oder rechts,
und die Drohne fliegt horizontal
nach links oder rechts.
Wenn die Drohne in der Luft
schwebt und die Drohne
automatisch vorwärts oder
rückwärts vorrückt, kann dies
durch Drücken des rechten
Joysticks nach oben oder unten
behoben werden, bis die
Drohne das Gleichgewicht hält.
Wenn die Drohne in der Luft
schwebt und die Drohne
automatisch links oder rechts
seitwärts fliegt, kann dies durch
Drücken des rechten Joysticks
nach rechts oder links behoben
werden, bis die Drohne das
Gleichgewicht hält.
17 18

ANSCHLIESSEN IHRES MOBILGERÄTS
1. Laden Sie die VS FPV-App aus dem App Store / Google Play oder durch
Scannen des folgenden QR-Codes auf Ihr Mobilgerät herunter.
APP OPERATION PANEL
1. RUN THE APP "VS FPV"
① Tippen Sie auf die Schaltfläche, um die Hilfeschnittstelle aufzurufen.
② Tippen Sie auf die Schaltfläche, um die Steueroberfläche aufzurufen.
2. STEUERSCHNITTSTELLE
① Tippen Sie auf die Schaltfläche, um die Hilfeschnittstelle aufzurufen.
② Tippen Sie auf die Schaltfläche, um die Steuertaste für den
Höhenhaltemodus zu öffnen.
Download on the
App Store
GET IT ON
Google Play
2. Schalten Sie die Drohne ein und die LED-Anzeigen blinken. Gehen Sie zu den
Wi-Fi-Einstellungen auf Ihrem Mobilgerät. Stellen Sie eine Verbindung zum
Netzwerk her (DF01-xxxx).
1 2 3 4 5 6 7 8 9
10
24
12
28
29 11
19 20
23
26
27 21 22
18
25
30
31
32
33
15
13 14
16
Zurück
Foto
Video
Dateien
Geschwindigkeitsschalter
Höhe halten
Schwerkraftinduktion
App EIN/AUS
Weitere Einstellungen
Linker Joystick (Beschleuniger)
Links/Rechts Flip and Roll
Links/Rechts seitwärts
Vorwärts rückwärts
Vorwärts-/Rückwärts-
Feinabstimmung
Links/Rechts Flip and Roll
Feinabstimmung
Links/Rechts seitwärts
Feinabstimmung
360 ° Flip & Roll
Ein-schlüssel-start/rückkehr
Flugbahn
Not-Aus
Musik
Gesten für Foto
Kamera umkehren
3D-Anzeige
Headless-Modus
Kalibrierung
17
1
2
3
4
5
6
7
8
9
10
1211
13 14
15 16
1817
19 20
21 22
24
23
25
26
27
28
29
30
31
32
33
19 20

FLUGBETRIEBSANLEITUNG
KOPFLOSER MODUS
Drücken Sie zum Aktivieren die Taste Headless Mode. In diesem Modus fliegt die
Drohne in die Richtung, die von Ihrem rechten Joystick gesteuert wird, unabhängig
von der Position des Kopfes oder des Hecks Ihrer Drohne. Drücken Sie dieselbe
Taste, um diesen Modus zu verlassen.
EIN-SCHLÜSSEL-RÜCKKEHR
Drücken Sie die "EIN-SCHLÜSSEL-RÜCKKEHR". Die Drohne fliegt ungefähr auf
ihrem ursprünglichen Startpfad zurück. Drücken Sie die Taste erneut, um den
Modus zu verlassen.
360° FLIP
Fliegen Sie die Drohne auf eine Höhe von über 3 Metern, drücken Sie die
Flip-Taste und bewegen Sie den rechten Joystick, um die Drohne entsprechend
um 360 ° zu drehen.
TRAJEKTORISCHER FLUG
Tippen Sie hier , um den Flugbahnmodus zu aktivieren. Zeichnen Sie einen
Pfad in den leeren Bereich auf dem Bildschirm und die Drohne fliegt dem Pfad
folgend. Tippen Sie erneut auf, um diesen Modus zu verlassen.
GESCHWINDIGKEITSSCHALTER
Die Standardgeschwindigkeit der Drohne ist niedrige Geschwindigkeit. Drücken
Sie die Taste für den Geschwindigkeitsschalter einmal für mittlere Geschwindigkeit
und erneut für hohe Geschwindigkeit. Ein dritter Druck kehrt zur niedrigen
Geschwindigkeit zurück.
HÖHE HOLD/HOVER
Dies ist eine der Standardeinstellungen der Drohne. Wenn Sie den linken Joystick
nach einer auf-/absteigenden Aktion loslassen, schwebt die Drohne auf der
aktuellen Flughöhe.
F1: Warum leuchten die Drohnen-LEDs nicht auf?
• Drücken Sie den Netzschalter an der Drohne.
• Ersetzen oder laden Sie den Akku Ihrer Drohne auf.
• Stellen Sie sicher, dass die Batterieanschlüsse fest eingesteckt sind.
F2: Warum blinken die LEDs der Drohne weiter, aber sie reagiert nie auf einen
Befehl des Senders?
• Koppeln Sie die Drohne erneut mit dem Sender.
• Ersetzen oder laden Sie den Akku der Drohne auf.
• Stellen Sie sicher, dass die Batterien des Senders ausreichend mit Strom
versorgt werden.
F3: Warum ist der Flug instabil?
• Bringen Sie die Drohne zurück und führen Sie eine Flugkalibrierung wie
angewiesen durch.
• Stellen Sie sicher, dass der Flug entsprechend angepasst wird.
• Fliegen Sie die Drohne bei geeigneten Wetterbedingungen.
Q4: Warum reagiert die Drohne nicht auf Steuereingaben?
• Stellen Sie sicher, dass der Abstand zwischen der Drohne und dem mobilen
Gerät in Reichweite liegt.
• Halten Sie sich von offenem Wasser, Hochspannungsleitungen oder Bäumen fern.
FAQ
Bei Fragen zu Dragon Touch-Produkten können Sie sich gerne an uns wenden.
Wir werden Ihnen innerhalb von 24 Stunden antworten.
E-mail: [email protected]
Official website: www.dragontouch.com
KONTAKTIERE UNS
GESTEN FÜR FOTO
Tippen Sie zum Aktivieren auf. Machen Sie ein V-Zeichen, wenn Sie 2-3 m von
der Kamera entfernt sind, und die Kamera macht ein Foto.
Deutsch
21 22

DESCARGO DE RESPONSABILIDAD & REGLAS DE SEGURIDAD
1. Para los novatos, por favor vuelen no más de 20 metros (65 pies).
2. No mires directamente a la luz del dron.
3. No trate este producto como basura doméstica.
4. No vuele por encima o cerca de obstáculos, multitudes, aguas abiertas, caminos
públicos, líneas de alta tensión o árboles.
5. No use el dron en condiciones climáticas severas como viento, nieve, lluvia,
smog, granizo, rayos, tornados o huracanes.
6. Manténgase alejado de las hélices giratorias y motores.
7. Mantenga su dron a la vista en todo momento. Por favor NO confíes únicamente
en una cámara de vista en primera persona para controlar tu dron.
8. Este producto NO es un juguete y no se recomienda para usuarios menores de
14 años.
9. Asegúrese de observar todas las regulaciones locales, obtener las autorizaciones
apropiadas y comprender los riesgos.
Nota: Es responsabilidad suya para cumplir con todas las regulaciones de vuelo.
DRAGON TOUCH no acepta responsabilidad por daños, lesiones o cualquier
responsabilidad legal incurrida directa o indirectamente por el uso de este
producto. El usuario deberá observar prácticas seguras y legales, incluidas, entre
otras, las establecidas en estas Pautas de seguridad.
MANTENIMIENTO Y CUIDADO
1. Verifique a fondo el dron después de un choque o impacto violento.
2. No cargue la batería antes de que se enfríe.
3. Retire las baterías si no planea usar el dron durante mucho tiempo.
4. No sobrecargue la batería. Desenchufe el cargador una vez que esté
completamente cargado.
5. Guarde el dron y el control remoto en un lugar fresco y seco, lejos de la luz
solar directa.
6. Evite poner la cámara en contacto directo con agua u otros líquidos. Seque con
un paño suave y absorbente si se moja.
DIAGRAMA DE DRONES
Hélice B
Cámara Wi-Fi
LED
Interruptor de
alimentación
Motor
Hélice A
Español
7. No cargue la batería cerca de materiales inflamables, como alfombras, pisos de
madera o en la superficie de objetos electroconductores. Por favor siempre
vigile la batería mientras se carga.
8. Para evitar perder su dron, vuele al aire libre después de que haya adquirido
mucha experiencia y esté muy seguro de manejarlo.
23 24

DIAGRAMA DEL TRANSMISOR
INSTALANDO LA BATERIA
REEMPLAZO DEL PROPULSOR
1. Las hélices no son idénticas. Las hélices tienen una marca "A" o "B" en la parte
inferior y deben instalarse en la posición con la marca correspondiente.
Asegúrese de instalarlos en las posiciones correctas. De lo contrario, no podrá
controlar el dron.
2. Al volar, la hélice A gira en sentido horario y la hélice B gira en sentido
antihorario.
INSTALANDO LA CUBIERTA PROTECTORA
Encaje los conectores del marco protector en los grilletes.
Interruptor de velocidad
1
Retorno con una tecla
2
Despegue/Aterrizaje con una tecla
3
Modo sin cabeza
7
Parada de emergencia
8
( Presione brevemente para ingresar
al modo de ajuste fino, presione el
joystick para ajustar ligeramente el
frente, atrás, izquierda y derecha.
Presione nuevamente para salir del
ajuste fino. Presione prolongadamente
para una parada de emergencia.)
9
Gira a la izquierda/Gira a la
derecha Ascender/Descender
4
Abrazaderas del teléfono
5
360° Flip
6Vídeo
10
Foto
11 Encender/Apagar
12
16
2
3
49
7
8
12 11 10
5
Transmisor: 3x 1.5V AA Batería (Baterías no incluidas).
RECARGANDO LA BATERÍA DRONE
Saque la batería del dron. Para cargar la batería, enchufe el
conector USB de la batería en un puerto USB de una
computadora (o adaptador de corriente USB). La luz
indicadora LED en el cable se volverá roja mientras se está
cargando y se apagará cuando esté completamente cargada.
El tiempo de carga es aproximadamente 120-150 minutos.
Nota: Utilice solo el cable de carga original para
cargar la batería. Está prohibido usar el cable de
carga original para cargar otros productos.
MADE IN CHINA
AA 1.5V
AA 1.5V
AA 1.5V
Inserte la batería en el dron (batería de 3.7V 1000mAh Li-Po incluida).
Dirección
25 26

LISTO PARA VOLAR
Nota:
① Asegúrese de que las hélices y las cubiertas protectoras de la hélice estén
instaladas y apretadas correctamente.
② Antes de volar, por favor empareje el dron con el control remoto y calibre el
dron y el control remoto.
1. CÓMO EMPAREJAR TU DRONE CON EL CONTROL REMOTO
①Enciende el interruptor de encendido del fuselaje y coloca el dron en una
superficie nivelada.
②Encienda el interruptor de encendido del control remoto.
③ coloque el dron en una superficie nivelada. Empuje el joystick izquierdo hacia
arriba hasta la parte superior, luego tire hacia abajo tanto como sea posible.
En este momento, escuchará dos pitidos desde el control remoto y la luz
indicadora cambiará de rápido parpadea a constante encendido, lo que indica
que el emparejamiento fue exitoso.
①②③
2. CÓMO CALIBRAR Y SALIR
① Coloque el dron en una superficie nivelada. Presione los joysticks izquierdo y
derecho como se muestra arriba simultáneamente durante 2-3 segundos.
Las luces del dron parpadearán rápidamente y se encenderán constantemente
en 2-3 segundos, lo que indica que la calibración fue exitosa.
②Para despegar, el primer método es presionar el botón de despegue de una
tecla. El segundo método es operar los dos joysticks al mismo tiempo que se
muestra arriba durante 2-3 segundos para desbloquear el dron, luego empuje
lentamente el joystick izquierdo hacia arriba.
3. CÓMO ATERRIZAR
Método 1: Empuje lentamente el joystick izquierdo hacia abajo hasta que el dron
descienda lentamente al suelo. Mantenga el joystick izquierdo en la
posición más baja durante 2 segundos, el motor se detendrá y el dron
aterrizará con éxito.
Método 2: Cuando el avión no tripulado está volando, presione nuevamente el
botón de despegue de una tecla y el avión no tripulado aterrizará
lentamente.
27 28

MÉTODO DE OPERACIÓN DE VUELO CONECTANDO SU DISPOSITIVO MÓVIL
1. Descargue la app VS FPV en su móvil desde App Store / Google Play o
escaneando el código QR a continuación.
PANEL DE FUNCIONAMIENTO DE APP
1. EJECUTE LA APP "VS FPV"
① Toque el botón para ingresar a la interfaz de Ayuda.
② Toque el botón para ingresar a la interfaz de control
2. INTERFAZ DE CONTROL
① Toque el botón para abrir la interfaz de control.
② Toque el botón para abrir el botón de control del modo de retención de
altitud.
Download on the
App Store
GET IT ON
Google Play
2. Encienda el dron y las luces LED parpadearán. Vaya a la configuración de Wi-Fi
en su móvil. Conéctese a la red (DF01-xxxx).
Ascendiendo/
Descendiendo
Empuja hacia arriba o hacia
abajo el joystick izquierdo, y el
dron ascenderá o descenderá.
Torneado
Hacia adelante
/hacia atrás
Vuelo lateral
Ajuste de
vuelo lateral
Ajuste fino
hacia
adelante/
hacia atrás
Empuja el joystick izquierdo
hacia la izquierda o hacia la
derecha, y el dron girará hacia
la izquierda o hacia la derecha.
Empuja hacia arriba o hacia
abajo el joystick derecho, y el
dron volará hacia adelante o
hacia atrás.
Empuja el joystick derecho hacia
la izquierda o hacia la derecha,
y el dron volará horizontalmente
hacia la izquierda o hacia la
derecha.
Cuando el dron está suspendido
en el aire, en el caso de que el
dron avance automáticamente
hacia adelante o hacia atrás,
puede rectificarse presionando
el joystick derecho hacia arriba o
hacia abajo hasta que el dron
mantenga el equilibrio.
Cuando el avión no tripulado está
suspendido en el aire, en el caso de
que el avión no tripulado vuele
automáticamente hacia un lado
hacia la izquierda o hacia la derecha,
puede rectificarse presionando el
joystick derecho hacia la derecha o
hacia la izquierda hasta que el avión
no tripulado mantenga el equilibrio.
29 30

GUÍA DE OPERACIÓN DE VUELO
MODO SIN CABEZA
Presione el botón Modo sin cabeza para activar. En este modo, el dron volará en
la dirección controlada por su joystick derecho, independientemente de la
posición de la cabeza o la cola de su dron. Presione el mismo botón para salir de
este modo.
RETORNO DE UNA CLAVE
Presione el botón de retorno de una tecla, el dron volará más o menos a lo largo
de su ruta de despegue original.Presione el botón nuevamente para salir del modo.
360° FLIP
Vuela el dron a una altura de más de 3 metros, presiona el botón Flip y mueve el
joystick derecho para voltear el drone 360 ° en consecuencia.
VUELO DE TRAYECTORIA
Toca para activar el modo Vuelo de trayectoria. Dibuja un camino en el áreaen
blanco en la pantalla y el dron volará siguiendo el camino. Toca nuevamente
para salir de este modo.
INTERRUPTOR DE VELOCIDAD
La velocidad predeterminada del dron es de baja velocidad. Presiona el botón
Interruptor de velocidad una vez para velocidad media, presiona nuevamente
para alta velocidad. Una tercera presión volverá a baja velocidad.
ALTURA DE SUJECIÓN
Esta es una de las configuraciones predeterminadas del dron. Cuando sueltas el
Joystick izquierdo después de una acción ascendente/descendente, el dron se
desplazará a la altura de vuelo actual.
GESTOS PARA FOTO
Toque para activar. Frente a 2-3 m de la cámara, haga un signo de V y la
cámara tomará una foto.
1 2 3 4 5 6 7 8 9
10
24
12
28
29 11
19 20
23
26
27 21 22
18
25
30
31
32
33
15
13 14
16
Volver
Foto
Vídeo
Archivos
Interruptor de velocidad
Retención de altitud
Inducción por gravedad
APP ON/OFF
Más configuraciones
Joystick izquierdo (acelerador)
Izquierda/Derecha Flip and Roll
Izquierda/derecha Lateral
Adelante/Atrás
Ajuste fino hacia adelante/hacia atrás
Izquierda/derecha Flip and Roll Ajuste fino
Ajuste fino hacia la izquierda/derecha
360° Flip & Roll
Despegue/aterrizaje con una tecla
Trayectoria de vuelo
Parada de emergencia
Música
Gestos para la foto
Cámara inversa
Pantalla 3D
Modo sin cabeza
Calibración
17
1
2
3
4
5
6
7
8
9
10
1211
13 14
15 16
1817
19 20
21 22
24
23
25
26
27
28
29
30
31
32
33
31 32

P1: ¿Por qué no se iluminan los LED del dron?
• Presiona el interruptor de encendido del dron.
• Reemplace o recargue la batería de su dron.
• Asegúrese de que los conectores de la batería estén bien enchufados.
Q2: ¿Por qué los LED del dron siguen parpadeando, pero nunca responde a
ningún comando del transmisor?
• Vuelva a emparejar el dron con el transmisor.
• Reemplace o recargue la batería del dron.
• Asegúrese de que las baterías del transmisor tengan suficiente energía.
Q3: ¿Por qué el vuelo es inestable?
• Devuelva el dron y realice una calibración de vuelo según las instrucciones.
• Asegure el recorte de vuelo en consecuencia.
• Vuela el dron en condiciones climáticas adecuadas.
Q4: ¿Por qué el dron no responde a las entradas de control?
• Asegúrese de que la distancia entre el dron y el dispositivo móvil esté dentro del
alcance.
• Manténgase alejado de aguas abiertas, líneas de alta tensión o árboles.
FAQ
FPara cualquier consulta sobre los productos Dragon Touch, sin duda en
contactarnos y le responderemos dentro de las 24 horas.
Sitio web oficial: www.dragontouch.com
CONTÁCTENOS
AVIS DE NON-RESPONSABILITÉ ET CONSIGNES DE SÉCURITÉ
1. Pour les novices, veuillez voler à une altitude ne dépassant pas 20 mètres (65 pieds).
2. Ne regardez pas directement dans la lumière du drone.
3. Ne traitez pas ce produit comme des déchets ménagers.
4. Ne volez pas au-dessus ou à proximité d'obstacles, de foules, d'eau libre, de
routes publiques, de lignes électriques à haute tension ou d'arbres.
5. N'utilisez pas le drone dans des conditions météorologiques extrêmes telles
que le vent, la neige, la pluie, le smog, la grêle, la foudre, les tornades ou les
ouragans.
6. Éloignez-vous des hélices et des moteurs en rotation.
7. Gardez votre drone en vue à tout moment. Ne vous fiez pas uniquement à une
caméra à vue à la première personne pour contrôler votre drone.
8. Ce produit n'est PAS un jouet et n'est pas recommandé aux utilisateurs de
moins de 14 ans.
9. Assurez-vous de respecter toutes les réglementations locales, d'obtenir les
autorisations appropriées et de comprendre les risques.
Remarque: Il est de votre seule responsabilité de vous conformer à toutes les
réglementations de vol.
DRAGON TOUCH n'accepte aucune responsabilité pour les dommages, blessures
ou toute responsabilité légale encourue directement ou indirectement par
l'utilisation de ce produit. L'utilisateur doit observer des pratiques sûres et légales,
y compris, mais sans s'y limiter, celles énoncées dans ces consignes de sécurité.
MAINTENANCE ET ENTRETIEN
1. Vérifiez soigneusement le drone après un accident ou un impact violent.
2. Ne chargez pas la batterie avant qu'elle ne refroidisse.
3. Si vous prévoyez de ne pas utiliser le drone pendant une longue période,
veuillez retirer la batterie.
4. Ne surchargez pas la batterie. Débranchez le chargeur une fois qu'il est
complètement chargé.
5. Rangez le drone et la télécommande dans un endroit frais et sec à l'abri de la
lumière directe du soleil.
Español Français
33 34

6. Évitez de mettre l'appareil photo en contact direct avec de l'eau ou d'autres
liquides. Essuyez avec un chiffon doux absorbant s'il est mouillé.
7. Ne chargez pas la batterie à proximité de produits inflammables, tels que des
tapis, des planchers en bois ou sur la surface d'objets électroconducteurs.
Veuillez toujours garder un œil sur la batterie pendant la charge.
8. Pour éviter de perdre votre drone,pilotez-le en plein air après avoir acquis
beaucoup d'expérience et être très confiant dans sa manipulation.
DRONE DIAGRAM
Hélice B
Caméra Wi-Fi
LED
Interrupteur
d'alimentation
Moteur
Hélice A
DIAGRAMME DE L'ÉMETTEUR
REMPLACEMENT DE L'HÉLICE
1. Les hélices ne sont pas identiques. Les hélices ont une marque «A» ou «B» en
bas et elles doivent être installées dans la position avec une marque
correspondante. Assurez-vous de les installer dans les bonnes positions. Le non
-respect de cette consigne entraînera une incapacité à contrôler le drone.
2. En vol, l'hélice A tourne dans le sens horaire et l'hélice B tourne dans le sens
antihoraire.
INSTALLATION DU COUVERCLE DE PROTECTION
Enclenchez les connecteurs du cadre de protection dans les manilles.
Commutateur de vitesse
1Retour par un bouton
2
Décollage/
Atterrissage par un Bouton
3
Mode sans tête
7Arrêt d'Urgence
8
(Appuyez brièvement pour accéder au mode de
réglage fin, appuyez sur le levier oscillant pour
régler légèrement l'avant, l'arrière, la gauche et
la droite. Appuyez à nouveau pour quitter le
réglage fin. Appuyez longuement pour un arrêt
d'urgence.)
9
Tourner à gauche/Tourner à droite
4
Pinces de téléphone
5Retournement à 360°
6
Vidéo
10
Photo
11
Allume/Éteint
12
16
2
3
49
7
8
12 11 10
5
Direction
35 36
Other manuals for DF01
1
Table of contents
Languages:
Other Dragon Touch Drone manuals