Shua X6 User manual
User’s Manual

Contents
Motorized Treadmill ..................................................................................................................................................... 1
Assembly Parts List ........................................................................................................................................ 1
Moving Instructions............................................................................................................................................... 8
Specification .......................................................................................................................................................... 9
Data Sheet ....................................................................................................................................................... 9
Product Function Description ....................................................................................................................... 10
Safety Use Instruction ......................................................................................................................................... 12
User’s Guide ........................................................................................................................................................ 14
Before Exercise ............................................................................................................................................ 14
Exercising ..................................................................................................................................................... 14
Exercise Frequency ...................................................................................................................................... 14
Exercising Intensity ...................................................................................................................................... 14
Wearing ......................................................................................................................................................... 15
Stretch Exercise: ........................................................................................................................................... 15
Operation Instruction ........................................................................................................................................... 16
Built-in Program: P1-P8 ............................................................................................................................... 18
Error Display ................................................................................................................................................ 21
Exercise Safety Measures .................................................................................................................................... 21
Maintaining Guidance ......................................................................................................................................... 21
Method to Add the Silicon Oil ............................................................................................................................ 23
Maintenance Instructions..................................................................................................................................... 23
Adjust running belt to be in the middle ........................................................................................................ 24
V-Belt Adjusting ........................................................................................................................................... 24
Common faults and trouble shooting .................................................................................................................. 26
Equipment Warranty ............................................................................................................................................ 26
Warranty Range: ........................................................................................................................................... 26
Non human made damage caused during normal use and correct maintenance. ......................................... 26
Term of service: ............................................................................................................................................ 26
The following statement can not be included in the range of warranty: ...................................................... 26
Repair and Parts Replacements .................................................................................................................... 27

1 / 27
Motorized Treadmill
Assemble Instruction
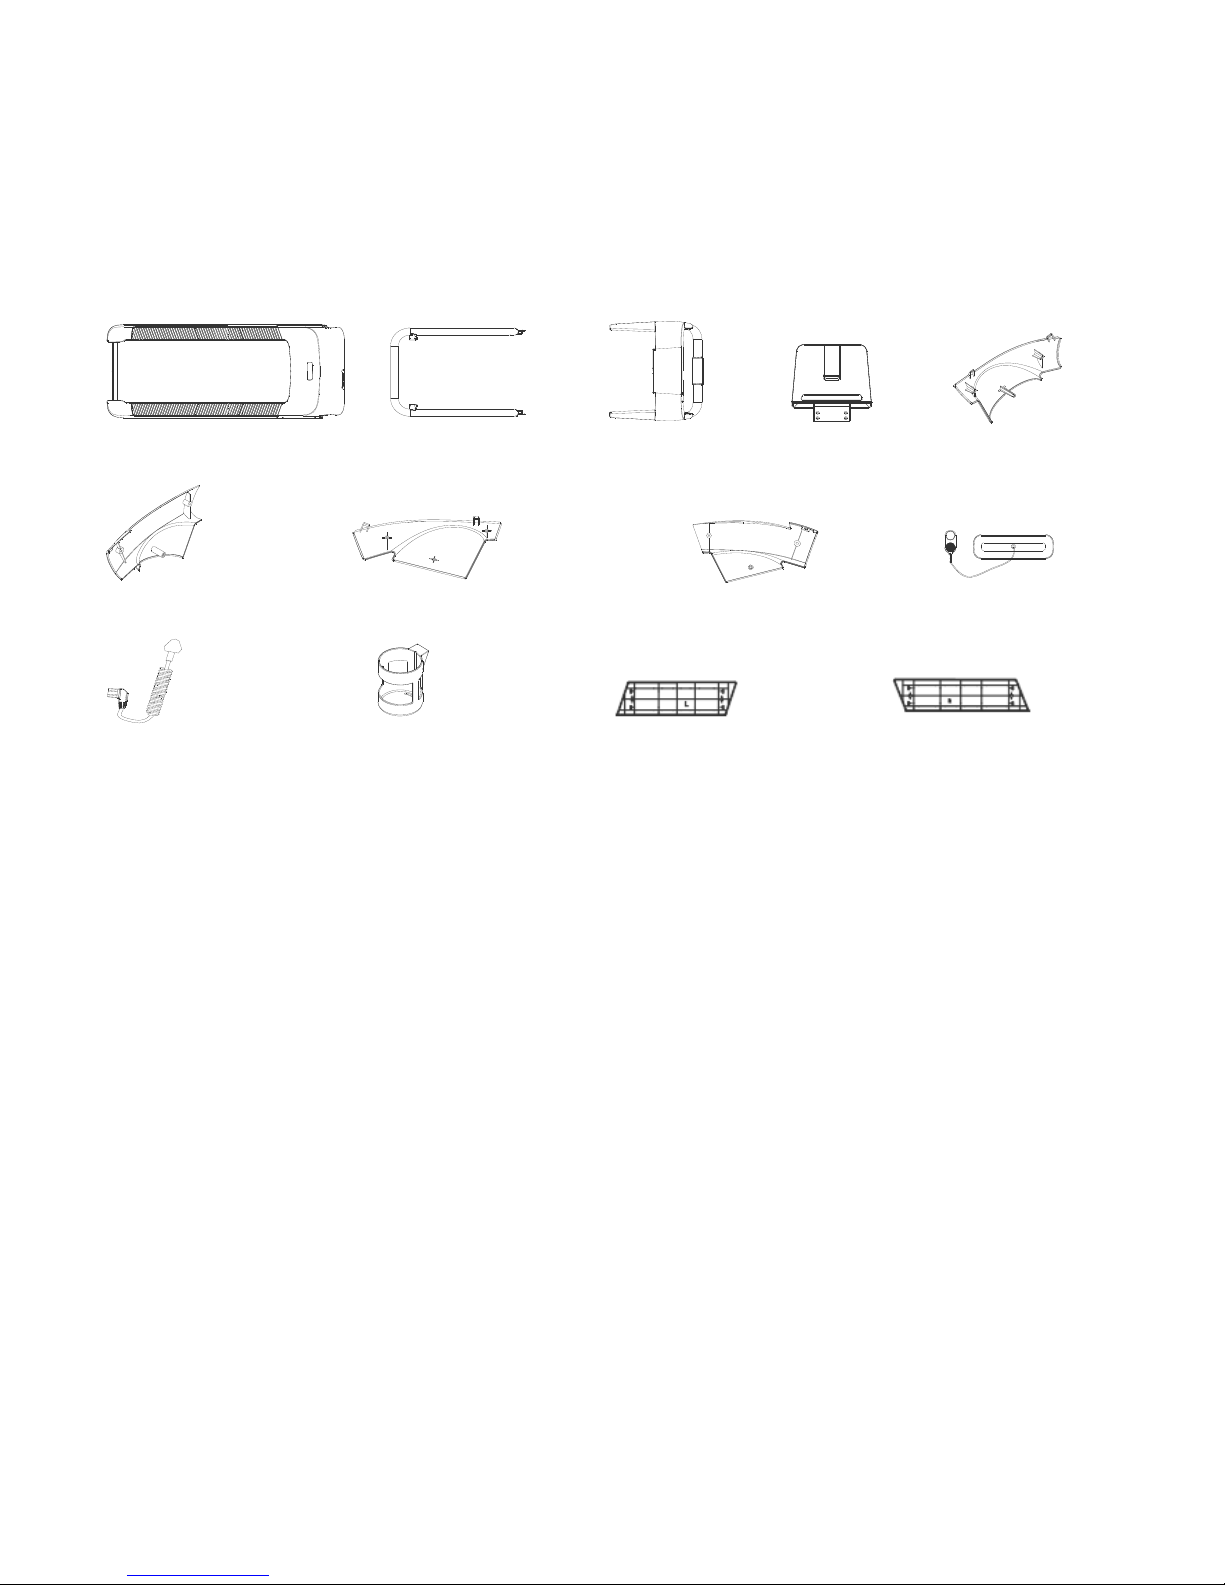
Assembly Parts List
Part # Name Q.T.Y
. Part # Name
Spec.
Q.T.Y.
01 Main Frame 1 11 Motor Hood 1
02 Post Frame 1 12 Tapping Screw ST4.2*15 6
03 Lower Console 1 13 Hex Bolt M10*20 2
04 Upper Console 1 14 Hex Bolt M10*25 3
05 L Post Cover
(Upper) 1 15 Hex Bolt M8*40 4
06 L Post Cover
(Upper) 1 16 Hex Bolt M8*15 6
07 R Post Cover
(Upper) 1 17 Tapping Screw ST4.2*15 10
08 R Post Cover
(Lower) 1 18 Washer Ø10.5*ø20*t1.
5 3
09 Safety Key 1 19 Washer ø8.4*ø16*t1.6 4
10 Power wire 1 20 Water Holder Frame 1
21 Left Weighing Cover 1
22 Right Weighing Cover 1
2 / 27
Tools needed for the assembly
Philips Screw Driver
Open Spanner
Allen Wrench ø6mm (provided as spare parts)
Main Frame Post Frame Lower Console Upper Console L Post Cover (Upper)
L Post Cover (Lower) R Post Cover (Upper) R Post Cover (Lower) Safety Key
Power Wire Water Hold Frame Left Weighing Cover Right Weighing Cover
Open packing box and take out the above mentioned parts. Place machine body in ground horizontally.
Reminder: We recommend 3 persons to take body machine from the packing box, and 2 persons assemble treadmill
for the sake of safety.

3 / 27
Assembly Steps
Step 1:
a: Use Philips Screw Driver to disassemble #11and #12 parts from 01(see figure below), and collect #12 (screw)
b: take out 21 and 22, and stick them into 01, then they will be higher than 01 and will not loose and fall off
Notice:
a: Take motor hood out gently after disassembling screw. 2 screws at the left of motor hood, 2 at the right of motor
hood (see figure below).
b: the inner logo of 21 is L, the inner logo of 22 is R, positioning bar need to be placed in the hole of 01 steel board
12
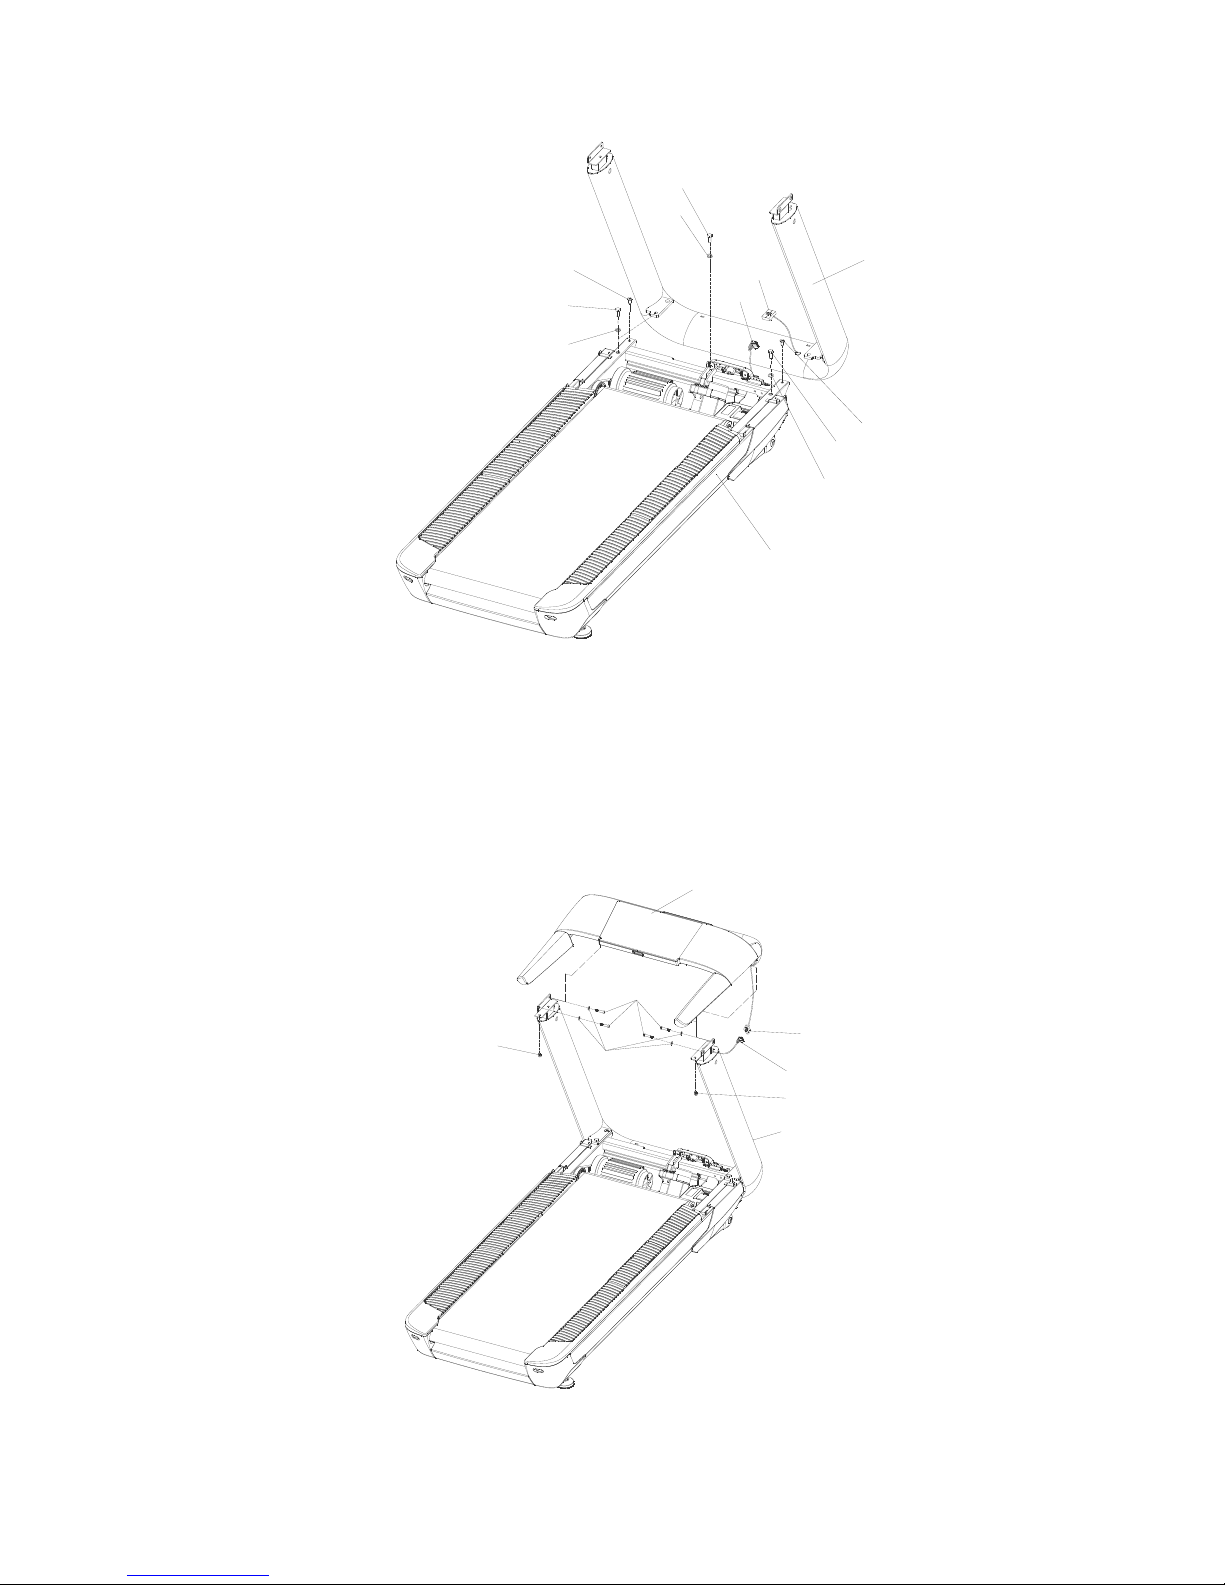
Step 2:
Set post (#2) into main frame (#1), and connect B of main frame with B of post. Use Hex Bolt and Flat Washer (as
shown in figure) to fix #13, #14, and #18 into Main Frame. (Do not fix them tight)
Notice: When setting main frame, it needs 2 persons to operate, avoiding connector caught. When connecting,
please note the direction of BNC and do not pull the wire hard.
4 / 27
01
02
13
14
14
13
B
B
18
18
14
18
Step 3:
Set console (#3) into main frame (#2), and connect C of main frame with C of console. Use Allen Wrench (as
shown in figure) to fix console into #15 and #19. Screw it tight after 4 screws are screwed.
Notice: When setting main frame, it needs 2 persons to operate, avoiding connector caught. When connecting,
please note the direction of BNC and do not pull the wire hard.
15
19
03
C
C
02
16
16

5 / 27
Step 4:
Use Open Spanner to fix #5, #7 into console, and screw it tight.
Notice: When setting #5, #7 into console, please note the position of buckles at both side. Put it gently into plastic
parts of console. And it takes 2 persons to screw it.
03
07
05 17
Step 5:
Use PH Screw Driver to fix #6, #8 into console, and connect #5, #7. Finally, screw it tight.
Notice: When setting #6, #8 into #5, #7, please note the front buckle. And do not press the wire, screw it after
buckle settled.
03
02
17
06
08

6 / 27
Step 6:
Use Hexagon wrench to fix #4 into console. Screw it tight after 4 screws are screwed.
Notice: set #4, #3 into console position. Put #4 into console tightly and screw it. And it takes 2 persons to screw it.
16
03
04
Step 7:
A: Use Hexagon wrench and open spanner to tighten #13, #14.
B: Use the motor hood (#11) and screws (#12) that are disassembled at step 1, use Phillip screw driver to fix
#11 into #1, and screw it tight.
Notice: Put #11 into 1 at a certain angle. Please set gently into #1 in the middle of post at a certain angle and adjust
the position. Finally, screw it tight.
13
14
12
12
14
13
11 12

7 / 27
Step 8:
Fix safety key (#9) into #3, then put #20 into #3, connect #10 into #1 at last.
09
03
10
20
03
01
Caution!
Make sure the above assembly is finished properly as above steps before connecting the equipment with
electricity.
Carefully check below instruction before operating the treadmill.
8 / 27
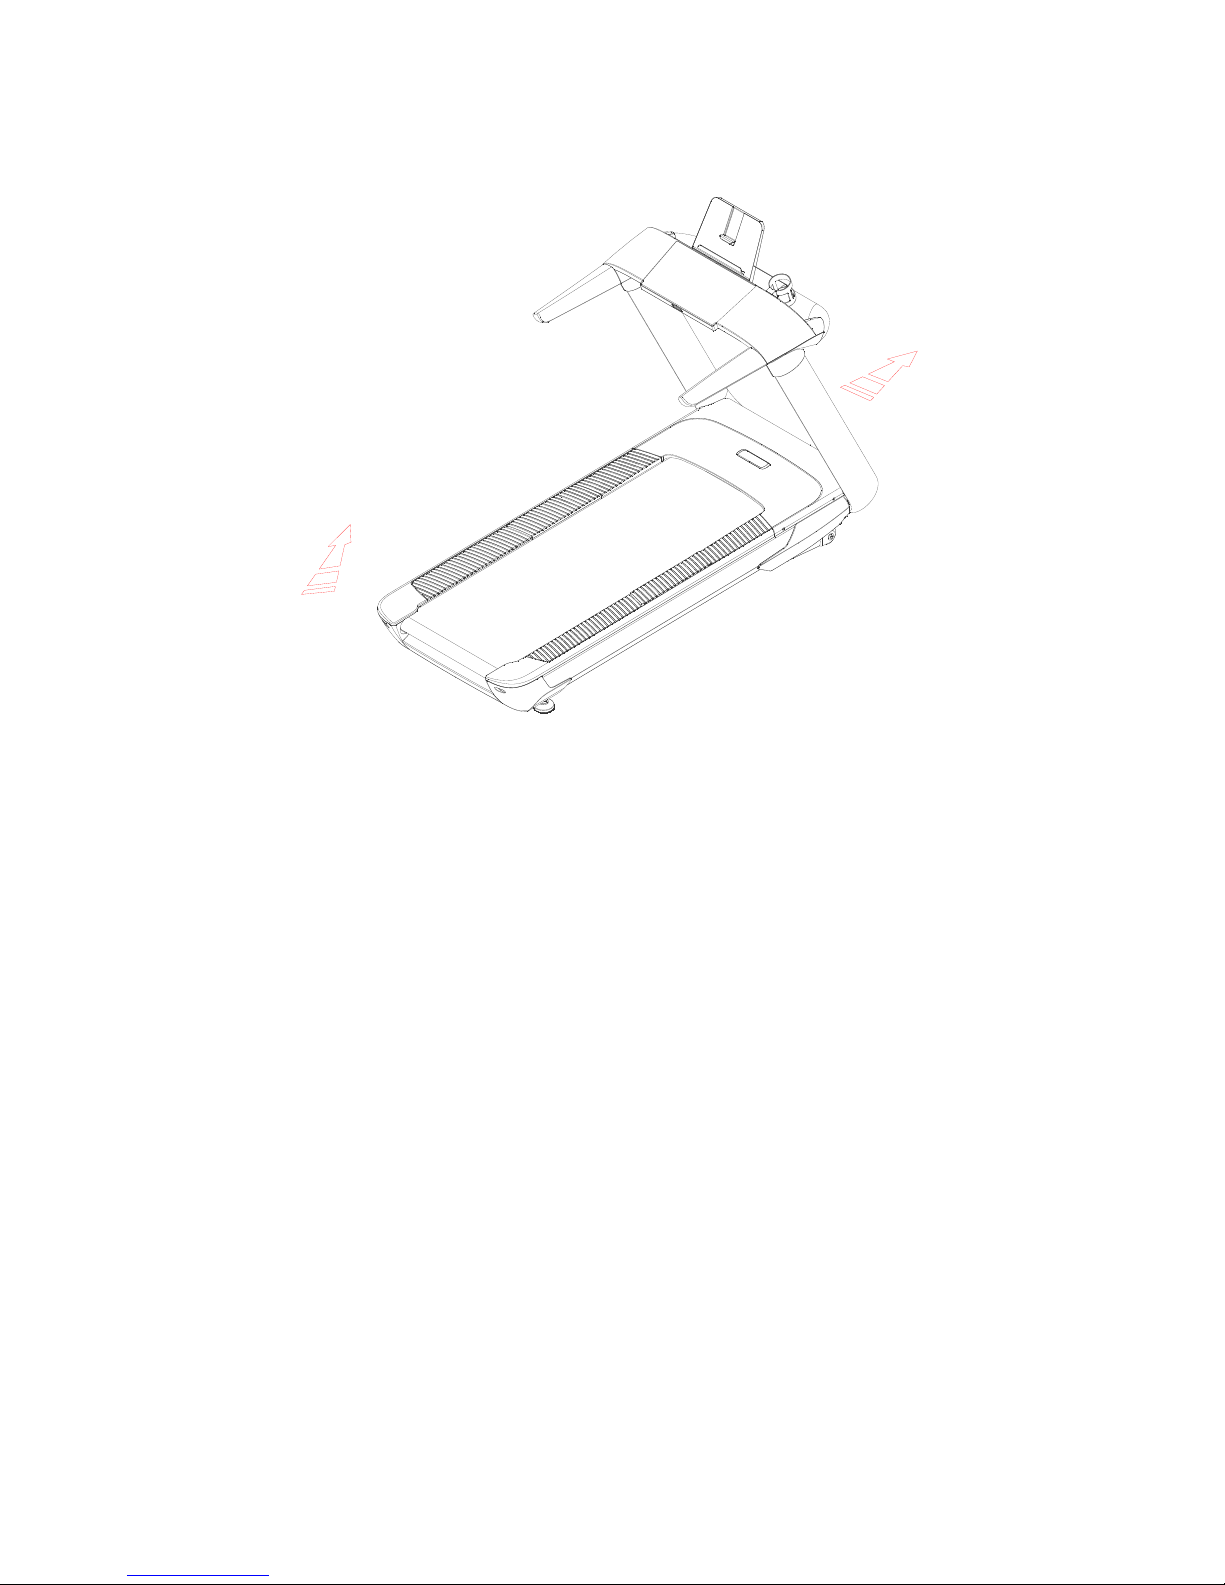
Moving Instructions
To Move the Treadmill
Make sure the treadmill is fully stopped before trying to move it.
Stand towards the rear end of running deck. Lift up the rear end of the running deck as the arrow shown in
above picture.
Push the treadmill forward to your desired location and stop. Put the rear end down to the ground gently.
Attention!
Before moving treadmill, please make sure the power cord plug has been pulled from the socket. Otherwise it
may result damage to the plug and socket.

9 / 27
Specification
Data Sheet
Dimension(mm) 2030*910*1530 Power AC 110 ~120V
Foldable
Size(mm) Un-foldable Rated Power 1450W
Walking
Area(mm) 520*1450 Electric Current ≤12A
Net Weight 311 lbs Speed Range 0.6-12 mph
Gross Weight 382 lbs Surrounding
Temperature
0—40℃
Incline 0~15%(Front incline) Class HB
Allowed Weight ≤285 lbs
Computer
Display speed incline steps time distance calorie heart rate
Safety
Protection
A. The red Safety Key on computer.
B. The Over-current Protection, Over-voltage Protection.
C. Over-current protection on inner Control Board.
Product Executive Standard
1. GB17498.1-2008/ISO20957-1:2013 pass the safety requirement and test method
2. GB17498.6-2008/ISO20957-6:2013 additional special safety requirement and test method
3. GB5296.7-2008 Sports equipment consumer goods instructions
Our company reserves the right to improve the picture and technical parameters. We will not notice you for any
change.
10 / 27
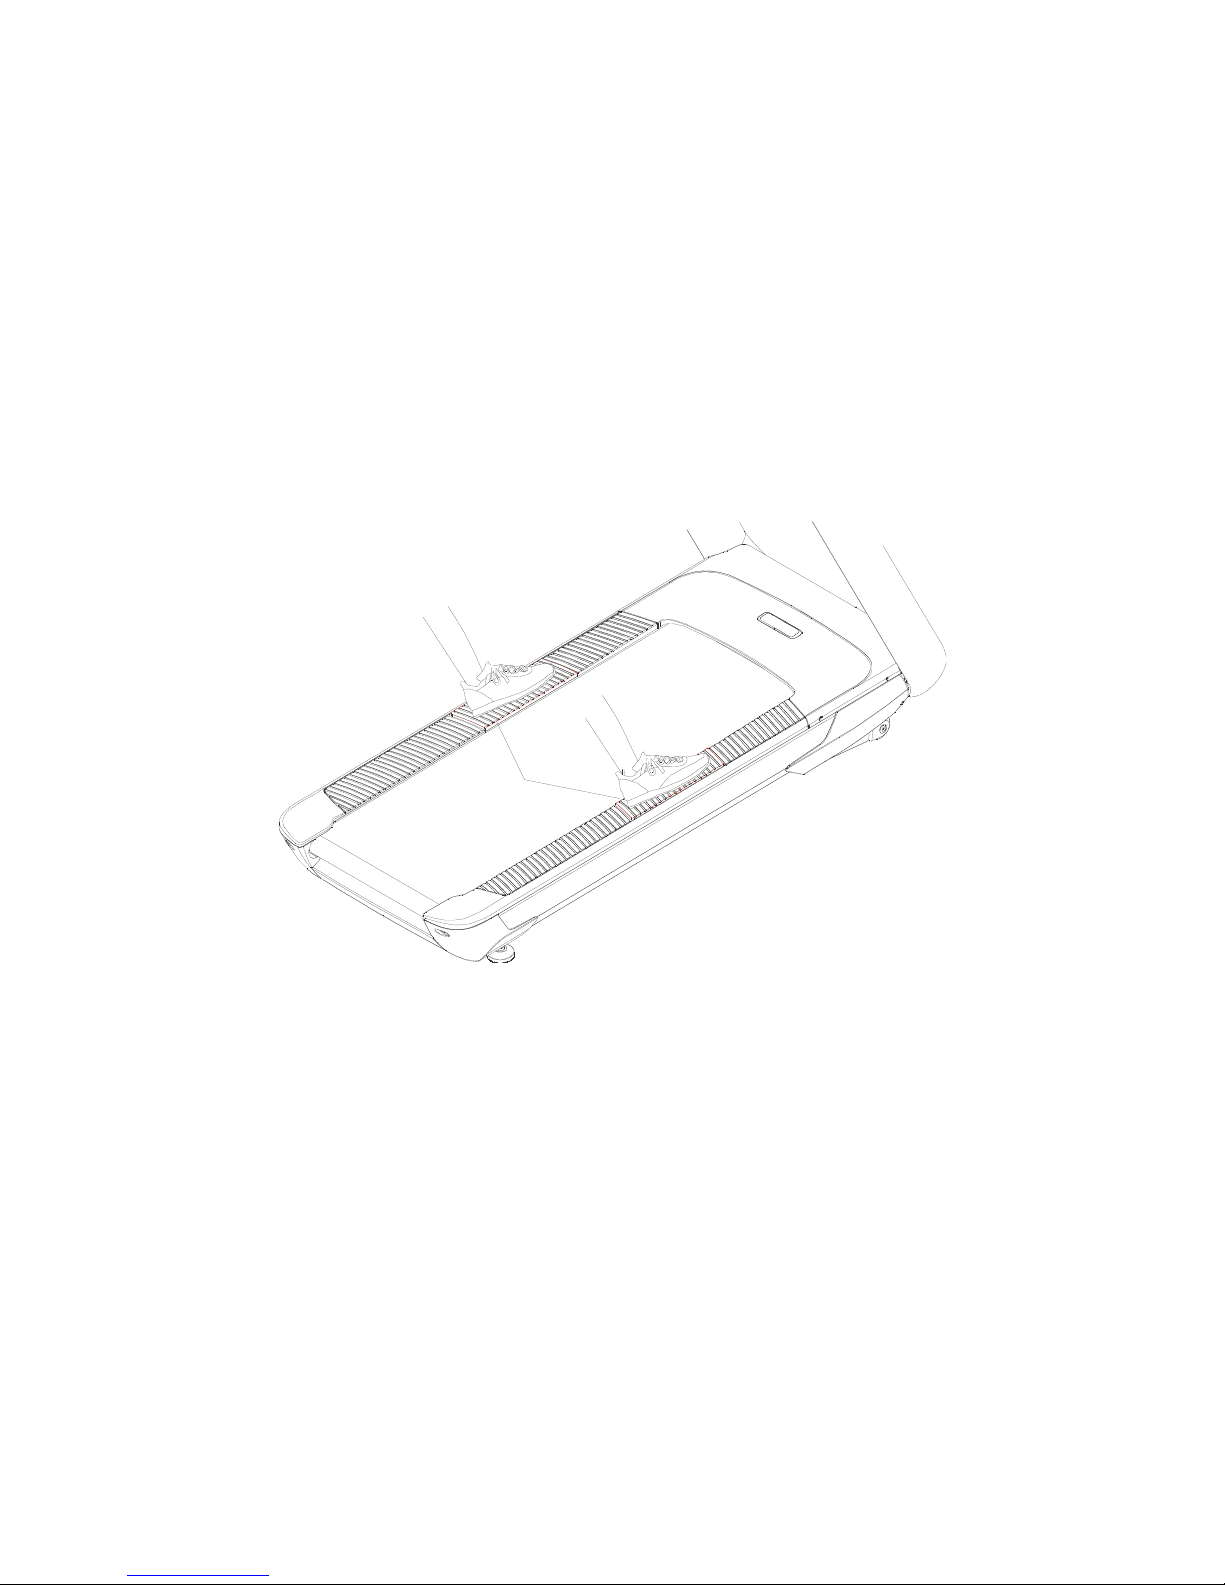
Weighing Instruction
The treadmill has weighing function. When performing this function, the treadmill needs to be in standby status.
Press weighing key, then window shows the body weight. Please note that user should stand in the middle of red
area (see figure below). Because weighing device is precision parts, so please do not jump or strike, just stand
steadily on the weighing area.
Notice: weight difference may be caused by different height and the standing angle of legs.
Weighing area
Product Function Description
High strength, high density, abrasion resistant double running deck.
Antistatic, wear-resisting, anti-slip running belt.
Front and rear roller t3.0*¢60.
Super buffer shock device to reduce vibration noise.

11 / 27
AC motor, rated power is 2.0HP, less shock, less noise, longer service life, higher torsion.
3 function windows, 8 professional programs, 3 customized programs.
The screen of LED display, showing speed, steps, incline, time, distance, calories, heart rate, speed range of
0.6-12 mph, incline range 0-15%
The computer contains a high-fidelity audio, provide charging function for cellphone through
USB( 5V--500MA)
Use Titanium alloy baking varnish for left and right upright column, left and right handrail
With overvoltage over-current and under-voltage overload protection function
The electronic watch can be used for putting books and table, increasing the joy of running
Hand pulse rate for reference
With front incline
Convenient audio key and Volume +/- key
With weighing and steps function, learn steps amount better
Panel is acrylic touched design, increasing appearance and lifespan.
Automatic off when user is not running (5 minutes); In standby status, if users do not press any key, then the
system is automatically into power-saved mode. But press any key to start the system, smart and energy-saved.
Caution: The user is cautioned that changes or modifications not expressly approved by the party responsible for
compliance could void the user's authority to operate the equipment.
This device complies with Part 15 of the FCC Rules. Operation is subject to the following two conditions: (1) this device
may not cause harmful interference, and (2) this device must accept any interference received, including interference that
may cause undesired operation.
NOTE: This equipment has been tested and found to comply with the limits for a Class B digital device, pursuant to Part
15 of the FCC Rules. These limits are designed to provide reasonable protection against harmful interference in a
residential installation. This equipment generates, uses and can radiate radio frequency energy and, if not installed and
used in accordance with the instructions, may cause harmful interference to radio communications. However, there is no
guarantee that interference will not occur in a particular installation.
If this equipment does cause harmful interference to radio or television reception, which can be determined by turning the
equipment off and on, the user is encouraged to try to correct the interference by one or more of the following measures:
-- Reorient or relocate the receiving antenna.
-- Increase the separation between the equipment and receiver.
-- Connect the equipment into an outlet on a circuit different from that to which the receiver is connected.
-- Consult the dealer or an experienced radio/TV technician for help.
FCC Radiation Exposure Statement:
This equipment complies with FCC radiation exposure limits set forth for an uncontrolled environment. This equipment should be installed
and operated with a minimum distance of 20cm between the radiator and your body.
This transmitter must not be co-located or operating in conjunction with any other antenna or transmitter.

12 / 27
Safety Use Instruction
Thank you for purchasing our product. It is important to read this entire manual before assembling and using the
equipment. Safe and efficient use can only be achieved if the equipment is assembled, maintained and used
properly. It is your responsibility to ensure that all users of the equipment are informed of all warnings and
precautions. Please keep this manual in a safe place for reference.
The power can be connected after the correct assembly according to the Assembly Instruction. Please make
sure the socket is not covered by the treadmill itself when locating. So you can find the socket for power
easily.
To avoid electrostatic interference, make sure to insert the plug into the socket with ground wire. Socket not
well grounded might result in unstable operation of the computer, even damage to it. The power line from
original package is of exclusive usage to the treadmill. If damaged, please purchase from our dealer or contact
us directly.
To avoid circuit interference, do not use other electrical appliances at the same power line. Or it might cause
unstable use or damage to both appliances.
The treadmill is a kind of indoor fitness equipment, please don’t use it outdoors. The place putting the
treadmill should be neat and waterproof. Please note that don’t put the treadmill on the thick carpet or that kind
of material, so that the air under the treadmill can flow. The treadmill is a kind of exclusive fitness equipment;
please don’t use it for other purpose.
When you exercise, please don’t wear long or loose clothes, to avoid twine clothes to the treadmill and cause
injury. It is suggested that the users wear sneakers or sport shoes.
Please don’t take away the protection cover at will, if the opening is only for the maintenance, please pull out
the plug firstly.
During running exercise, keep the children away from the treadmill to avoid any accident.
If kids using the treadmill, they should be closely watched and protected by adults or professional trainers.
If it is your first time to use the treadmill, please keep in mind to grasp the handle with two hands, until you
feel that you adapt to the situation, then you can let go of the handles.

13 / 27
Please press the safety key (red) on the appropriate position of the clothing, to prevent accidents during the
exercise, we can pull off the safety key timely to stop the treadmill in order to ensure safety.
Power off the power supply and take out the plug and save it well after using.
Do not touch any parts which are on the exercise.
Heart rate sensor does not belong to medical equipment, there are many reasons can cause inaccurate testing,
so the test results are just for reference.
If you feel any danger during exercising, should hold handrails on both sides, jump off the ground or the pedal
platform on the sides.
During exercise, there should have 2000mm*1000mm safety areas so that can jump off when there have any
accidents.
Safe operation required free space to 2000mm (L)*1000mm (W)*2250mm (H) when exercise.
The treadmill is a kind of indoor fitness equipment, please don’t use it outdoor. Apply to aerobic cardio
exercise, increase heart and lung function mainly, training muscle supplement.
It’s not allowed to convert the equipment beyond its o
riginal design.

14 / 27
User’s Guide
If this is your first time using Motorized Treadmill, you are strongly suggested to read below carefully.
Before Exercise
Before the exercise, you should know about your health situation, and make out a best exercise plan for your
exercise. Suggestions of consultation from the physician or professionals, that may be get more efficiency.
Before the first use of treadmill, please stand by a side and familiar with how to control it—for example, start,
stop, speed adjustment, and so on. After you master the skill very well, you can use it. Then stand on the
skid-proof plastic board of the two sides of the running surface, grasp the handles with two hands, and adjust
the speed of the treadmill computer to the 1.60-3.20 k/h. Before your exercise, try to relax yourself as soon as
possible. Then stand on the running belt exercising. After feeling adapt to the situation, increasing the speed to
3-5 k/h slowly. Remaining this speed exercise for about ten minutes, then let the machine stop slowly. When
first using the treadmill, please don’t adjust to a high speed to avoid the tumble.
Exercising
Walking about one kilometer with a regular pace, the treadmill meter will record the exercise time. It will take
about 15-25 minutes. Walking with a speed of 4.8 k/h, one kilometer will take about 20 minutes. After feeling
easy to get this target for several times, you can increase the speed gradually. Exercising like this for about 30
minutes, you will get a good training. Before the next exercising, please don’t rush.
Exercise Frequency
The target is 3-5 times per week. The time is about 15-60 minutes every time. You should make out a schedule
according to the health situation, but not your interest. You can control the degree of severe exercise by
adjusting the speed and exercise time.
Exercising Intensity
Shortcut-----It is a good time saving method to exercise 15-20 minutes.
Warm up for 5 minutes under the speed of 4-4.8 k/h, then increase the speed according to a rate of 0.3 k/h every
two minutes until you feel it is a challenge to exercise with a certain rate for 45 minutes.
The above is only for reference; please consult the expert for details.

15 / 27
Wearing
What you need is a pair of good shoes; sneaker or sports shoes are suggested. The shoes bottoms don’t stick to
any other things that can avoid to wear and tear the running board and running belt. The clothes should be
comfortable and suitable for the exercise, suggestion of wearing cotton ventilate sportswear.
Stretch Exercise:
No matter what kind of speed you walk with, you should firstly do the stretch exercise. Then the muscle will be
stretched more easily. So firstly, walk for 5-10 minutes to warm up, then stop and do the stretch exercise
according to the following methods for five times. Each leg exercise for 10 minutes every time or even
more .Suggestion try it again after ending the exercise.
Stretch Down
The knees slightly bend, the body bend forward slowly. Relax the back and
shoulders, the two hands try to touch the tiptoe. Hold for 10-15 minutes, and
then relax. Exercise like this for three times. As picture 1
Foot sinew stretch
Sitting on the clean ground, extend one leg straightly, then bend the other,
lastly make it close to the inner side of the straight leg tightly. Try to touch
the tiptoe with the hands. Hold for 10-15 minutes, and then relax. Each leg
repeats this exercise for three times. As picture 2 shows.
Shank and heel sinew stretch
Standing with two hands touching the wall, one food is behind and the other
is front. Keep the rear leg straight and the heel touch the ground, and then
incline to the wall. Hold for 10-15 minutes, and then relax. Each leg repeats
the exercise for three times. As picture 3 shows.
Quadriceps Stretch
With the left hand touching the wall or desk to control the body balance, and
right hand extend toward the back and grasp the right ankle, then pull it
toward the buttocks slowly, until you feel that the front muscle of thigh is
very strength. Hold for 10-15 minutes, and then relax. Each leg repeats this
exercise for three times. As picture 4 shows.
Sartorial Stretch
Make the feed soles opposite, and sit down with the knees toward outside.
Grasp the feed with two hands and bring them toward the groin. Hold for 10-15 minutes, and then relax. Repeat
this exercise for three times. As picture 5 shows.

16 / 27
Operation Instruction
Kindly reminder: please check the safety key before start
Window display
1. ”TIME”, “Cal “,”STEPS” window: Display exercise time/calories/steps after 5 seconds during exercise.
When it shows time, timing is from 0:00-99:59, when it is greater than 99:59, the data will start overall again. Time
will be decreased to zero when it is countdown mode. The treadmills will slow down till stop when the countdown
reaches 0:00. When it shows cal, forward calculation will be 0-9999, and clear the data when the value is greater
than 9999. When it is reverse calculation, then the value will be countdown to 0. Treadmill will slow down and stop
when the value reaches 0. When it shows steps, then the range will be 0-99999(notice: steps function may have
difference for exercises speed lower than 2km/h
2. “DIS “,”Speed” window: Display distance/speed after 5 seconds during exercise.
The screen shows distance and speed within 5 seconds under exercising mode.
3. “Pulse “,”INC” window: Display heart rate or incline; Incline range is 0-15%. (Heart rate is only for reference)
4. Window: Display treadmill other information.
Buttons function
1.”Program” key: In standby mode, press the key to choose “0:00”, ”15:00”, ”1.00”, ”50.0”, ”P01-P02-….P08”
(“0:00” is manual mode, ”15:00” is time countdown mode, ”1.00” is distance countdown mode, ”50.0”, is calorie
countdown mode)

17 / 27
2. “Start/Pause” key: Under the power on and locked safety key, press this key to stop treadmill. In working
conditions, press this key to pause treadmill.
3. “Stop” key: User can stop treadmill during exercise.
4. “Speed+”, “Speed-” key: In standby mode, it adjusts set value. And it adjust speed after start.
5. “Incline+”, “Incline-” key: In standby mode, it adjusts set value. And it adjust incline after start.
6. “Weighing key”: In standby mode, press this key and window displays body weight value. Data inaccuracy exists
due to the standing posture and position.
7. “Volume+”,“Volume-” key: Adjust the volume of sound.
8.“3、6、9”are speed shortcut key which can set speed quickly.
Quick start (manual mode)
1. Turn the power on, lock safety key into safety key position
2. Press start key, system is in the 3 seconds countdown. Buzzer sounds and speed window displays countdown
number, and then treadmill is running at the speed of 0.5km/h
3. Press "speed +", "speed-" to adjust speed; Press "Incline+", "Incline-" to adjust the incline.
Operation during exercise
1. Press “speed-” key to reduce treadmill speed.
2. Press “speed+” key to increase treadmill speed.
3. Press “incline-” key to reduce treadmill incline.
4. Press “incline+” key to increase treadmill incline.
5. Press stop key to stop treadmill slowly.
6. It displays heart rate data after 3 seconds when user is wearing heart rate band.
Manual mode
1. In standby mode, press ”start” key, and treadmill is running at the speed of 0.5km/h. Adjust incline and speed by
"Incline+", "Incline-", "speed +", "speed-" .
2. In standby mode, press “mode” key to enter time countdown mode, “TIME” window displays “15:00” and blinks;
Press "Incline+", "Incline-", "speed +", "speed-" to set exercise time, time range is 5:00-99:00.
3. In time countdown mode, press “mode” key to enter distance countdown mode, “DIS” window displays “1.00”
and blinks; Press "Incline+", "Incline-", "speed +", "speed-" to set exercise distance, distance range is 0.50-99.90.
4. In distance countdown mode, press “mode” key to enter calorie countdown mode, “CAL” window displays
“50.0” and blinks; Press "Incline+", "Incline-", "speed +", "speed-" to set calorie, calorie range is 10.0-999.0.
5. Choose one of 3 countdown modes and sets start key, treadmill is running after 3 seconds. Press "Incline+",
"Incline-", "speed +", "speed-" to adjust speed and incline; Press stop key, treadmill stops running.
18 / 27
Built-in Program: P1-P8
This system has 8 built-in programs P1- P8. In the standby mode, press the "program" key, the distance window
of auxiliary window displays "P1-P8", choose program that you like. After that, "Time" window blinks;
displaying preset time 10:00, press "Incline+", "Incline-", "speed +", "speed-" for desired motion of time; And
then press the "start" button to start the built-in program. The built-in program is divided into 16 sections, each
section of the movement time = set time /16. When enters the next stage, the system sounds 3 tones "Bi---" for
indication. The speed and incline of system changes as program changes, and it is adjustable by "Incline+",
"Incline-", "speed +", "speed-". When program enters the next stage, the speed and incline changes, same to the
stage. System sounds 3 tones "Bi---" for indication when finishes one program. The treadmill speed reduces
slowly and window displays “End”, enter into standby mode when treadmill is still.
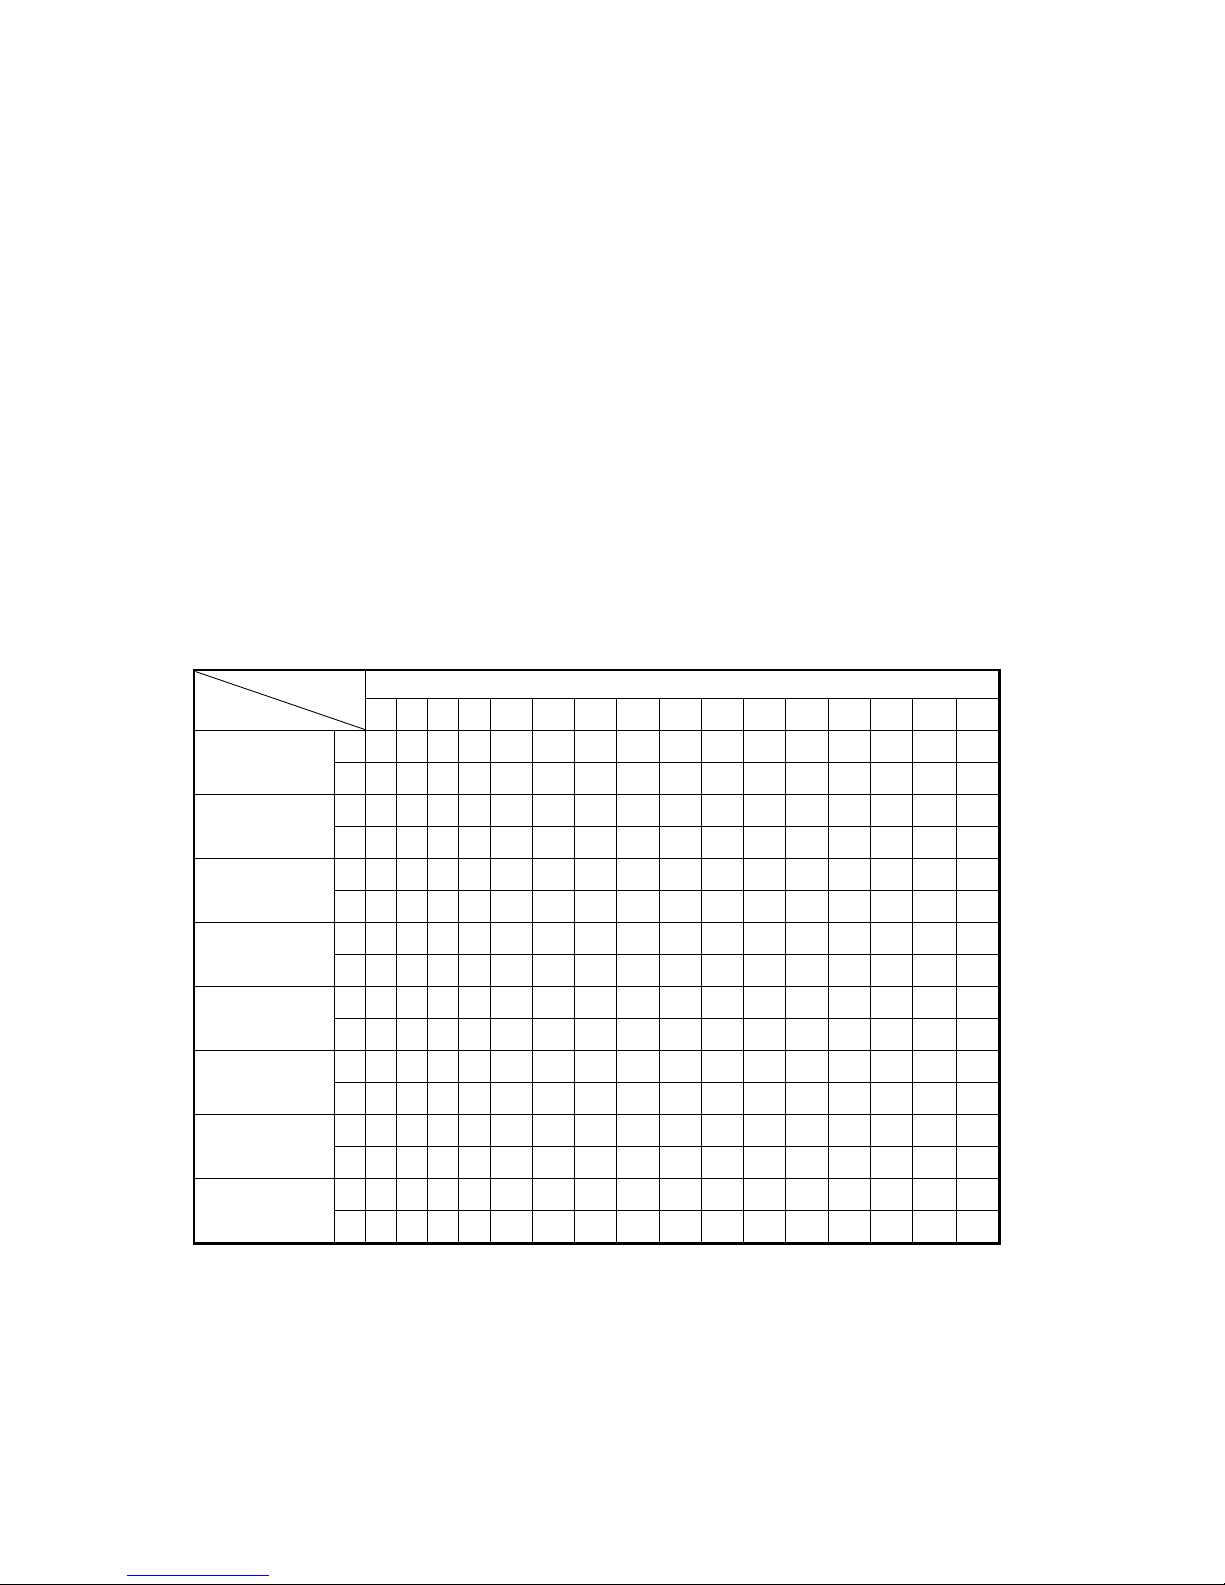
Programs instruction:
Speed stands for speed, incline stands for pitch(total 15 pitches,each pitch is 1/15)。Time is divided
into 16 parts for each program, corresponding speed and pitch for each time.
Time
Program
Time set/16
1 2 3 4 5 6 7 8 9 10 11 12 13 14 15 16
P01
Walk
S 24 5 5 66777 7665 4 3 2
I 11 2 2 22333 3222 2 1 1
P02
Jog
S 25 6 8 99999 9987 6 5 3
I 12 3 3 22332 2333 3 2 1
P03
Hill
S 24 6 6 9101096 6999 7 5 3
I 12 3 4 55445 5336 6 3 2
P04
Random
S 26 7 7 111111 9 9 9 9 6 6 6 4 2
I 45 6 6 33786 4567 7 4 2
P05
Weight Loss
S 45 7 8 9101088 9999 6 4 3
I 13 3 2 22344 3224 4 3 1
P06
Cardio
S 36 6 6 8 8 8 8 1010101111 8 5 3
I 02 2 4 44222 3344 3 2 1
P07
Race
S 3 6 7 7 8 9 9 10 10 10 9 9 8 6 4 3
I 11 2 2 33322 2332 2 1 1
P08
Sprint
S 2 6 6 9 9 11 11 11 11 11 6 6 6 5 4 2
I 45 6 7 8 910109 9 5 6 7 8 5 2
PS: S for speed; I for incline;
Table of contents


