Shuoyu Technology SYW0258 User manual
Alarm Clock Night Light Wireless Charger
Model: SYW0258
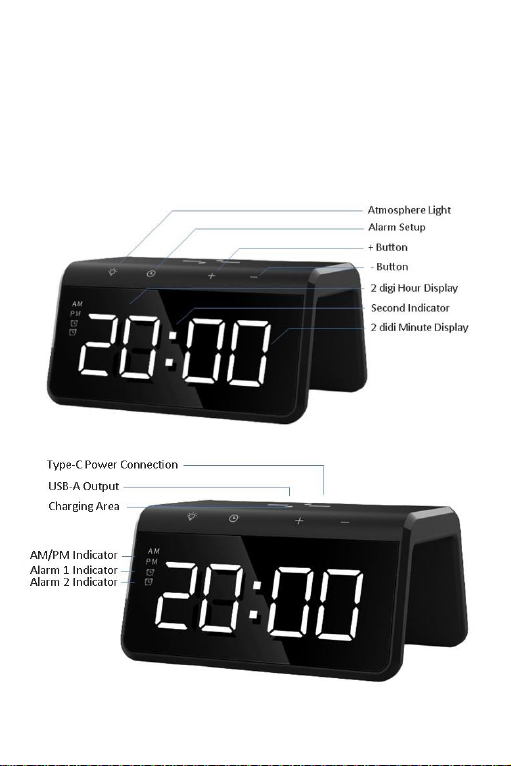
I. Function Buttons

II. Functions
A.Power Connection
1.Plug the USB-A end of cable into the power adapter while plug
Type-C end into the product.
2.The product will be ready and stand by after all indicators are on.
B.Wireless Charging
1.Output: 15W
2.Indicator Display:Power connection successful – blue light flashes
once
Standby – light off
Charging – blue light on
Charged – light off
FOD – blue light flashes continuously
C.Alarm Clock Functions
1.Four Buttons: Alarm, +, -, Light.
2.Time System Setting:
Double click Alarm button to setup 12-hour time system and 24-hour
time system. AM and PM will display while 12-hour time system is
set.
3.Time Setting:
1) Click Alarm button once to enter minute setting, adjust value with
+/-;
2) Click Alarm button once after minute setting, to enter hour setting,
adjust value with +/-;
3) Click Alarm button a third time to finish time setting.
4.Alarm Setting:
1) Press “+” 3 seconds to activate or deactivate Alarm 1; Press “-” 3
seconds to activate or deactivate Alarm 2. Alarm indicator is on while
Alarm is activated;
2) While activated, press Alarm button 3 seconds to enter alarm
minute setting, adjust value with +/-;
3) Click Alarm button once after alarm minute setting, to enter alarm
hour setting, adjust value with +/-;

4) Click Alarm button a third time to finish alarm time setting;
5) Alarm bell rings 3 minutes before automatic switch-off while no
any operation.
6) Touch any button to enter Sleepy Mode when bell rings. Bell will
rings for 3 more times after 5 minutes. The indicator flashes and
Alarm button is out of function during the Sleepy Mode. If time
setting is needed, please long press “+” to stop alarm 1 or long press
“-” to stop alarm 2. All buttons will function normally;
7) The brightness of the clock light can be manually adjusted to four
grades (dark, low light, sub-bright, high-brightness): "+" and "-" to
manually adjust the light brightness of the digital display, the default
is the brightest state after plugging in, each time you click " -
"Decrease the brightness one stop at a time and turn off the clock
display light one last time.
8) Time display brightness can also be adjusted manually to 3
grades (Min/Mid/Max). “+” and “-” can be used to adjust display
brightness manually. The default grade is max brightness when
power is connected. Single click “-” to dark the display one grade.
5.Night Light Setting:
1) Night light can be set into 9 color modes: white, RGB shade, red,
yellow, light green, green, light blue, blue and pink;
2) Touch the Light button once to turn on the night light with white
color. Another touch shall allow you to set another color in turn as
specified in 5. 1). The last touch will turn off atmosphere light.
6.Eco-power function:
1) Button cell inside is only for time keeping.
2) All functions are out during power disconnection. Functions
restored when power is connected.
D.Note
1.Attention: In order to function alarm, wireless charging, night light
and USB output all together, power shall be connected by a QC2.0
or QC3.0 adapters. If connected by a 5V adapter, only wireless
charging and alarm can work together.

2.Do not squeeze or collide.
3.Do not disassemble or put into the fire, water, to avoid short-circuit
leakage.
4.Do not use wireless chargers in severe high temperature, humidity
or corrosive environments to avoid leakage of damaged circuits.
5.Do not place too close to magnetic cards (ID cards, bank cards,
etc.) with magnetic strips or chips to avoid magnetic card failure.
6.Keep more than 20cm between the implanted medical device
(pacemaker, implantable cochlea, etc.) and the wireless charger to
avoid potential disruption to medical devices.
7.Keep children from the product in case they play the wireless
charger as a toy to avoid accidents.
8.Keep the wireless charger and receiver device away from water
and other liquids.
9.To clean the charger, make sure the power supply is disconnected.
10.Usage temperature: 0-45℃.
11.Usage humidity: 20-85% (40℃)
* Pictures in this manual are all illustration. Final product is subject to
fact.
* Inside package: alarm charger, charging cable, manual.
* power adapter is not included. Please purchase otherwise or use
phone original adapter.
III.Specification
Input: DC5V/3A, 9V/3A 12V/2A
Output power: 15W (MAX)
Charging efficiency: 73%
Charging distance: ≤8mm
Frequency: 110.2-128.8KHz,
Maximum wireless transmit Power:-7.85dBuA/m@10m
Size: 145x116x73mm
IV.Applicable Devices
Products qualified with Qi standard.

Manufacturer
Shenzhen Shuoyu Technology Co., Ltd.
Address: 30F East Block, Wenhua Bldg, 1027 Shennan East Road,
Luohu District, Shenzhen, Guangdong, China
Importer
Caliber Europe BV
Address: Kortakker 10 4264 AE Veen, The Netherlands
UP Global Sourcing UK (Ltd)
Manor Mill,Victoria Street, Chadderton, Oldham, OL9 0DD,UK
FCC compliance statement
This device complies with Part 15 of the FCC Rules.
Operation is subject to the following two conditions: (1)
this device may not cause harmful interference, and (2)
this device must accept any interference received,
including interference that may cause undesired
operation.
changes or modifications not expressly approved by the
party responsible for compliance could void the user’s
authority to operate the equipment.
This equipment has been tested and found to comply
with the limits for a Class B digital device, pursuant to
Part 15 of the FCC Rules. These limits are designed to
provide reasonable protection against harmful
interference in a residential installation. This equipment
generates, uses and can radiate radio frequency energy
and, if not installed and used in accordance with the
instructions, may cause harmful interference to radio
communications. However, there is no guarantee that
interference will not occur in a particular installation.

If this equipment does cause harmful interference to
radio or television reception, which can be determined by
turning the equipment off and on, the user is encouraged
to try to correct the interference by one or more of the
following measures:
-- Reorient or relocate the receiving antenna.
-- Increase the separation between the equipment and
receiver.
-- Connect the equipment into an outlet on a circuit
different from that to which the receiver is connected.
-- Consult the dealer or an experienced radio/TV
technician for help.
This equipment complies with FCC radiation exposure
limits set forth for an uncontrolled environment. This
equipment should be installed and operated with
minimum distance 20cm between the radiator and your
body. This transmitter must not be co-located or
operating in conjunction with any other antenna or
transmitter.
Table of contents
Popular Alarm Clock manuals by other brands

American Innovative,
American Innovative, Neverlate Executive NL7DEX-US Instructions for use

Reflexion
Reflexion CLR2610USB owner's manual

Trevi
Trevi EC 883 BL user guide

Oregon Scientific
Oregon Scientific RMB383A user manual

Timex
Timex T120 user manual

Auriol
Auriol 4-LD5822-1-2 Usage and safety instructions


