Trevi EC 883 BL User manual

EC 883 BL
Guida d’uso
User guide
OROLOGIO DIGITALE
CON DISPLAY LED
ALARM CLOCK
WITH LED DISPLAY
* Per informazioni integrative e aggiornamenti di questo prodotto vedi: www.trevi.it
* For additional information and updates of this product see: www.trevi.it

EC 883 BL
2_
ATENCION
PELIGRO DE CHOQUES ELECTRICOS
NO EXPONER A LLUVIA Y
HUMEDAD
ATENCION: NO ABRIR EL APARATO, EN SU INTERIOR NO HAY MANDOS
QUE PUEDAN SER MANIPULADOS POR EL USUARIO NI PARTES DE
REPUESTO.PARA TODAS LAS OPERACIONES DE SERVICIO DIRIGIRSE A UN
CENTRO DE ASISTENCIA AUTORIZADOTREVI.
ATTENZIONE
RISCHIO DI SCOSSE
ELETTRICHE
NON ESPORRE
A PIOGGIA E UMIDITÀ
ATTENZIONE: NON APRIRE L’APPARECCHIO.ALL’INTERNO NON VI
SONO COMANDI MANIPOLABILI DALL’UTENTE NE PARTI DI RICAMBIO.
PER TUTTE LE OPERAZIONI DI SERVIZIO RIVOLGERSI AD UN CENTRO DI
ASSISTENZA AUTORIZZATO TREVI
CAUTION
DANGER OF ELECTRIC SHOCK!
DO NOT EXPOSE TO
RAIN OR HUMIDITY
CAUTION: TO REDUCETHE RISK OF ELECTRIC SHOCK, DO NOT REMOVE
COVER OR BACK.NO USER SERVICEABLE PERTS INSIDE. REFER SERVICING
TO QUALIFIED PERSONNEL ONLY.
ATENÇÃO
PERIGO DE CHOQUES ELÉTRICOS
NÃO EXPOR A CHUVA E UMIDADE
ATENÇÃO: NÃO ABRIR O APARELHO. NO INTERIOR DO MESMO NÃO
EXISTEM COMANDOS OU PEÇAS DE SUBSTITUIÇÃO QUE POSSAM SER
MANIPULADOS PELO USUÁRIO. EM CASO DE EVENTUAL OPERAÇÃO DE
SERVIÇO,DIRIGIR-SE A UM CENTRO DE ASSISTÊNCIA AUTORIZADOTREVI
ATTENTION
DANGER DE DECHARGES
ELECTRIQUES
NE PAS EXPOSER A LA PLUIE
NI A L’HUMIDITE
ATTENTION: NE PAS OUVRIR L’APPAREIL. SON INTERIEUR NE CONTIENT
AUCUNE COMMANDE DESTINEE A L’UTILISATEUR NI DE PIECES DE
RECHANGE. POUR TOUTE OPERATION D’ASSISTANCE CONTACTER UN
CENTRE D’ASSISTANCE AGREE TREVI.
ΠΡΟΣΟΧΗ
ΚΙΝ∆ΥΝΟΣ ΗΛΕΚΤΡΟΠΛΗΞΙΑΣ
ΜΗΝ ΕΚΘΕΤΕΤΕ
ΣΕ ΒΡΟΧΗ ΚΑΙ ΥΓΡΑΣΙΑ
ΠΡΟΣΟΧΗ: ΜΗΝ ΑΝΟΙΓΕΤΕ ΤΗΝ ΣΥΣΚΕΥΗ. ∆ΕΝ ΥΠΑΡΧΟΥΝ ΣΤΟ
ΕΣΩΤΕΡΙΚΟ ΤΗΣ ΕΝΤΟΛΕΣ ΠΟΥ ΝΑ ΜΠΟΡΕΙ ΝΑ ΧΕΙΡΙΣΤΕΙ Ο
ΚΑΤΑΝΑΛΩΤΗΣ ΟΥΤΕ ΑΝΤΑΛΛΑΚΤΙΚΑ ΤΜΗΜΑΤΑ. ΓΙΑ ΟΠΟΙΑ∆ΗΠΟΤΕ
ΕΡΓΑΣΙΑ ΑΠΕΥΘΥΝΘΕΙΤΕ ΣΕ ΕΝΑ ΑΠΟ ΤΑ ΕΞΟΥΣΙΟ∆ΟΤΗΜΕΝΑ ΚΕΝΤΡΑ
ΑΝΤΙΠΡΟΣΩΠΕΙΑΣ ΤΡΕςΙ.
ACHTUNG
GEFAHR ELEKTRISCHER SCHLÄGE
NICHT DER FEUCHTIGKEIT
UND DEM REGEN AUSSETZEN
ACHTUNG: DAS GERÄT NICHT ÖFFNEN. IM INNERN BEFINDEN SICH KEINE
VOM BENUTZER SELBST INSTANDSETZBAREN TEILE UND AUCH KEINE
ERSATZTEILE. FÜR JEGLICHE SERVICEARBEITEN,WENDEN SIE SICH BITTE
AN EINE TREVI AUTORISIERTEN KUNDENDIENSTSTELLE.
UK PLUG ONLY
WIRES CONNECTIONS TO A THREE-PIN
PLUG
The wires in this mains lead are coloured in accordance
with the following wiring codes:
Blue:...........................................................Neutral
Brown:.......................................................Live
The wires in this mains lead must be connected to the
terminals in the plug as follows:
Blue wire:.................................................N or Black
Brown wire:.............................................L or Red
Neither wire is to be connected to the earth (E orW)
terminal of three-pin plug.
Should the fuse fail in the plug remove the plug form
the wall socket and replace the fuse with a 3 Amp.
ASTA approved BS 1362 fuse.
WARNING!

_3
EC 883 BL
Tasti funzione / Operation keys / Touches d’opération / Bedientasten / Teclas
de operación / Teclas de operação
Presa di alimentazione posteriore / Power supply socket / Prise d’alimentation
/ Netzteilbuchse / Toma de corriente / Tomada de alimentação
Alloggio batterie / Battery compartment / Compartiment de la batterie / Bat-
teriefach / Compartimiento de la batería / Compartimento da bateria

EC 883 BL
4_
INSTALLAZIONE
Inserire lo spinotto dell’alimentatore nella presa sul retro dell’apparecchio.
Inserire l’alimentatore in una presa di corrente 230V~50/60Hz.
BATTERIA TAMPONE ANTI BLACK-OUT
Per mantenere in funzione l’orologio e la memorizzazione dell’allarme anche
durante una momentanea mancanza di energia elettrica,inserire tre batterie
AAA 1,5V nell’apposito vano sul fondo dell’apparecchio rispettando le
polarità indicate.Vi consigliamo di sostituire questa batteria ogni 6 mesi.
Se in caso di interruzione elettrica l’apparecchio mostri sul display un orario
sbagliato e lampeggiante sostituire le batterie.
REGOLAZIONE ORARIO
1. Tenere premuto il tasto MODE per entrare in modalità impostazione orolo-
gio.
2. Utilizzare i tasti UP e DOWN per regolare in sequenza la visualizzazione
12/24H, ora e minuti.Premere il tasto MODE per spostarsi da una regolazio-
ne all’altra. Dopo aver impostato l’orologio attendere qualche secondo per
il ritorno al normale funzionamento.
NOTE D'USO
Evitare di posizionare il dispositivo:
- Vicino a campi magnetici.
- Vicino a fonti di calore come caloriferi e stufe.
- In luoghi molto umidi come stanze da bagno, piscine,ecc...
- In luoghi molto polverosi.
- In luoghi soggetti a forti vibrazioni.
Posizionare l’apparecchio in modo che ai suoi lati ci sia sempre abbastanza spazio per la
libera circolazione di aria (almeno 5 cm).
Se dei liquidi penetrano all’interno dell’apparecchio scollegare immediatamente la spina
dalla presa e portare l’apparecchio al più vicino centro assistenza autorizato TREVI.
Controllare sempre prima di utilizzare l’apparecchio, che i cavi di alimentazione e di colle-
gamento siano installati correttamente.
Nessuna sorgente di amma nuda, quali candele accese, dovrebbe essere posta sull’ap-
parecchio.
L’apparecchio non deve essere esposto a stillicidio o a spruzzi d’acqua e nessun oggetto
pieno di liquido,quali vasi,deve essere posto sull’apparecchio.
Conservare il presente manuale per futuri riferimenti.
CURA E MANUTENZIONE
Per la pulizia si consiglia l’uso di un panno morbido, leggermente inumidito.Evitate
solventi o sostanze abrasive.
IMPORTANTE
La buona costruzione di questo apparecchio ne garantisce per lungo tempo il perfetto
funzionamento.Se tuttavia dovesse presentarsi qualche inconveniente, sarà opportuno
consultare il più vicino Centro Assistenza autorizzato TREVI.
TREVI persegue una politica di continua ricerca e sviluppo.Pertanto i prodotti possono
presentare caratteristiche diverse da quelle descritte.
ITALIANO

_5
EC 883 BL
REGOLAZIONE E ATTIVAZIONE ALLARME
1. Sorare 2 volte il tasto MODE per entrare nel modo allarme (viene visua-
lizzato AL sul display).A questo punto premere a lungo il tasto MODE per
entrare in modalità impostazione allarme.
2. Utilizzare i tasti UP e DOWN per regolare in sequenza ora e minuti dell’al-
larme.Premere il tasto MODE per spostarsi da una regolazione all’altra.
Dopo aver impostato l’allarme attendere qualche secondo per il ritorno al
normale funzionamento.
FUNZIONE SNOOZE E DISATTIVAZIONE ALLARME
1. Per attivare/disattivare l’allarme sorare il tasto DOWN (compare/scompare
sul display l’indicazione AL).
2. Durante il suono dell’allarme,premere il tasto DOWN per arrestare mo-
mentaneamente l’allarme (SNOOZE). Dopo 5 minuti l’allarme riprenderà a
suonare.
3. Durante il suono dell’allarme, premere il tasto MODE per arrestare deniti-
vamente l’allarme. L’allarme rimarrà attivo e suonerà 24 ore dopo.
Senza nessun intervento l’allarme suonerà per 2 minuti.
VISUALIZZAZIONE TEMPERATURA
Sorare 1 volte il tasto MODE per visualizzare la temperatura ambiente.
Durante la visualizzazione della temperatura,premere il tasto UP per passare
dalla visualizzazione in gradi Celsius a quella in gradi Fahrenheit.
FUNZIONE DIMMER (REGOLAZIONE LUMINOSITÀ DISPLAY)
E’possibile regolare la luminosità del display su 3 livelli (alto, medio,basso).
Durante la visualizzazione dell’ora sorare il tasto UP per variare la luminosità
del display.
FUNZIONE NIGHT MODE
Tramite questa funzione e’possibile impostare l’abbassamento automatico
della luminosità del display durante le ore notturne.
In un orario prestabilito (default dalle 18:00 alle 6:00) la luminosità si abbassa
nelle ore notturne per poi tornare al livello normale durante le ore diurne.
Per attivare questa funzione sorare il tasto MODE 3 volte e sorare il tasto
DOWN no a visualizzare sul display la scritta ON (attivo) o OFF (non attivo).
Per impostare un’orario differente a quello di fabbrica, durante la visualizzazio-
ne dell ascritta ON premere a lungo il tasto MODE e regolare in sequenza,
utilizzando i tasti UP e DOWN, l’ora e i minuti di attivazione e l’ora e i minuti
di spegnimento della funzione NIGHT MODE.
CARATTERISTICHE TECNICHE
Alimentazione:.................................................. 5V 1A
con alimentatore 100-240V~50/60Hz
Batterie tampone:............................................ 3x AAA - 4,5V
Consumo:............................................................ 5W
TREVI persegue una politica di continua ricerca e sviluppo. Pertanto i prodotti
possono presentare caratteristiche diverse da quelle descritte.

EC 883 BL
6_
NOTES ON USE
This is a precision electronic appliance; avoid using it in the following cases:
- Near strong heat sources,such as central heating plants or stoves.
- In very humid places such as bathrooms, swimming pools, etc.
- In very dusty places.
- In places subject to strong vibrations.
- Position the appliance in such a way that there is always enough room for
free air circulation (at least 5 cm).
- Do not block the air inlets.
- If any liquid enters the appliance, unplug it immediately from the socket
and take it to the nearest TREVI authorised service centre.
- Before switching on the appliance, always check that the power cable and
the connection cable are properly installed.
- No naked ame sources, such as lighted candles, should be placed on this.
- The apparatus shall not be exposed to dripping or splashing water and no
object lled with water, such as vases, should be placed on the unit.
- Keep this manual for future reference.
CARE AND MAINTENANCE
Use a slightly damp soft cloth for cleaning.Do not use solvents and abrasive
substances.
IMPORTANT
This appliance has been carefully built to ensure long-lasting perfect perfor-
mance.However, should any inconvenience occur, please contact your local
authorised TREVI Service Centre.
TREVI follows a policy of ongoing research and development.Therefore pro-
ducts may have different features from those described.
ENGLISH
INSTALLATION
Insert the plug into the socket on the back of the unit.
Insert the power adapter into a 230V ~ 50 / 60Hz power outlet.
ANTI BLACK-OUT BATTERY
To keep the clock running and storing the alarm even during a momentary
power failure, insert 3x 1.5V AAA batteries into the compartment on the bot-
tom of the unit. Replace this battery every 6 months.
If the appliance shows an incorrect and ashing time in the event of a power
failure,replace the batteries.
TIME ADJUSTMENT
1. Press and hold the MODE button to enter the clock setting mode.
2. Use the UP and DOWN keys to adjust the 12 / 24H display, hour and minute
in sequence.Press the MODE button to move from one setting to another.
After setting the clock, wait a few seconds for the return to normal opera-
tion.
ADJUSTMENT AND ALARM ACTIVATION
1.Touch the MODE key 2 times to enter the alarm mode (AL is shown on the
display).At this point, press the MODE key for a long time to enter the alarm
setting mode.
2. Use the UP and DOWN keys to adjust the alarm hour and minute in se-

_7
EC 883 BL
quence.Press the MODE button to move from one setting to another. After
setting the alarm, wait a few seconds for the return to normal operation.
SNOOZE FUNCTION AND ALARM DEACTIVATION
1.To activate / deactivate the alarm,touch the DOWN key (the AL indication
appears / disappears on the display).
2. During the alarm sound, press the DOWN key to momentarily stop the alarm
(SNOOZE). After 5 minutes the alarm will resume.
3. During the alarm sound, press the MODE key to stop the alarm permanently.
The alarm will remain active and will sound 24 hours later.
Without any intervention the alarm will sound for 2 minutes.
TEMPERATURE DISPLAY
Touch the MODE key to display the room temperature.
While viewing the temperature, press the UP key to switch between Celsius
and Fahrenheit degrees.
DIMMER FUNCTION (DISPLAY BRIGHTNESS ADJUSTMENT)
It is possible to adjust the brightness of the display on 3 levels (high, medium,
low).
While displaying the time,touch the UP key to change the brightness of the
display.
NIGHT MODE FUNCTION
With this function it is possible to set the automatic lowering of the display
brightness during the night hours.
At a set time (default from 18:00 to 6:00) the brightness decreases at night and
then returns to normal during daylight hours.
To activate this function, touch the MODE key 3 times and touch the DOWN
key until the word ON (active) or OFF (not active) appears on the display.
To set a different time to the factory setting,during the ON display long press
the MODE key and adjust in sequence,using the UP and DOWN keys, the hour
and minutes of activation and the hour and minutes of ending of the NIGHT
MODE function.
TECHNICAL FEATURES
Power supply: ................................................... 5V 1A
................................................................................. power adaptor100-240V~50/60Hz
Back up battery:................................................ 3x AAA 4,5V
Consumption: ................................................... 5W
TREVI pursues a policy of continuous research and development.Therefore
the products may have different characteristics from those described.

EC 883 BL
8_
FRANÇAIS
INSTALLATION
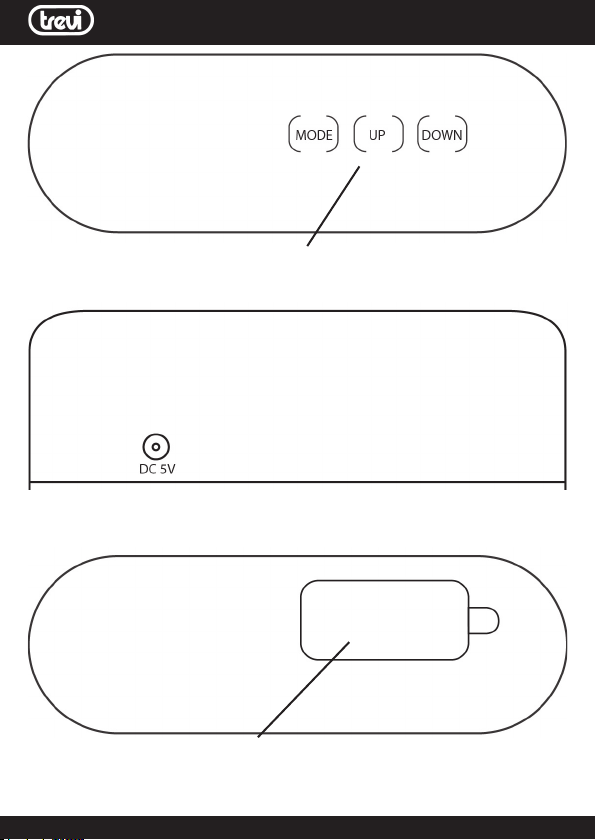
Insérez la che dans la prise située à l’arrière de l’unité.
Insérez l’adaptateur d’alimentation dans une prise de courant 230V ~ 50 / 60Hz.
BATTERIE ANTI-BLACK-OUT
Pour maintenir l’horloge en marche et enregistrer l’alarme même pendant une panne de courant
momentanée,insérez 3 piles AAA de 1,5 V dans le compartiment situé au bas de l’appareil. Remplacez
cette batterie tous les 6 mois.
Si l’appareil afche une heure incorrecte et clignotante en cas de panne de courant, remplacez les piles.
AJUSTEMENT DU TEMPS
1. Appuyez sur le bouton MODE et maintenez-le enfoncé pour accéder au mode de réglage de l’horloge.
2. Utilisez les touches UP et DOWN pour régler l’afchage 12 / 24H, les heures et les minutes dans l’ordre.
Appuyez sur le bouton MODE pour passer d’un réglage à l’autre. Après avoir réglé l’horloge, attendez
quelques secondes pour le retour au fonctionnement normal.
AJUSTEMENT ET ACTIVATION D’ALARME
1. Appuyez 2 fois sur la touche MODE pour passer en mode d’alarme (AL apparaît sur l’afchage). À ce
stade,appuyez longuement sur la touche MODE pour entrer dans le mode de réglage de l’alarme.
2. Utilisez les touches UP et DOWN pour régler l’heure et la minute de l’alarme en séquence.Appuyez
sur le bouton MODE pour passer d’un réglage à l’autre. Après avoir réglé l’alarme, attendez quelques
secondes pour le retour au fonctionnement normal.
FONCTION DE SNOOZE ET DÉSACTIVATION D’ALARME
1. Pour activer / désactiver l’alarme, appuyer sur la touche DOWN (l’indication AL apparaît / disparaît sur
l’afchage).
2. Pendant le son de l’alarme, appuyez sur la touche DOWN pour arrêter momentanément l’alarme
(SNOOZE). Après 5 minutes, l’alarme reprendra.
3. Pendant le son de l’alarme, appuyez sur la touche MODE pour arrêter dénitivement l’alarme. L’alarme
restera active et retentira 24 heures plus tard.
Sans aucune intervention, l’alarme retentira pendant 2 minutes.
AFFICHAGE DE LA TEMPÉRATURE
Appuyez sur la touche MODE pour afcher la température de la pièce.
Tout en regardant la température,appuyez sur la touche UP pour basculer entre les degrés Celsius et
Fahrenheit.
FONCTION DIMMER (RÉGLAGE DE LA LUMINOSITÉ DE L’AFFICHAGE)
Il est possible d’ajuster la luminosité de l’afchage sur 3 niveaux (haut, moyen, bas).
Pendant l’afchage de l’heure, appuyez sur la touche UP pour modier la luminosité de l’afchage.
FONCTION DU MODE NUIT
Avec cette fonction, il est possible de régler l’abaissement automatique de la luminosité de l’écran
pendant les heures nocturnes.
À un moment donné (par défaut entre 18h00 et 6h00), la luminosité diminue la nuit et redevient norma-
le pendant la journée.
Pour activer cette fonction, appuyez sur la touche MODE 3 fois et appuyez sur la touche DOWN jusqu’à
ce que le mot ON (actif) ou OFF (inactif ) apparaisse sur l’afchage.
Pour régler une autre heure sur le réglage d’usine, pendant l’afchage ON, appuyez longuement sur la
touche MODE et ajustez dans l’ordre,en utilisant les touches UP et DOWN, les heures et minutes d’activa-
tion et les heures et minutes de n de la fonction NIGHT MODE.
CARACTÉRISTIQUES TECHNIQUES
Alimentation: ................................................................................5V 1A alimentation 100-240V ~ 50 / 60Hz
Consommation: ...........................................................................5W

_9
EC 883 BL
DEUTSCH
INSTALLATION
Stecken Sie den Stecker in die Buchse auf der Rückseite des Geräts.
Stecken Sie das Netzteil in eine 230V ~ 50 / 60Hz Steckdose.
ANTI BLACK-OUT BATTERIE
Um die Uhr in Betrieb zu halten und die 1,5 V AAA-Batterien in das Fach an der Unterseite des Geräts zu
stecken. Ersetzen Sie diese Batterie alle 6 Monate.
Wenn das Gerät eine falsche Anzeige zeigt und die Batterien auswechseln.
ZEITEINSTELLUNG
1. Halten Sie die MODE-Taste gedrückt, um den Uhreinstellungsmodus aufzurufen.
2. Stellen Sie mit den Tasten UP und DOWN die Anzeige für 12 / 24H, Stunde und Minute nacheinander
ein. Drücken Sie die MODE-Taste, um von einer Einstellung zur nächsten zu gelangen.Warten Sie
nach dem Einstellen der Uhr einige Sekunden, bis Sie wieder normal arbeiten.
EINSTELLUNG UND ALARM-AKTIVIERUNG
1. Drücken Sie dreimal die Taste MODE, um in den Alarmmodus zu gelangen (AL wird auf dem Display
angezeigt). An diesem Punkt drücken Sie lange die MODE-Taste,um in den Alarm-Einstellungsmodus
zu gelangen.
2.Verwenden Sie die Tasten UP und DOWN, um den Alarm einzustellen.Drücken Sie die MODE-Taste, um
von einer Einstellung zur nächsten zu gelangen.Warten Sie nach dem Einstellen des Alarms einige
Sekunden, bis Sie wieder normal arbeiten.
SNOOZE FUNKTION UND ALARM DEACTIVATION
1. Um den Alarm zu aktivieren / deaktivieren,die DOWN-Taste drücken (die AL-Anzeige erscheint /
verschwindet auf dem Display).
2. Drücken Sie während des Alarmtons die DOWN-Taste, um den Alarm kurz zu stoppen (SNOOZE).Nach
5 Minuten wird der Alarm fortgesetzt.
3. Drücken Sie während des Alarmtons die Taste MODE, um den Alarm dauerhaft zu stoppen. 24 Stunden
später.
Ohne Eingreifen ertönt der Alarm für 2 Minuten.
TEMPERATURANZEIGE
Berühren Sie die MODE-Taste zweimal, um die Raumtemperatur anzuzeigen.
Während Sie die Temperatur anzeigen, drücken Sie die UP-Taste, um zwischen Celsius und Fahrenheit
Grad zu wechseln.
DIMMER FUNKTION (DISPLAY HELLIGKEIT EINSTELLUNG)
Die Helligkeit des Displays kann in 3 Stufen (hoch, mittel, niedrig) eingestellt werden.
Berühren Sie während der Anzeige der Uhrzeit die UP Taste, um die Helligkeit des Displays zu ändern.
NACHTMODUS-FUNKTION
Es ist möglich, die automatische Absenkung des Displays während der Nachtstunden einzustellen.
Zu einer bestimmten Zeit (Standard von 18.00 Uhr bis 18.00 Uhr) nimmt die Helligkeit nachts ab und
kehrt dann bei Tageslicht zurück.
Um diese Funktion zu aktivieren, berühren Sie die MODE-Taste viermal und berühren Sie die AB-Taste,
bis das Wort EIN (aktiv) oder AUS (nicht aktiv) auf dem Display erscheint.
Um eine andere Zeit als die Werkseinstellung einzustellen,verwenden Sie die Tasten AUF und AB,um die
Stunde und Minuten der Aktivierung der Nacht einzustellen.
TECHNISCHE MERKMALE
Stromversorgung: .......................................................................5V 1A mit Netzteil 100-240V ~ 50 / 60Hz
Batterie:............................................................................................3x AAA 4,5V
Verbrauch: ......................................................................................5W

EC 883 BL
10_
ESPAÑOL
INSTALACIÓN
Inserte el enchufe en el enchufe en la parte posterior de la unidad.
Inserte el adaptador de alimentación en un tomacorriente de 230V ~ 50 / 60Hz.
BATERÍA ANTI BLACK-OUT
Para mantener el reloj en funcionamiento y almacenar la alarma incluso durante una falla de energía
momentánea, inserte 3 baterías AAA de 1.5V en el compartimiento en la parte inferior de la unidad.
Reemplace esta batería cada 6 meses.
AJUSTE DE TIEMPO
1. Mantenga presionado el botón MODE para ingresar al modo de ajuste del reloj.
2. Use las teclas UP y DOWN para ajustar la pantalla 12 / 24H,la hora y los minutos en secuencia. Presione
el botón MODE para pasar de una conguración a otra. Después de ajustar el reloj, espere unos
segundos para volver a la operación normal.
AJUSTE Y ACTIVACIÓN DE LA ALARMA
1.Toque la tecla MODE 2 veces para ingresar al modo de alarma (AL se muestra en la pantalla). En este
punto, presione la tecla MODE por un tiempo prolongado para ingresar al modo de conguración de
la alarma.
2. Use las teclas UP y DOWN para ajustar la hora y los minutos de la alarma en secuencia.Presione el
botón MODE para pasar de una conguración a otra. Después de congurar la alarma, espere unos
segundos para volver a la operación normal.
SNOOZE FUNCIÓN Y DESACTIVACIÓN DE ALARMAS
1. Para activar / desactivar la alarma, toque la tecla DOWN (la indicación AL aparece / desaparece en la
pantalla).
2. Durante el sonido de la alarma,presione la tecla DOWN para detener momentáneamente la alarma
(SNOOZE). Después de 5 minutos,la alarma se reanudará.
3. Durante el sonido de la alarma,presione la tecla MODE para detener la alarma permanentemente.La
alarma permanecerá activa y sonará 24 horas después.
Sin ninguna intervención, la alarma sonará durante 2 minutos.
PANTALLA DE TEMPERATURA
Toque la tecla MODE para mostrar la temperatura ambiente.
Mientras visualiza la temperatura, presione la tecla UP para cambiar entre grados Celsius y Fahrenheit.
FUNCIÓN DEL ATENUADOR (AJUSTE DEL BRILLO DE LA PANTALLA)
Es posible ajustar el brillo de la pantalla en 3 niveles (alto, medio, bajo).
Mientras visualiza la hora, toque la tecla UP para cambiar el brillo de la pantalla.
FUNCIÓN DE MODO NOCTURNO
Con esta función, es posible ajustar el descenso automático del brillo de la pantalla durante las horas
nocturnas. En un tiempo establecido (predeterminado de 18:00 a 6:00),el brillo disminuye por la noche
y luego vuelve a la normalidad durante el día.Para activar esta función, toque la tecla MODE 3 veces y
toque la tecla DOWN hasta que aparezca en la pantalla la palabra ON (activo) o OFF (no activo).Para
congurar una hora diferente a la conguración de fábrica, durante la pantalla ENCENDIDO mantenga
presionada la tecla MODE y ajuste en secuencia,usando las teclas UP y DOWN, la hora y minutos de
activación y la hora y minutos de nalización de la función MODO NOCTURNO.
CARACTERÍSTICAS TÉCNICAS
Fuente de alimentación: ...........................................................5V 1A adaptador 100-240V ~ 50 / 60Hz
Bateria:..............................................................................................3x AAA 4,5V
Consumo: .......................................................................................5W

_ 11
EC 883 BL
PORTUGUÊS
INSTALAÇÃO
Insira a cha na tomada na parte de trás da unidade.
Insira o adaptador de energia em uma tomada de 230V ~ 50 / 60Hz.
BATERIA ANTI BLACK-OUT
Para manter o relógio funcionando e armazenar o alarme mesmo durante uma falha de energia
momentânea, insira 3 pilhas 1.5V AAA no compartimento na parte inferior da unidade. Substitua esta
bateria a cada 6 meses.
Se o aparelho mostrar um tempo incorreto e intermitente em caso de falha de energia, substitua as
baterias.
AJUSTE DO TEMPO
1. Pressione e mantenha pressionado o botão MODE para entrar no modo de conguração do relógio.
2. Use as teclas UP e DOWN para ajustar o display 12 / 24H,hora e minuto em seqüência. Pressione o
botão MODE para passar de uma conguração para outra. Depois de ajustar o relógio, aguarde
alguns segundos para o retorno ao funcionamento normal.
AJUSTAMENTO E ATIVAÇÃO DE ALARME
1.Toque a tecla MODE 2 vezes para entrar no modo de alarme (AL é exibido no visor). Neste ponto, pres-
sione a tecla MODE por um longo período de tempo para entrar no modo de conguração do alarme.
2. Use as teclas UP e DOWN para ajustar as horas e minutos do alarme em seqüência.Pressione o botão
MODE para passar de uma conguração para outra. Depois de congurar o alarme, aguarde alguns
segundos para o retorno ao funcionamento normal.
FUNÇÃO SNOOZE E DESACTIVAÇÃO DE ALARME
1. Para ativar / desativar o alarme, toque a tecla DOWN (a indicação AL aparece / desaparece no visor).
2. Durante o som do alarme,pressione a tecla DOWN para interromper momentaneamente o alarme
(SNOOZE). Após 5 minutos,o alarme retomará.
3. Durante o som do alarme,pressione a tecla MODE para parar o alarme permanentemente.O alarme
permanecerá ativo e soará 24 horas depois.
Sem intervenção, o alarme soará durante 2 minutos.
INDICADOR DE TEMPERATURA
Toque a tecla MODE para exibir a temperatura ambiente.
Ao visualizar a temperatura,pressione a tecla UP para alternar entre os graus Celsius e Fahrenheit.
DIMMER FUNCTION (DISPLAY BRIGHTNESS ADJUSTMENT)
É possível ajustar o brilho do visor em 3 níveis (alto, médio, baixo).
Ao exibir a hora,toque a tecla UP para alterar o brilho da tela.
FUNÇÃO NO MODO DA NOITE
Com esta função,é possível ajustar a redução automática do brilho da tela durante as horas noturnas.
Em um horário denido (padrão das 18:00 às 6:00), o brilho diminui de noite e depois retorna ao normal
durante o horário de verão.
Para ativar esta função, toque a tecla MODE 3 vezes e toque a tecla DOWN até que a palavra ON (ativa)
ou OFF (não ativa) apareça no visor.
Para ajustar um horário diferente para a conguração de fábrica, durante a exibição ON, pressione a tecla
MODE e ajuste em seqüência, usando as teclas UP e DOWN, a hora e os minutos de ativação e as horas e
minutos do m da função NIGHT MODE.
CARACTERÍSTICAS TÉCNICAS
Fonte de alimentação: ...............................................................5V 1A com adaptador 100-240V ~ 50 / 60Hz
Bateria:..............................................................................................3x AAA 4,5V
Consumo: .......................................................................................5W

EC 883 BL
12 _
INFORMAZIONI AGLI UTENTI ai sensi del Decreto Legislativo N° 49 del 14 Marzo 2014
“Attuazione della Direttiva 2012/19/UE sui riuti di apparecchiature elettriche ed elettroniche
(RAEE)”
Il simbolo del cassonetto barrato riportato sull’apparecchiatura indica che il prodotto alla ne della
propria vita utile deve essere raccolto separatamente dagli altri riuti. L’utente dovrà, pertanto, conferire
l’apparecchiatura integra dei componenti essenziali giunta a ne vita agli idonei centri di raccolta
differenziata dei riuti elettronici ed elettrotecnici, oppure riconsegnarla al rivenditore al momento
dell’acquisto di nuova apparecchiatura di tipo equivalente, in ragione di uno a uno,oppure 1 a zero per
le apparecchiature aventi lato maggiore inferiore a 25 cm. L’adeguata raccolta differenziata per l’avvio
successivo dell’apparecchiatura dimessa al riciclaggio, al trattamento e allo smaltimento ambientale
compatibile contribuisce ad evitare possibili effetti negativi sull’ambiente e sulla salute e favorisce il
riciclo dei materiali di cui è composta l’apparecchiatura. Lo smaltimento abusivo del prodotto da parte
dell’utente comporta l’applicazione delle sanzioni amministrative di cui al D.Lgs n. Decreto Legislativo N°
49 del 14 Marzo 2014.
Precautions for correct disposal of the product.
The symbol shown on the equipment indicates that waste must be disposed of in“separate collection”
and so the product must not be disposed of together with urban waste.
The user must take the product to special“separate waste collection centres” provided by local go-
vernment,or deliver it to the retailer against the purchase of a new product.
Separate collection of waste and subsequent treatment,recycling and disposal operations promotes the
production of equipment with recycled materials and limits negative effects on the environment and on
health caused by improper handling of waste.
Illegal disposal of the product leads to the enforcement of administrative penalties.
Recommandations pour l’élimination correcte du produit.
Le symbole gurant sur l’appareil indique que le produit fait l’objet d’une “ collecte séparée “. C’est
pourquoi, le produit ne doit pas être éliminé avec les déchets urbains.
L’utilisateur doit remettre le produit auprès de “ décharges spécialisées de collecte séparée “ prévues par
les autorités locales, ou bien le rendre au revendeur quand il achètera un nouvel appareil équivalent.
La collecte séparée du produit et les opérations successives de traitement, recyclage et élimination favo-
risent la production d’appareils composés par des matériaux recyclés ainsi que permettent d’éviter des
effets négatifs sur l’environnement et sur la santé des personnes suite à une gestion impropre du déchet.
Toute élimination abusive du produit entraîne l’application de sanctions administratives.
CORRECT DISPOSAL OF PRODUCT

_ 13
EC 883 BL
Hinweise zur ordnungsgemäßen Entsorgung des Produkts.
Das auf dem Gerät angebrachte Symbol weist darauf hin,dass das Altgerät “getrennt zu sammeln”ist
und das Produkt daher nicht zusammen mit dem Gemeindeabfall entsorgt werden darf.
Der Benutzer muss das Produkt zu den entsprechenden,von der Gemeindeverwaltung eingerichteten
“Wertstoffsammelstellen”bringen oder dem Händler beim Kauf eines neuen Produkts übergeben.
Die getrennte Müllsammlung und anschließende Aufbereitung, Wiederverwertung und Entsorgung
fördern die Herstellung von Geräten unter Verwendung wiederverwerteter Materialien und vermindern
die negativen Auswirkungen auf die Umwelt und Gesundheit in Folge einer falschen Müllverwaltung.
Die widerrechtliche Entsorgung des Produkts führt zur Auferlegung von Verwaltungsstrafen.
Advertencias para la correcta eliminación del producto.
El símbolo que aparece en el aparato indica que el residuo debe ser objeto de“recogida selectiva”por
tanto el producto no se debe eliminar junto con residuos urbanos.
El usuario deberá entregar el producto a los“centros de recogida selectiva”creados por las administra-
ciones municipales o bien al distribuidor cuando adquiera un nuevo producto.
La recogida selectiva del residuo y las sucesivas operaciones de tratamiento, recuperación y eliminación
favorecen la fabricación de aparatos con materiales reciclados y limitan los efectos negativos en el
medio ambiente y la salud causados por una gestión incorrecta del residuo.
La eliminación abusiva del producto da lugar a la aplicación de sanciones administrativas.
Advertências para a correcta demolição do produto.
O símbolo indicado na aparelhagem indica que o resíduo deve ser objecto de“recolha separada” portan-
to o produto não deve ser desmantelado junto dos resíduos urbanos.
O utilizador deverá entregar o produto nos apropriados“centros de recolha diferenciada”predispostos
pelas administrações comunais,ou entregá-lo ao revendedor em troca de uma compra de um novo
produto.
A recolha diferenciada do resíduo e as sucessivas operações de tratamento,recuperação e desmantela-
mento favorecem a produção de aparelhagens com materiais reciclados e limitam os efeitos negativos
no ambiente e na saúde causados por uma gestão imprópria do resíduo.
O desmantelamento abusivo do produto comporta a aplicação de sanções administrativas.

EC 883 BL
14 _
GARANZIA
1. L’apparecchio è garantito per 24 mesi dalla data di fab-
bricazione indicata sull’etichetta applicata sul prodotto.
2. La garanzia si applica solo ad apparecchi, non manomes-
si, riparati da centri assistenza TREVI, essa comprende la
riparazione dei componenti per difetti di fabbricazione
con l’esclusione di etichette,manopole e parti asportabili.
3. TREVI non risponde di danni diretti o indiretti a cose o/e
persone causati dall’uso o sospensione d’uso dell’appa-
recchio.
WARRANTY
1. This unit is guaranteed for a period of 24 months from
the date of production printed on the product itself or on
label on product.
2. The warranty is valid only if the unit has not been tam-
pered with.The warranty is valid only at authorized TREVI
assistance centres,that will repair manufacturing defects,
excluded replacement of labels and removable parts.
3. TREVI is not liable for damage to people or things caused
by the use of this unit or by the interruption in the use of
this unit.
CONDITIONS DE GARANTIE
1. L’appareil est garanti pendant une période de 24 mois de
la date de fabrication indiquée sur l’étiquette se trouvant
sur le produit.
2. La garantie n’est appliquée que sur les appareils non
altérés, ayant été réparés chez un Service Après-Vente
TREVI. Elle comprend la réparation des composantes à la
suite de défauts de fabrication, à l’exclusion d’étiquettes,
boutons de réglage et parties amovibles.
3. TREVI ne répond pas des dommages directs ou indirects
aux choses et/ou aux personnes entraînés pendant
l’usage ou la suspension d’usage de l’appareil.
GARANTIEBESTIMMUNGEN
1. Das Gerät hat eine Garantie von 24 Monaten ab dem
Herstellungsdatum. Das Herstellungsdatum ist auf der
am Produkt angebrachten Etikette angegeben.
2. Die Garantie gilt nur für Geräte, an denen nicht selbst
ausgeführte Reparaturen erfolgt sind, sondern die von
TREVI-Kundendienststellen durchgeführt wurden. Die
Garantie umfaßt die Reparatur von Bauteilen,wenn diese
auf Herstellungsfehler zurückzuführen sind.Die Garantie
gilt hingegen nicht für Etiketten, Drucktasten, Knöpfe
und entfernbare Teile.
3. TREVI haftet nicht für direkte oder indirekte Sach- und/
oder Personenschäden,die vom Gebrauch des Gerätes
verursacht worden sind.
CLAUSULAS DE GARANTIA
1. El aparato tiene una garantía de 24 meses a partir de
la fecha de fabricación indicada en la tarjeta sobre el
producto.
2. La garantía está aplicada solamente a los productos no
desarreglados y reparados por los centros de asistencia
TREVI. Además, la garantía incluye la reparación de los
componentes a causa de defectos de fabricación,con la
exclusión de etiquetas,botones y partes removibles.
3. TREVI no es responsable por daños directos o indirectos
a cosas y/o personas causados por el uso o suspensión
del uso del aparato.
GARANTIA
1. O aparelho tem uma garantia de 24 meses a partir da
data de fabricação indicada na etiqueta que consta no
produto.
2. Somente aparelhos não violados,e que foram reparados
pelo Centro de Assistência TREVI incluem-se nesta
garantia. Esta compreende a reparação dos componentes
em caso de defeitos de fabricação com a exclusão de
etiquetas,botões e partes que podem ser extraídas.
3. A TREVI não considera-se responsável por danos directos
ou indirectos, causados pelo uso ou suspensão do uso do
aparelho,à objectos e/ou pessoas.

_ 15
EC 883 BL

EC 883 BL
16 _
TREVI S.p.A. Strada Consolare Rimini-San Marino, 62 47924 Rimini (RN) - Italy
Made in CHINA
EN If you will not nd your language on the instruction manual,
please go on our website www.trevi.it to nd it
FR Si vous ne trouverez pas votre langue sur le mode d’emploi,
veuillez vous visiter sur notre siteWeb www.trevi.it de le trouver
DE Wenn Sie Ihre Sprache auf die Bedienungsanleitung nicht nden,
gehen Sie bitte auf unsere Webseite www.trevi.it zu nden
ES Si no encuentras tu idioma en el manual de instrucciones,
por favor vaya a nuestra página web www.trevi.it se encuentra
PT Se você não vai encontrar sua língua sobre o manual de instruções,
por favor, vá em nosso site www.trevi.it para encontrá-lo
Table of contents
Other Trevi Alarm Clock manuals

Trevi
Trevi SLD 3865 Blu User manual

Trevi
Trevi SLD 3870 User manual

Trevi
Trevi RC 821 D User manual

Trevi
Trevi RC 825 D User manual

Trevi
Trevi SL 3098RC User manual

Trevi
Trevi RC 853 D User manual

Trevi
Trevi RC 850 BL User manual

Trevi
Trevi SLD 3068 S User manual

Trevi
Trevi SL 3050 S User manual

Trevi
Trevi EC 878 User manual